

HP Scripting Toolkit for Windows User
Guide
Abstract
This document provides information about the Scripting Toolkit for Windows utilities and how best to use the Scripting Toolkit
for Windows to configure HP ProLiant servers and BladeSystem infrastructure in a Windows environment. This document is
intended for IT experts with experience in scripting operating system installations and configuring HP ProLiant server hardware.
HP Part Number: 415598-409
Published: October 2012
Edition: 18

Notices
© Copyright 2005, 2012 Hewlett-Packard Development Company, L.P.
The information contained herein is subject to change without notice. The only warranties for HP products and services are set forth in the express
warranty statements accompanying such products and services. Nothing herein should be construed as constituting an additional warranty. HP shall
not be liable for technical or editorial errors or omissions contained herein.
Confidential computer software. Valid license from HP required for possession, use or copying. Consistent with FAR 12.211 and 12.212, Commercial
Computer Software, Computer Software Documentation, and Technical Data for Commercial Items are licensed to the U.S. Government under
vendor’s standard commercial license.
Microsoft, Windows, Windows Server, and Windows Vista are U.S. registered trademarks of Microsoft Corporation. Intel is a trademark of Intel
Corporation in the U.S. and other countries.

Contents
1 Introduction…………………………………………………………………………………..6
Scripting Toolkit for Windows………………………………………………………………………………………..6
Microsoft Windows Preinstallation Environment…………………………………………………………………..6
Minimum requirements………………………………………………………………………………………………..6
2 Deployment using the Scripting Toolkit for Windows…………………………………7
Deployment overview………………………………………………………………………………………………….7
Sample deployment procedure………………………………………………………………………………………7
Creating a network share…………………………………………………………………………………………8
Adding drivers to Windows PE 3.0……………………………………………………………………………..8
Adding drivers to Windows PE 4.0…………………………………………………………………………….9
Capturing a reference configuration from the source server………………………………………………10
Configuring the target server and installing the operating system ………………………………………11
3 Advanced topics…………………………………………………………………………..12
Overview………………………………………………………………………………………………………………12
Customizing deployment scripts using HPDISCOVERY and IFHW…………………………………………..12
Querying the HPDISCOVERY file based on system name ………………………………………………..12
Querying the HPDISCOVERY file to determine the presence of a particular card ……………………12
Querying the HPDISCOVERY file to determine the presence of a card family…………………………13
Booting Windows PE from a USB drive key……………………………………………………………………..13
Flashing the ROM in a Windows PE environment………………………………………………………………13
Erasing array configurations………………………………………………………………………………………..15
4 Scripting Toolkit utilities…………………………………………………………………..16
Syntax conventions…………………………………………………………………………………………………..16
Utility online help…………………………………………………………………………………………………….16
Using Scripting Toolkit utilities……………………………………………………………………………………..16
Using REBOOT………………………………………………………………………………………………………..17
REBOOT command-line syntax…………………………………………………………………………………17
REBOOT command-line arguments……………………………………………………………………………17
REBOOT return codes……………………………………………………………………………………………17
REBOOT command-line examples…………………………………………………………………………….17
Using SETBOOTORDER……………………………………………………………………………………………..18
SETBOOTORDER command-line syntax………………………………………………………………………18
SETBOOTORDER command-line arguments…………………………………………………………………18
SETBOOTORDER return codes…………………………………………………………………………………18
SETBOOTORDER command-line examples…………………………………………………………………..18
Using STATEMGR…………………………………………………………………………………………………….18
STATEMGR command-line syntax……………………………………………………………………………..18
STATEMGR command-line arguments…………………………………………………………………………19
STATEMGR return codes………………………………………………………………………………………..19
STATEMGR command-line examples………………………………………………………………………….19
Using RBSURESET…………………………………………………………………………………………………….19
RBSURESET command-line syntax……………………………………………………………………………..19
RBSURESET command-line arguments………………………………………………………………………..19
RBSURESET return codes………………………………………………………………………………………..20
Using HPDISCOVERY………………………………………………………………………………………………..20
HPDISCOVERY command-line syntax…………………………………………………………………………20
HPDISCOVERY command line arguments……………………………………………………………………20
HPDISCOVERY return codes……………………………………………………………………………………21
HPDISCOVERY command line examples…………………………………………………………………….21
Using IFHW……………………………………………………………………………………………………………21
Contents 3

IFHW command-line syntax…………………………………………………………………………………….21
IFHW command-line arguments……………………………………………………………………………….21
IFHW return codes……………………………………………………………………………………………….21
IFHW command line examples………………………………………………………………………………..22
Expression operators and terms……………………………………………………………………………….22
Expression examples…………………………………………………………………………………………….22
Using HWQUERY…………………………………………………………………………………………………….23
HWQUERY command-line syntax……………………………………………………………………………..23
HWQUERY command line arguments………………………………………………………………………..23
HWQUERY return codes………………………………………………………………………………………..23
HWQUERY command-line examples…………………………………………………………………………23
Using CONREP……………………………………………………………………………………………………….24
CONREP command-line syntax………………………………………………………………………………..24
CONREP command line arguments…………………………………………………………………………..25
CONREP return codes…………………………………………………………………………………………..25
CONREP screen output………………………………………………………………………………………….25
CONREP -s (Store to Data file) Example usage for HP ProLiant servers not using the Oxx ROM
family……………………………………………………………………………………………………………….26
CONREP –l (Load from Data file) Example usage for HP ProLiant servers not using the Oxx ROM
family……………………………………………………………………………………………………………….26
CONREP Data File Sample Contents for HP ProLiant servers not using the Oxx ROM family………26
CONREP command file contents………………………………………………………………………………27
Using HPRCU………………………………………………………………………………………………………….28
HPRCU command-line syntax…………………………………………………………………………………..28
HPRCU command line arguments……………………………………………………………………………..28
HPRCU return codes……………………………………………………………………………………………..29
HPRCU sample XML format…………………………………………………………………………………….29
Using HPACUSCRIPTING……………………………………………………………………………………………29
Capturing a configuration………………………………………………………………………………………30
Using an Input script……………………………………………………………………………………………..30
Creating an ACU script file…………………………………………………………………………………….31
Sample custom input script…………………………………………………………………………………31
Script file options…………………………………………………………………………………………………32
Control category……………………………………………………………………………………………..33
Action mode………………………………………………………………………………………………34
Method mode…………………………………………………………………………………………….34
Controller category………………………………………………………………………………………….34
Controller………………………………………………………………………………………………….34
ChassisName…………………………………………………………………………………………….35
ClearConfigurationWithDataLoss……………………………………………………………………..35
LicenseKey, DeleteLicenseKey………………………………………………………………………….35
PreferredPathMode………………………………………………………………………………………35
ReadCache, WriteCache……………………………………………………………………………….35
RebuildPriority, ExpandPriority…………………………………………………………………………36
SSPState……………………………………………………………………………………………………36
SurfaceScanDelay……………………………………………………………………………………….36
Video performance options…………………………………………………………………………….36
Array category……………………………………………………………………………………………….37
Array……………………………………………………………………………………………………….37
Drive………………………………………………………………………………………………………..37
DriveType………………………………………………………………………………………………….37
OnlineSpare………………………………………………………………………………………………38
Logical Drive category………………………………………………………………………………………38
ArrayAccelerator…………………………………………………………………………………………38
LogicalDrive……………………………………………………………………………………………….38
4 Contents

LogicalDriveSSPState…………………………………………………………………………………….38
ParityGroups………………………………………………………………………………………………39
PreferredPath……………………………………………………………………………………………..39
RAID………………………………………………………………………………………………………..39
Sectors……………………………………………………………………………………………………..39
Size…………………………………………………………………………………………………………39
SSPAdaptersWithAccess………………………………………………………………………………..40
StripeSize………………………………………………………………………………………………….40
HBA category…………………………………………………………………………………………………40
ConnectionName………………………………………………………………………………………..40
HBA_WW_ID…………………………………………………………………………………………….41
HostMode…………………………………………………………………………………………………41
ACU scripting error messages………………………………………………………………………………….41
Using HPLPCFG……………………………………………………………………………………………………….45
HPLPCFG command-line syntax………………………………………………………………………………..45
HPLPCFG command-line arguments…………………………………………………………………………..45
HPLPCFG return codes…………………………………………………………………………………………..45
HPLPCFG command-line examples……………………………………………………………………………46
Using LO100CFG…………………………………………………………………………………………………….46
LO100CFG command-line syntax……………………………………………………………………………..46
LO100CFG command-line arguments………………………………………………………………………..47
LO100CFG return codes………………………………………………………………………………………..47
LO100CFG command-file contents……………………………………………………………………………47
Using HPQLAREP…………………………………………………………………………………………………….48
HPQLAREP command-line syntax……………………………………………………………………………..48
HPQLAREP command-line arguments…………………………………………………………………………48
HPQLAREP return codes…………………………………………………………………………………………49
HPQLAREP command-line examples………………………………………………………………………….49
Using HPONCFG…………………………………………………………………………………………………….50
HPONCFG command-line syntax……………………………………………………………………………..50
HPONCFG command-line arguments………………………………………………………………………..50
HPONCFG return codes………………………………………………………………………………………..51
HPONCFG command file contents……………………………………………………………………………51
Obtaining an entire configuration…………………………………………………………………………51
Obtaining a specific configuration………………………………………………………………………..52
Setting a configuration………………………………………………………………………………………53
HPONCFG command-line examples………………………………………………………………………….53
5 Troubleshooting…………………………………………………………………………….54
Troubleshooting table………………………………………………………………………………………………..54
6 Support and other resources…………………………………………………………….55
Information to collect before contacting HP………………………………………………………………………55
How to contact HP……………………………………………………………………………………………………55
Subscription service………………………………………………………………………………………………….55
Related information…………………………………………………………………………………………………..55
Scripting Toolkit support…………………………………………………………………………………………….55
Typographic conventions……………………………………………………………………………………………56
HP Insight Remote Support software………………………………………………………………………………56
7 Documentation feedback…………………………………………………………………58
Acronyms and abbreviations……………………………………………………………….59
Index……………………………………………………………………………………………61
Contents 5

1 Introduction
Scripting Toolkit for Windows
The Scripting Toolkit for Windows is a server deployment product that delivers an unattended
automated installation for high-volume HP ProLiant server and BladeSystem infrastructure
deployments. This document describes how to best use the Scripting Toolkit to configure HP ProLiant
servers and BladeSystem infrastructure. It also contains information about the Scripting Toolkit
utilities and how to use them in an unattended environment. This document does not include
information about installing the operating system.
The Scripting Toolkit is designed for IT experts with experience in scripting operating system
installations and configuring HP ProLiant and BladeSystem infrastructure server hardware.
CAUTION: Improper use of the Scripting Toolkit utilities can result in loss of critical data. Because
of the potential data-loss risk, only experienced individuals should use the Scripting Toolkit utilities.
Before using the Scripting Toolkit, all necessary precautions must be taken to ensure that
mission-critical systems remain online if a failure occurs.
Microsoft Windows Preinstallation Environment
Microsoft Windows Preinstallation Environment (Windows PE) is a small footprint of the Windows
Server environment that enables you to run tools in a 32- or 64-bit Windows environment. Because
Windows PE is based on the Windows kernel running in protected mode, only a subset of features
and APIs are available in this environment. This document is applicable to Windows PE 3.0 and
4.0 only, and is not backward compatible with previous versions of Windows PE.
Windows PE enables you to install the Windows operating system, establish a connection with
network servers, and perform hardware configuration using the Scripting Toolkit. You can use
Windows PE to customize and configure your servers before the operating system is installed.
To obtain Windows PE 3.0, download the Microsoft Windows Automated Installation Kit for
Windows 7 and Windows Server 2008 R2 from the Microsoft website at http://www.microsoft.com.
To obtain Windows PE 4.0, download the Microsoft Windows Assessment and Deployment Kit
for Windows 8 and Windows Server 2012 from the Microsoft website at http://www.microsoft.com.
Minimum requirements
Before beginning the deployment process, be sure to have the following items available:
• HP Scripting Toolkit for Windows
• HP Scripting Toolkit for Windows User Guide
• Microsoft Windows Automated Installation Kit for Windows 7 and Server 2008 R2 (for the
creation of Windows PE 3.0) or Microsoft Windows Assessment and Deployment Kit for
Windows 8 and Windows Server 2012 (for the creation of Windows PE 4.0).
• The operating system to be deployed (Windows Server 2008, Windows Server 2008 R2, or
Windows Server 2012)
6 Introduction

2 Deployment using the Scripting Toolkit for Windows
Deployment overview
The Scripting Toolkit includes a set of utilities for configuring and deploying servers in a customized,
predictable, and unattended manner. These utilities enable you to duplicate the configuration of
a source server on target servers with minimal user interaction.
IMPORTANT: HP ProLiant 100-Series servers previous to Gen8 do not support all Scripting Toolkit
commands, and those that are supported might not work as expected. For example,
SETBOOTORDER might behave differently on these systems. For a better understanding, read the
server documentation carefully.
You can perform server deployments in many different ways using the Scripting Toolkit, but you
must include the following steps in every deployment:
1. Create a network share.
2. Prepare the bootable media (CD/DVD, USB drive key, or PXE).
3. Configure the system and storage hardware on the target server.
4. Install the operating system.
5. Update the drivers and agents as needed.
IMPORTANT: Not all options can be configured using Scripting Toolkit utilities. Some options
must be configured manually or with other configuration utilities, which are available online,
before they can be used with the Scripting Toolkit. For more information on configuration, see
the option documentation.
Sample deployment procedure
The following procedure is a case study of a typical deployment. This procedure assumes that you
are performing a media-based installation and that you want to replicate an existing server
configuration. The process described in this section can vary depending on your specific
requirements.
This section provides a simple overview of a basic deployment, but the flexibility of the Scripting
Toolkit enables you to do much more. With an understanding of the basic steps and your own
deployment environment, you can use the Scripting Toolkit to further customize and automate the
deployment process. For information on automating deployments, see “Advanced topics” (page
12).
Deployment overview 7
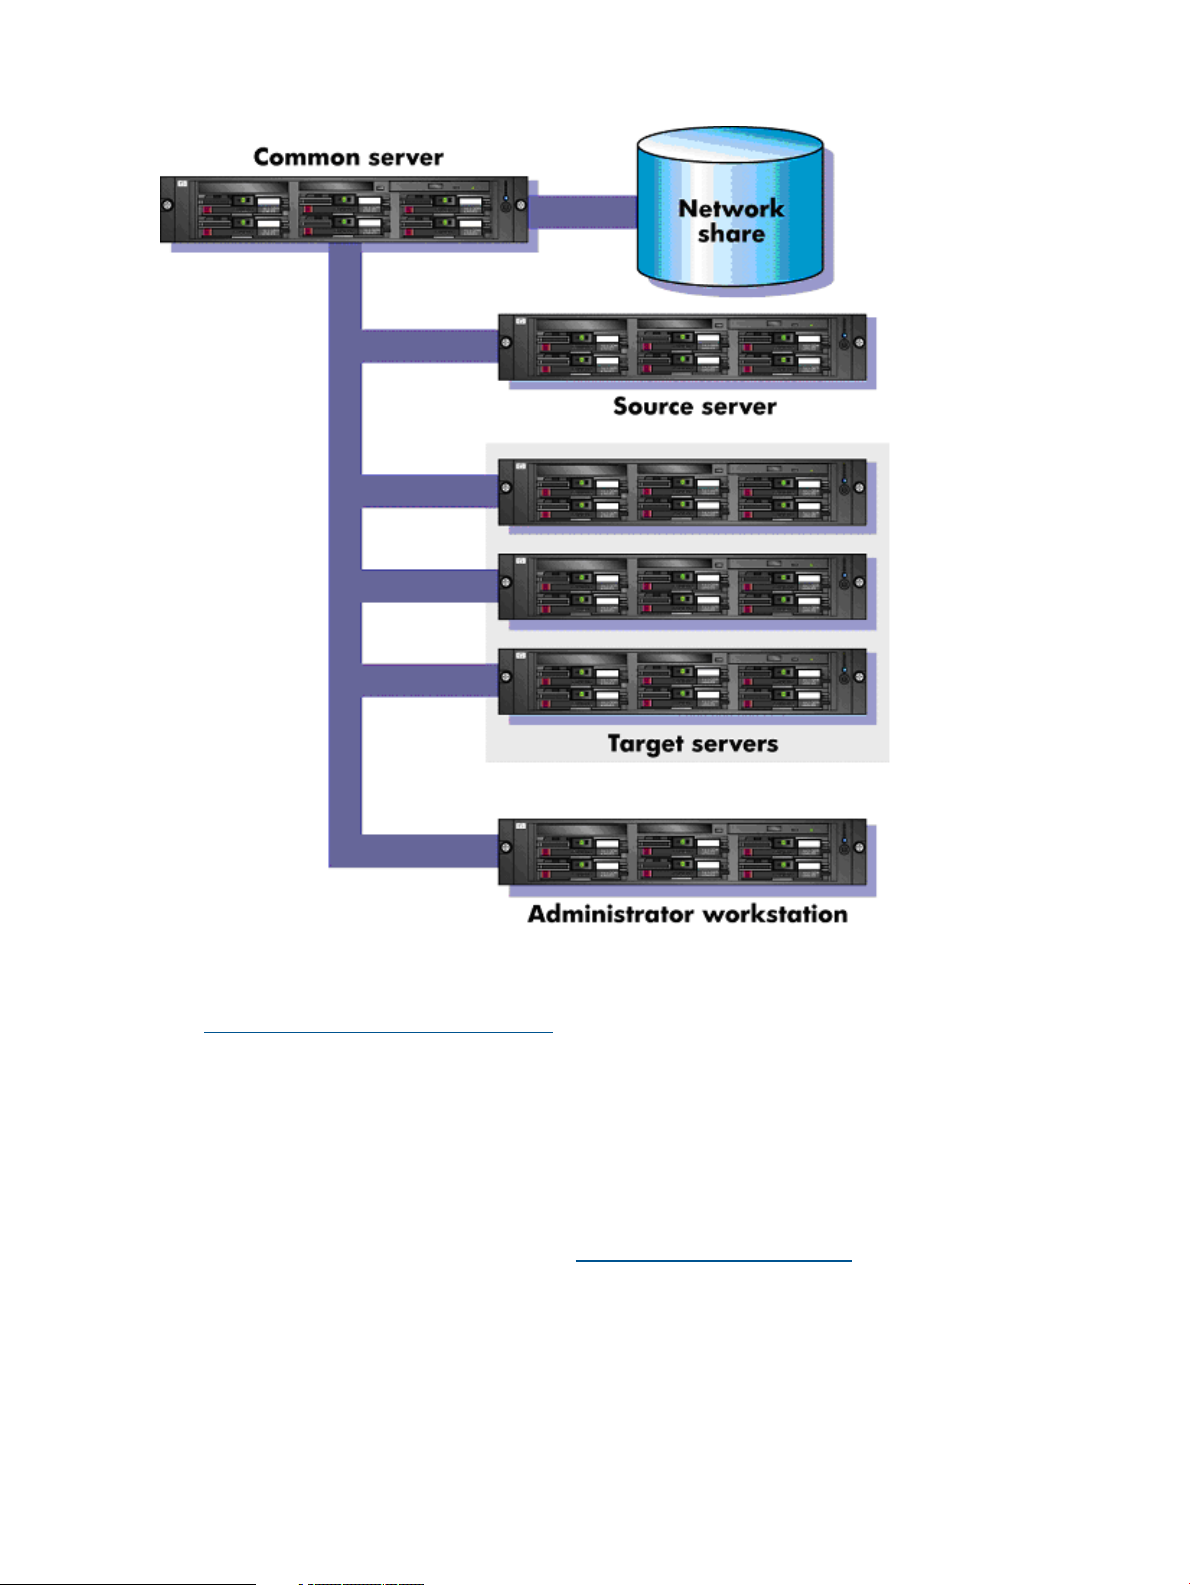
Creating a network share
To create a network share:
1. Download the appropriate Scripting Toolkit SoftPaq from the Scripting Toolkit website at
http://www.hp.com/go/ProLiantSTK.
2. Install the Scripting Toolkit SoftPaq on a common server that resides on the same network as
the servers to be deployed.
3. Share the folder in which you installed the Scripting Toolkit. Be sure that the account you use
has read and write access.
4. Create an empty directory called \DATA in the Scripting Toolkit folder for configuration files.
Captured files are stored in this directory.
HP also recommends installing the latest version of the HP Service Pack for ProLiant (SPP). To obtain
the most current SPP, see the SPP website at http://www.hp.com/go/spp.
Adding drivers to Windows PE 3.0
The Scripting Toolkit contains HP drivers that are to be used with Windows PE 3.0. These drivers
are located in the drivers directory of the Scripting Toolkit. Run the executable file in this directory,
and then select Extract to extract the drivers to a location to be used in the following steps.
Drivers can be added to Windows PE either offline or online. For all the utilities to work correctly,
complete the following steps to ensure the appropriate iLO driver (based on OS and version number)
8 Deployment using the Scripting Toolkit for Windows

is installed and the STK IO driver (hpsstkio.sys) is copied to the windows\system32\
drivers directory.
To add drivers offline:
1. Mount the base image to a local directory by using dism.
For example:
dism /Mount-Wim /WimFile:C:\winpe_x86\winpe.wim /index:1 MountDir:C:\STK.TMP
2. Add the .inf file to the base image by using the dism /Add-Driver command.
For example:
dism /image:C:\SSSTK.TMP /Add-Driver /driver:C:\ssstk\drivers\example.inf
3. For each additional device driver repeat steps 1 and 2. When you finish customizing the
image, prepare the image for deployment by using the peimg /prep command.
NOTE: If the appropriate iLO driver is not installed, some utilities do not work correctly. For
more information, see the README.txt file located with the drivers.
To add drivers online:
1. Use the drvload tool, drvload.exe inf_path, where inf_path is the path to a device
driver INF file.
drvload x:\drivers\example.inf
2. Copy and then paste the STK IO driver to the windows\system32\drivers directory.
NOTE: If the HPSTKIO.SYS driver is not installed, some utilities do not work correctly.
copy c:\ssstk\drivers\system\ hpsstkio\ hpsstkio.sys c:\SSSTK.TMP\
windows\system32\drivers
For more information about Windows PE 3.0, see the Windows Preinstallation Environment User’s
Guide (WinPE.chm) located in the Windows Automated Installation Kit.
For more information about the Windows PE drivers included in the Scripting Toolkit for Windows,
see the readme.txt file located at the root of the Windows PE driver bundle in the drivers
directory.
NOTE: Before running HPDISCOVERY, you must install WMI. For more information on installing
extra packages in Windows PE, see the Windows PE documentation.
Adding drivers to Windows PE 4.0
The Scripting Toolkit contains HP drivers that are to be used with Windows PE 4.0. These drivers
are located in the drivers directory of the Scripting Toolkit. Run the executable file in this directory,
and then select Extract to extract the drivers to a location to be used in the following steps.
Drivers can be added to Windows PE either offline or online. For all the utilities to work correctly,
complete the following steps to ensure the appropriate iLO driver (based on OS and version number)
is installed and the STK IO driver (hpsstkio.sys) is copied to the windows\system32\
drivers directory.
To add drivers offline:
1. Mount the base image to a local directory by using dism.
For example:
dism /Mount-Wim /WimFile:C:\winpe_x86\winpe.wim /index:1 MountDir:C:\STK.TMP
2. Add the .inf file to the base image by using the dism /Add-Driver command.
For example:
dism /image:C:\SSSTK.TMP /Add-Driver /driver:C:\ssstk\drivers\example.inf
Sample deployment procedure 9

3. For each additional device driver repeat steps 1 and 2. When you finish customizing the
image, prepare the image for deployment by using the peimg /prep command.
NOTE: If the appropriate iLO driver is not installed, some utilities do not work correctly. For
more information, see the README.txt file located with the drivers.
To add drivers online:
1. Use the drvload tool, drvload.exe inf_path, where inf_path is the path to a device
driver INF file.
drvload x:\drivers\example.inf
2. Copy and then paste the STK IO driver to the windows\system32\drivers directory.
NOTE: If the HPSTKIO.SYS driver is not installed, some utilities do not work correctly.
copy c:\ssstk\drivers\system\ hpsstkio\ hpsstkio.sys c:\SSSTK.TMP\
windows\system32\drivers
For more information about Windows PE 4.0, see the Windows Advanced Deployment Guide for
System Builders located in the Microsoft Windows Assessment and Deployment Kit for Windows
8 and Windows Server 2012.
For more information about the Windows PE drivers included in the Scripting Toolkit for Windows,
see the readme.txt file located at the root of the Windows PE driver bundle in the drivers
directory.
NOTE: Before running HPDISCOVERY, you must install WMI. For more information on installing
extra packages in Windows PE, see the Windows PE documentation.
Capturing a reference configuration from the source server
1. Boot the media (CD/DVD, USB drive key, or PXE) that contains the customized Windows PE
image on the source server.
2. Open a command window.
3. Capture the system settings from the source server using the CONREP utility:
a. Change to the directory where CONREP resides.
b. Save the current system configuration to a data file in the \data directory you created
on the network share:
conrep -s -fs:\data\filename
Choose a file name that is descriptive of the source server; for instance, dl380g3.xml.
4. Capture the storage settings:
a. Change to the directory in which HPACUSCRIPTING resides.
b. Save the current array configuration to a data file in the \data directory you created on
the network share:
hpacuscripting -c s:\data\filename
Choose a file name that is descriptive of the source array; for instance,
dl380g3array.ini.
5. Verify that the new output files are present in the \data directory.
You cannot capture and apply iLO settings using HPONCFG in the same fashion as CONREP and
HPACUSCRIPTING. For more information, see “Using HPONCFG” (page 50).
IMPORTANT: Because the -w argument does not capture certain types of information, such as
the administrator password, data files created with HPONCFG using the -w argument cannot then
be used as input files for HPONCFG, unless they are modified first.
10 Deployment using the Scripting Toolkit for Windows

Configuring the target server and installing the operating system
1. Boot the media (CD/DVD, USB drive key, or PXE) that contains the customized Windows PE
image on the target server.
2. Run CONREP to configure the target server with the captured settings:
a. Change to the directory where CONREP resides.
b. Apply the captured configuration to the target server:
conrep -l -fs:\data\filename
3. Run HPACUSCRIPTING to configure the storage of the target server with the captured settings:
a. Change to the directory where HPACUSCRIPTING resides.
b. Apply the captured configuration to the target array:
bin \hpacuscripting.exe -i s:\data\filename
4. (Optional) Configure the iLO option. HP recommends that you set these parameters:
a. Edit the sample iLOconfig.xml file that is provided with the Scripting Toolkit so that
it contains the appropriate password and other required information. For more information,
see the «Using HPONCFG» section.
b. Copy the edited iLOconfig.xml file to s:\data.
c. Change to the directory where HPONCFG resides.
d. Configure the iLO option:
hponcfg -f s:\data\iLOconfig.xml
5. Insert the operating system DVD.
6. Reboot to run the operating system installation.
For information on automated, unattended installation, see the following resources:
• Operating system documentation
• Windows Server Technical Reference at http://technet.microsoft.com/en-us/library/
bb625087.aspx
Sample deployment procedure 11

3 Advanced topics
Overview
The advanced topics addressed in this section cover some of the most common deployment tasks
that can be automated using the Scripting Toolkit.
IMPORTANT: The script files and script segments in this section are provided only as examples.
You must modify the scripts for your environment. When creating or modifying your own scripts,
the pause command is a valuable tool to help you determine that each step of the script is
functioning as desired.
Customizing deployment scripts using HPDISCOVERY and IFHW
Use the HPDISCOVERY utility to determine which devices and capabilities are available in a
particular HP ProLiant server. HPDISCOVERY generates an XML-based output file that provides
information such as system ROM version, amount of RAM available, and the types of devices
present in the system. Then, use the HWQUERY and IFHW (IF Hardware utility) files to query the
output file, enabling you to add conditional tests to a script so it performs different operations
based on the outcome of the tests.
Querying the HPDISCOVERY file based on system name
In the following script, the IFHW utility searches the HPDISCOVERY data in the hpdiscovery.xml
file for the system name HP ProLiant BL20p. If the system name is found, the script calls the
bl20p.cmd file.
ifhw .\hpdiscovery.xml allboards.xml HWQ:SystemName eq «ProLiant BL20p»
if errorlevel 1 goto NEXT1
call .\BL20p.cmd
goto end
:NEXT1
ifhw .\hpdiscovery.xml allboards.xml HWQ:SystemName eq «ProLiant DL380 G4»
if errorlevel 1 goto NEXT2
call .\ DL380G4.cmd
goto end
Querying the HPDISCOVERY file to determine the presence of a particular card
Using IFHW to detect a particular PCI card or device can be valuable in determining which settings
to apply. For example, an array controller used as a boot controller might require a RAID 1 setting,
while an optional array controller used for a database (such as a Smart Array 5312 Controller)
might require a RAID 5 ADG setting. The following example demonstrates how to use IFHW to
detect a particular card or device:
REM *** Configure the array controllers by reading the configuration
REM *** information in the script file and stamping it onto the array
REM *** controllers of the target server
echo Configuring the Array Controllers…
ifhw .\hpdiscovery.xml allboards.xml PCI:»Smart Array 5i Controller»
if errorlevel 1 GOTO NEXT1
.\ACU\bin\hpacuscripting.exe -i .\ArraySettings\SA5iArray.ini
:NEXT1
ifhw .\hpdiscovery.xml allboards.xml PCI:»Smart Array 6i Controller»
if errorlevel 1 GOTO NEXT2
12 Advanced topics

.\ACU\bin\hpacuscripting.exe -i .\ArraySettings\SA6iArray.ini
:NEXT2
\ifhw .\hpdiscovery.xml allboards.xml PCI:»Smart Array 5312″
if errorlevel 1 GOTO NEXT3
.\ACU\bin\hpacuscripting.exe -i .\ArraySettings\SA5312Array.ini
:NEXT3
Querying the HPDISCOVERY file to determine the presence of a card family
IFHW and HWQUERY can perform queries based on partial name information, enabling you to
verify the presence of a whole family of cards by using a partial query such as Smart Array.
NEXT1:
ifhw .\hpdiscovery.xml allboards.xml PCI:»Smart Array»
if errorlevel 1 GOTO NEXT2
.\ACU\bin\hpacuscripting.exe -i .\ArraySettings\GeneralArrayConfig.ini
NEXT2:
Before creating a test condition, refer to the allboards.xml file to determine the correct name
for the device or group of devices you want to query.
IMPORTANT: IFHW is case-sensitive. Incorrect case, misspellings, and incorrect spacing cause
the query to fail.
Booting Windows PE from a USB drive key
Some applications, such as the firmware update components, require the use of a writable medium.
A writable file system allows for the expansion of the contents of the components and provides a
scratch area for the backup firmware image copied from the device under flash. While using
Windows PE on CD is not suitable for this purpose, a USB drive key provides the ideal medium
for this type of activity.
NOTE: Booting from a USB drive key is supported only on certain HP ProLiant servers. For more
information, see the SPP website at http://www.hp.com/go/spp.
To boot Windows PE from a USB drive key, see the Microsoft Windows PE documentation.
Flashing the ROM in a Windows PE environment
You can run the Online ROM Flash Smart Components to flash system and option ROMs in the
Windows PE environment, but you must ensure that a writable area is available for the component
to use. You can use the Online ROM Flash Smart Components as part of a scripted installation
before the operating system installation portion of the deployment.
Be sure to download the latest Online ROM Flash Smart Components for the system or option to
be flashed. Be sure that the component number and the server name correspond. The latest ROM
flash components are available from the HP software and drivers website at http://www.hp.com/
support.
With flash system and option ROMs, you can create a script file to perform the following tasks:
• Use HPDISCOVERY and IFHW to determine the current system or option ROM.
• Run the Online ROM Flash Smart Component.
• Verify the error level.
The following script is provided as an example only and must be modified for your particular
environment. Additional checks can be added as needed. Lines in bold type must be modified to
customize the script.
System\hpdiscovery -f hpdiscovery.xml
Booting Windows PE from a USB drive key 13

System\ifhw hpdiscovery.xml System\allboards.xml HWQ:SystemName eq «ProLiant DL380 G2»
if errorlevel 1 goto NEXT1
REM —REM This section performs the System ROM Flash. Online Flash components
REM are kept in a directory called Roms
REM —-
Roms\cp004648.exe /INSTPATH:S:\ROMScratcharea
REM —REM Check the error code returned to determine Success or Failure
REM —if errorlevel 3 goto HWNOTFOUND
if errorlevel 2 goto REBOOTREQUIRED
if errorlevel 1 goto NEXT2
goto end
NEXT1:
REM Try next system type
System\ifhw hpdiscovery.xml System\allboards.xml HWQ:SystemName eq «ProLiant DL380 G3»
if errorlevel 1 goto NEXT2
REM —REM This section performs the System ROM Flash. Online Flash components
REM are kept in a directory called Roms
REM —-
Roms\cp005041.exe /INSTPATH:S:\ROMScratcharea
REM —REM Check the error code returned to determine Success or Failure
REM —if errorlevel 3 goto HWNOTFOUND
if errorlevel 2 goto REBOOTREQUIRED
if errorlevel 1 goto NEXT2
goto end
NEXT2:
REM —REM Example of Option Rom Flash for a SmartArray 5i Controller
REM —-
System\ifhw hpdiscovery.xml System\allboards.xml PCI:»Smart Array 5i Controller»
if errorlevel 1 goto NEXT3
REM —REM This section performs the Option ROM Flash. Online Flash components
REM are kept in a directory called Roms
REM —-
Roms\cp002238.exe /INSTPATH:S:\ROMScratcharea
REM —REM Check the error code returned to determine Success or Failure
REM —if errorlevel 3 goto HWNOTFOUND
if errorlevel 2 goto REBOOTREQUIRED
if errorlevel 1 goto NEXT3
goto end
14 Advanced topics

NEXT3:
REM —REM DONE
REM —REBOOTREQUIRED:
System\reboot PXE
HWNOTFOUND:
End:
For more information about Online ROM Flash Smart Components, see the HP Online ROM Flash
User Guide on the HP Software and Driver Downloads website at http://www.hp.com/support.
Erasing array configurations
Before beginning the deployment process, you might want to erase the current array configuration.
The commands in the following examples can be run as part of a script or alone.
To erase the array configuration:
1. Use the Microsoft DiskPart utility to clear the partition table:
a. Create a script file called ErasePart.txt that contains the following commands:
REM This file instructs Diskpart.exe to select the first disk as
REM target, then clean the target.
rescan
select disk=0
clean
b. Run the Microsoft DiskPart utility to clear the partition table:
diskpart /s .\ErasePart.txt
2. Use ACU to erase the array configurations:
hpacuscripting -i erase.ini
The erase.ini file is provided in the Scripting Toolkit sample files.
Erasing array configurations 15

4 Scripting Toolkit utilities
Syntax conventions
Syntax refers to the way a command and parameters must be entered. Unless specified otherwise,
enter commands, parameters, and switches in all uppercase or all lowercase letters.
Sample syntax line:
SAMPLE[/R|-R][DRIVE:][PATH]FILENAME[…]
MeaningCommand element
SAMPLE
[ ]
/ or —
DRIVE:
PATH
FILENAME
…
Specifies the name of the command.
Indicates a component of the command line. Enter only the information within the brackets,
not the brackets themselves.
Indicates a command line switch for executable files.
Specifies the name of the hard disk drive, diskette drive, or other storage device.
Specifies the route the operating system must follow through the directory structure to locate a
directory or file. A path and file name must be specified only if the file is not in the current
directory.
This document uses uppercase file names. A device name or a drive letter cannot be specified
for a file name.
Indicates that the previous parameter or switch can be repeated several times in a command.
Enter only the information, not the ellipsis (…) itself.
In this document, the length of an example command or syntax might require it to continue on
another line. When this happens, the second line and any additional lines are indented under the
first line.
Placeholder items used in the syntax lines in this chapter include:
• Source—Specifies the location of the data to be transferred to a specified destination or used
as input to a command. The source can consist of a drive letter and colon, a directory name,
a file name, or a combination of these items.
• Destination—Specifies the location to which the data specified by the source is to be transferred.
The destination can consist of a drive letter and colon, a directory name, a file name, or a
combination of these items.
• String—Specifies a group of characters to be treated as a unit. A string can include letters,
numbers, spaces, or any other characters and is usually enclosed in double quotation marks.
Utility online help
Most Scripting Toolkit utilities include usage instructions. To obtain help with the syntax, parameters,
and switches of a particular Scripting Toolkit utility, enter the file name followed by /? in the
command line. For example, for usage instructions on the CONREP utility, enter the following
command:
CONREP /?
The utility displays information about its command line syntax, argument, and switches.
Using Scripting Toolkit utilities
The Scripting Toolkit utilities control the installation process, read the source server configuration,
and duplicate the configuration on a target server through a generated script file.
16 Scripting Toolkit utilities

The Scripting Toolkit utilities include:
• REBOOT
• SETBOOTORDER (Limited functionality for HP ProLiant 100 series servers)
• STATEMGR (Utility is not supported on 100 series servers)
• RBSURESET
• HPDISCOVERY
• IFHW
• HWQUERY
• CONREP
• HPRCU
• HPACUSCRIPTING
• HPLPCFG
• LO100CFG (Utility only supports HP ProLiant 100 series servers)
• HPQLAREP
• HPONCFG (Not supported on HP ProLiant 100 series servers using the Oxx ROM family)
Using REBOOT
The REBOOT utility enables the user to reboot the server, controlling which device is the boot
device. In conjunction with other utilities, the REBOOT utility controls server reboots from a batch
file.
REBOOT command-line syntax
REBOOT [DRIVE:] [/?]
REBOOT command-line arguments
DescriptionCommand line argument
[DRIVE:]
/cold
/?
Valid arguments that can be passed to REBOOT are A:, C:, CD, RBSU, or PXE. By
specifying an argument, the drive indicated is set to boot on the next reboot, and the
system is restarted. If no argument is provided, then the system is set to boot using
the defined boot order.
This argument performs a one-time cold boot of the system.
This argument displays help information.
REBOOT return codes
There are no return codes for the REBOOT utility.
REBOOT command-line examples
REBOOT A:
REBOOT PXE
DescriptionCommand-line argument
This command reboots the system to the A: drive.
This command reboots the system by itself to the PXE NIC.
Using REBOOT 17

Using SETBOOTORDER
SETBOOTORDER enables you to set the order in which devices are booted, including diskette
drives, CD-ROM or DVD drives, hard drives, PXE, and USB devices. This utility sets the boot order
only for devices that exist for a server. The devices can be set to boot in any order.
SETBOOTORDER cannot be used to set the storage controller order. You must use the CONREP
utility. For more information about setting the controller order, see “Using CONREP” (page 24)
NOTE: Any changes made to the SETBOOTORDER take affect at the next reboot. For HP ProLiant
servers with Oxx ROM Family (most 100 series servers), only one device can be set as the boot
device and others cannot be re-ordered. These Oxx servers do not support the default or usb
parameters.
SETBOOTORDER command-line syntax
setbootorder [floppy cdrom pxe hd usb | default] [/?]
SETBOOTORDER command-line arguments
Options are disabled if not listed in the argument.
DescriptionCommand line argument
floppy cdrom pxe hd usb
default
/?
SETBOOTORDER return codes
0
SETBOOTORDER command-line examples
SETBOOTORDER cdrom hd pxe usb floppy
SETBOOTORDER default
The order of these arguments sets the boot order for the
system devices. Each term can be used only once in any
order. It is not necessary to use all terms. HP ProLiant 100
series servers can only pass in one option.
This argument resets the boot order to the factory default.
This argument displays help information.
MeaningValue
The boot order was set successfully.
DescriptionCommand-line argument
This command sets the system devices to boot in this order:
CD-ROM drive, hard drive, PXE, USB, diskette drive.
This command sets the boot order to the factory default.
Using STATEMGR
The STATEMGR utility enables the user to keep track of the execution state during system reboots.
This utility saves persistent state information across reboots of the system.
NOTE: The STATEMGR utility is not supported on 100 series servers.
STATEMGR command-line syntax
STATEMGR [/R | -R] [EVNAME] [/?]
— or —
STATEMGR [/W | -W] [EVNAME] [VALUE] [/?]
18 Scripting Toolkit utilities

STATEMGR command-line arguments
DescriptionCommand-line argument
/R or –R
/W or -W
EVNAME
VALUE
/?
STATEMGR return codes
0
n
This argument reads the state of the environment variable
defined by [EVNAME]. The value of the environment
variable is returned as a return code.
This argument writes the state defined by [VALUE] to an
environment variable defined by [EVNAME].
This argument creates an environment variable used to
represent the state to manage. The variable can be any
word that is eight characters or fewer.
This argument is used only with the /W or -W arguments to
indicate the value of the environment variable to maintain.
[VALUE] is limited to integers between 0 and 254. If no
value is provided when using /W or -W, the state
environment variable is cleared.
This argument displays help information.
MeaningValue
The command was completed successfully.
N arguments were ignored because they were not in the
variable=<string> format.
STATEMGR command-line examples
STATEMGR /W PHASE 3
STATEMGR /R PHASE
Using RBSURESET
RBSURESET resets the BIOS settings for a server by reapplying the default factory setting at the
next reboot. To prevent accidental or malicious damage to a server’s configuration, this utility only
functions in a Windows PE environment. It will not operate in any other Windows environment.
RBSURESET does not erase array configurations or logical storage volumes.
RBSURESET command-line syntax
rbsureset [/?]
RBSURESET command-line arguments
DescriptionCommand-line argument
STATEMGR writes the state value 3 to the PHASE
environment variable.
STATEMGR reads the PHASE environment variable and
returns its value as a return code. If the environment
variable has been reset or no value has been stored, the
return code is 0.
[/?]
DescriptionCommand-line argument
This argument displays help information.
Using RBSURESET 19
Loading…

1 Introduction
Scripting Toolkit for Windows
The Scripting Toolkit for Windows is a server deployment product that delivers an unattended
automated installation for high-volume ProLiant server and BladeSystem infrastructure deployments.
This document describes how to best use the Scripting Toolkit to configure HP ProLiant servers and
BladeSystem infrastructure. It also contains information about the Scripting Toolkit utilities and how
to use them in an unattended environment. This document does not include information about
installing the operating system.
The Scripting Toolkit is designed for IT experts with experience in scripting operating system
installations and configuring ProLiant and BladeSystem infrastructure server hardware.
CAUTION:
Improper use of the Scripting Toolkit utilities can result in loss of critical data. Because
of the potential data-loss risk, only experienced individuals should use the Scripting Toolkit utilities.
Before using the Scripting Toolkit, all necessary precautions must be taken to ensure that
mission-critical systems remain online if a failure occurs.
Microsoft Windows Preinstallation Environment
Microsoft Windows Preinstallation Environment (Windows PE) is a small footprint of the Windows
Server environment that enables you to run tools in a 32- or 64-bit Windows environment. Because
Windows PE is based on the Windows kernel running in protected mode, only a subset of features
and APIs are available in this environment. This document is applicable to Windows PE 2.1 and
3.0 only, and is not backward compatible with previous versions of Windows PE.
Windows PE enables you to install the Windows operating system, establish a connection with
network servers, and perform hardware configuration using the Scripting Toolkit. You can use
Windows PE to customize and configure your servers before the operating system is installed.
To obtain Windows PE 2.1, download the Microsoft Windows Automated Installation Kit for
Windows Vista SP1 and Windows Server 2008 from the Microsoft website at (
http://
www.microsoft.com
).
To obtain Windows PE 3.0, download the Microsoft Windows Automated Installation Kit for
Windows 7 and Windows Server 2008 R2 from the Microsoft website at (
http://
www.microsoft.com
).
Minimum requirements
Before beginning the deployment process, be sure to have the following items available:
•
HP Scripting Toolkit for Windows
•
HP Scripting Toolkit for Windows User Guide
•
Microsoft Windows Automated Installation Kit for Windows Vista SP1 and Windows Server
2008 (for the creation of Windows PE 2.1) or Microsoft Windows Automated Installation Kit
for Windows 7 and Server 2008 R2 (for the creation of Windows PE 3.0).
•
The operating system to be deployed (Windows Server 2008 or Windows Server 2008 R2)
6
Introduction
System x DataCenter Solutions
Converged Systems HX Series
iDataPlex
System x 1U-high Rack Servers
System x3250 M4
2583
System x3250 M5
5458
System x3250 M6
3633
System x3530 M4
7160
System x3550 M3
4254,7944
System x3550 M4
7914,8062
System x3550 M5
5463,8869
System x Rack Servers
System x3630 M4
7158
System x3650 M4
7915,5466,5460,8061
System x3650 M5
5462,8871
System x3750 M4
8753
System x3850 X6
6241
System x3950 X6
6241
System x Tower Servers
System x3100 M4
2582
System x3100 M5
5457
System x3300 M4
7382
System x3500 M4
7383
System x3500 M5
5464
Flex System Compute Nodes
Flex System x220
7096
Flex System x222
7916
Flex System x240
7162
Flex System x240 M5
9532
Flex System x440
7167
Flex System X6
7196
Flex System Nodes
Flex System PCIe Expansion Node
81Y8983
Flex System Storage Expansion Node
65Y8588
Chassis Management Module 2
Flex System Chassis
Flex System Enterprise Chassis
7893,8721,8724
Flex System Carrier-Grade Chassis
7385
NeXtScale
NeXtScale n1200 Enclosure
5456
NeXtScale nx360 M4
5455
NeXtScale nx360 M5
5465
NeXtScale nx360 M5 Water-Cooled
5467,5468,5469
BladeCenter Chassis
BladeCenter E
8677
BladeCenter T
8720,8730
BladeCenter HT
8740,8750
BladeCenter H
8852
BladeCenter S
8886
BladeCenter Nodes with Intel CPUs
BladeCenter HS12
BladeCenter HS20
BladeCenter HS21
BladeCenter HS21 XM
BladeCenter HS22
BladeCenter HS22V
BladeCenter HS23
BladeCenter HS23E
BladeCenter HX5
BladeCenter Nodes with AMD CPUs
BladeCenter LS20
BladeCenter LS21
BladeCenter LS22
BladeCenter LS41
BladeCenter LS42
BladeCenter Special Purpose Blade Devices
IBM WebSphere DataPower Integration Blade XI50B
HC10 Blade Workstation
PN41 Deep Packet Inspection Blade
Adding drivers for WinPE boot image to get all drivers for HP Scripting toolkit for Windows loaded is not correctly documented in its UserGuide. First of all download HP scripting tools for Windows and extraxt it to some folder. Use next commands for DISM tool (Deployment Image Servicing and Management). Use winpe.wim file you can find under Windows Preinstalation Enviroment folder in WADK. Use platform you need x86 or x64
#mount image to already created folder
dism /mount-wim /wimfile:c:\winpe\winpe.wim /index:1 /mountdir:e:\temp
#add drivers
dism /image:e:\temp /add-driver /driver:c:\swsetup\sp67765\x64\drivers\winpe50 /recurse /forceunsigned
#copy HPSTKIO.SYS driver
copy c:\swsetup\sp67765\x64\drivers\winpe50\system\hpsstkio\hpsstkio.sys e:\temp\windows\system32\drivers
#copy tools folder to image
md e:\temp\tools
copy c:\swsetup\sp67765\x64\tools\*.* e:\temp\tools
#save changes to image and unmount it
dism /unmount-wim /mountdir:e:\temp /commit

If you want to see a list off all 3rd party drivers mount image again and type
dism /image:e:\temp /get-drivers

I assume you use MDT 2013 for creating bootable ISO file. To create it thick this options on Properties od Deployment Share for x64 and x86 platform. After you changed winpe.wim file with procedure above you need to run update deployment share, it will create new LiteTouchPE_x64.iso file with changes in winpe.wim file.


Boot HP Proliant server with LiteTouchPE_x64.iso . Press F8 to open command prompt. Ping some computer to check for network connectivity. Map network share where you will save hp configuration files. You can save ILO, system BIOS setting and storage adapter configuration. I am only saving storage configuration because I need only that, and for all other settings consult HP Scripting Toolkit User Guide . Navigate to tools folder, map network share, and then save array configuration.
net use k:\ \\serveripaddress_orname\share
hpssascripting -c k:\dl360g8storagearray.ini

For changing Keyboard layout to choose you local edit bootstrap.ini file, and update Deployment share after that. Line to add is KeyboardLocalePE=041a:0000041a (for my keyboard code)
For Deployment wizard you will usually have some default value you will have (Time zone, User Locale etc.) To fill wizard with already predefined values edit Rules windows in MDT 2013. This is my setup

If you want to have you local keyboard code page in command prompt you need to set it by DISM tool on your winpe.wim image. You have short example on picture down for setting keyboard layout but if you need more info consult this page. After setup please update Deployment share to update iso file.

For getting all settings type next command

After that login to reference computer to create image. Open deploymentshare on MDT server from windows explorer and run Litetouch script from scripts folder. You will get this windows and chose sysprep and capture sequence you created on MDT server. Fill in other needed info and capture will begin.


Procedure to restore it to another computer is:
- Boot PC from LiteTouchPE_x64.iso image
- Press F8 on Microsoft Deployment Toolkit to enter command prompt
- Navigate to Tools folder and run commands to restore storage array configuration on computer
net use k:\ \\serveripaddress_orname\share
hpssascripting -i k:\dl360g8storagearray.ini
After that close command prompt, reboot and continue to deploy image on target computer. I hope article helped. I am sorry if it is missing real step by step approach, because I was writing it during longer period of time.
Instlal hponcfg
#curl -s https://downloads.linux.hpe.com/SDR/hpePublicKey2048_key1.pub | sudo  apt-key add -
wget -q https://downloads.linux.hpe.com/SDR/hpePublicKey2048_key1.pub -O-| sudo  apt-key add

#sudo add-apt-repository -y 'deb [arch=amd64,i386] http://downloads.linux.hpe.com/SDR/repo/mcp bionic/current non-free'
echo "deb http://downloads.linux.hpe.com/SDR/repo/mcp bionic/current non-free" | sudo tee /etc/apt/sources.list.d/hp-nonfree.list

sudo apt update

# sudo apt-get install amsd
sudo apt-get install -y hponcfg
Configure IPMI / iLo password
cat <<EOF> pass.xml
<RIBCL VERSION="2.0">
  <LOGIN USER_LOGIN="x" PASSWORD="x">
  <USER_INFO MODE="write">
    <MOD_USER USER_LOGIN="Administrator">
      <PASSWORD value="pa$$word"/>
    </MOD_USER>
  </USER_INFO>
  </LOGIN>
</RIBCL>
EOF

sudo hponcfg -f pass.xml
Format NAND
cat <<EOF> ResetNAND.xml
<RIBCL VERSION="2.0">
<LOGIN USER_LOGIN="Administrator" PASSWORD="xxxxx">
<RIB_INFO MODE="write">
<FORCE_FORMAT VALUE="all" />
</RIB_INFO>
</LOGIN>
</RIBCL>
EOF

hponcfg -f ResetNAND.xml
Flash IPMI
cat <<EOF> /tmp/update_firmware.xml
<RIBCL VERSION="2.0">
    <LOGIN USER_LOGIN="${BMC_USER}" PASSWORD="${BMC_PASS}">
        <RIB_INFO MODE="write">
            <UPDATE_RIB_FIRMWARE IMAGE_LOCATION="http://${ARCHIVE_HOST}/ilo4_270.bin" />
        </RIB_INFO>
    </LOGIN>
</RIBCL>
EOF
MicroServer Gen8
http://www.hardwareluxx.de/community/f101/hp-proliant-g8-g1610t-g2020t-i3-3240-e3-1220lv2-microserver-963207.html#download
HP Tools repository
https://downloads.linux.hpe.com/SDR/project/mcp/
HP Tools (install with pip)
https://pypi.org/project/proliantutils/
iLO (IPMI)
http://www.panticz.de/ilo
RAID (storage)
https://downloads.linux.hpe.com/SDR/project/mcp/
https://wiki.phoenixlzx.com/page/ssacli/
https://support.hpe.com/hpsc/doc/public/display?docId=emr_na-c03493210
sudo ntpdate -u ntp.ubuntu.com

# install ssacli
apt install -y gpg-agent
wget http://downloads.linux.hpe.com/SDR/hpePublicKey2048_key1.pub -qO-| apt-key add -
https://downloads.linux.hpe.com/SDR/keys.html
#echo "deb http://downloads.linux.hpe.com/SDR/repo/mcp bionic/current non-free" > /etc/apt/sources.list.d/hp.list
echo "deb http://downloads.linux.hpe.com/SDR/repo/mcp jessie/current non-free" > /etc/apt/sources.list.d/hp.list
apt update
apt install -y ssacli

# or
wget https://downloads.linux.hpe.com/SDR/repo/mcp/pool/non-free/ssacli-6.30-8.0_amd64.deb
dpkg -i ssacli-*_amd64.deb


# show physical devices
ssacli ctrl slot=0 pd all show status

# show logical devices
ssacli ctrl slot=0 ld all show status

# enable HBA mode (if supported, remove logical devices first)
ssacli controller slot=0 modify hbamode=on forced

ssacli controller slot=0 show config detail

# clear previous raid
ssacli controller slot=0 modify clearconfigdata
ssacli ctrl slot=0 pd all show detail

ssacli controller rescan

ssacli ctrl slot=0 ld 1 show
ssacli ctrl slot=0 ld 1 delete

# create raid0
ssacli ctrl slot=0 create type=ld drives=1I:1:1 raid=0

# create raid1
ssacli ctrl slot=0 create type=ld drives=1I:2:1,1I:2:2 raid=1

# boot volume
ssacli controller slot=0 ld 1 modify bootvolume=primary
sas cli
https://wiki.phoenixlzx.com/page/ssacli/
https://gist.github.com/mrpeardotnet/a9ce41da99936c0175600f484fa20d03
Harddrive LED
Off - Not Configured
Solid Green - Configured
Blinking Green - Rebuilding
Blinking Green\Amber - Configured & Predictive Failure
Blinking Amber - Predictive Failure
Solid Amber - Failed
hponcfg
https://support.hpe.com/hpsc/swd/public/detail?swItemId=MTX_5ab6295f49964f16a699064f29
Ansible
- name: Add HPE repository
  apt_repository:
    repo: deb http://downloads.linux.hpe.com/SDR/repo/mcp {{ ansible_distribution_release|lower }}/current non-free
    update_cache: yes
Service Pack for ProLiant (SPP) download (registration required)
http://h17007.www1.hpe.com/us/en/enterprise/servers/products/service_pack/spp/index.aspx
Identify server
https://partsurfer.hpe.com/Search.aspx?SearchText=xxxx
Enable HBA storage controler
https://kb.gtkc.net/hp-smart-array-cli-commands/
https://www.busche.org/index.php/2016/07/14/hba-modus-auf-hp-p420-aktivieren/
F10
Scripting Toolkit Windows PE 64 Bit Mode

hpssacli ctrl all show config
hpssacli ctrl slot=0 ld 0 show
hpssacli ctrl slot=0 ld 0 delete
hpssacli controller slot=2 modify hbamode=on forced
IPMI
# Enable IPMI remote access
Administration > IPMI/DCMI over LAN Access > "IPMI/DCMI over LAN Access"
Links
https://github.com/CSCfi/ansible-role-hp-spp
https://github.com/mrlesmithjr/ansible-hp-mcp