
In this tutorial, you will learn how to use the scp command to securely copy files and directories between local and remote systems using SSH.
In This Tutorial
- System Requirements for SCP
- SCP Command Syntax
- Examples: Copying Files from Local to Remote
- Examples: Copying Files from Remote to Local
- Copying Directories
- Copying Between Two Remote Servers
- Using an Identity File (Private Key)
System Requirements for SCP
Local Computer:
- The
scpcommand relies on the SSH protocol. - On the local computer where you’re running the
scpcommand, only an SSH client is needed. - Linux, macOS, and Windows all come with the
scpcommand installed by default.
Remote Computer:
- However, on the remote server side you need
OpenSSH serverto accept incoming SSH connections. - So the OpenSSH server must be running on the remote computer.
If your Linux system doesn’t have an SSH server, click this link for instructions on how to install the OpenSSH Server.
You can install the OpenSSH Server on Windows as well.
SCP Command Syntax
The basic syntax of the scp command looks like this:
scp [options] source destination- The source is the file or folder you want to copy.
- The destination is where you want to copy it to.
Command Options:
-r: Recursively copy directories.-P port: Specifies the port number to connect to on the remote host (if it’s not the default port 22).-i identity_file: Specifies the private key file to use for authentication.
Remote Path Format
When specifying a remote source or destination, the format is as follows:
user_name@IP-Address:pathExample:
[email protected]:/var/www/The user@ portion is optional if your local username is the same as the remote username. If it’s missing, the scp command will use your local user account name.
Examples: Copying Files from Local to Remote
Copy file1.txt from the local computer to the /tmp directory on the remote server at 192.168.1.10:
scp file1.txt [email protected]:/tmp/Copy file1.txt and file2.txt to the remote server at the same time:
scp file1.txt file2.txt [email protected]:/tmp/Examples: Copying Files from Remote to Local
Download /etc/passwd from the remote computer and save it in the C:\data\ folder on your Windows computer:
scp [email protected]:/etc/passwd C:\data\Download multiple files at once from the remote server:
scp [email protected]:/tmp/file1.txt /tmp/file2.txt /backup/Note: The above syntax for downloading multiple remote files might not work as expected in the Windows version of the scp command. It works in a Linux Bash shell.
Copying Directories
When copying a directory, you must use the -r option to copy all files and sub-directories recursively.
Examples:
scp -r /var/www/ [email protected]:/tmp/
scp -r [email protected]:/var/www/ /backup
Copying Between Two Remote Servers
It’s also possible to copy files between two remote computers using scp, but the data is transferred through your local machine.
Example:
scp -r [email protected]:/var/www/ [email protected]:/backup/Using an Identity File (Private Key)
And the last example we’ll look at is how to copy files using an identity file or private key, if you’re using passwordless authentication.
The command option to specify the identity file is -i.
scp -r -i srv01.pem [email protected]:/var/www/ /backup/And that concludes this tutorial on the Linux scp command. If you found it helpful, subscribe to @RealClearComputing for more Linux tutorials.
Как копировать и передавать файлы по SSH
В статье мы расскажем, как передать файлы через SSH на разных операционных системах — Windows и Linux.
- Что нужно для подключения
- Как скопировать файл через SSH на Linux
- Как отправить файл по SSH с локального компьютера на сервер
- Как скачать файлы с удаленного сервера на компьютер
- Как скопировать файлы по SSH на Windows
- Как загрузить файл с компьютера на сервер
- Как скачать файл через SSH на локальный компьютер
Для подключения к серверу вам потребуются:
- IP-адрес или имя сервера,
- логин пользователя (в том числе root),
- пароль пользователя,
- порт.
Чаще всего копирование файлов через SSH делают с помощью двух мини-программ:
- scp (Secure Copy) — утилита для Linux. Она позволяет безопасно передать или скачать файл по протоколу SSH. Программа scp входит в комплект OpenSSH и не требует установки.
- pscp.exe — это утилита для Windows. Она используется по тому же назначению, что и scp: подключение к серверу по SSH и работа с файлами. Эта мини-программа входит в состав PuTTY: ее можно скачать на официальном сайте. Процедура настройки SSH-клиента описана в нашей статье.
Важно: если загружаемый файл существует на целевом хосте, он перезапишется.
Работа через SSH предполагает использование консольных команд. Наиболее популярные из них вы можете найти в статье.
Как скопировать файл через SSH на Linux
Копирование файлов по SSH на Linux можно сделать с помощью scp. Эта утилита позволяет:
- передать файл с локального компьютера на удаленный сервер,
- скачать файл с удаленного сервера на локальный компьютер.
Команда scp имеет следующий синтаксис:
scp опция источник получатель
Как отправить файл по SSH с локального компьютера на сервер
Чтобы загрузить файл:
- Подключитесь к серверу по SSH.
- Выполните команду:
scp /home/test.doc username@servername:/directory
Где:
- /home/test.doc — путь к файлу на локальном компьютере;
- username — имя SSH-пользователя;
- servername — имя сервера или его IP-адрес;
- directory — директория на сервере, в которую нужно загрузить файл.
Готово, вы загрузили файл на сервер.
Как скачать файлы с удаленного сервера на компьютер
Чтобы загрузить файл:
- Подключитесь к серверу по SSH.
- Выполните команду:
scp username@servername:/directory/test.doc /home
Где:
- /directory/test.doc — путь к файлу на сервере;
- username — имя SSH-пользователя;
- servername — имя сервера или его IP-адрес;
- home — папка на компьютере, в которую нужно загрузить файл.
Готово, вы скачали файл на компьютер.
Как скопировать файлы по SSH на Windows
Копирование через SSH на ОС Windows выполняется с помощью утилиты pscp.exe из набора PuTTY.
Как загрузить файл с компьютера на сервер
Чтобы загрузить файл:
- Подключитесь к серверу по SSH.
- Выполните команду:
pscp C:/documents/test.doc username@servername:/directory
Где:
- /documents/test.doc — путь к файлу на локальном компьютере;
- username — имя SSH-пользователя;
- servername — имя сервера или его IP-адрес;
- directory — директория на сервере, в которую нужно загрузить файл.
Если название файла или путь содержит пробелы, заключите его в кавычки:
pscp “C:/documents/test 1.doc” username@servername:/directory
Готово, вы загрузили файл на сервер.
Как скачать файл через SSH на локальный компьютер
Чтобы загрузить файл:
- Подключитесь к серверу по SSH.
- Выполните команду:
pscp username@servername:/directory/test.doc C:/documents
Где:
- username — имя SSH-пользователя;
- servername — имя сервера или его IP-адрес;
- directory/test.doc — путь к файлу на сервере;
- /documents — директория на локальном компьютере, в которую нужно загрузить файл.
Если название файла или путь содержит пробелы, заключите его в кавычки:
pscp username@servername:”/directory/test 1.doc” C:/documents
Готово, вы скачали файл на компьютер.
Сегодня короткая заметка об одном полезном иструменте под название SCP — утилита для копирования файлов в SSH сессии. Он доступен в Windows 10 как один из инструментов работы с SSH.
Копирование файла с компьютера Windows на удаленный компьютер Linux по SSH:
scp "C:\dir\file.zip" root@192.168.1.1:~/archives
file.zip будет скопирован в каталог archives в домашнем каталоге пользователя root
Можно копировать файлы используя маски в имени:
scp "C:\dir\*.zip" root@192.168.1.1:~/archives
все файлы c расширением zip будут скопированы в каталог archives в домашнем каталоге
С ключем -r можно рекурсивно скопировать файлы и каталоги в каталог назначения:
scp -r "C:\dir\" root@192.168.1.1:~/archives
все файлы и каталоги будут скопированы в каталог archives в домашнем каталоге
Копирование файла с удаленного компьютера Linux на компьютер Windows по SSH:
scp.exe root@192.168.1.1:~/archives/file.zip "C:\dir\"
Файл file.zip будет скопирован в каталог C:\dir
When you are working on the multiple servers, copying files between two servers is a common task for any system administrator. In this case, the SCP utility is the best choice for any system administrator.
SCP stands for “Secure Copy Protocol” is a Linux command-line tool used to transfer files and directories securely between two servers.
By default, GUI mode is not installed in Linux servers. SCP utility makes it easier for Linux system administrator to manage the multiple servers from the command-line.
SCP utility is based on the SSH, as so you will need a username and password of the source and target system to transfer the files.
In this tutorial, we will show you how to transfer files and directories between two systems using SCP file transfers!
Basic Syntax
The basic syntax of the scp command is shown below:
scp [OPTION] local-file-or-directory user@remote-ip:/directory/
You can use the above command to transfer files and directories from a local system to remote system.
scp [OPTION] user@remote-ip:/remote-file /local-directory
You can use the above command to transfer files and directories from a remote system to local system.
scp [OPTION] user@remote-ip:/directory/ user@remote-ip:/directory/
You can use the above command to transfer files and directories from one remote system to another remote system.
A brief explanation of each option in SCP command are shown below:
*Note: all these options are Case sensitive!
- -r
This option will copy files and directories recursively. - -v
This option will display verbose output during the copying process. - -P
This option is used to specify the ssh port number of the target host when the target host using the different SSH port. - -l
This option is used to limit the bandwidth while copying the files and directories. - -q
This option skips the SSH warning message. - -p
This option will preserve permissions, modes and access time of files while copying. - -i
This option is used to specify the SSH private key.
Transfer Files and Directories with SCP in Linux
The SCP utility allows you to transfer files between, local to remote, remote to local and remote to remote systems.
In this section we will show you how to transfer files and directories between them.
Local to Remote System Transfers:
Local to Remote File Transfers:
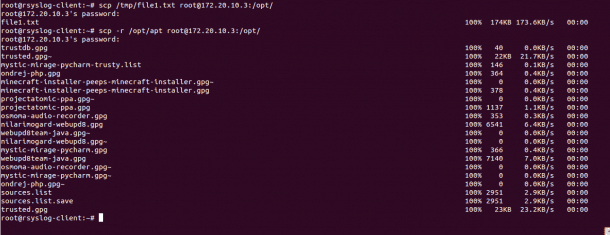
To transfer a file named file1.txt located inside /tmp directory from a local system to the remote system directory /opt use the following command:
scp /tmp/file1.txt root@172.20.10.3:/opt/
You will be asked to provide remote system’s root user password to transfer the file as shown below:
root@172.20.10.3's password:

file1.txt                                                                                                    100%  174KB 173.6KB/s   00:00
You can use the option -v with SCP to see the verbose output during the file transfer:
scp -v /tmp/file1.txt root@172.20.10.3:/opt/
Local to Remote Directories/Folders Transfers:
To transfer a directory named apt located inside /opt from a local system to the remote system directory /opt recursively use the following command:
scp -r /opt/apt root@172.20.10.3:/opt/
Provide remote system’s root user password to transfer the directory as shown below:
trustdb.gpg                                                                                                  100%   40     0.0KB/s   00:00

trusted.gpg~                                                                                                 100%   22KB  21.7KB/s   00:00

mystic-mirage-pycharm-trusty.list                                                                            100%  146     0.1KB/s   00:00

ondrej-php.gpg                                                                                               100%  364     0.4KB/s   00:00

minecraft-installer-peeps-minecraft-installer.gpg~                                                           100%    0     0.0KB/s   00:00

minecraft-installer-peeps-minecraft-installer.gpg                                                            100%  378     0.4KB/s   00:00

projectatomic-ppa.gpg~                                                                                       100%    0     0.0KB/s   00:00

projectatomic-ppa.gpg                                                                                        100% 1137     1.1KB/s   00:00

osmoma-audio-recorder.gpg                                                                                    100%  353     0.3KB/s   00:00

nilarimogard-webupd8.gpg                                                                                     100% 6541     6.4KB/s   00:00

webupd8team-java.gpg~                                                                                        100%    0     0.0KB/s   00:00

nilarimogard-webupd8.gpg~                                                                                    100%    0     0.0KB/s   00:00

mystic-mirage-pycharm.gpg                                                                                    100%  366     0.4KB/s   00:00

webupd8team-java.gpg                                                                                         100% 7140     7.0KB/s   00:00

osmoma-audio-recorder.gpg~                                                                                   100%    0     0.0KB/s   00:00

mystic-mirage-pycharm.gpg~                                                                                   100%    0     0.0KB/s   00:00

ondrej-php.gpg~                                                                                              100%    0     0.0KB/s   00:00

sources.list                                                                                                 100% 2951     2.9KB/s   00:00

sources.list.save                                                                                            100% 2951     2.9KB/s   00:00

trusted.gpg                                                                                                  100%   23KB  23.2KB/s   00:00
Example:
Remote to Local Transferring:
Remote to Local File Transfers:
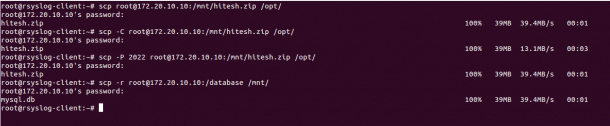
To transfer a file named hitesh.zip located inside /mnt directory of the remote to the local system’s directory /opt use the following command:
scp root@172.20.10.10:/mnt/hitesh.zip /opt/
You can increase the transfer speed by enabling the compression using the option -C with SCP as shown below:
scp -C root@172.20.10.10:/mnt/hitesh.zip /opt/
If your remote server uses SSH port 2022, then you can use -P option to specify the remote SSH port as shown below:
scp -P 2022 root@172.20.10.10:/mnt/hitesh.zip /opt/
Remote to Local Directory/Folders Transfers:
To transfer a directory named /etc from the remote system to local system’s directory /mnt recursively use the following command:
scp -r root@172.20.10.10:/database /mnt/
Example:
Remote to Remote System Transfers:
Remote to Remote File Transfers:
In order to transfer files and directories between two remote servers. You will need to configure SSH key-based authentication between both remote servers.
To transfer a file named /etc/rc.local from the one remote system (172.20.10.3) to another remote system’s (172.20.10.5) directory /opt use the following command:
scp root@172.20.10.3:/etc/rc.local root@172.20.10.5:/opt/
To transfer a directory named /mnt/apt from the one remote system (172.20.10.3) to another remote system’s (172.20.10.5) directory /opt use the following command:
scp -r root@172.20.10.3:/mnt/apt root@172.20.10.5:/opt/

Transfer Files and Directories with SCP in Windows (7, 8, 10, and Server)
If you are working on the Windows system and want to transfer files and directories from Windows to Linux and Linux to Windows system. Then, you can achieve this using WinSCP utility.
WinSCP is a free and open-source SCP and SFTP client for Windows based operating systems.
Transfer files between Windows and Linux system follow the below steps:
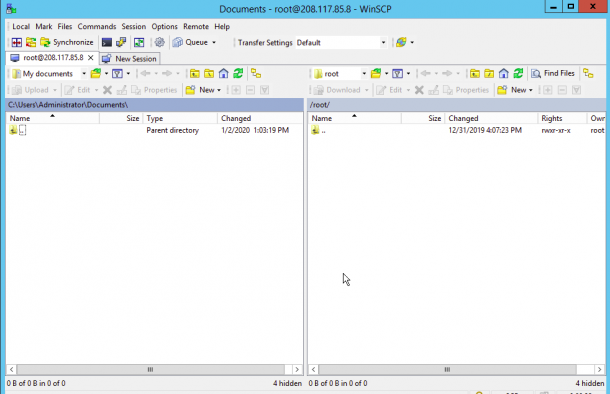
1. On the windows system, launch the WinSCP utility as shown below:
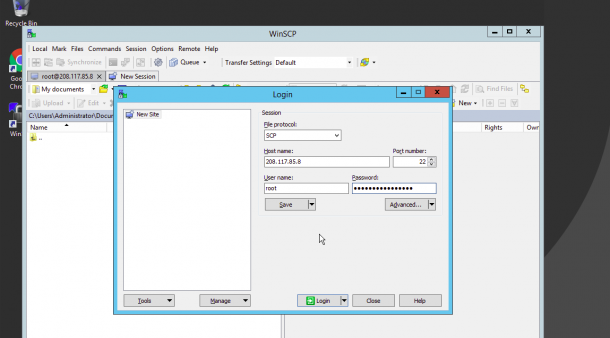
Now provide the following information:
- File Protocol : Select SCP as file transfer protocol.
- Host name : Provide your Linux server IP address.
- Port number : Provide your Linux server SSH port.
- User name : Provide the user name of your Linux server.
- Password : Provide your user’s password.
2. Now click on the Login button. You should see the following page:
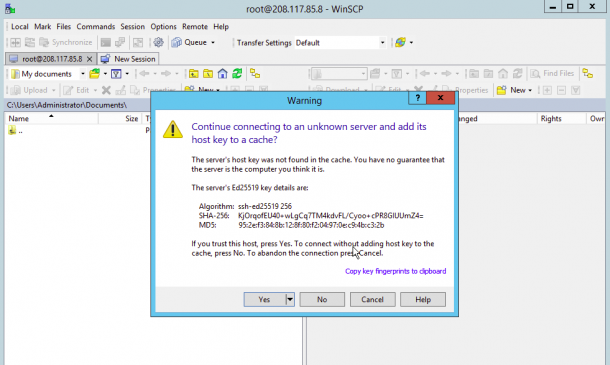
Click on the Yes button to verify the host. Once you are connected to the Linux server, you should see the following page:
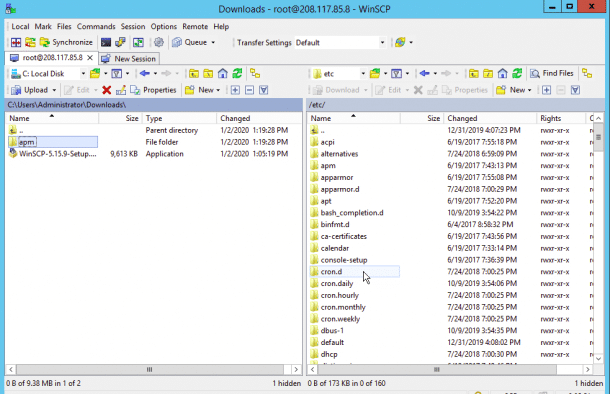
On the left pane, right-click on the file you want to upload on the Linux server and click on the Upload button as shown below:
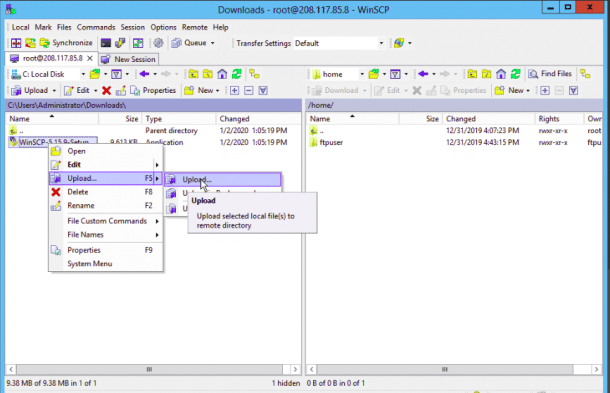
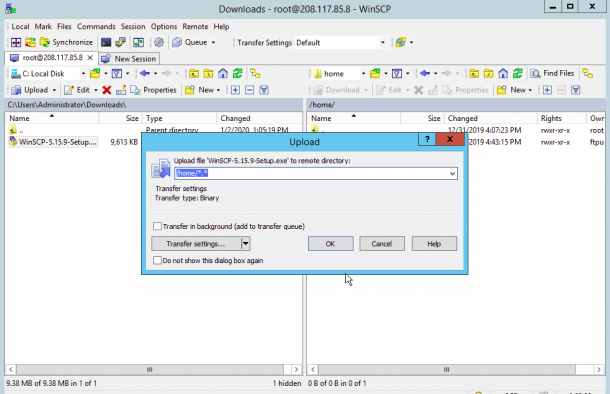
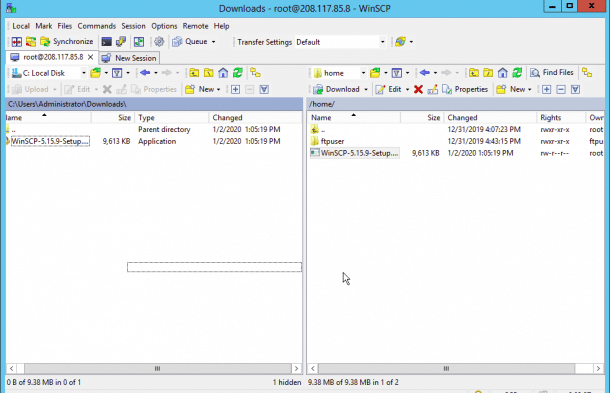
Now, provide the path of the Linux server’s directory and click on the OK button. Once the file has been uploaded, you should see the following page:
3. On the right pane, right-click on the directory you want to download from the Linux server to the Windows system and click on the Download button as shown below:


Now, provide the path of the Windows system directory and click on the OK button. Once the file has been uploaded, you should see the following page.
Conclusion
In the above tutorial, we’ve learned how to transfer files and directories from Linux to Linux, Windows to Linux and Linux to Windows. Feel free to ask questions below in the comments section if you have any!
Протокол SSH (Secure Shell) — это сетевой протокол для удаленного управления операционной системой через командную строку, который можно назвать стандартом для удаленного доступа к *nix-машинам. Позволяет производить защищенный вход на сервер, удаленно выполнять команды, управлять файлами (создавать, удалять, копировать и т.д.) и многое другое. Большинство облачных и хостинг-провайдеров требуют наличие SSH для доступа к своим сервисам. В этой статье рассмотрим копирование файлов по SSH в Windows и Linux-системах.

SSH способен передавать любые данные (звук, видео, данные прикладных протоколов) через безопасный канал связи. В отличие от устаревших и небезопасных протоколов telnet и rlogin, в SSH обеспечивается конфиденциальность передаваемых данных и подлинность взаимодействующих сторон — необходимые условия для сетевого взаимодействия в Интернете.
Рассмотрим алгоритм установки зашифрованного соединения между клиентом и сервером:
- Установка TCP-соединения. По умолчанию сервер слушает 22-й порт. В работе протокола используется набор алгоритмов (сжатие, шифрование, обмен ключами), поэтому стороны обмениваются списком поддерживаемых алгоритмов и договариваются, какие из них будут использовать.
- Чтобы третья сторона не смогла выдать себя за сервер или клиент, стороны должны удостоверится в подлинности друг друга (аутентификация). Для этого используются асимметричные алгоритмы шифрования и пара открытый-закрытый ключ. Вначале проверяется аутентичность сервера. Если соединение происходит впервые, пользователь увидит предупреждение и информацию о сервере. Список доверенных серверов и их ключей записывается в файл по адресу /home/<username>/.ssh/known_hosts.
- Как только клиент убедился в достоверности сервера, стороны генерируют симметричный ключ, с помощью которого происходит шифрования всех обмениваемых данных. Таким образом при перехвате данных, никто, кроме сторон не сможет узнать содержимое сообщений.
- Далее происходит аутентификация пользовательского сеанса. Для этого используется либо пароль, либо присланный клиентом публичный ключ, сохраняемый в файле /home/<username>/.ssh/authorized_keys на сервере.
Самая популярная реализация на Линукс, OpenSSH, предустанавливается практически на всех дистрибутивах: Ubuntu, Debian, RHEL-based и других. На Windows в качестве клиентов можно использовать программы PuTTY, MobaXterm. Начиная с WIndows 10 и Windows Server 2019 инструменты OpenSSH доступны и на Windows.
Подробнее об SSH и работе с ним мы писали в статье «Как пользоваться SSH».
VDS
Копирование файлов
Копирование файлов в Linux по SSH осуществляется с помощью двух основных программ: scp и sftp. Обе утилиты поставляются вместе с пакетом OpenSSH. Существуют две основные версии протокола SSH: 1 и 2. Оболочка OpenSSH поддерживает обе версии, однако первая применяется редко.
Настройка автодополнений
При работе с scp крайне удобно использовать tab для автодополнения путей на удаленной машине. Для этого нужно настроить аутентификацию пользователя по публичному ключу.
Для начала сгенерируем открытый и закрытый ключ:
ssh-keygenВывод:
Generating public/private rsa key pair.
Enter file in which to save the key (/home/user/.ssh/id_rsa):
Created directory '/home/user/.ssh'.
Enter passphrase (empty for no passphrase):
Enter same passphrase again:
Your identification has been saved in /home/user/.ssh/id_rsa.
Your public key has been saved in /home/user/.ssh/id_rsa.pub.
The key fingerprint is:
SHA256:wJQ/XBZq69qXGHxseTuccUEpzWYHhsVVHcDXE3MrTHQ user@host
В конце вывода будет графическое представление ключа (key’s randomart image), которое легче запомнить, чем хэш ключа.
По умолчанию ключи (id_rsa.pub — открытый, id_rsa — закрытый) сохранятся в домашнем каталоге пользователя в директории .ssh. Также во время генерации программа попросит ввести пароль, которым будут защищены ключи. Если не хотите дополнительной защиты, нажмите два раза Enter.
Теперь копируем публичный ключ на удаленную машину:
ssh-copy-id [имя пользователя]@[ip-адрес]Здесь [имя пользователя] — учетная запись пользователя, под которой будем логиниться на удаленной машине, [ip-адрес] — адрес удаленной машины (можно использовать доменное имя, если они локально резолвится). Далее вводим пароль пользователя. Если все прошло корректно, то в выводе будет команда для удаленного подключения:
Number of key(s) added: 1
Now try logging into the machine, with:   "ssh '<имя пользователя>@<ip-адрес>'"
and check to make sure that only the key(s) you wanted were added.
Secure copy (SCP)
Для копирования небольших объемов информации (например, конфиги сервисов) лучше всего подойдет утилита scp.
Синтаксис команды для копирования с локальной машины на удаленный сервер:
scp [путь к файлу] [путь к файлу] [имя пользователя]@[ip-адрес]:[путь к файлу]Попробуем скопировать файл на сервер:
scp test.txt user@192.168.1.29:/home/user/Вывод:
test.txt 100% 12 20.6KB/s 00:00Можно передать несколько файлов за раз. Для этого указываем пути, разделенные пробелами:
scp test1.txt test2.txt user@192.168.1.29:/home/user/Для копирования с удаленного сервера на локальную машину нужно поменять источник и место назначения местами:
scp user@192.168.1.29:/home/user/test.txt ~/Для передачи директории используйте ключ -r:
scp -r testdir user@192.168.1.29:/home/user/Также имеется возможность передачи с одного удаленного сервера на другой:
scp gendo@192.168.1.25:/home/gendo/test.txt user@192.168.1.29:/home/user/Secure FTP (SFTP)
Еще одной утилитой для передачи файлов, поставляемых в OpenSSH, является sftp. C релизом OpenSSH 9.0 утилита scp переведена по умолчанию на использование SFTP вместо устаревшего протокола SCP/RCP. Sftp работает практически также, как и классический ftp, за исключением того, что в sftp данные передаются не в виде обычного текста, а по зашифрованному туннелю (туннелирование — это процесс упаковки и передачи одного сетевого подключения с помощью другого). Также для работы sftp не нужен отдельный FTP-сервер.
Пример простого скачивания через sftp:
gendo@melhior:~$ sftp misato@192.168.1.29
Connected to 192.168.1.29.
sftp> ls
file.txt   file1.txt  file2.txt  test.txt
sftp> lcd testdir/
sftp> get test.txt
Fetching /home/misato/test.txt to test.txt
test.txt                              100%  12  4.8KB/s  00:00
sftp> bye
Сам по себе sftp применяется редко: вместо этого его используют файловые менеджеры, например Midnight Commander и Nautilus:
Использование sftp в файловом менеджере Nautilus. Удаленная машина отображается в виде папки с именем пользователя и IP-адресом.
Копирование файлов по SSH в Windows
Скачать файл с сервера или на сервер в Windows можно с помощью консольной программы pscp, поставляемой вместе с PuTTY. Синтаксис очень похож на обычный scp:
pscp [путь к файлу] [имя пользователя]@[имя сервера/ip-адрес]:[путь к файлу]Для SSH-копирования файлов на сервер, используйте следующую команду:
pscp C:\server\test.txt misato@192.168.1.29:/home/misato/Скачивание файла с сервера на компьютер:
pscp misato@192.168.1.29:/home/misato/test.txt C:\file.txtУвидеть список файлов на сервере можно при помощи опции -ls:
pscp -ls [имя пользователя]@[ip-адрес]:[путь]Если в пути или в названии файла есть пробелы, используйте кавычки:
pscp "C:\dir\bad file name" misato@192.168.1.29:/home/misatoДля получения помощи по команде введите pscp без аргументов.
Заключение
Мы рассмотрели, как копировать файлы на сервер и с сервера с помощью безопасного сетевого протокола SSH. Если вы используете облачные серверы, важно уметь работать с SSH, так как он является стандартом для удаленного доступа к *nix-машинам и будет необходим вам в повседневной работе.
Кстати, в официальном канале Timeweb Cloud собрали комьюнити из специалистов, которые говорят про IT-тренды, делятся полезными инструкциями и даже приглашают к себе работать.