
Last Updated :
30 Apr, 2024
SCP (Secure Copy Protocol) is a convenient way to transfer files securely between a local host and a remote server. However, encountering a «Permission Denied» error during an SCP transfer can be frustrating, especially when you have the necessary permissions. In this article, we’ll explore the various causes of SCP permission denied errors and provide step-by-step solutions to resolve them, ensuring smooth file transfers.
Solve Scp Permission Denied Error
- Addressing Ownership Issues
- Check File Permissions
- Check Directory Permissions
- Check User Permissions
- Key-based Authentication
- Debugging SCP
- Consult Server Logs
Addressing Ownership Issues
Sometimes, permission-denied errors in SCP can stem from ownership issues with the destination directory on the remote server. Ensuring that the directory you’re copying files to is owned by the appropriate user can resolve such issues. Here’s how you can do it:
chown username /etc/Myfiles/downloads
Replace username with the correct username and /etc/Myfiles/downloads with the path to the destination directory on the remote server. This command changes the ownership of the directory to the specified user, allowing them to write to it.
Once you’ve verified and adjusted the ownership of the destination directory, proceed to transfer the file from your local machine to the remote server using SCP:
sudo scp filename.zip username@192.168.0.5:/etc/Myfiles/downloads
Replace filename.zip with the name of the file you want to transfer, username with the remote server’s username, 192.168.0.5 with the server’s IP address, and /etc/Myfiles/downloads with the path to the destination directory.
Check File Permissions
The most common reason for SCP permission denied errors is insufficient file permissions. Ensure that both the source and destination files have the correct permissions set. You can use the ls -l command to view the permissions of the files.
Example:
ls -l file.txt
Output Example:
-rw-r—r— 1 user group 1234 Apr 30 10:00 file.txt
In the above output, -rw-r—r— indicates that the file has read and write permissions for the owner (user) but only read permissions for the group and others. Use the chmod command to modify file permissions if necessary.
Check Directory Permissions
Ensure that you have the necessary permissions to read from the source directory and write to the destination directory. If you’re trying to copy a file to a directory where you don’t have write permissions, SCP will return a permission denied error.
Example:
scp file.txt user@example.com:/path/to/destination/
Output Example
scp: /path/to/destination/: Permission denied
Check the permissions of the destination directory using ls -ld /path/to/destination/ and adjust them accordingly.
Check User Permissions
Make sure that you’re logged in with the correct username and that you have the required permissions to access the files on both the local and remote systems. If you’re using SCP to copy files to a remote server, ensure that you have the necessary privileges to write to the destination directory.
Key-based Authentication
If you’re using key-based authentication for SCP, ensure that your public key is correctly configured on the remote server. Verify that the permissions of ~/.ssh and ~/.ssh/authorized_keys are set correctly (typically 700 for .ssh and 600 for authorized_keys).
Debugging SCP
Use the -v option with SCP to enable verbose output, which can help diagnose permission issues. The verbose output provides detailed information about the SCP connection, including authentication methods, file permissions, and error messages.
Example:
scp -v file.txt user@example.com:/path/to/destination/
Analyze the verbose output to identify any permission-related errors or issues with authentication.
Consult Server Logs
Check the server logs (e.g., /var/log/auth.log on Ubuntu) for any error messages related to SSH or SCP. Server logs often provide valuable insights into authentication failures and permission denied errors.
Conclusion:
Encountering a permission denied error while using SCP can be frustrating, but with a systematic approach, you can quickly identify and resolve the underlying issues. By checking file permissions, directory permissions, user permissions, and ensuring proper key-based authentication, you can troubleshoot and fix SCP permission denied errors effectively. Additionally, using verbose output and consulting server logs can provide valuable information for debugging. With these strategies in hand, you’ll be able to perform SCP transfers smoothly and securely without encountering permission issues.
The SCP permission denied is an error message that is displayed when the user tries to copy files or data from a remote host that he does not have permission to access or tries to store the data in the root directory of his system, which does not allow the user to store data in it. In either of the cases, permission to access the data is required.
The SCP (Secure Copy Protocol) is a data transfer protocol explicitly used to copy data from one host to another over the network. The protocol runs on top of SSH (secured shell), which uses asymmetric cryptography to protect the data during transfers. Today we show you how to deal with protocol’s scp permission denied error.
Defining SCP
SCP is shot for secure copy protocol. It is an application layer protocol that works on top of the SSH protocol, a security protocol implemented between the application layer and the transport layer (TCP in this case). Scp command is compatible with all mainstream operating systems like Windows, Linux, macOS, etc. There are other similar protocols to the scp, such as SFTP (secure file transfer protocol), which transfers the data and performs data management functions. SCP comes pre-installed on macOS, Linux, and Windows. The user must have appropriate rights and permissions to avoid an scp permission denied error.
How to copy files using SCP
The scp command is not very complicated and simple to use. To perform any actions using the SCP without facing any permission error, you must have at least read permission on the remote host and otherwise write permission on the localhost. You might receive an scp permission error. The syntax of the command is intuitive and straightforward to use. Follow the given syntax to copy a file to the target location using scp.
scp [OPTION] user@src_host:file1 user@dest_host:file2The OPTIONs are additional options that can be used to perform tasks according to the provided arguments. user@src_host:file1 is the file’s name to be copied prefixed with the username and address of the source host. And user@dest_host:file2 is the name to the resultant file with the specified address prefixed with the target host username and machine address. Use the -r option to copy all the files and subdirectories inside the folder recursively.
The scp permission denied error shows up when the users do not have the required rights or permission to perform a specific operation. Executable permissions are not required on any host while using the scp command. It requires read permissions on the source system and writing permission on the target system. There might be some ownership issue with the file or directory if you are receiving the scp permission denied error.
SCP permission denied ownership issue.
If the remote host’s directory from which the user is trying to copy the file or data is not owned by the username specified in the command, then an SCP permission denied error could be encountered. Follow the given steps to resolve this issue.
- Login into the remost host with admin privileges.
- Change the ownership of the directory to the USER instead of the root.
- Use the chown (change owner) command to change the ownership.
- Now run the scp command again.
Try using –verbose option
The -v or –verbose options are used to provide a detailed output of the program’s working. Use this option with the scp command to wisely observe the problems occurring under the hood and then troubleshoot the scp permission denied problem accordingly.
Use -P to specify the port number
Sometimes hidden or silent processes run on the arbitrary standard ports number on either host. For example, on the remote host, the chosen port number might be used by another process for another connection. Conflicting port numbers can also cause errors. Use the -P option to provide a specific arbitrary port number in such a case. NOTE – keep in mind that an uppercase -P is used to specify the port number while a lowercase -p is used for other purposes related to the original file.

SCP permission denied (publickey)
The SCP permission denied (public key) is an error message that the users are reported to face when they try to login to their AWS EC2 instance while using the passphrase-less authentication protocol such as ssh. The ssh passwordless authentication makes use of asymmetric cryptography to authenticate the user. If you provide the wrong private key to the scp utility, the scp permission denied error occurs. By default, the scp uses the default ssh private key directory to authenticate the user. Use the -i option to provide your specific private key file.

Gcloud scp permission denied
Google provides cloud computing services in many forms. Google Compute Engine is one such way to use googles cloud services. The glcoud is a command-line utility tool that can interact with the cloud server. The cloud compute scp command is used to copy files from a google cloud virtual machine to your local computer. The syntax is almost similar to the SCP command. Complete documentation of the command can be found here.
If you receive an SCP permission error while copying data from your cloud host, then try downloading the content as the root user. Add @root before your destination or target address to resolve this issue.
gcloud compute scp /Users/File.tar root@local_machine:/home/Desktop
FAQs on SCP Permission Denied
Does the SCP utility come pre-installed with Windows?
Yes, it comes pre-installed on windows.
What is the extension of a private key file?
.pem, is the extension for private key files.
What is the shortcut for accessing the home directory in Linux?
~/, can be used in place of /home.
Conclusion
The SCP permission denied is one of the common errors that could happen during the use of SCP utility for copying files from one host to another. This article provided you with complete information regarding the SCP protocol. We discussed some of the ways and methods that could help in the scenario of the permission denied error.
Trending Now
-
The Best Popup Builders in 2025: Boost Engagement and Conversions
●February 22, 2025
-
Fixing Xtools XToolkit Installation Error
by Dharam Nath Jha●March 3, 2023
-
Troubleshoot DeepMotion Preview Not Working: Tips and Tricks
by Dharam Nath Jha●March 3, 2023
-
Getting Virtwifi has No Internet Access? Here’s What to Do!
by Dharam Nath Jha●February 16, 2023
SCP Permission Denied: A Guide to Fixing the Error
SCP, or secure copy, is a command-line utility that allows you to copy files between two computers over a secure connection. It’s a powerful tool that can be used to transfer files between different operating systems, and it’s often used by system administrators to manage files on remote servers.
However, SCP can sometimes be a bit tricky to use, and one of the most common errors that users encounter is the “permission denied” error. This error occurs when you don’t have the correct permissions to copy the file to the destination location.
In this guide, we’ll show you how to fix the SCP permission denied error. We’ll cover the different causes of the error, and we’ll provide step-by-step instructions on how to resolve each one.
By the end of this guide, you’ll be able to use SCP to copy files between computers without any problems.
| Column 1 | Column 2 | Column 3 |
|---|---|---|
| Title | Description | Link |
| SCP Permission Denied Public Key | This error occurs when you try to use SCP to copy files to a remote server, but you do not have the correct permissions to do so. | https://www.ssh.com/ssh/scp/faqpermission-denied-publickey |
| How to Fix SCP Permission Denied Public Key | There are a few ways to fix this error. You can either:
|
https://www.ssh.com/ssh/scp/faqpermission-denied-publickey-how-to-fix |
What is SCP permission denied publickey?
SCP (Secure Copy) is a command-line tool used to securely copy files between two computers over a network. It uses SSH (Secure Shell) to encrypt the data transferred between the two computers, making it a secure way to transfer sensitive files.
When you attempt to use SCP to copy a file to a remote computer, you may receive an error message that says “Permission denied (publickey).” This error message means that the remote computer does not have the public key that you are using to authenticate yourself.
There are a few possible causes for this error message:
- The remote computer does not have your public key.
- The remote computer has your public key, but it is not in the correct location.
- The remote computer is configured to deny access to users who do not have a valid public key.
To fix this error message, you will need to either add your public key to the remote computer or configure the remote computer to allow access to users who do not have a valid public key.
What causes SCP permission denied publickey?
There are a few possible causes for the SCP permission denied publickey error message:
- The remote computer does not have your public key. This is the most common cause of the error message. To fix this, you need to copy your public key to the remote computer. You can do this by using the following command:
ssh-copy-id @
- The remote computer has your public key, but it is not in the correct location. By default, SCP looks for public keys in the `~/.ssh/authorized_keys` file on the remote computer. If your public key is not in this file, SCP will not be able to authenticate you. To fix this, you need to add your public key to the `~/.ssh/authorized_keys` file on the remote computer.
- The remote computer is configured to deny access to users who do not have a valid public key. Some remote computers are configured to deny access to users who do not have a valid public key. If this is the case, you will need to contact the administrator of the remote computer to request access.
To troubleshoot the SCP permission denied publickey error message, you can try the following steps:
1. Check to make sure that you have copied your public key to the remote computer.
2. Check to make sure that your public key is in the correct location on the remote computer.
3. Check to see if the remote computer is configured to deny access to users who do not have a valid public key.
If you are still unable to resolve the error message, you can contact the administrator of the remote computer for assistance.
SCP is a secure copy program that allows you to copy files between two computers over a network. It uses public-key cryptography to encrypt the files during transmission, so that only the intended recipient can decrypt them.
However, sometimes you may encounter the error “Permission denied (publickey)” when trying to use SCP. This error occurs when the remote server does not have the correct public key installed.
To fix this error, you need to add the public key to the authorized_keys file on the remote server. Here are the steps to do this:
1. On the local computer, generate a public and private key pair. You can do this using the following command:
ssh-keygen -t rsa
This will create a file called `id_rsa` in your home directory. This file contains the private key. The public key will be output to the terminal.
2. Copy the public key to the remote server. You can do this using the following command:
ssh-copy-id -i ~/.ssh/id_rsa.pub username@remote_server
Replace `username` with the username of the remote server.
3. Verify that the public key has been added to the authorized_keys file on the remote server. You can do this by running the following command:
cat ~/.ssh/authorized_keys
You should see the public key that you generated in step 1.
Once you have added the public key to the authorized_keys file, you should be able to use SCP without any problems.
Here are some additional tips for troubleshooting SCP permission denied errors:
- Make sure that the remote server is running the SSH daemon. You can check this by running the following command:
ps aux | grep sshd
- Make sure that the remote server is configured to allow passwordless authentication. You can check this by running the following command:
cat /etc/ssh/sshd_config | grep “PasswordAuthentication”
If the value of `PasswordAuthentication` is set to `no`, you will need to set it to `yes`.
- Make sure that the remote server is using the same SSH key algorithm as the local computer. You can check this by running the following command:
ssh -v username@remote_server
The output of this command will show the SSH key algorithm that is being used.
If the SSH key algorithms are not the same, you will need to convert the public key on the local computer to the same algorithm as the remote server. You can do this using the following command:
ssh-keygen -f ~/.ssh/id_rsa -e -m PKCS8 -o ~/.ssh/id_rsa.pkcs8
Once you have converted the public key, you can copy it to the remote server using the following command:
ssh-copy-id -i ~/.ssh/id_rsa.pkcs8 username@remote_server
Prevention of SCP permission denied publickey
There are a few things you can do to prevent SCP permission denied errors:
- Use a strong password. A strong password will make it more difficult for someone to guess your password and gain access to your account.
- Enable two-factor authentication. Two-factor authentication adds an extra layer of security to your account by requiring you to enter a code in addition to your password when you log in.
- Use a firewall. A firewall can help to protect your computer from unauthorized access.
- Keep your software up to date. Software updates often include security patches that can help to protect your computer from vulnerabilities.
- Be careful about what you click on. Phishing emails and websites can be used to trick you into giving away your personal information. Be careful about what you click on and never enter your password on a website that you don’t trust.
By following these tips, you can help to prevent SCP permission denied errors and keep your data safe.
SCP is a powerful tool for transferring files between computers. However, it can sometimes be difficult to troubleshoot permission denied errors. By following the steps in this article, you can learn how to fix SCP permission denied publickey errors and keep your data safe.
Q: What does it mean when I get the error “Permission denied (publickey)” when using SCP?
A: This error means that the remote server is refusing to accept your SSH key. This can happen for a few reasons:
- The remote server does not have your public key. You can fix this by adding your public key to the authorized_keys file on the remote server.
- The remote server is configured to only accept SSH keys from specific users. You can check the sshd_config file on the remote server to see if your user is listed.
- The remote server is configured to use a different SSH key algorithm than the one you are using. You can check the sshd_config file on the remote server to see what algorithm is being used.
Q: How do I add my public key to the authorized_keys file on the remote server?
A: To add your public key to the authorized_keys file on the remote server, you can use the following command:
ssh-copy-id -i ~/.ssh/id_rsa.pub user@remote_host
This will copy your public key from the `~/.ssh/id_rsa.pub` file to the `~/.ssh/authorized_keys` file on the remote server.
Q: How do I check the sshd_config file on the remote server?
A: To check the sshd_config file on the remote server, you can use the following command:
cat /etc/ssh/sshd_config
This will display the contents of the sshd_config file on the remote server.
Q: How do I change the SSH key algorithm on the remote server?
A: To change the SSH key algorithm on the remote server, you can edit the sshd_config file and change the `KexAlgorithms` option. For example, to change the SSH key algorithm to `ecdsa-sha2-nistp256`, you would add the following line to the sshd_config file:
KexAlgorithms ecdsa-sha2-nistp256
After you have made changes to the sshd_config file, you must restart the SSH daemon for the changes to take effect.
Q: What other things can I do to troubleshoot this issue?
A: If you are still having trouble with the “Permission denied (publickey)” error, here are a few other things you can try:
- Check the permissions on your SSH key file. Make sure that the file is owned by you and that it has read and write permissions.
- Try using a different SSH key. If you have multiple SSH keys, try using a different one.
- Try using a different SSH client. If you are using a third-party SSH client, try using the built-in SSH client instead.
- Contact the administrator of the remote server for help. The administrator may be able to help you troubleshoot the issue.
In this blog post, we discussed the common error “scp permission denied publickey” and how to troubleshoot it. We first explained what the error means and why it occurs. Then, we provided several solutions to the problem, including using a different user account, disabling SELinux, and using the -o option. Finally, we gave some tips for preventing the error in the future.
We hope that this blog post has been helpful in resolving your “scp permission denied publickey” issue. If you have any other questions or concerns, please feel free to contact us.
Author Profile
-
Hatch, established in 2011 by Marcus Greenwood, has evolved significantly over the years. Marcus, a seasoned developer, brought a rich background in developing both B2B and consumer software for a diverse range of organizations, including hedge funds and web agencies.
Originally, Hatch was designed to seamlessly merge content management with social networking. We observed that social functionalities were often an afterthought in CMS-driven websites and set out to change that. Hatch was built to be inherently social, ensuring a fully integrated experience for users.
Now, Hatch embarks on a new chapter. While our past was rooted in bridging technical gaps and fostering open-source collaboration, our present and future are focused on unraveling mysteries and answering a myriad of questions. We have expanded our horizons to cover an extensive array of topics and inquiries, delving into the unknown and the unexplored.
Latest entries
In my view “SCP permission denied” error, is the most common error in the world of Linux. So, whether you are Linux admin or newbie, Every one of us would have encountered this error. At least, once in a lifetime, that I can bet.
As a Linux user for many years. I have faced this issue during SCP and SSH operations. So I am sure, if you will land on this page, you will get the solution to all your “permission denied error in Linux”. Below mentioned are the samples of a few errors, you generally encounter. I am sure, at least one of the 9 solutions provided in this post will help you to resolve these issues.

- SCP permission denied
- SCP permission denied (publickey)
- Saving key “.ssh/id_rsa” failed: permission denied when SCP
- SCP permission denied ec2
- SCP permission denied AWS
- SCP permission denied, please try again
- SCP permission denied (publickey gssapi-keyex gssapi-with-mic)
- SCP permission denied (publickey). lost connection
Before explaining anything, Let me tell you all these problems occurs during file copy using SCP. So let’s understand about SCP utility first –
What is SCP file transfer?
SCP stands for Secure copy. This program helps in copying a file or folder between two computers securely, whether local or remote. it uses SSH (secure shell) protocol in background. Additionally, The data and password are encrypted to secure sensitive information.
Using scp, you have option of file or directory copy between –
- Local to the local system
- Remote system to local system
- Local system to remote system
- Local system to AWS EC2 instance
How do you SCP?
There are a lot of options and switches to use with SCP command. Let me show you some basic commands, just to give you some understanding of SCP.
SCP syntax:-
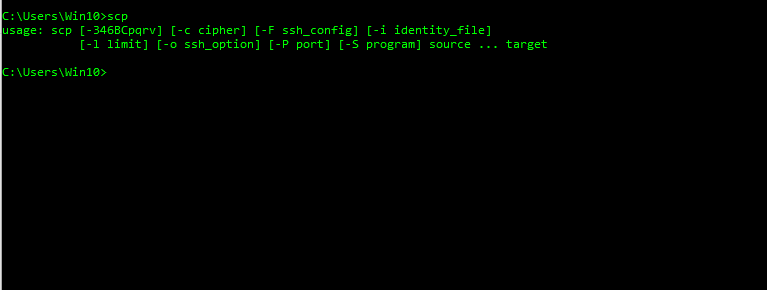
$ scp [-346BCpqrTv] [-c cipher] [-F ssh_config] [-i identity_file]
[-l limit] [-o ssh_option] [-P port] [-S program]
[[user@]host1:]file1 … [[user@]host2:]file2
- Visit scp man page for more information on options or syntax.
$ man scp
How to Copy local files to remote host with SCP
$ scp file user@host:path
Host :- can be IP address or hostname of remote system
: (colon) :- helps scp to identify remote host
Username:- on remote host
SSH key or password :- is required to copy file using scp
Path :- Absolute or relative path for local file or directory
For example –
$ scp test.txt user1@ubuntu:/tmp
Copy Remote file to local host
$ scp user@host:file path
How to Copy directories to local host using SCP
$ scp -r user@host:directory_path path
Copy file between two remote hosts
$ scp user1@host1:file1.txt user2@host1:directory_path
Now when you know, what are basic scp commands. Time to know about public key authentication-
SCP requires a password to authenticate to the remote system. But in case you want to avoid it or using SCP in scripts, Public key is required.
Basically, you generate a public-private key pair on the client (local) and copy the public key to a remote system (server) into the authorized key.
To make you understand scp commands easily, i have shared my LAB details
Lab setup details –
Local server name – Server1 (Ubuntu 18.04)
Remote server name – Server2 (Ubuntu 20.04)
Source file – /test/file1.txt
Target directory – /remote-test
username – dev

Scenario1-
I am trying to copy /test/file1.txt from server1 (local) to server2 (remote) in /remote-test directory. I am also getting permission denied.
$ scp "local-file" "user@remote-host:/path-to-remote-dir"
Reference output


To resolve these error – perform below mentioned steps-
Solution 1 :- Double check your user and password
Please make sure, you have mentioned correct username and password in the command. This is one of the very basic mistakes, we do. So, you can try writing your password in notepad, copy and paste it in command prompt. When asked during SCP command.
i have validated username and password is correct in my case.
Solution 2 :- Check for remote path
Make sure, the path you have mentioned as the remote directory is correct. For example, in my case /remote-test is the remote directory and it’s correct.
Solution 3 :- Check for Read write access on remote directory
Double-check, whether your user mentioned in command have read-write (RW) access on the remote directory. For example, in my case “/remote-dir” must-have RW access to user “dev“.
Follow these steps to check –
-> Login to remote system (server2)
-> Run “ls” -ld command to check permissions of /remote-dir.
$ ls -ld "your-remote-dir"
Reference output

So, if you will see in image, /remote-dir only allows read, write and execute (rwx) permission to root user only. For group and others, it has read and execute (r-x) permission. So my user “dev” will be treated as other, and it won’t be able to write. As a result, I am getting SCP permission denied error.
-> Now to resolve this error, assign Read-write-execute (rwx) permission to everyone.
$ sudo chmod 777 "path-to-your-remote-directory"
Reference output

-> Run scp command again

Warning
Setting 777 permission on any directory is not secure. So once you are able to isolate the “SCP permission denied” issue. Either change ownership and set permission to 755.
If you are still facing permission denied error, move to next step
Solution 4 :- ownership issues (directory should be owned by user)
-> Login to your remote system (server2)
-> Change ownership of your remote directory for your user. For example, I will change ownership of /remote-dir to my user “dev” instead of “root“.
$ sudo chown -R dev:dev "path to your remote directory"
Reference output

-> Run scp command and it must work for you

Solution 5 :- Diagnose problem with scp -v command
Try to use -v (verbose) option to diagnose the issue with scp command.
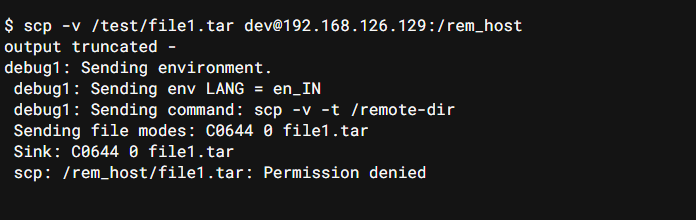
For example
$ scp -v /test/file1.txt dev@192.168.126.129:/remote-dir
output truncated -
debug1: Sending environment.
 debug1: Sending env LANG = en_IN
 debug1: Sending command: scp -v -t /remote-dir
 Sending file modes: C0644 0 file1.txt
 Sink: C0644 0 file1.txt
 scp: /remote-dir/file1.txt: Permission denied
Check message after scp -v -t command, if it shows permission denied, Follow solution 3 or 4 as described in the post. it will resolve your issue.

Solution 6 :- Validate option -P is used for port not -p
When running SCP command Option -P is used to mention custom port, in case default port TCP 22 is not used. Sometimes, instead of -P, we use -p (lowercase) by mistake. For better understanding let me tell you the difference between these two –
- -p (lowercase):- Preserve access, modification and modes from the original file.
- -P (uppercase):- Specified customize port to connect remote host.
For example port 2314 is custom port instead of 22.
$ scp -P 2314 dev@192.168.126.129:/remote-dir/file1.txt /test/
SCP permission denied (publickey) – AWS EC2 instance

Scenario 2-
Try below mentioned solution, in case of SCP permission denied (publickey) with AWS ec2 instance –
If you have set up password-less authentication or you have permission key with you to authenticate remote system, you may encounter this error.
Have a check from Solution 1-6 mentioned in the post, if it doesn’t help move further –
Solution 7 :- Use -i option and provide “.pem” private key always
When you use SCP and don’t use -i option. It uses default ssh key under (~/.ssh/) directory. So always use -i option and provide the path to “.pem” key file.
For example “ubuntu.pem” is key file in my case.
$ scp -i ~/Desktop/ubuntu.pem ~/Desktop/test/code/www/index.html dev2@server:/var/wwwSolution 8 :- if using permission key SSH is working but not SCP
If you are able to ssh to the remote host using -i option and not able to scp. It means you are hitting a bug.
So instead of using -i “path to .pem file”
$ scp -i ~/Desktop/ubuntu.pem ~/Desktop/test/code/www/index.html dev@server2:/var/wwwuse -o "IdentityFile" option.
$ scp -o IdentityFile ~/Desktop/ubuntu.pem ~/Desktop/test/code/www/index.html dev@server2:/var/wwwSolution 9 :- Try removing your host entry from “known_hosts” file
Sometime, there may be issue due to old or incorrect host key. Delete that particular host from know_hosts file using editor or command as follows.
$ ssh-keygen -R hostname

or

$ vim ~/.ssh/known_hosts
Frequently Asked Questions (FAQ’s)

Can ssh but not SCP permission denied?
Answer
Run SCP command -vv option and try to debug the issue. Depending upon error, follow solution 1-9 mentioned in this post to resolve your issue.
Will SCP overwrite existing file?
Answer
Yes, SCP utility finds a file with the same name on target, and you have write permission on it. SCP command will overwrite it. You can change the permission of the target file or directory. So that SCP complaints about permission issue and can avoid overwriting. Alternatively, you can use rsync tool, which has a lot of options to sync data.
Does SCP copy or move?
Answer
SCP mean secure copy, as name suggest it only copy files or directories. There is no file movement occurs.
Why SCP is not working?
Answer
There may be many reasons if SCP is not working. check SCP “-vvv” option and try to debug, why it’s not working. I have given 9 solutions to tackle different permission denied errors. you can refer to them.
How do I know if SCP is working?
Answer
if the exit status of your command is “0 ” and you are able to copy your file or directory to remote host or AWS EC2 instance. You can be assured, SCP is working.
Why is permission denied error in Linux?
Answer
A lot of scenarios may be there for “permission denied error in Linux“. For example, if you don’t have read-write access on file or directory. Also, if you are trying to run a command which only root can run. You would need either root or sudo access to run these commands. For example, chmod or chown is one of these commands.
Video tutorial
If you need some video guidance. Check out this video on “SCP permission denied error“, The basic or common troubleshooting to start with.
Conclusion
There is no limit to issues or errors when you are in the technical world or on the way of learning. But I think your question on “why am I getting permission denied with SCP” will be resolved, once you will read the solution mentioned in this post. One or other solution will resolve your issue depending upon error code.
I hope you will leave with smile on your face, once your permission denied issue during scp will get resolve.
See you soon in the next post. Till that time keep learning.
When you encounter a “SCP permission denied” error while working with the SCP (Secure Copy) command, it typically means that you don’t have the necessary permissions to access or copy the specified file or directory.
Causes and fixes for the SCP permission denied error
Verify the file permissions
Permissions can cause issues when trying to use SCP (Secure Copy). SCP relies on the underlying SSH protocol for authentication and file transfer, which means that the permissions on the source file or directory, as well as the permissions on the destination directory, can affect the successful execution of the SCP command.
Here are a few scenarios where permissions can cause problems:
- Insufficient read permissions on the source file: If the user running the SCP command does not have read permissions on the source file, the SCP operation will fail with a permission denied error. Ensure that the user has appropriate read permissions on the file you are trying to copy.
- Insufficient write permissions on the destination directory: If the user does not have write permissions on the destination directory, the SCP command won’t be able to create or write the copied file in that directory. Ensure that the user has the necessary write permissions on the destination directory.
- Restricted access due to ownership and group settings: The ownership and group settings of the source file and the destination directory can also impact SCP. If the file or directory is owned by a different user or group, and the user running SCP does not have the appropriate permissions, the SCP operation will be denied. In such cases, you may need to adjust the ownership or group settings using commands like chown or chgrp.
To overcome these permission-related issues, you need to ensure that the user running the SCP command has the necessary permissions to read the source file and write to the destination directory. Checking and adjusting the permissions and ownership settings of the files and directories involved can help resolve permission denied errors during SCP.
Use the correct username and password
Ensure that you are using the correct username and password for the remote server. If you are copying files to a different user’s directory, you might need to provide appropriate credentials.
Check the ownership and group
Incorrect ownership of files or directories can cause issues when trying to use SCP (Secure Copy). The ownership of the source file or directory, as well as the ownership of the destination directory, can affect the successful execution of the SCP command.
Here’s how incorrect ownership can cause problems:
- Source file ownership: If the source file you are trying to copy is owned by a different user or a different group, and the user running the SCP command does not have sufficient permissions to access that file, the SCP operation will fail. The user needs appropriate read permissions on the file to be able to copy it.
- Destination directory ownership: If the destination directory on the remote server is owned by a different user or a different group, and the user running the SCP command does not have sufficient permissions to write to that directory, the SCP operation will fail. The user needs appropriate write permissions on the destination directory to be able to copy the file into it.
To resolve ownership-related issues during SCP:
- Ensure that the user running the SCP command has the necessary permissions on the source file and the destination directory. This may involve adjusting the ownership using the chown command to make sure the user running SCP has the appropriate ownership of the files and directories involved.
- If you don’t have administrative access or the necessary permissions to adjust ownership, you may need to coordinate with the owner of the file or the system administrator to grant you the required access or have them perform the SCP operation on your behalf.
It’s important to ensure that the user running the SCP command has the correct ownership permissions for both the source and destination to avoid permission denied errors or other issues during the SCP process.
Verify the destination directory
Ensure that the destination directory exists and that you have the necessary permissions to write to it. If the directory doesn’t exist, you can create it using the mkdir command. Note that SCP can transfer directories just like files. Make sure to use the -r option (recursive).
Use the appropriate SCP syntax
Double-check that you are using the correct syntax for the SCP command. The general format is scp [options] source_file destination, where the source file can be a local file or a remote file and the destination can be a local path or a remote location.
The correct syntax for using the SCP (Secure Copy) command is as follows:
scp [options] source_file destinationHere’s a breakdown of each component:
- scp: The command itself that invokes the SCP utility.
- [options]: Optional flags that modify the behavior of the SCP command. Some commonly used options include:
- -r: Recursively copy directories and their contents.
- -p: Preserve the file attributes (permissions, timestamps, etc.) during the copy.
- -v: Verbose mode, which provides detailed output during the copy process.
- -i identity_file: Specify the identity file (private key) to use for authentication.
- source_file: The file or directory you want to copy. This can be a local file or a remote file specified using the SSH syntax (user@host:file).
- destination: The destination path where the file or directory will be copied. This can be a local directory or a remote location specified using the SSH syntax (user@host:directory).
Here are a few examples to illustrate the usage:
Copy a local file to a remote server:
scp /path/to/local/file.txt user@remote:/path/on/remote/Copy a remote file to the local machine:
scp user@remote:/path/to/remote/file.txt /path/on/local/Copy a directory and its contents recursively to a remote server:
scp -r /path/to/local/directory/ user@remote:/path/on/remote/Remember to replace the placeholders (user, remote, /path/to/, etc.) with the appropriate values specific to your situation. SCP can be used for directories as well.
Use SSH key authentication
If you have SSH key authentication set up, try using it instead of a password. This can help bypass any permission-related issues. You can generate an SSH key pair using the ssh-keygen command and copy the public key to the remote server using ssh-copy-id.
If none of these steps resolve the issue, it’s possible that you don’t have sufficient privileges or there might be additional restrictions in place. In such cases, you may need to contact the system administrator or the owner of the remote server for further assistance.
To set up SSH keys for authentication, follow these steps:
Generate SSH key pair: On your local machine, open a terminal and run the following command to generate a new SSH key pair:
ssh-keygen -t rsa -b 4096 -C "your_email@example.com"You can replace “your_email@example.com” with your actual email address. Press Enter to accept the default file location and enter a passphrase (optional) to provide an extra layer of security.
Copy the public key to the remote server: Use the ssh-copy-id command to copy your public key to the remote server. Replace user and remote with the appropriate values for your situation:
ssh-copy-id user@remoteEnter the password for the remote user when prompted. This command will copy your public key to the remote server and add it to the authorized_keys file, allowing you to authenticate using the corresponding private key.
If the ssh-copy-id command is not available on your system, you can manually copy the public key to the remote server. The public key is stored in a file with the same name as your private key but with a .pub extension. Use an appropriate method like SCP or manual copy-pasting to transfer the public key file to the remote server.
Test SSH key authentication: Once the public key is copied to the remote server, you can test SSH key authentication by running:
ssh user@remoteIf everything is set up correctly, you should be logged in without being prompted for a password.
By setting up SSH keys, you eliminate the need to enter a password every time you connect to the remote server, while still maintaining a secure authentication mechanism.
Conclusion about SCP permission denied
The most common causes of the SCP permission denied error when using SCP are:
Insufficient file or directory permissions: This occurs when the user executing the SCP command does not have the necessary permissions to read the source file or write to the destination directory. It could be due to the file being owned by a different user or having restrictive permissions that prevent access. Additionally, if you are copying files to a remote server, you might encounter permission issues if you are not using the correct credentials or if the server’s configuration restricts access.
Ownership and group issues: If the file or directory you are attempting to copy has incorrect ownership or group settings, it can result in permission denied errors. If the file is owned by another user or a different group, and you don’t have the appropriate privileges, you won’t be able to access or copy it.
While the causes of the permission denied error can be straightforward, solving them may vary in difficulty depending on the specific situation. Some cases can be easily resolved by adjusting the file or directory permissions using commands like chmod or chown. Others may require administrative access or coordination with the server’s owner or system administrator to address any access restrictions or ownership issues. The same issue can happen in SFTP or FTPS. It’s important to carefully analyze the error message, check the permissions and ownership of the files involved, and make the necessary adjustments to resolve the permission denied error.