
В Windows 10 и Windows Server 2019 появился встроенный SSH клиент, который вы можете использовать для подключения к *Nix серверам, ESXi хостам и другим устройствам по защищенному протоколу, вместо Putty, MTPuTTY или других сторонних SSH клиентов. Встроенный SSH клиент Windows основан на порте OpenSSH и предустановлен в ОС, начиная с Windows 10 1809.
Содержание:
- Установка клиента OpenSSH в Windows 10
- Как использовать SSH клиенте в Windows 10?
- SCP: копирование файлов из/в Windows через SSH
Установка клиента OpenSSH в Windows 10
Клиент OpenSSH входит в состав Features on Demand Windows 10 (как и RSAT). Клиент SSH установлен по умолчанию в Windows Server 2019 и Windows 10 1809 и более новых билдах.
Проверьте, что SSH клиент установлен:
Get-WindowsCapability -Online | ? Name -like 'OpenSSH.Client*'

В нашем примере клиент OpenSSH установлен (статус: State: Installed).
Если SSH клиент отсутствует (State: Not Present), его можно установить:
- С помощью команды PowerShell:
Add-WindowsCapability -Online -Name OpenSSH.Client* - С помощью DISM:
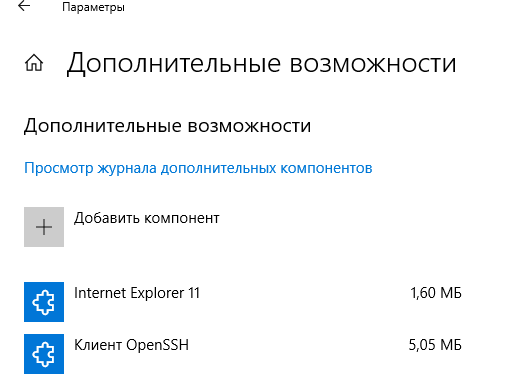
dism /Online /Add-Capability /CapabilityName:OpenSSH.Client~~~~0.0.1.0 - Через Параметры -> Приложения -> Дополнительные возможности -> Добавить компонент. Найдите в списке Клиент OpenSSH и нажмите кнопку Установить.
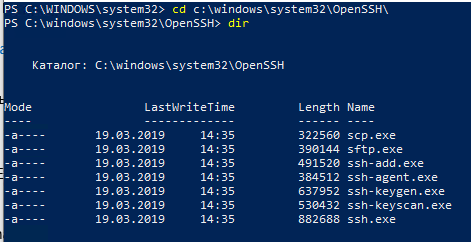
]Бинарные файлы OpenSSH находятся в каталоге c:\windows\system32\OpenSSH\.
- ssh.exe – это исполняемый файл клиента SSH;
- scp.exe – утилита для копирования файлов в SSH сессии;
- ssh-keygen.exe – утилита для генерации ключей аутентификации;
- ssh-agent.exe – используется для управления ключами;
- ssh-add.exe – добавление ключа в базу ssh-агента.
Вы можете установить OpenSSH и в предыдущих версиях Windows – просто скачайте и установите Win32-OpenSSH с GitHub (есть пример в статье “Настройка SSH FTP в Windows”).
Как использовать SSH клиенте в Windows 10?
Чтобы запустить SSH клиент, запустите командную строку
PowerShell
или
cmd.exe
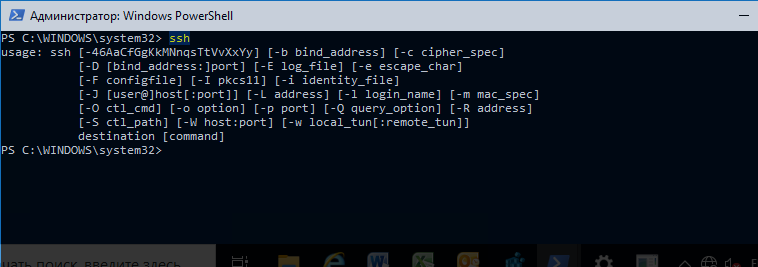
. Выведите доступные параметры и синтаксис утилиты ssh.exe, набрав команду:
ssh
usage: ssh [-46AaCfGgKkMNnqsTtVvXxYy] [-b bind_address] [-c cipher_spec]
[-D [bind_address:]port] [-E log_file] [-e escape_char]
[-F configfile] [-I pkcs11] [-i identity_file]
[-J [user@]host[:port]] [-L address] [-l login_name] [-m mac_spec]
[-O ctl_cmd] [-o option] [-p port] [-Q query_option] [-R address]
[-S ctl_path] [-W host:port] [-w local_tun[:remote_tun]]
destination [command]
Для подключения к удаленному серверу по SSH используется команда:
ssh username@host
Если SSH сервер запущен на нестандартном порту, отличном от TCP/22, можно указать номер порта:
ssh username@host -p port
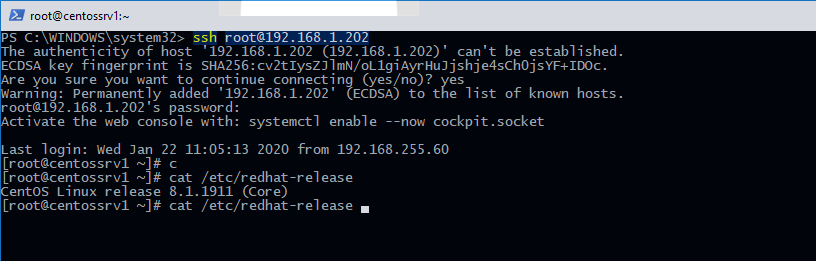
Например, чтобы подключиться к Linux хосту с IP адресом 192.168.1.202 под root, выполните:
ssh [email protected]
При первом подключении появится запрос на добавление ключа хоста в доверенные, наберите yes -> Enter (при этом отпечаток ключа хоста добавляется в файл C:\Users\username\.ssh\known_hosts).
Затем появится запрос пароля указанной учетной записи, укажите пароль root, после чего должна открытся консоль удаленного Linux сервера (в моем примере на удаленном сервере установлен CentOS 8).
С помощью SSH вы можете подключаться не только к *Nix подобным ОС, но и к Windows. В одной из предыдущих статей мы показали, как настроить OpenSSH сервер на Windows 10 и подключиться к нему с другого компьютера Windows с помощью SSH клиента.
Если вы используете SSH аутентификацию по RSA ключам (см. пример с настройкой SSH аутентификации по ключам в Windows), вы можете указать путь к файлу с закрытым ключом в клиенте SSH так:
ssh [email protected] -i "C:\Users\username\.ssh\id_rsa"
Также вы можете добавить ваш закрытый ключ в SSH-Agent. Сначала нужно включить службу ssh-agent и настроить ее автозапуск:
set-service ssh-agent StartupType ‘Automatic’
Start-Service ssh-agent
Добавим ваш закрытый ключ в базу ssh-agent:
ssh-add "C:\Users\username\.ssh\id_rsa"
Теперь вы можете подключиться к серверу по SSH без указания пути к RSA ключу, он будет использоваться автоматически. Пароль для подключения не запрашивается (если только вы не защитили ваш RSA ключ отдельным паролем):
ssh [email protected]
Еще несколько полезных аргументов SSH:
-
-C
– сжимать трафик между клиентом и сервером (полезно на медленных и нестабильных подключениях); -
-v
– вывод подробной информации обо всех действия клиента ssh; -
-R
/
-L
– можно использовать для проброса портов через SSH туннель.
SCP: копирование файлов из/в Windows через SSH
С помощью утилиты scp.exe, которая входит в состав пакета клиента SSH, вы можете скопировать файл с вашего компьютера на SSH сервер:
scp.exe "E:\ISO\CentOS-8.1.1911-x86_64.iso" [email protected]:/home

Можно рекурсивно скопировать все содержимое каталога:
scp -r E:\ISO\ [email protected]:/home
И наоборот, вы можете скопировать файл с удаленного сервера на ваш компьютер:
scp.exe [email protected]:/home/CentOS-8.1.1911-x86_64.iso e:\tmp
Если вы настроите аутентификацию по RSA ключам, то при копировании файлов не будет появляться запрос на ввод пароля для подключения к SSH серверу. Это удобно, когда вам нужно настроить автоматическое копирование файлов по расписанию.
Итак, теперь вы можете прямо из Windows 10 подключаться к SSH серверам, копировать файлы с помощью scp без установки сторонних приложений и утилит.
In this tutorial, you will learn how to use the scp command to securely copy files and directories between local and remote systems using SSH.
In This Tutorial
- System Requirements for SCP
- SCP Command Syntax
- Examples: Copying Files from Local to Remote
- Examples: Copying Files from Remote to Local
- Copying Directories
- Copying Between Two Remote Servers
- Using an Identity File (Private Key)
System Requirements for SCP
Local Computer:
- The
scpcommand relies on the SSH protocol. - On the local computer where you’re running the
scpcommand, only an SSH client is needed. - Linux, macOS, and Windows all come with the
scpcommand installed by default.
Remote Computer:
- However, on the remote server side you need
OpenSSH serverto accept incoming SSH connections. - So the OpenSSH server must be running on the remote computer.
If your Linux system doesn’t have an SSH server, click this link for instructions on how to install the OpenSSH Server.
You can install the OpenSSH Server on Windows as well.
SCP Command Syntax
The basic syntax of the scp command looks like this:
scp [options] source destination- The source is the file or folder you want to copy.
- The destination is where you want to copy it to.
Command Options:
-r: Recursively copy directories.-P port: Specifies the port number to connect to on the remote host (if it’s not the default port 22).-i identity_file: Specifies the private key file to use for authentication.
Remote Path Format
When specifying a remote source or destination, the format is as follows:
user_name@IP-Address:pathExample:
[email protected]:/var/www/The user@ portion is optional if your local username is the same as the remote username. If it’s missing, the scp command will use your local user account name.
Examples: Copying Files from Local to Remote
Copy file1.txt from the local computer to the /tmp directory on the remote server at 192.168.1.10:
scp file1.txt [email protected]:/tmp/Copy file1.txt and file2.txt to the remote server at the same time:
scp file1.txt file2.txt [email protected]:/tmp/Examples: Copying Files from Remote to Local
Download /etc/passwd from the remote computer and save it in the C:\data\ folder on your Windows computer:
scp [email protected]:/etc/passwd C:\data\Download multiple files at once from the remote server:
scp [email protected]:/tmp/file1.txt /tmp/file2.txt /backup/Note: The above syntax for downloading multiple remote files might not work as expected in the Windows version of the scp command. It works in a Linux Bash shell.
Copying Directories
When copying a directory, you must use the -r option to copy all files and sub-directories recursively.
Examples:
scp -r /var/www/ [email protected]:/tmp/
scp -r [email protected]:/var/www/ /backup
Copying Between Two Remote Servers
It’s also possible to copy files between two remote computers using scp, but the data is transferred through your local machine.
Example:
scp -r [email protected]:/var/www/ [email protected]:/backup/Using an Identity File (Private Key)
And the last example we’ll look at is how to copy files using an identity file or private key, if you’re using passwordless authentication.
The command option to specify the identity file is -i.
scp -r -i srv01.pem [email protected]:/var/www/ /backup/And that concludes this tutorial on the Linux scp command. If you found it helpful, subscribe to @RealClearComputing for more Linux tutorials.
The `scp` command, which stands for secure copy protocol, is used in Windows Command Prompt to securely transfer files between a local and a remote host over SSH.
Here’s an example of the syntax for using `scp` to copy a file from your local machine to a remote server:
scp C:\path\to\local\file.txt username@remote_host:/path/to/remote/directory/
Setting Up SCP on Windows
Prerequisites
Installing OpenSSH on Windows
To use SCP in Windows CMD, you need to have OpenSSH installed. Follow these steps:
- Open Settings.
- Navigate to Apps > Optional features.
- Click on Add a feature.
- Search for OpenSSH Client and click on Install.
- Confirm the installation and wait for it to finish. Once installed, you’re ready to use SCP.
Ensuring SSH Client is Enabled
To confirm that the SSH Client is enabled:
- Open Control Panel.
- Go to Programs > Turn Windows features on or off.
- Check whether OpenSSH Client is listed and ticked. If not, check it and click OK to enable it.
Utilizing Windows CMD
Opening Command Prompt
To execute SCP commands, you need to access the Windows Command Prompt:
- Press `Win + X` to open the quick access menu.
- Select Windows Terminal (Admin) or Command Prompt (Admin) to ensure you have the necessary permissions for file transfers.
Mastering SSH in Windows Cmd: A Quick How-To Guide
Understanding SCP Syntax
Basic Syntax Structure
The SCP command format is crucial for understanding how to use it effectively. The general syntax follows this structure:
scp [options] [source] [destination]
In this format:
- [options]: Additional flags to modify behavior.
- [source]: The file or directory you want to copy.
- [destination]: Where you want to copy the file or directory to.
Breaking Down the Components
Options
Common options include:
- `-r`: Use this flag to copy directories recursively.
- `-P`: Specify a port when connecting to SSH.
Source
The source can be a local file (on your machine) or a remote file (on another machine) following the pattern `user@host:/path/to/file`.
Destination
Similar to the source, the destination can be a local path or a remote path, adapting the same user and host format.
List in Windows Cmd: Quick and Easy Commands Explained
Executing SCP Commands
Copying Files from Local to Remote
To transfer a file from your local machine to a remote host, you can use the following command:
scp C:\path\to\file.txt user@remote_host:/remote/path/
In this command:
- `C:\path\to\file.txt` is your source file.
- `user@remote_host:/remote/path/` specifies the user and host you’re transferring the file to.
Copying Files from Remote to Local
To copy a file from a remote server to your local machine, the command is slightly adjusted:
scp user@remote_host:/remote/path/file.txt C:\path\to\
Here:
- The source is now the remote file, and the destination is your local path.
Copying Directories Recursively
If you need to transfer a directory and all its contents, include the `-r` option:
scp -r C:\path\to\folder user@remote_host:/remote/path/
This command ensures that not just the folder, but all its nested files and directories are copied.
Port Specification
If the SSH server is running on a non-standard port (not 22), you can specify this with the `-P` option:
scp -P port_number C:\path\to\file.txt user@remote_host:/remote/path/
Replace `port_number` with the actual port when connecting to the server.
Mastering Pwd in Windows Cmd: Your Quick Reference Guide
Advanced SCP Usage
Using Identity Files
For added security, you may want to use SSH keys for authentication. If you have a private key, the command looks like this:
scp -i C:\path\to\key_file user@remote_host:/file/path /local/destination
This ensures that your key is used for connection without needing to input a password.
Batch Transfers
To copy multiple files matching a certain pattern, you can utilize wildcards:
scp C:\path\to\*.txt user@remote_host:/remote/path/
This command transfers all `.txt` files from your specified directory to the remote location.
Using Verbose Mode
If you encounter issues or want to see more information during the transfer, use the `-v` option:
scp -v C:\path\to\file.txt user@remote_host:/remote/path/
The verbose output will provide insights into the connection process and potential issues you may face.
Repair Windows Cmd: Quick Fixes and Tips
Troubleshooting Common Issues
Authentication Errors
One of the most common problems is authentication errors. These typically occur due to incorrect username/password combinations or SSH key setups. Ensure that your credentials are accurate, and if using a key, ensure it is correctly referenced.
Connectivity Problems
If you experience connectivity issues, check your network connection. You can also use the `ping` command to verify the connectivity with the remote host.
Permissions Problems
Permission denied errors are common when your user does not have write access to the destination folder. Ensure you have the right permissions on the remote server to avoid this issue.
Sleep Windows Cmd: Mastering Sleep Commands in Cmd
Conclusion
SCP in Windows CMD is a robust and versatile tool for transferring files securely between machines. With the proper setup and understanding of commands, it opens many possibilities for efficient file management across networks. By mastering these commands, you can enjoy streamlined file transfers while maintaining strong security protocols. With practice, you’ll find SCP is a vital addition to your toolkit for remote work.
Lock Windows Cmd: A Quick Guide to Securing Your Commands
Additional Resources
For those looking to deepen their understanding, consider browsing the official OpenSSH documentation or searching for tutorial videos that can guide you through various use-case scenarios.
pscp / scp is the keyword when wanting to copy files from Windows to Linux and vice versa.
How to use
example
Linux to Windows
scp /home/ubuntu/myfile.txt username@IP_of_windows_machine:/C:/Users/Admin/Desktop
Windows to Linux
scp C:\Users\Admin\Desktop\myfile.txt username@IP_of_linux_machine:/home/ubuntu
Instead of ip the hostname can be used as well
PSCP
PSCP usually comes with the popular ssh client Putty and is used to copy files via the command line interface from one machine to another.
Quick example
Windows to Linux
pscp C:\Users\Name\Downloads\myfile.txt username_linux_machine@ip_of_linux_machine:/home/ubuntu
Linux to Windows
pscp username_linux_machine@ip_of_linux_machine:/home/ubuntu/myfile.txt C:\Users\Name\Downloads
Set up
1. Download pscp.exe [1]
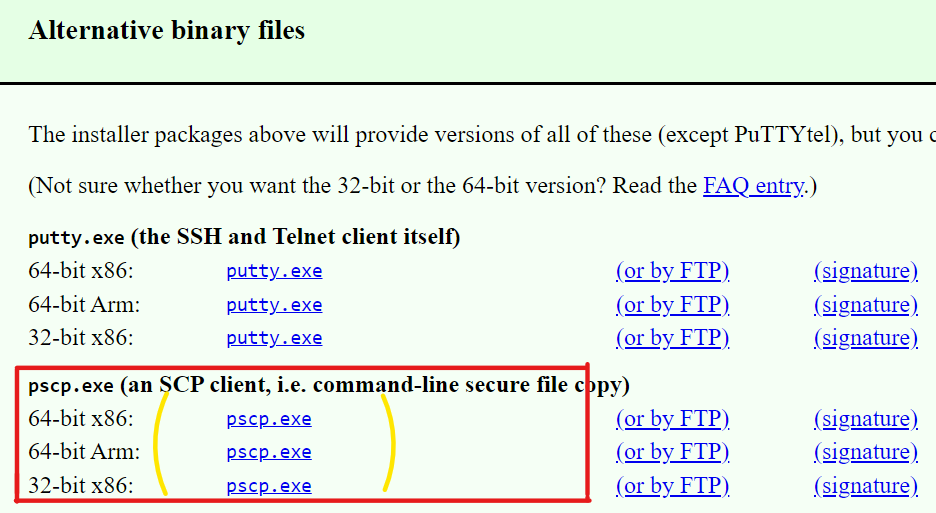
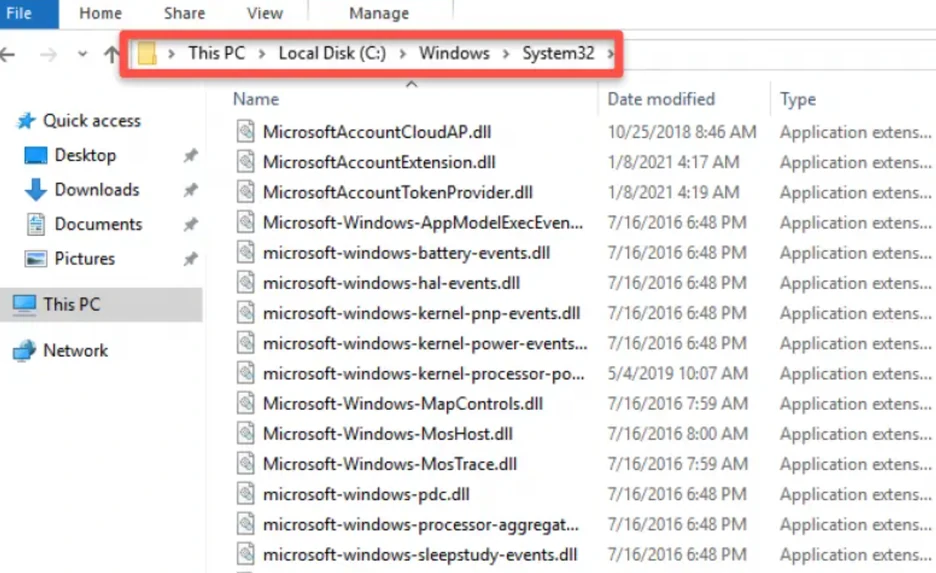
2. copy pscp.exe executable to system32 folder
copy the pscp.exe executable to the system32 directory of your windows machine. This folder normally exists in C:\Windows\System32 path.
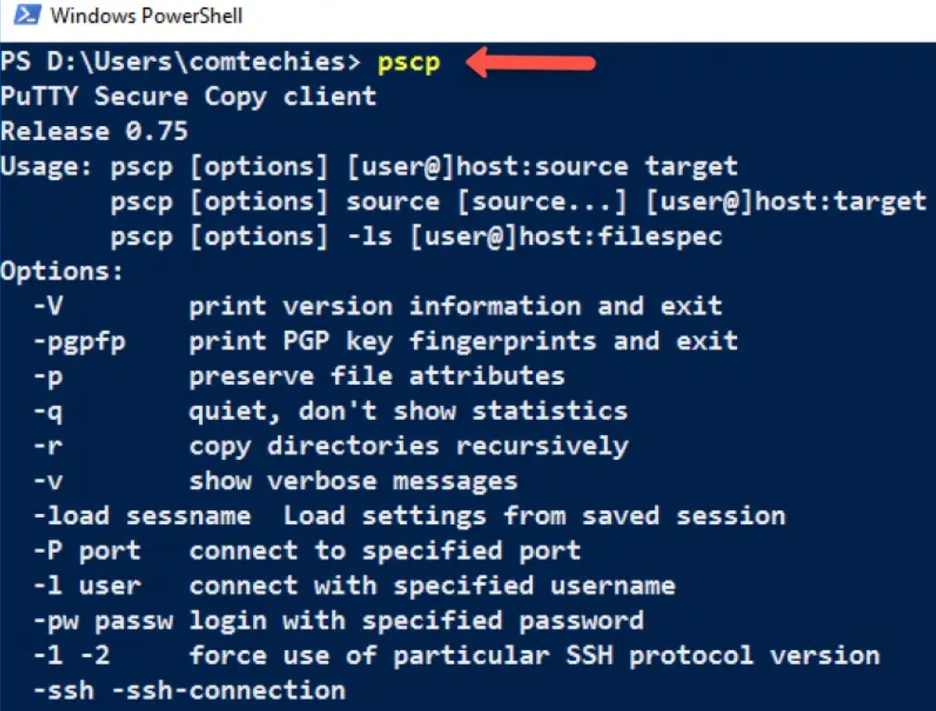
3. Verify with PowerShell
Open Windows PowerShell and use the following command to verify if pscp is accessible from the path.
You should see the following output.
4. Copy file
From Windows to Linux
Use the following format to copy the single file from Windows to the Linux box.
pscp -pw password C:\Users\Admin\Desktop\test.txt \user@192.168.33.10:/home/JohnDoe
From Linux to Windows
pscp -pw password user@192.168.33.10:/path/to/file \C:\Users\Admin\Desktop\
Explanation of the command:
-pwfor the password.- Replace
passwordwith the Linux user password. C:\Users\Admin\Desktop\test.txtrepresents the path of the file that has to be copied to the Linux system.192.168.33.10is the IP of the Linux server./home/vagrantis the user-accessible path in the Linux system to copy the file.
Copy all files of a folder:
If you want to copy all the files in a directory to Linux, you need to add a star (*) to the folder. eg. folder\*
pscp -pw password C:\Users\Admin\Desktop\folder\* \user@192.168.33.10:/home/JohnDoe
When you are working on the multiple servers, copying files between two servers is a common task for any system administrator. In this case, the SCP utility is the best choice for any system administrator.
SCP stands for “Secure Copy Protocol” is a Linux command-line tool used to transfer files and directories securely between two servers.
By default, GUI mode is not installed in Linux servers. SCP utility makes it easier for Linux system administrator to manage the multiple servers from the command-line.
SCP utility is based on the SSH, as so you will need a username and password of the source and target system to transfer the files.
In this tutorial, we will show you how to transfer files and directories between two systems using SCP file transfers!
Basic Syntax
The basic syntax of the scp command is shown below:
scp [OPTION] local-file-or-directory user@remote-ip:/directory/
You can use the above command to transfer files and directories from a local system to remote system.
scp [OPTION] user@remote-ip:/remote-file /local-directory
You can use the above command to transfer files and directories from a remote system to local system.
scp [OPTION] user@remote-ip:/directory/ user@remote-ip:/directory/
You can use the above command to transfer files and directories from one remote system to another remote system.
A brief explanation of each option in SCP command are shown below:
*Note: all these options are Case sensitive!
- -r
This option will copy files and directories recursively. - -v
This option will display verbose output during the copying process. - -P
This option is used to specify the ssh port number of the target host when the target host using the different SSH port. - -l
This option is used to limit the bandwidth while copying the files and directories. - -q
This option skips the SSH warning message. - -p
This option will preserve permissions, modes and access time of files while copying. - -i
This option is used to specify the SSH private key.
Transfer Files and Directories with SCP in Linux
The SCP utility allows you to transfer files between, local to remote, remote to local and remote to remote systems.
In this section we will show you how to transfer files and directories between them.
Local to Remote System Transfers:
Local to Remote File Transfers:
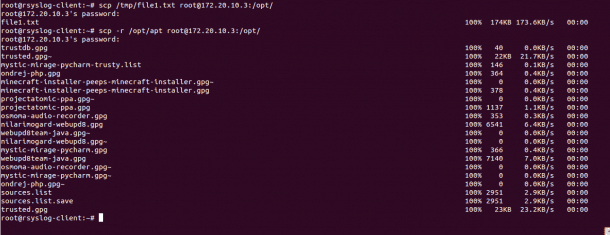
To transfer a file named file1.txt located inside /tmp directory from a local system to the remote system directory /opt use the following command:
scp /tmp/file1.txt root@172.20.10.3:/opt/
You will be asked to provide remote system’s root user password to transfer the file as shown below:
root@172.20.10.3's password:

file1.txt                                                                                                    100%  174KB 173.6KB/s   00:00
You can use the option -v with SCP to see the verbose output during the file transfer:
scp -v /tmp/file1.txt root@172.20.10.3:/opt/
Local to Remote Directories/Folders Transfers:
To transfer a directory named apt located inside /opt from a local system to the remote system directory /opt recursively use the following command:
scp -r /opt/apt root@172.20.10.3:/opt/
Provide remote system’s root user password to transfer the directory as shown below:
trustdb.gpg                                                                                                  100%   40     0.0KB/s   00:00

trusted.gpg~                                                                                                 100%   22KB  21.7KB/s   00:00

mystic-mirage-pycharm-trusty.list                                                                            100%  146     0.1KB/s   00:00

ondrej-php.gpg                                                                                               100%  364     0.4KB/s   00:00

minecraft-installer-peeps-minecraft-installer.gpg~                                                           100%    0     0.0KB/s   00:00

minecraft-installer-peeps-minecraft-installer.gpg                                                            100%  378     0.4KB/s   00:00

projectatomic-ppa.gpg~                                                                                       100%    0     0.0KB/s   00:00

projectatomic-ppa.gpg                                                                                        100% 1137     1.1KB/s   00:00

osmoma-audio-recorder.gpg                                                                                    100%  353     0.3KB/s   00:00

nilarimogard-webupd8.gpg                                                                                     100% 6541     6.4KB/s   00:00

webupd8team-java.gpg~                                                                                        100%    0     0.0KB/s   00:00

nilarimogard-webupd8.gpg~                                                                                    100%    0     0.0KB/s   00:00

mystic-mirage-pycharm.gpg                                                                                    100%  366     0.4KB/s   00:00

webupd8team-java.gpg                                                                                         100% 7140     7.0KB/s   00:00

osmoma-audio-recorder.gpg~                                                                                   100%    0     0.0KB/s   00:00

mystic-mirage-pycharm.gpg~                                                                                   100%    0     0.0KB/s   00:00

ondrej-php.gpg~                                                                                              100%    0     0.0KB/s   00:00

sources.list                                                                                                 100% 2951     2.9KB/s   00:00

sources.list.save                                                                                            100% 2951     2.9KB/s   00:00

trusted.gpg                                                                                                  100%   23KB  23.2KB/s   00:00
Example:
Remote to Local Transferring:
Remote to Local File Transfers:
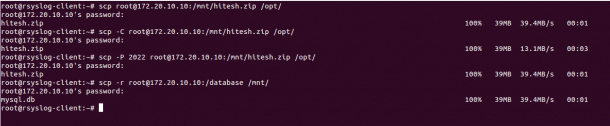
To transfer a file named hitesh.zip located inside /mnt directory of the remote to the local system’s directory /opt use the following command:
scp root@172.20.10.10:/mnt/hitesh.zip /opt/
You can increase the transfer speed by enabling the compression using the option -C with SCP as shown below:
scp -C root@172.20.10.10:/mnt/hitesh.zip /opt/
If your remote server uses SSH port 2022, then you can use -P option to specify the remote SSH port as shown below:
scp -P 2022 root@172.20.10.10:/mnt/hitesh.zip /opt/
Remote to Local Directory/Folders Transfers:
To transfer a directory named /etc from the remote system to local system’s directory /mnt recursively use the following command:
scp -r root@172.20.10.10:/database /mnt/
Example:
Remote to Remote System Transfers:
Remote to Remote File Transfers:
In order to transfer files and directories between two remote servers. You will need to configure SSH key-based authentication between both remote servers.
To transfer a file named /etc/rc.local from the one remote system (172.20.10.3) to another remote system’s (172.20.10.5) directory /opt use the following command:
scp root@172.20.10.3:/etc/rc.local root@172.20.10.5:/opt/
To transfer a directory named /mnt/apt from the one remote system (172.20.10.3) to another remote system’s (172.20.10.5) directory /opt use the following command:
scp -r root@172.20.10.3:/mnt/apt root@172.20.10.5:/opt/

Transfer Files and Directories with SCP in Windows (7, 8, 10, and Server)
If you are working on the Windows system and want to transfer files and directories from Windows to Linux and Linux to Windows system. Then, you can achieve this using WinSCP utility.
WinSCP is a free and open-source SCP and SFTP client for Windows based operating systems.
Transfer files between Windows and Linux system follow the below steps:
1. On the windows system, launch the WinSCP utility as shown below:
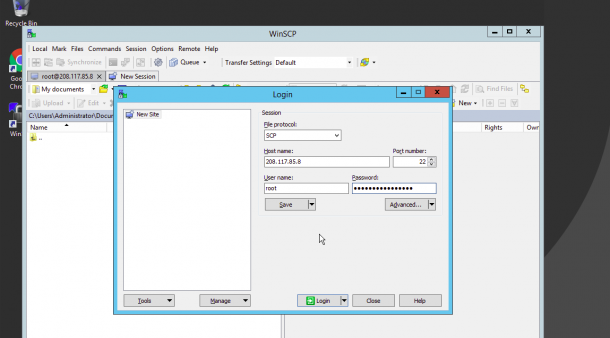
Now provide the following information:
- File Protocol : Select SCP as file transfer protocol.
- Host name : Provide your Linux server IP address.
- Port number : Provide your Linux server SSH port.
- User name : Provide the user name of your Linux server.
- Password : Provide your user’s password.
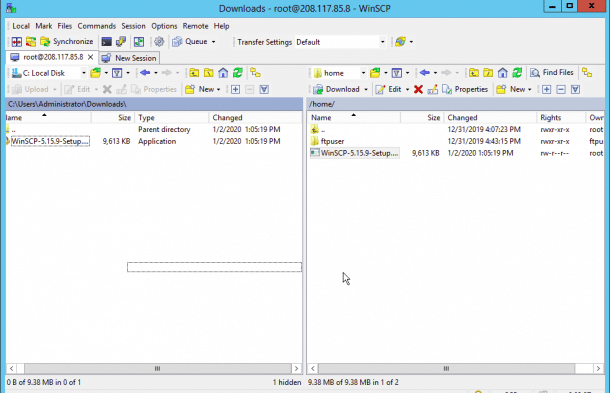
2. Now click on the Login button. You should see the following page:
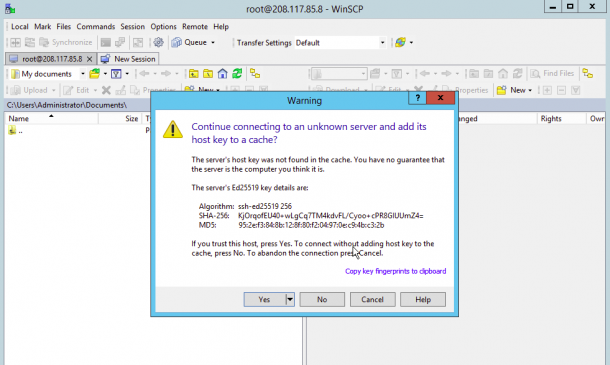
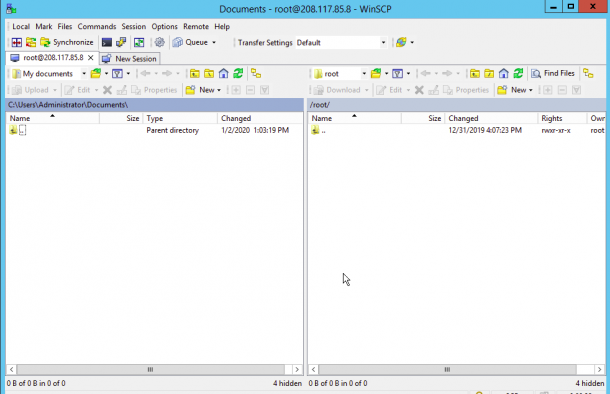
Click on the Yes button to verify the host. Once you are connected to the Linux server, you should see the following page:
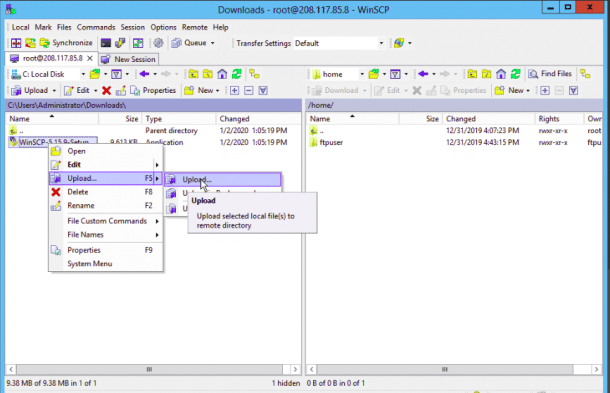
On the left pane, right-click on the file you want to upload on the Linux server and click on the Upload button as shown below:
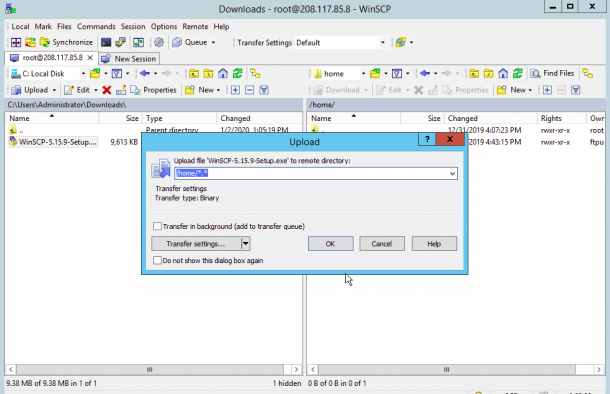
Now, provide the path of the Linux server’s directory and click on the OK button. Once the file has been uploaded, you should see the following page:
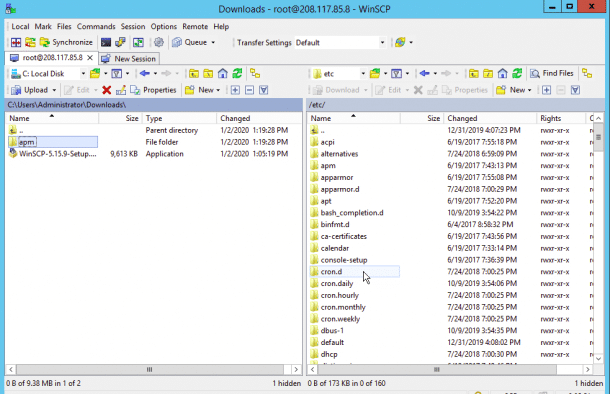
3. On the right pane, right-click on the directory you want to download from the Linux server to the Windows system and click on the Download button as shown below:


Now, provide the path of the Windows system directory and click on the OK button. Once the file has been uploaded, you should see the following page.
Conclusion
In the above tutorial, we’ve learned how to transfer files and directories from Linux to Linux, Windows to Linux and Linux to Windows. Feel free to ask questions below in the comments section if you have any!