
Scoop
Features
|
Installation
|
Documentation
Scoop is a command-line installer for Windows.
What does Scoop do?
Scoop installs apps from the command line with a minimal amount of friction. It:
- Eliminates User Account Control (UAC) prompt notifications.
- Hides the graphical user interface (GUI) of wizard-style installers.
- Prevents polluting the
PATHenvironment variable. Normally, this variable gets cluttered as different apps are installed on the device. - Avoids unexpected side effects from installing and uninstalling apps.
- Resolves and installs dependencies automatically.
- Performs all the necessary steps to get an app to a working state.
Scoop is quite script-friendly. Your environment can become the way you like by using repeatable setups. For example:
scoop install sudo
sudo scoop install 7zip git openssh --global
scoop install aria2 curl grep sed less touch
scoop install python ruby go perl
If you have built software that you would like others to use, Scoop is an alternative to building an installer (like MSI or InnoSetup). You just need to compress your app to a .zip file and provide a JSON manifest that describes how to install it.
Installation
Run the following commands from a regular (non-admin) PowerShell terminal to install Scoop:
Set-ExecutionPolicy -ExecutionPolicy RemoteSigned -Scope CurrentUser
Invoke-RestMethod -Uri https://get.scoop.sh | Invoke-Expression
Note: The first command makes your device allow running the installation and management scripts. This is necessary because Windows 10 client devices restrict execution of any PowerShell scripts by default.
It will install Scoop to its default location:
C:\Users\<YOUR USERNAME>\scoop
You can find the complete documentation about the installer, including advanced installation configurations, in ScoopInstaller/Install. Please create new issues there if you have questions about the installation.
Multi-connection downloads with aria2
Scoop can utilize aria2 to use multi-connection downloads. Simply install aria2 through Scoop and it will be used for all downloads afterward.
By default, scoop displays a warning when running scoop install or scoop update while aria2 is enabled. This warning can be suppressed by running scoop config aria2-warning-enabled false.
You can tweak the following aria2 settings with the scoop config command:
- aria2-enabled (default: true)
- aria2-warning-enabled (default: true)
- aria2-retry-wait (default: 2)
- aria2-split (default: 5)
- aria2-max-connection-per-server (default: 5)
- aria2-min-split-size (default: 5M)
- aria2-options (default: )
Inspiration
- Homebrew
- Sub
What sort of apps can Scoop install?
The apps that are most likely to get installed fine with Scoop are those referred to as «portable» apps. These apps are compressed files which can run standalone after being extracted. This type of apps does not produce side effects like changing the Windows Registry or placing files outside the app directory.
Scoop also supports installer files and their uninstallation methods. Likewise, it can handle single-file apps and PowerShell scripts. These do not even need to be compressed. See the runat package for an example: it is simply a GitHub gist.
Contribute to this project
If you would like to improve Scoop by adding features or fixing bugs, please read our Contributing Guide.
Support this project
If you find Scoop useful and would like to support the ongoing development and maintenance of this project, you can donate here:
- PayPal (one-time donations)
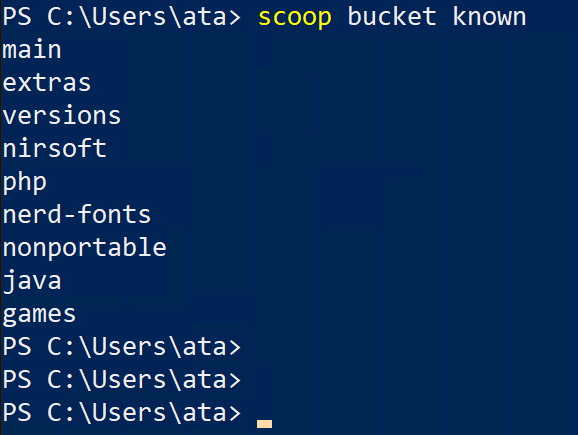
Known application buckets
The following buckets are known to Scoop:
- main — Default bucket which contains popular non-GUI apps.
- extras — Apps that do not fit the main bucket’s criteria.
- games — Open-source and freeware video games and game-related tools.
- nerd-fonts — Nerd Fonts.
- nirsoft — A collection of over 250+ apps from Nirsoft.
- sysinternals — The Sysinternals suite from Microsoft.
- java — A collection of Java development kits (JDKs) and Java runtime engines (JREs), Java’s virtual machine debugging tools and Java based runtime engines.
- nonportable — Non-portable apps (may trigger UAC prompts).
- php — Installers for most versions of PHP.
- versions — Alternative versions of apps found in other buckets.
The main bucket is installed by default. You can make use of more buckets by typing:
For example, to add the extras bucket, type:
You would be able to install apps from the extras bucket now.
Other application buckets
Many other application buckets hosted on GitHub can be found on ScoopSearch or via other search engines.
Requirements
- Windows 7 SP1+ / Windows Server 2008+
- PowerShell 3 (or later) and .NET Framework 4.5+
- PowerShell must be enabled for your user account and
executionpolicyset toremotesigned
Make sure you have PowerShell 3 or later installed. If you’re on Windows 10 or Windows Server 2012 you should be all set, but Windows 7 and Windows Server 2008 might have older versions.
Check your PowerShell version with following command:
Make sure you have allowed PowerShell to execute local scripts by typing following command:
TIP
Unrestricted will work too, but it is less secure. So stick with RemoteSigned if you’re not sure.
Installation
Quick Installation
In a PowerShell command console, run:
Custom Directory Installation
Assuming the target directory is D:\Applications\Scoop, in a PowerShell command console, run:
If you didn’t see any error messages, Scoop is now ready to run.
If you need to set global installation to custom directory, you need to set SCOOP_GLOBAL environment to your preferred location, here is PowerShell command to set the environment:
WARNING
Global installations need an Administrator privilege.
Using Scoop
Although Scoop is written in PowerShell, it’s interface is closer to Git and Mercurial than it is to most PowerShell programs.
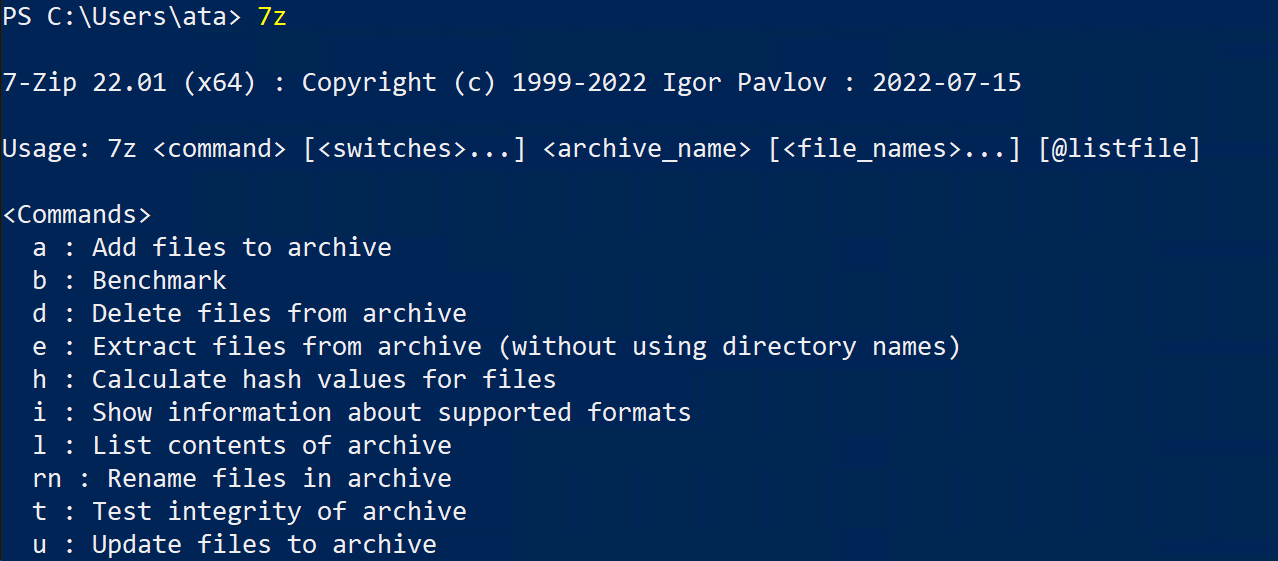
To get an overview of Scoop’s interface, run:
You’ll see a list of commands with a brief summary of what each command does. For more detailed information on a command, run scoop help <command>, e.g. scoop help install (try it!).
Now that you have a rough idea of how Scoop commands work, let’s try installing something.
Installing Apps
You’ll probably see a warning about a missing hash, but you should see a final message that cURL was installed successfully. Try running it:
You should see some HTML, probably with a ‘document moved’ message. Note that, like when you installed Scoop, you didn’t need to restart your console for the program to work. Also, if you’ve installed cURL manually before you might have noticed that you didn’t get an error about SSL—Scoop downloaded a certificate bundle for you.
Finding Apps
Let’s say you want to install the ssh command but you’re not sure where to find it. Try running:
You’ll should see a result for ‘openssh’. This is an easy case because the name of the app contains ‘ssh’.
You can also find apps by the name of the commands they install. For example,
This shows you that the ‘mercurial’ app includes ‘hg.exe’.
Upgrade Apps
To get the latest version of Scoop apps you have to run the command
This will download the latest version of scoop and updates the local app manifests.
After you updated Scoop you can update individual apps
If you want to update all your installed apps, you can run
Uninstall Scoop
If you’ve tried Scoop and it’s not for you—no problem. You can uninstall Scoop and all the programs you’ve installed with Scoop by running:
scoop uninstall scoop
This will let you know what’s going to happen and ask if you’re sure—just type ‘y’ and press enter to confirm.
Broken Install
If you delete ~/scoop you should be able to reinstall.
Last Updated: 10/23/2018, 8:29:48 AM
in Windows 10
In this tutorial, we are going to about How to Install Scoop Command Line Manager on Windows 10.
Scoop.sh is a Command line Installer tool for Windows — If you are Looking for Ubuntu/Debian like apt-get Package Manager for Windows then try Scoop Command line Installer & Package Manager tool for Windows Systems.
Requirements
- Windows Powershell
How to Install Scoop Command-Line Installer on Windows?
- Open the Windows Powershell
- Run this Below command to line set execution policy
Set-ExecutionPolicy RemoteSigned -scope CurrentUser
- After that install Scoop.sh by running this Below Command line
iex (new-object net.webclient).downloadstring('https://get.scoop.sh')
- Install packages
scoop install <Package Name>
- List the Full Packages from scoop
scoop search
- Learn about scoop Command Line Installer Tool
scoop help
- That’s all Done
Table of Contents
In this article, we will see how to install scoop on Windows 10 Using Few Easy Steps. Scoop is a free and open source command line installer for Windows based systems. If you are a command line lover or a linux user who recently switched to windows then this is the tool you would like to use to manage your programs and plugins in the System. Scoop download and manages all the programs in a clean way by keeping it isolated under ~\scoop folder. You can also choose to keep scoop installation wherever you like. More on official website. Here we will see the steps to install scoop on Windows 10 in great detail.
Features
- It is quick and easy to use.
- It does not show any popup windows during installation of a program.
- It can find and install all the dependencies of a package automatically.
- It avoid all the unwanted side affects of installing and uninstalling a program.
- It hides GUI wizard-style installers.
- It does not populate PATH environment variable with lots of program path.
Also Read: 9 Best tracert command examples in Windows
Step 1: Prerequisites
a) You should have a running Windows 10 System.
b) You should have Windows Powershell 5 available in your System.
c) You should have access to invoke web request in your System.
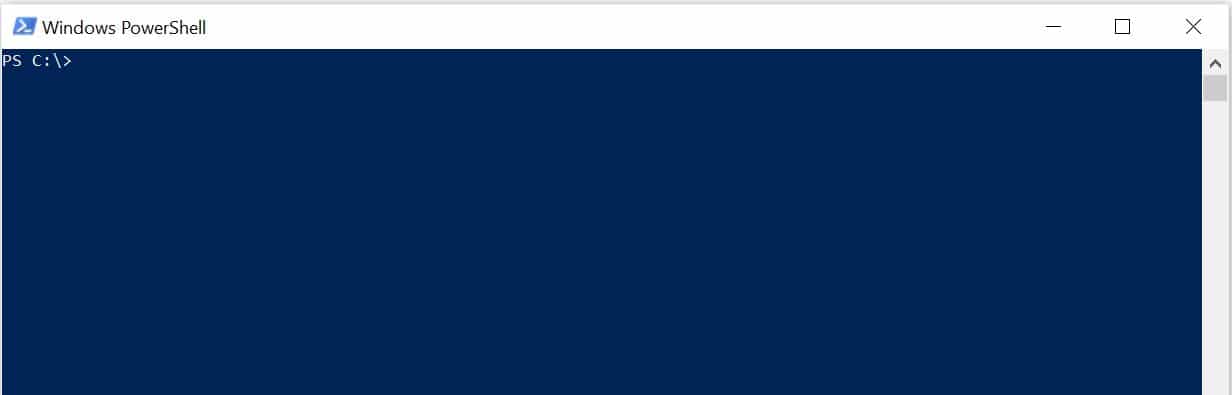
Step 2: Open Powershell
To open Powershell, go to search box showing on bottom left of your Desktop screen and type powershell there as shown below.
You will see Windows Powershell appearing on top as shown below. Click on it to open.
It should open and show like below after clearing the screen using cls command.
Step 3: Set Execution Policy
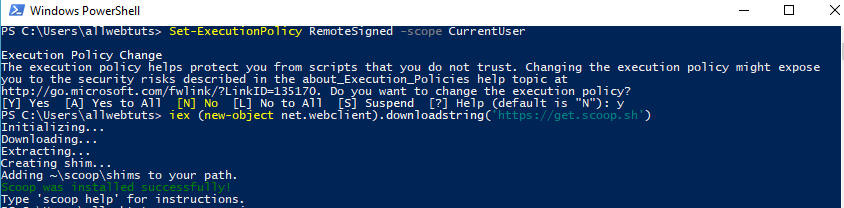
If you don’t have execution policy set for scope CurrentUser then you need to first set the execution policy to RemoteSigned using Set-ExecutionPolicy RemoteSigned -scope CurrentUser command as shown below. Without this policy set, you won’t be able to install scoop in your system.
PS C:\> Set-ExecutionPolicy RemoteSigned -scope CurrentUser
Execution Policy Change
The execution policy helps protect you from scripts that you do not trust. Changing the execution policy might expose
you to the security risks described in the about_Execution_Policies help topic at
https:/go.microsoft.com/fwlink/?LinkID=135170. Do you want to change the execution policy?
[Y] Yes [A] Yes to All [N] No [L] No to All [S] Suspend [?] Help (default is "N"): Y
Step 4: Install Scoop
Once the execution policy is set, you can now install scoop by using iwr -useb get.scoop.sh | iex command as shown below. This will download and install scoop in your System.
PS C:\> iwr -useb get.scoop.sh | iex
Initializing...
Downloading ...
Creating shim...
Adding ~\scoop\shims to your path.
Scoop was installed successfully!
Type 'scoop help' for instructions.
Step 5: Check Instructions
You can check for all available scoop instructions by using scoop help command as shown below. This will show all the available commands with description in summary.
PS C:\> scoop help
Usage: scoop <command> [<args>]

Available commands are listed below.

Type 'scoop help <command>' to get more help for a specific command.

Command    Summary
-------    -------
alias      Manage scoop aliases
bucket     Manage Scoop buckets
cache      Show or clear the download cache
cat        Show content of specified manifest.
checkup    Check for potential problems
cleanup    Cleanup apps by removing old versions
config     Get or set configuration values
create     Create a custom app manifest
depends    List dependencies for an app, in the order they'll be installed
download   Download apps in the cache folder and verify hashes
export     Exports installed apps, buckets (and optionally configs) in JSON format
help       Show help for a command
hold       Hold an app to disable updates
home       Opens the app homepage
import     Imports apps, buckets and configs from a Scoopfile in JSON format
info       Display information about an app
install    Install apps
list       List installed apps
prefix     Returns the path to the specified app
reset      Reset an app to resolve conflicts
search     Search available apps
shim       Manipulate Scoop shims
status     Show status and check for new app versions
unhold     Unhold an app to enable updates
uninstall  Uninstall an app
update     Update apps, or Scoop itself
virustotal Look for app's hash or url on virustotal.com
which      Locate a shim/executable (similar to 'which' on Linux)
Step 6: Check Status
You can check for any latest available versions and current status by using scoop status command as shown below.
PS C:\> scoop status
Scoop is up to date.
Everything is ok!
Step 7: Check for any Problems
If you are looking for any potential problems then you need to run scoop checkup command as shown below.
PS C:\> scoop checkup
WARN LongPaths support is not enabled.
You can enable it by running:
sudo Set-ItemProperty 'HKLM:\SYSTEM\CurrentControlSet\Control\FileSystem' -Name 'LongPathsEnabled' -Value 1
(Requires 'sudo' command. Run 'scoop install sudo' if you don't have it.)
WARN Windows Developer Mode is not enabled. Operations relevant to symlinks may fail without proper rights.
You may read more about the symlinks support here:
https://blogs.windows.com/windowsdeveloper/2016/12/02/symlinks-windows-10/
ERROR '7-Zip' is not installed! It's required for unpacking most programs. Please Run 'scoop install 7zip' or 'scoop install 7zip-zstd'.
ERROR 'Inno Setup Unpacker' is not installed! It's required for unpacking InnoSetup files. Please run 'scoop install innounp'.
ERROR 'dark' is not installed! It's required for unpacking installers created with the WiX Toolset. Please run 'scoop install dark' or 'scoop install wixtoolset'.
WARN Found 5 potential problems.
Step 8: Install a Program
You can choose to install a program in your windows system by using scoop install <program_name> syntax. For example, here we are installing Node.js by using scoop install nodejs command as shown below.
PS C:\> scoop install nodejs
Installing '7zip' (23.01) [64bit] from main bucket
7z2301-x64.msi (1.8 MB) [=====================================================================================] 100%
Checking hash of 7z2301-x64.msi ... ok.
Extracting 7z2301-x64.msi ... done.
Linking ~\scoop\apps\7zip\current => ~\scoop\apps\7zip\23.01
Creating shim for '7z'.
Creating shim for '7zFM'.
Creating shim for '7zG'.
Creating shortcut for 7-Zip (7zFM.exe)
Persisting Codecs
Persisting Formats
Running post_install script...
'7zip' (23.01) was installed successfully!
Notes
-----
Add 7-Zip as a context menu option by running: "C:\Users\cyberithub\scoop\apps\7zip\current\install-context.reg"
Installing 'nodejs' (20.3.1) [64bit] from main bucket
node-v20.3.1-win-x64.7z (17.7 MB) [===========================================================================] 100%
Checking hash of node-v20.3.1-win-x64.7z ... ok.
Extracting node-v20.3.1-win-x64.7z ... done.
Linking ~\scoop\apps\nodejs\current => ~\scoop\apps\nodejs\20.3.1
Persisting bin
Persisting cache
Running post_install script...
'nodejs' (20.3.1) was installed successfully!
Step 9: Uninstall Scoop
Once you are done using scoop, you can choose to remove it along with all the programs that you have installed through scoop by just running scoop uninstall scoop command as shown below.
PS C:\> scoop uninstall scoop
WARN This will uninstall Scoop and all the programs that have been installed with Scoop!
Are you sure? (yN): y
Removing ~\scoop\shims from your path.
Scoop has been uninstalled.
Love using the command line in Linux but had to switch to Windows? Relax, you have Scoop Windows as your package manager. Scoop is a command-line installer for Windows that lets you quickly install and update packages without breaking anything.
In this tutorial, you’ll learn how to install and use Scoop to manage packages on your Windows machine.
Read on and never resort to multiple click-through installers again!
Prerequisites
This tutorial will be a hands-on demonstration. If you’d like to follow along, be sure you have a Windows 10 machine with administrative privileges. This tutorial uses Windows 10 21H2.
Installing Scoop Windows Package Manager
Scoop can save the day when you feel tired of installing or managing software with your usual package manager. But as incredible as Scoop may sound, it doesn’t come installed on your system by default.
Before using Scoop, you need to install it on your Windows machine:
1. Open PowerShell as administrator, and run the below Set-ExecutionPolicy command to set your execution policy to RemoteSigned. Doing so ensures you can run PowerShell scripts you wrote or downloaded from the Internet.
Set-ExecutionPolicy RemoteSigned -Scope CurrentUserInput Y and press Enter when prompted, as shown below, to confirm the execution policy change.

2. Next, run the following command to download Scoop’s installer script (get.scoop.sh) and run that script to install Scoop on your system with elevated privileges (-RunAsAdmin).
Invoke-Expression "& {$(Invoke-RestMethod get.scoop.sh)} -RunAsAdmin"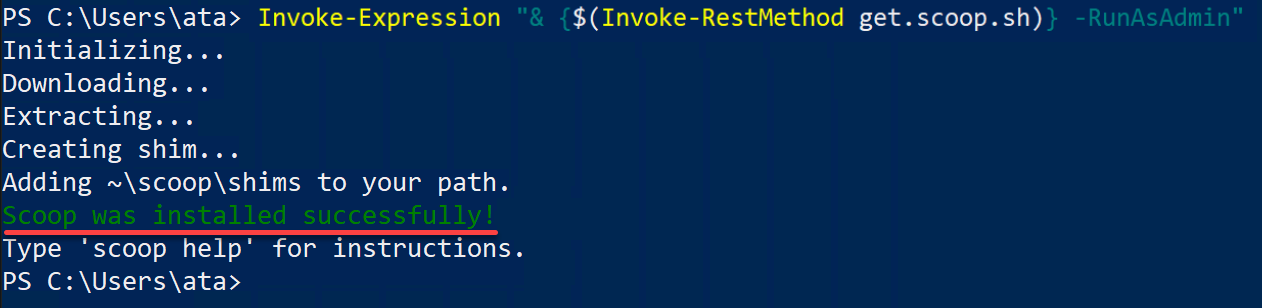
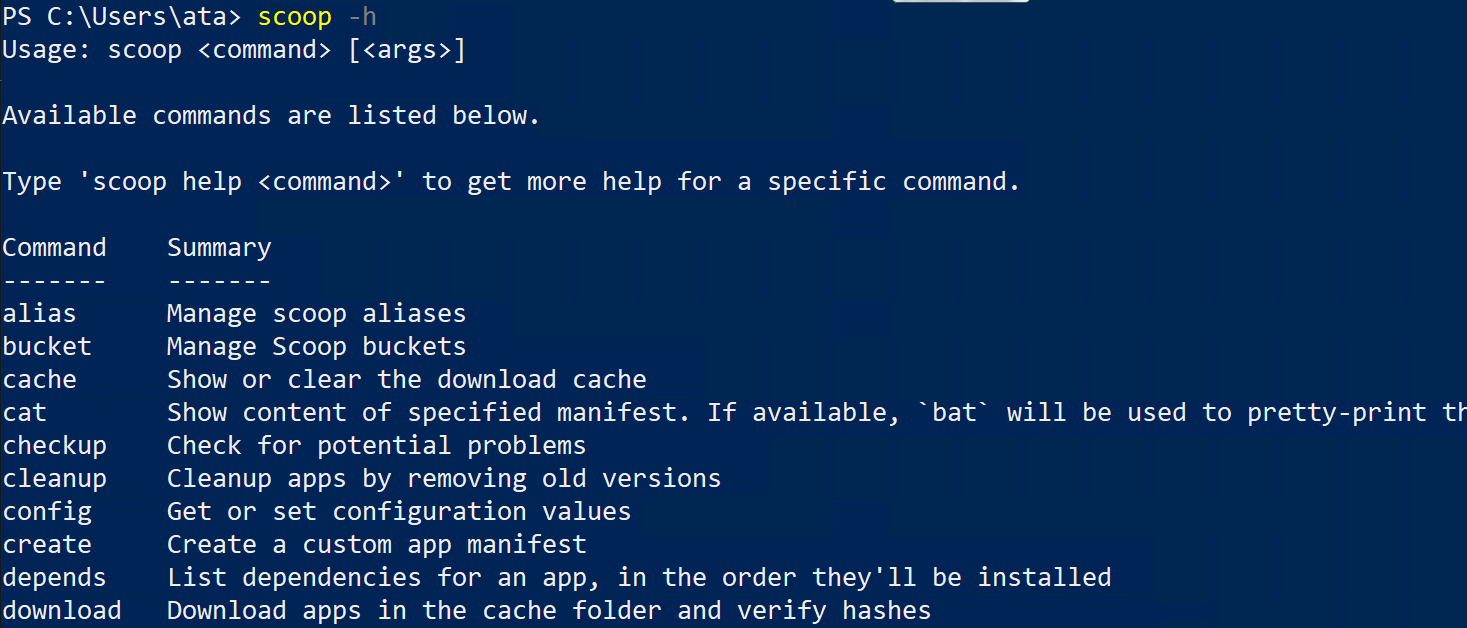
Now, run the below scoop command to display a list of available commands for Scoop.
The output below confirms that you’ve successfully installed Scoop on your system.
Finding and Installing Packages with Scoop
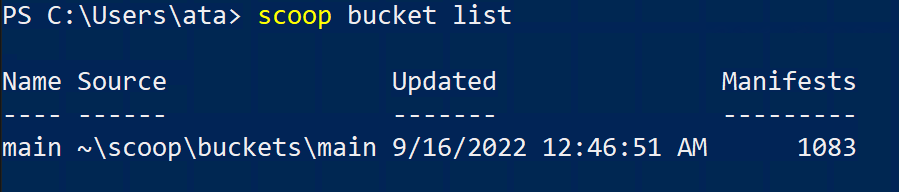
Now that you have a package manager, you may wonder what to install via Scoop. Luckily, Scoop lets you search packages available to install with the bucket command.
The bucket command lists all repositories (or buckets) containing Scoop packages. These buckets are like the package repositories used in Linux that contain a list of available packages and their dependencies.
To find and install packages with Scoop:
1. Run the below scoop command to list locally available buckets.
The output below indicates that the main bucket contains 1083 packages you can install.
Each Scoop bucket has manifest files, which are updated periodically to add new packages and remove old ones. These files describe how to install a package and its dependencies.
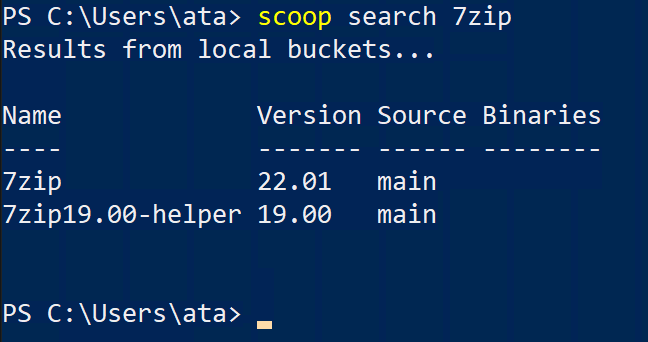
2. Now, run the command below to search for a specific package, like 7zip, in all available buckets.
The output below shows two packages that match the search term 7zip (7zip and 7zip19.00-helper) from the main bucket. You can also see the version number of each package.
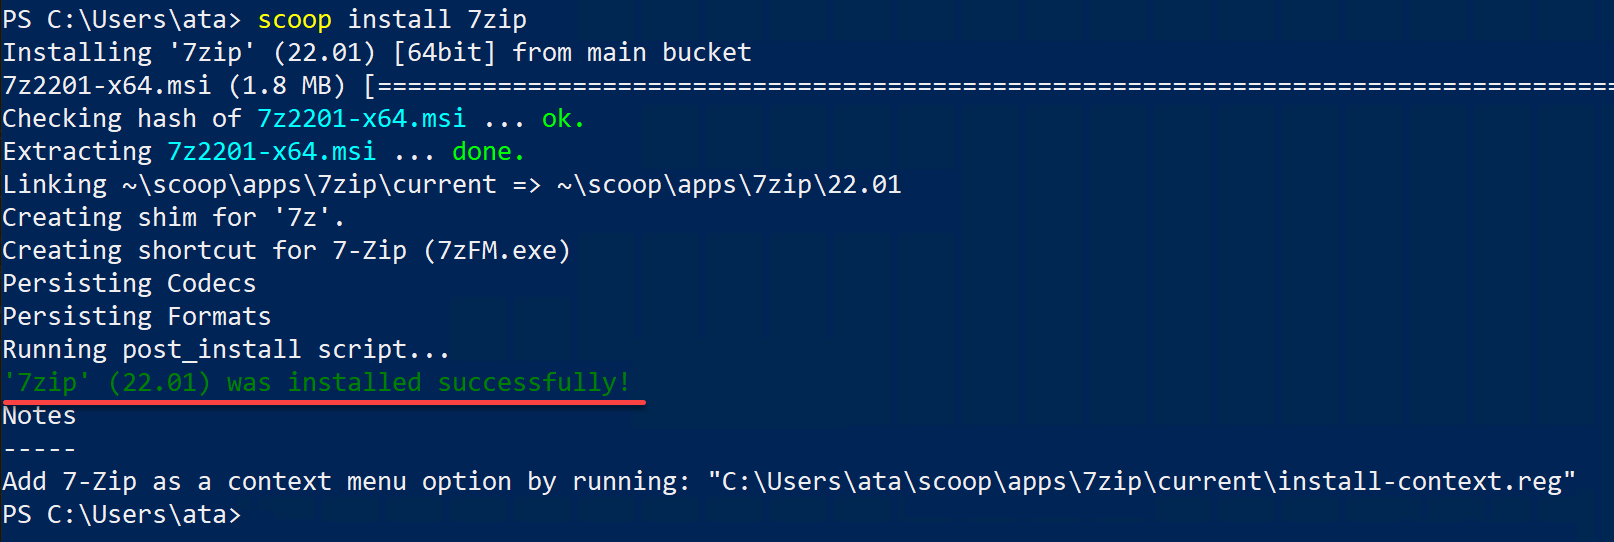
3. Once you’ve found a package, run the following command to install the 7zip package.
At this point, 7zip should be installed and ready to use! Did you notice you don’t need to click through multiple buttons to install a program? Installing programs eliminates permission pop-ups.
With Scoop, a one-liner command is enough to install as long as you know the package’s name.
4. Now, run the 7z command below to verify your 7zip installation, which should display a list of available options for the 7z command.
The output below confirms that 7z has been successfully installed. But perhaps you plan to install multiple packages at once. If so, let Scoop do the dirt work for you in the following step.
5. Lastly, run the following command to install the 7zip and nodejs packages.
Why install them one by one when you can install them all in one go? Scoop lets you install multiple packages specified and separated by spaces. This feature is helpful when you already have a list of packages to install.
scoop install 7zip nodejs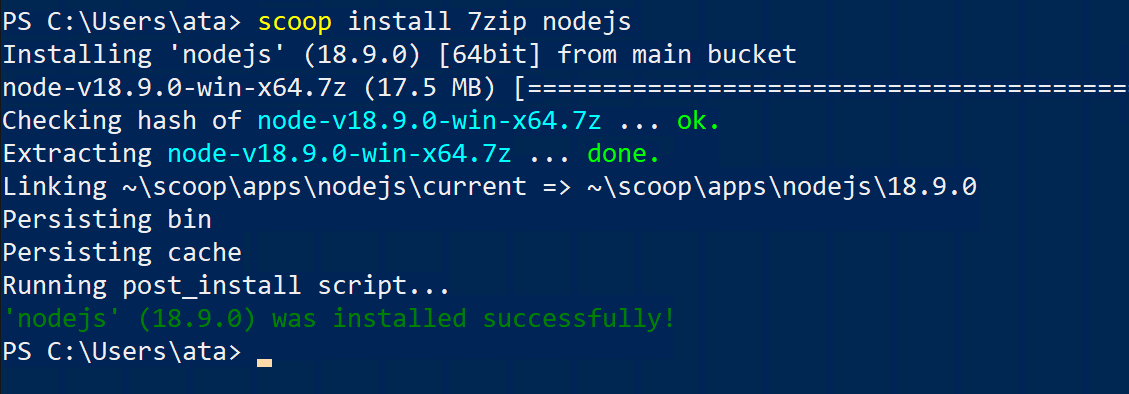
Updating Packages with Scoop
Keeping your packages updated is one way to keep your system healthy. Once your package is installed, Scoop helps you get the latest features or bug fixes.
No worries, updating packages with Scoop is just like installing them.
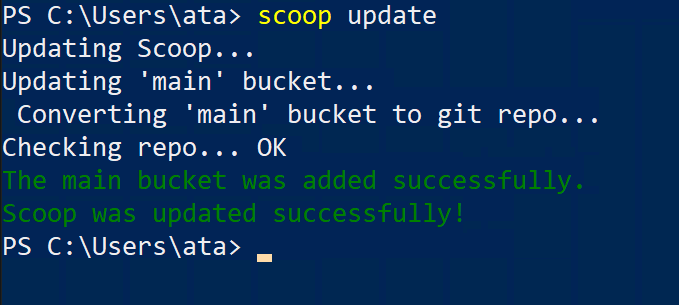
1. Run the scoop update command to update Scoop itself to its latest version and app manifests.
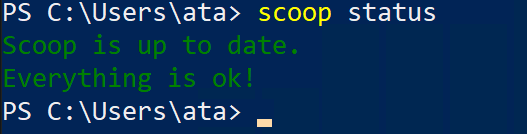
2. Next, run the following command to check the status of Scoop of other packages if they’re outdated.
The output below shows Scoop is up to date.
3. Now, run the command below to update a specific package you have in mind, in this case, the 7zip package.
Selectively updating your packages eliminates the risk of breaking anything, especially when you are in the middle of working on a project.

Perhaps you want to go ballistic and update all your packages. If so, run the same scoop update and append the * character to update all packages simultaneously, as shown below.

Adding Extra Bucket/Versions and Installing Multiple Versions of a Package
As you’ve seen, Scoop installs packages from buckets. And by default, Scoop comes with a handful of useful buckets such as main, versions, and extras.
If you wish to install packages from other buckets beside the main one, you must configure Scoop to know about the bucket.
1. Run the following scoop command to list known available buckets by the community.
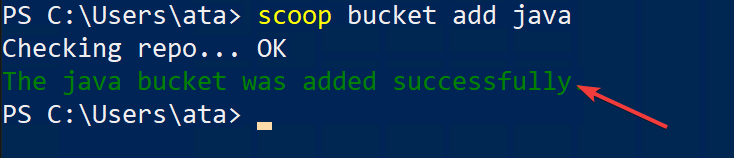
2. Next, run the below command to add the java bucket.
After adding a new bucket, you can now install packages with Scoop from that bucket.
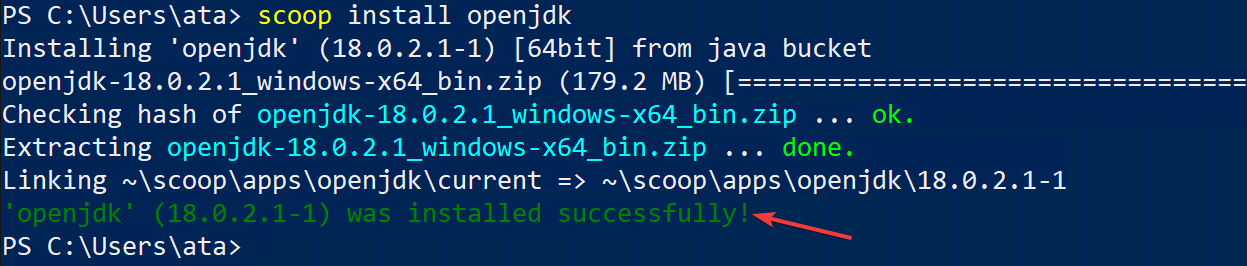
3. Now, run the command below to install the openjdk package from the java bucket.
This command installs the latest version of openjdk (v18 at this time of writing). This package is an open-source implementation of the Java Platform, Standard Edition. Many programs require Java to run, so installing it is a good idea.
Note that you can also install a different version of Java by specifying the package’s version, as shown below. This command allows multiple versions of Java to be installed on your system.
scoop install openjdk12

Switching Between Package Versions
Perhaps you’ve installed different versions of Java, as previously demonstrated. But suppose you have one program that requires Java 18 and another that requires Java 12. How do you switch between those versions?
Worry not! Scoop supports switching different versions of the same package with the reset command.
1. Run the below reset command to switch to Java 12 (openjdk12).

2. Next, run the following java command to check the current active Java –version.
Below, you can see that Java 12 is the one currently active.

3. Now, run the following command to switch back to the latest package version (openjdk).

4. Finally, rerun the java command below to check the current active Java –version.
The output below confirms that you’ve switched back to Java 18.

Conclusion
Installing and managing packages don’t have to be a complex task. Luckily, you’ve learned how to install use Scoop in Windows for more convenient package management. You’ve realized that installing and keeping different versions of the same package is possible with Scoop.
At this point, you should be more confident about installing and updating packages in your system. Now, why not create a custom app manifest of your own and share it with the Scoop community?