
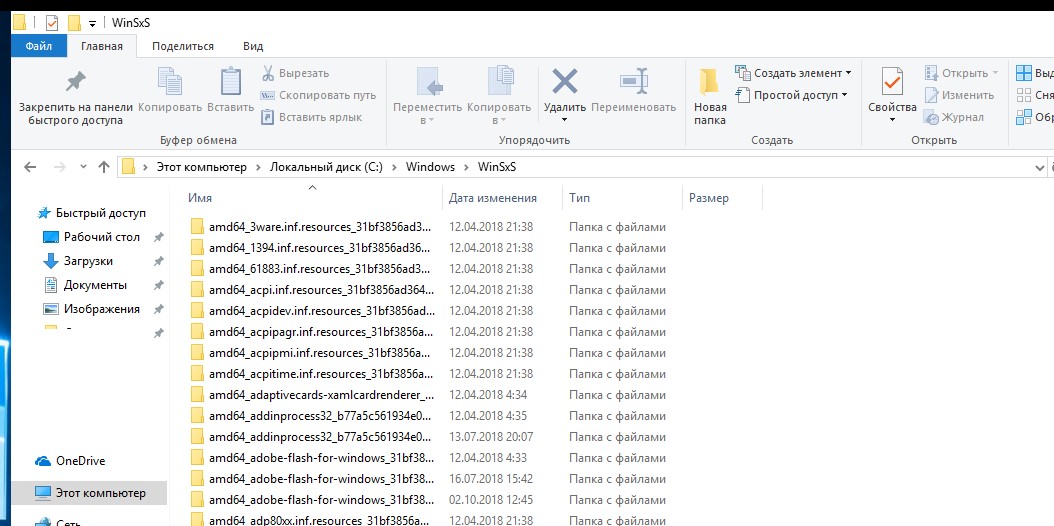
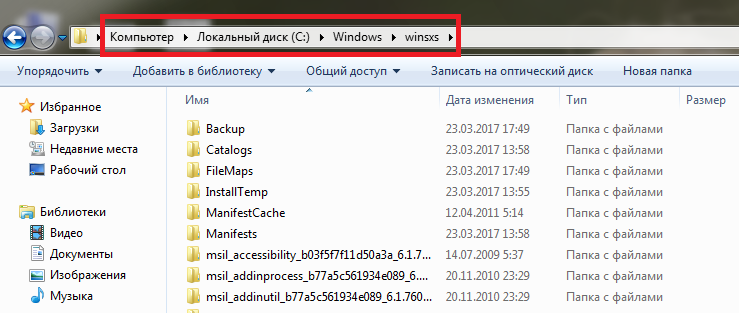
В этой статье мы поговорим о каталоге WinSxS в Windows, причинах его постоянного роста и способах очистки. Каталог C:\windows\WinSxS является хранилищем компонентов Windows. В этом каталоге хранятся dll библиотеки, бинарные и xml файлы, необходимые для установки и работы различных ролей и компонентов Windows. Каждый раз когда вы устанавливаете обновления Windows (это происходит ежемесячно), новая версия обновляемого компонента устанавливается в систему, а старая сохраняется в хранилище компонентов WinSxS (это необходимо для обеспечения совместимости и возможности “отката“ к старым версиям компонентов при удалении проблемного обновления).
Со временем размер каталога WinSxS постоянно увеличивается. Причем его размер ничем не ограничен (хотя на практике размер папки WinSxS в Windows 10 редко превышает 15-20 Гб.)
В этой статье мы рассмотрим наиболее безвредные способы очистки папки WinSxS в Windows 10 и Windows Server.
- Оптимизация хранилища компонентов и удаление старых версий компонентов, оставшихся после установки обновлений Windows;
- Технология Features on Demand (функции по требованию), позволяющая удалить неиспользуемые компоненты Windows с диска;
- Сжатие файлов в папке WinSxS – способ уменьшить размер каталога WinSxS за счет включения NTFS компрессии.
У многих пользователей возникает естественный вопрос можно ли вручную удалить файлы из папки WinSxS. Ответ на этот вопрос – категоричное НЕТ! Такими действиями с большой долей вероятности вы сломаете свою Windows. И хотя отдельные попытки удаления конкретных файлов из папки WinSxS могут быть удачными, рекомендовать этот способ нельзя.
Содержание:
- Как узнать реальный размер папки WinSxS в Windows 10?
- Очистка хранилища компонентов WinSxS в Windows
- Удаление неиспользуемых компонентов Windows (Windows Server)
- Включаем NTFS сжатие на папке WinSxS в Windows
Как узнать реальный размер папки WinSxS в Windows 10?
Самый простой способ получить текущий размер каталога WinSxS в Windows, запустить проводник File Explorer и открыть свойства папки %windir%\WinSxS (или воспользоваться скриптом PowerShell). Но имейте в виду, что большинство файловых менеджеров (в том числе File Explorer) показывают несколько больший размер каталога WinSxS, чем он занимает на диске.
Дело в том, что в каталоге WinSxS есть большое количество hard links (жестких символических ссылок) на файлы в других системных каталогах. Файловые менеджеры при подсчете размера папки WinSxS учитывают объем файлов, на которые ссылаются жесткие ссылки, а это не корректно.
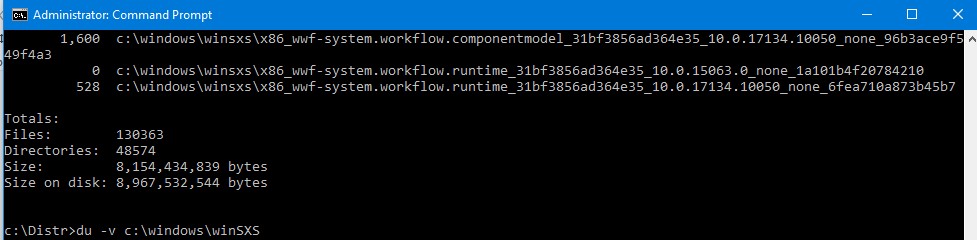
Чтобы реальный (без учета жестких ссылок) размер папки WinSxS, воспользуйтесь утилитой SysInternal du:
du -v c:\windows\winSXS
Но проще всего проанализировать размер хранилища компонентов в папке WinSxS с помощью команды DISM:
Dism.exe /Online /Cleanup-Image /AnalyzeComponentStore
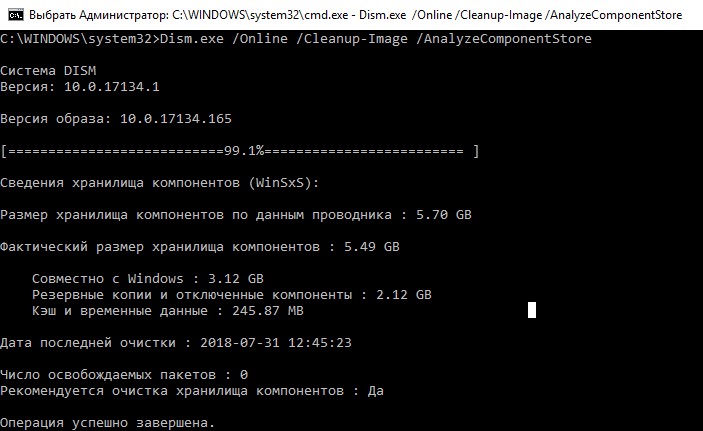
Разберемся, что возвращает данная команда:
Размер хранилища компонентов по данным проводника : 5.70 GB (это размер хранилища с учета жестких ссылок, который отображается в проводнике)
Фактический размер хранилища компонентов : 5.49 GB (реальный размер хранилища компонентов за исключением жестких ссылок)
Совместно с Windows : 3.12 GB (обязательные файлы системы, не могут быть удалены)
Резервные копии и отключенные компоненты : 2.12 GB (устаревшие файлы компонентов, которые нужны на случай проблем с установленными обновлениями)
Кэш и временные данные : 245.87 MB (файлы используются для ускорения работы системы обслуживания)
Дата последней очистки : 2018-07-31 12:45:23
Число освобождаемых пакетов : 10 (файлы, которые обновились после установки обновлений Windows, они будут удалены при очистке хранилища)
Рекомендуется очистка хранилища компонентов : Да
Как вы видите, в данном случае можно уменьшить размер каталога WinSxS на 2.1 Гб + 250 Мб.
Очистка хранилища компонентов WinSxS в Windows
Самый быстрый и простой способ освободить место в хранилище компонентов Windows (т.е. очистить папку WinSxS) – оптимизация хранилища командой:
Dism.exe /Online /Cleanup-Image /StartComponentCleanup
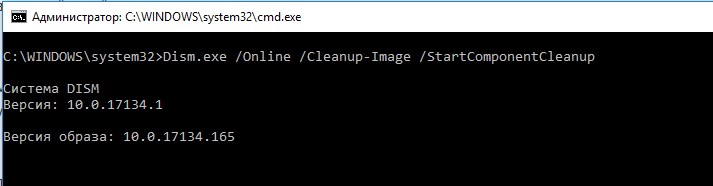
Опция Dism /StartComponentCleanup поддерживается во всех версиях Windows, начиная с Windows 8/Windows Server.
После окончания очистки проверьте текущий размер хранилища компонентов:
Dism.exe /Online /Cleanup-Image /AnalyzeComponentStore
В моем примере это помогло уменьшить размер папки WinSxS на 2,5 Гб.
С помощью еще одного параметра /ResetBase вы можете удалить все предыдущие версии компонентов, оставшиеся после установки обновлений Windows. После этого вы не сможете удалить установленные обновления или Service Pack, а в панели обновлений
appwiz.cpl
у обновлений пропадет кнопка «Удалить»).
Чтобы очистить старые версии компонентов, выполните:
Dism.exe /Online /Cleanup-Image /StartComponentCleanup /ResetBase
В Windows 7 и Windows Server 2008 R2 для очистки старых версий компонентов, оставшихся после установки сервис пака, использовался еще один параметр DISM:
dism /online /Cleanup-Image /spsuperseded
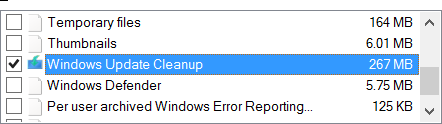
Также вы можете удалить устаревшие обновления с помощью мастера очистки диска. Выполните команду cleanmgr c правами администратора.
В окне утилиты выберите диск и в следующем окне нажмите кнопку «Очистить системны файлы».
Далее выберите опцию “Файлы журнала обновления Windows» и нажмите ОK. Утилита очистки диска покажет сколько места вы можете освободить, удалив файлы журнала старых обновлений Windows. В моем примере это 427 Мб.
После окончания очистки хранилища с помощью DISM проверьте сколько освободилось места на диске.
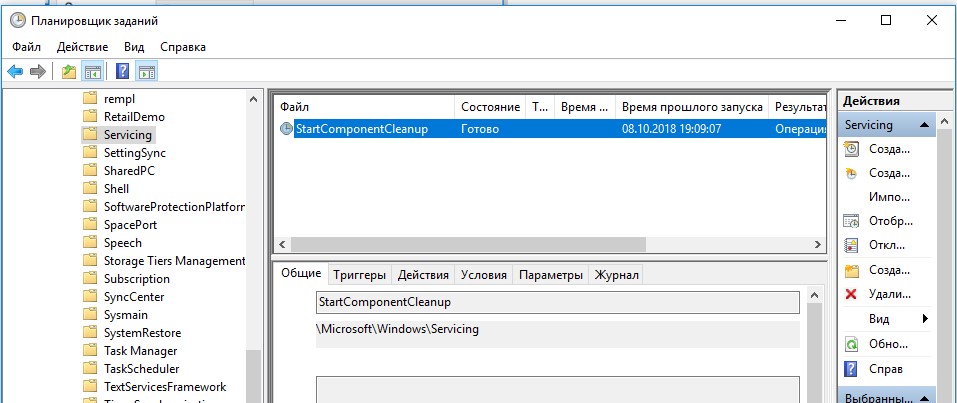
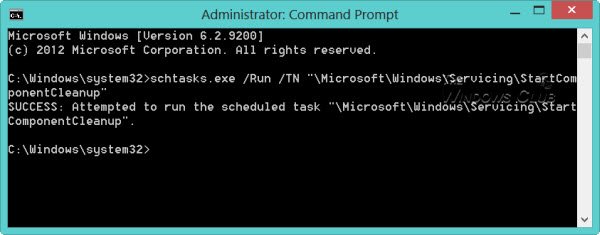
В планировщике задания Windows 10 и Windows Server 2016 есть специальное задание автоматического обслуживания, которое регулярно выполняет оптимизацию и очистку каталога WinSxS (выполняется действия, аналогичные команде dism с ключом StartComponentCleanup). Это задание StartComponentCleanup находится в разделе \Microsoft\Windows\Servicing. Данное задание запускается в фоновом режиме и автоматически удаляет версии компонентов старше 30 дней, которое были заменены более новыми версиями.
Можно запустить это задание вручную так:
schtasks.exe /Run /TN "\Microsoft\Windows\Servicing\StartComponentCleanup"
Удаление неиспользуемых компонентов Windows (Windows Server)
В статье Безопасная очистка папки WinSxS в Windows Server 2016/2012 мы рассмотрели функцию Features on Demand (функции по требованию), предоставляющую возможность удаления с диска бинарных файлов неиспользуемых ролей и компонентов из каталога WinSxS. Для этого в Windows Server используется командлет PoweShell Uninstall-WindowsFeature.
В Windows 10 командлет Uninstall-WindowsFeature отсуствует, и для удаления компонентов Windows из образа нужно использовать DISM.
DISM в отличии от Uninstall-WindowsFeature не удаляет зависимые компоненты.
Полный список доступных функций в образе Windows 10 можно получить с помощью команды:
DISM.exe /Online /English /Get-Features /Format:Table
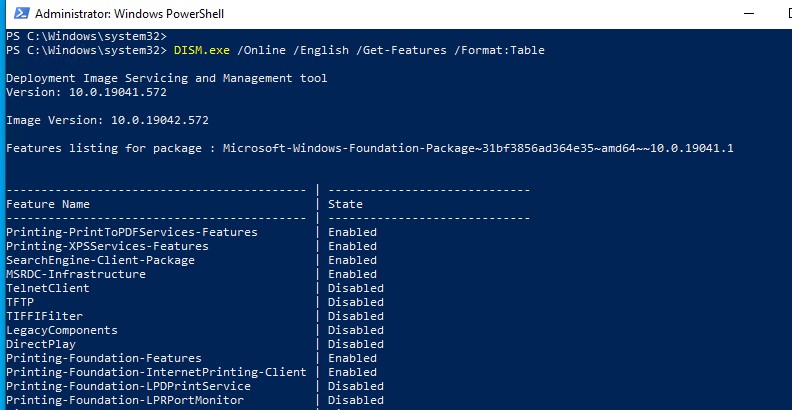
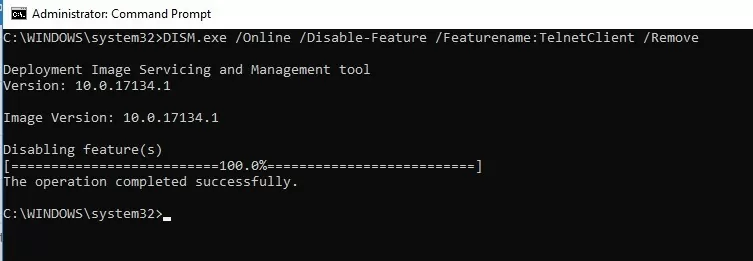
Чтобы удалить, например компонент TelnetClient с диска (из каталога WinSxS), выполните команду:
DISM.exe /Online /Disable-Feature /Featurename:TelnetClient /Remove

Если еще раз вывести список всех доступных функций по требованию в Windows, вы увидите, что статус компонента изменится на Disabled with Payload Removed.
Таким образом в Windows можно существенно уменьшить размер папки WinSxS, удалив с диска неиспользуемые компоненты. Единственный нюанс, это вариант очистки каталога WinSxS подойдет для достаточной продвинутых пользователей, которые разбираются в компонентах Windows 10 и их назначении.
Включаем NTFS сжатие на папке WinSxS в Windows
Еще один способ уменьшить размера каталога WinSxS в Windows 10 – сжать содержимое каталога на уровне файловой системы NTFS.
- Откройте командную строку с правами администратора;
- Остановите и отключите службы Windows Installer и Windows Module Installer:
sc stop msiserver

sc stop TrustedInstaller

sc config msiserver start= disabled

sc config TrustedInstaller start= disabled
- Создайте резервную копию списков доступа (ACL) назначенных на файлы и папки в каталоге WinSxS с помощью утилиты icacls. Резервная копия ACL представляет собой обычной текстовый файл, в котором указаны все файлы и каталоги и назначенные на них NTFS разрешения (в дальнейшем этот файл понадобиться для восстановления оригинальных ACL):
icacls "%WINDIR%\WinSxS" /save "%WINDIR%\WinSxS_NTFS.acl" /t

- Назначьте себя владельцем папки WinSxS и всех вложенных каталогов:
takeown /f "%WINDIR%\WinSxS" /r
- Предоставьте своей учетной записи полные права на каталог WinSxS:
icacls "%WINDIR%\WinSxS" /grant "%USERDOMAIN%\%USERNAME%":(F) /t
- Теперь можно выполнить сжатие файлов в каталоге WinSxS с помощью команды compact. Т.к. часть файлов может использоваться Windows, нужно указать параметр /i. Иначе сжатие будет остановлено на первом же занятом файле (в Windows 10 можно использовать более прогрессивное LZX сжатие):
compact /s:"%WINDIR%\WinSxS" /c /a /i *

- Теперь нужно восстановить TrustedInstaller как владельца каталога WinSxS:
icacls "%WINDIR%\WinSxS" /setowner "NT SERVICE\TrustedInstaller" /t
- И вернуть оригинальные NTFS разрешения на каталог WinSxS из резервной копии ACL:
icacls "%WINDIR%" /restore "%WINDIR%\WinSxS_NTFS.acl" - Измените типа тип запуска служб Windows Installer и Windows Module Installer:
sc config msiserver start= demand

sc config TrustedInstaller start= demand


Проверьте текущий размер каталога WinSxS.
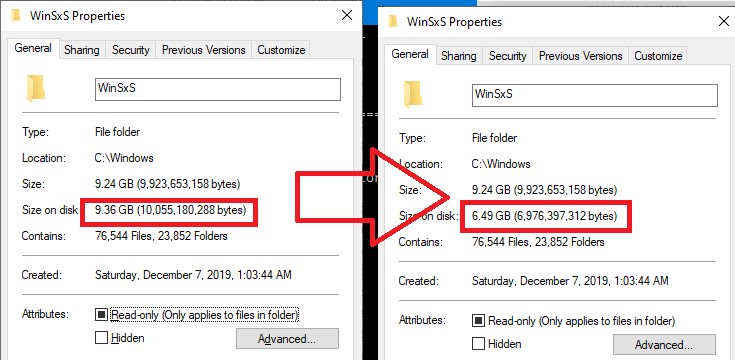
Как вы видите, в нашем примере размер папки WinSxS за счет сжатия уменьшился с 9,36 Гб до 6,5 Гб (примерно на треть). Неплохо, особо для небольшого по размеру SSD-диска.
Указанные команды можно выполнять по отдельности (так проще контролировать успешность выполнения каждой из них), либо можно объединить все операции в один файл скрипт. Вы можете скачать готовый bat файл для сжатия WinSxS здесь compress_winsxs.bat
Данный скрипт нужно запускать периодически, т.к. в каталоге WinSxS будут появляться новые «несжатые» файлы после установки новых обновлений Windows и программ.
На что может повлиять сжатие каталога WinSxS? Windows работает со сжатыми файлами в прозрачном режиме, однако при обработке таких файлов, ей может понадобиться дополнительное время на их декомпрессию/компрессию. Это может вызвать небольшое замедление при установке компонентов Windows или обновлений. Однако для современных процессоров (CPU) операция компрессии/декомпрессии файлов выполняется практически мгновенно, так что реального уменьшения скорости пользователь даже не заметит.
In this article we will talk about the WinSxS folder in Windows, the reasons for its constant growth, and ways to clean up it. The C:\Windows\WinSxS directory is the repository of Windows components. This directory contains DLLs, binary, and XML files necessary for the installation and operation of various Windows roles or features. When installing the Windows updates (usually this happens every month), the new version of the updated component is installed on the system, while the old one is saved to the WinSxS folder (it is necessary to provide compatibility and make it possible to rollback to the previous versions of the components when you uninstall the Windows update).
The WinSxS directory has grown in size over time. Moreover, its size is not limited by anything (although in practice the size of the WinSxS folder in Windows 10 rarely exceeds 15-20 GB).
Contents:
- How to Check the Actual Size of WinSxS Folder on Windows 10?
- How to Clean Up the Component Store (WinSxS folder) on Windows?
- Remove Unused Roles and Features from Windows 10/Windows Server
- How to Enable NTFS Compress on WinSxS Folder on Windows 10?
In this article, we’ll go over the safest ways to clean up the WinSxS folder on Windows 10 and Windows Server 2016/2019:
- Optimize the component store and remove old versions of Windows component files left after installing Windows updates;
- Features on Demand – allows you to remove unused Windows components from the disk;
- Enable NTFS compression on the WinSxS folder – a way to reduce the size of the WinSxS directory using the built-in compression of the NTFS file system.
Many users often ask: if it’s possible to manually delete files from the WinSxS folder. The answer is categorically NO! These actions can damage your Windows image. Though some attempts to remove files from the WinSxS folder can be successful, this method cannot be recommended.
How to Check the Actual Size of WinSxS Folder on Windows 10?
The easiest way to get the current size of the WinSxS folder on Windows is to open the properties of the %windir%\WinSxS folder in File Explorer (or use a PowerShell script). But keep in mind that most file managers (including File Explorer) show a slightly larger WinSxS folder size than it takes on disk.
The fact is that the WinSxS directory contains a large number of hard links (symbolic links) to system files in other folders. File managers, when calculating the size of the WinSxS folder, take into account the size of files referenced by hard links, but this is not correct.
You can find out the real size of the WinSxS folder on disk using the du tool from Sysinternals:
du -v c:\windows\winSXS

You can also analyze the size of the component store (WinSxS folder) using the DISM command:
Dism.exe /Online /Cleanup-Image /AnalyzeComponentStore
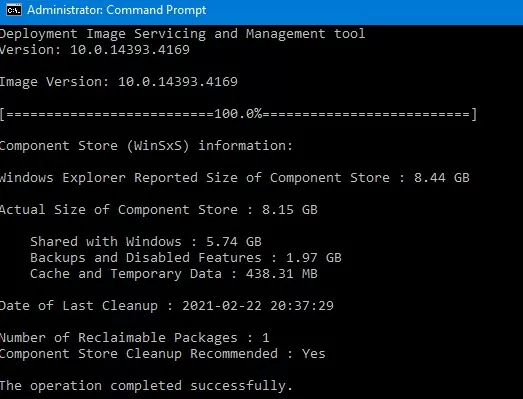
Deployment Image Servicing and Management tool
[==========================100.0%==========================]
Component Store (WinSxS) information:
Windows Explorer Reported Size of Component Store : 8.44 GB
Actual Size of Component Store : 8.15 GB
Shared with Windows : 5. 74GB
Backups and Disabled Features : 1.97 GB
Cache and Temporary Data : 438.31 MB
Date of Last Cleanup : 2021-02-22 20:37:29
Number of Reclaimable Packages : 1
Component Store Cleanup Recommended : Yes
The operation completed successfully.
As you can see, in this case, I can reduce the size of the WinSxS folder by (1,97 + 0,44) Gb.
How to Clean Up the Component Store (WinSxS folder) on Windows?
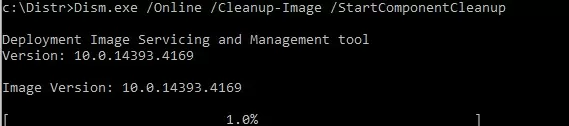
The fastest and easiest way to clear the Windows Component Store (the WinSxS folder) is to optimize the storage with the command:
Dism.exe /Online /Cleanup-Image /StartComponentCleanup
The StartComponentCleanup DISM option is supported on all Windows versions starting from Windows 8 and Windows Server 2012.
After cleaning is complete, check the current size of the component store:
Dism.exe /Online /Cleanup-Image /AnalyzeComponentStore
In my example, this reduced the size of the WinSxS folder by 2.4 GB.
The /StartComponentCleanup option has an additional /ResetBase option that allows you to remove all previous versions of components left after installing Windows updates. After that, you won’t be able to remove installed updates or Service Packs, and the Uninstall button will disappear from the Uninstall an Update Control Panel item). To clean up old versions of components, run:
Dism.exe /Online /Cleanup-Image /StartComponentCleanup /ResetBase
In Windows 7 and Windows Server 2008 R2, an additional DISM option was used to clean up old versions of components that were left over after installing service packs.
DISM /online /Cleanup-Image /spsuperseded
You can also remove old update files using the “Disk Cleanup” wizard:
- Run the
cleanmgrcommand as an administrator; - Select the disk and in the next window, click the “Clean up system files” button;
- Then select the “Windows update cleanup” option. The Disk Cleanup tool will show how much space you can free up by deleting old Windows update files. In my example, this is 324 MB. Click OK to start the cleanup.
After you finish cleaning up the component store using DISM, check how much disk space has been freed.
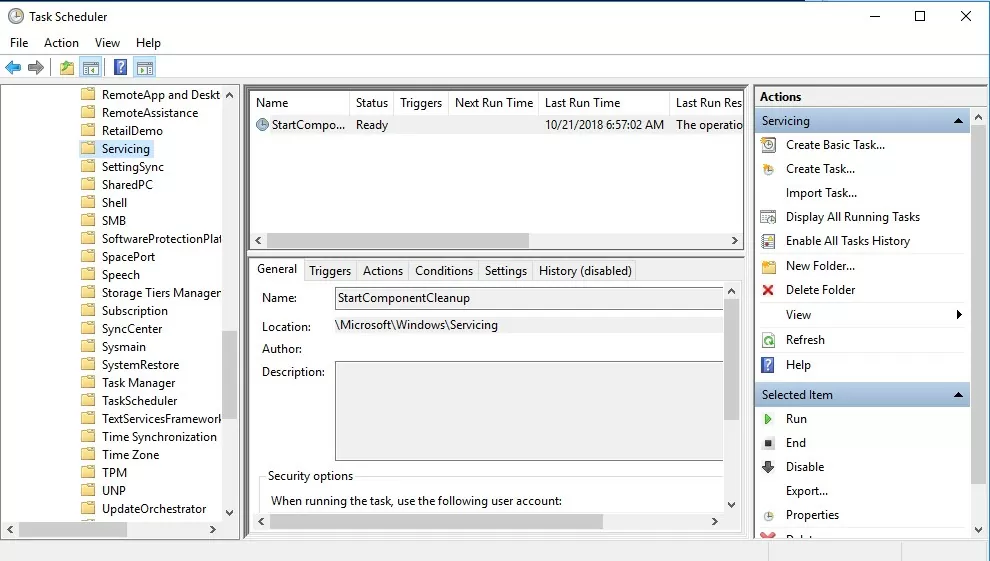
In addition, Windows 10/Windows Server 2016 Task Scheduler has a special automatic maintenance task that regularly optimizes and cleans up the WinSxS folder (same operation as DISM with StartComponentCleanup parameter). This StartComponentCleanup task is located under the \Microsoft\Windows\Servicing section of the taskschd.msc. This task runs in the background and automatically removes component versions older than 30 days that have been superseded by newer files.
You can start this task manually like this:
schtasks.exe /Run /TN "\Microsoft\Windows\Servicing\StartComponentCleanup"
Remove Unused Roles and Features from Windows 10/Windows Server
Features on Demand on Windows allows to remove binary files of the unused roles from the WinSxS folder. You can remove role and feature binaries on Windows Server using the Uninstall-WindowsFeature PowerShell cmdlet.
Windows 10 does not have the Uninstall-WindowsFeature cmdlet, and you must use DISM.exe to remove features from the Windows image.
Note that DISM, unlike the Uninstall-WindowsFeature PowerShell cmdlet doesn’t remove dependent features.
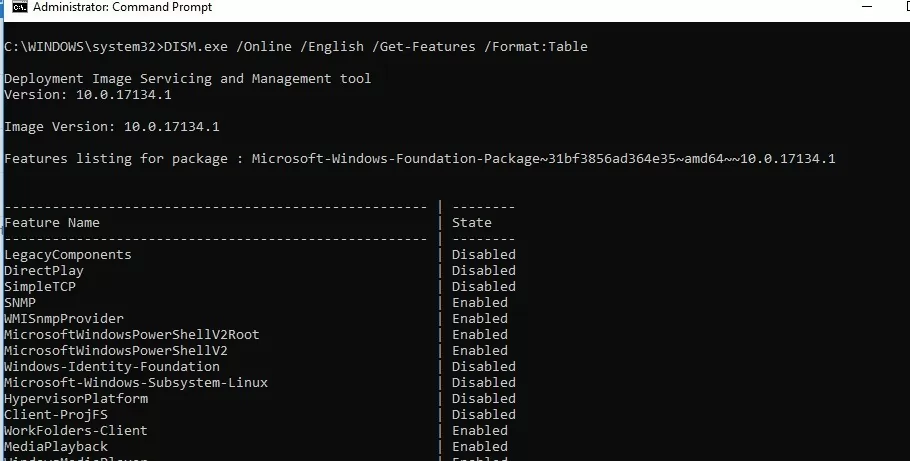
A complete list of available features in Windows 10 image can be obtained using the command:
DISM.exe /Online /English /Get-Features /Format:Table
To remove, for example, the TelnetClient feature from the Windows image (from the WinSxS folder), run the command:
DISM.exe /Online /Disable-Feature /Featurename:TelnetClient /Remove
If you display the list of all on-demand features available in Windows, you will see that the component status has changed to Disabled with Payload Removed.
Thus, Windows allows to significantly reduce the size of the WinSxS folder by removing the unused components from the disk. The only thing is that this cleanup method suits only advanced users, who are familiar with the Windows 10 features and their purpose.
How to Enable NTFS Compress on WinSxS Folder on Windows 10?
Another way to reduce the size of the WinSxS directory on Windows 10 is to compress the directory contents on the level of the NTFS file system.
Note. As in case of any non-standard intervention into the system configuration, you are strongly recommended to create a full backup of your Windows 10 image.
- Open the command prompt as administrator;
- Stop and disable Windows Installer and Windows Module Installer services:
sc stop msiserver
 sc stop TrustedInstaller
 sc config msiserver start= disabled
sc config TrustedInstaller start= disabled - Let’s backup the Access Control Lists (ACLs) assigned to the files and folders in the WinSxS directory using the built-in icacls tool. A backup copy of an ACL is a plain text file that lists all files and directories and the NTFS permissions assigned to them (later this file will be needed to restore the original ACLs):
icacls "%WINDIR%\WinSxS" /save "%WINDIR%\WinSxS_NTFS.acl" /t

- Assign yourself as an owner of the WinSxS folder and all its subfolders:
takeown /f "%WINDIR%\WinSxS" /r - Grant your account full control permissions on the WinSxS directory:
icacls "%WINDIR%\WinSxS" /grant "%USERDOMAIN%\%USERNAME%":(F) /t - You can now compress files in the WinSxS directory using the compact command. Because some of the files can be used by Windows, you need to specify the
/ioption. Otherwise, compression will stop at the first locked file (in Windows 10, you can use more advanced LZX compression):
compact /s:"%WINDIR%\WinSxS" /c /a /i *

- Restore the owner of the WinSxS directory back to TrustedInstaller:
icacls "%WINDIR%\WinSxS" /setowner "NT SERVICE\TrustedInstaller" /t - Restore the original ACLs for the WinSxS folder items using the ACL backup file you created earlier:
icacls "%WINDIR%" /restore "%WINDIR%\WinSxS_NTFS.acl" - Restore the default startup type for the Windows Installer and Windows Module Installer services:
sc config msiserver start= demand
 sc config TrustedInstaller start= demand


Now check the current size of the WinSxS folder:
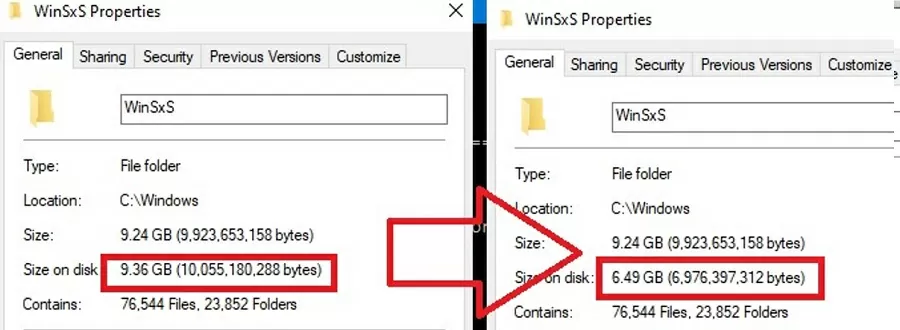
As you can see, in our example the size of the WinSxS folder after the compression has reduced from 9.4GB to 6.5GB (about a third). Not bad, especially for a small-sized SSD drive.
These commands can either be run separately (then it is much easier to track the results of each of them) or used in a single script file. If you run it, the described compression procedure for items in the WinSxS folder will start. You can download the ready-to-use batch file to enable NTFS compression on WinSxS here: winsxs_ntfs_compress.bat
You can use this script regularly because new uncompressed files will appear in the WinSxS folder after you install new Windows updates or apps.
What can be affected by compressing the WinSxS folder? Windows works transparently with compressed files. However, when processing such files, it may take additional CPU time to decompress/compress them. This may cause a slight slowdown when installing Windows components or updates. However, on modern CPUs, the file compression/ decompression operations are performed almost instantly, so the user may not even notice the real impact on performance.
Not many of you may know this, nor has this been blogged anywhere—yet—but Windows 11/10/8.1/8 lets you safely clean up the WinSxS folder. In fact, you can even automate WinSxS folder cleanup using the Task Scheduler. The WinSxS folder, which stands for ‘Windows Side By Side’, is a Windows native assembly cache with Libraries stored there by multiple applications. It is the location for storing Windows Component Store files.
Some common questions that Windows users asked were: Is there a way to clean up the WinSxS folder so as to reduce its size? Can I delete the WinSxS folder? Or move the WinSxS folder to another drive? The short answer, as we saw in the earlier post, was No.
In Windows 11/10, however, things have become easier. Windows will automatically reduce the size of the WinSxS. These methods include internal processes, such as uninstalling and deleting packages with components that have been replaced by other newer components. Previous versions are then kept for a period, after which they are automatically removed.
We saw that Windows 8.1 introduced a new command-line option for DISM.exe, /AnalyzeComponentStore. Running this command, will analyze the WinSxS folder and tell you whether a Component Store Cleanup is recommended or not.
Delete Component Store Files in Windows 11/10
Windows 11/10 offers a number of ways to cleanup of the WinSxS folder which includes the Windows Component Store. It may compress certain files, or it may delete some packages. Let us see how you can clean up the WinSxS folder in these latest versions of the Windows operating system. There are three ways how you can do it.
1] Using StartComponentCleanup
The StartComponentCleanup task was created to regularly clean up components automatically when the system is not in use. This task is set to run automatically when triggered by the operating system. When run automatically, the task will wait at least 30 days after an updated component has been installed before uninstalling the previous versions of the component.
To run it, open Task Scheduler and navigate to the following task:
Task Scheduler Library\Microsoft\Windows\Servicing\StartComponentCleanup

In the right pane, under Selected Items, you will see Run. Click on it to start the StartComponentCleanup task.
This will start a process called TiWorker.exe or Windows Modules Installer Worker. You will not see any confirmation dialog box that the process has been started, but you will be able to see it in the Task Manager – and feel a lot of hot air coming out of your laptop’s vent! By default, in Windows 10/8, if this task runs for more than 1 hour, it will terminate automatically. To end this process, you can click on End. You will, in this case, see Windows asking you for confirmation: Do you want to end all instances of this task. Click Yes.

You may run it manually, or you may schedule it to run, say every month using the StartComponentCleanup command, to clean up and compress the components. You may automate the process by setting up a Trigger for the task to run using the Task Scheduler.
Alternatively, you can also run the StartComponentCleanup task using an elevated Command Prompt, using the following command:
schtasks.exe /Run /TN "\Microsoft\Windows\Servicing\StartComponentCleanup"
If you are successful, you will see a SUCCESS message returned.
2] Using Deployment Image Servicing and Management
Using DISM you can configure and update Windows features, packages, drivers and so on. The /Cleanup-Image parameter of Dism.exe, will provide you with advanced options to reduce the size of the WinSxS folder, writes TechNet.
A) Using the /StartComponentCleanup parameter of Dism.exe on a running version of Windows 8.1 gives you similar results to running the StartComponentCleanup task in Task Scheduler.
Open an elevated command prompt, type the following and hit Enter:
Dism.exe /online /Cleanup-Image /StartComponentCleanup
B) If you use the /ResetBase switch with the /StartComponentCleanup parameter, you will be able to remove all superseded versions of every component in the component store.
From the elevated command prompt, type the following and hit Enter:
Dism.exe /online /Cleanup-Image /StartComponentCleanup /ResetBase
C) If you want to reduce the amount of space used by a Service Pack, use the /SPSuperseded parameter of Dism.exe on a running version of Windows 8.1 to remove any backup components needed for the uninstallation of the service pack.
From the elevated command prompt, type the following and hit Enter:
Dism.exe /online /Cleanup-Image /SPSuperseded
Do note that if you carry out this command, you will not be able to uninstall existing service packs and updates.
3] Disk Cleanup Tool
Home users should stick to using the Disk Cleanup Tool. Open the Disk Cleanup Utility and click on the Clean System Files button. You will see the option for Windows Update Cleanup. Check this option. This will help reduce the size of the component store.
Do note that deleting files from the WinSxS folder or deleting the entire WinSxS folder may damage your system and make it unbootable. You may not also be able to install, uninstall or update Windows components, so exercise utmost precautions. For regular Windows users, you may create a system restore point first and then try Method 1 or Method 3 mentioned above. Method 2 is for advanced users.
Windows 7 users too can now use the Windows Update Cleanup option in the Disk Cleanup tool.
Over time, as your Windows Server runs longer, more and more disk space is eaten. Simply gone! Investigating the disk usage leaves you clueless; there are no large log files, crash dumps, or there is no software to be removed. Where did that space go?
The answer: Windows Updates, Service Pack, and hotfix installations.
The Windows disk cleanup utility cleanmgr is not available in Windows Server 2012 if the Desktop Experience-feature is not installed. This makes cleaning up used disk space a bit harder. You can utilize your cmd.exe or PowerShell command-line, and use Deployment Image Servicing and Management (DISM) to clean up the Windows Component Store (WinSxS) in Windows Server 2012 and up.
This post also shows you how to move the Windows Server SoftwareDistribution folder and user’s Documents folder to a different partition.
WinSxS cleanup in Windows Server — using DISM and PowerShell
The WinSxS folder is located in the Windows folder, for example C:\Windows\WinSxS. It’s the location for Windows Component Store files.
The Windows Component Store contains all the files that are required for a Windows installation. And, any updates to those files are also held within the component store as the updates are installed (source: KB 2795190 — and do read Manage the Component Store). The WinSxS folder will become large…
Let’s clean up WinSxS!
Regain used disk space with Deployment Image Servicing and Management (DISM)

Dism disk cleanup: Deployment Image Servicing and Management (DISM) is a command-line tool that allows you to install, uninstall, configure, and update Windows features, packages, drivers, and international settings. The /Cleanup-Image parameter of dism.exe provides advanced users more options to further reduce the size of the WinSxS folder.
The Dism.exe /Online /Cleanup-Image has a few extra parameters (or switches):
/AnalyzeComponentStore/StartComponentCleanup/ResetBasewith/StartComponentCleanup/SPSuperseded
Throughout this article, I assume you’ll read help options, just add /?, like: dism.exe /Online /Cleanup-Image /?.
If you enjoyed this, you might also enjoy the following post summing up 5 extra ways to clean up disk space in Windows Server!
Analyze WinSxS folder (Component Store) with /AnalyzeComponentStore
First you can use the /AnalyzeComponentStore parameter. This analyzes the size of the Component Store in Windows. The AnalyzeComponentStore option is available in Windows 8.1 Windows Server 2012 R2, and it’ll notify you whether a Component Store Cleanup is recommended or not.
& dism.exe /Online /Cleanup-Image /AnalyzeComponentStore

In the above image, AnalyzeComponentStore recommends a Component Store Cleanup. Let’s do so.
/StartComponentCleanup parameter
Dism.exe removes superseded and unused system files from a system with the /StartComponentCleanup parameter.
& dism.exe /Online /Cleanup-Image /StartComponentCleanup

There is also a registered scheduled task called StartComponentCleanup. You can start this task from the command line:
schtasks.exe /Run /TN "\Microsoft\Windows\Servicing\StartComponentCleanup"
The /StartComponentCleanup parameter is supported on Windows 8, Windows Server 2012 and up.
Using the /StartComponentCleanup parameter of Dism.exe on Windows 10 gives you similar results to running the StartComponentCleanup task in Task Scheduler, except previous versions of updated components will be immediately deleted (without a 30 day grace period) and you will not have a 1-hour timeout limitation.
From an elevated command prompt, type the following:
Dism.exe /online /Cleanup-Image /StartComponentCleanup
/ResetBase switch with /StartComponentCleanup parameter
Using the /ResetBase switch with the /StartComponentCleanup parameter of dism.exe, all superseded versions of every component in the component store is removed.
Dism.exe /Online /Cleanup-Image /StartComponentCleanup /ResetBase

All existing service packs and updates cannot be uninstalled after this command is completed. This will not block the uninstallation of future service packs or updates.
The /ResetBase parameter is supported on Windows 8.1 and Windows Server 2012 R2.
/SPSuperseded parameter
The /SPSuperseded parameter removes any backup components needed for de-installation of a service pack. The service pack cannot be uninstalled after this command is completed.
Dism.exe /Online /Cleanup-Image /SPSuperseded
The Service Pack cannot be uninstalled after this command is completed.
The /SPSuperseded parameter is supported on Windows 7 or Windows Server 2008 R2 Service Pack 1, 2012, 2012 R2.
The
/AnalyzeComponentStoreoption is available in Windows 8.1 and Windows Server 2012 R2. Use this to analyze the size of the Component Store (WinSxS folder) in Windows.
As said at the beginning of this article, the Disk Cleanup Tool is available in Windows Server 2012, if you install the Desktop Experience-feature.
In some versions of Windows Server, you can simply copy the Disk Cleanup Tool executable cleanmgr.exe and cleanmgr.exe.mui to C:\Windows\system32 and C:\Windows\system32\en-Us from an old Windows 2008 R2 server, if you don’t want to install the Desktop Experience feature.
The following steps to install (copy) cleanmgr may not work on all versions of Windows Server. Try for yourself.
Disk Cleanup Wizard addon on Windows Server 2008 R2
Microsoft KB2852386 adds a Disk Cleanup option on Windows Server 2008 R2, similar to the Windows 7 update. I’ve tested this on Windows Server 2012. It may not clean up everything, but at least a lot.
Here’s how to make cleanmgr.exe available on Windows Server 2012 Standard (Windows version 6.2.9200), without installing the Desktop Experience feature:
Microsoft Windows [Version 6.2.9200]
(c) 2012 Microsoft Corporation. All rights reserved.
PS C:\Users\jan> $osversion = [System.Environment]::OSVersion.Version
PS C:\Users\jan> write-host $osversion
6.2.9200.0
C:\Windows\System32>cd ..
C:\Windows>copy WinSxS\amd64_microsoft-windows-cleanmgr.resources_31bf3856ad364e35_6.2.9200.16384_en-us_b6a01752226afbb3\cleanmgr.exe.mui \Windows\system32\en-US
        1 file(s) copied.
C:\Windows>copy WinSxS\amd64_microsoft-windows-cleanmgr_31bf3856ad364e35_6.2.9200.16384_none_c60dddc5e750072a\cleanmgr.exe \Windows\system32
        1 file(s) copied.
C:\Windows>system32\cleanmgr.exe
C:\Windows>
Unfortunately, this no longer works on Windows Server 2012 R2 (6.3.9600), probably due to KB2821895. As Aaron pointed out in the comments, the above solution to copy over the cleanmgr.exe and cleanmgr.exe.mui files doesn’t always work well. Therefore I removed this information for Windows Server 2012 R2.
Fortunately, the Disk Cleanup functionality is back in Windows Server 2016 (at least TP5).
After cleaning up the disk, a server reboot is required. Don’t forget to reboot your computer — or server — afterwards! The actual cleanup of the WinSxs directory occurs during the next reboot.
Error 0x800f0906 with DISM /Online /Cleanup-Image, PowerShell Install-WindowsFeature and SFC /scannow
Some reports are available explaining Microsoft Security Bulletin MS14-046 broke DISM /Online /Cleanup-Image /RestoreHealth, PowerShell Install-WindowsFeature with -Source parameter, and SFC /scannow. Yes, it broke a lot…
An update is made available by Microsoft: KB3005628
Update for the .NET Framework 3.5 on Windows 8, Windows 8.1, Windows Server 2012, and Windows Server 2012 R2. This update resolves an issue that prevents the optional Microsoft .NET Framework 3.5 feature from being enabled after you install security update 2966827 or 2966828 (described in Microsoft Security Bulletin MS14-046) for the Microsoft .NET Framework 3.5.
Move Windows Server SoftwareDistribution folder
Over time, your Windows Updates SoftwareDistribution folder in c:\Windows\SoftwareDistribution can become quite large, for example when multiple updates were not installed successfully.
Windows Update files are downloaded to this folder and removed after successful installation. When you find yourself in a situation where your C: partition is rather small, and SoftwareDistribution folder eats up too much disk space, follow these steps to move the SoftwareDistribution folder to a different location.
All in a cmd.exe shell (Start > Run > cmd and press enter). In this example the new location is D:\Windows-SoftwareDistribution.
-
Stop the Windows Update service:
net stop wuauserv -
Rename the folder
c:\Windows\SoftwareDistributiontoc:\Windows\SoftwareDistribution.old:rename c:\windows\SoftwareDistribution SoftwareDistribution.old -
Create a link using Windows Sysinternals Junction, or Windows mklink
-
Create the new directory:
mkdir D:\Windows-SoftwareDistribution -
Create the Junction:
c:\>junction C:\Windows\SoftwareDistribution "D:\Windows-SoftwareDistribution", or:
c:\>mklink /J C:\Windows\SoftwareDistribution "D:\Windows-SoftwareDistribution"
-
-
Restart the Windows Update Service:
net start wuauserv
When, after a while, everything seems to run and update fine, you can delete your SoftwareDistribution.old folder safely.
Move User Documents folder
Another way for you to gain some extra free space is to move the User Documents folder (and others, like Downloads), for instance from C:\Users\$USER$\Documents to D:\User\$USER$\Documents (substitute \(USER\) with the username whose Documents folder you want to move). Here are the steps for you to follow (screenshots taken from Windows Server 2016 TP5):
- Open Explorer and right click on the Documents folder and then Properties
- Choose Location
- Change the location where files are stored
- When the destination does not exist, Windows asks to create the folder for you
- After completion, files are moved to their new location.

Conclusion
Yes, the Windows component store (WinSxS folder) can become large, very large. But fortunately, Microsoft provides us the tools to monitor, manage and clean up the WinSxS folder to regain that used disk space.
If you are comfortable with installing the Desktop Experience Windows feature on your system, you can have the Disk Cleanup utility on your system. Otherwise, you can use the DISM (Deployment Image Servicing and Management) command for various clean up tasks.
To gain some extra free space, you can also move the Windows SoftwareDistribution folder to a different partition.
Те пользователи, кто уже не первый год пользуется операционной системой Windows, наверняка замечали, как стремительно наполняется папка «Windows”. Такое скорое наполнение происходит из-за папки, которая называется «winsxs«. Именно она весит больше всех. Сегодня я расскажу вам, что это за папка в операционных системах Windows 7, 8, 10 как ее чистить и стоит ли удалять файлы в ней.

Для чего нужна папка winsxs?
Эту папку вы все сможете найти на своем компьютере, если пройдете путь «C:/Windows/winsxs/«. Она предназначена для хранения файлов компонентов ОС. Также в ней хранятся резервные копии и обновления к этим файлам. Несмотря на то, что все эти компоненты могут быть не установлены на вашей операционной системе, все равно они хранятся в папке и занимают очень много места на диске вашего компьютера.
Кстати, уточню, что я указал диск «С« в описании пути, в расчете на то, что именно он является системным. Возможно у вас эта папка находится на другом диске.
По факту, компоненты операционки находятся не в этой папке, а в других местах. Файлы, которые содержаться в «winsxs« являются ссылками на все эти компоненты. Как только будут установлены обновления Windows, то новые файлы и их старые копии будут находиться именно в этой папке. С каждым разом обновления растут в объеме, соответственно, папка «winsxs« заполняется сильнее и весит больше. В конечном итоге она может занимать очень много места на жестком диске.
Папка «winsxs« может весить несколько гигабайт, а то и десятков гиг. Понятное дело, что для современных жестких дисков этот объем особой роли не играет. Но для тех, у кого еще старые винчестеры, такой объем памяти имеет большое значение и далеко не лишний. Узнать, сколько весит папка «winsxs«, очень просто. Стандартный способ: правая кнопка мыши, выбираем свойства и вкладка общие. Фактический размер папки вы точно не узнаете, то судить о количество свободного пространства уже сможете. Обязательно запомните размерность данной папки, а лучше запишите ее. В дальнейшем оно вам пригодится, чтобы сравнить результаты проделанной работы.
Отвечу сразу на вопрос по поводу удаления этой папки. Вручную удалять «winsxs« никак нельзя. Удалив ее обычным способом, вы лишите операционную систему важных компонентов, без которых она не сможет должным образом функционировать.
Программами чистильщиками тоже лучше не пользоваться. Поэтому придется использовать штатные средства операционной системы, которые помогут уменьшить размер папки «winsxs«. О нескольких таких способах я вам сейчас расскажу.
Удаляем старые обновления через очистку диска
Данный способ можно применить ко всем операционным системам Windows 7 и старше. Запустить компонент очистки диска возможно любым из нижеприведенных способов.
Откройте «Мой компьютер«, выберите системный диск и щелкните по нему правой кнопкой мыши. После, в контекстном меню открываем пункт «свойства«. Переходим во вкладку «общие«. Здесь вам нужно запомнить объем свободного и занятого места на жестком диске. Далее нажимаем кнопку «очистка диска« и дожидаемся, когда процедура закончится.
Второй способ осуществляется через команду «выполнить«. Нажимаем комбинацию клавиш «Win+r«. В поле для ввода текста прописываем команду «cleanmgr« и нажимаем «Enter«. Далее находим системный диск и выбираем его. Жмем «Ок« и дожидаемся, когда система закончит подсчет удаляемых данных.
В открывшемся окне нажимаем кнопку «Очистить системные файлы«. Если всплывет запрос UAC, нажимаем «да«.
Для того, чтобы папка «winsxs« в Windows была очищена, убедитесь, что напротив пункта «Очистить обновления Windows«, стоит галочка. Именно этот раздел отвечает за удаление файлов в данной папке. Все остальные пункты можете отмечать по своему желанию. Так же в этом окне вы увидите приблизительный объем освободившейся памяти после чистки. После того, как все необходимые для вас пункты будут отмечены, нажимаем «Ок«. Процесс очистки может немного затянуться. Также в конце процедуры возможно потребуется перезагрузка компьютера.
Уточнение: функция очистки обновлений на Windows 8 и 10 встроена автоматически. В семерке такого нет. Но, есть обновление, которое поможет вам провести процедуру очистки в этой версии ПО. Для этого нужно скачать пакет обновлений КВ2852386 и установить на Windows 7.
Остальные способы, о которых я вам расскажу, не смогут вам помочь, если у вас установлена семерка.
Очистка планировщиком заданий
В Windows 8 и 10 разработчики позаботились об очистке папки «winsxs«. Поэтому в этой ОС стала доступна функция автоматической очистки. В этой операционной системе присутствует автоматическое задание «StartComponentCleanup«, которое можно запустить в фоновом режиме, чтобы удалить старые версии файлов, которым больше 30 дней. Такой временной период взят, чтобы не удалить свежие обновления. Утилита запускается вручную.
Для запуска вам необходимо нажать комбинацию клавиш «Win+r« и в поле «выполнить” прописать команду «taskschd.msc«. Вы увидите новое окно. В меню слева необходимо выбрать раздел «библиотека планировщика заданий«, после найти и открыть раздел «Microsoft« и «Windows«. Здесь находим раздел «Servicing« открываем его. В нем вы увидите файл «StartComponentCleanup«, выбираем его. В правой части окна находятся различные пункты, вам нужно найти «выполнить«. Таким образом вы запустите очистку папки «winsxs«. Процедура не быстрая и может занять около часа.
Такую же чистку можно провести через командную строку. Также вызываем команду «выполнить« и вводим «cmd«. Затем нужно ввести следующую команду «schtasks.exe /Run /TN «\Microsoft\Windows\Servicing\StartComponentCleanup« и нажать «Enter«
Очистка через командную строку
Программа Dism.exe специальное приложение cmd, которое дает возможность производить различные манипуляции с компонентами операционной системы, в том числе и очистить папку «winsxs«. В ОС Windows 8,1 и 10, имеется новый параметр «AnalyzeComponentStore«. Благодаря ему можно точно узнать, сколько места на жестком диске занимает папка «winsxs”.
Вызываем командную строку, как это сделать я уже рассказал выше, и вводим команду «Dism.exe /Online /Cleanup-Image /AnalyzeComponentStore«, далее нажимает «Enter«.
После того, как закончится подсчет, вы увидите, стоит ли вообще проводить чистку. В пунктах «Резервные копии и отключенные компоненты« и «Кэш и временные данные« вы увидите данные, суммарное значение которых покажет, сколько именно места занимает папка «winsxs« на жестком диске.
Если папка занимает много места, приступаем к ее очистке. Это вариант очистки отличается от предыдущего тем, что вам не придется ждать целый час, пока процедура закончится. Запускаем командную строку от имени администратора и вводим следующую команду «Dism.exe /online /Cleanup-Image /StartComponentCleanup«.
Если вы используете команду «ResetBase«, то сможете удалить устаревшие версии каждого компонента в папке «winsxs«. Команда выглядят так «Dism.exe /online /Cleanup-Image /StartComponentCleanup /ResetBase«.
Для того, чтобы уменьшить место для пакетов обновления, необходимо указать параметр «Dism.exe /online /Cleanup-Image /SPSuperseded«. После того, как введете все команды, нажимаем «Enter« и дожидаемся конца процедуры.
После этого вы можете оценить, сколько освободилось места через параметр «AnalyzeComponentStore«.
Удаляем компоненты Windows
В операционных системах Windows 8 и 10 есть возможность включать и отключать компоненты ОС. Данные функции можно найти в разделе «программы«.
Все компоненты операционной системы хранятся в нашей папке, в независимости от того, включены они или нет. Соответственно, место они тоже занимают. Есть способ, который позволит удалить данные в папке и освободить место. В дальнейшем, при необходимости, вы сможете легко загрузить компоненты обратно.
Для удаления запускаем командную строку от имени администратора и вводим команду «DISM.exe /Online /English /Get-Features /Format:Table« ,нажимаем «Enter«.
Эта команда выстроит таблицу имен элементов и их состояния. Запоминаем название элемента, который необходимо удалить и вводим следующую команду «DISM.exe /Online /Disable-Feature /featurename:NAME /Remove«. Вместо «NAME« вы впишите название нужного компонента.
Собственно, на этом и все. Теперь вы знаете несколько способов, с помощью которых можно очистить папку «winsxs«. Надеюсь, хотя бы один из предложенных мною вам поможет. Заходите на сайт еще, если статья вам понравилось или добавьте его в закладки.