
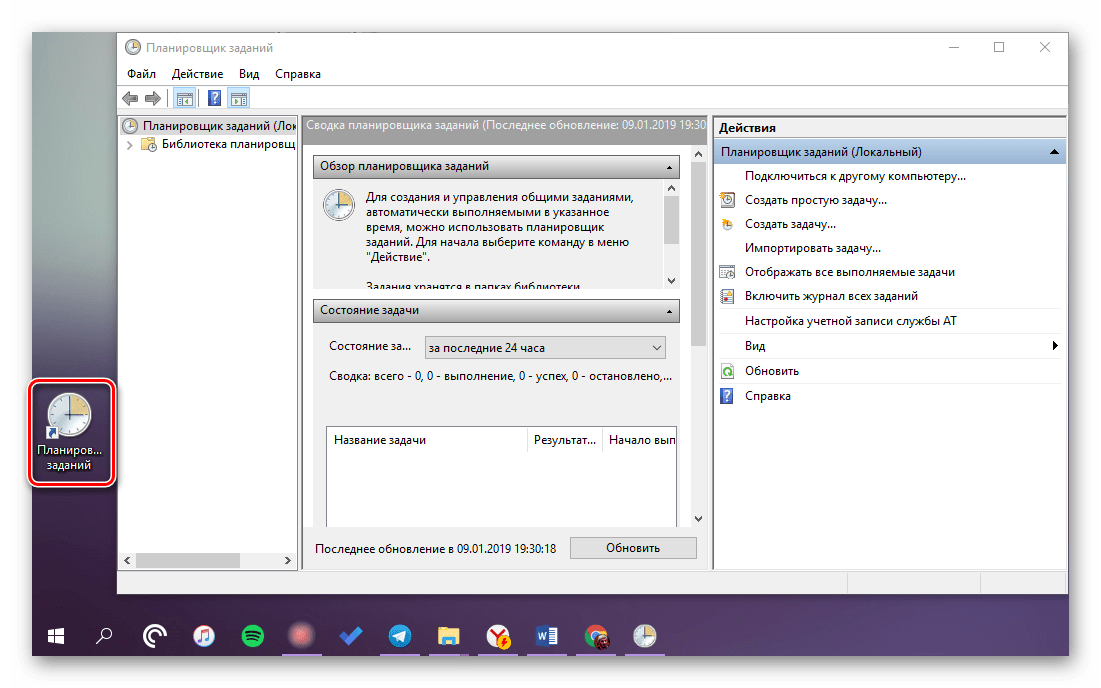
Планировщик заданий Windows служит для настройки автоматических действий при определенных событиях — при включении компьютера или входе в систему, в определенное время, при различных системных событиях и не только. Например, с его помощью можно настроить автоматическое подключение к Интернету, также, иногда, вредоносные программы добавляют свои задания в планировщик (см., например, здесь: Сам открывается браузер с рекламой).
В этой инструкции — несколько способов открыть планировщик заданий Windows 10, 8 и Windows 7. В целом, независимо от версии, методы будут практически одинаковыми. Также может быть полезно: Планировщик заданий для начинающих.
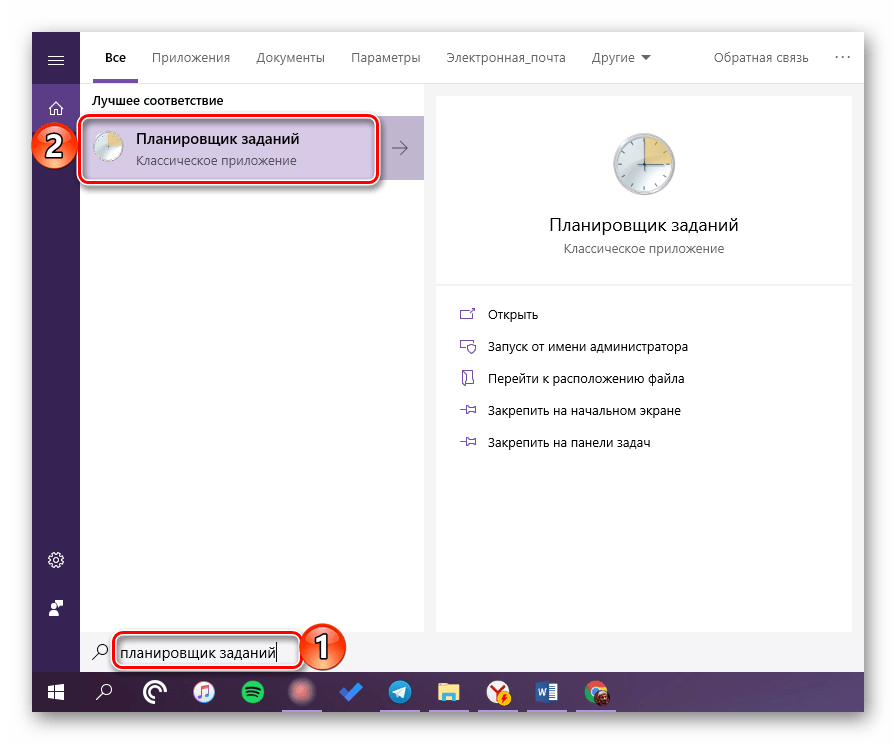
1. Использование поиска
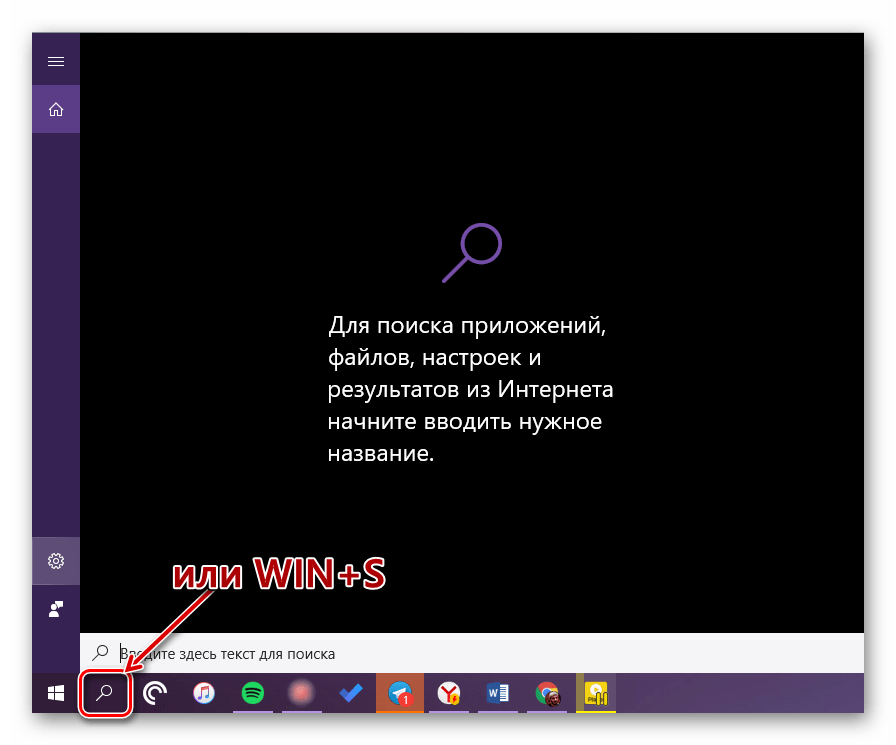
Во всех последних версиях Windows есть поиск: на панели задач Windows 10, в меню Пуск Windows 7 и на отдельной панели в Windows 8 или 8.1 (панель можно открыть клавишами Win+S).
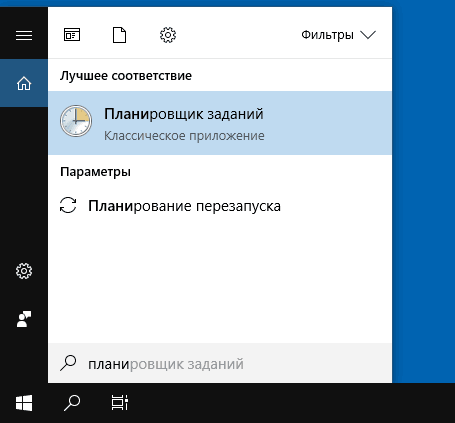
Если в поле поиска начать вводить «Планировщик заданий», то уже после ввода первых символов вы увидите нужный результат, запускающий планировщик заданий.
В целом, использование поиска Windows для открытия тех элементов, для которых возникает вопрос «как запустить?» — наверное, самый эффективный метод. Рекомендую помнить о нем и использовать при необходимости. Одновременно, почти все системные инструменты можно запустить более, чем одним методом, о чем — далее.
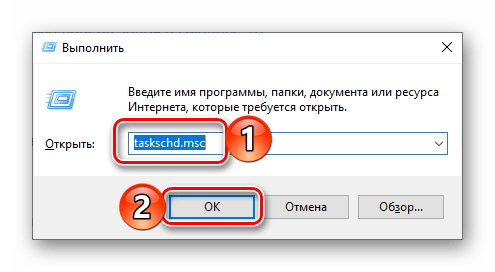
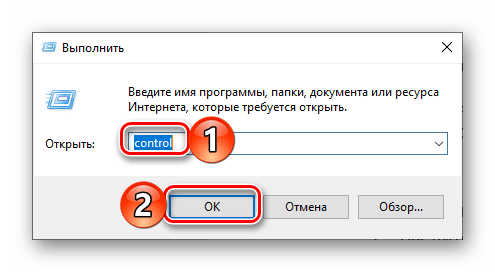
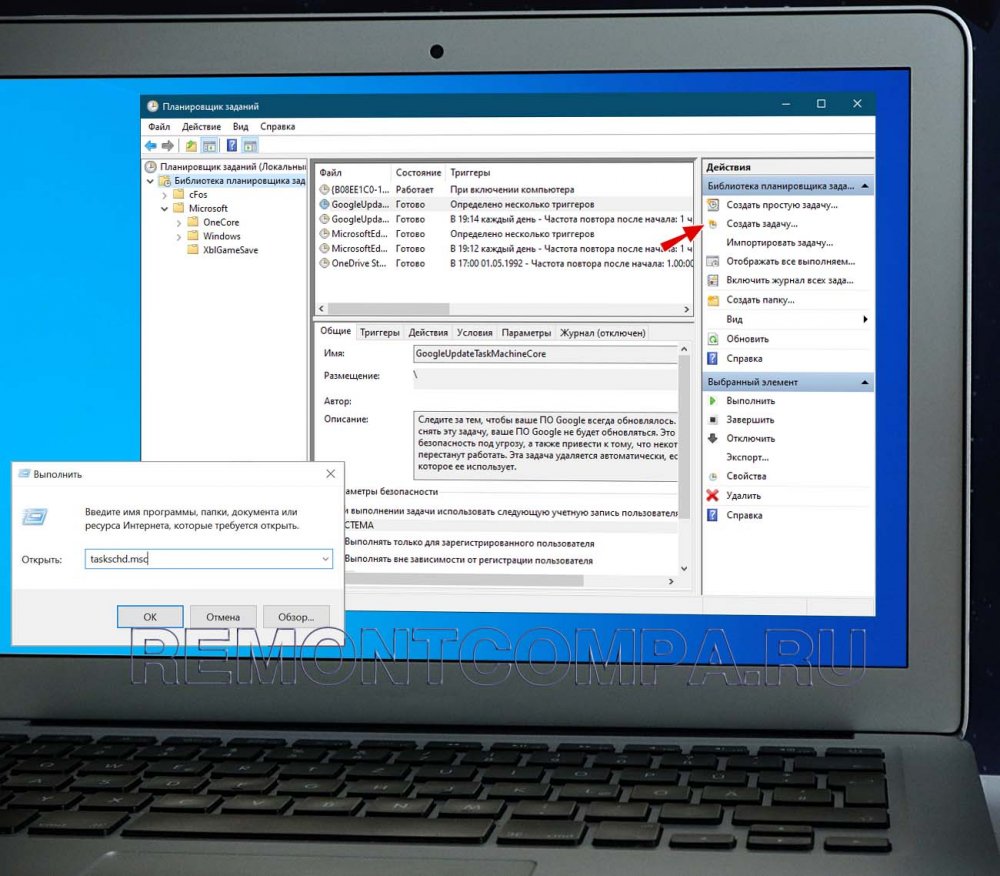
2. Как запустить планировщик заданий с помощью диалогового окна «Выполнить»
Во всех версиях ОС от Microsoft этот способ будет одинаковым:
- Нажмите клавиши Win+R на клавиатуре (где Win — клавиша с эмблемой ОС), откроется диалоговое окно «Выполнить».
- Введите в него taskschd.msc и нажмите Enter — запустится планировщик заданий.


Эту же команду можно ввести и в командной строке или PowerShell — результат будет аналогичным.
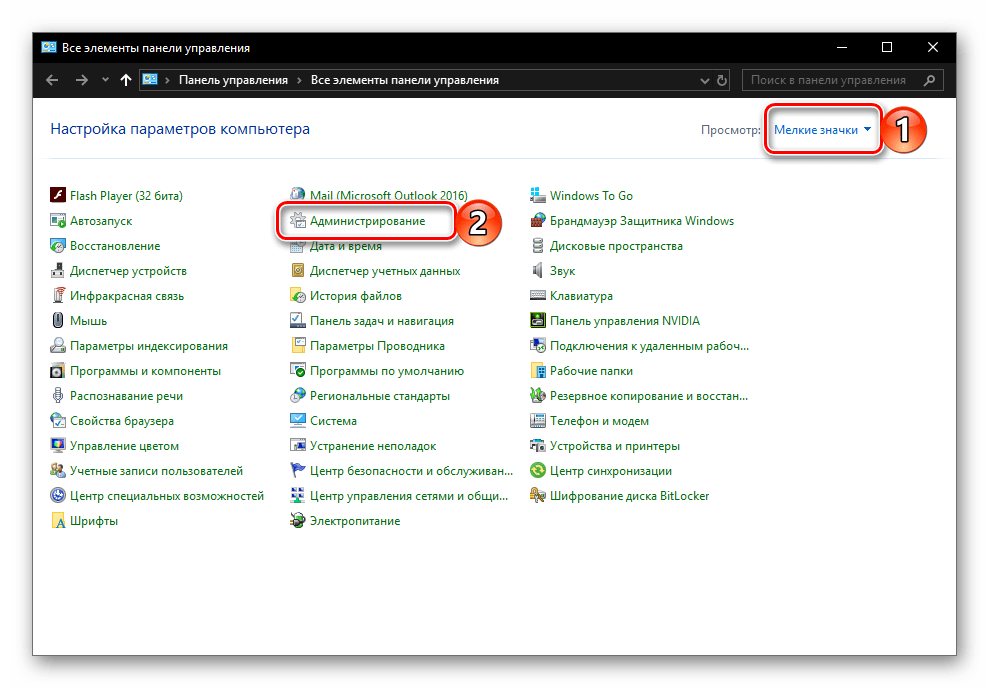
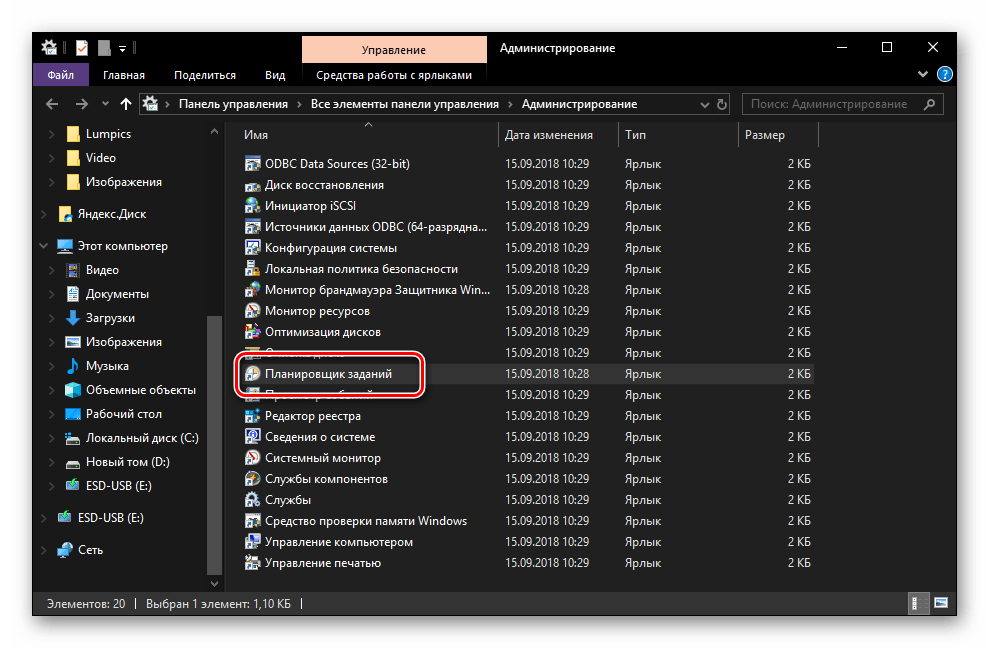
3. Планировщик заданий в панели управления
Запустить планировщик заданий можно и из панели управления:
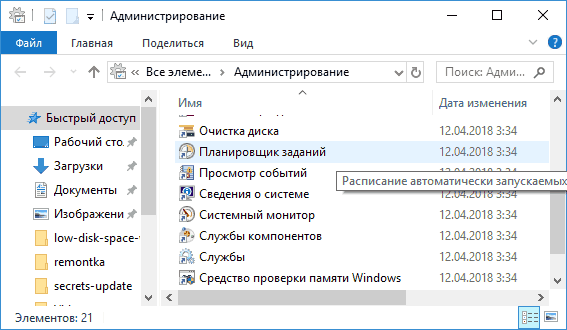
- Откройте панель управления.
- Откройте пункт «Администрирование», если в панели управления установлен вид «Значки», или «Система и безопасность», если установлен вид «Категории».

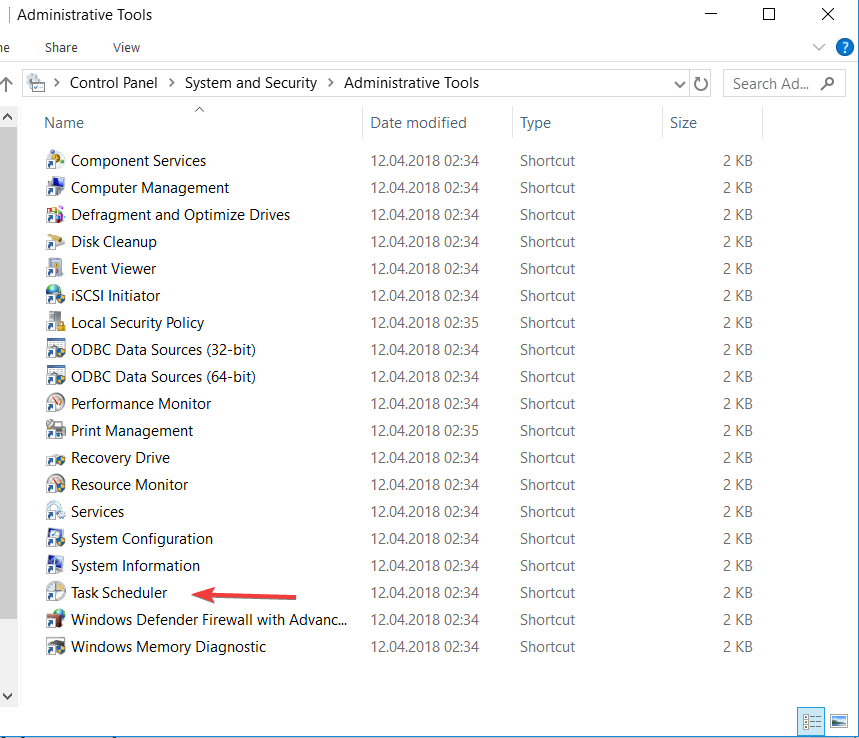
- Откройте «Планировщик заданий» (или «Расписание выполнения задач» для случая с просмотром в виде «Категорий»).


4. В утилите «Управление компьютером»
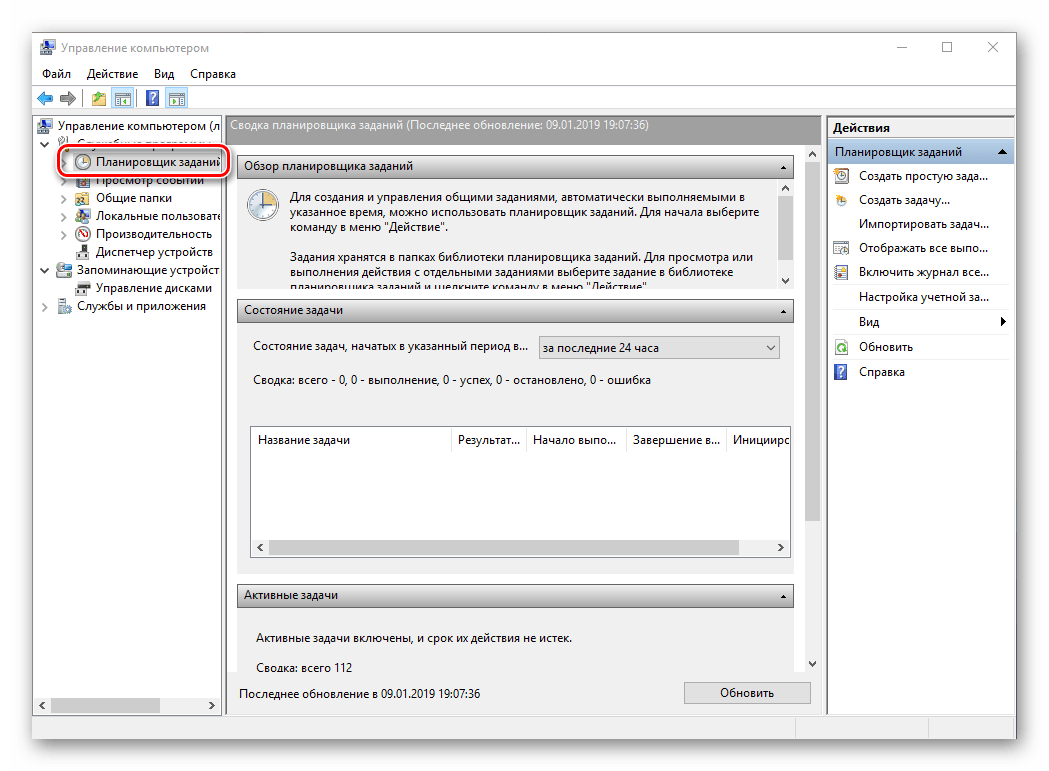
Планировщик заданий присутствует в системе и как элемент встроенной утилиты «Управление компьютером».
- Запустите управление компьютером, для этого, например, можно нажать клавиши Win+R, ввести compmgmt.msc и нажать Enter.
- В левой панели, в разделе «Служебные программы» выберите «Планировщик заданий».


Планировщик заданий будет открыт прямо в окне «Управление компьютером».
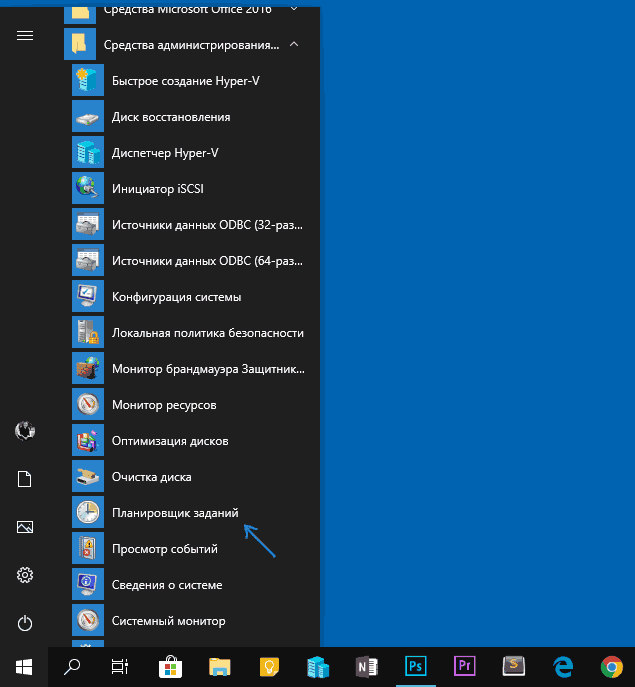
5. Запуск планировщика заданий из меню Пуск
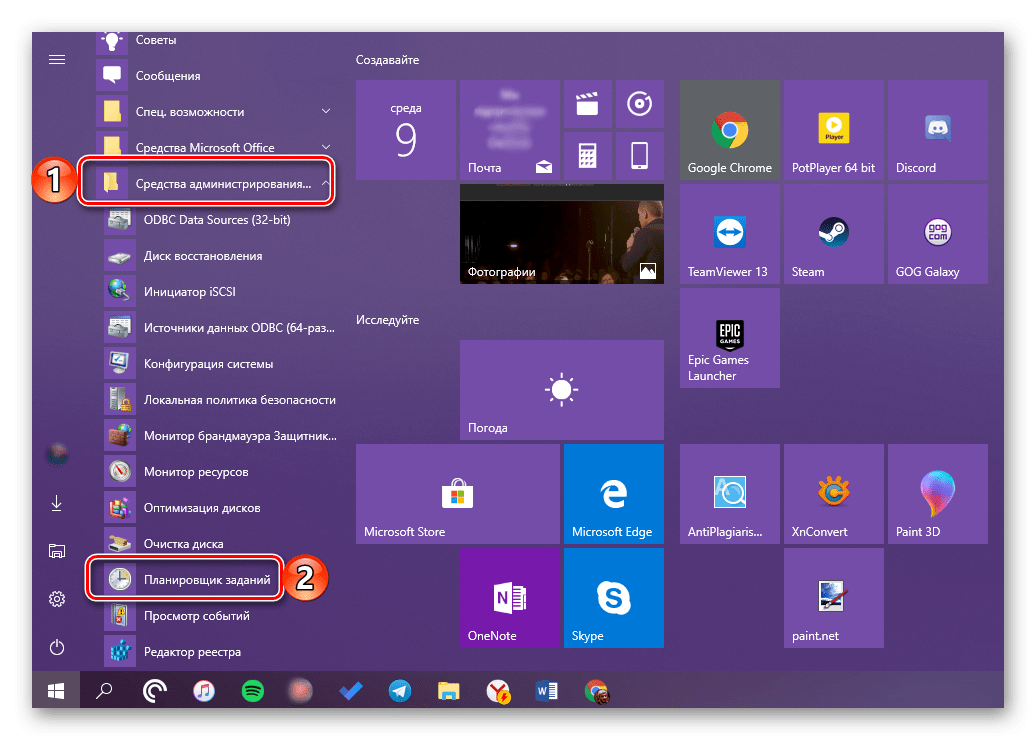
Планировщик заданий также присутствует и в меню Пуск Windows 10 и Windows 7. В 10-ке его можно найти в разделе (папке) «Средства администрирования Windows».
В Windows 7 он находится в Пуск — Стандартные — Служебные.
Это не все способы запуска планировщика заданий, но, уверен, для большинства ситуаций описанных методов будет вполне достаточно. Если же что-то не получается или остаются вопросы, задавайте в комментариях, я постараюсь ответить.
Все способы:
- Открытие «Планировщика заданий» в Виндовс 10
- Способ 1: Поиск по системе
- Способ 2: Функция «Выполнить»
- Способ 3: Стартовое меню «Пуск»
- Способ 4: «Управление компьютером»
- Способ 5: «Панель управления»
- Способ 6: Исполняемый файл
- Создание ярлыка для быстрого запуска
- Заключение
- Вопросы и ответы: 0
«Планировщик заданий» — важный компонент Windows, предоставляющий возможность настройки и автоматизации действий при определенных событиях, происходящих в среде операционной системы. Существует довольно много вариантов его использования, но сегодня мы расскажем немного о другом – о способах запуска данного инструмента.
Открытие «Планировщика заданий» в Виндовс 10
Несмотря широкие возможности автоматизации и упрощения работы с ПК, которые предоставляет «Планировщик заданий», среднестатистический пользователь не слишком уж часто к нему обращается. И все же многим будет полезно знать обо всех возможных вариантах его открытия.
Способ 1: Поиск по системе
Интегрированную в ОС Windows 10 функцию поиска можно использовать не только по ее прямому назначению, но и для запуска различных программ, в том числе и стандартных, коим является «Планировщик заданий».
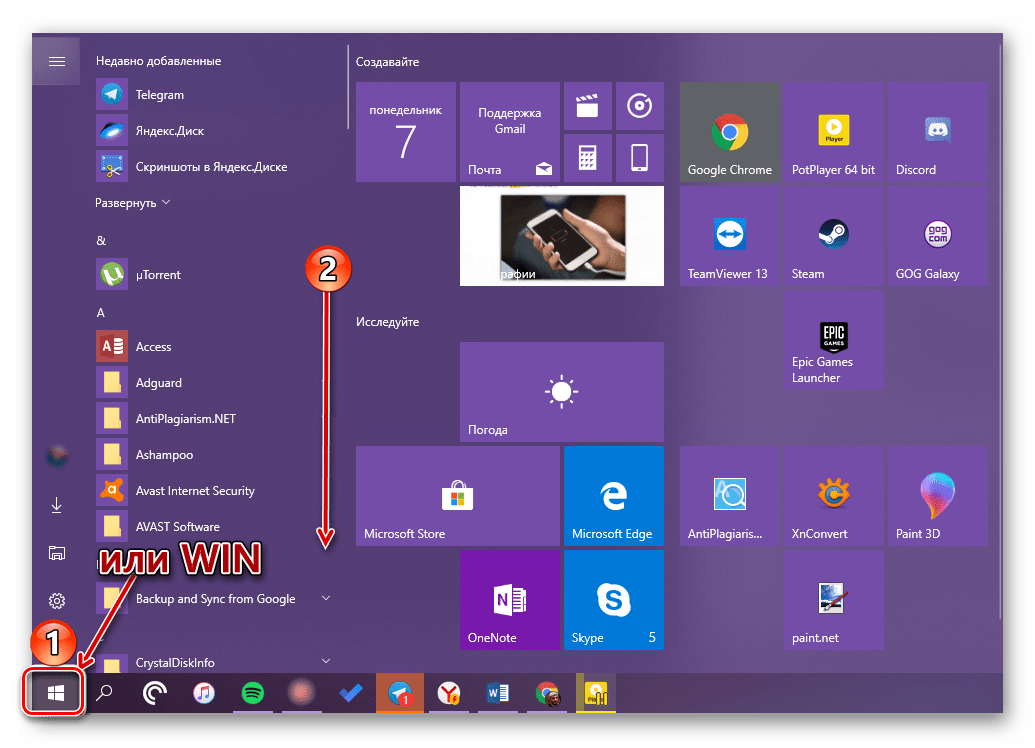
- Вызовите окно поиска, нажав по его значку на панели задач или воспользовавшись клавишами «WIN+S».
- Начните вводить в строку запрос «планировщик заданий», без кавычек.
- Как только увидите интересующий нас компонент в поисковой выдаче, запустите его одинарным кликом левой кнопки мышки (ЛКМ).
Читайте также: Как сделать прозрачную панель задач в Виндовс 10
Способ 2: Функция «Выполнить»
А вот данный элемент системы предназначен как раз-таки для запуска стандартных приложений, для каждого из которых предусмотрена стандартная команда.
- Нажмите «WIN+R» для вызова окна «Выполнить».
- Введите в его поисковую строку следующий запрос:
taskschd.msc - Нажмите «ОК» или «ENTER», что инициирует открытие «Планировщика заданий».
Способ 3: Стартовое меню «Пуск»
В меню «Пуск» можно найти абсолютно любое приложение, установленное на компьютере, а также большинство стандартных для операционной системы программ.
- Откройте «Пуск» и начните листать вниз список представленных в нем элементов.
- Найдите папку «Средства администрирования» и разверните ее.
- Запустите находящийся в этой директории «Планировщик заданий».
Способ 4: «Управление компьютером»
Данный раздел Виндовс 10, как понятно из его названия, предоставляет возможность управления отдельными компонентами операционной системы. Интересующий нас «Планировщик заданий» является его частью.
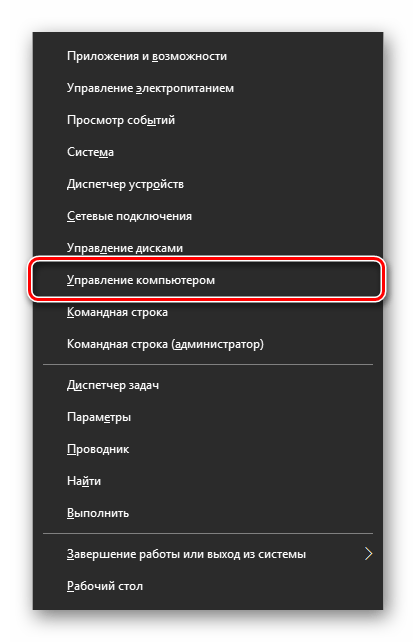
- Нажмите «WIN+X» на клавиатуре или выполните клик правой кнопкой мышки (ПКМ) по значку стартового меню «Пуск».
- Выберите пункт «Управление компьютером».
- На боковой панели открывшегося окна перейдите к «Планировщику заданий».

Читайте также: Просмотр журнала событий в Windows 10
Способ 5: «Панель управления»
Разработчики Виндовс 10 постепенно переносят все элементы управления в «Параметры», но для запуска «Планировщика» по-прежнему можно воспользоваться «Панелью».
- Вызовите окно «Выполнить», введите в него представленную ниже команду и выполните ее нажатием «ОК» или «ENTER»:
control - Измените режим просмотра на «Мелкие значки», если изначально будет выбран другой, и перейдите к разделу «Администрирование».
- В открывшейся директории найдите «Планировщик заданий» и запустите его.
Читайте также: Как открыть «Панель управления» в Windows 10
Способ 6: Исполняемый файл
Как и любая программа, «Планировщик заданий» имеет свое законное место на системном диске, в котором находится файл для его прямого запуска. Скопируйте представленный ниже путь и перейдите по нему в системном «Проводнике» Виндовс («WIN+E» для запуска).
C:\Windows\System32
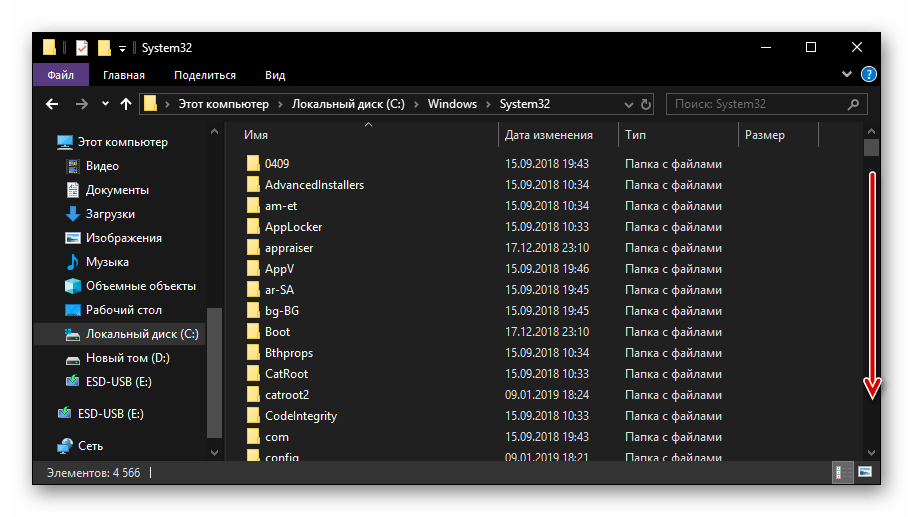
Убедитесь, что содержащиеся в папке элементы отсортированы в алфавитном порядке (так будет проще искать) и пролистайте его вниз, пока не найдете приложение с названием taskschd и уже знакомым нам с вами ярлыком. Это и есть «Планировщик заданий».
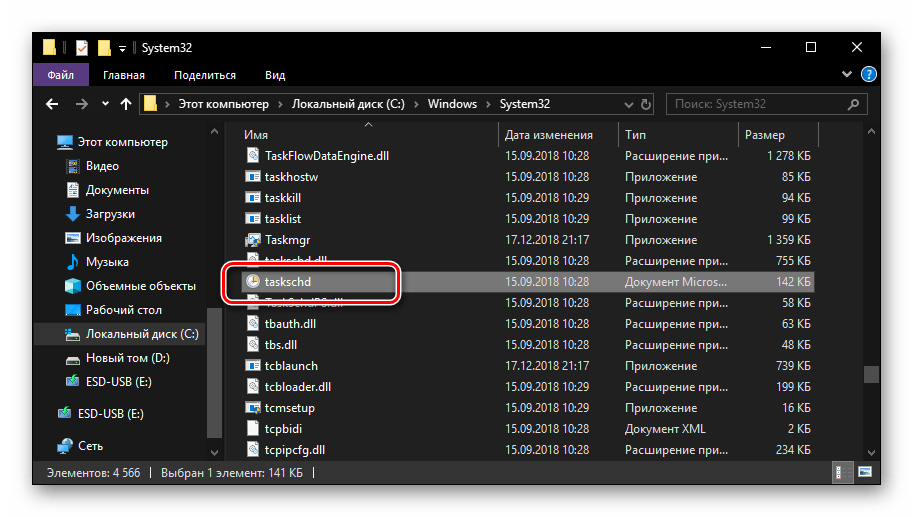
Есть и еще более быстрый вариант запуска: скопируйте представленный ниже путь в адресную строку «Проводника» и нажмите «ENTER» — это инициирует непосредственное открытие программы.
C:\Windows\System32\taskschd.msc
Читайте также: Как открыть «Проводник» в Windows 10
Создание ярлыка для быстрого запуска
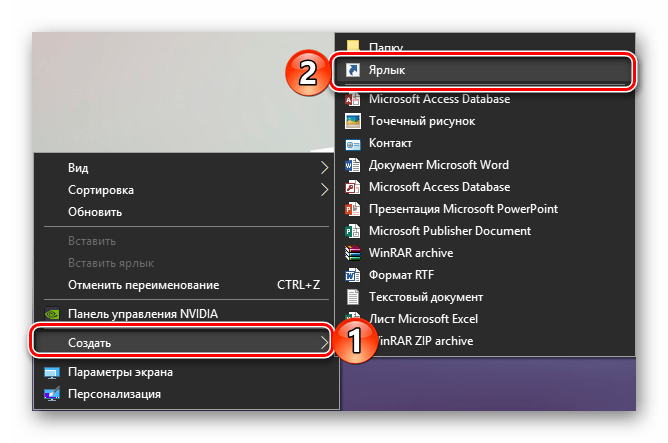
Для обеспечения возможности быстрого вызова «Планировщика заданий» нелишним будет создать его ярлык на Рабочем столе. Делается это следующим образом:
- Выйдите на Рабочий стол и кликните ПКМ по свободному месту.
- В открывшемся контекстном меню поочередно перейдите по пунктам «Создать» — «Ярлык».
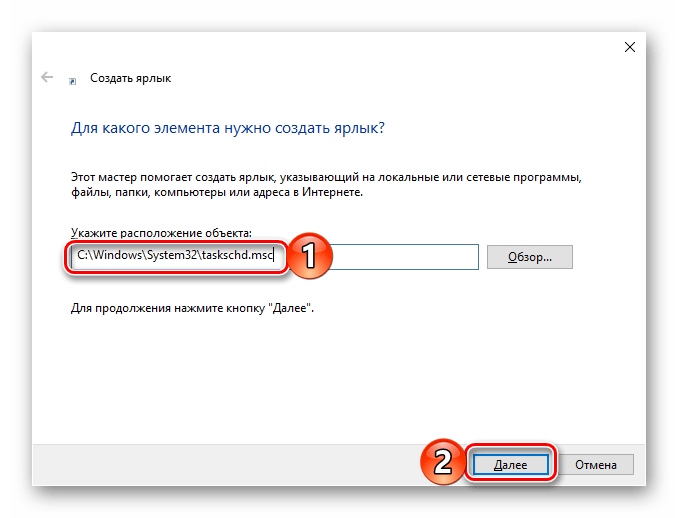
- В появившемся окне введите полный путь к файлу «Планировщика», который мы указали в конце предыдущего способа и продублировали ниже, после чего нажмите «Далее».
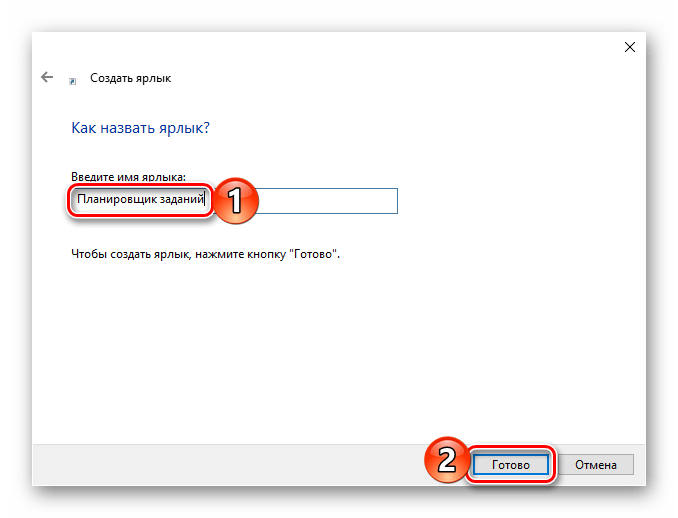
C:\Windows\System32\taskschd.msc - Задайте создаваемому ярлыку желаемое имя, например, очевидное «Планировщик заданий». Нажмите «Готово» для завершения.
- С этого момента вы сможете запускать данный компонент системы через его ярлык, добавленный на Рабочий стол.

Читайте также: Как создать ярлык «Мой компьютер» на Рабочем столе Виндовс 10
Заключение
На этом мы закончим, ведь теперь вы знаете не только о том, как открыть «Планировщик заданий» в Windows 10, но и как создать ярлык для его быстрого запуска.
Наша группа в TelegramПолезные советы и помощь
Многие программы, особенно те из них, которые предназначенные для обслуживания Windows, имеют функцию автозагрузки, то есть могут автоматически запускаться после загрузки рабочего окружения операционной системы. Если программа не оснащена такой функцией, добавить её в автозагрузку можно вручную, разместив её ярлык в каталог startup или прописав путь к её исполняемому файлу в специальный ключ системного реестра. Отредактировав другой ключ в реестре, можно включить отсрочку старта добавленных в автозагрузку программ, если же вам нужно что-то большее, скажем, вы хотите запускать программы по расписанию или по событию, вам потребуется что-то большее. Думаете, это какая-то особо продвинутая сторонняя программа-менеджер? Ничего подобного, ведь подобная программа уже имеется в самой Windows. Называется она Планировщик заданий.
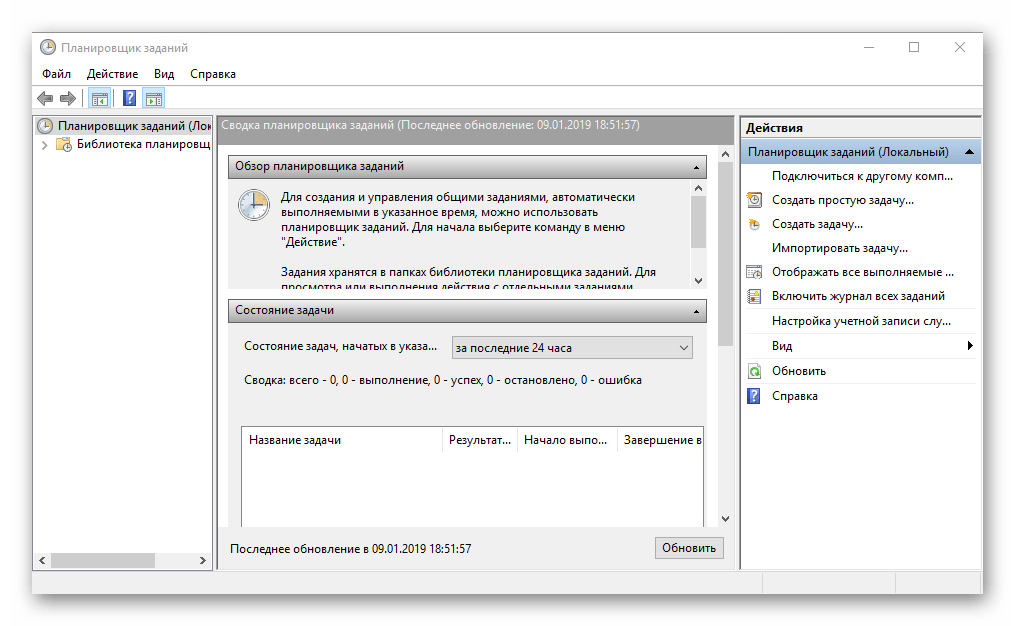
Планировщик заданий представляет собой встроенный компонент Windows, предназначенный для автоматического запуска скриптов и программ в определённое время и в определённые моменты. Появился он ещё в Windows 95, но тогда он назывался System Agent, название Task Scheduler, которое остаётся актуальным и до нынешнего дня, он получил в Windows 98. В современных версиях Windows Планировщик представлен файлом консоли Microsoft Management taskschd.msc в системном каталоге System32 и набором связанных динамических библиотек. В Windows 10 открыть Планировщик можно из меню Пуск, из результатов поиска, а также одноименной командой taskschd.msc в окошке «Выполнить».
Рабочее пространство оснастки разделено на три основные области. В левой колонке располагается Библиотека, представляющая собой древовидную иерархию каталогов, или узлов, содержащих списки заданий, созданных системными компонентами и установленными на компьютере сторонними приложениями. Средняя колонка служит для получения сведений о конкретных заданиях, в ней вы можете просмотреть описание и параметры задания, триггеры и условия его выполнения.
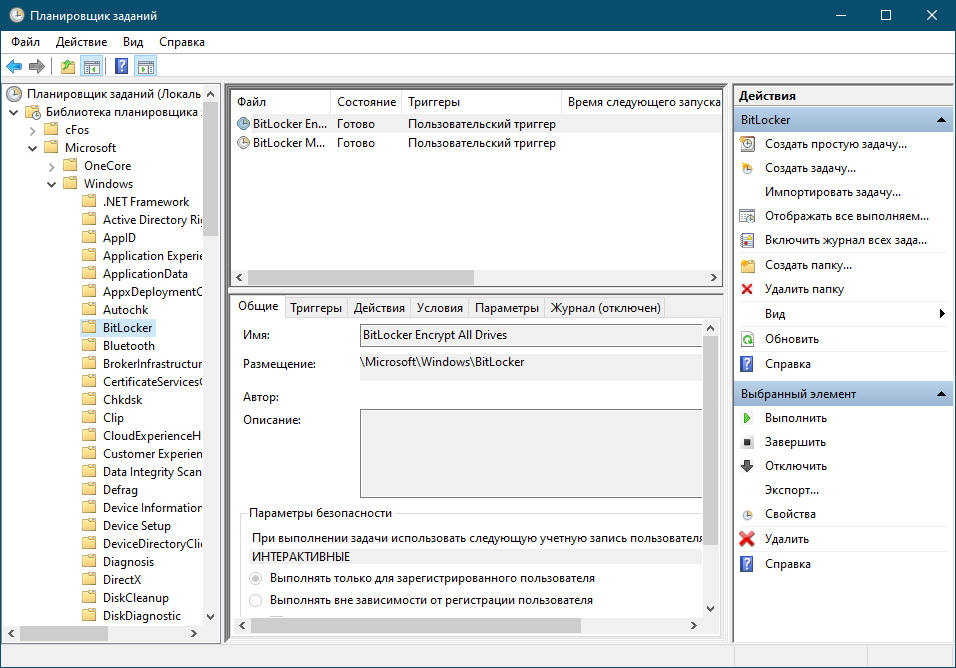
Если же дважды кликнуть по заданию мышкой, откроется окошко свойств, оно реже редактор, в котором можно будет изменить параметры запуска задачи. Правая колонка содержит меню операций, которые могут применены к заданиям. Вкратце рассмотрим главные из них.
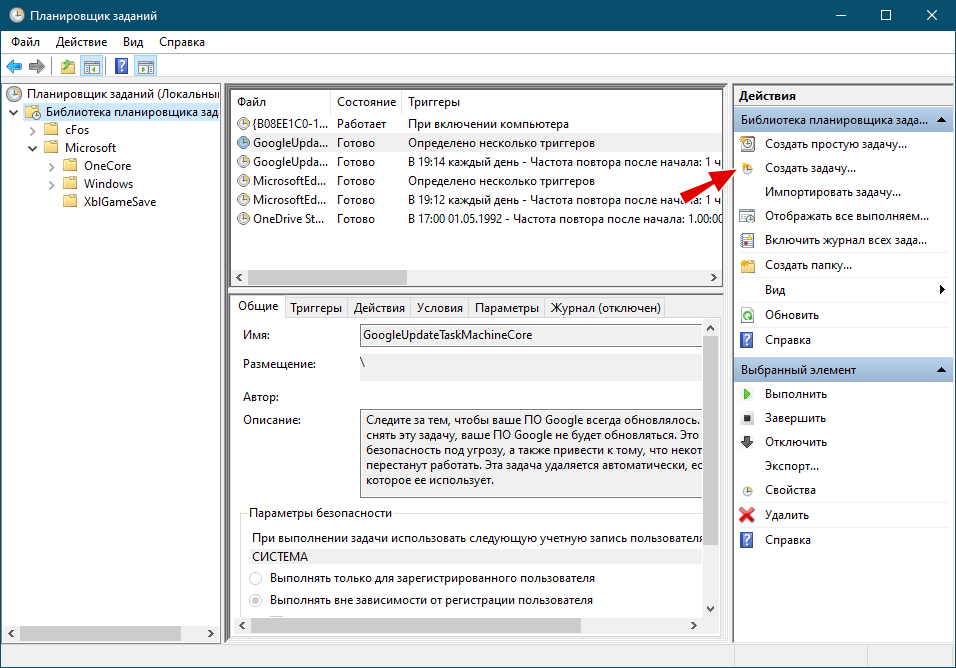
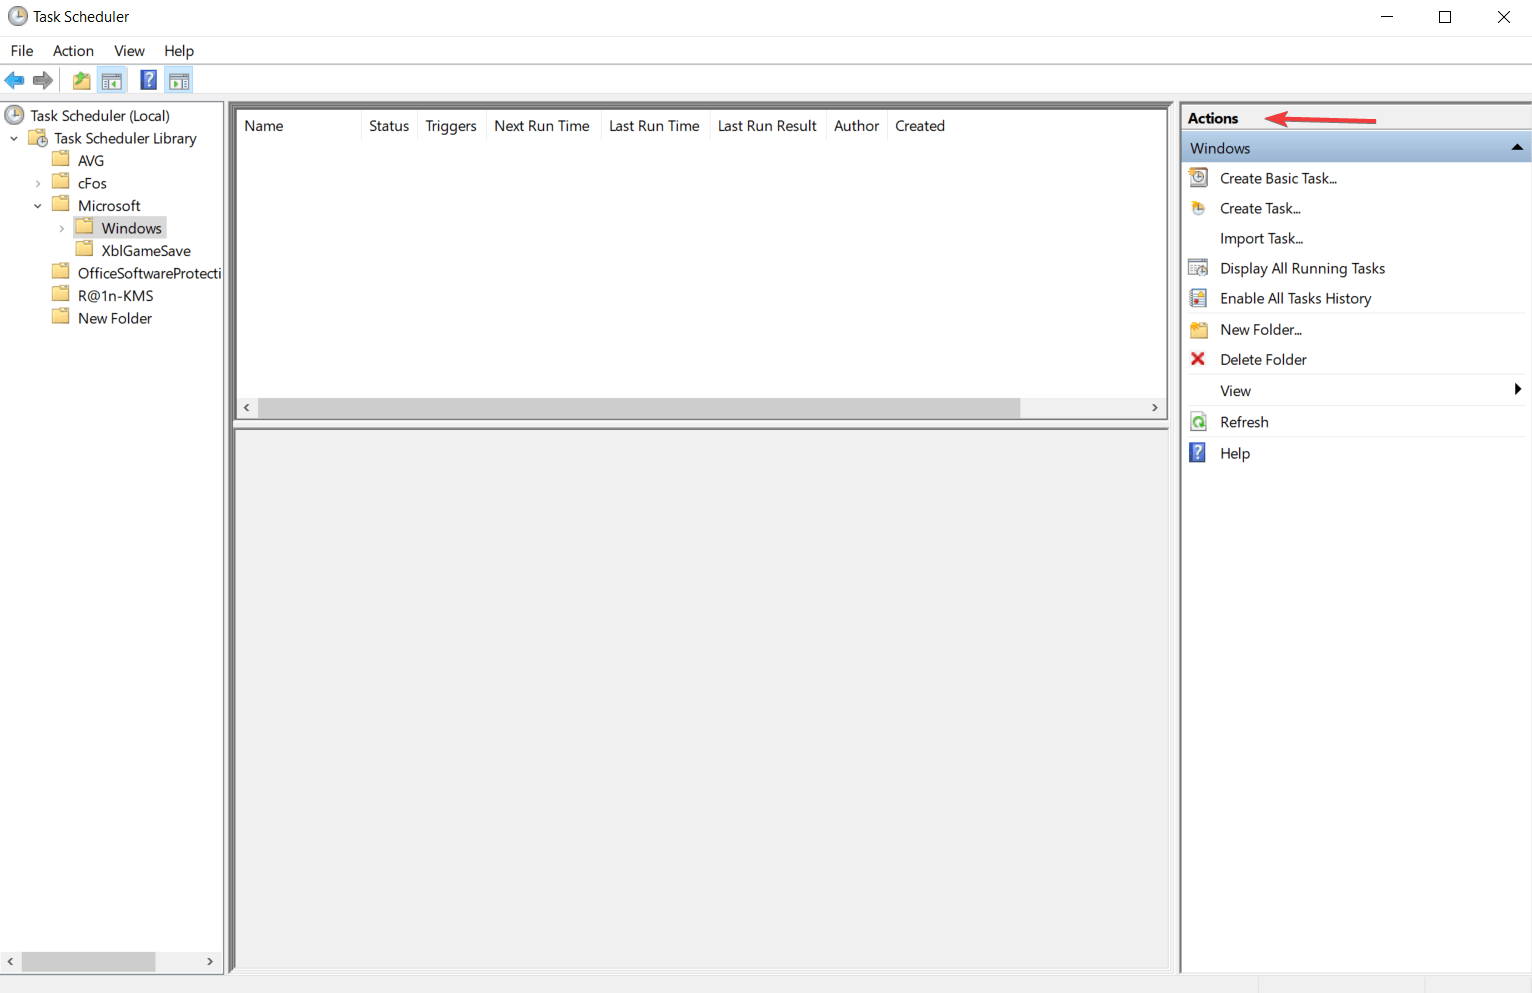
- Создать (простую) задачу — служит для создания новой задачи.
- Импортировать задачу — добавляет в Планировщик задачу из XML-файла, используется для восстановления задач из резервных копий и переноса задач с одного компьютера на другой.
- Включить журнал для всех заданий — активирует функцию логирования выполняемых заданий.
- Выполнить — запускает немедленное выполнение задачи.
- Завершить — останавливает выполняемое задание.
- Отключить — временно отключает задание.
- Экспорт — сохраняет задачу в XML-файл, который может использоваться как резервная копия задания.
- Свойства — открывает окно с параметрами задания, доступными для просмотра и редактирования.
- Удалить — удаляет выбранное задание.
В верхней части окна Планировщика располагается стандартное текстовое меню, обеспечивающие доступ к базовым функциям оснастки. Особого интереса оно не представляет, так как как основная часть доступных в нём опций дублируется в правой колонке «Действия».
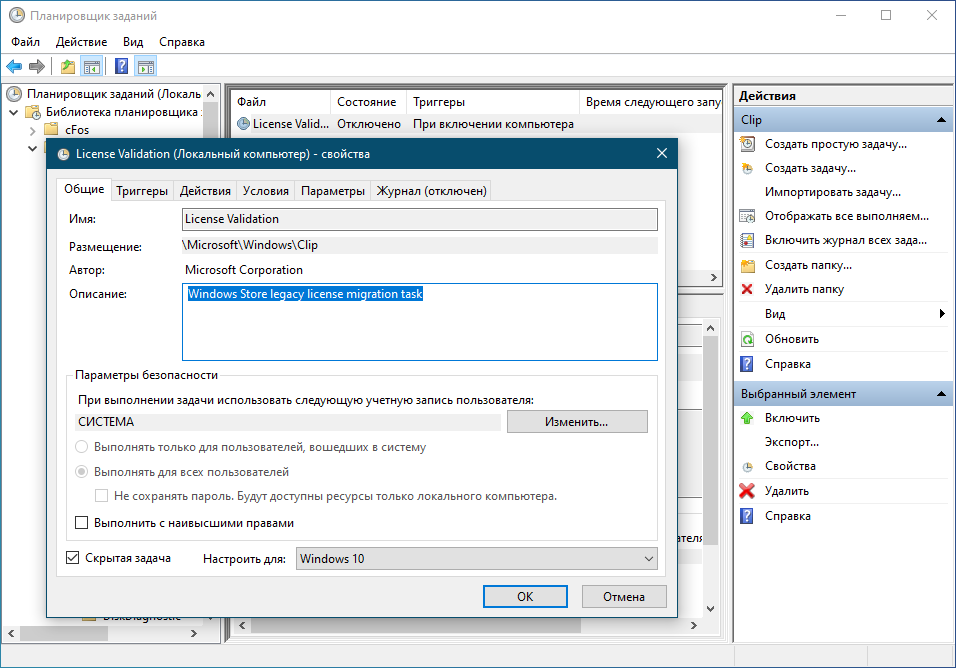
Каждое задание имеет набор свойств, например, свойствами являются название и описание задания. Свойства могут быть основными и дополнительными. Просмотреть и изменить их можно в упоминаемом выше окне свойств в соответствующих вкладках.
- Общие. К общим свойствам задания относится его имя, описание, права запуска, режим выполнения и учётная запись, от имени которой выполняется задание. Имя в данном примере является обязательным свойствам, тогда как описание — это свойства дополнительное, которое можно пропустить.
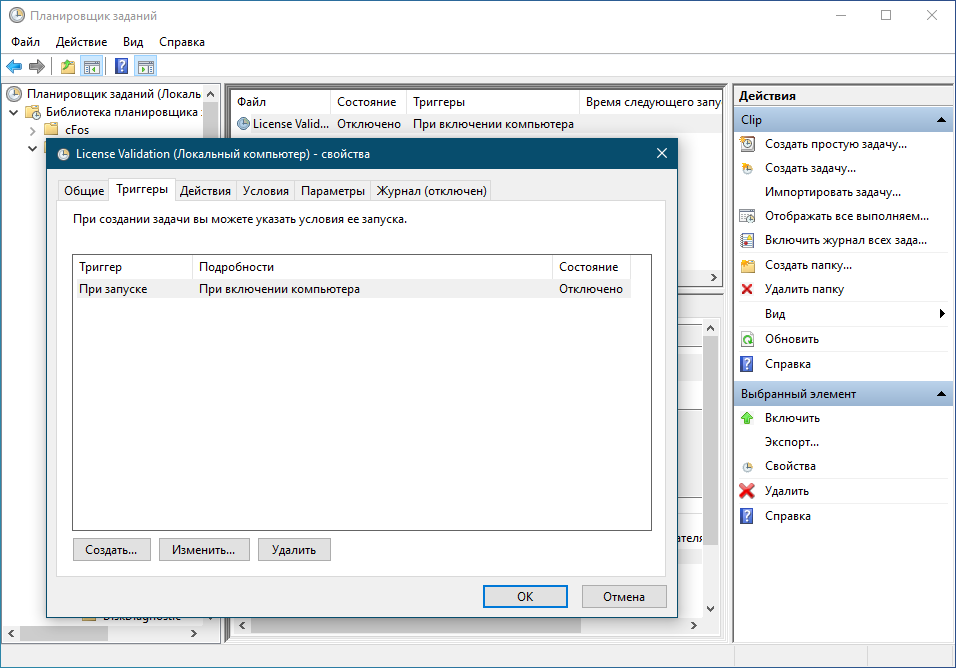
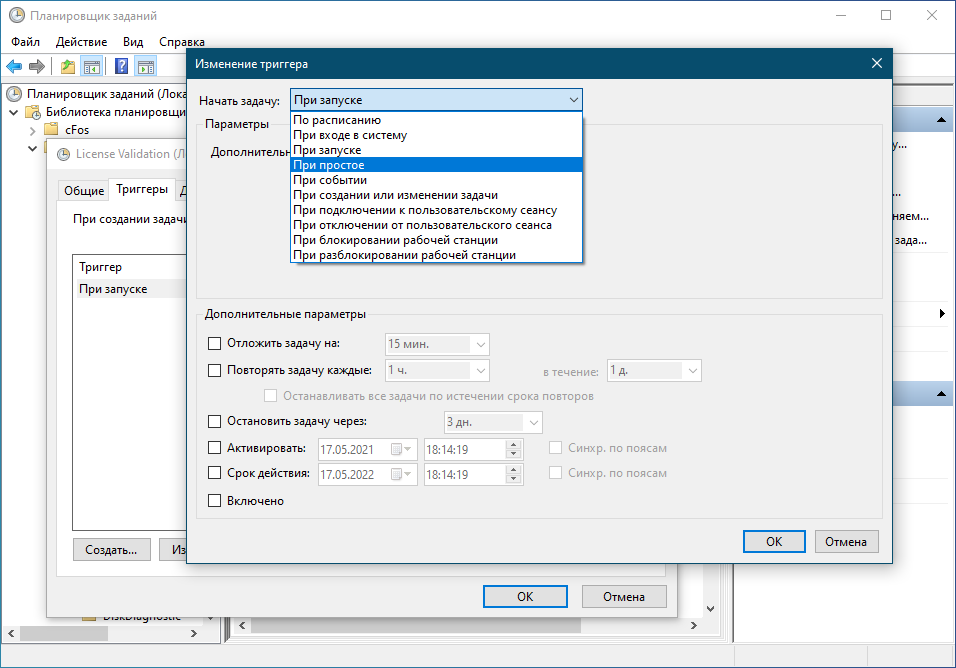
- Триггеры, или спусковые крючки. Триггер — это по сути событие, по которому выполняется задание. В качестве триггера может быть указано время (запуск задания по расписанию), а также определённое действие, например, загрузка или блокирование компьютера, вход пользователя в систему, создание и изменение другой задачи, подключение и отключение от пользовательского сеанса, отсутствие активности пользователя, ошибки и уведомления с определённым кодом и так далее. Особенно расширяют возможности автоматизации управления процессами триггеры, использующие системные события Журнала, которых в Планировщике заданий имеется огромное количество.
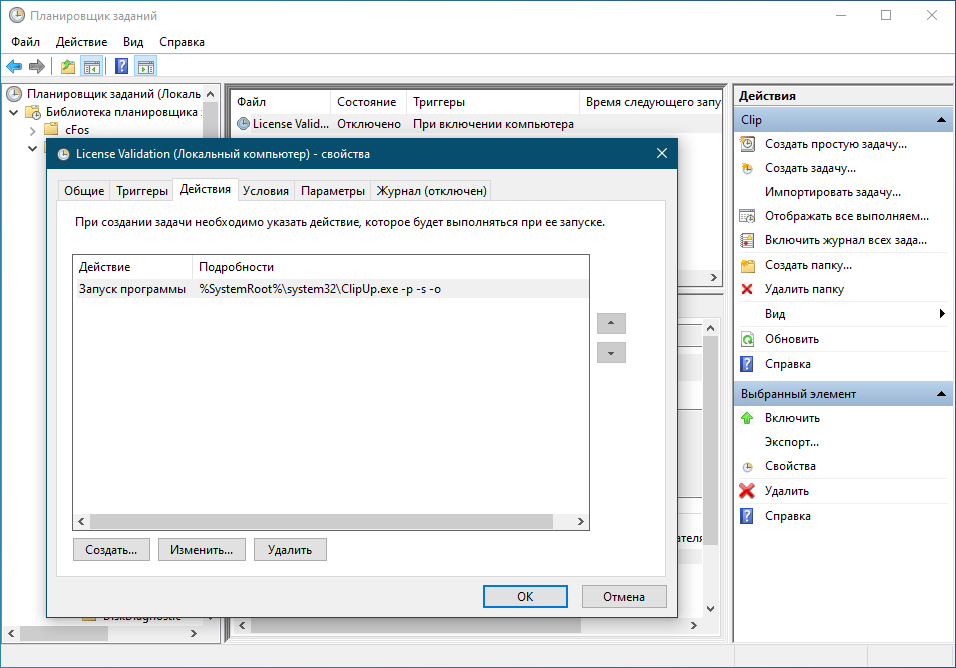
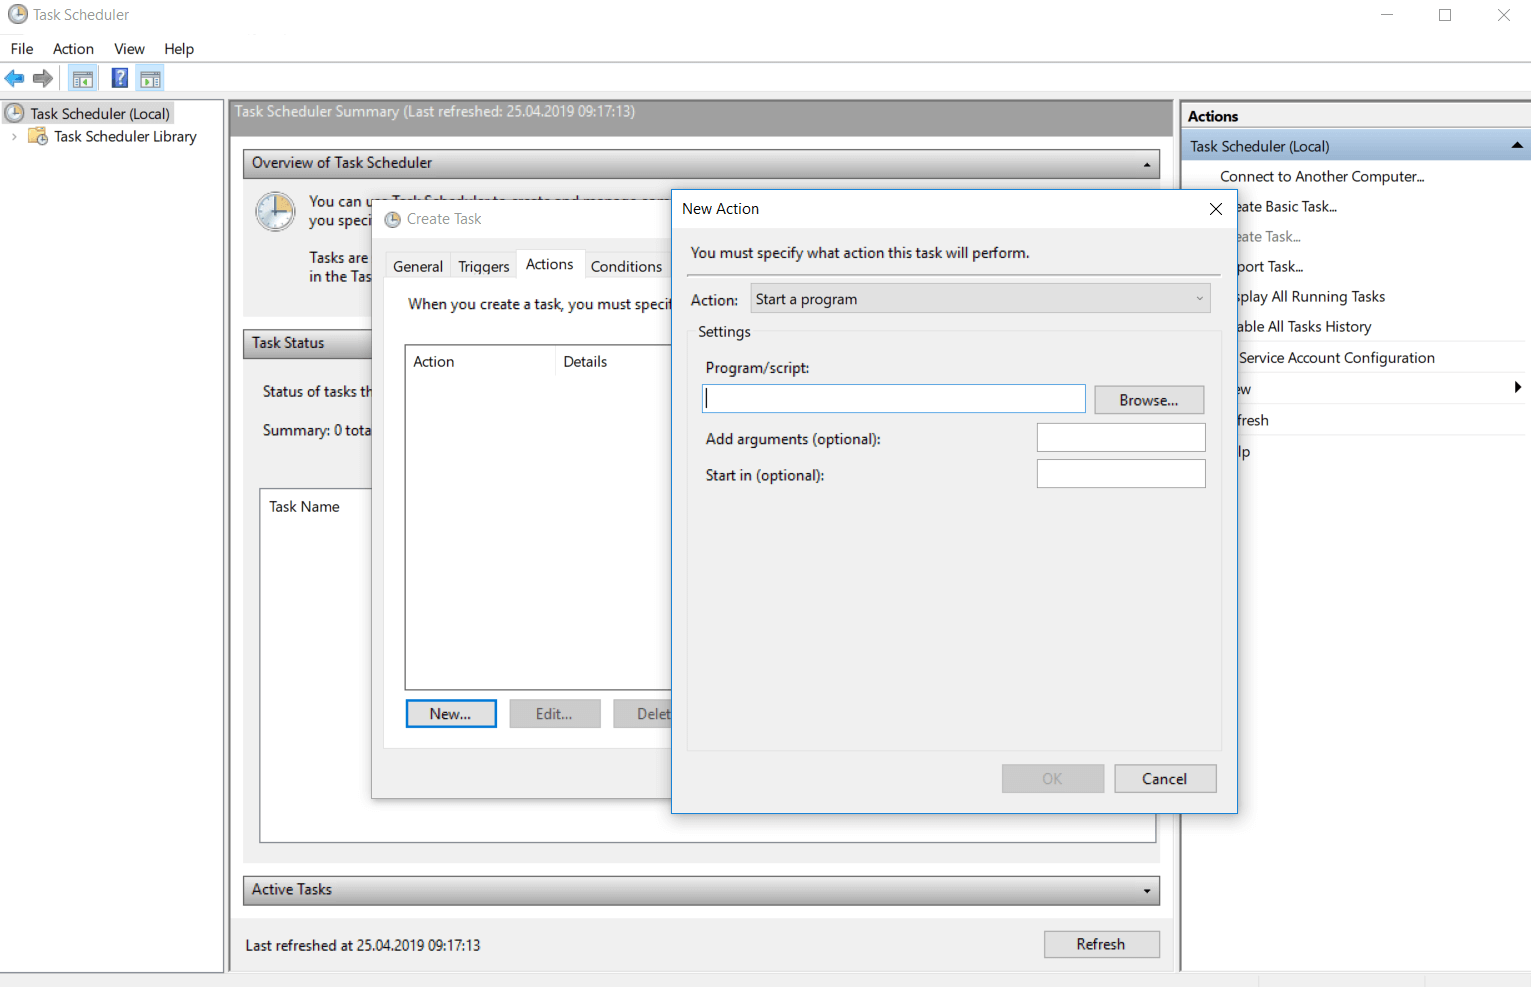
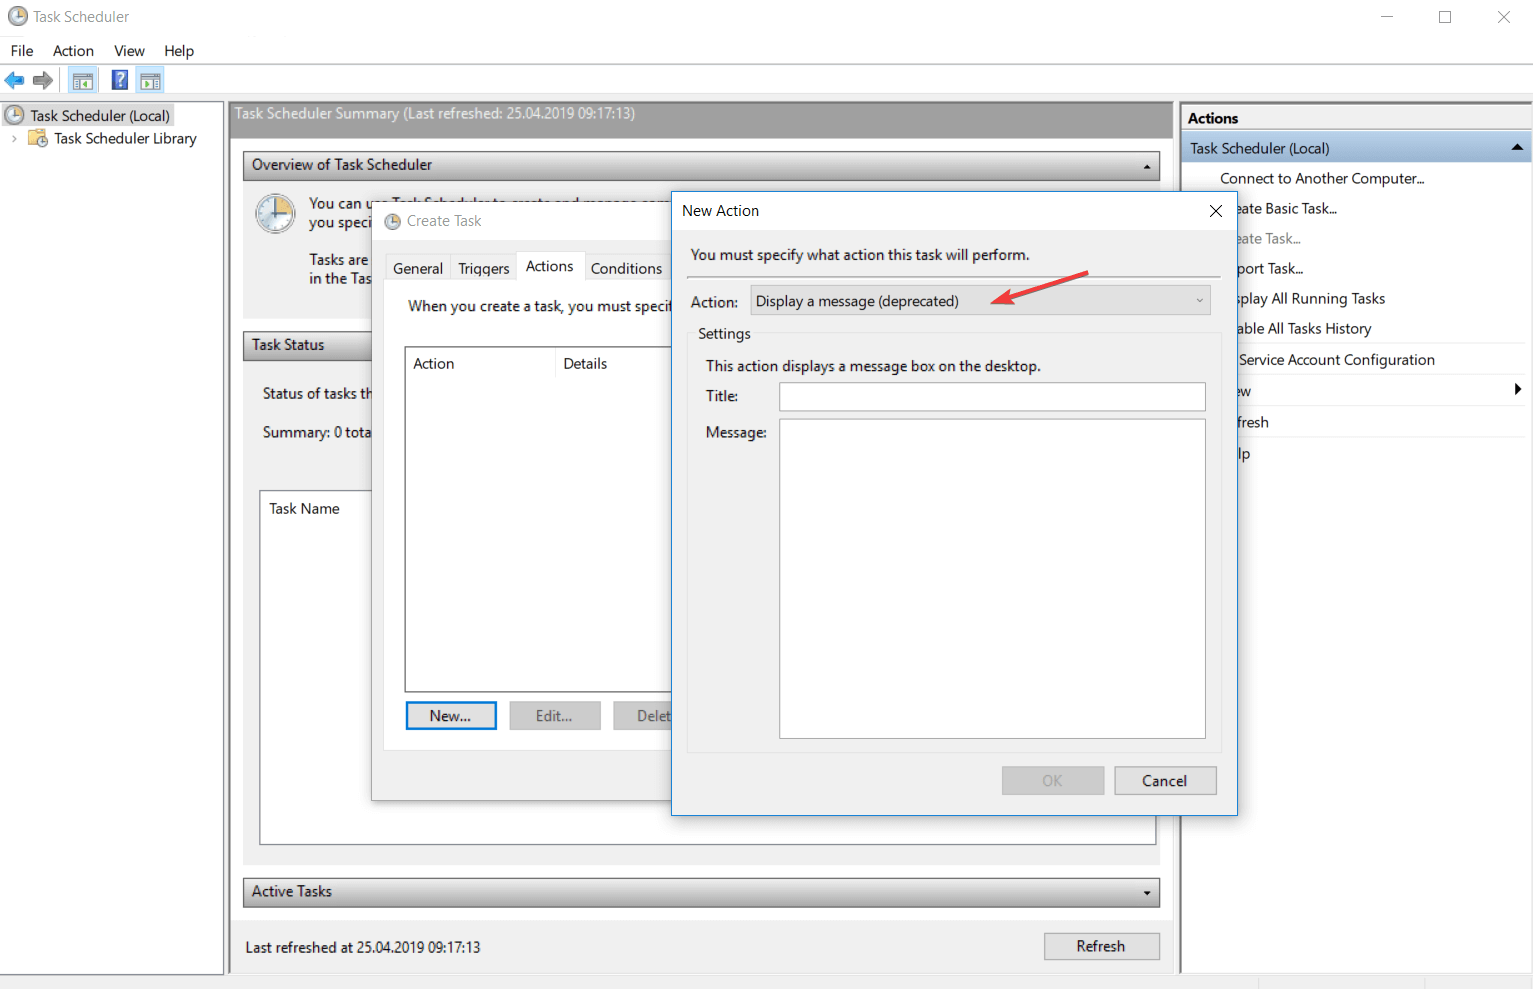
- Действия. Данное свойство определяет выполняемое в рамках созданной задачи действие — запуск программы или сценария, отправка сообщения по электронной почте или вывод уведомления (напоминания) на рабочий стол. В Windows 8.1 и 10 эти две последние функции считаются устаревшими и уже не работают, поэтому для вывода уведомлений и отправки сообщений по email Microsoft рекомендует использовать скрипты.

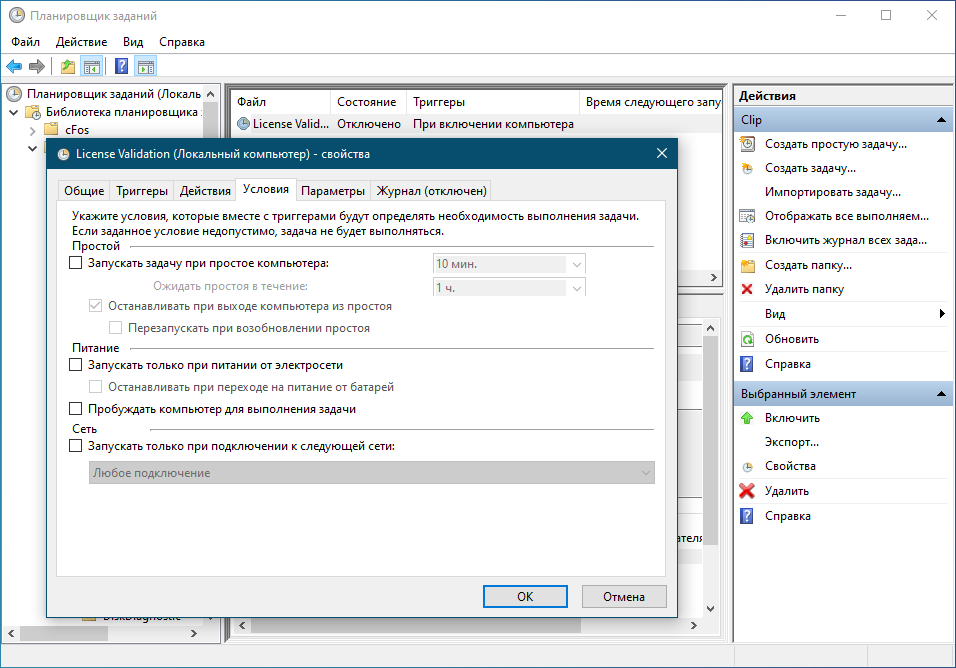
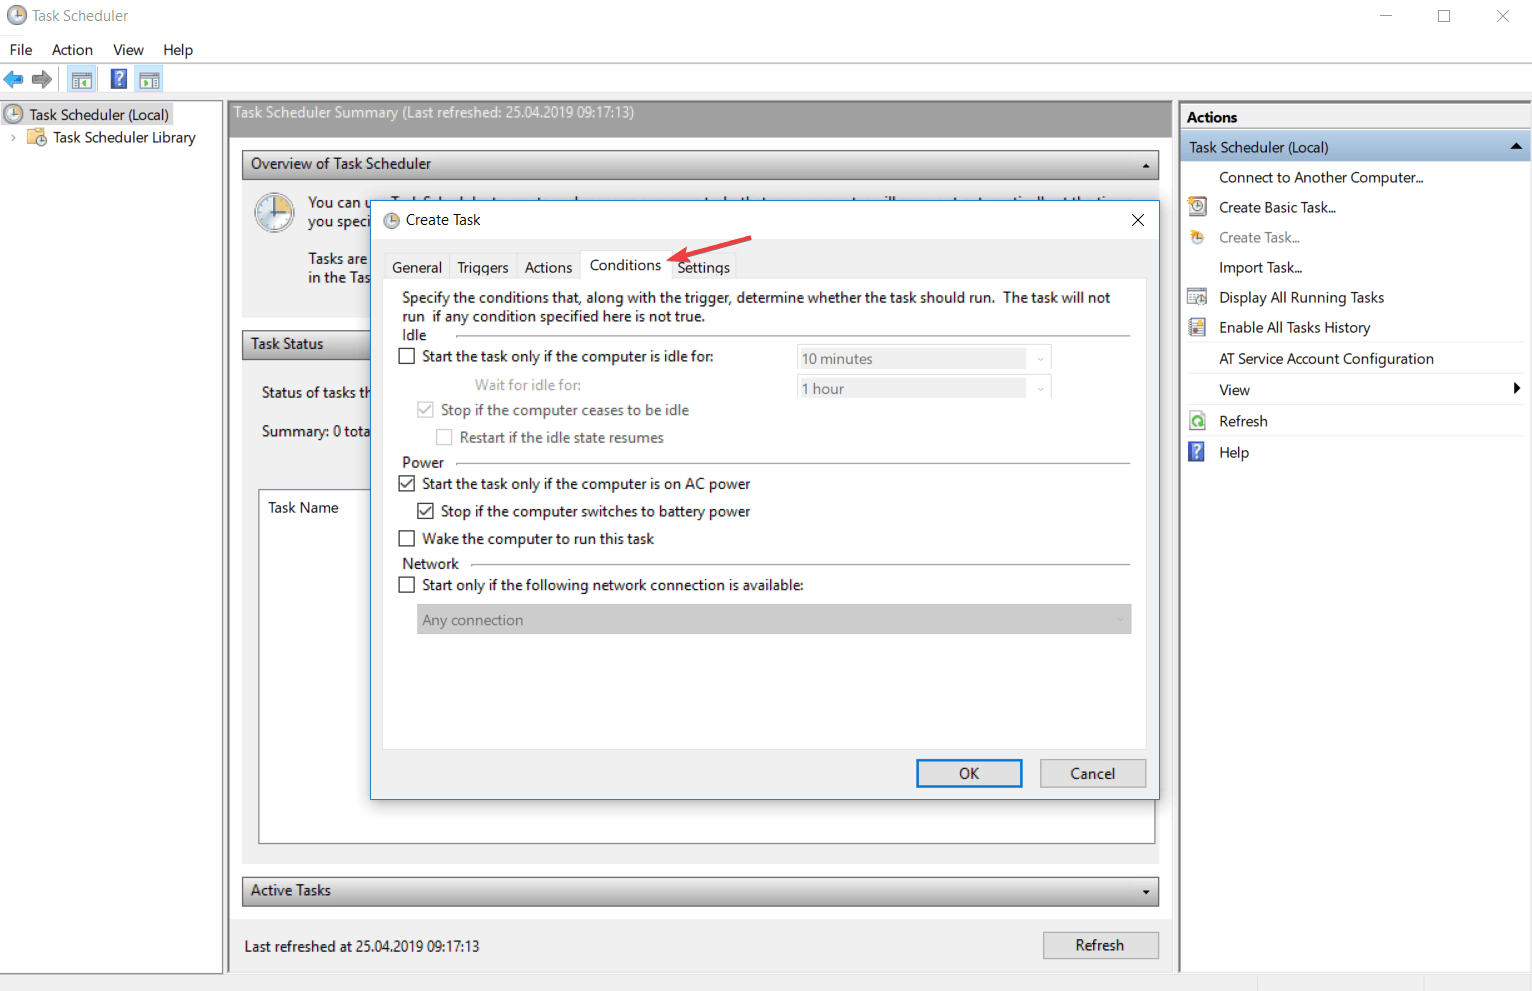
- Условия. Свойство «Условия» является уточняющим, оно используется как дополнение к триггерам, позволяя запускать или останавливать выполнение задания на основе длительности бездействия пользователя, режима электропитания и подключения к другой сети.
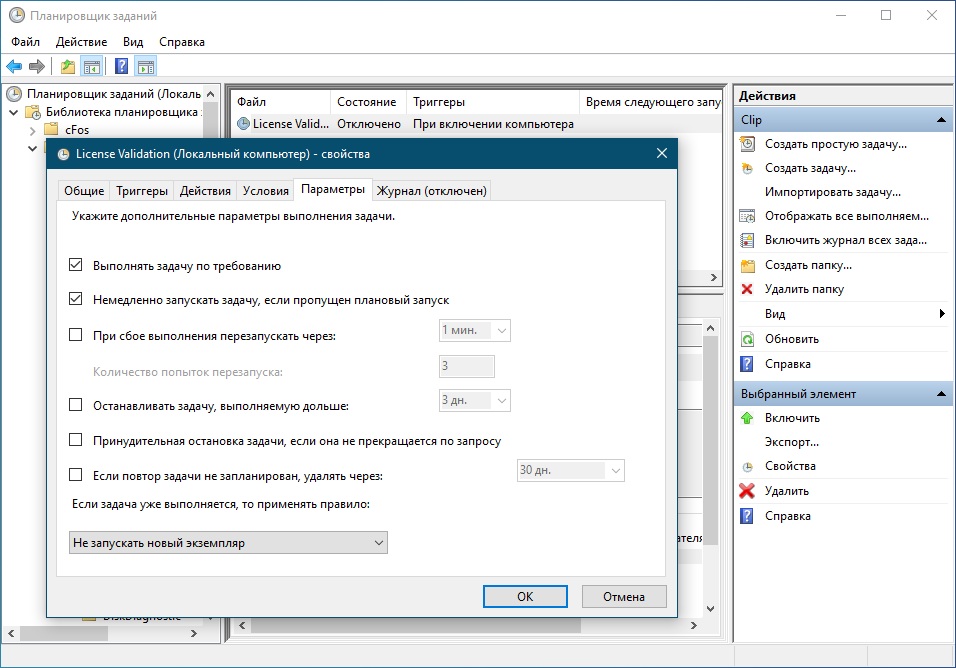
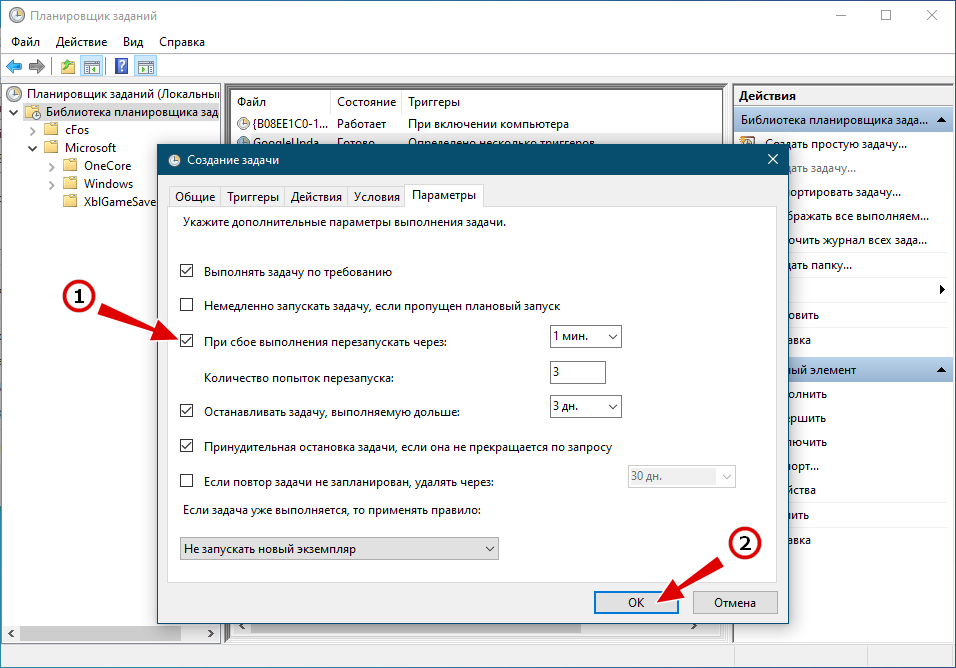
- Параметры. Дополнительная вкладка, содержащая настройки, позволяющие корректировать автоматическое выполнение заданий. Например, если при выполнении задания произойдёт сбой, активированная опция «При сбое выполнения перезапускать через» запустит задание повторно через указанный период времени.
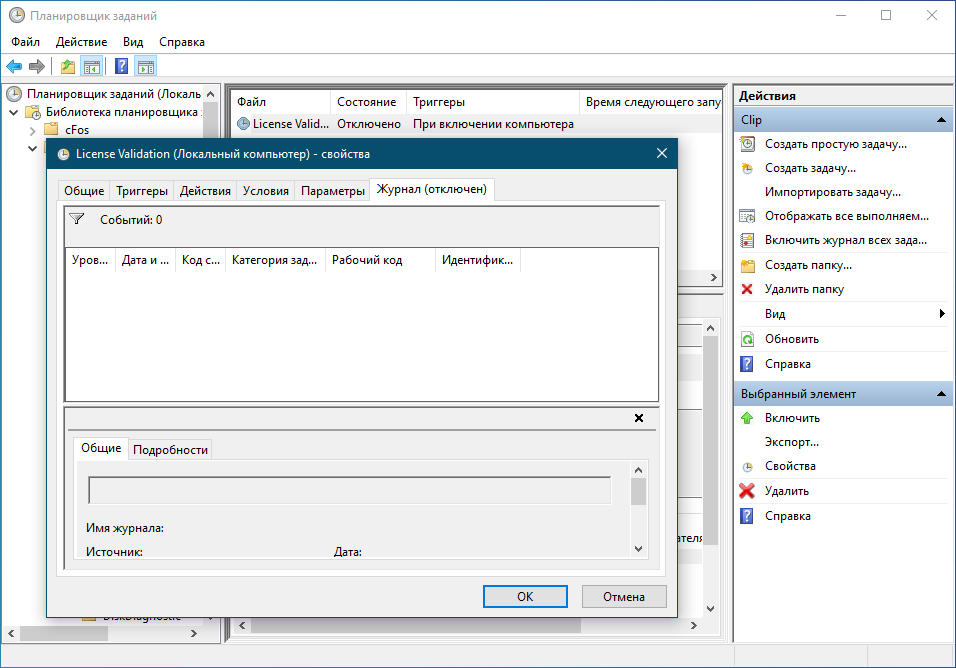
Окно свойств также содержит ещё одну дополнительную вкладку «Журнал». Если последний включить, Windows станет журналировать выполнение заданий самим Планировщиком. Особой нужды в таком журналировании нет, поэтому по умолчанию данная опция отключена.
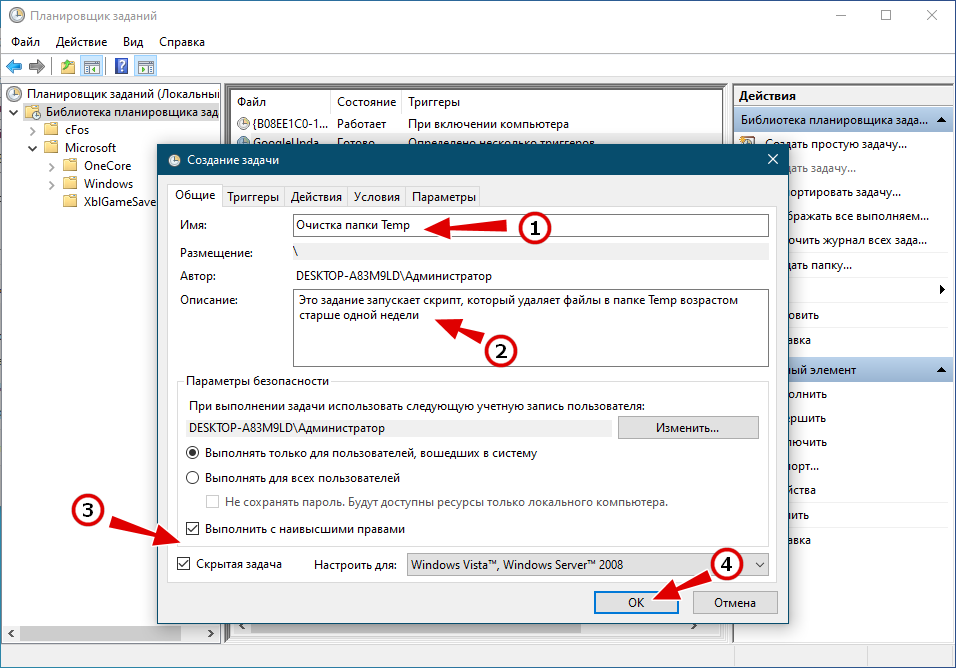
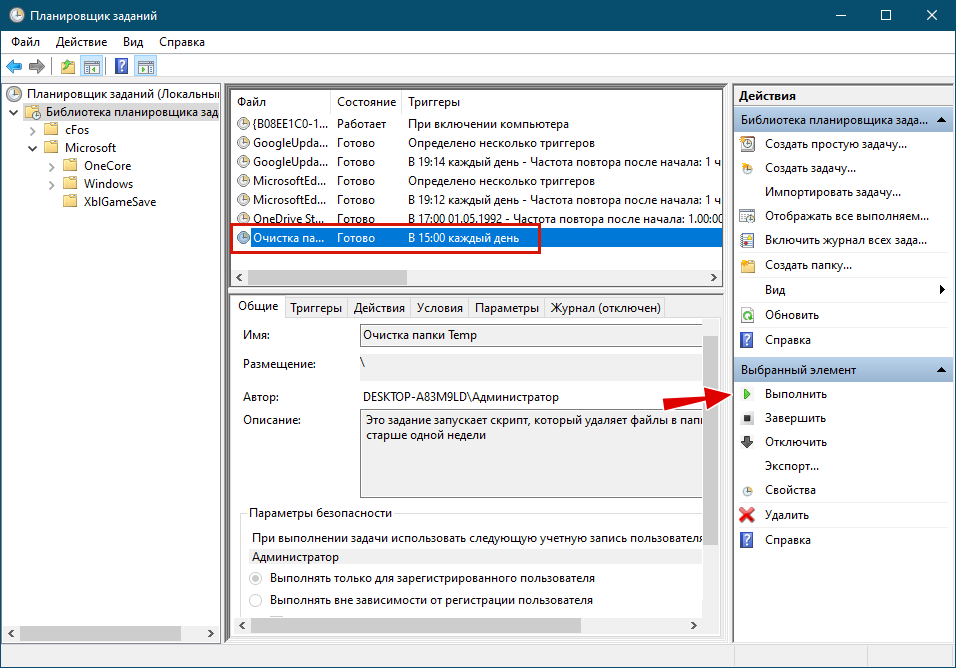
А теперь перейдём к практике, создав для примера задание, которое с помощью скрипта командной строки станет удалять из условной папки Temp файлы старше одной недели. Запускаем Планировщик заданий командой taskschd.msc и выбираем в правой колонке опцию «Создать задачу».
Опция «Создать простую задачу» подходит только для создания самых простых заданий, так как в этом режиме вы не сможете настраивать дополнительные параметры. В открывшемся окне даём новому заданию понятное имя и добавляем, если необходимо, комментарий. Остальные параметры можно не менять, но мы на всякий случай сделаем задание скрытым, чтобы на экране не появлялось окно командной строки (увы, окно всё равно появляется), а заодно и повысим заданию права, установив флажок в чекбоксе «Выполнить с наивысшими правами».
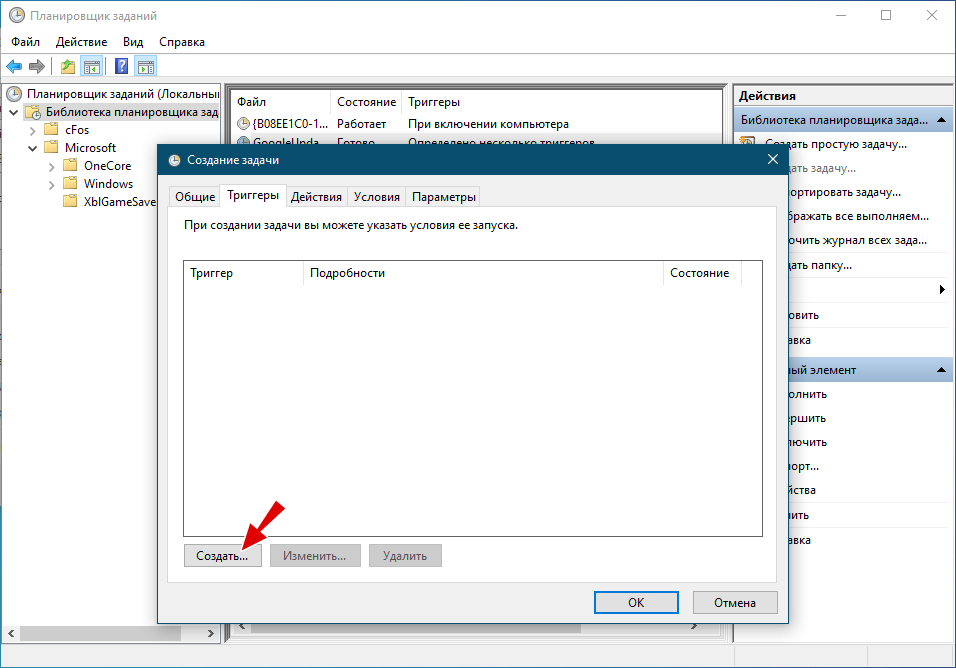
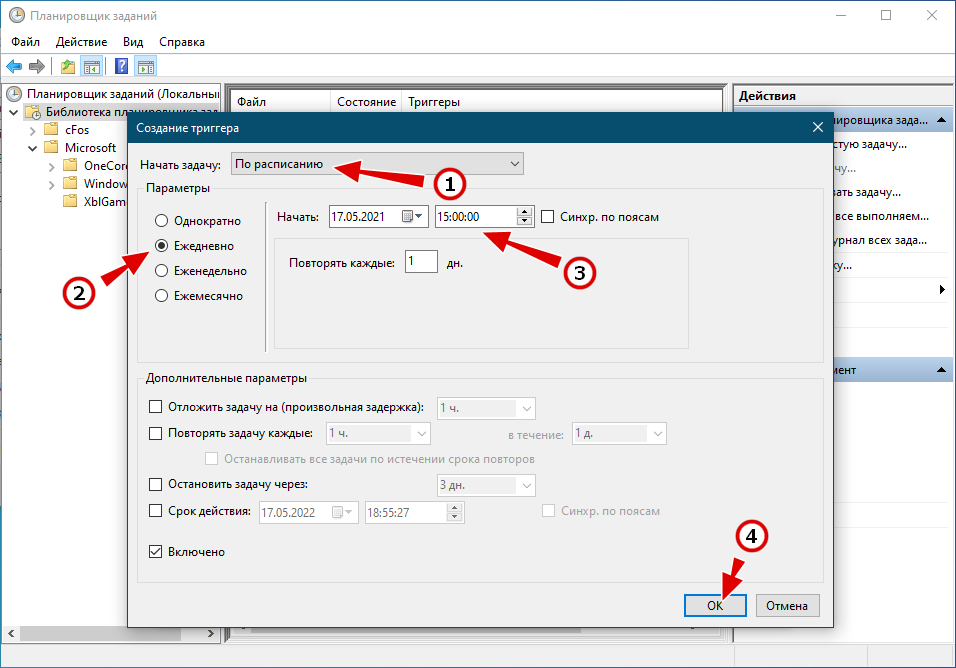
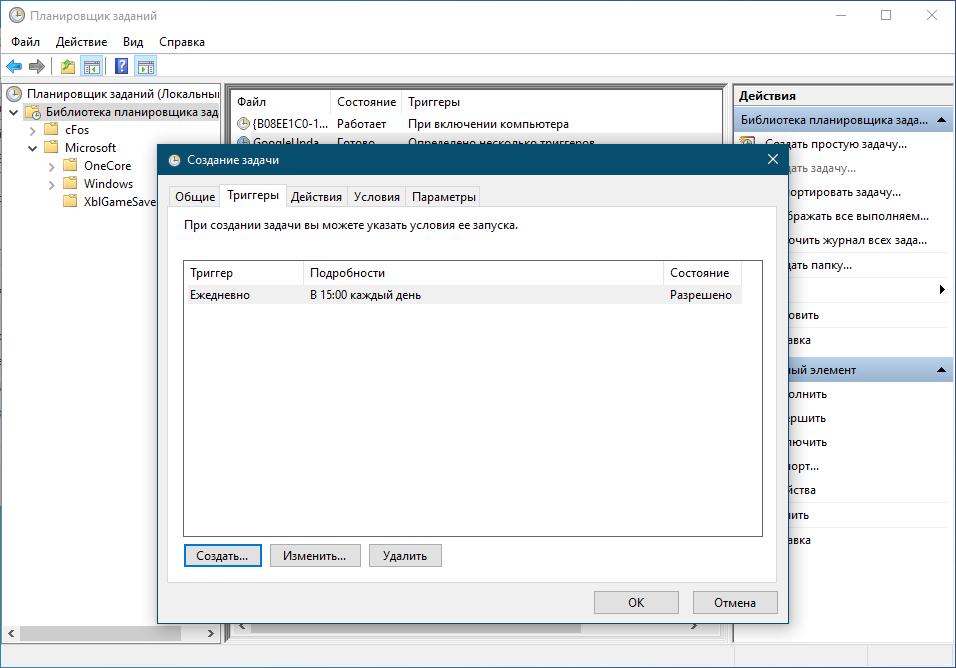
Теперь создадим триггер. Переключаемся на одноименную вкладку, жмём «Создать» и устанавливаем время и периодичность выполнения задания. Допустим, мы хотим, чтобы скрипт отрабатывал ежедневно в 15.00. Соответственно, тип выполнения выбираем «По расписанию», устанавливаем время, а в параметрах активируем радиокнопку «Ежедневно». Триггер создан, жмём «ОК» и переключаемся на следующую вкладку «Действия».
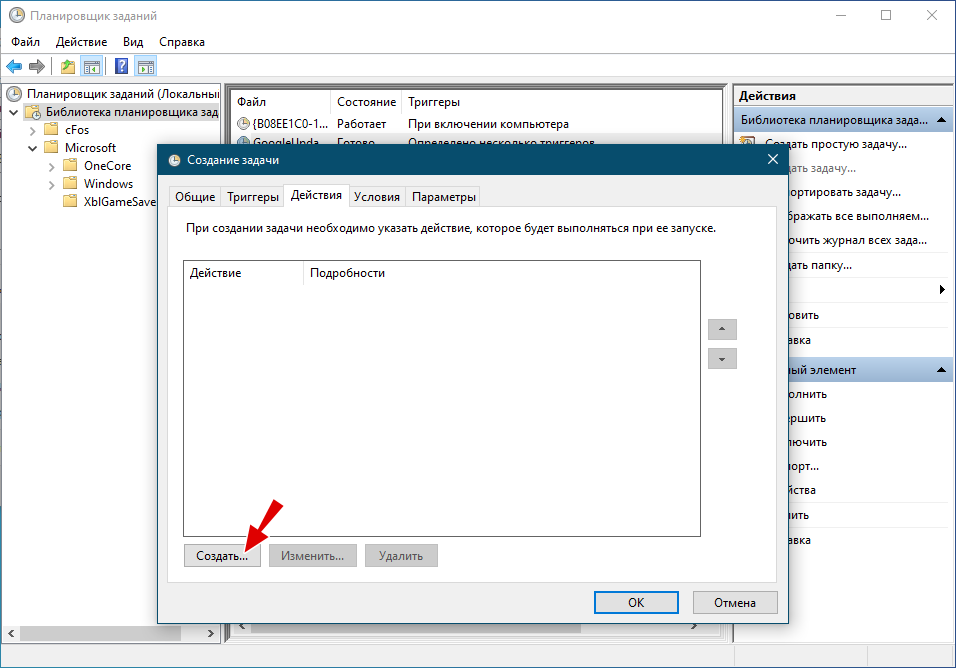
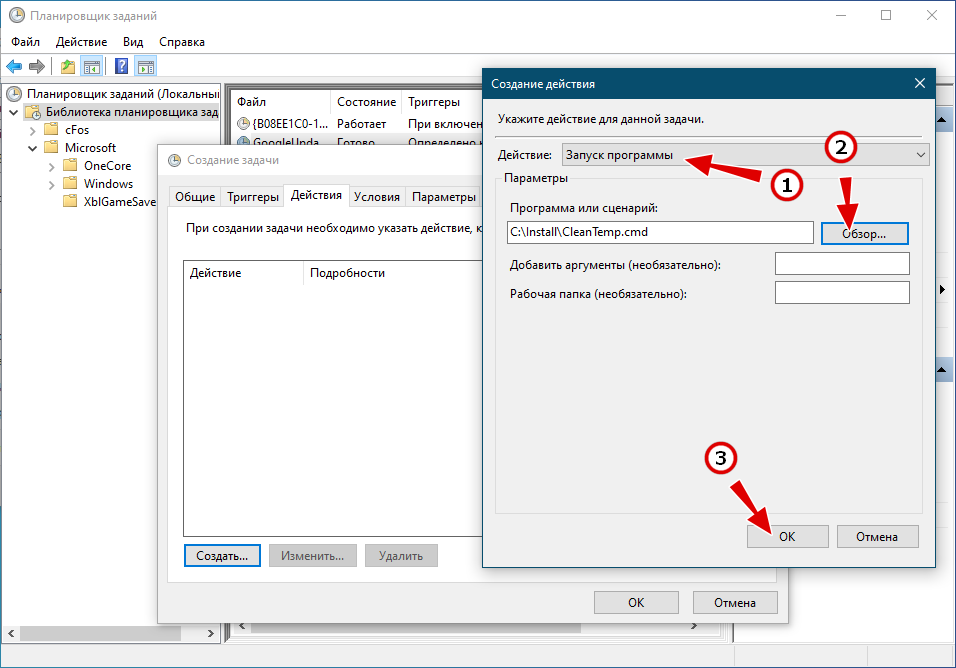
Точно так же жмём «Создать», в качестве действия оставляем «Запуск программы» и указываем через кнопку обзора полный путь к скрипту, содержимое которого вы можете видеть не приложенном ниже скриншоте. Готово и действие, можно переходить к следующему этапу.
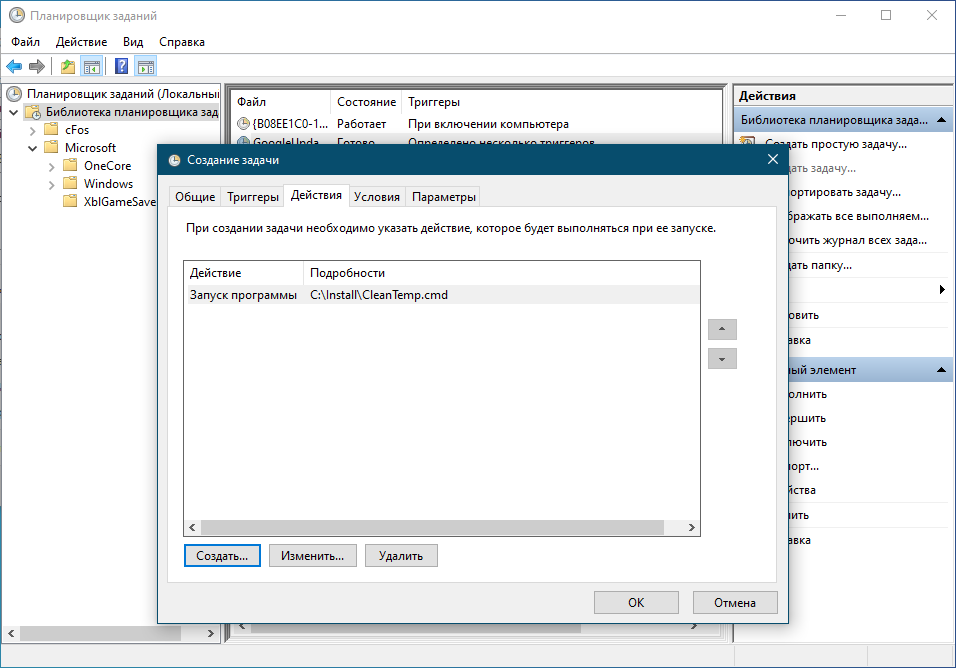

В данном примере задавать дополнительные условия для такой в целом задачи нет нужды, поэтому мы пропускаем этот шаг и переключаемся на вкладку «Параметры». Здесь тоже можно ничего не менять, активируем разве что опцию запуска заданий при сбое, так, на всякий случай. Сохраняем задание и проверяем, выбрав в правой колонке Планировщика опцию «Выполнить».
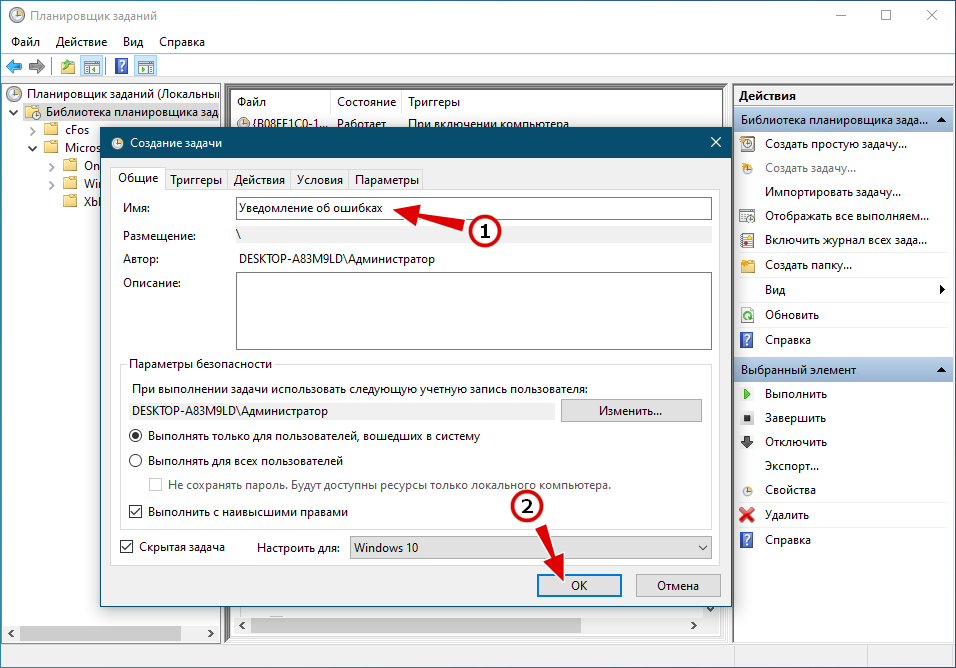
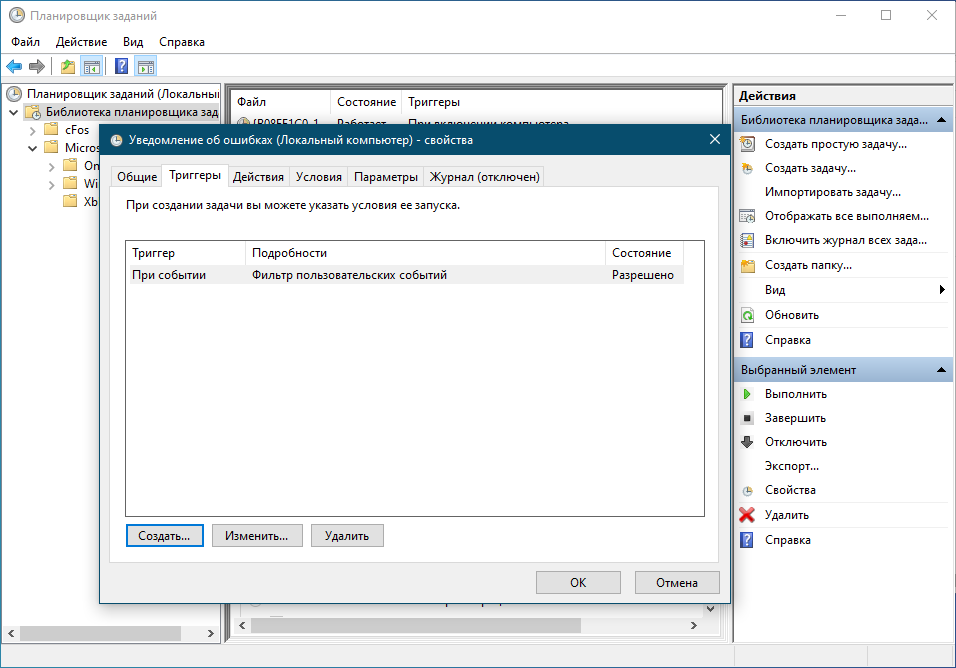
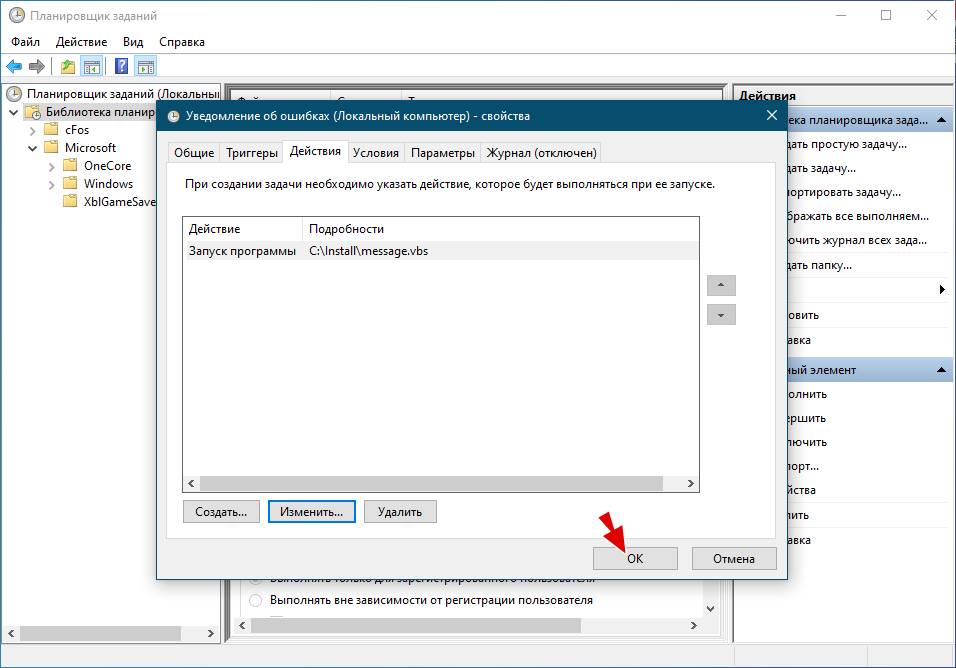
А теперь рассмотрим чуть более сложный сценарий. Допустим, мы хотим, чтобы Windows выводила на рабочий стол уведомления об ошибках в работе программ или системы. Создадим новое задание и назовём его «Уведомление об ошибках».
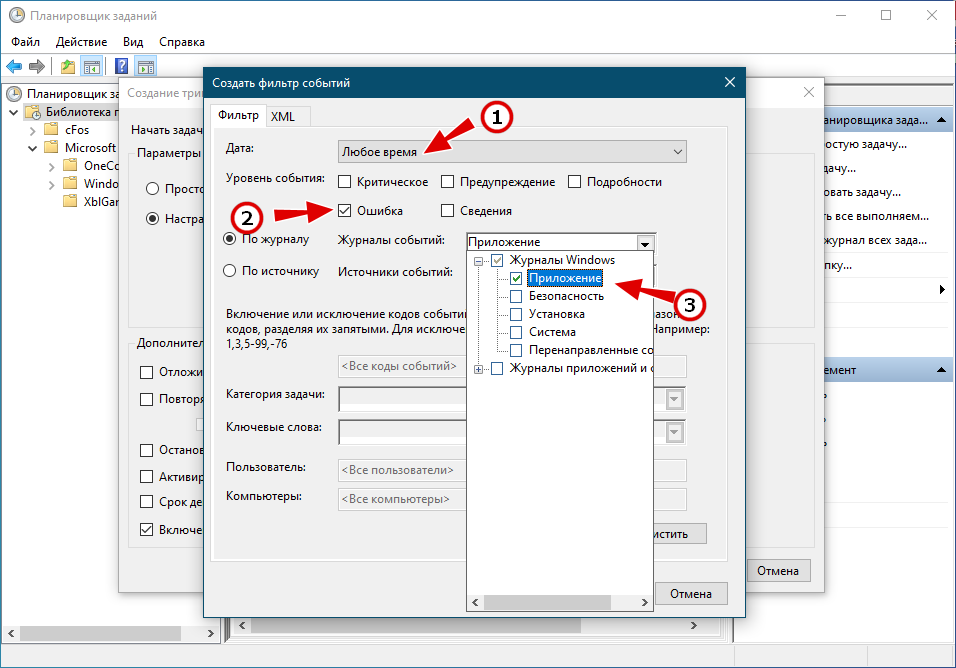
Переключаемся на вкладку «Триггеры» и выбираем вместо «По расписанию» опцию «При событии». В параметрах выбираем «Настраиваемое» и жмём «Создать фильтр события».
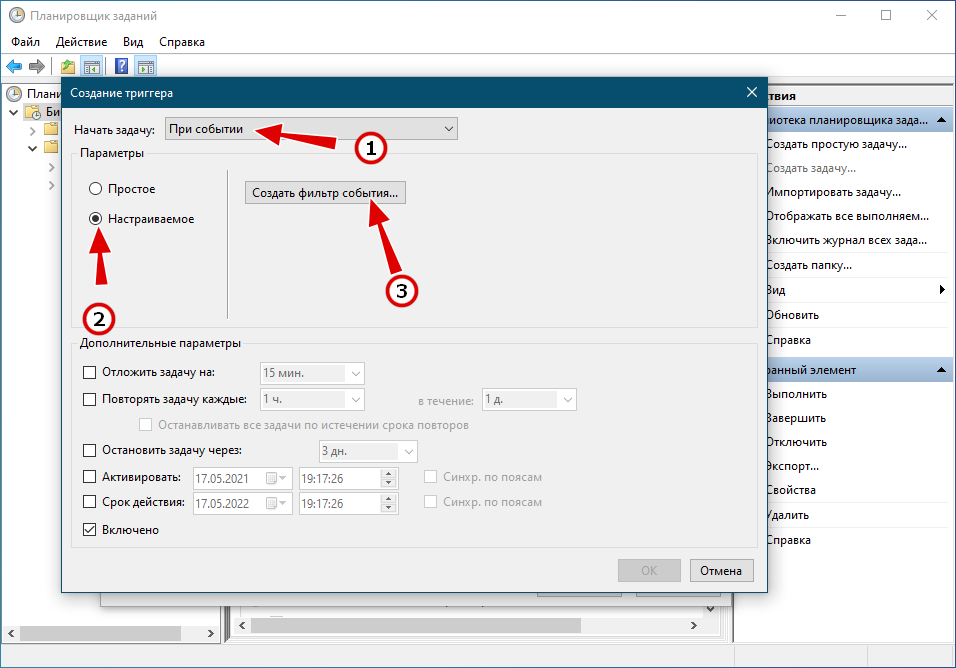
Так как мы будем отслеживать ошибки, уровень события мы выбираем «Ошибка» и указываем раздел системного журнала, в который Windows записывает логи ошибок. Пусть для примера это будет «Приложения». Далее выбираем источник события — компонент операционной системы. Мы выбрали все компоненты. Код события не указываем, так как хотим отслеживать все ошибки.

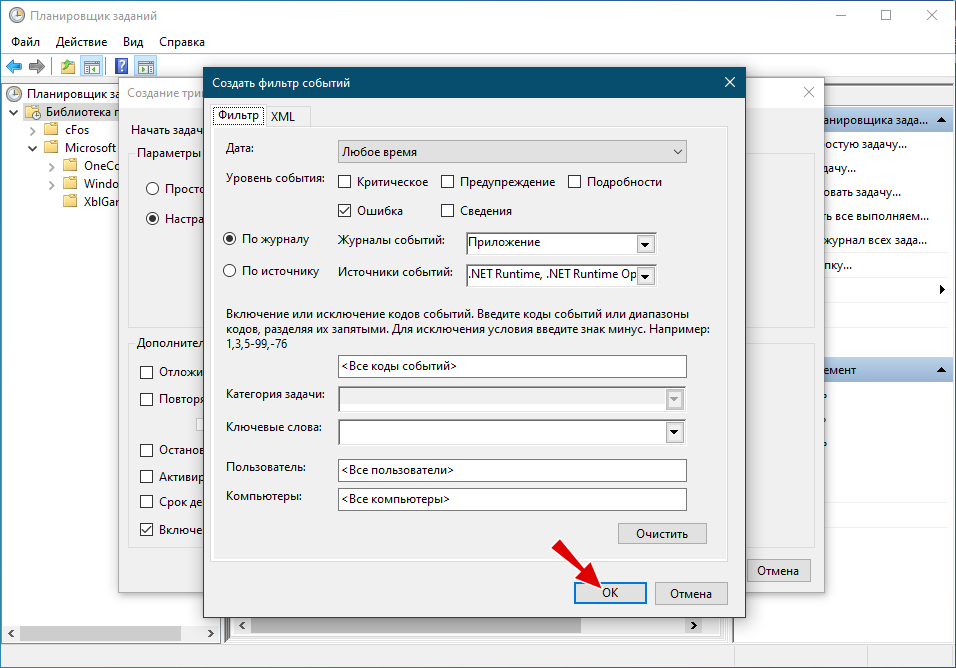
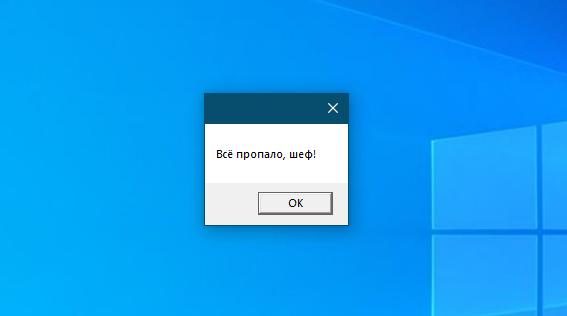
Сохраняем наш фильтр, жмём «OK» и переходим на вкладку действия. Так как Windows 10 более не поддерживается вывод Планировщиком текстовых уведомлений, воспользуемся простейшим скриптом VBS. Создаём в Блокноте текстовый документ и вставляем в него код MsgBox «», прописывая между двойными прямыми кавычками текст уведомления.
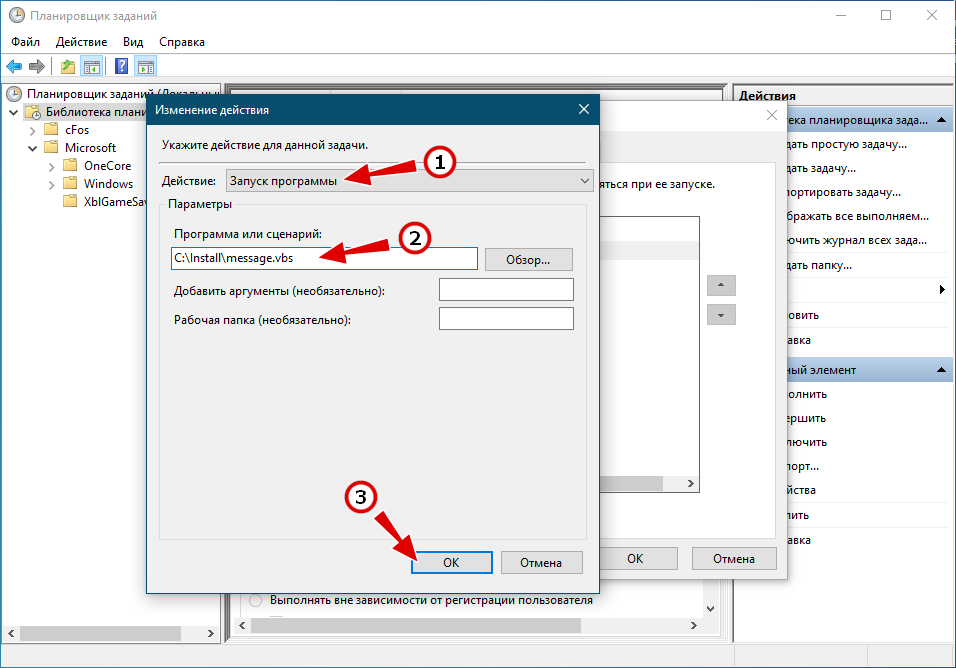
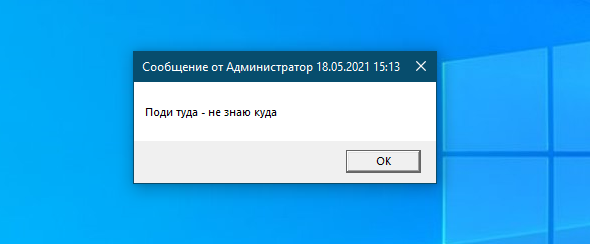
Примечание: для вывода уведомлений на рабочий стол вместо скриптов можно использовать штатную утилиту msg.exe, прописав в поле «Программа или сценарий» путь C:\Windows\System32\msg.exe, а в поле аргументы вставив сообщение в формате * текст сообщения, смотрите скриншот ниже.
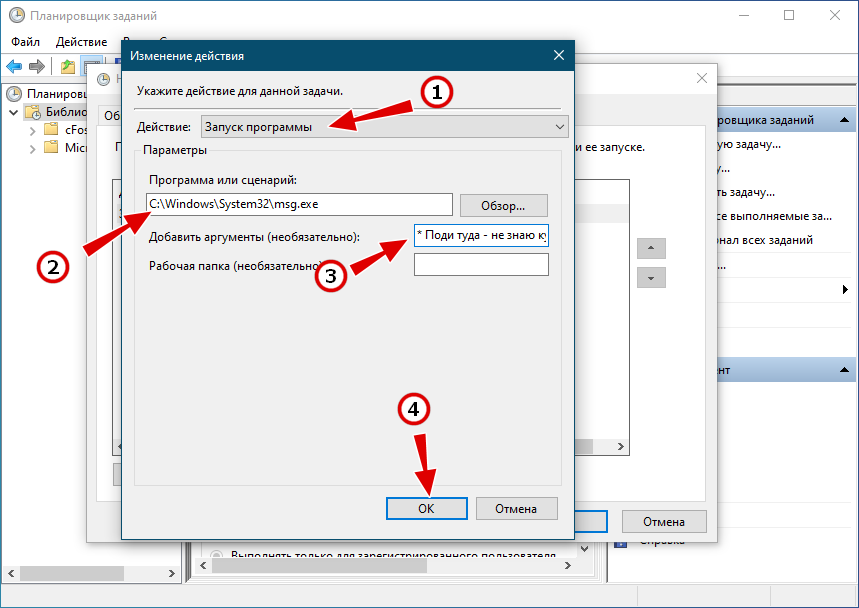
Сохраняем файл в формате VBS и указываем к нему путь на вкладке «Действия», указав в качестве действия запуск программы, то есть нашего скрипта.

Этого вполне достаточно, сохраняем настройки и проверяем работу скрипта. Когда какое-нибудь приложение даст сбой, Windows занесёт событие об ошибке в Журнал, Планировщик же в свою очередь перехватит это событие согласно настройкам и выполнит заданий — запустит на исполнение скрипт, который выведет на рабочий стол уведомление.
Здесь мы привели лишь два примера использования Планировщика заданий, в действительности он способен и на большее. Запускать программы строго с определённым временным диапазоном, создавать напоминания, открывать сайты, запускать задачи обслуживания системы и многое другое — всё это можно реализовать с помощью этого удобного и гибкого инструмента, не говоря уже о таком простом действии как автоматическое выключение компьютера.
«Планировщик заданий» Windows поможет автоматизировать выполнение задач в ОС. Например, зададим время или некоторые условия, при которых стартует указанный процесс или приложение. Сначала рассмотрим различные методы запуска данного полезного инструмента. Затем вкратце пройдёмся по основному функционалу.
Содержание
- Как запустить Планировщик заданий из главного меню
- В Проводнике через исполняемый файл
- Запустим утилиту с помощью команд
- В окне Выполнить
- Как открыть Планировщик заданий из командной строки cmd
- Через Поиск Windows
- С помощью Панели управления
- Вход через Управление компьютером
- Создайте ярлык Планировщика заданий на рабочем столе
- Как создавать и удалять задачи в Планировщике заданий Windows
Воспользуемся главным меню операционной системы — чуть больше действий, зато не надо ничего печатать или вводить команды. Кликните по «Пуску» левой кнопкой мыши. В Windows 11 перейдите во «Все приложения». Прокрутите алфавитный указатель до буквы «И». Перейдите в «Инструменты Windows». Отметим, что в Windows 10 нужный вам раздел называется «Средства администрирования».

Откроется папка со средствами администрирования ОС, где необходимо дважды кликнуть по «Планировщику заданий».

В Проводнике через исполняемый файл
Исполняемый файл «Планировщика заданий» имеется на диске с ОС Windows. Можем открыть программу непосредственно оттуда. Первым делом откройте Проводник и зайдите в папку:
C:\Windows\System32
Актуально для большинства компьютеров, где ОС находится на диске C:. Если на другом — учитывайте данный момент. Если, например, Windows установлена на диск D:\, тогда:
D:\Windows\System32
По опыту, на сегодня такая ситуация нечасто, но все же встречается. Выберите сортировку элементов в алфавитном порядке, чтобы проще было искать. Найдите и запустите файл taskschd.

Можем сократить число действий. Напечатайте C:\Windows\System32\taskschd.msc в адресной строке Проводника, а затем нажмите клавишу «Enter».

Запустим утилиту с помощью команд
Быстрые и надежные способы, которые не зависят от особенностей графического интерфейса. Универсальны, поскольку синтаксис команд не меняется от версии к версии ОС.
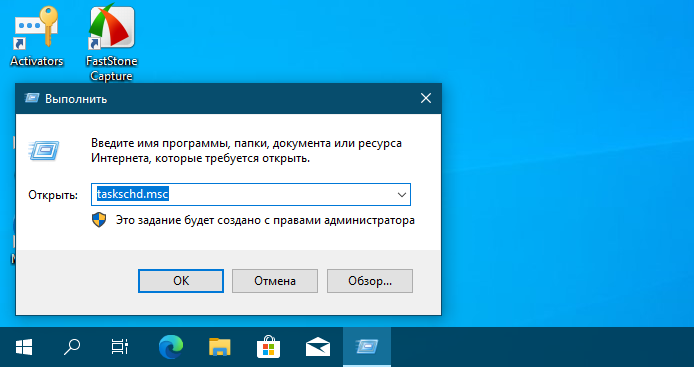
В окне Выполнить
Один из самых простых способов запуска оснастки — через окно «Выполнить» («Run»). Кликните правой кнопкой мыши по «Пуску» и выберите данный пункт в меню опытного пользователя Windows.

Затем напечатайте:
taskschd.msc
Нажмите «OK» и окно утилиты появится на экране.

Как открыть Планировщик заданий из командной строки cmd
Можем применить классическую командную строку Windows (Command Prompt). Кликните правой кнопкой мыши по «Пуску» и запустите окно «Выполнить».
Введите cmd и нажмите «Enter».

В консоли введите:
start taskschd.msc
Нажмите «Enter», чтобы открыть планировщик.

Через Поиск Windows
Microsoft интегрировала в свою ОС удобную функцию — поиск. Позволяет не только искать программы и опции по системе, но и запускать ПО. Нажмите одновременно клавиши «Windows» + S. В строке напечатайте:
планировщик заданий
В меню найденного приложения кликните по «Открыть».

С помощью Панели управления
Классическая Панель управления и в Windows 11/10 довольно полезна. Позволит легко открыть нужную утилиту. Клавиатурным сочетанием Win + R откройте окно «Выполнить». Там напечатайте control и нажмите «Enter».

Вы также можете открыть панель одним из рассмотренных ранее способов:
Переключитесь на «Мелкие значки» (список режимов просмотра расположен справа вверху), чтобы упростить поиск нужного раздела. Пользователю Windows 11 надо перейти в категорию «Инструменты Windows». Обратите внимание, что на ПК с Windows 10 нужный раздел носит имя «Администрирование».

Запустите «Планировщик заданий» из правой панели нового окна.

Вход через Управление компьютером
Нажмите Win + X на клавиатуре для перехода в меню опытного пользователя ОС. Откройте категорию «Управление компьютером».

Выберите «Планировщик заданий» на левой панели окна из списка служебных программ.

Создайте ярлык Планировщика заданий на рабочем столе
Рассмотренные способы оптимальны, если надо открывать утилиту лишь время от времени. Планируете часто пользоваться планировщиком — создайте ярлык запуска программы на рабочем столе. Кликните правой кнопкой мышки в свободном месте рабочего стола. В первом контекстном меню нужен пункт «Создать», а во втором: «Ярлык».

Откроется мастер создания элемента. Сначала надо указать расположение объекта на диске компьютера: C:\Windows\System32\taskschd.msc, а затем нажать «Далее» для перехода к следующему окну.

Присвойте ярлыку удобное и понятное название. В данном примере: «Запуск Планировщика заданий». Кликните по кнопке «Готово», которая находится внизу справа.

На главном экране появится элемент. Дважды кликните по данному объекту, когда необходимо зайти в «Планировщик заданий».

Как создавать и удалять задачи в Планировщике заданий Windows
Данная утилита экономит немало времени и как системному администратору, так и обычному пользователю. Позволяет настроить регулярное выполнение задач, в том числе:
- Создание резервных копий данных.
- Обновление ПО и сканирование системы антивирусом.
- Очистку кэша и временных файлов.
- Дефрагментацию жесткого диска (HDD).
- Выполнение скриптов.
- Отключение настольного ПК или ноутбука в заданное время.
Задача может быть выполнена не только в заданное время, но и при определенном условии. Например, при подключении к определенной сети Wi-Fi или отключении от неё. Активировать действие можем также по включению ноутбука или настольного ПК.
Выбираем тип задания из пункта «Действие», который находится в строке меню.

Простые задачи создаем при помощи программного мастера. Опыт показывает, что большинству начинающих пользователей данного функционала достаточно. В первом окне присваиваем заданию имя, а при необходимости добавляем описание.

Во втором задаем триггер — условие или периодичность выполнения действия. Например: раз в месяц или при старте ПК.

В третьем подтверждаем время.

В четвертом определяем, что именно надо будет сделать:
- открыть программу;
- отправить сообщение на email;
- уведомить пользователя.

В пятом предоставляем планировщику параметры. Например, местоположение исполняемого файла программы, которую надо открыть. Для навигации по диску можем воспользоваться кнопкой «Обзор».

А для обычной задачи придется вручную настраивать триггеры, действия, параметры и условия в соответствующих вкладках. Более гибкий инструмент для опытных пользователей.

Предположим, сразу после включения компьютера запускаем браузер. Автоматизируем процесс, чтобы выполнять вручную поменьше действий. Первым делом создаем задачу.

Далее перемещаемся по вкладкам окна свойств задачи для настройки параметров. Открываем «Общие» и присваиваем заданию имя. В данном примере: «Автозапуск браузера». В поле «Описание» можем уточнить, что будет происходить на компьютере. Данный шаг можно пропустить, если и так всё очевидно. Указываем для каких пользователей действие будет выполняться.

При необходимости устанавливаем выполнение с наивысшими правами, делаем задачу скрытой или обеспечиваем совместимость с прежними версиями ОС.

Теперь переходим к «Триггерам» и кликаем по «Создать…».

Из списка «Начать задачу:» выбираем условие, в данном примере — при входе в ОС. Если нужно, можем отложить выполнение на некоторое время — например, на 5 минут. Кликаем по «ОК».

Созданное условие появится в перечне триггеров.

Теперь открываем «Действия», где нажимаем кнопку «Создать…».

Из списка действий выберем «Запуск программы». Надо также указать местоположение исполняемого файла браузера (в данном случае: Opera). Например, скопируем из свойств ярлыка на рабочем столе. Опционально можем добавить аргументы. Например, URL сайта, который посещаем каждый раз при старте браузера. В нашем примере будет открыт «Блог системного администратора». Жмём «ОК».

Затем переходим к «Условиям». К примеру, можем указать, что задача будет выполнена лишь при питании от розетки или подключении к определенной сети.

В «Параметрах» уточняем дополнительные опции — при необходимости активируем или отключаем. Относятся к тому, как действовать при накладках и сбоях. Кликаем по «ОК» справа внизу — готово: задание создано.

Готово, запуск браузера добавлен в библиотеку утилиты.

Больше не требуется — удалим. Откройте «Библиотеку планировщика заданий», кликните по ненужной задаче правой кнопкой мыши. Выберите пункт «Удалить».

Нажмите «Да», чтобы подтвердить действие.

Теперь вы по аналогии сможете создать и удалить нужное задание в Windows.
Вы пользуйтесь ПО для автоматизации действий в Windows? Напишите в комментариях.
5
2
голоса
Рейтинг статьи
Task Scheduler is one of the most practical preset Windows applications because it can streamline your work.
The main idea of this application is to trigger the running of different scripts and programs at a specific time or a certain event.
It has a library where all the tasks loaded are indexed, and it organizes them according to the time that must be done and their importance.
Let’s discover together in the lines below what Task Scheduler contains and how we can use this useful application.
How do I schedule tasks in Windows 10 using Task Scheduler?
- Types of triggers
- Types of actions
- Types of Task Conditions
- Task settings
- Task security context
- How to use the Task Scheduler
1. Types of triggers
The first step of creating a task is to determine what will cause it to run, so the trigger is a set of conditions that when fulfilled, starts the task.
The triggers can be found in the Trigger tab from the Task Properties and the Create Task menu. From the Create Task menu, you can create new triggers for your needs.
There are two types of triggers: the time-based trigger and the event-based trigger.
- The time-based trigger is used for tasks that start at a certain time or tasks that starts periodically, depending on your schedule.
- The event-based trigger is used for actions that start at a specific system event.
For example, let’s suppose that on this day you want to recover a few hours of work, and you want to have the same productivity, even though you know you will work more than usual.
You can set a task to be triggered every time your computer is entering an idle state.
NOTE
1.1. Triggers for a schedule
This kind of trigger causes the task to run after a well-determined schedule configured by you. From the trigger settings, you can choose if the task will be repeated once, daily, weekly, or monthly.
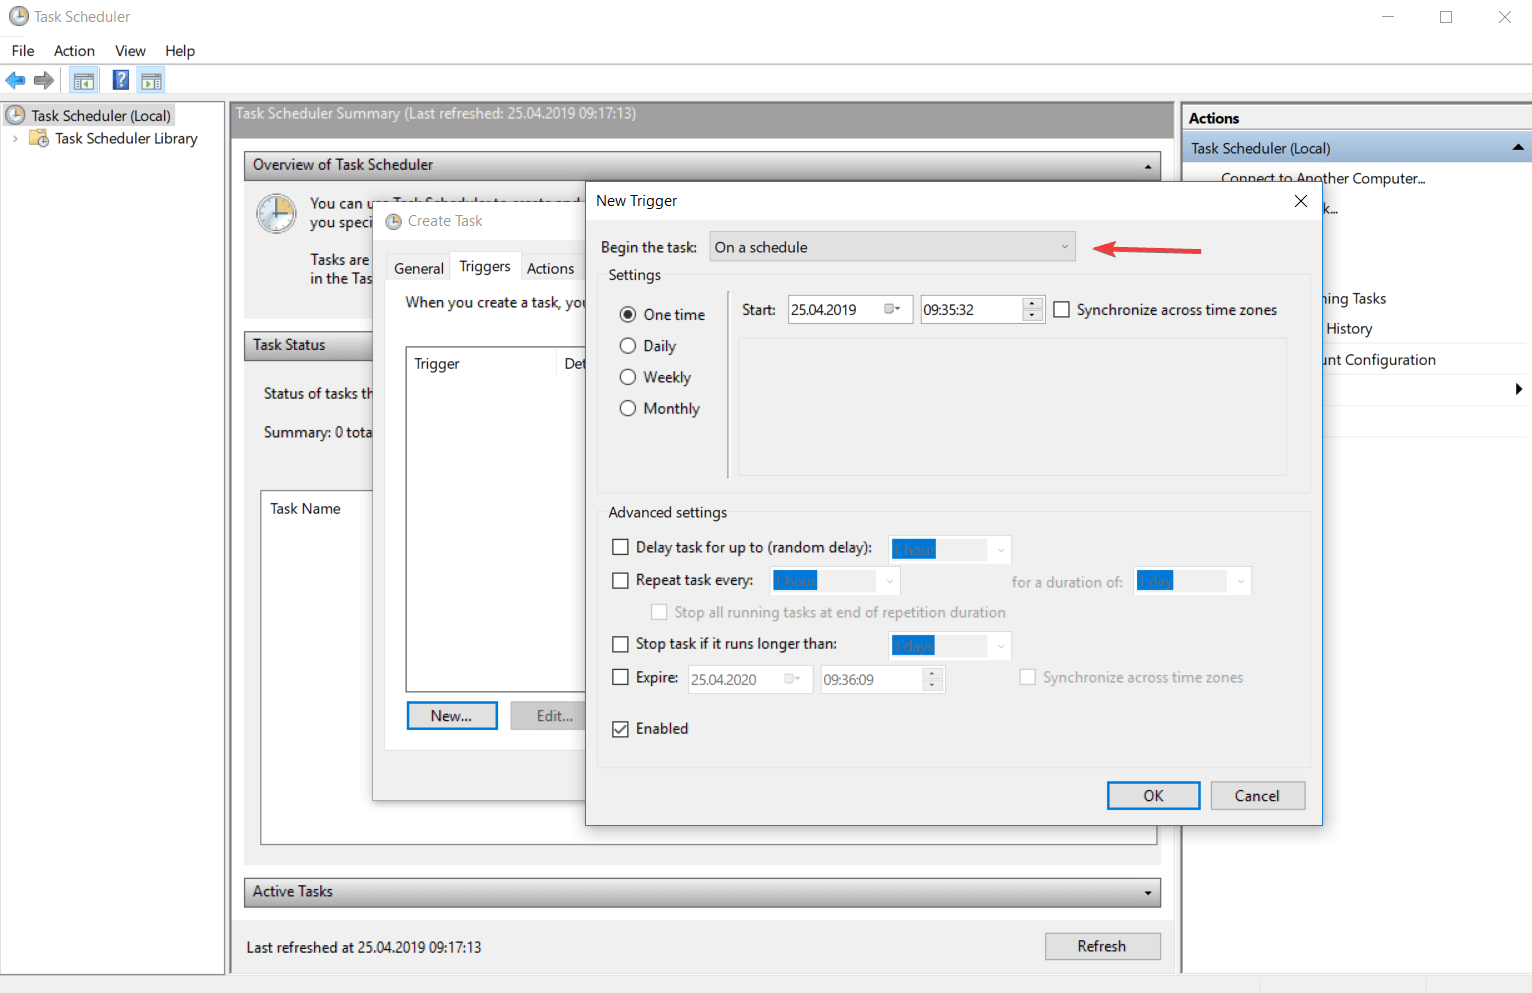
This time interval is guided by the computer’s date and time. You can check the Universal box for making the time interval relative and synchronize it with UTC (Coordinated Universal Time).
This feature allows you to coordinate multiple tasks to run independently in different time zones.
- The One time trigger is the easiest to set up. All you have to do is enter the day and time you want the action to take place.
- The Daily trigger is based on a recurrent system and the date and time you want to start using this kind of trigger.
The interval of 1 is producing a daily schedule, the interval of 2 is producing an every other day schedule, and so on.
- If you opt for a Weekly trigger you must enter the date and time you want to start this schedule, the days when you want to take place and how often to repeat. Recursion of this trigger is similar to the daily one.
For the interval of 1, the task will be repeated weekly, for the interval of 2, the task will be repeated every two weeks, and so on.
- The Monthly trigger does not have many differences from the others, you only need to select the week and the day that you want to activate your task.
The recursion system is the same, the only difference being that the minimum interval of repetition is one month.
1.2. Triggers for logging on
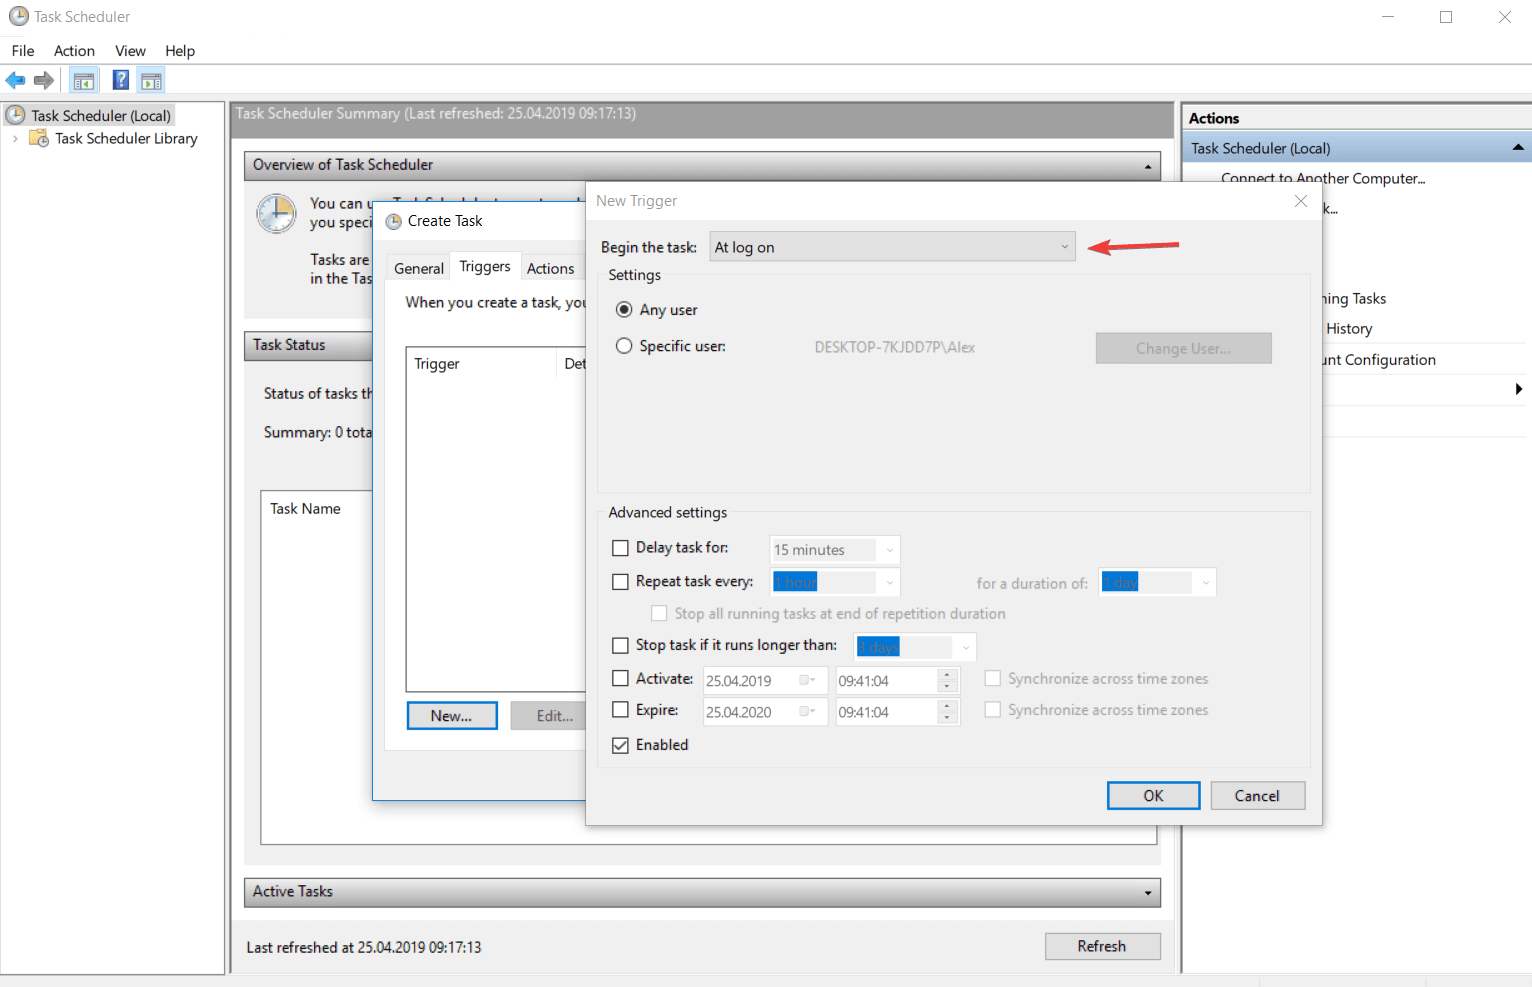
This type of trigger runs an action when a user logs onto the computer. It has a customization feature that allows you to set the action to occur for all users or only for certain users.
1.3. Triggers for idle state
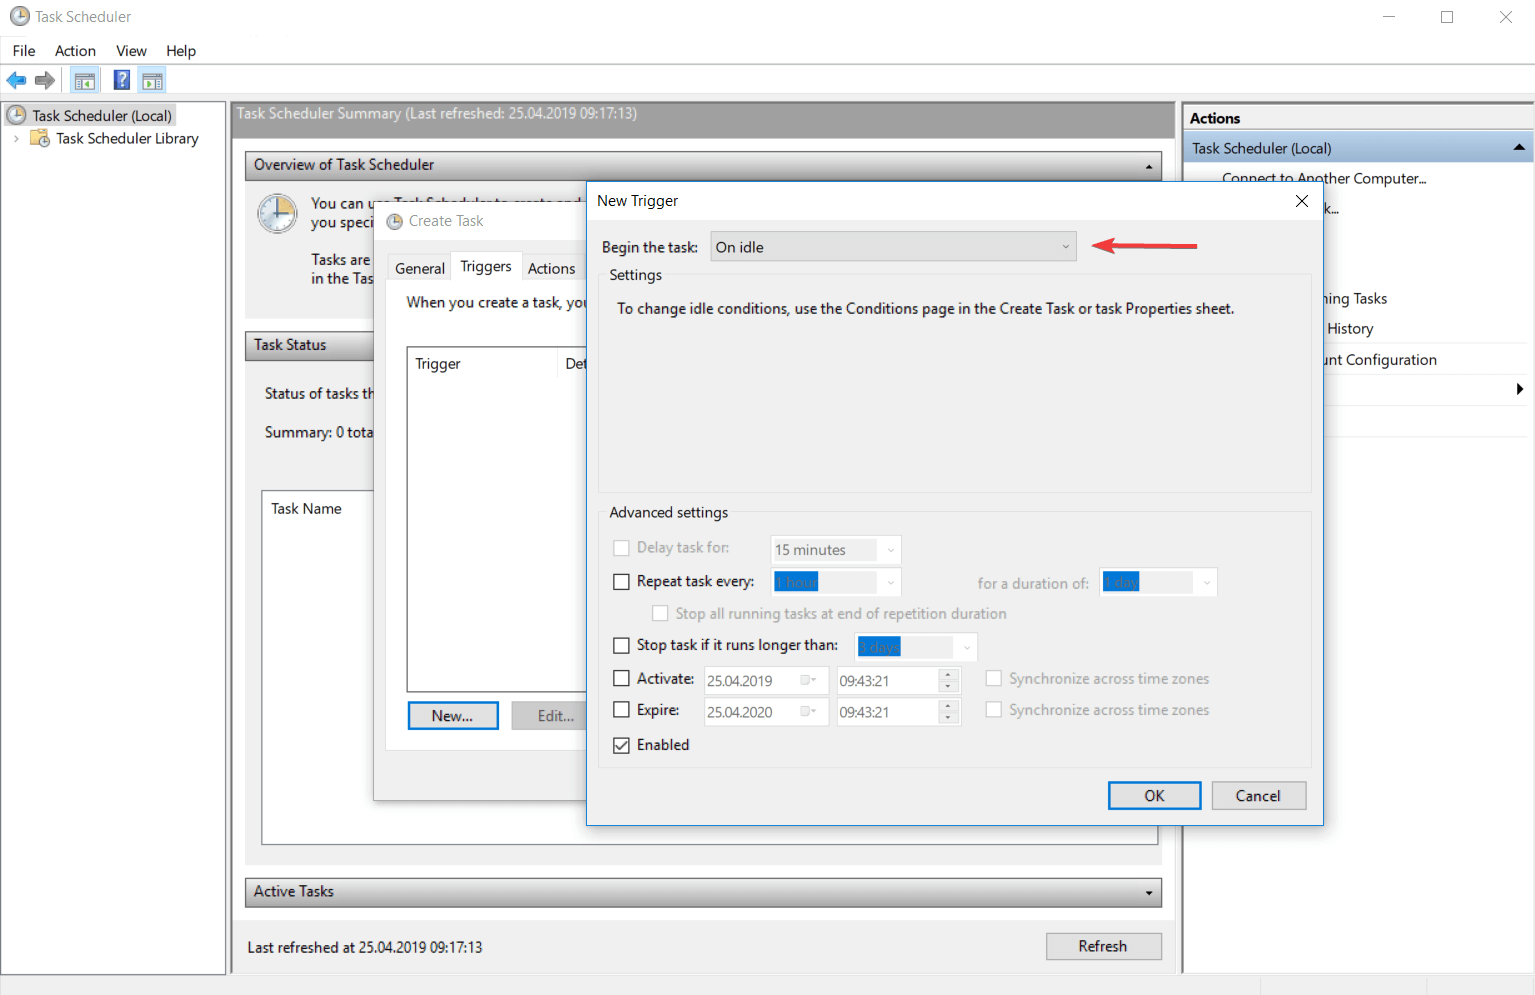
This trigger determines the action to run after entering the computer in the idle state. The trigger conditions can be configured from the Conditions tab of the Create Task menu or from the Task Properties window.
1.4. Triggers for an event
The event-based trigger determines the action to run after an event occurs. You can choose from a predefined list of events but you can also set a specific event.
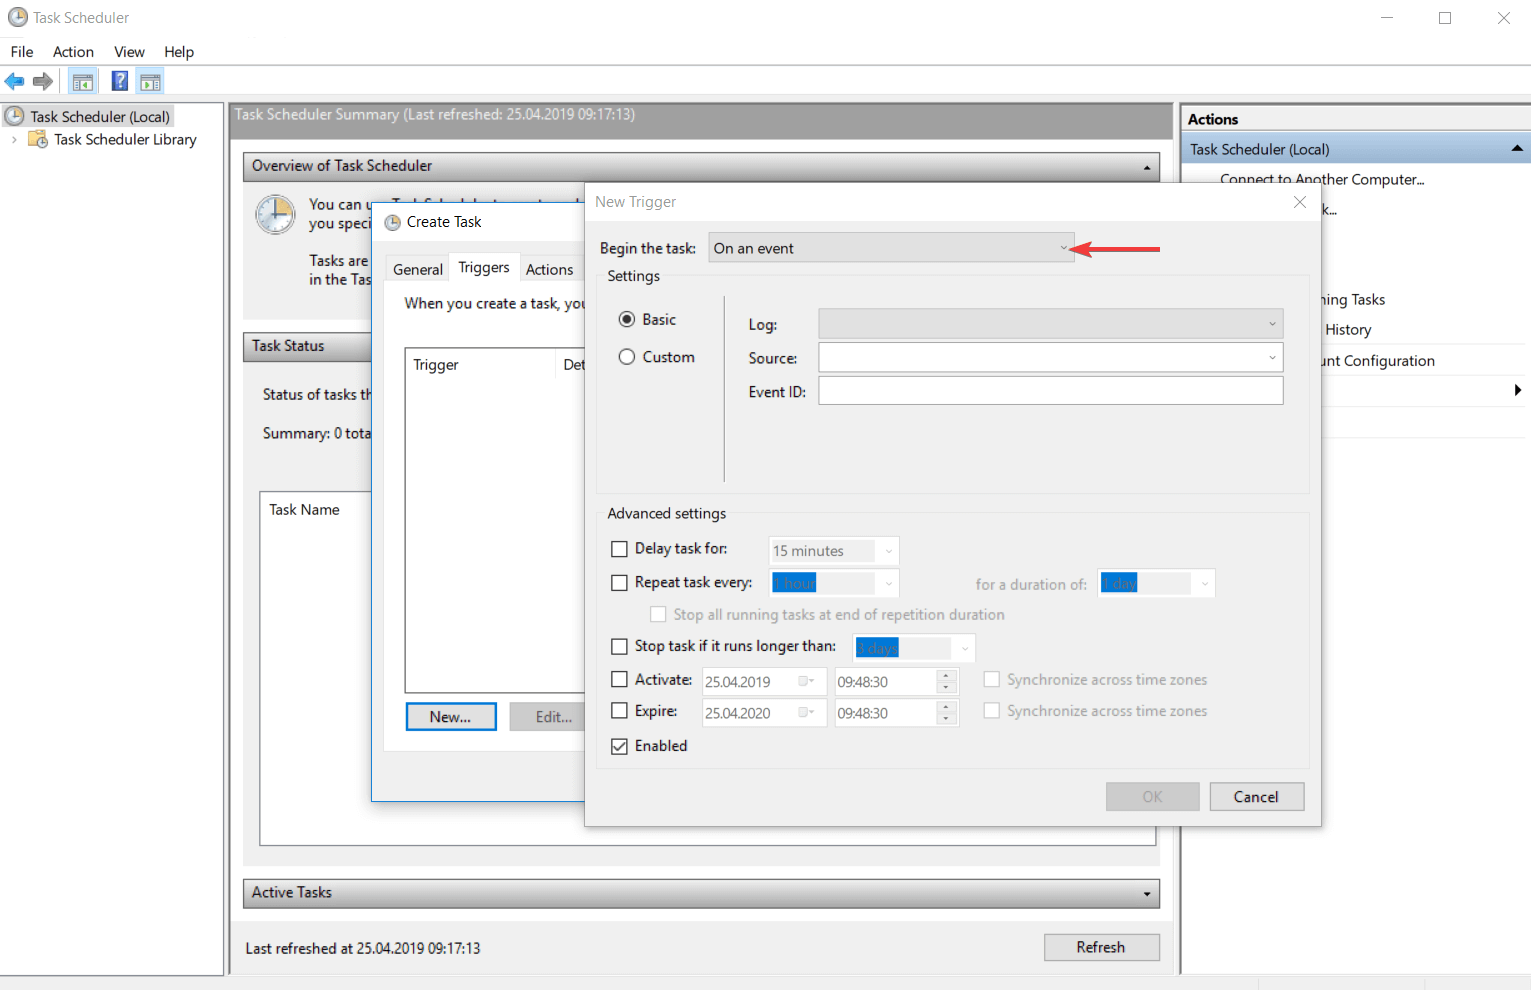
If you are choosing the Basic trigger settings, only one event from the specific event log will run the task.
If you choose the Custom trigger settings you can enter the XML event query or a custom filter for the events that can run the task.
1.5. Triggers on workstation lock
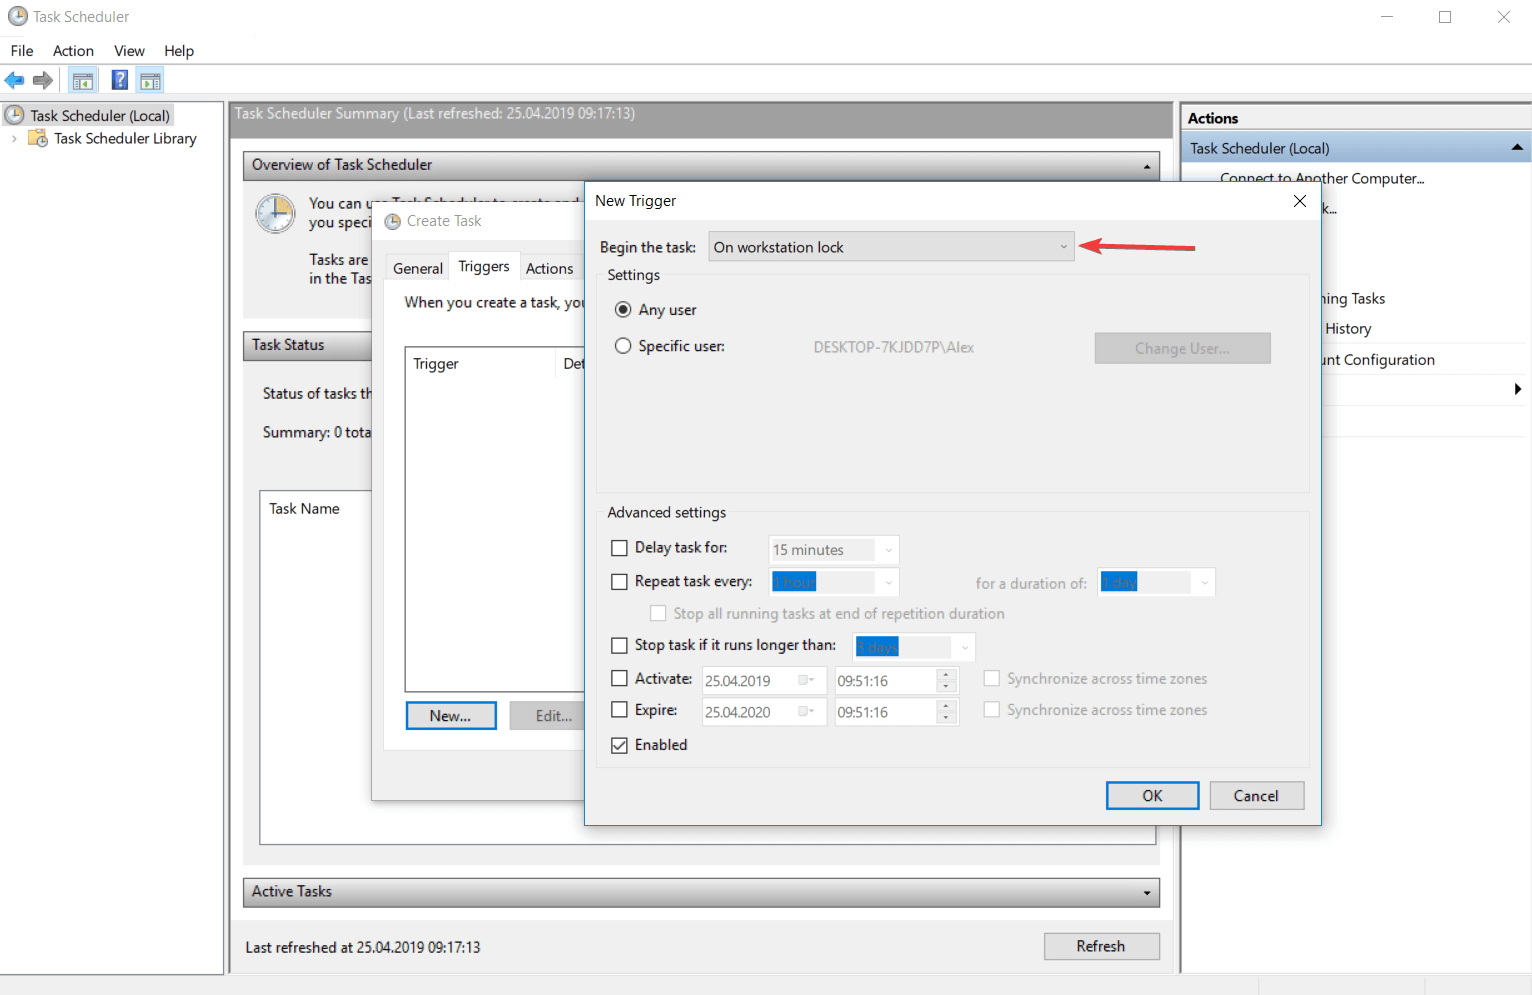
This type of trigger runs the task when the computer is locked. You can configure from the settings if this action will be available for any user or for a specific user. You can do the same thing for the unlocking station process.
1.6. Advanced settings of triggers
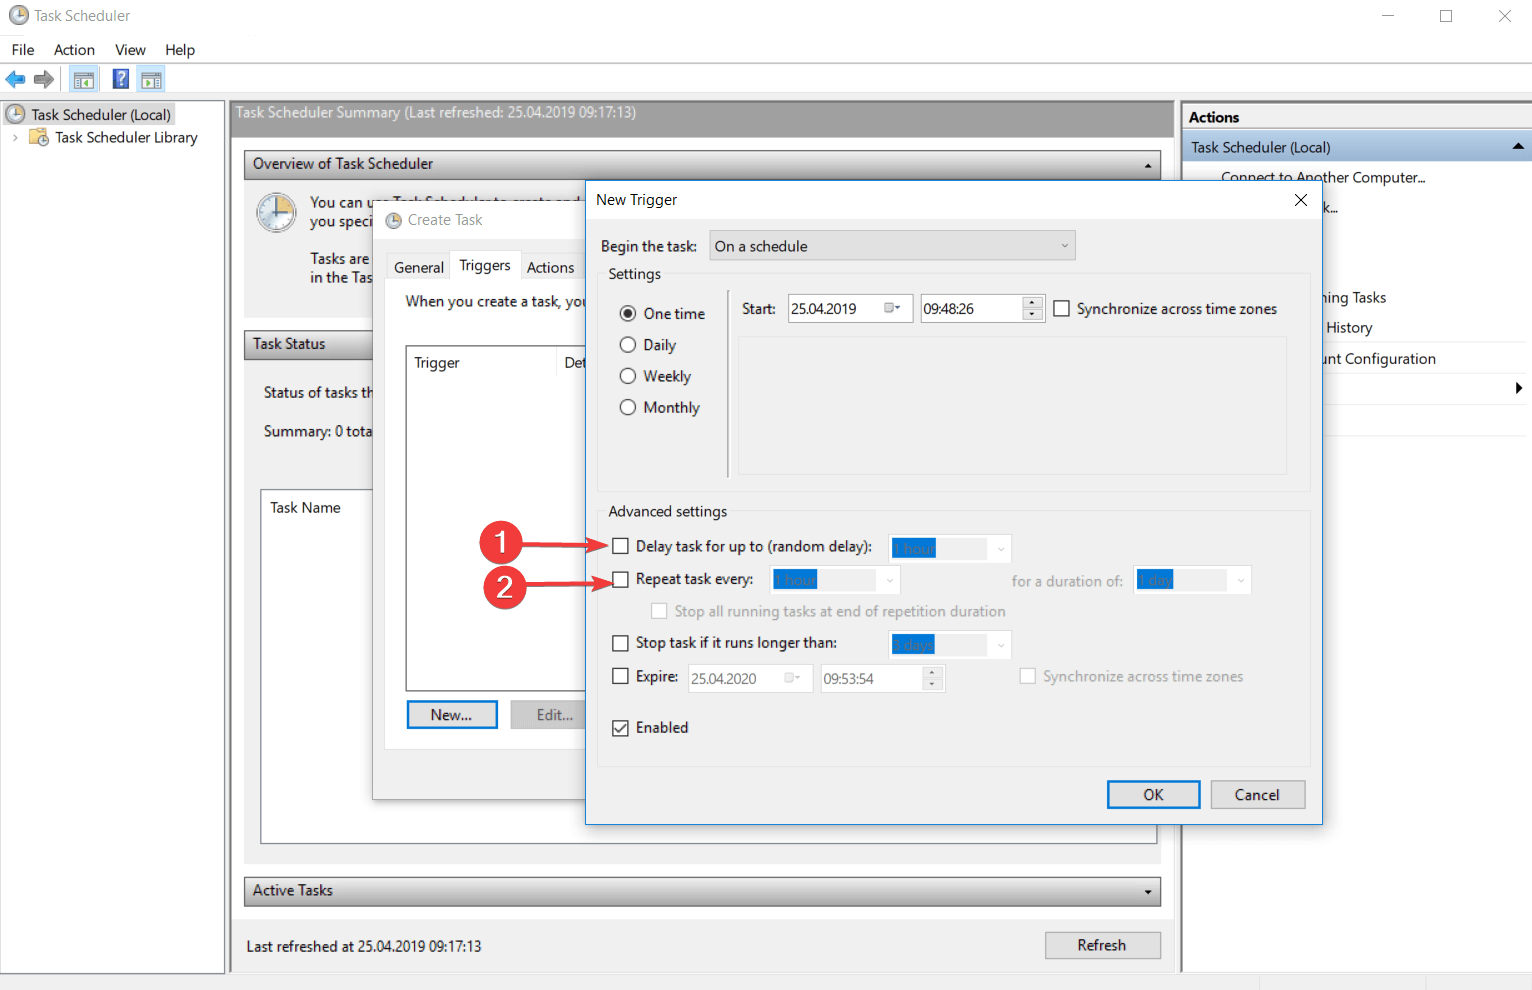
- Delay task for up to (random delay)
This feature allows you to insert a delay between the moment when the task was triggered and the moment when the task will take place.
For example, if you have a time based trigger, the task is scheduled to be triggered at 3:00 PM and you set the Delay task for up to (random delay) to 30 minutes, your task will be triggered in between 3:00 PM and 3:30 PM.
- Repeat task every:
Here you can set a repeating time for your task. So, after the task will be triggered, it will wait the amount of time specified and after that, it will be triggered again. This entire process will continue until the period allocated is done.
2. Types of actions
The action is the process or a part of the process that is performed when the task is running. A task can have up to 32 actions. Every action has some settings that determine how the task is performed.
You can find and edit the task‘s actions from the Actions tab of the Task Properties menu or from Create Task window.
When the list contains more than one action, they will be executed consecutively starting with the action from the top of the Actions tab and ending with the action from the bottom of the list.
If you want to change the actions order all you have to do is to click on the action that you want to move and then use the arrow keys to move it above or below.
2.1. Action that activates a program
This kind of action is used for starting a program or a script.
In the Settings menu of the Actions tab, you enter the name of the script or the program you want to start.
If one of those sequences takes command line arguments you can add, delete and edit them in the Add arguments (optional) text box.
The Start In (optional) is the place where you can specify the directory for the command line that will execute your script or your program.
This should be either the path to the program or the script file that leads to the files that are used by the executable file.
2.2. Action that sends an e-mail
This action is particularly useful for people who communicate a lot via email.

In the settings of this action, you have to enter your e-mail address, the e-mail address of the person who will receive the mail, the title of the e-mail, the message you want to be sent, and you have also an optional feature to attach different files to the mail.
You must also specify the SMTP server of your e-mail.
2.3. Action that displays a message
This action is used more like a reminder because it displays on your screen a text with a title. Select the Display a message category from the Actions menu and type the title and the message of the reminder.
If you are facing Task Scheduler failed to launch an action issue, we recommend you check out this detailed guide for solutions.
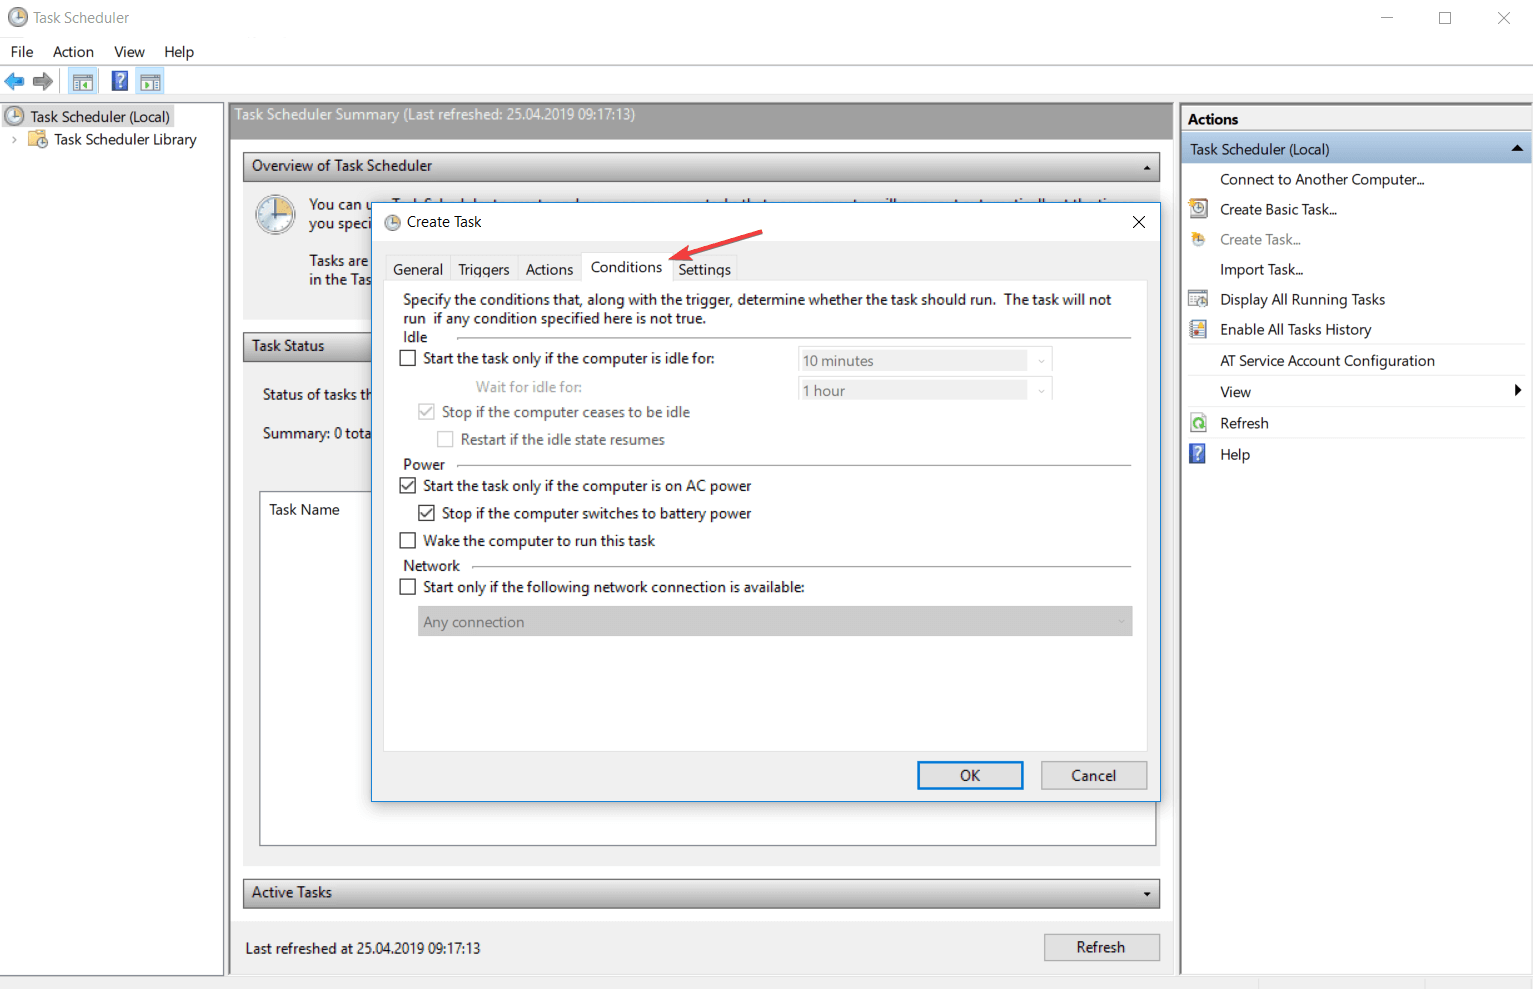
3. Types of Task Conditions
Task conditions decide if a task can run after it was triggered. Conditions are optional and their main role is to help you accomplish a more accurate task reported to the operating situation.
You can find them in the Conditions tab of the Task Properties or Create Task menu. Conditions are divided into 3 categories: idle conditions, network conditions, and network conditions.
3.1. Idle conditions
With this condition, you can tell the task to run only if your computer is an idle for a certain amount of time. Every 15 minutes, Task Scheduler is checking your activity to find out if your PC has entered into an idle state.
It is considered that your computer is in an idle state if the screensaver is on or if the percentage of CPU and memory operation is 0%.
As soon as the Task Scheduler has detected that your computer is in an idle state, it will begin the countdown of the length of time that has been set.
If you come back at this time and continue your work, the application will reset the task.
You can also set the time condition to 0 and in this case, the task will run when the application will detect that your computer has entered the idle state.
If the Stop if the computer ceases to be the idle condition is on, the task will stop running after the computer gets out from the idle state. Normally, this task will run just one time.
To run every time the computer remains inactive you have to check the Restart if the idle state resumes.
3.2. Power conditions
This condition is dedicated to laptop users because it follows the power method of the device.
While a computer receives a current flow of energy from a source, the laptop can run on a battery when you do not have a stable source of power.
With this condition, you can set a task to run when the computer is connected to a stable and continuous source of energy after the trigger was activated. You can also set a condition.
You can also configure the condition so as not to allow the task to run if the device goes on the battery power.
From these conditions, you can also create a task that will tell the computer to start from sleep mode and run the actions after it was triggered. Consider that this can happen during hours of rest and may create trouble.
To avoid this, make sure the device is at a distance where it cannot bother you or turn it off when you rest.
NOTE
3.3. Network conditions
With this condition, you can configure a task to run if a specific named network is available or if any connection is available when the task is triggered.
If you consider that your task will need network conditions to run, you can also set this in the conditions.
4. Task settings
Task settings are indicating how a task run, is deleted, or is stopped. You can find the panel with all the available settings in the Settings tab from the Task Properties or from the Create Task menu.

The following list contains a description of all the available settings.
4.1. Allow tasks to run on demand
Here you can specify if the task can be run manually before or after it is scheduled by allowing it to run on demand. You can set a task to run at any time on demand.
You find more information about the demand configuration in the How to run a task on demand topic of this article.
4.2. Run a task as soon as possible after a scheduled start is missed
This setting will assure you that a task will start running even if it could not run when it was scheduled from different reasons (the device was turned off, Task Scheduler was busy).
In the default settings, the Task Scheduler will not start the task immediately when the service is available. It will wait 10 minutes and then immediately start the process.
4.3. If the task fails, restart every time period
This setting will force the Task Scheduler to restart the task if the previous attempt was thwarted by an error.
You have to add the time interval between the running attempts and the number of attempts to achieve.
4.4. Stop a task if it runs longer than the time period
With this setting you can establish a time limit in which the task can run.
This setting is used for limiting the number of tasks that need a long period of time to execute and in this way you can save resources for your computer.
4.5. If the task is not scheduled to run again, delete if after a time period
This feature replaces an action that you should do it manually.
If you schedule a task to run only once means that you will not need it in the future and not unnecessarily load the list of tasks you should delete after you have used it.
This setting will delete automatically the task after a period of time set by the user after it was activated.
Remember, your task must include at least one trigger with an expiration date in order to select this setting.
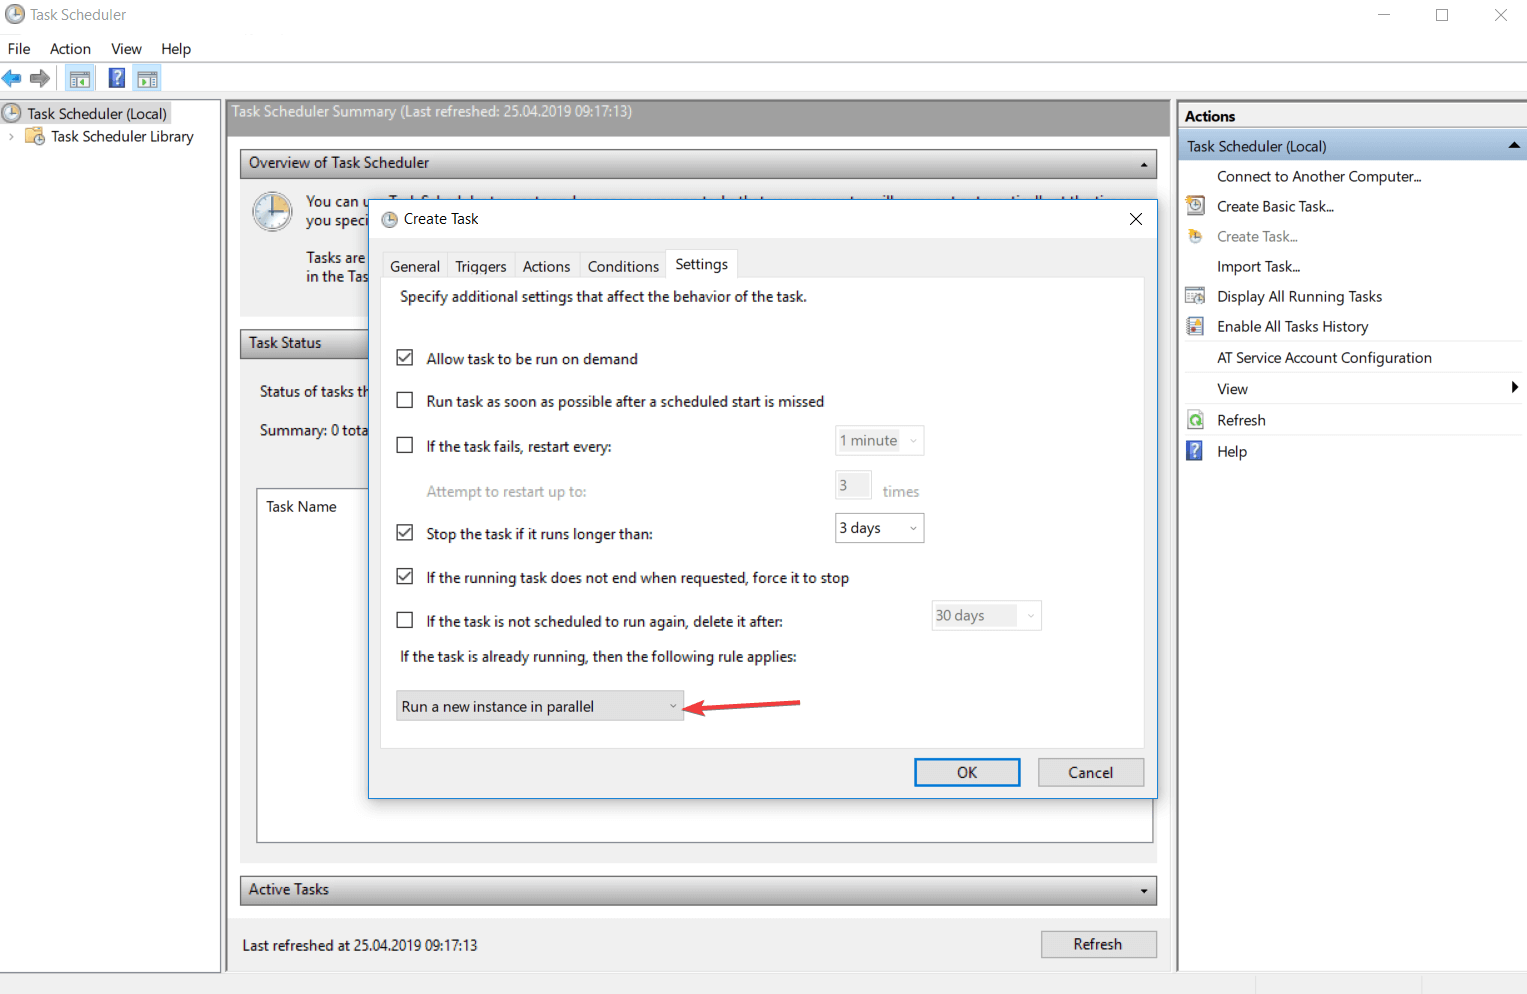
4.6. If a task is already running you must know a few things
You must configure the Task Scheduler to know how to run the task in case another instance of the current task is already running.
- Do not try to start a new instance because the application will not run the new instance and either stop the current instance from running.
- You can run a new instance in parallel. Task Scheduler is able to run different instances in parallel, so if you want to run a new instance, it will run it at the same time as the instance that is already running.
- You can queue a new instance. You can set an instance to start as soon as the current task ends the activity. The Task Scheduler will add your add the new instance in a queue and the service will not stop the current task from running.
- Stop the current instance. After you stop the current instance, the service will try to run on the next one.
- You can run a new instance in parallel. Task Scheduler is able to run different instances in parallel, so if you want to run a new instance, it will run at the same time as the instance that is already running.
- You can queue a new instance. You can set an instance to start as soon as the current task ends the activity. The Task Scheduler will add your add the new instance in a queue and the service will not stop the current task from running.
- Stop the current instance. After you stop the current instance, the service will try to run on the next one.
- You can run a new instance in parallel. Task Scheduler is able to run different instances in parallel, so if you want to run a new instance, it will run it at the same time as the instance that is already running.
- You can queue a new instance. You can set an instance to start as soon as the current task ends the activity. The Task Scheduler will add your add the new instance in a queue and the service will not stop the current task from running.
- Stop the current instance. After you stop the current instance, the service will try to run on the next one.
If you are looking for ways to enable Task Scheduler History, check out this guide.
5. Task security context
By default, the Task Scheduler runs the tasks in order with the security context of every user logged on when the task is triggered.
You can modify these settings from the Security options sections of the General tab after you have selected the task that you want to modify.
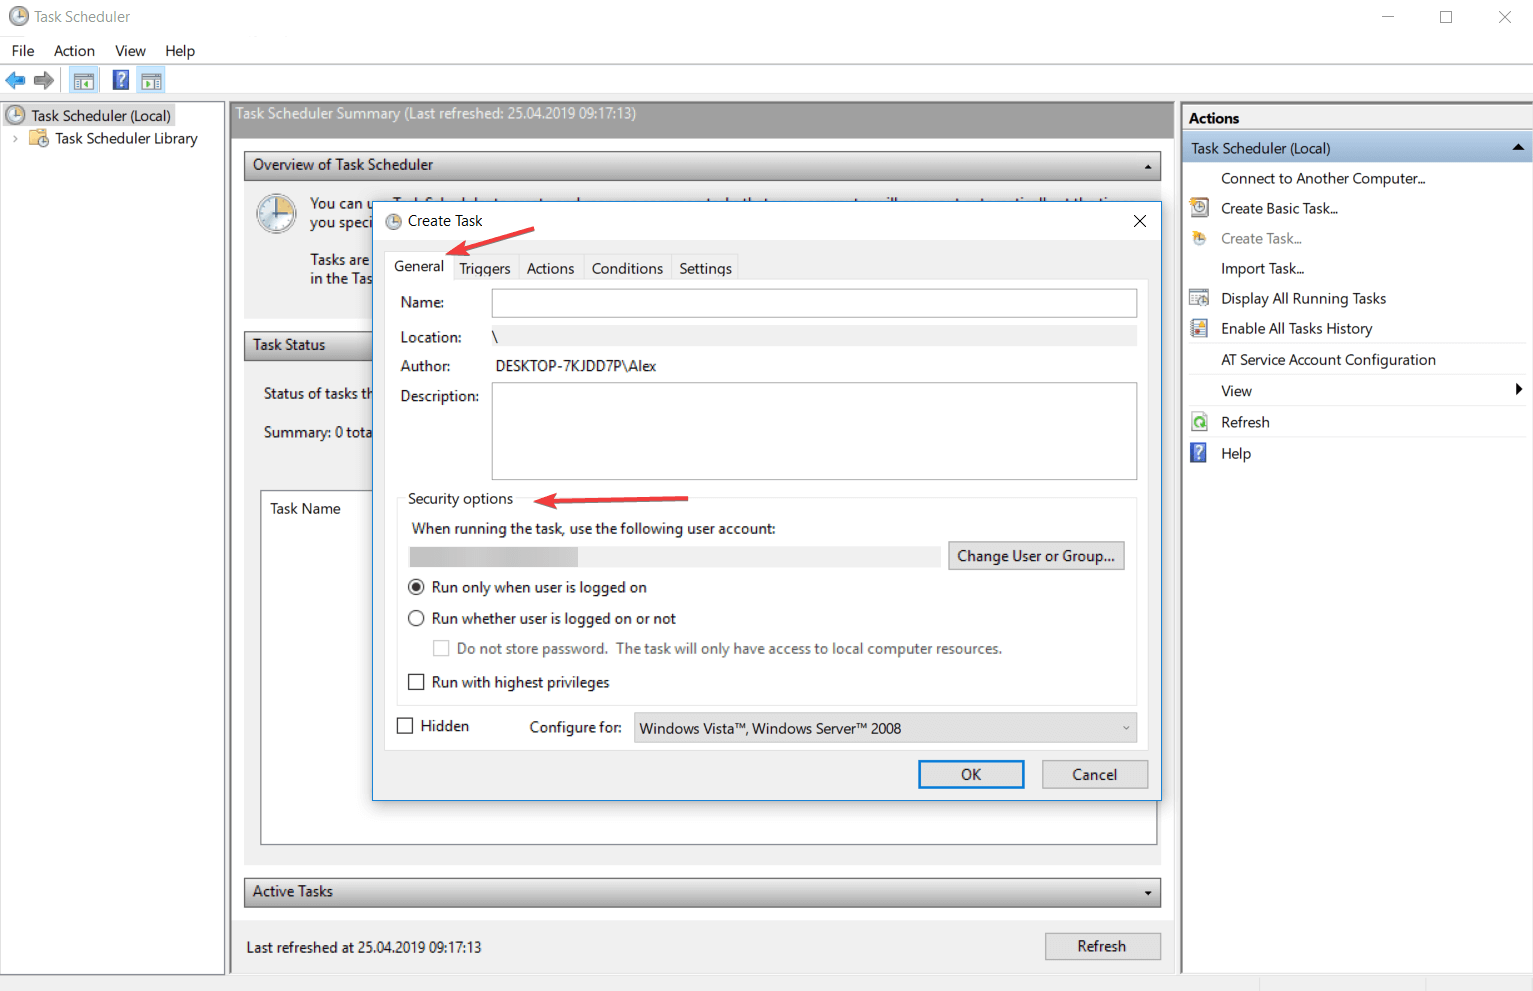
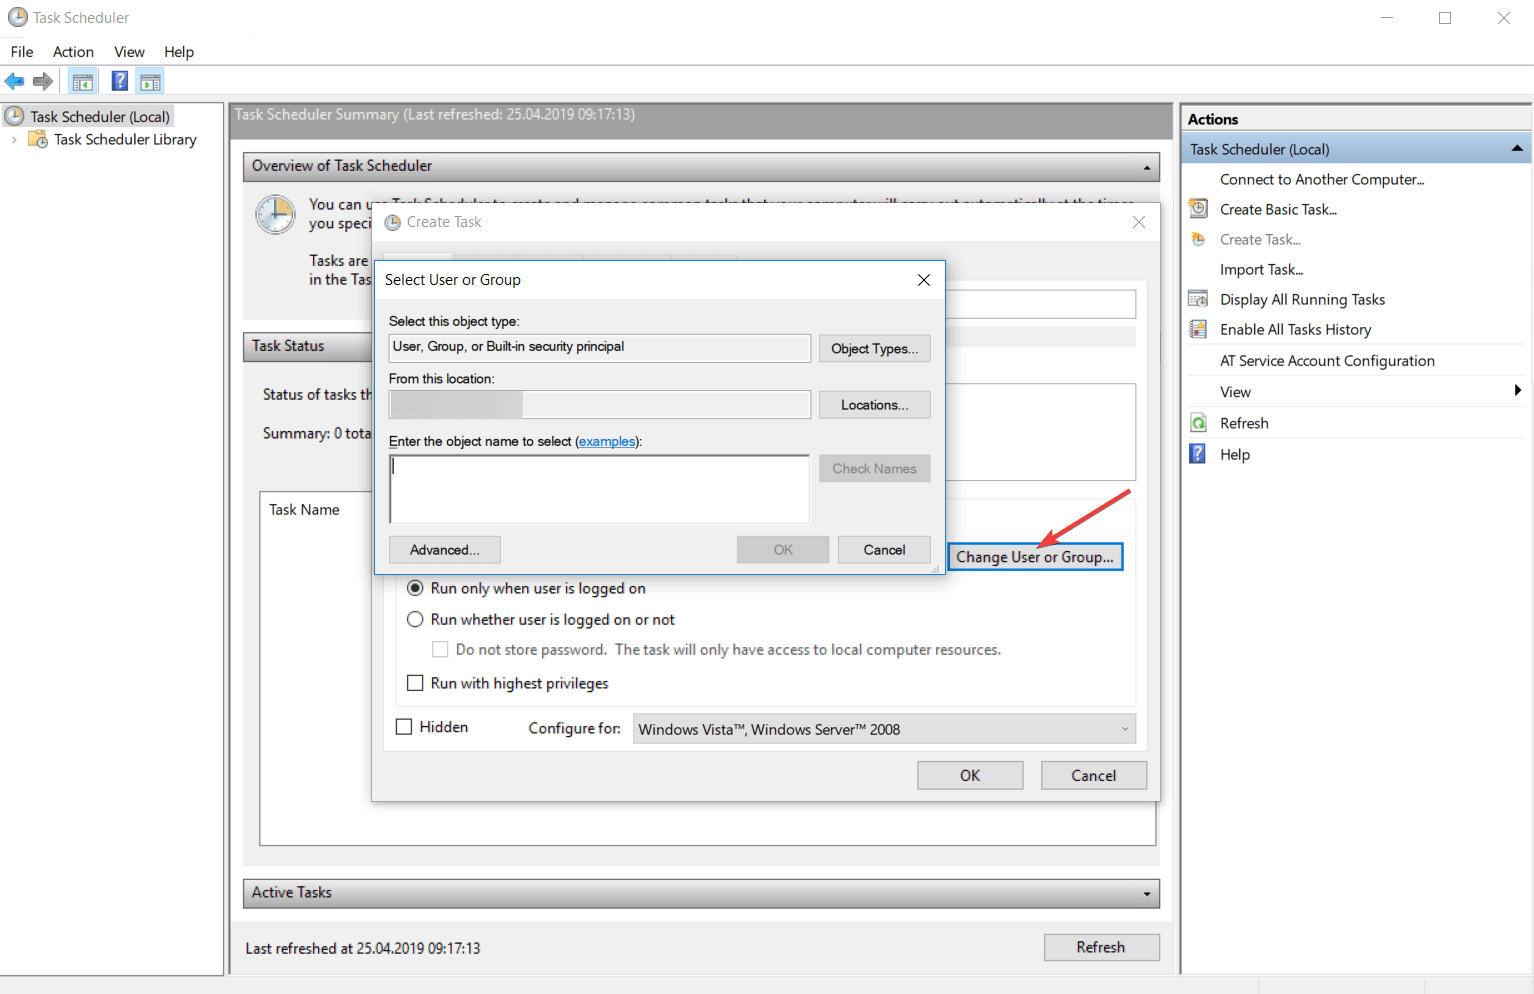
For a better organization of your tasks, you can group them on users or on groups of users by clicking on the Change User or Group category.
If your user does not have administrator rights the button will be called Change User and your account will not be able to enter the Administrators group.
The Run whether the user is logged on or not feature allows you to run tasks even if the specific user is not logged on.
The feature is used for tasks that need to be run on any user of the system. If this setting is checked, the tasks will not run interactively.
To make a task run only when a user is logged on, select the Run only when the user is logged on radio button.
If the Run whether the user is logged on or not feature is used, you should supply the credentials of the account no matter if you check the Do not store password or not.
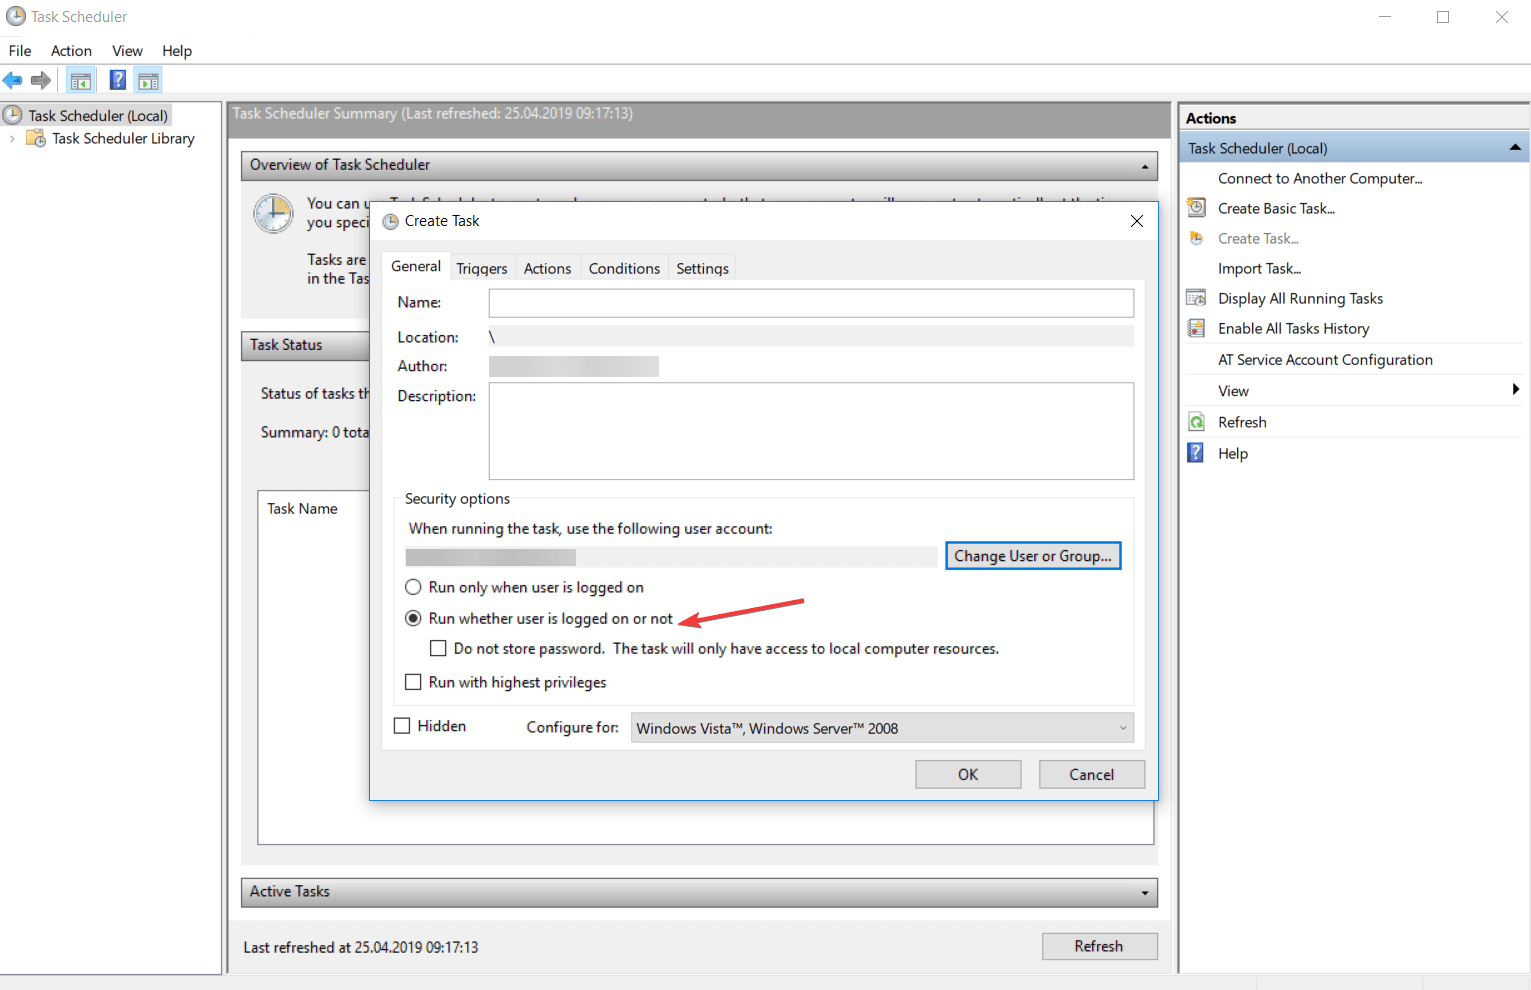
In the account is not logged on, the Task Scheduler will use the saved credentials in order to run the task.
When you select the Do not store password, the application will not save the credentials when you are creating a task but will discard them after the user properly authenticates.
When the service requires running a task, it will use the Service-for-user (S4U) extensions to the logging protocol to retrieve the user’s token.
In other words, the main purpose of the Service-for-user is to secure the context of the account.
- Microsoft Office Lens: A Powerful Tool for Capturing and Organizing Information
- Swap Left/Right Speaker in Realtek Audio Console [How to]
- How to Get DirectX 12 End-User Runtime and Fix Installation Issues
- Overclocking in OMEN Gaming Hub: How to Use it
6. How to use the Task Scheduler
6.1. Start Task Scheduler
- Using Windows interface
- Type Control Panel in the search bar from the bottom left corner of your screen.
- Click on the System and Security, and select Administrative Tools.
- This will open you a list with different applications and in that list, you will find Task Scheduler.

- Double-click on it and the application will open.
- Using Command Prompt
- Type cmd in the search bar from the bottom left corner of your screen, and select Command Prompt.
- Type msd command in the console, and you will open the application.
There are several ways you can get to access this application. You find above two of them that will work on any version of Windows that you have.
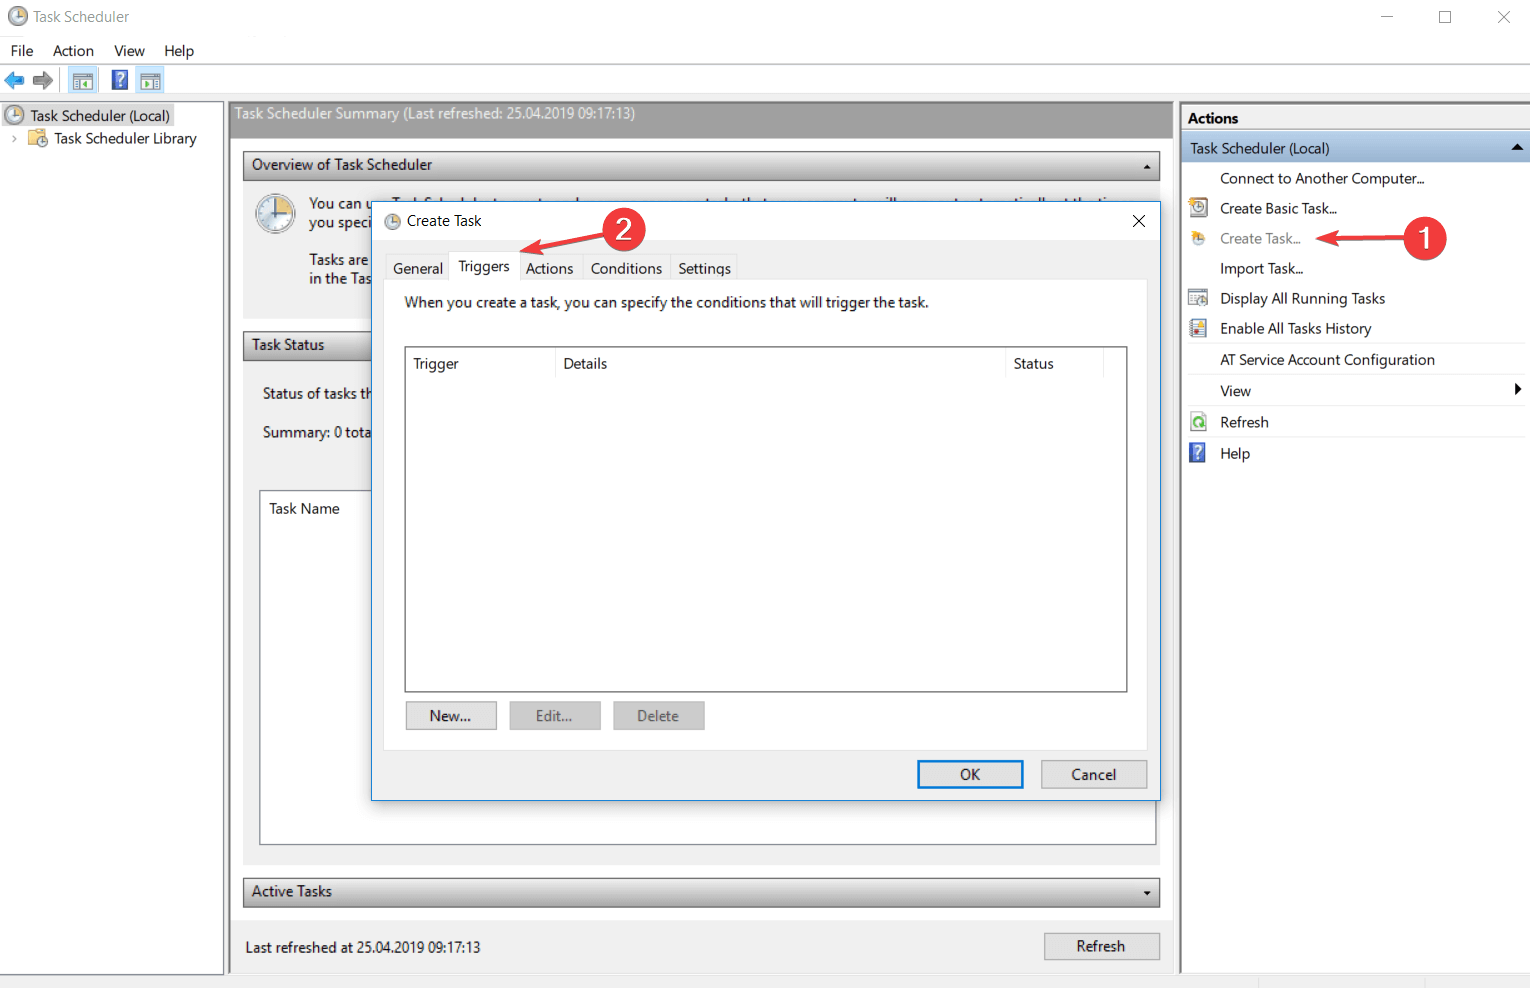
6.2. Create a task
-
1. Press the Start button on your taskbar.
-
2. Type task scheduler in the search box that opens and click on the first result.
-
3. When the Task Scheduler app opens, navigate to the Library section from the left pane.
-
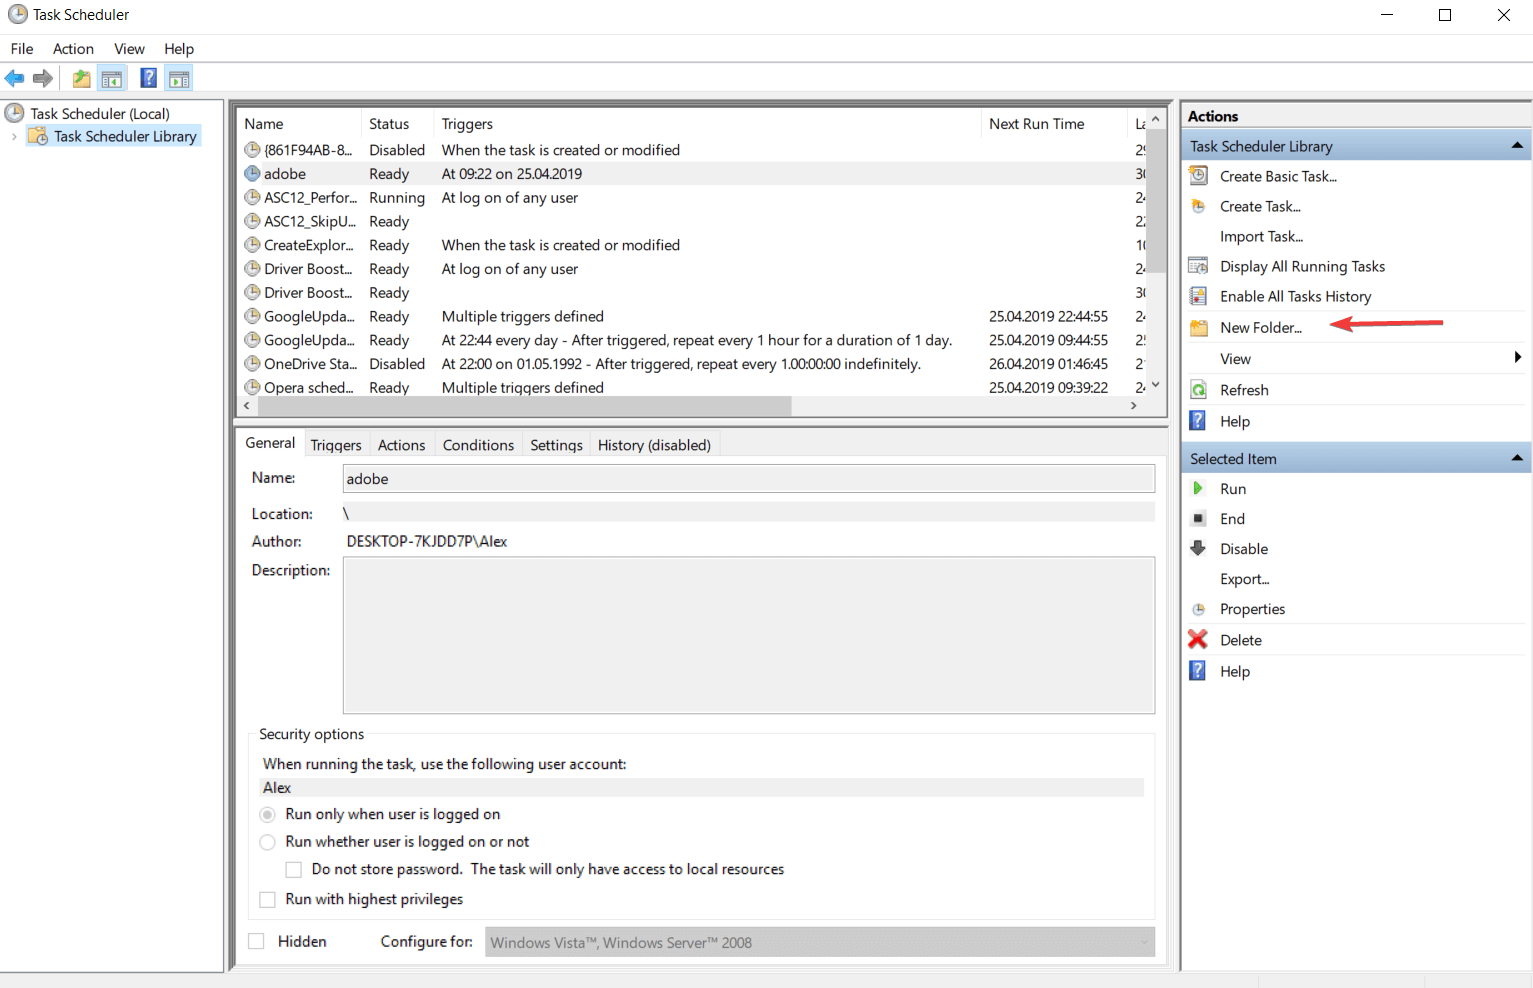
4. Select the folder where you want to create a task. If you have not already a created folder, from the Actions tab, click on the New folder… button and name your new folder.

-
5. Click on the Create Task button from the Actions section.
-
6. You must enter a name for your task in the General tab of the Create Task dialog box.
-
7. Select what type of trigger you want to be attached to this action. To do this, open the Triggers tab, and click on the … button.
-
8. Choose the action or the set of actions which will be found in the task. Enter the Actions menu of the Create Task, and click on the .. button and configure your action settings.
-
9. Take a look at the Conditions and Settings tab to better customize the task for your needs.
-
10. Click on the OK button from the Create Task dialog box to finish the task creation process.
The process of creating an automated task via Task Scheduler in Windows 10 is simple and fast. The app allows you to configure every setting, such as the task’s name, its triggers and conditions.
6.3. How to change an already created task
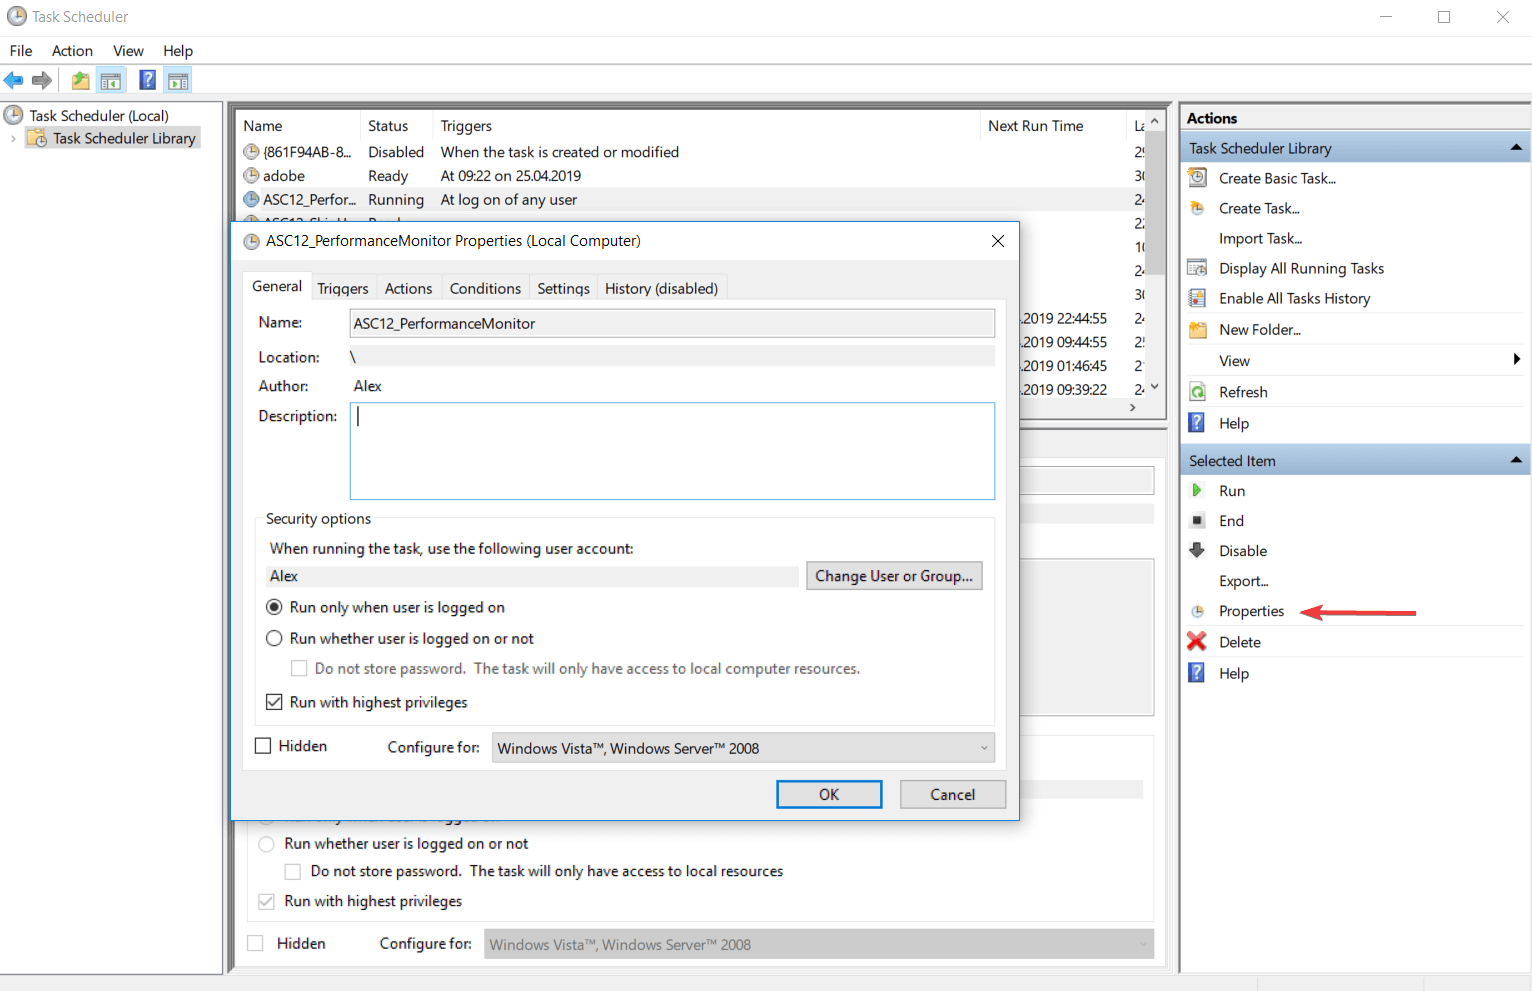
- Open Task Scheduler, and select the task that you want to change.
- Click on the Properties tab from the Action menu to open the Task Properties dialog box.

- Click on the General tab to view the task‘s general settings that you can modify.
- To finish the process click on the OK button of the Task Properties dialog box, and the new task will be registered.
- If you have already created a task that activates when you register another task, it will enable it.
6.4. How to delete a task
- Using Windows interface
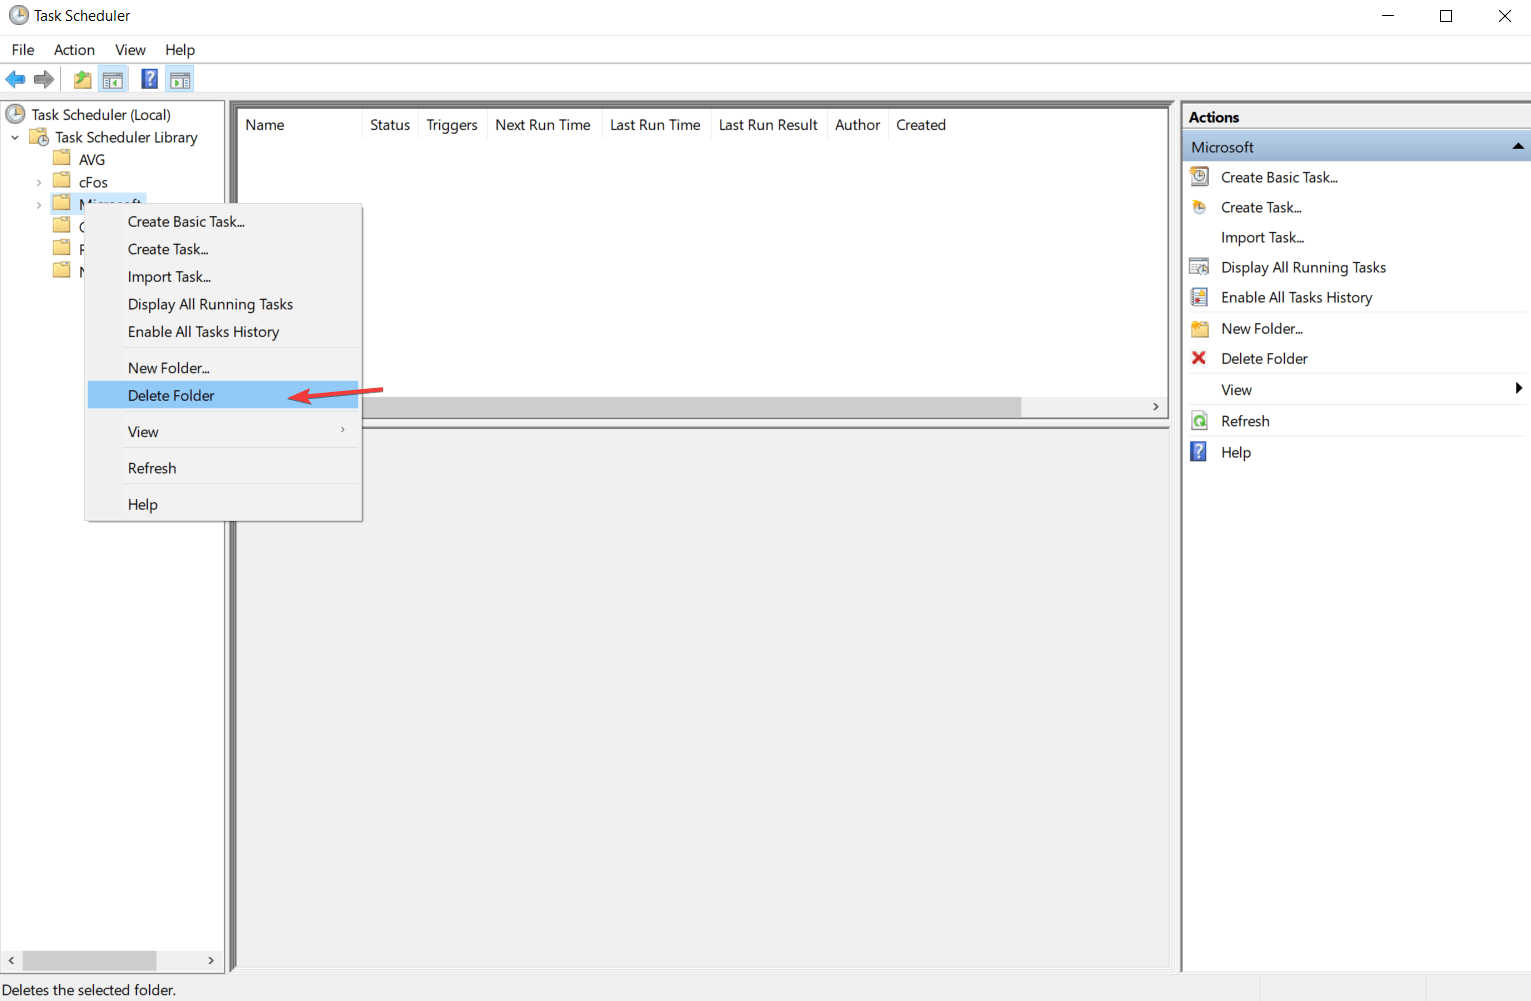
- Open Task Scheduler, and click on the Task Scheduler Library folder.
- Right-click on the task that you want to remove and select Delete Folder.
- Using Command Prompt
- Type Command Prompt in the search bar, and open it.
- Paste the following command:
schtasks /Delete [/S <system> [/U <username> [/P [<password>]]]] /TN <taskname> [/F] - To find more information about the command from above, type: schtasks /Delete /?
6.5. How to create a Task Folder
- Open Task Scheduler, and select the task folder under which you want to create a new task folder.
- Press on the New Folder button from the Actions, and enter the name of the new folder.
- Click on the OK button to finish the process.
To organize better the scheduled tasks we recommend you to share them in different folders depending on their role.
NOTE
6.6. How to delete a Task Folder
- Start Task Scheduler, and select the task folder from the left table of the application interface.
- You will notice that in the Action panel you have the Delete folder.

- Click on that option and choose the Yes option to complete the process.

If you want to delete a folder to better organize your tasks, you must ensure that it is empty, so be sure to delete all the tasks and the subfolder tasks before you delete the task folder.
NOTE
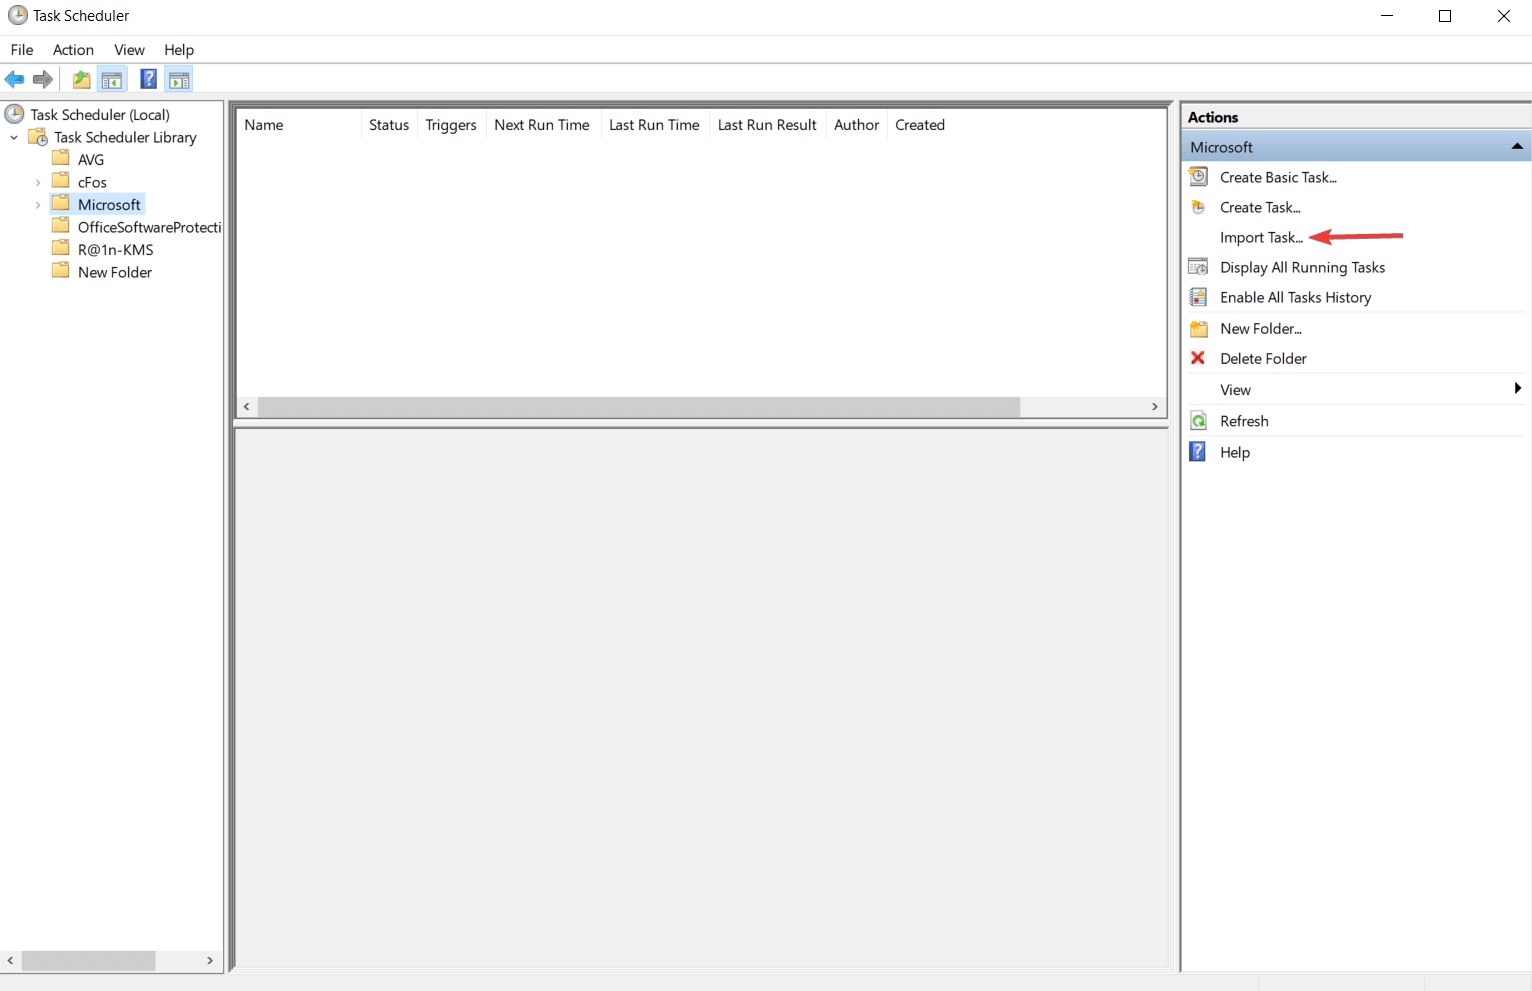
6.7. How to import a task
- Using Windows interface
- Open Task Scheduler, and select the folder where you want to import the new task.
- Click on the Import Task button from the Action, and select the path to the XML file of the task.
- After you entered the path to the task, the app will open the Create Task dialog box where you can find all the information about the imported task.
- Click on the OK button to finish the importing process.
- Using Command Prompt
- Open Command Prompt. To do that, type cmd in the Windows search bar.
- Edit and paste the following command:
schtasks /Create [/S <system> [/U <username> [/P [<password>]]]] /XML <xmlfile> /TN <taskname> - For more information about the command from above, type the following command:
schtasks /Create /?
Task Scheduler has a feature that allows you to import tasks, which will be added to a folder chosen by you. All the task characteristics can be found in an XML file.
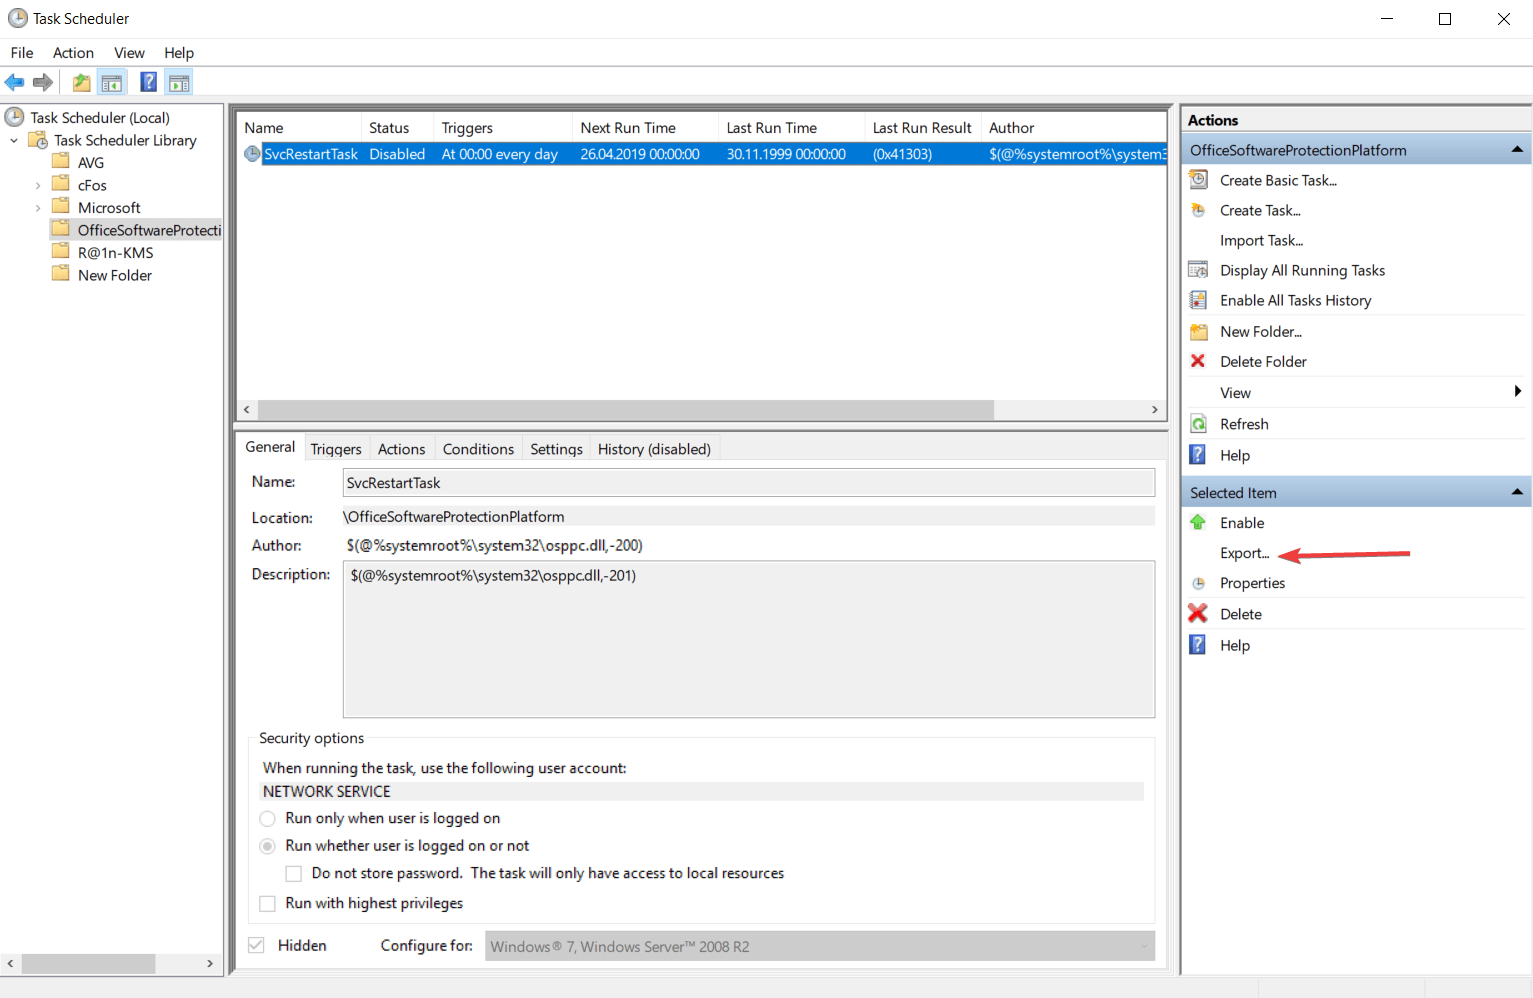
6.8. How to export a task
- Export a task using Windows interface
- Open Task Scheduler, and select the task folder which contains the task that you want to export.
- Right-click on the task that you want to export and select the Export option.

- If you select the task, you can find this option in the Action panel.
- This action will open a dialog box where you must browse the location where you want to save the task.
- Using Command Prompt
- Open Command Prompt by typing cmd in the Windows search bar.
- Edit and paste the following command: schtasks /Query [/S <system> [/P <password>]]]] /XML /TN <taskname>
- To find more information about the command tag, type the following command:
schtasks /Query /? - Your XML file is shown in the console. Copy the task XML and paste it into a blank XML file.
- After the XML file is saved, it will contain all the characteristics of your task.
Task Scheduler has also an integrated feature that allows you to export your task to different users. The task will be saved in an XML format that can be shared like a usual file.
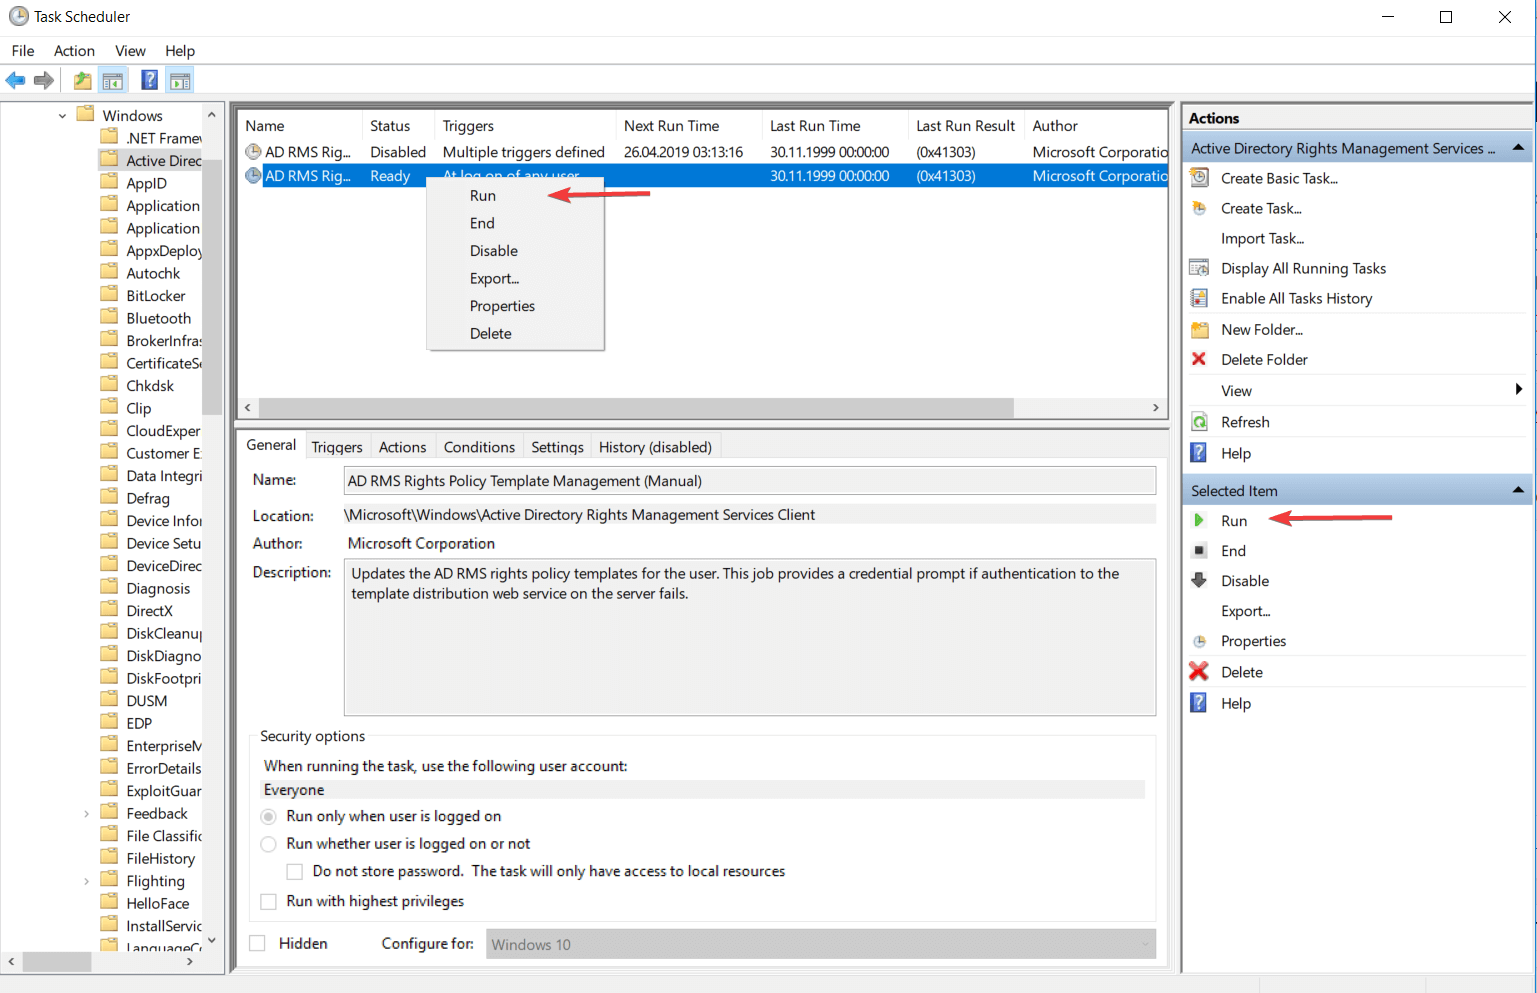
6.9. How to run a task on demand
- Using Windows interface
- Open the Task Scheduler, and select the folder that contains the task you want to run.
- Right-click on your task and select Run.

- If you select the task you can find this option in the Action panel.
- Using Command Prompt
- Right-click on the Windows icon from the bottom left corner of your screen, and select the Command Prompt (Admin) section.
- Edit and type this command:
schtasks /Run [/S <system> [/U <username> [/P [<password>]]]] /TN <taskname> - For more information about the command lines from above, type in the console
schtasks /Run /?
This feature helps you to run a task after or before it was scheduled to run. This is possible only if the task is not disabled and the Allow task to be run on demand setting is selected for your task.
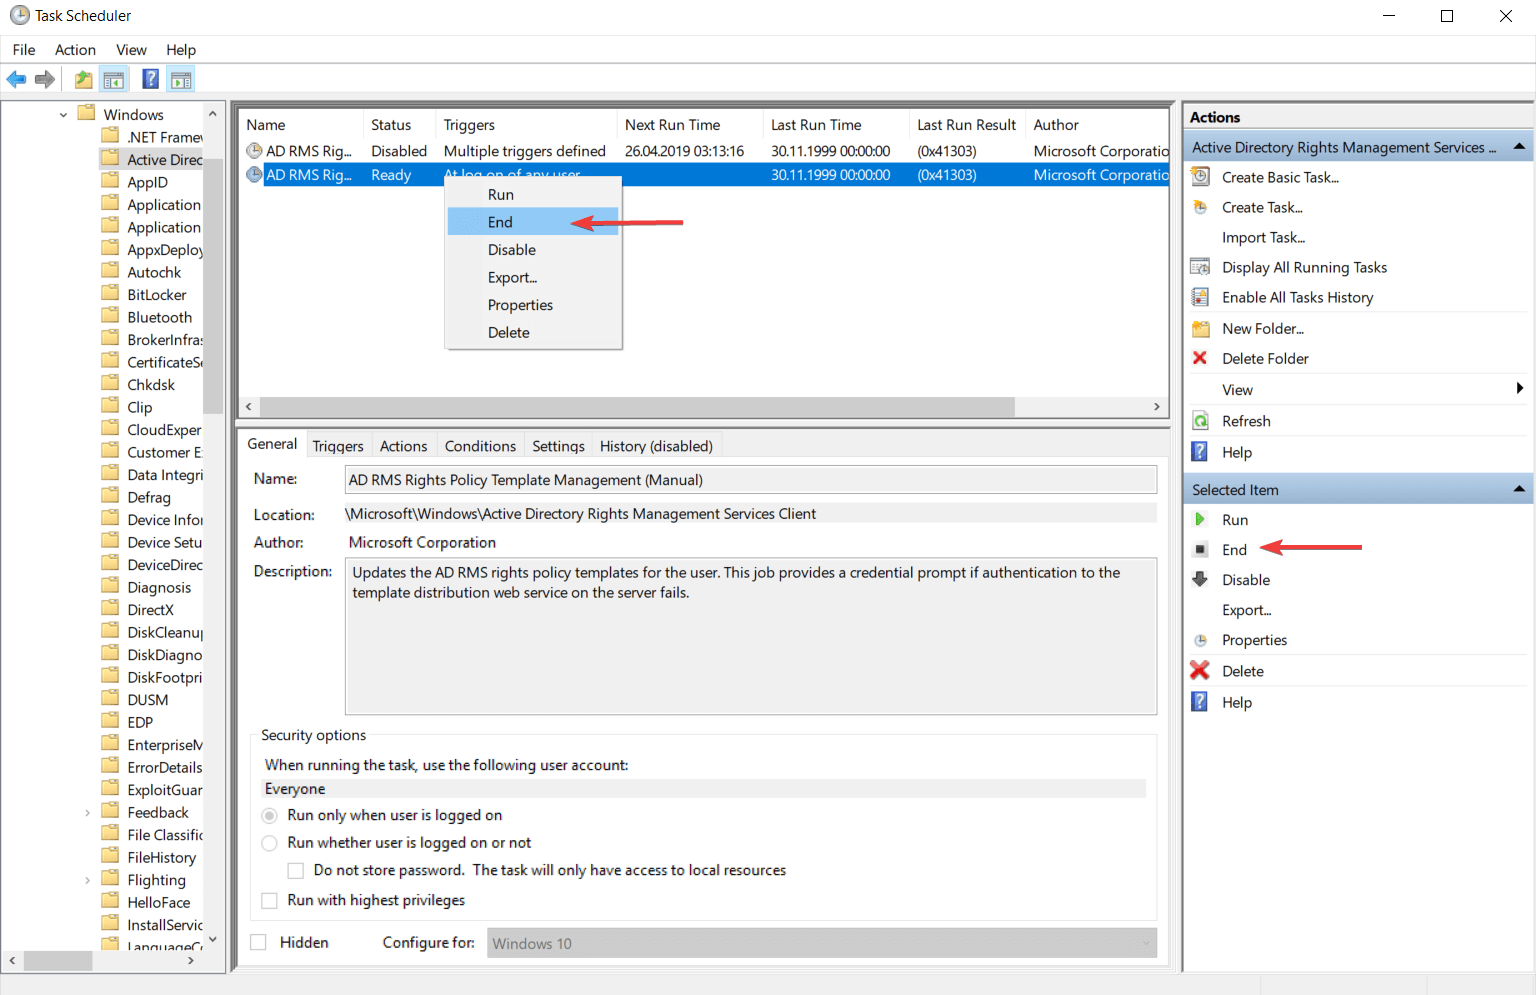
6.10. How to stop a running task
- Using Windows interface
- Open Task Scheduler, and select the folder which contains the task that you want to close.
- Right-click on your task, and select the End If you select the task.

- It will be displayed a dialog box where you will be asked if you want to end all instances of this task. Click on the Yes button to end stop the task.
- Using Command Prompt
- Use the Windows Key + R combination to open the Command Prompt.
- Edit and type this command to end the activity of your task:
schtasks /End [/S <system> [/U <username> [/P [<password>]]]] /TN taskname - To see the role of each sequence you can enter the following command in the console to get all the information you need:
schtasks /End /?
Task Scheduler is offering a feature that allows you to end the activity of a task even if it is already running.
To do that, the running task must have the If the running task does not stop when requested, force it to stop setting activated.
This feature is commonly used when a task does not finish its activity when you finish the ending process.
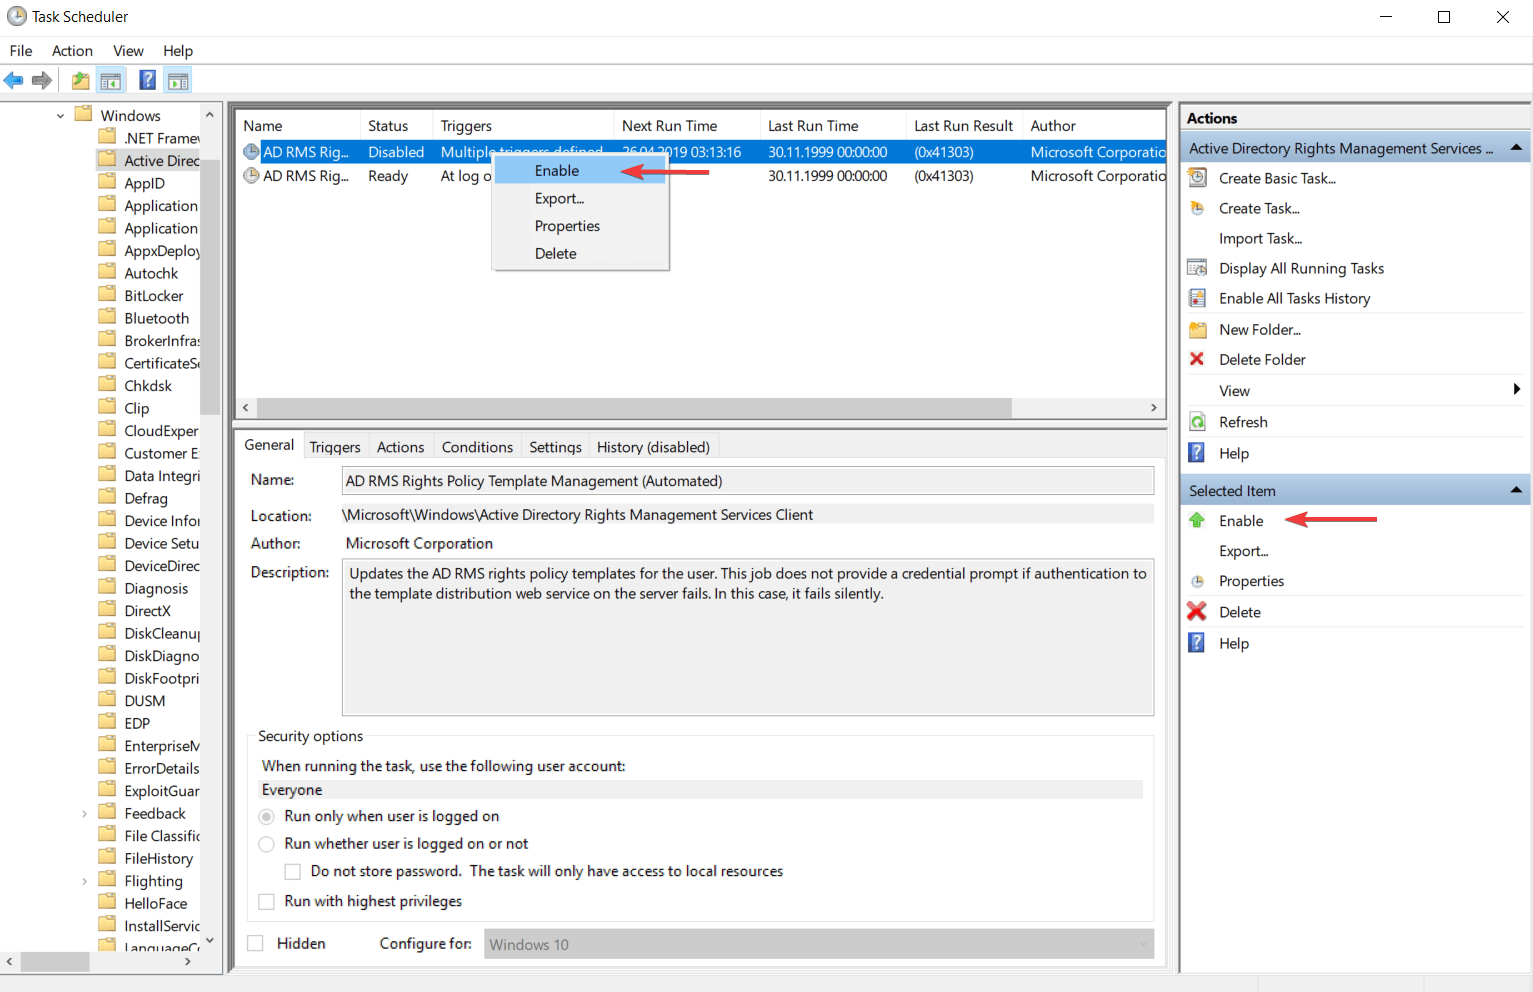
6.11. How to enable a task to run
- Using Windows interface
- Open Task Scheduler, and select the task folder which contains the task you want to enable.
- Right-click on your task, and select the Enable option.

- You can also select your task and run it from the Actions panel.
- Using Command Prompt
- Use the Windows Key + R key combination to open Command Prompt.
- Edit the following command and paste it in the console dialog box:
schtasks /Change [/S <system> [/U <username> [/P [<password>]]]] /TN <taskname> [/ENABLE] - Enter this command to obtain more information about the command from above:
schtasks /Change /?
When a task is disabled it can execute the actions. You can create a task and leave it off until the moment you want to use it. Here are two ways to activate a task that any kind of user can implement.
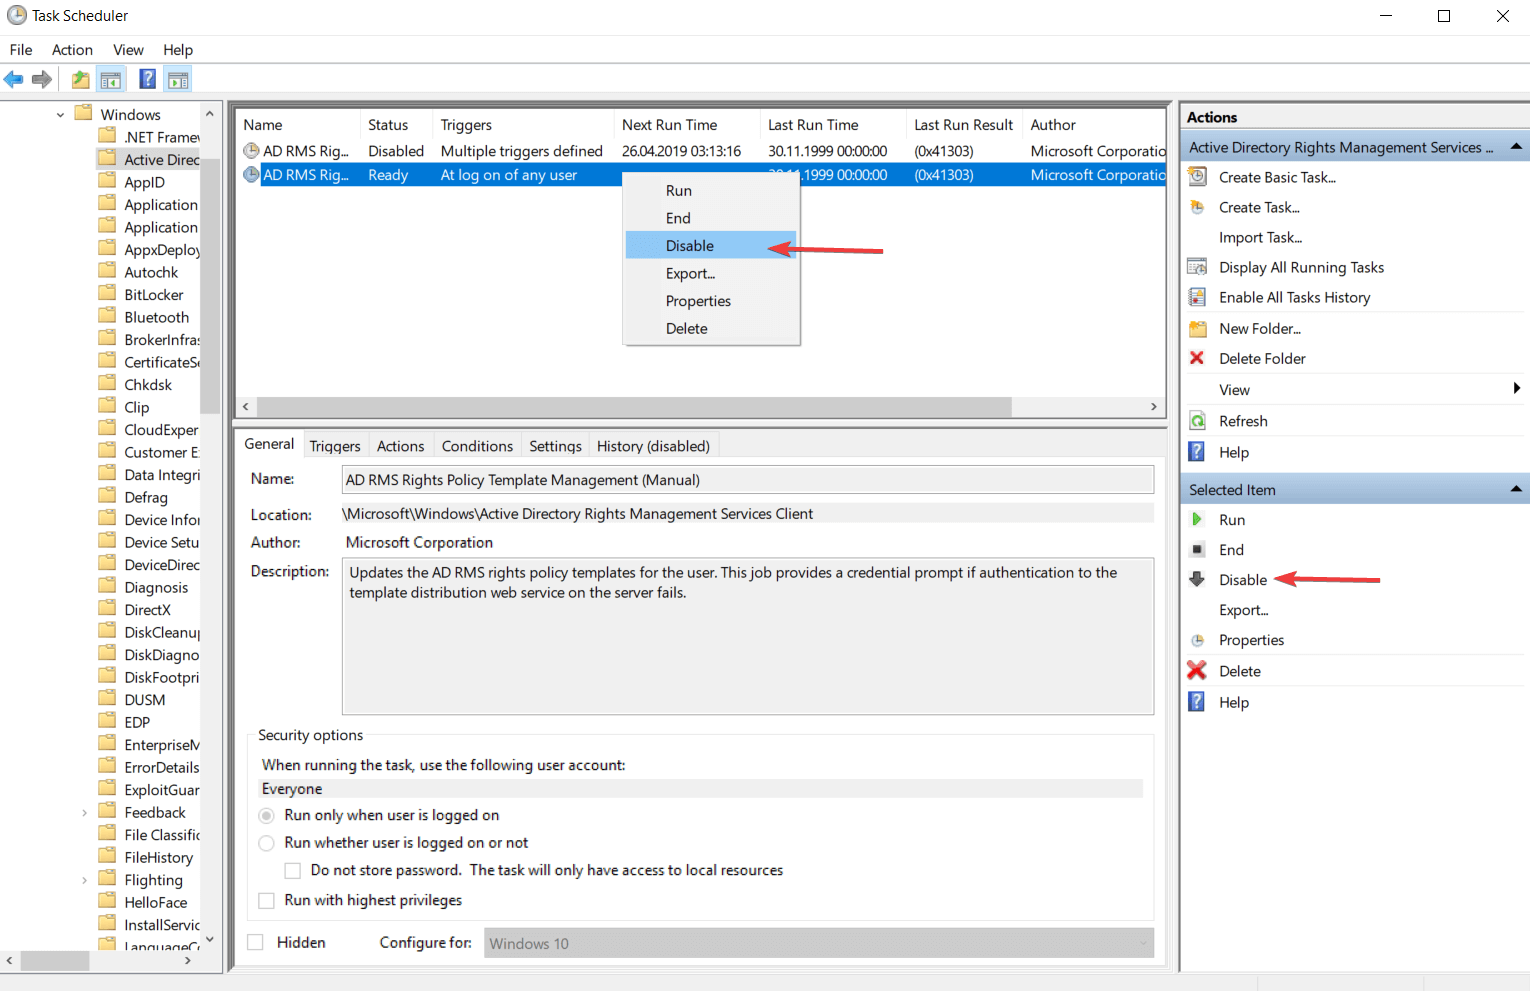
6.12. How to disable a task for running
- Using Windows interface
- Open the Task Scheduler, and select the folder where you have the task.
- This action will display in the console panel all tasks from that folder.
- Search the task that you want to disable and then right-click on it.
- It will display a list with some actions, but in this case, we are only interested in one. Click on the Disable option to stop your task activity.

- Using Command Prompt
- To open Command Prompt, right-click on the Windows icon from the bottom left corner of your screen.
- Click on the Command Prompt (Admin) to open the console as an administrator.
- Edit with your information the following command and paste it in the Command Prompt dialog box:
schtasks /Change [/S <system> [/U <username> [/P [<password>]]]] /TN <taskname> /DISABLE - You can find more information about this command line by pasting the following command in the console:
schtasks /Change /?
Task Scheduler has a feature that allows you to disable the activity of a task for a certain period of time. You can enable the task again at any time when you will need it.
6.13. How to view task properties and history
- Using Windows interface
- Open Task Scheduler, and select the folder that contains the task you want to view.
- Right-click your task and select Properties.
- In the Task Properties dialog box, you will find the General, Triggers, Actions, Conditions, and Settings.
- Click on any of these tabs to see the properties.
- Click on the History tab to view the task‘s history.
The task history option can be enabled and also disabled from the Action panel. There you will find the Disable All Task History / Enable All Task History buttons, and depending on your wish, you can configure the task’s history.
Also, you can view the description of an event from the events list by clicking on the History tab.
- Using Command Prompt
- Right-click on the Windows icon next to the Windows search bar, and select Command prompt (Admin).
- Paste the following command:
Schtasks /Query /FO LIST /V - For more information about the command line from above, type:
schtasks /Query /?
The task properties contain everything we must know about every task (name, description, actions, triggers, security options, conditions, and settings).
The task history is a list with all the tasks created until that moment and can be viewed along with the properties. This list is based on the events tracked by Microsoft Windows Task Scheduler event log.
Every action related to a task is considered an event, so every time when a task runs is building a line in the event log.
We hope that our detailed guide to Tasks Scheduler has given you a broad overview of this application and that you will be able to successfully schedule your tasks in Windows going forward.
Also, if you own a business and want to make sure you have everything under control, then check out our list of the best scheduling software for employees.
For any questions and more suggestions, please access the comments section below.