
Installing System Center Configuration Manager 1610 (Current Branch) on Windows Server 2016 with SQL Server 2016. PART1
IT Production Manager. Nicolas is primarily focused on Microsoft technologies, he is a Microsoft MVP in Cloud and Datacenter Management.
IT Production Manager. Nicolas is primarily focused on Microsoft technologies, he is a Microsoft MVP in Cloud and Datacenter Management.
Changes and new capabilities introduced in version 1610 of the Configuration Manager current branch are:
- In-console monitoring of update installation status
- Exclude clients from automatic upgrade
- Improvements for boundary groups
- Peer Cache for content distribution to clients
- Migrate multiple shared distribution points at the same time
- Cloud management gateway for managing Internet-based clients
- Improvements to the Windows 10 Edition Upgrade Policy
- Manage hardware identifiers
- Enhancements to Windows Store for Business integration with Configuration Manager
- Policy sync for Intune-enrolled devices
- Use compliance settings to configure Windows Defender settings
- General improvements to Software Center
- New columns in device collection views
- Customizable Branding for Software Center Dialogs
- Enforcement grace period for required application and software update deployments
- Improved functionality in dialog boxes about required software
- Software updates dashboard
- Improvements to the application request process
- Filter by content size in automatic deployment rules
- Office 365 Client Management dashboard
- Task sequence steps to manage BIOS to UEFI conversion
- Improvements to the task sequence step: Prepare ConfigMgr Client for Capture
- New compliance settings for configuration items
- Intune compliance policy charts
- Lookout integration for hybrid implementations to protect iOS and Android devices
For details, please read this page: https://docs.microsoft.com/en-us/sccm/core/plan-design/changes/whats-new-in-version-1610
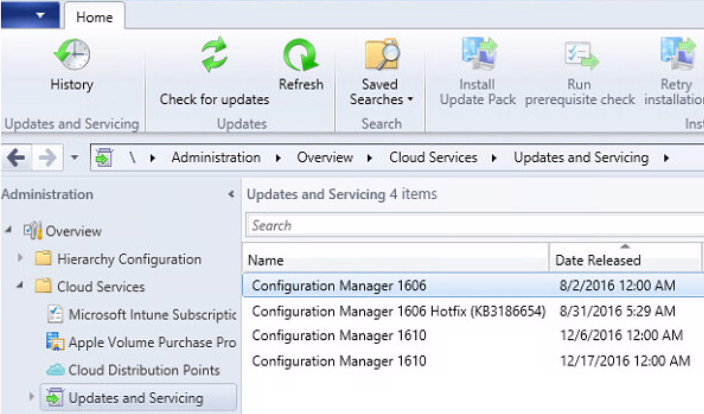
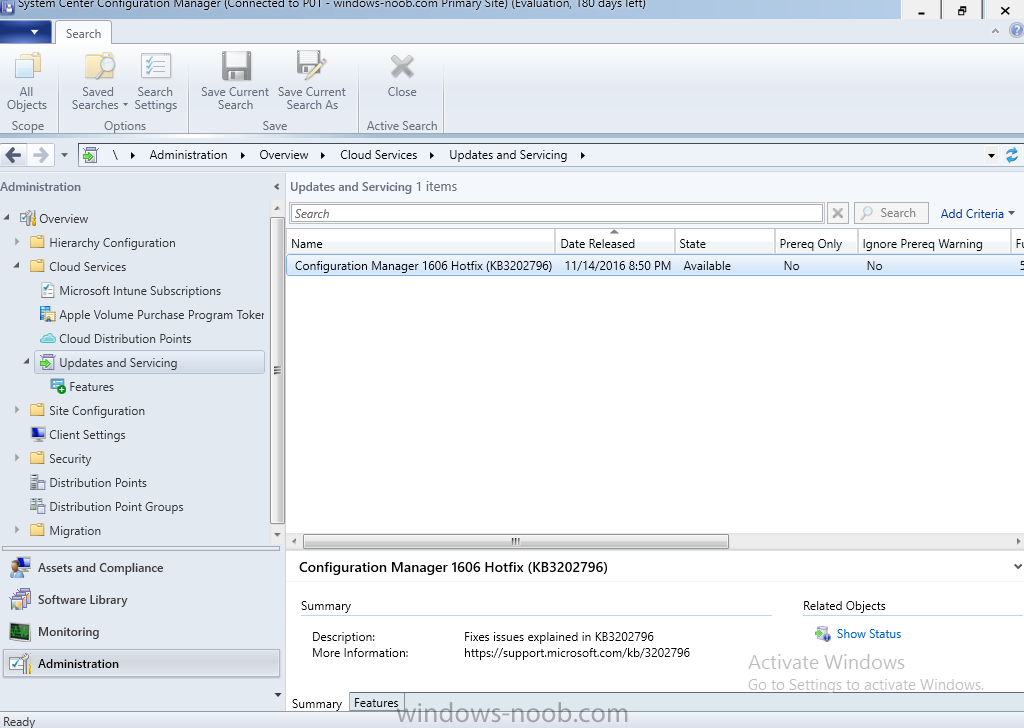
In this article, I will describe how to install SC Configuration Manager 1610 from scratch on the latest version of Windows Server 2016 with SQL 2016. Actually, SCCM 1610 is the latest release available for the production environment. If you are running SCCM 1511 and higher version, you can easily upgrade to 1610 version from “Updates and Servicing” as shown below:
Architecture
Installing SCCM is not a big deal but you will need to run through some prep work to get your environment ready. This post will guide you through the installation of a standalone primary site server with MP and DP roles installed as part of the install wizard and SQL installed locally. Let’s take a look at the architecture:
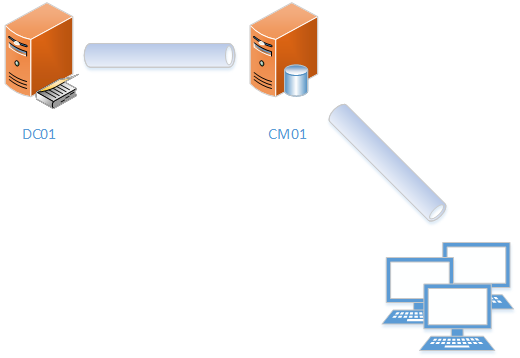
- DC01 is my Domain Controller running inside a Hyper-V VM.
- CM01 is my Configuration Manager Server with SQL installed locally running inside a Hyper-V
- Active Directory Domain: “get-cmd.local”
- Hyper-V host (Windows Server 2016) is running on DELL R720 PowerEdge
In this guide, we will install SQL Server and SCCM on the same server but in a production environment, I advise you to install SQL on a remote server. So don’t forget to configure Windows Firewall by GPO, read this page: https://technet.microsoft.com/en-us/library/ms175043.aspx. If you don’t want to install one more full version of Windows Server 2016, note that Windows Server Core supports SQL Server installation as explained by Florent Appointaire here: https://www.starwindsoftware.com/blog/install-sql-server-2016-on-windows-server-2016-server-core.
Before starting, note the following information:
- During the SQL installation, the collation should be SQL_Latin1_General_CP1_CI_AS
- SQL Server no longer comes with the Management Studio and it’s offered as a separate download: https://download.microsoft.com/download/3/1/D/31D734E0-BFE8-4C33-A9DE-2392808ADEE6/SSMS-Setup-ENU.exe
- For SQL Service Accounts, Microsoft recommends that you use domain service accounts and not the local system accounts. So we need to create separate users accounts for each of the SQL services.
So, connect to a domain controller and open the “Active Directory Users and Computers” MMC. Create the following service accounts:
Next, you will need to be certain .NET 3.5 is installed on your server. Run the following PowerShell command to confirm:
PS > Get-WindowsFeature *NET-Framework-Core*

All is done!
Installation
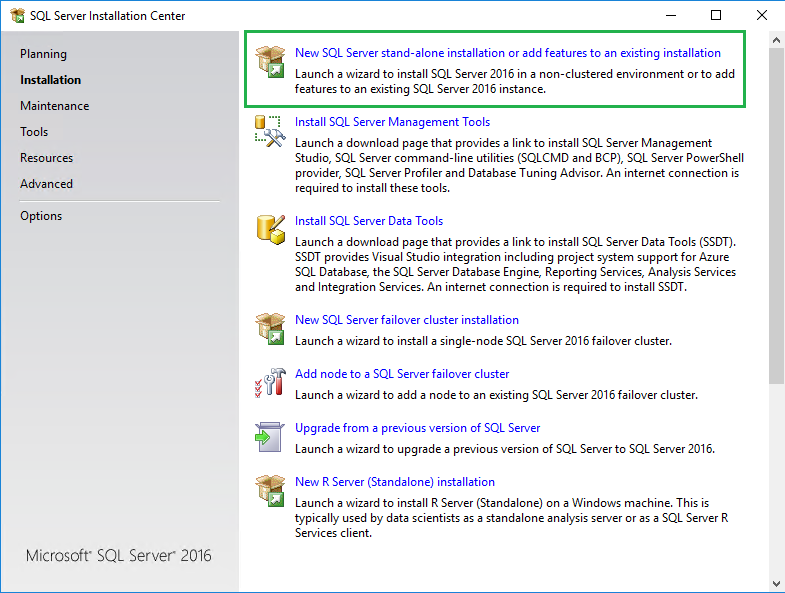
I will not explain each step because it’s not very interesting and it depends on your organization requirements, but below are the important steps for your SCCM installation. Select “New SQL Server stand-alone installation”
Next, select the following required features:
- Database Engine Services
- Reporting Services
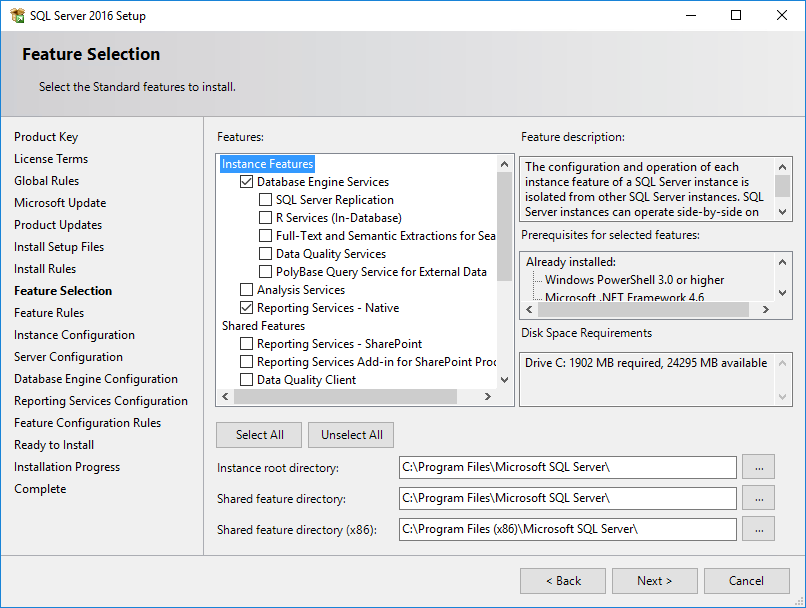
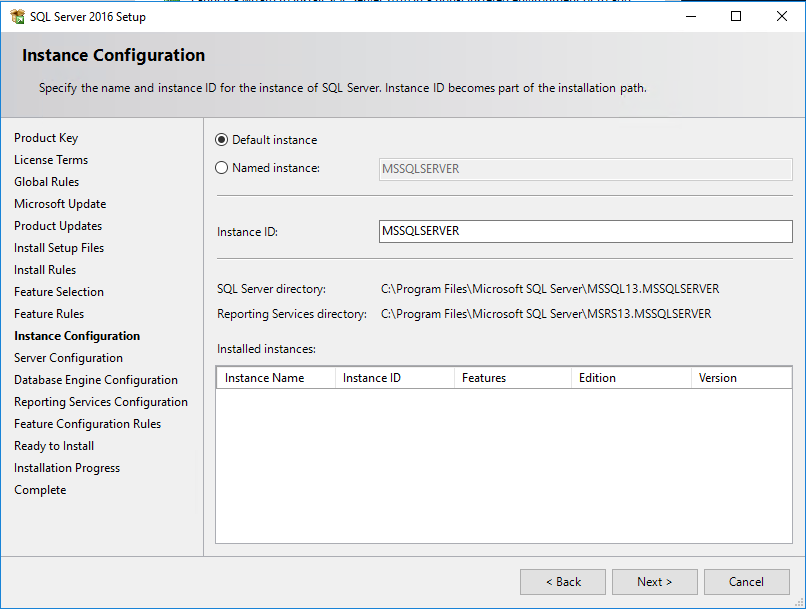
Of course, you can select other features in the list to suit your needs. Next, select the default instance:
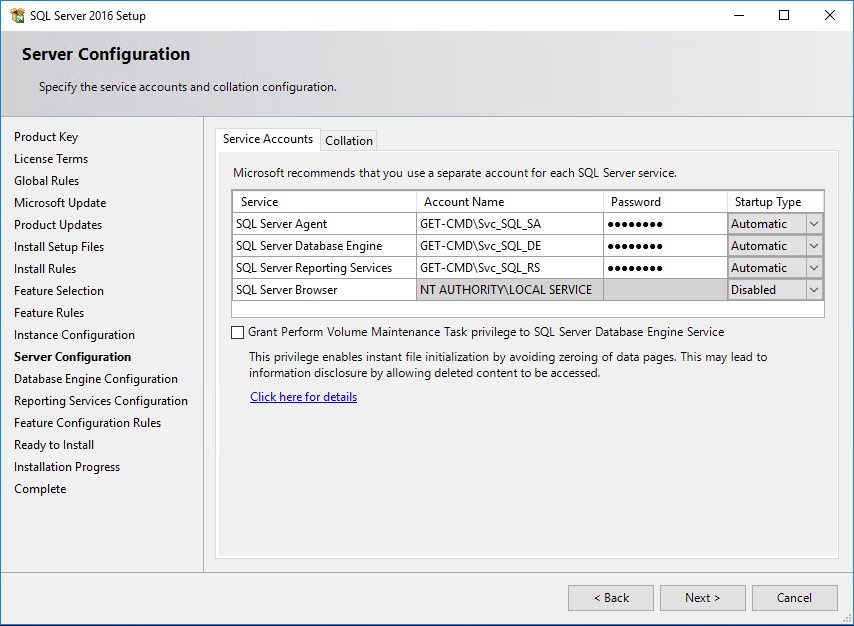
On the following screen, you need to provide the service accounts that SQL Server services will use. Replace default service accounts on the Server Configuration page with the domain service accounts.
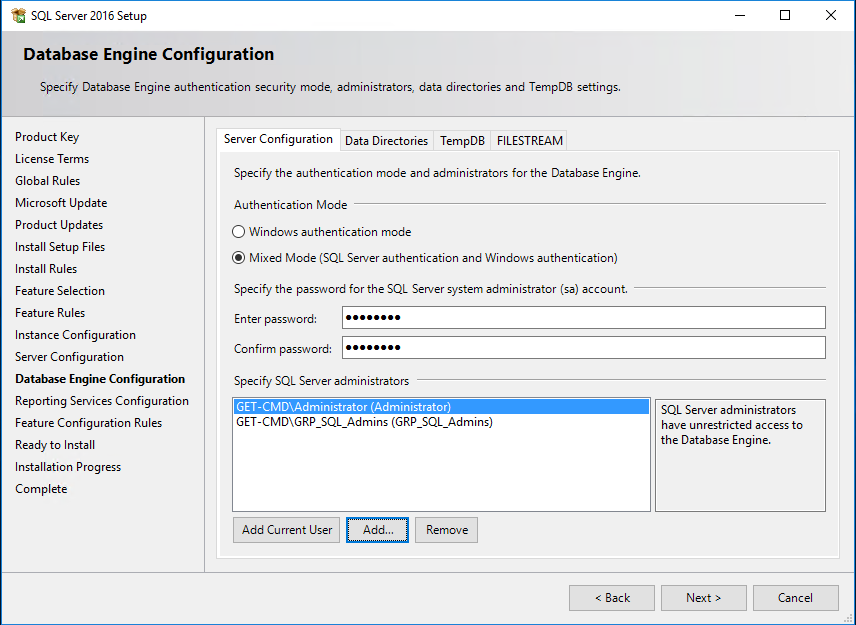
On the next screen, the Database Engine Configuration page (see below image), choose the authentication mode to use for your SQL Server installation. If you select Mixed Mode, Setup creates an “sa” account. Enter and confirm the password for the “sa” login when you choose Mixed Mode.
I always prefer the Mixed Mode but remember that you will get a warning message during SCCM prerequisites check process.
Click the buttons “Add Current User” or “Add” to provide at least one account that will have unrestricted access to the SQL Server instance. As a best practice, I prefer to use AD groups.
Don’t forget to check the collation. It should be SQL_Latin1_General_CP1_CI_AS.

All the status must be “Succeeded”.
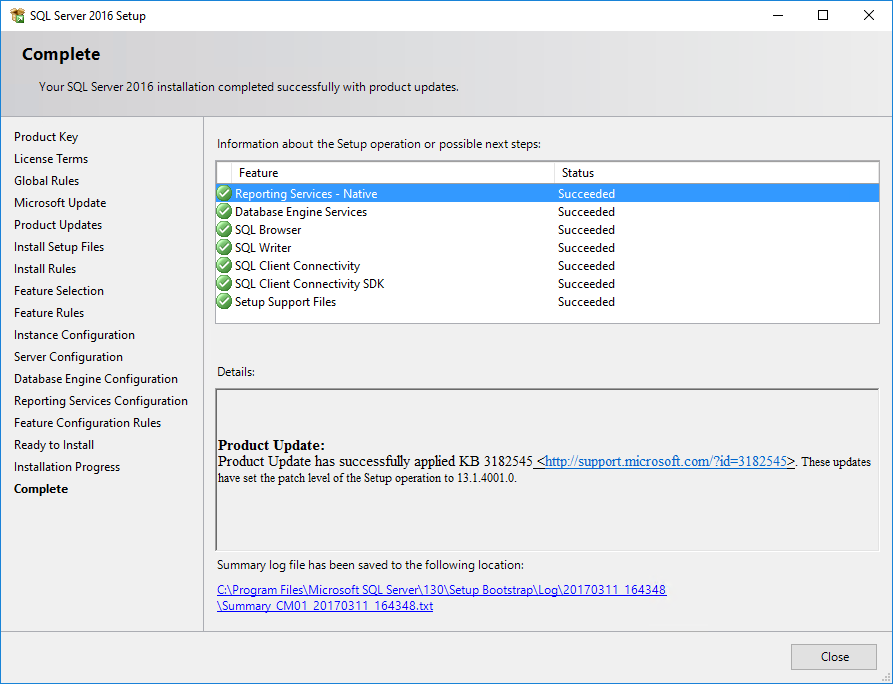
Cool! SQL Server 2016 is installed on your server called CM01.get-cmd.local
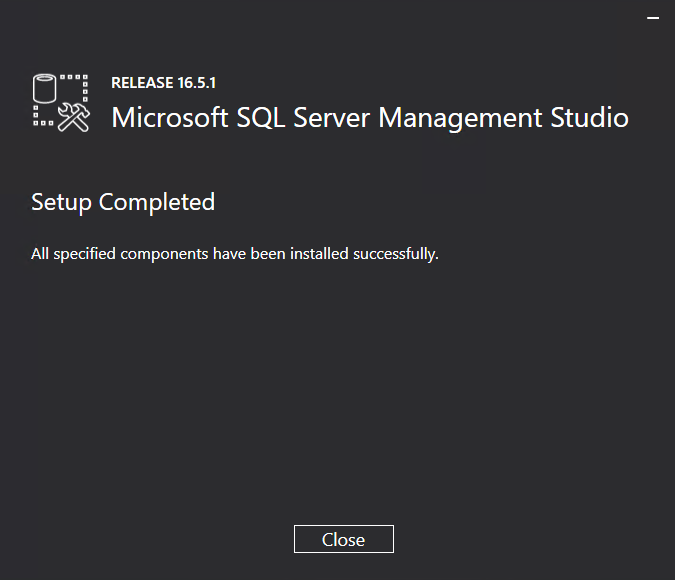
SQL Server Management Studio
As I said at the beginning of the article, SQL Server no longer comes with SSMS. So you need to download and run SSMS.exe:

Open SSMS and connect to the SQL Database (CM01.get-cmd.local) because you must limit the SQL server memory. SCCM will check during installation if SQL Server is limited or not. If not, then you will get a warning message.

Click OK to finish.
Conclusion
The first part of this series is done! We have seen how to:
- Prepare our environment
- Install SQL Server 2016
- Configure SQL Server 2016
In the next part, we will prepare our Active Directory domain and install System Center Configuration Manager Current Branch.
Thanks for reading!
- The High Availability Features in SQL Server 2016 Standard Edition
- Install SQL Server 2016 on Windows Server 2016 Server Core
The deployment guide provides an excellent walkthrough of installing SCCM 2016 on the same server as SQL Server.
The installation of SCCM 2016 is primarily divided into two sections:
- Prerequisite installation
- System Center Configuration Manager Installation
Before installing SCCM 2016 on the server 2016 you have to set up a few prerequisites on the server
The prerequisites that you would be setting up are:
- Create System Management Container in the Domain Controller System
- Extend Active Directory Scheme
- Run Prerequisite PowerShell
- Install Windows ADK 10
- Install Windows Server Update Service Role
Create System Management Container in the Domain Controller System
Set the System Management Container in the AD Server. To do that, open the Server Manager and from tools select ADSI Edit.

Right-click on ADSI Edit option in the below window and select Connect to.
This will open up the Connection Settings window. Click OK.

Right-click the Domain Controller name and select New->Object.

Specify the values as “System Management”.

This will create the object in the AD. Now we have to assign object permissions to this container. Right-click the newly created container object and select properties.

Add the SCCM_Admin Account of SCCM Server and the SCCM Computer (SCCM2016) to this container object.

From advanced settings, change the permission entry from “This object” to “This object and all descendant objects”.

Now both SCCM_Admin Account and SCCM2016 has been granted Full Control to the Container Object.

Extend Active Directory Schema
After downloading SCCM 2016 Setup Files and unzipped to a drive folder
Go inside the extracted folder to the path C:\ SC_Configmgr_SCEP_TechPreview1806 \SMSSETUP\BIN\X64.

From there, run the application extadsch.

It will run the command line tool to extend the active directory schema. You can find the output file in the C Drive.

Opening it, we can see the success status of the operation.

Install site server prerequisites.
On SCCM 2016 server, Run PowerShell Script to Install all required Roles and Features
Add-WindowsFeature Web-Windows-Auth,Web-ISAPI-Ext,Web-Metabase,Web-WMI,BITS,RDC,NET-Framework-Features,Web-Asp-Net,Web-Asp-Net45,NET-HTTP-Activation,NET-Non-HTTP-Activ,Web-Static-Content,Web-Default-Doc,Web-Dir-Browsing,Web-Http-Errors,Web-Http-Redirect,Web-App-Dev,Web-Net-Ext,Web-Net-Ext45,Web-ISAPI-Filter,Web-Health,Web-Http-Logging,Web-Log-Libraries,Web-Request-Monitor,Web-HTTP-Tracing,Web-Security,Web-Filtering,Web-Performance,Web-Stat-Compression,Web-Mgmt-Console,Web-Scripting-Tools,Web-Mgmt-Compat –Restart –Source D:\sources\sxs


Install Windows ADK 10
Download and install Windows ADK 10. SCCM will check if USMT, Windows PE, and Deployment tools are installed.

Specify the install location and continue.

Check the required features that have to be installed. I already have set up SQL Server 2016 on the server, so let’s uncheck the last option and install.

Install Windows Server Update Service
Now, let’s add the last Role to the SCCM Server. It is the Windows Server Update Service Role.

Specify the folder location where the updates will be stored
Select “SQL Server Connectivity” instead of WID Windows Internal Database.

Next, you must enter a location to store the WSUS Updates and the NETBIOS name of your SQL Server. You are now ready to install SCCM.

Click on Install to start the installation.

Click Close.

Install System Center Configuration Manager
From the downloaded installation files, start the installer

Click next

Select “Install a Configuration Manager primary site” option.

Accept the agreement and continue.

If you have already downloaded the required installation files we can specify the location of the installation media.
Else we will have to download them to drive location first.

Select Server Language

Select Client Language

Specify the site code and site name and proceed.

Now we have to specify the Full Qualified name of the SQL Server where the SCCM databases will be created.
Since we have chosen the SCCM to be installed on the same server as SQL Server, we don’t have to change the default value.

Specify the location for the SQL Server data file and transaction log to be saved and proceed.

Now we have to mention the location of the SMS provider which will be used to communicate with the site database.
Let’s install it on the same SQL Server.

Check HTTP communication option and proceed.


Finally, we are in the setting summary page. Click on Next to start the installation.

This will start the prerequisite check. Ensure that there are no errors. We can skip the warnings after checking for the severity.
If there are errors we will have to resolve them before proceeding.

Once we click Begin Install, it would take around 45 minutes to complete the installation of System Center Configuration Manager

Once the installation has run to completion we go ahead and run the Configuration Manager Console.


System Center Configuration Manager
Helps IT manage PCs and servers, keeping software up-to-date, setting configuration and security policies, and monitoring system status while giving employees access to corporate applications on the devices that they choose. When Configuration Manager is integrated with Microsoft Intune, you can manage corporate-connected PCs, Macs and UNIX/Linux servers along with cloud-based mobile devices running Windows, Windows Phone, iOS, and Android, all from a single management console.
System Center Endpoint Protection/ Windows Defender
Protects client and server operating systems against the latest malware threats. It is built on System Center Configuration Manager, giving customers a unified infrastructure for client security and compliance management.
This Technical Preview includes support for Windows 10 with existing Configuration Manager and Endpoint Protection features as well as additional enhancements for operating system deployments, software update management, device management, and more.
As a reminder, these are early pre-release builds. Many of the features and scenarios are still in development. As such, this preview is not intended for production environments, production labs, nor full evaluations.
Prerequisites:
Server Features and Roles ADK V10 More details click here https://technet.microsoft.com/library/mt595861.aspx#bkmk_reqs
SQL Server 2016 How to install SQL 2016? Click Here
SQL Required Features:
- Database
Engine Services - Full-Text
and Semantic Extractions for Search - Reporting
Services Native - Management
Tools – Complete - Additional
selections based on need - Name pipes (Enabled) after SQL is installed.
PowerShell Script
to Install all required Roles and Features
PS Script [
Add-WindowsFeature

Web-Windows-Auth,Web-ISAPI-Ext,Web-Metabase,Web-WMI,BITS,RDC,NET-Framework-Features,Web-Asp-Net,Web-Asp-Net45,NET-HTTP-Activation,NET-Non-HTTP-Activ,Web-Static-Content,Web-Default-Doc,Web-Dir-Browsing,Web-Http-Errors,Web-Http-Redirect,Web-App-Dev,Web-Net-Ext,Web-Net-Ext45,Web-ISAPI-Filter,Web-Health,Web-Http-Logging,Web-Log-Libraries,Web-Request-Monitor,Web-HTTP-Tracing,Web-Security,Web-Filtering,Web-Performance,Web-Stat-Compression,Web-Mgmt-Console,Web-Scripting-Tools,Web-Mgmt-Compat

-Restart ]
Add
the new Site System to the System Management Container in ADDS
- Click Start, click Run, and
then enter dsa.msc to open the
Active Directory Users and Computers administrative
tool. - Click View, and then click
Advanced Features. - Expand the System container.
- Right-click System
Management. On the context menu, click Properties. - In the System Management
Properties dialog box, click the Security tab. - Click Add to add the site
server computer account and grant the account Full Control permissions. - Click Advanced, select the
site server’s computer account, and click Edit. - In the Apply onto list,
select This object and all child objects. - Click OK.
Hardware:
Windows Server 2016 SQL Server and Reporting Services 2016 Hyper-V 2016 Virtual Machine.
Microsoft
Recommendations
CAS/Standalone
Primary Site (up to 50,000 clients) w/co-located SQL Server:
- 2 x Quad-Core (Intel Xeon
E5504 or comparable) - 32GB of RAM
- 350GB – 950GB total hard disk
space* (OS, ConfigMgr, SiteDB, TempDB)
Step by Step Installation:
- Extract the content from the SC_ConfigMGr_SCEP package.
- Run the HTA to start the Primary Site installation.
![clip_image001[4]](https://blogger.googleusercontent.com/img/b/R29vZ2xl/AVvXsEhkPG4OCqL0E2bzIIkAxbrK1DadvxPMu16wLl7a9m7H_5PJ1n0ccu3_bzxN6ambrI2fd92rrkFVqZ4yTYElh2XA1kFHw5SPNQ8XVTTjlz4uskjav2jznJktcbLeEn4nVjq4VgI9tk2dHTFi/?imgmax=800 "clip_image001[4]")
![clip_image002[4]](https://blogger.googleusercontent.com/img/b/R29vZ2xl/AVvXsEhVAaohMoL99peJh-YvkDS3u_wAn6Axoz4NonRJyoYyyMHRUxkBgYLL93jlbrW3KEv0V4fcGNaiMPya52QPB-x_RLPvCIdreZVoI7JTlYsMqKAbWwAf8jhKuUMGdUfXgNO60L-y3vG4jDVd/?imgmax=800 "clip_image002[4]")
![clip_image003[4]](https://blogger.googleusercontent.com/img/b/R29vZ2xl/AVvXsEhv5n5Iwo26MSKWdK8YDM0uZUMhr_4jDAuKe6ZMXR8Ev47D9qQ7M9sreLYfwH9g28WPOE0BRxAVsafNpHgkyRyJOOpAz_FWSmSf24-vog46gj5Ny602bHB48Wd9DZX2LScxScixK8E9LGSk/?imgmax=800 "clip_image003[4]")
![clip_image004[4]](https://blogger.googleusercontent.com/img/b/R29vZ2xl/AVvXsEhpLJD1PQOsMODrrzIiOCUos-mqjqTXcgWhdggz1rSVm-eEdl6obO7Bw9X9N0e4cM5GpE2EUd2hs155cdDz949n0SEGT2haAf6VFbz8yJAaHyx2vqWQsgHmwYfNsaU7c47OLzjVbeFgDMpT/?imgmax=800 "clip_image004[4]")
Download required files for SCCM 2016
![clip_image005[4]](https://blogger.googleusercontent.com/img/b/R29vZ2xl/AVvXsEgEV11YKomd5JtrD6oKhYGHx5FiVYBbg8DBimhxY8jC0vVHoAgiwfQZerl6YXt8fWENn9bj2geqQW79Z3Fo8H-A39gzLnwa22a4T6nO5IRikY3AWntgOuHmUbfJgilTfgoFVmUL9kM8GmDM/?imgmax=800 "clip_image005[4]")
![clip_image006[4]](https://blogger.googleusercontent.com/img/b/R29vZ2xl/AVvXsEjfC2MKq47gTUkpqbwY8RJfadzJ9jYsQiOsEVDoY3xo9D0y6SyewVvHBanaN3bnyGM67Wiemh5DPZcQeVmtctH2eVLR2aKm_kfuC4xRgQc6hr2Qs2XVuPWDs50zuGfIY1NU6OgzGmN7iIBj/?imgmax=800 "clip_image006[4]")
![clip_image007[4]](https://blogger.googleusercontent.com/img/b/R29vZ2xl/AVvXsEh0p1gVI2Ka1RRDtEKZeERyYoKfI2mk6ExdTDtT6SoT1Tq6411jNzU5XT9BBTKRFXdhKXzuc6jTZYCMy-LcRZFy7Z7z6OeKJjCOqcUq0bqlrghhg1w2Fwb9yA-Qlp2NRREgNIN8GIAywSqo/?imgmax=800 "clip_image007[4]")
Configure your Site code and Name then Next.
![clip_image008[4]](https://blogger.googleusercontent.com/img/b/R29vZ2xl/AVvXsEj0knOqm8JwuOwxAVHCRhPu2D2Fwt1YG9kke5OGGV9iORakBbAtSHN-hLx-H7CbOhe-w7GIbI8N2wYmPRM6jT27AGybOs7SugWYtoRU6H3hUM4gKd5UQQorxi9PtWrz8vlKXcbxoFf0QHZl/?imgmax=800 "clip_image008[4]")
![clip_image009[4]](https://blogger.googleusercontent.com/img/b/R29vZ2xl/AVvXsEjxF7JrCBiW7kNRRz23G3NAFTCjiVc_xVKcTDdxA_juGd3SOyu_us98unxqj6a2HoC0VWYcFUb0uRkPP4NK9DukNr-GkqjAWjufrSN9q-_dWWRbJ5NONgYCBxr7b0ZApco5lQplEjlcodbJ/?imgmax=800 "clip_image009[4]")
Important: If the prerequisite check fails make sure you download and install required component then re-run check and then Next.
Installing ADK 10
![clip_image010[4]](https://blogger.googleusercontent.com/img/b/R29vZ2xl/AVvXsEhGMzvCNc9ZxeZKohfkJhv1JsUqnrpkA72rVdsDJ8EouvUwVXdqmpA3Ibvdpkhpaos43lhfCykePxy0mTrK2zeOTs0dIIKy9D2K4Ppd4VDdMxJQrtSCgGBG4X_QdC6K8turGpNvnczxrxWL/?imgmax=800 "clip_image010[4]")
![clip_image011[4]](https://blogger.googleusercontent.com/img/b/R29vZ2xl/AVvXsEivQiNfmr0B4-k2_e5zRh0xduV84XgSN2PnTknk5VA8uJVCe-hHZjxfZ9ToAGRq_x7cAIT0WrtABxyZ7J7-oDg82jHDYNIf8o4EMNGJkIOjM4ESgKkR0SR0-RSRcgmTOVPr5yilRHbRyNJa/?imgmax=800 "clip_image011[4]")
![clip_image012[4]](https://blogger.googleusercontent.com/img/b/R29vZ2xl/AVvXsEgxnMlK1deIAA06kpmJfIg4toaijSgxa0rvPXPRt6-eSS9CRu-wdYlCOcrQ5UuzaVxSxFugJA4Jfkb1NJHHuJI7iB-bHn2Q4FvGFFBsDegGBpbKpKtk5ltdYzbp8xnBP6eqHnEv6Y1WEAbZ/?imgmax=800 "clip_image012[4]")
![clip_image013[4]](https://blogger.googleusercontent.com/img/b/R29vZ2xl/AVvXsEhdvL25LSWxaoAIudvAO1fktoV1F8Hneh6Sx47h1QBg-FfgEi6xXzE93h7VPDQlUJUay8sHTuEPEYbIhLaXC2QcK6pbpq7nGPh_c7ZD6-QaFdl2Y0Ty_xFWLDFxzl3XE7zevCDTDTfsZcVF/?imgmax=800 "clip_image013[4]")
![clip_image017[4]](https://blogger.googleusercontent.com/img/b/R29vZ2xl/AVvXsEi8c51fDq3RhXVYyxKMKdpsJ7HnAXrDZNsJEdKOU7z34CqO_CnZZWNOFWxB1Y2cYZVDXqfJV9bvEMsSRmF6rX8J4ORw933RJkBzxinzXbMT0mEJZ4CITrRiR16Spuw5T91w29vzvw-FQeHu/?imgmax=800 "clip_image017[4]")
![clip_image018[4]](https://blogger.googleusercontent.com/img/b/R29vZ2xl/AVvXsEg1iE6ODCOjJWhQ9hcBWcVFFdKCRHc5r5NV4CEHrfHtPY1HiVfMhwBXhhpNTSlHhUeQpUVBYs3gqqSiUsUUAO2A_JO_NdVfTmUGehl3LL9mB8Hz9KKvEUurbKBYoXHTz0N0lznHYkbYrIPX/?imgmax=800 "clip_image018[4]")
![clip_image019[4]](https://blogger.googleusercontent.com/img/b/R29vZ2xl/AVvXsEixqDaS6pLKx-ZXIW29qz8tagyWI-60j4o9A-p1O2fgzNDMD434xI4hlPz2YfAsr1LGi4IEcHYoOqjS0jQZsalpyizzjw9Ciuc4IcR2fcyMLaZIhjyjBva57Ttd9OiYHyJT9yoC0AC8M5J5/?imgmax=800 "clip_image019[4]")
![clip_image020[4]](https://blogger.googleusercontent.com/img/b/R29vZ2xl/AVvXsEiQdSr9NZi5ToRdmFBs0Ir5pcWIdJJ91TtrQCCZFv5MD8pKZBEMn4qo8HL51SXm_O_6LyyjX4TxCZz6P51sNYvl_M7S-ClO3FBKdpP9JizUZcujUGJgZt2_RP51kfIGJRGi-TRpcg5QZQHj/?imgmax=800 "clip_image020[4]")
![clip_image021[4]](https://blogger.googleusercontent.com/img/b/R29vZ2xl/AVvXsEiHEyXNqCo4pAm-k3JfwZf4LqaNWubou-hoVgFtDQogm9GnHO2DkbD4a4WncK6rEveAmMnSDTrpkhZik3DrNB9eBa8M6b3rAA470CesZICZT2NVTEhnxrBy2FCmBiHCUPrlX4apIY4A2vgk/?imgmax=800 "clip_image021[4]")
That’s it, now you have deployed SCCM 2016.
Introduction
In a previous guide I showed you how to install System Center Configuration Manager version 1511 (Current Branch) on Windows Server 2012R2. Times are changing fast in this cloud-first mobile-first world, and as a result the System Center Configuration Manager (Current Branch) releases are being released rapidly. In addition to these releases are new Windows Server and SQL Server releases.
Now that these new releases are all supported to run together, this guide will show you how to quickly install System Center Configuration Manager version 1606 (Current Branch) on Windows Server 2016 using SQL Server 2016, and then upgrade it to System Center Configuration Manager version 1610 (Current Branch).
Some PowerShell knowledge is desired. I will show you how to do most actions manually as well as automated.
Assumptions
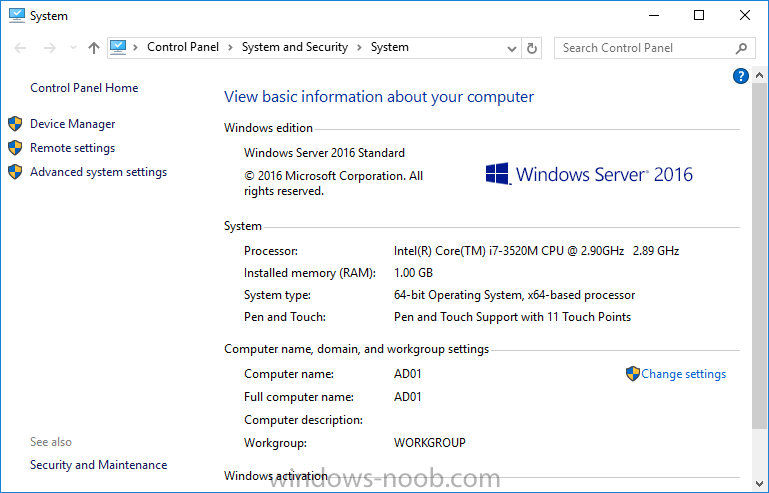
In this guide I assume you have already installed two workgroup joined servers running Windows Server 2016 (choose Windows Server 2016 Standard (Desktop Experience)) as listed below, and that you’ve configured the network settings. I also assume you have some knowledge of PowerShell, if you don’t, start learning it now !
Server name: AD01
Server status: Workgroup joined
- IPv4 Address: 192.168.4.1
- Subnet Mask: 255.255.255.0
- Default Gateway: 192.168.4.199
- DNS: 192.168.4.1
Server name: CM01
Server status: Domain joined
- IPv4 Address: 192.168.4.2
- Subnet Mask: 255.255.255.0
- Default Gateway: 192.168.4.199
- DNS: 192.168.4.1
Server name: Smoothwall
Server roles: A Linux firewall for sharing internet into these virtual machines, in hyperv you can add two legacy nics to achieve this.
Scripts used in this guide
The scripts used in this guide are available at the bottom of the guide in the Downloads section, download them before beginning and extract them to C:\scripts on your destination server(s).
Step 1. Configure Active Directory Domain Services (ADDS)
Note: Perform the following on the AD01 as Local Administrator on the workgroup joined server.
To setup Active Directory Domain Services you could manually click your way through the appropriate wizard in Server Manager or automate it using PowerShell. For your benefit I’ll show you both methods below, all you have to do is choose which one suits you.
Method #1 – Do it manually
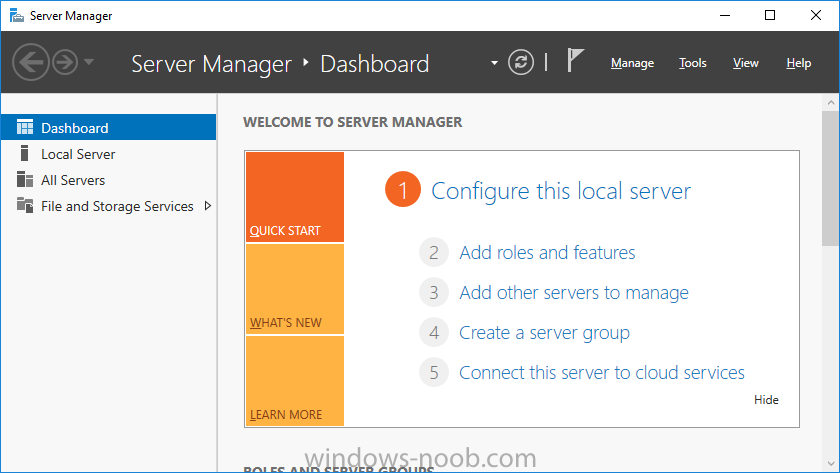
1. To manually setup ADDS, in the start screen search for Server Manager
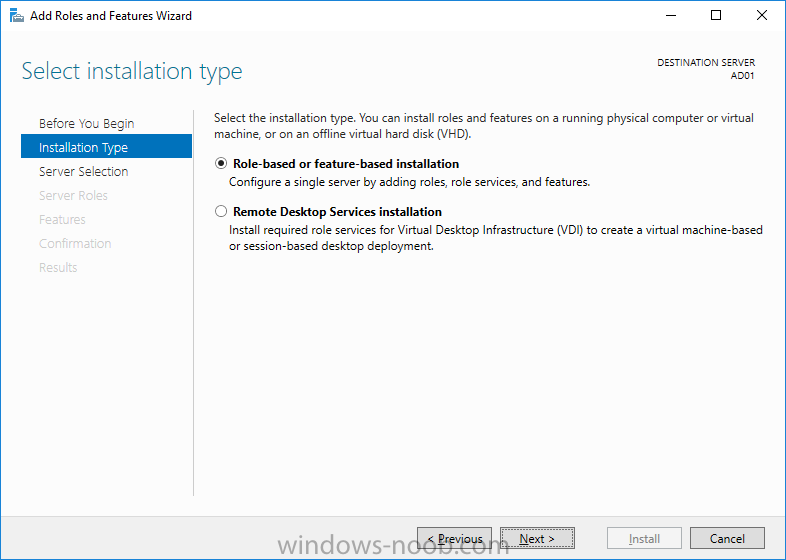
2. Click on Add roles and features, for Installation Type choose Role-based or Feature-based installation
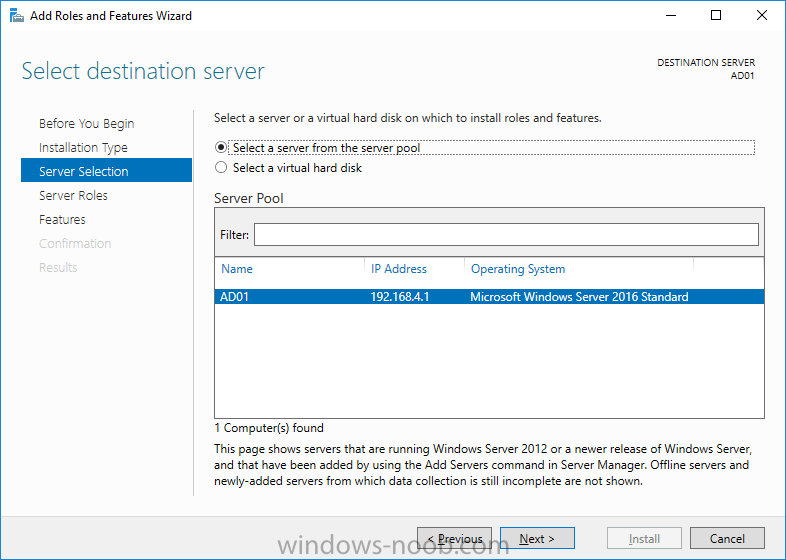
3. For Server Selection choose the local server (AD01)
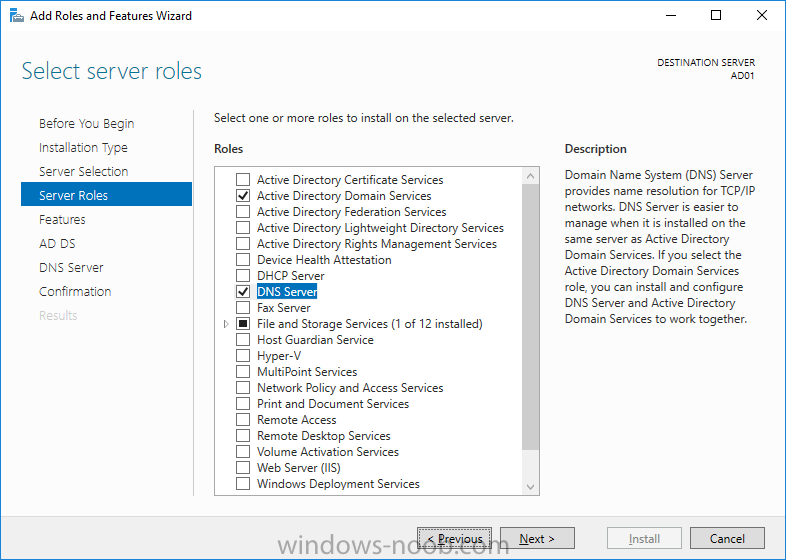
4. For Server Roles select Active Directory Domain Services and DNS Server, answer yes to install any required components.
5. Continue the the wizard and click Install, then click Close to complete the wizard.
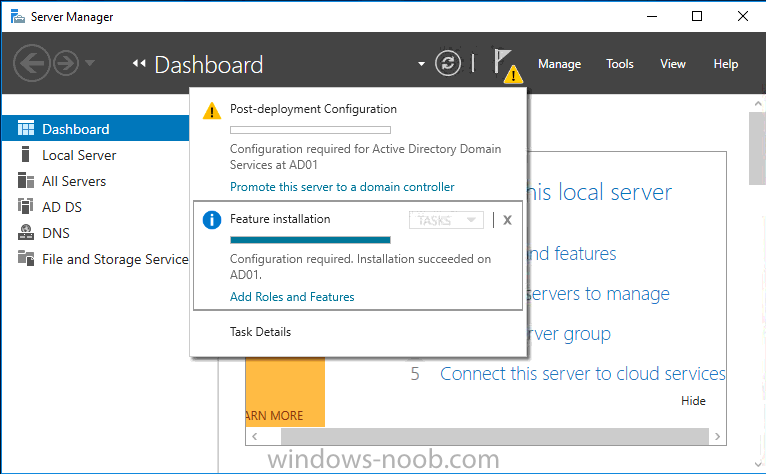
6. After it’s finished, perform the Post Deployment Configuration by clicking on Promote this server to a domain controller
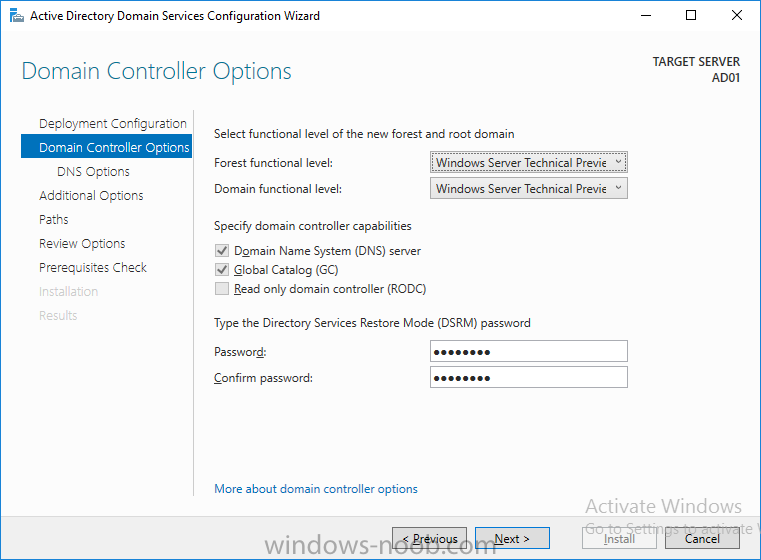
select the Add a new forest option, give it a root domain name such as windowsnoob.lab.local and click through the wizard, when prompted for the password use P@ssw0rd.
Method #2 – Automate it with PowerShell
To configure ADDS automatically, use the ConfigureADDS.ps1 PowerShell script.
1. Copy the script to C:\scripts.
2. Edit the variables as desired before running.
3. Start Windows PowerShell ISE as Administrator and run the script by clicking on the green triangle.

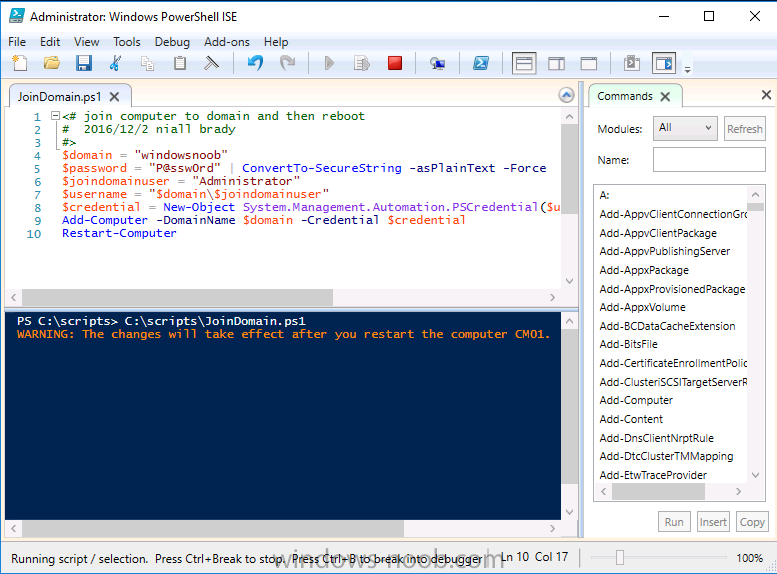
Step 2. Join CM01 to the domain
Note: Perform the following on the CM01 as Local Administrator on the workgroup joined server.
Method #1 – Do it manually
To join the domain manually, bring up the computer properties. Click on Change settings beside the computer name, click Change and enter the appropriate domain join details, reboot when done.
Method #2 – Automate it with PowerShell
To join the domain automatically, use the joindomain.ps1 PowerShell script.
1. Copy the script to C:\scripts.
2. Edit the variables as desired before running.
3. Start Windows PowerShell ISE as Administrator and run the script by clicking on the green triangle.
Step 3. Create users
Note: Perform the following on the Active Directory Domain Controller server (AD01) as Local Administrator
You can do this step manually or automated using the supplied PowerShell script.
Method #1 – Do it manually
To create users manually, add the following users in AD using Active Directory Users and Computers:
* <your user name>, a domain user, this user will become a local administrator on CM01
* Testuser, a domain user
* CM_BA, used for building ConfigMgr created images
* CM_JD, used for joining computers to the domain
* CM_SR used for reporting services.
* CM_CP, a domain user used when installing the Configuration Manager Client for Client Push.
* CM_NAA, a domain user, (Network Access Account) used during OSD
Method #2 – Automate it with PowerShell
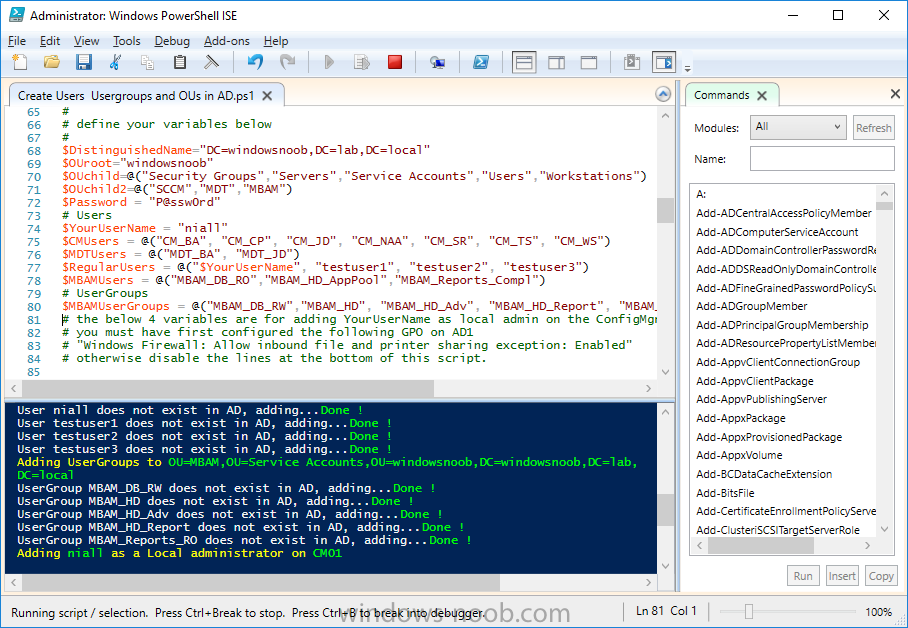
To create users automatically, use the Create Users Usergroups and OUs in AD.ps1 PowerShell script.
Tip: You need to edit the script and adjust the variables to your liking, for example if you want to change the default password. You may also want to rem out the MDT and MBAM user/groups that are created and change some of the user names within the script. To rem out a line place a # in front of it.
1. Copy the script to C:\scripts.
2. Edit the variables [lines 68-80] as desired before running.
3. Start Windows PowerShell ISE as Administrator and run the script by clicking on the green triangle.
After running the PowerShell script in Windows PowerShell ISE you’ll see something like the following.
Step 4. Create the System Management Container
Note: Perform the following on the Active Directory Domain Controller server (AD01) as Local Administrator
For details of why you are doing this see https://technet.micr…y/gg712264.aspx.
Method #1 – Do it manually
Open ADSI Edit, click on Action, Connect To and click Ok, Double Click on Default Naming Context and the DC= that appears below it. Click on the + and scroll down to CN=System. Right Click on CN=System and choose New, Object, choose Container from the options, click Next and enter System Management as the value as shown below

Method #2 – Automate it with PowerShell
To create the System Management container automatically, use the Create System Management container.ps1 PowerShell script.
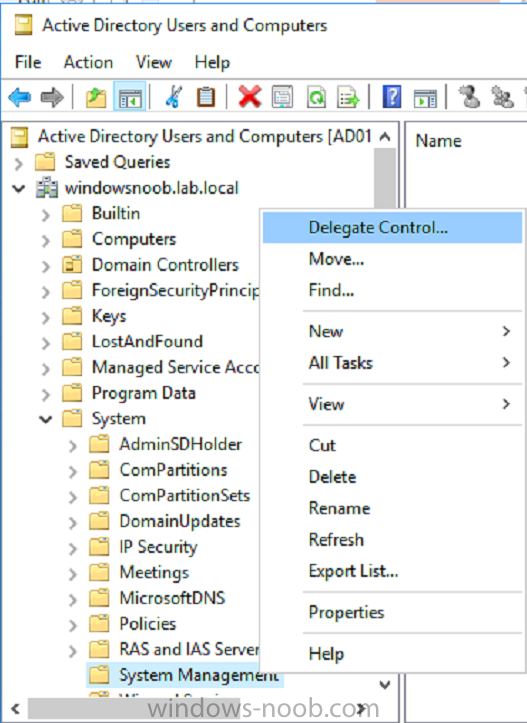
Step 5. Delegate Permission
Note: Perform the following on the Active Directory Domain Controller server (AD01) as Local Administrator
Method #1 – Do it manually
Open Active Directory Users and Computers. Click on view, select Advanced Features. Select the System Management Container, and right click it, choose All Tasks and Delegate Control.
When the Welcome to Delegation of Control Wizard appears click next, then click Add. click on Object Types, select Computers. Type in your Configuration Manager server name (CM01) and click on Check Names, it should resolve. Click Ok, then Next.
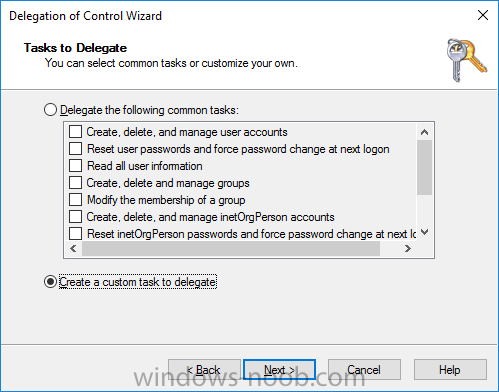
Choose Create a Custom Task to Delegate, click next, make sure This folder, existing objects in this folder and creation of new objects in this folder is selected. Click next, select the 3 permissions General, Property-Specific and Creation-deletion of specific child objects are selected then place a check mark in Full Control.
Tip: Repeat the above process for each site server that you install in a Hierarchy.
Method #2 – Automate it with PowerShell
To delegate permissions to the System Management container automatically, use the Delegate Permissions.ps1 PowerShell script on AD01.
Step 6. Install Roles and Features on CM01
Note: Perform the following on the Configuration Manager server (CM01) as a Local Administrator
To support various features in System Center Configuration Manager, the setup wizard requires some Server Roles and Features pre-installed. On CM01, login as the username you added to the Local Administrators group and navigate to C:\scripts. The XML files within the Scripts Used in This Guide.zip were created using the Export Configuration File option in Server Manager after manually installing roles and features and the accompanying PowerShell script simply installs it.
Note: Make sure your Server 2016 media is in the drive specified in the script or edit the script to point to the location of the media.
Method #2 – Automate it with PowerShell
To install the roles and features needed, start Windows Powershell ISE as Administrator and run the install roles and features.ps1 script.
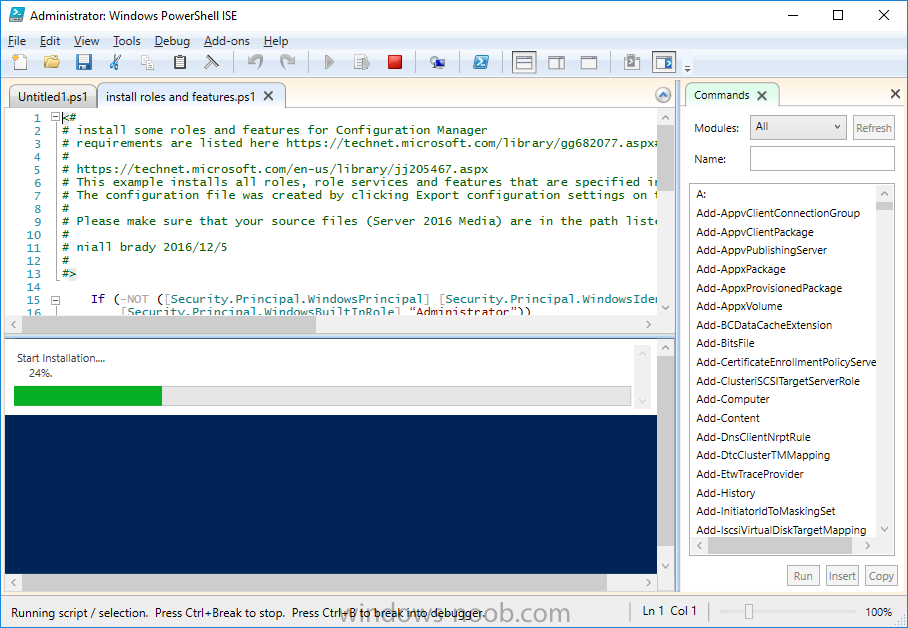
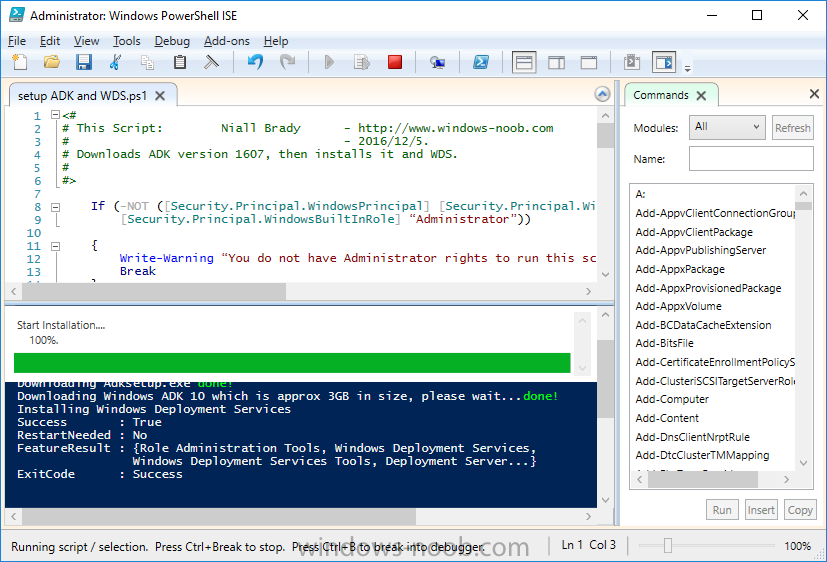
Step 7. Download and install Windows ADK 10 version 1607
Note: Perform the following on the Configuration Manager server (CM01) as a Local Administrator
The ConfigMgr prerequisite checker will check for various things, including ADK components such as USMT and Windows Preinstallation Environment (amongst others), therefore you need to install Windows ADK on your server. To do so, either download ADKsetup from here and manually install it or run the setup ADK and WDS.ps1 PowerShell script to download and install the correct components for you. This script not only downloads the components needed, it’s also installs ADK 10 and then installs Windows Deployment Services. The setup ADK and WDS.ps1 PowerShell script is available in the Scripts Used in this Guide zip file.
Method #2 – Automate it with PowerShell
To download and then install Windows ADK 10 with the components needed, start Windows Powershell ISE as Administrator and run the setup ADK and WDS.ps1 script.
Step 8. Install SQL Server 2016
Note: Perform the following on the Configuration Manager server (CM01) as a Local Administrator
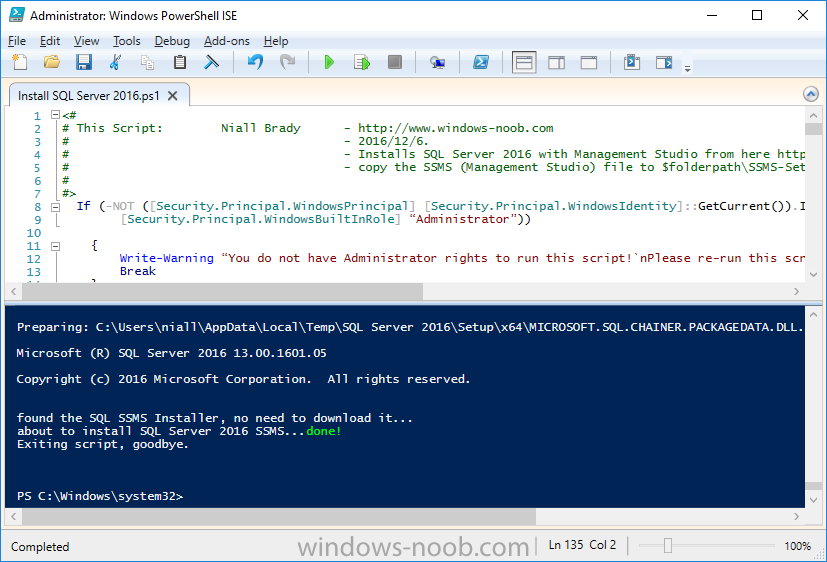
The following script will create a ConfigurationFile.ini used to automate the installation of SQL Server 2016, and after it’s installed the script will download the SSMS exe (Management Studio) and install it.
Note: Make sure your SQL Server 2016 media is in the drive specified in the script or edit the script to point to the location of the media.
Method #2 – Automate it with PowerShell
To install SQL Server2016 use the Install SQL Server 2016.ps1 script.
1. Copy the script to C:\scripts.
2. Edit the variables [lines 17-75] as desired before running.
3. Start Windows PowerShell ISE as Administrator and run the script by clicking on the green triangle.
Step 9. SQL Memory Configuration
Note: Perform the following on the Configuration Manager server (CM01) as a Local Administrator
Depending on your memory configuration and server setup, you may also want to configure SQL memory limits as per the following guidance prior to installing ConfigMgr otherwise you’ll get warnings in the Prerequisite checker when it runs the Server Readiness checks.
- Configuration Manager requires SQL Server to reserve a minimum of 8 gigabytes (GB) of memory for the central administration site and primary site and a minimum of 4 gigabytes (GB) for the secondary site. This memory is reserved by using the Minimum server memory setting under Server Memory Options and is configured by using SQL Server Management Studio. For more information about how to set a fixed amount of memory, see here.
- If your SQL Server is configured for unlimited memory usage, you should configure SQL Server memory to have a maximum limit.
Method #1 – Do it manually
Open Management Studio, select CM01, right click, choose Properties, select memory and configure the values as appropriate for your environment.
Method #2 – Automate it with PowerShell
<Coming soon>
Step 10. Restart the Server
Note: Perform the following on the Configuration Manager server (CM01) as a Local Administrator
Open an administrative command prompt and issue the following command:
shutdown /r
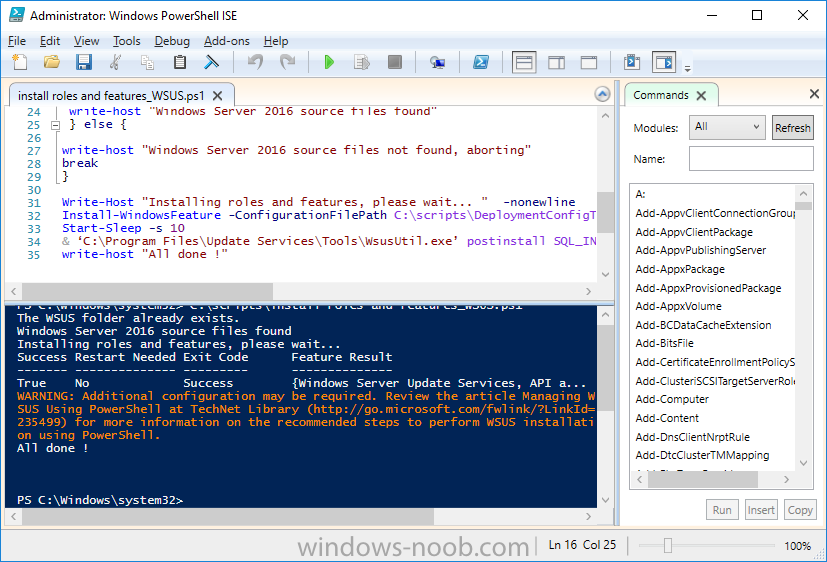
Step 11. Install the WSUS role
Note: Perform the following on the Configuration Manager server (CM01) as a Local Administrator
Now that SQL server is installed, we can utilize that for the WSUS database. To install WSUS and configure it to use the SQL servers database instead of the Windows Internal Database, do as follows:
Method #1 – Do it manually
<Coming soon>
Method #2 – Automate it with PowerShell
Browse to the location where you extracted the scripts, C:\scripts. Start Windows PowerShell ISE as administrator, open the Install roles and features_WSUS.ps1 script, edit the $servername variable and replace CM01 with the ServerName your are installing ConfigMgr on (SQL server). Make sure to have your Windows Server 2016 SXS media in the path referred to by $Sourcefiles.
Step 12. Download and extract the content
Note: Perform the following on the Configuration Manager server (CM01) as a Local Administrator
To install System Center Configuration Manager version 1606 you’ll need to download the content. You can download it from Microsoft’s Volume license site for use in production or from MSDN for use in a lab.
Method #1 – Do it manually
For the purposes of this guide I used the 1606 release from VLSC. This iso is named SW_DVD5_Sys_Ctr_ConfigMgrClt_ML_1606_MultiLang_ConfMgr_SCEP_MLF_X21-16461.ISO and is 1.20GB in size.
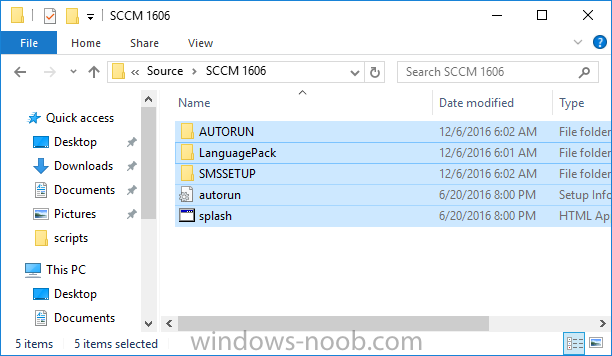
Once downloaded, I mounted the ISO in Windows File Explorer and copied the contents to C:\Source\SCCM 1606 on CM01.
Step 13. Download the ConfigMgr Prerequisites
Note: Perform the following on the Configuration Manager server (CM01) as a Local Administrator
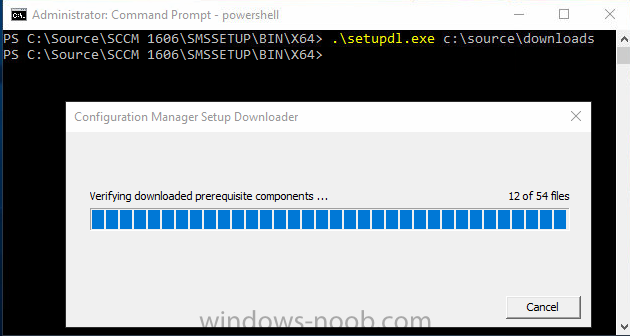
You can download the prerequisites during ConfigMgr setup or in advance. As you’ll probably want to install more than one copy of ConfigMgr (one lab, one production) it’s nice to have the prerequisites downloaded in advance. To do that, open a PowerShell prompt with administrative permissions and navigate to the following folder:
C:\Source\SCCM 1606\smssetup\bin\X64
Run the following line
.\SetupDL.exe C:\Source\Downloads
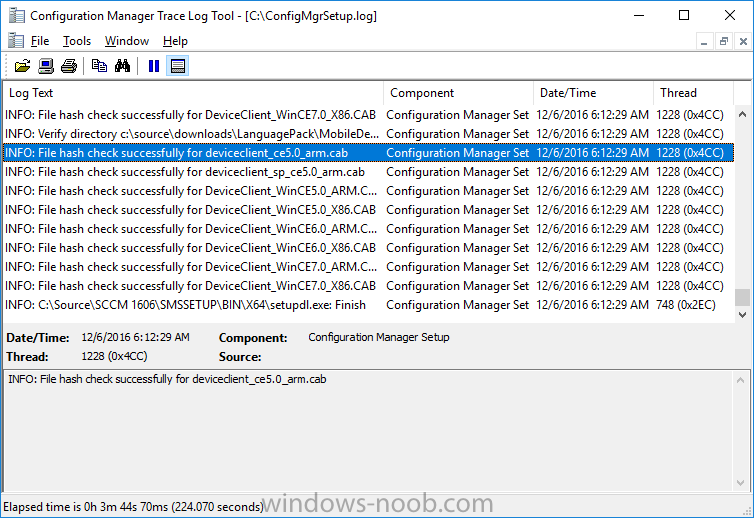
Tip: Browse to C:\source\SCCM 1606\SMSSETUP\TOOLS and double click on CMTrace.exe, answer Yes to the default logging question. Then, using Windows File Explorer, browse to C:\ and double click on ConfigMgrSetup.log which will open the log file in CMTrace. This will allow you to view any errors or problems with the download of the prerequisites in real time.
Step 14. Extend the Schema
Note: Perform the following on the Domain controller server (AD01) as Administrator. You do not have to extend the Active Directory schema if it was already extended for Configuration Manager previously.
1. Using Windows File Explorer on the Active Directory Domain Controller, browse to \\<server>\c$\Source\SCCM 1606\SMSSETUP\BIN\X64 where <server> is your ConfigMgr server
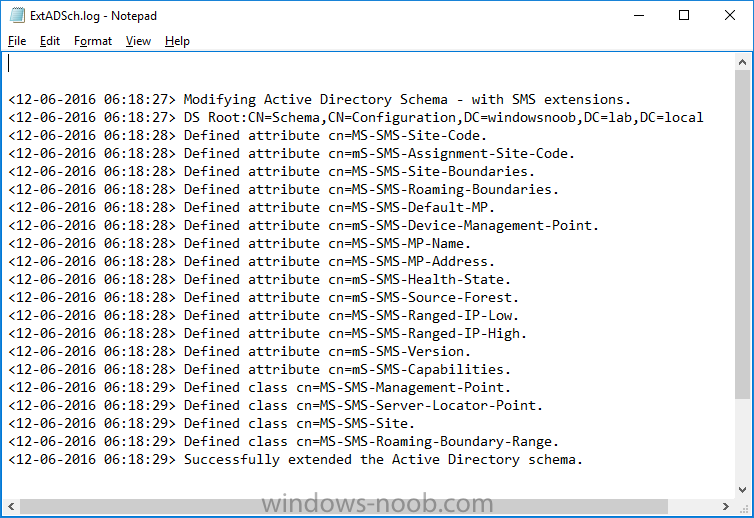
2. locate extadsch.exe, right click and choose Run As Administrator.
3. A command prompt window will appear briefly as the schema is extended, check in C:\ for a log file called ExtADSch.log it should look similar to this
Step 15. Install SCCM Current Branch (version 1606)
Note: Perform the following on the ConfigMgr server (CM01) as Administrator.
Method #1 – Do it manually
<Coming soon>
Method #2 – Automate it with PowerShell
You will need to edit the Install SCCM Current Branch version 1606.ps1 script and replace the variables inside with those that work in your environment. For example, to change the ProductId open the script in Windows ISE, locate the line that reads $ProductID= and either enter your ConfigMgr Product Key or use the evaluation version of ConfigMgr by entering the word EVAL.
1. Copy the script to C:\scripts.
2. Edit the variables [lines 16-17 & lines 32-57] as desired before running.
3. Start Windows PowerShell ISE as Administrator and run the script by clicking on the green triangle.
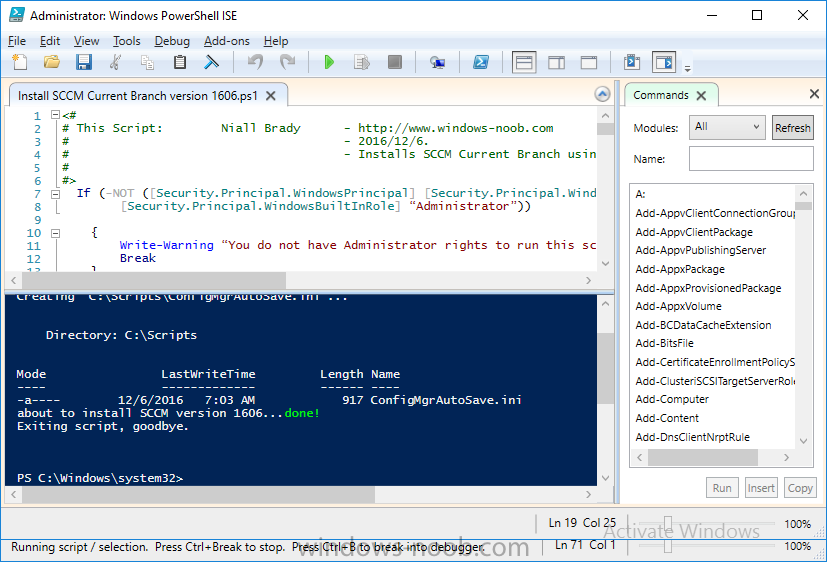
Once the script completes sucessfully, System Center Configuration Manager Current Branch (version 1606) is installed.
Step 16. Upgrade to SCCM Current Branch (version 1610)
Note: Perform the following on the ConfigMgr server (CM01) as Administrator.
Method #1 – Do it manually
As the upgrade process is a whole blog post by itself, please follow my guide here.
Summary
In this guide you used a lot of PowerShell to automate most of Installing System Center Configuration Manager Current Branch (version 1606), including installing and configuring SQL Server 2016 on Windows Server 2016. You then upgraded to version 1610 using Updates and Servicing.
Related Reading
- Use a command line to install System Center Configuration Manager sites – https://docs.microso…o-install-sites
- Supported operating systems for System Center Configuration Manager site system servers – https://docs.microso…-system-servers
- Install-WindowsFeature – https://technet.micr…y/jj205467.aspx
Downloads
You can download a Microsoft Word copy of this guide here dated 2016/12/6 How can I install System Center Configuration Manager version 1606 (Current Branch) on Windows Server 2016 with SQL 2016.zip 1.41MB 15 downloads
You can download the PowerShell scripts used above here Scripts Used In This Guide.zip 22.82KB 14 downloads
Hey guy,
Today I want to show you how to create Windows Server 2016 task sequence and deploy it.
Nowadays, Windows Server 2016 is one of the common operating systems we use whether is new server’s installation or in place deployments, usually when we are talking about server installation we use on VMware templates or installing n new scratch server which are enough good for us, however, I would like to add another deployment method which is deploying “Windows Server 2016” using SCCM with very basic steps.
This tutorial is for advanced guys who already have good SCCM knowledge.
So, let’s start:
Hopefully, you already have Boot Images, Drivers, any basic prerequisites we have in SCCM in order to deploy OS.
- The first step is to import Windows Server 2016 WIN file into the SCCM server.
Open to ISO file and add the WIM file to the SCCM:
Complete the wizard with next.
Distribute the new OS to your DP:
Great, the next step is to create a new OS > go to Software Library and the Operating systems > Task Sequences:
Right click “Create a Task Sequence”:
- Install an existing image package > Next
- Specify TS name, description and boot image.
- Select the OS – image package, image index and set a password to a local user, you can add the product key as well.
- You can automatically add this computer to the domain
- Install the ConfigMgr client post OS installations.
- Don’t need the USMT.
- Don’t need to run the windows update right now.

Deploy this TS to the certain collections, “unknown computers” as well.
- Do not forget to select on “Purpose: Available”!
- Make available to the following: “Configuration Manager Clients, Media and PXE”
My task sequence steps – default settings:
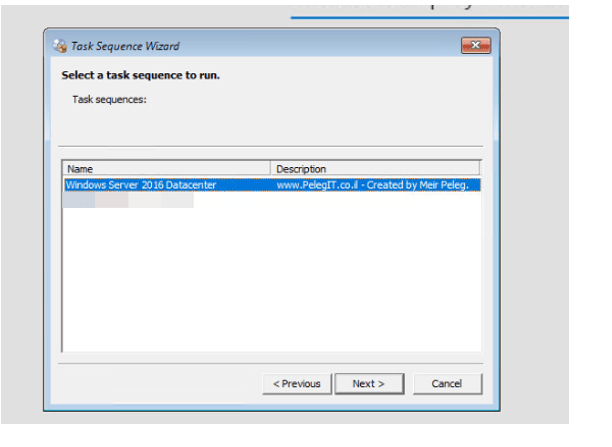
Deploying the TS:
Selecting our task sequence:
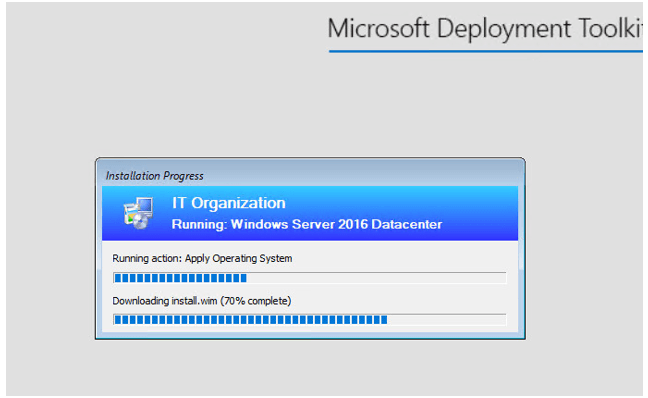
The progress – downloading “install.WIM”:
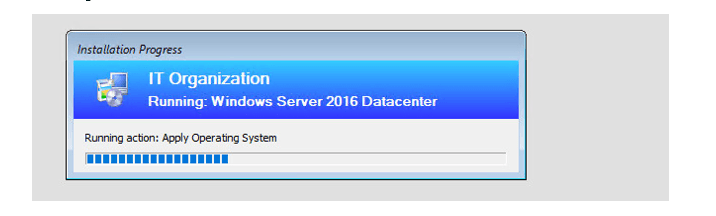
Installing the OS:
Getting Ready:
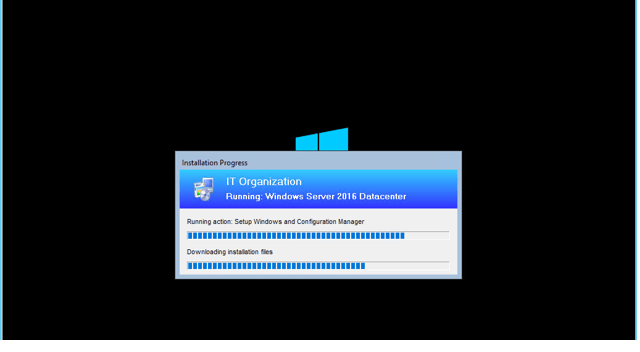
ConfigMge installation:
Installed successfully: