Using the steps described in this post, you can easily perform Windows 10 1903 upgrade using SCCM 1902. I will use an SCCM upgrade task sequence to perform the Windows 10 upgrade. I will cover the steps to upgrade Windows 10 1809 to Windows 10 1903 using SCCM upgrade task sequence.
The latest version of SCCM is version 1902. SCCM 1902 is also a baseline version. So you can either upgrade your Configuration Manager to version 1902 or use the SCCM 1902 baseline media to install the version 1902 from scratch.
Before you upgrade to SCCM 1902, check out the SCCM 1902 features. To know about SCCM 1902 prerequisites, read this post.

Windows 10 1903
Windows 10 version 1903 or Windows 10 May 2019 Update (build 18362) is out. Microsoft released Windows 10 May 2019 Update version 1903 to only the Release Preview ring Insiders. The announcement was made on 8th April 2019.
As per another announcement, “The May 2019 Update will remain in the Release Preview ring for an increased amount of time in order give us additional time and signals to detect any issues before broader deployment“.
If you are not in either slow or release preview rings, you may join the Windows Insider Program. To get the Windows 10 version 1903, you can download it via Settings > Update & Security > Windows Update > Check for updates.
If you are an MSDN subscriber, you can download the Windows 10 1903 ISO file. I assume the Windows 10 version 1903 will be released for public soon. The steps covered in this post will still be relevant even with final release of Windows 10 version 1903.
Note – Before performing Windows 10 1903 upgrade, you must have a proper plan for the roll out. As you will push upgrade package to your enterprise laptops, a proper planning is a must. I suggest you first perform the upgrade in a lab environment. Deploy it to a limited group and test all your business applications before broad deployment.
SCCM Version required for Windows 10 1903 Upgrade
When you deploy or upgrade Windows 10 to version 1903, the SCCM client agent should be compatible with Windows 10 version.
If you want to manage Windows 10 1903 as client, you need at least SCCM 1806. I am currently assuming this is true because I don’t see the information updated in below matrix. If I am wrong here, I will update the post once I get the correct information.
If you are using Configuration Manager 1810 or 1902, you are good to perform the Windows 10 1903 upgrade.

Windows ADK Requirement
Always ensure that you’re running a supported version of the Windows ADK. Microsoft always recommends using the Windows ADK that matches the version of Windows you’re deploying.
For example, in my lab setup I am SCCM 1902 installed and Windows ADK version is 1903. You can always update an existing installation of a Windows ADK on an SCCM server. Here is my Step-by-Step Guide to Update Windows ADK on SCCM Server – https://www.prajwaldesai.com/update-windows-adk-sccm-server/

To get the Windows ADK release history and download links, read this post.
SCCM Windows 10 Upgrade Options
If you wish to upgrade your Windows 10 to version 1903 using SCCM, there are two ways to do it. I am talking about performing the Windows 10 upgrade in an enterprise setup.
- Use an Upgrade Task Sequence
- Use Servicing plans
Configuration Manager allows you to create servicing plans to form deployment rings. This is to ensure that Windows 10 systems are kept up-to-date when new builds are released.
The second way to upgrade Windows 10 is by using an SCCM upgrade task sequence. Probably this method is preferred by many and I am going to cover the same in this post.
Windows 10 1903 Upgrade using SCCM
As I mentioned above, by using an SCCM upgrade task sequence, we will perform Windows 10 upgrade. I have got some Windows 10 machines in my setup and they are currently on version 1809. All the Window 10 machines are 64-bit and are enterprise editions.
If you have the Windows 10 1903 ISO file, extract the contents. You can mount the ISO file and copy the contents. Create a folder (usually a folder within Sources directory) and paste the copied contents to the folder.
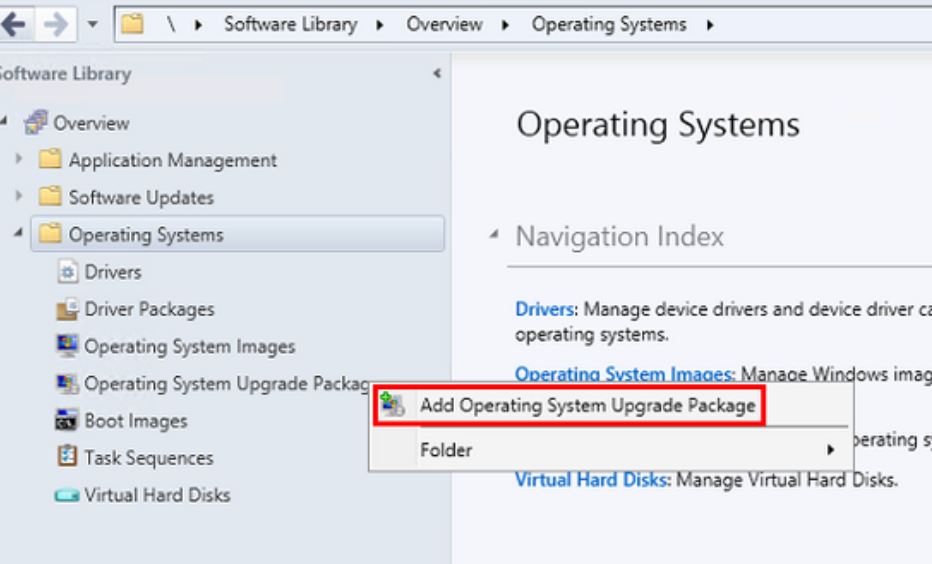
Add Operating System Upgrade Package
The first step is to add operating system upgrade package using SCCM console.
- Launch SCCM console.
- Navigate to Software Library > Operating Systems > Operating System Upgrade Packages.
- Right click Operating System Upgrade Packages and click Add Operating System Upgrade Package.

Specify the path to Windows 10 1903 media. Select the architecture as x64 and language based on your choice. Click Next.

On the General page, specify the name, version and comment for operating system upgrade package. Click Next.

Click Next on Summary page.

On the Completion page, click Close.

Distribute Operating System Upgrade Packages
You must distribute the Windows 10 upgrade package after adding/importing it. Right click Windows 10 upgrade package and click Distribute Content.
Ensure the content is distributed to all the distribution points.

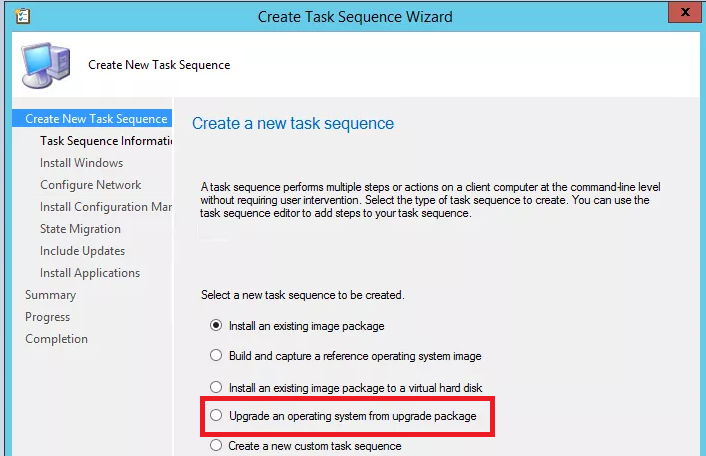
Create SCCM Upgrade Task Sequence
After adding the Windows 10 1903 upgrade package, we will now create a new task sequence which will be an upgrade task sequence.
Right click Task Sequences and click Create Task Sequence.

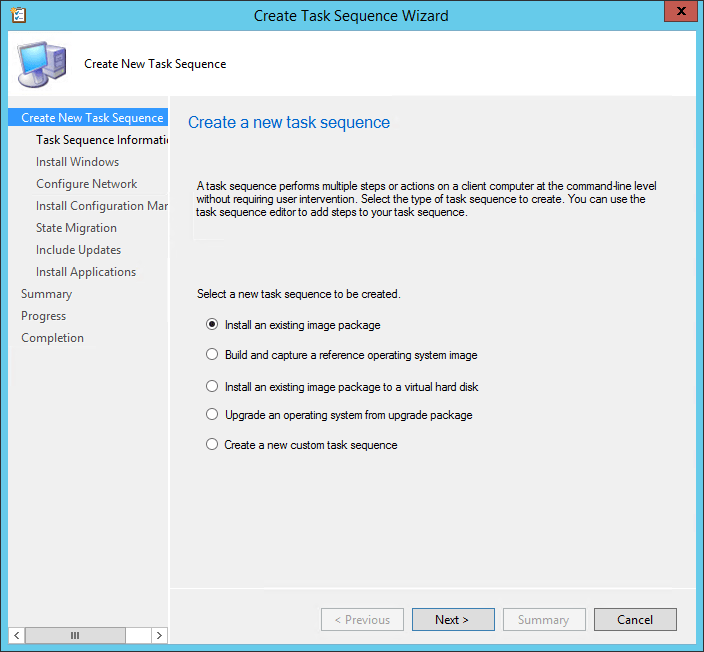
Select Upgrade an operating system from an upgrade package. Click Next.

Specify the task sequence information such as name and description. Click Next.

You must now select an operating system upgrade package. Click Browse and select Windows 10 1903 upgrade package. That’s the package that you imported in the above step.
Under Properties you should see list of editions, language, architecture and OS version. Select the edition index which is Windows 10 Enterprise.
If you have a KMS server in your setup, you can skip entering the product key. In case you use MAK keys to activate the OS, enter the correct Windows 10 product key.
Click Next.

You can include software updates if you wish to install them along with operating system. At this point, I will choose Do not install any software updates. Click Next.

If you have any list of Applications that should be installed along with this upgrade, select them by clicking Yellow icon. If not just click Next.

On the Summary page, click Next.

Click Close.

You should see the newly created task sequence under Task Sequences. You may edit the Task Sequence before upgrade and make required changes. In my case, since I am only performing the upgrade, I won’t modify the task sequence.
Deploy Windows 10 1903 Upgrade Task Sequence
Once your task sequence is ready, you are good to deploy to it a collection.
Right click the Task Sequence and click Deploy.

On the General page, click Browse and select a collection. The collection that I have selected contains Windows 10 1809 machines. Click Next.

Select the purpose as Available. By selecting Available, the windows 10 upgrade task sequence appears in software center. The upgrade begins only when user clicks Upgrade.
You may select the purpose as Required but be careful when you select that option. Selecting Required will force the deployment at the deadline. Click Next.

Under Scheduling, you can specify when the deployment will become available and when it gets expired. Click Next.

Click Next.

On Alerts page, click Next.

Click Next.

On the Summary page, click Next.

Finally, on Completion page, click Close.

Launch Windows 10 1903 Upgrade Process
So we have almost reached the final step which is performing the upgrade. Login to Windows 10 computer and initiate a Machine Policy Retrieval and Evaluation Cycle from Control Panel > Configuration Manager Icon.
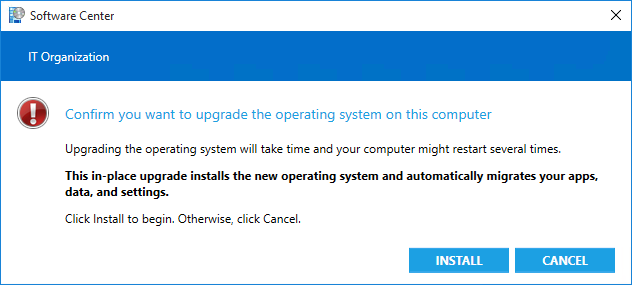
Launch Software Center and click Operating Systems. Our upgrade task sequence is available, click Install.

To upgrade the operating system on the computer you must acknowledge. Click Install. From this point, there is no user intervention required. The upgrade process should begin now.

You will notice the task sequence steps getting executed one by one.

Most of all, which log file should i open to monitor the upgrade process ??. Sometimes the upgrade may halt and there could be several reasons for that.
Hence it is very important that you know which log file should you refer while the upgrade process is running. The answer is C:\Windows\CCM\Logs\SMSTSLog\SMSTS.log.
Before the upgrade begins, first the install.wim file is downloaded.

Notice the Windows Upgrade Setup Progress seen in the log file.

Working on updates..That should bring a smile on your face.

The upgrade process is complete. We have successfully upgraded Windows 10 1809 to Windows 10 1903 using SCCM upgrade task sequence.

Still Need Help?
If you need further assistance on the above article or want to discuss other technical issues, check out some of these options.
Deploying Windows 10 with System Center Configuration Manager (SCCM)
There are a number of different ways Configuration Manager can be used to Deploy Windows 10.
- In-place Upgrade: Windows 7, 8, 8.1, or 10 to the latest version. The upgrade process retains the applications, settings, and user data on the computer.
- Refresh an existing computer (Wipe and Transfer Settings): Wipe an existing computer and installs a new operating system on the computer. You can migrate settings and user data after the operating system is installed.
- Bare Metal Install on a New Computer: Install Windows on a new computer.
- Replace an existing computer and transfer settings: Install Windows on a new computer. Optionally, you can migrate settings and user data from the old computer to the new computer.
In-place Upgrade

This method is used to upgrade Windows 7, 8, 8.1 to 10. You can also do build-to-build upgrades of Windows 10 such as 1607 to 1709. Additionally, starting in Configuration Manager 1802, the Windows 10 in-place upgrade task sequence supports deployment to internet-based clients managed through the cloud management gateway (CMG). This method is the most robust and has no external dependencies, such as the Windows ADK
With the in-place upgrade you:
- CANNOT change domain membership
- CANNOT change disk partitions
- CANNOT change architecture (x86 to x64)
Preparing the Upgrade Package
-
Add operating system upgrade packages to Configuration Manager (the extracted ISO path)

- Distribute operating system images to a distribution point
-
Apply software updates to an operating system upgrade package
Create an In-place Upgrade Task Sequence
- Create a New Task Sequence -> Upgrade an operating system from upgrade package
- Select he Upgrade Package from the previous step
- Set Product key, Include Updates and Install Applications preferences
- Complete the wizard
-
Add steps to get the previous OS in an upgrade state, such as
- Battery checks
- Network/wired connection checks
- Remove incompatible applications
- Remove incompatible drivers
- Remove/suspend third-party antivirus.
Pre-Cache Content on Client
You can optionally pre-deploy the Upgrade Package to clients so that they do not have to download it if they click to install it in Software Center. This is called pre-cache of the content.
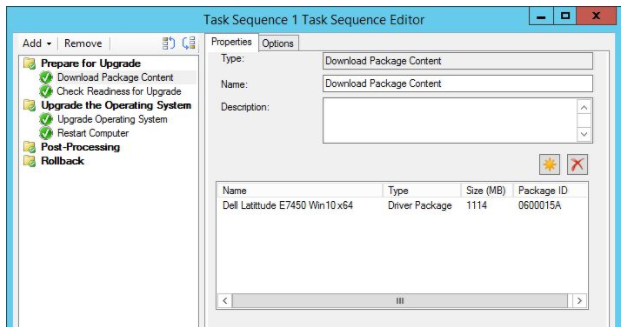
Download Package Content Step
You can also use the Add Download Package Content step to customize such things as detect the client architecture, hardware type for each driver package.
Deploy the Task Sequence to Computers
There are two ways in which you can deploy this task sequence to computers
- Use Software Center to deploy over the network
- Use USB drive to deploy without using the network
- Cloud Management Gateway (1802 and above)
Deploy with Software Center
- Task Sequence -> Deploy
- Set Deployment Settings, Scheduling, User Experience, Distribution Points
- With 1802 you can now also choose to save this deployment as a template.
Deploy with USB Drive
- Select your task sequence and choose Create Task Sequence Media
Deploy with Cloud Management Gateway (CMG)
Starting with Configuration Manager 1802, you can use a CMG to deploy a task sequence.
- Ensure all of the content referenced by the in-place upgrade task sequence is distributed to a cloud distribution point.
-
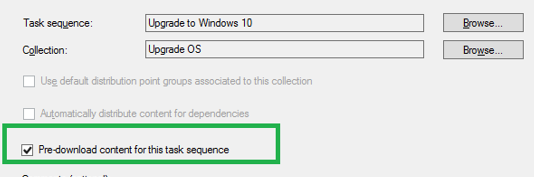
When deploying the task sequence, check the additional options:
- Allow task sequence to run for client on the Internet, on the User Experience tab of the deployment.
- Download all content locally before starting task sequence, on the Distribution Points tab of the deployment.
- Other options such as Download content locally when needed by the running task sequence do not work in this scenario.
- Pre-download content for this task sequence, on the General tab of the deployment
Refresh an Existing Computer (Wipe and Transfer Settings)

Let’s look at how we can partition and format (wipe) an existing computer and install a new operating system onto it and transfer the settings as well. We need to install a state migration point to store and restore user settings on the new operating system after it is installed. This is called a Refresh
Prepare for a Refresh Scenario
There are several infrastructure requirements that must be in place before we can deploy operating systems with Configuration Manager.
Dependencies External to Configuration Manager
- Windows ADK for Windows 10
- User State Migration Tool (USMT) (transfer user settings)
- WinPE images (PXE boot media)
- Windows Server Update Services (WSUS) (for updates during deployment)
-
Windows Deployment Services (WDS) (PXE boot environment)
- Also DHCP enabled
- Internet Information Services (IIS) on the site system server
- Device drivers ready
Configuration Manger Dependences
- OS Image
- Driver catalog (import the device driver, enable it, and make it available on a distribution point)
- Management point
- PXE-enabled distribution point
- Install a State Migration Point and configure it
Prepare WinPE Boot Image
- Two default images are provided by Configuration Manager in \\servername>\SMS_<sitecode>\osd\boot\<x64> or <i386>
- Add Boot Image (Operating Systems -> Boot Images)
- Distribute Boot Images to Distribution Points
- Boot Image Properties -> Data Source tab, select Deploy this boot image from the PXE-enabled distribution point
Prepare an Operating System Image
- Decide to use the default install.wim or capture a reference computer and make your own .wim file.
- Add the Operating System Image to Configuration Manager (Operating Systems -> Add Operating System Image)
- Distribute the Operating System to a Distribution Point
- Schedule Software Updates to the Operating System Image

Create a Task Sequence
- Create a New Task Sequence -> Install an existing image package
- Choose setting such as Image package (and image), partitions, product key
- Choose to Join A Domain
- Choose to install the Configuration Manager Client
-
Choose Under State Migration
- Capture user settings: capture the user state.
- Capture network settings: Captures network settings
- Capture Microsoft Windows settings: Capture the computer name, registered user and organization name, and the time zone settings.

Deploy the Task Sequence
You have a few different options to choose when deploying the task sequence.
- Use PXE to deploy over the network
- Use Multicast to deploy over the network
- Use Software Center to deploy over the network
-
Create an image for an OEM in factory or a local depot
- Create Task Sequence Media
- Use USB Drive to deploy Windows over the network
Bare Metal Install on a New Computer

Let’s look at how we can partition and format (wipe) a new computer and install a new operating system onto it.
Prepare for a Bare Metal Scenario
There are several infrastructure requirements that must be in place before we can deploy operating systems with Configuration Manager.
Dependencies External to Configuration Manager
- Windows ADK for Windows 10
- User State Migration Tool (USMT) (transfer user settings)
- WinPE images (PXE boot media)
- Windows Server Update Services (WSUS) (for updates during deployment)
-
Windows Deployment Services (WDS) (PXE boot environment)
- Also DHCP enabled
- Internet Information Services (IIS) on the site system server
- Device drivers ready
Configuration Manger Dependences
- OS Image
- Driver catalog (import the device driver, enable it, and make it available on a distribution point)
- Management point
- PXE-enabled distribution point
Everything else here is the same as a Refresh. Follow the directions above, skipping the sections where we would use the State Migration Point.
Replace an existing computer and transfer settings

Let’s look at how we can partition and format (wipe) a destination computer and install a new operating system onto it and transfer the settings as well from a source computer. We need to install a state migration point to store and restore user settings on the new operating system after it is installed. This is called a Refresh
Prepare for a Replace Scenario
There are several infrastructure requirements that must be in place before we can deploy operating systems with Configuration Manager.
Dependencies External to Configuration Manager
- Windows ADK for Windows 10
- User State Migration Tool (USMT) (transfer user settings)
- WinPE images (PXE boot media)
- Windows Server Update Services (WSUS) (for updates during deployment)
-
Windows Deployment Services (WDS) (PXE boot environment)
- Also DHCP enabled
- Internet Information Services (IIS) on the site system server
- Device drivers ready
Configuration Manger Dependences
- OS Image
- Driver catalog (import the device driver, enable it, and make it available on a distribution point)
- Management point
- PXE-enabled distribution point
- Install a State Migration Point and configure it
Configure State Migration Point
The scenario for a replace is similar to a restore. The exception is we need to configure the State Migration Point with settings to assure we have a spot to store our migration data that is not on the computer.
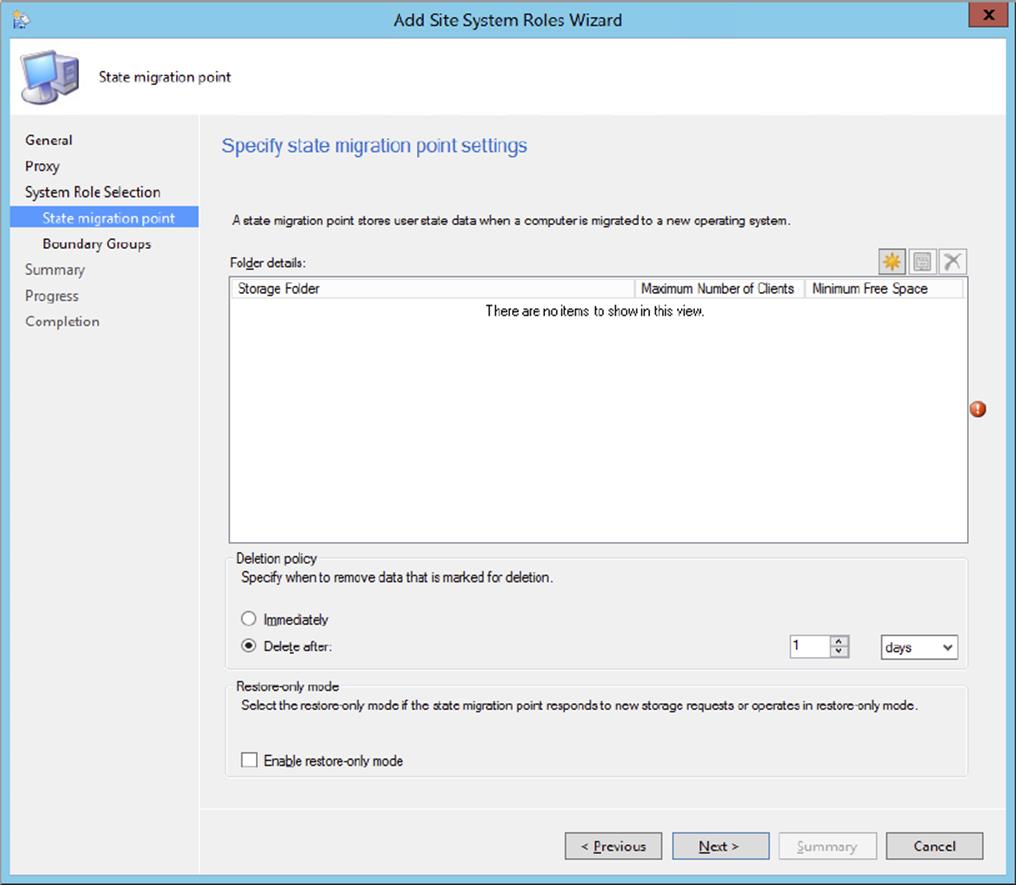
We must specify:
- The drive on the server to store the user state migration data.
- The maximum number of clients that can store data on the state migration point.
- The minimum free space for the state migration point to store user state data.
- The deletion policy for the role. Either specify that the user state data is deleted immediately after it is restored on a computer, or after a specific number of days after the user data is restored on a computer.
- Whether the state migration point responds only to requests to restore user state data. When you enable this option, you cannot use the state migration point to store user state data.
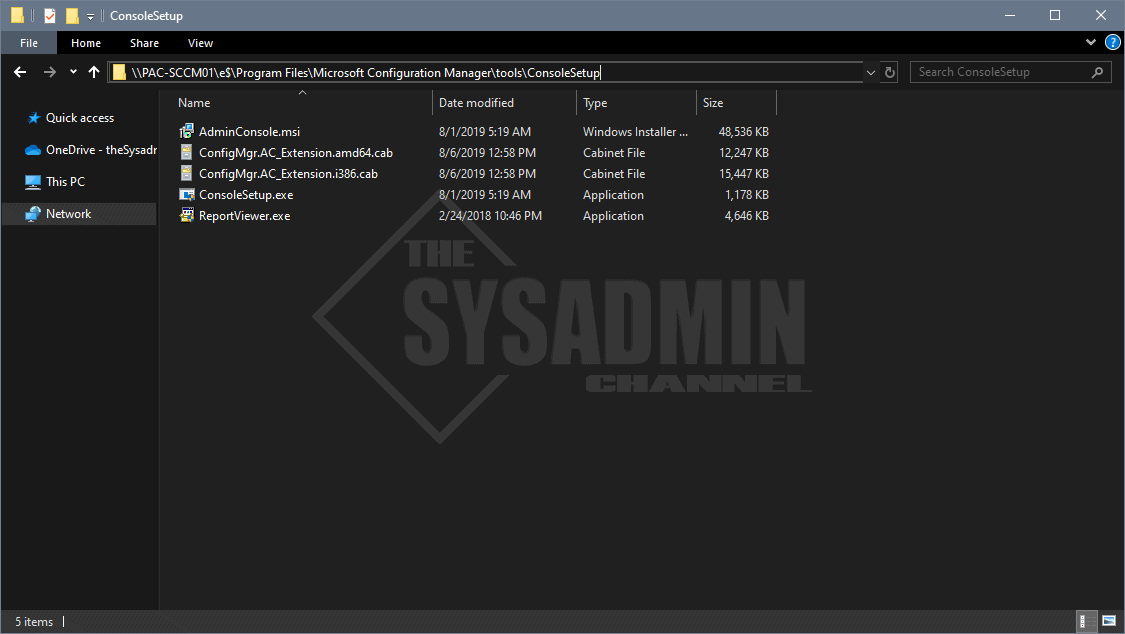
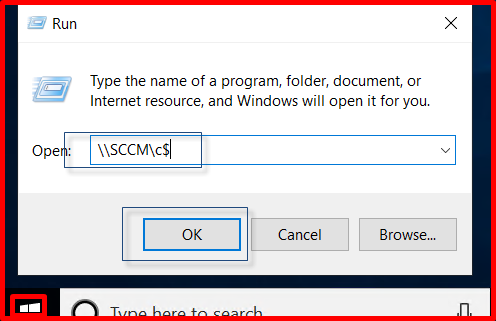
In this article, we will explain how the System Center Configuration Manager Console tool is installed on your Windows 10 PC. In some cases, you can easily operate on the SCCM Console screen from your Windows 10 operating system computer without the need to connect to the SCCM server. Now we can start the installation process. We need to go to our client computer and copy the SCCM Console Setup file. For this, we right-click on the ”Windows” button of our Windows 10 computer and click on the ”Run“ option.

We need to connect to the “c$” of our server. We can connect as ”\\SCCM\c$”. Continue by clicking the “OK” button.
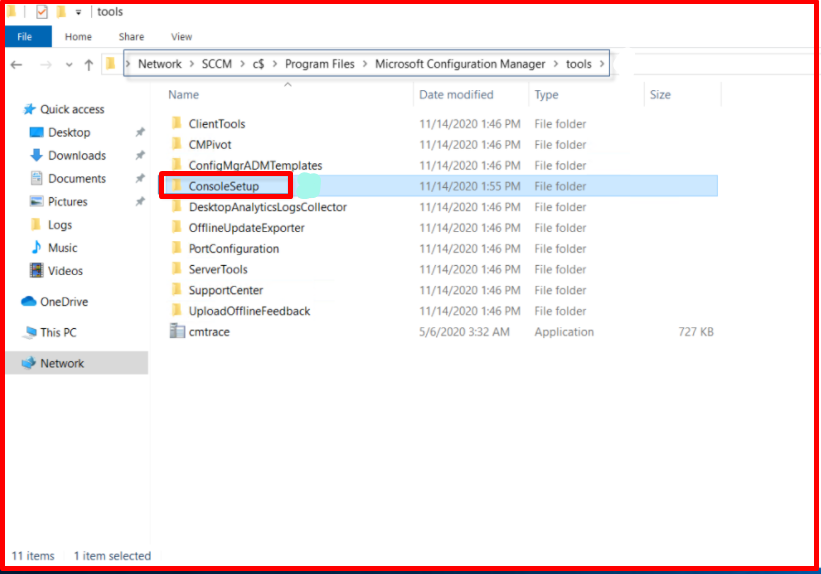
When we connect to the c$ screen of our SCCM Server, we can go to the Path we have specified below and copy the “SCCM Console Setup” file to our desktop.
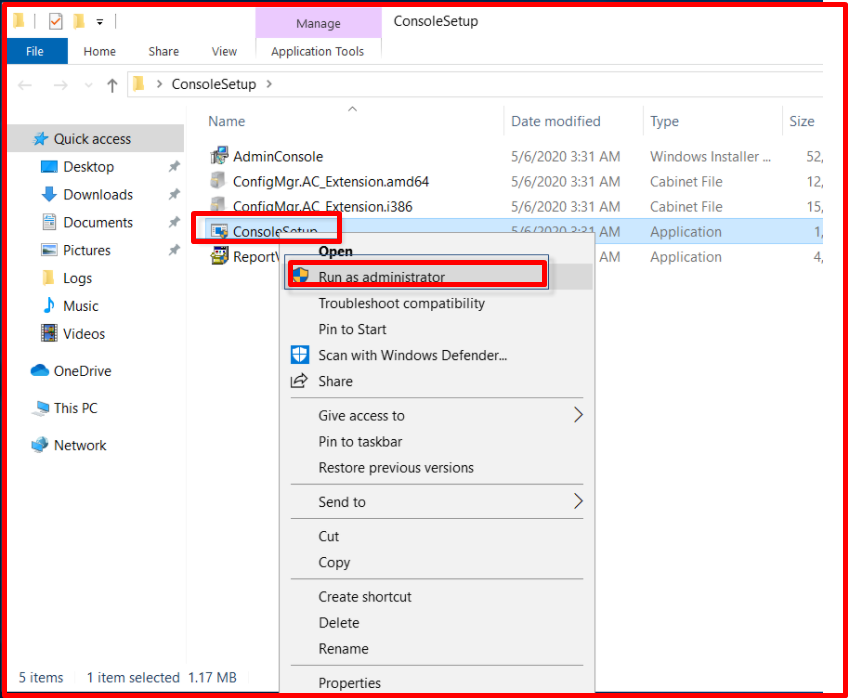
When we open the folder that we have moved to the desktop, we right-click the “ConsoleSetup” program and click the “Run as Administrator” option.
On the “Microsoft Endpoint Configuration Manager” page, click the “Next” button.

On the “Site Server” page, we write the “FQDN” of the server in the box to which “Site Console” screen you want to connect to. Then we click the “Next” button. Since there is only one site in our lab environment, we continue by typing the name of our server.

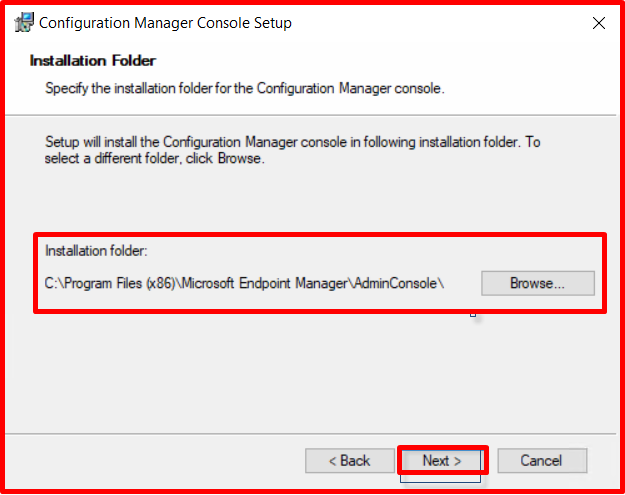
On the “Installation Folder” page, we select where the program will be installed. We leave it the same. Then we click the “Next” button.
On the “Ready to Install” page, we start the installation process by clicking the “Install” button.

On the “Please Wait” page, we wait a bit until the installation is finished.

On the last page, we will complete the installation process by clicking the “Finish” button.

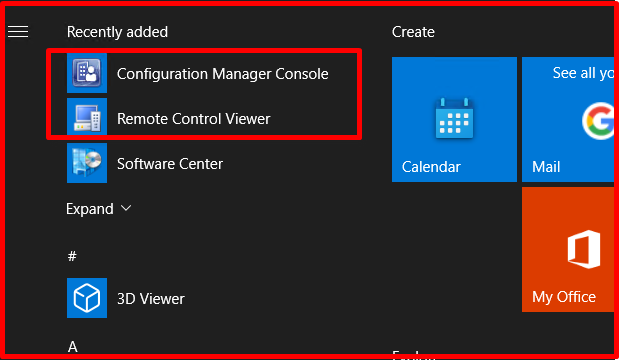
When you click on the start menu, you will see that the SCCM Console tool is installed.
When you type the name of your server by selecting the “Connect to site” option, the automatic name filling process will be performed. After the name filling process; By selecting the “Connect” option, the connection to the Console screen will be successfully established. In addition, the warning on the screen shows that the user we have become “Logon” does not have SCCM Console login authority.

For this; In order to give SCCM Console login authorization to the relevant user, we can authorize the relevant user or our own user by clicking the “Security” folder in the “Administration” section of our SCCM server and selecting the “Administrative Users” option. After the authorization is completed, we see that we have successfully accessed the SCCM Console screen.
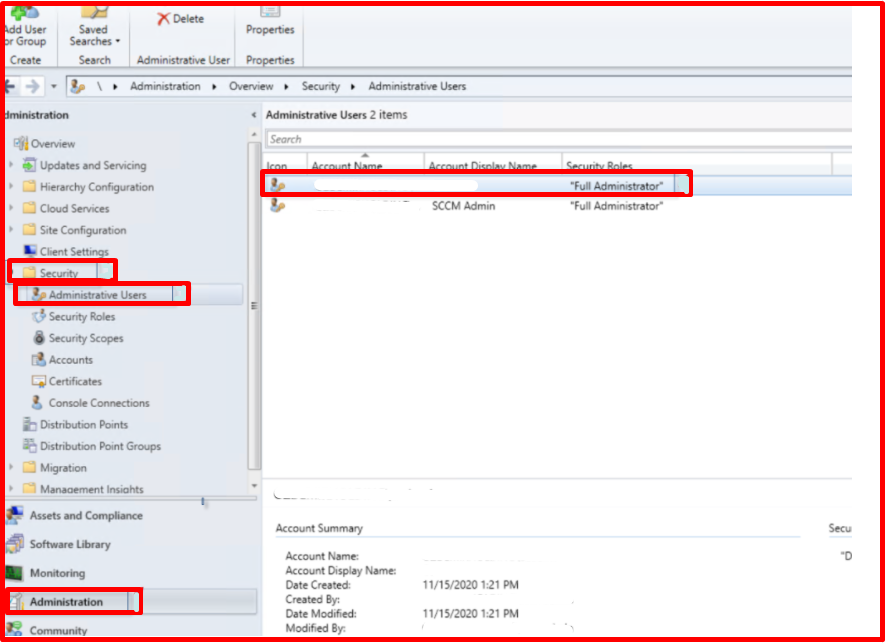
We have successfully accessed the SCCM Console screen.