
Восстановление файлов данных Outlook (PST и OST)
Applies ToOutlook для Microsoft 365 Outlook 2024 Outlook 2021 Outlook 2019 Outlook 2016 Microsoft365.com «Мой Office» для iPhone
Вы можете использовать средство восстановления папки «Входящие» (SCANPST.EXE) для диагностики и исправления ошибок в файле данных Outlook. Средство восстановления папки «Входящие» проверяет Outlook файлы данных на компьютере, чтобы убедиться, что они в хорошей форме.
Вы можете использовать средство восстановления папки «Входящие» в следующих ситуациях:
-
Вы получите сообщение о том, что Outlook не может открыть файл данных
-
Вы получаете сообщение о том, что Outlook не может открыть набор папок
-
Вы считаете, что файл данных Outlook может быть поврежден
Если вы используете учетную запись электронной почты Exchange, вы можете удалить автономный файл данных Outlook (OST- файл), и Outlook повторно создаст автономный файл данных Outlook (OST) при следующем открытии Outlook.
Примечания:
-
Средство восстановления папки «Входящие» не подключает и не анализирует данные, хранящиеся в почтовом ящике Exchange. Средство ищет только ошибки (повреждения) и, если таковые имеются, дает возможность разрешить средству исправить эти ошибки. Если не удается запустить средство восстановления папки «Входящие», попробуйте восстановить программу Outlook.
-
Перед запуском средства восстановления папки «Входящие» рекомендуется создать резервную копию существующего файла данных Outlook. Дополнительные сведения см. в статье Резервное копирование файла данных Outlook.
Восстановление файла данных Outlook (PST-файла)
-
Закройте Outlook и перейдите к одному из следующих расположений файлов:
-
Outlook 2019: C:\Program Files (x86)\Microsoft Office\root\Office16
-
Outlook 2016: C:\Program Files (x86)\Microsoft Office\root\Office16
-
-
Запустите файл SCANPST.EXE.
-
Нажмите кнопку Обзор , чтобы выбрать файл данных Outlook (PST), который требуется проверить. Если вам нужна помощь в поиске файла данных Outlook, перейдите в раздел Поиск файлов данных Outlook.
Примечание: По умолчанию во время сканирования создается новый файл журнала. Вы также можете нажать кнопку Параметры и отключить создание журнала или сделать так, чтобы результаты добавлялись в существующий файл журнала.
-
Нажмите кнопку Начать, чтобы начать проверку.
-
Если обнаружены ошибки, нажмите Восстановить, чтобы начать их исправление.
Примечание: В ходе восстановления создается файл резервной копии. Чтобы изменить принятое по умолчанию имя или расположение этого файла, введите новое имя в поле Имя файла резервной копии или нажмите кнопку Обзор, чтобы выбрать нужный файл. Для восстановления файла данных Outlook может потребоваться запустить средство несколько раз. В некоторых случаях элементы не могут быть восстановлены, если они были окончательно удалены или повреждены после восстановления.
-
По завершении восстановления запустите Outlook с профилем, связанным с восстановленным файлом данных Outlook.
Что происходит после восстановления файла данных Outlook?
В область папок может появиться папка с именем Восстановленные личные папки , которая содержит папки Outlook по умолчанию или папку Потерянные и найденные папки. Некоторые из восстановленных папок могут быть пустыми. Папка «Потерянные и найденные » содержит все папки и элементы, восстановленные средством восстановления, которые Outlook не могут размещаться в исходной структуре.
Создание нового файла данных
Вы можете создать файл данных Outlook и перетащить в него элементы из папки Потерянные и найденные. После этого можно удалить PST-файл Восстановленные личные папки, включая папку Потерянные и найденные. Чтобы создать файл данных Outlook, перейдите к разделу Создание файла данных Outlook.
Восстановление элементы из BAK-файла резервной копии
Если исходный файл данных Outlook открылся, вероятно, вы сможете восстановить дополнительные элементы. Средство восстановления папки «Входящие» создает файл резервной копии с тем же именем, что и у исходного файла, но с расширением BAK, и сохраняет его в той же папке. Вы можете попробовать восстановить из файла резервной копии элементы, которые не удалось восстановить средству восстановления папки «Входящие».
-
Перейдите к папке, в которой хранится PST-файл, и найдите BAK-файл (например, olgazueva01@outlook.com.bak), созданный средством восстановления папки «Входящие».
-
Сделайте копию BAK-файла и переименуйте его, используя расширение bak.pst. Например, olgazueva01@outlook.com.bak.pst.
-
Импортируйте файл с расширением bak.pst в Outlook, затем с помощью мастера импорта и экспорта импортируйте дополнительные восстановленные элементы в только что созданный PST-файл.
Поиск файлов данных Outlook
Вы можете проверить расположение файлов данных Outlook в Outlook.
-
Выберите Файл > Параметры учетной записи > Параметры учетной записи.
-
Перейдите на вкладку Файлы данных .
-
Все файлы данных Outlook (PST) и автономные файлы данных (OST) перечислены вместе с именем учетной записи, с которыми связаны файлы.
Нужна дополнительная помощь?
Нужны дополнительные параметры?
Изучите преимущества подписки, просмотрите учебные курсы, узнайте, как защитить свое устройство и т. д.
Microsoft Outlook recommends using its built-in Inbox Repair tool, also known as ScanPST.exe, to repair damaged or corrupt Personal Folder (.pst) files. The tool checks the data integrity errors in the Outlook PST file. If inconsistencies or errors are found in the scanned PST file, ScanPST.exe tries to fix the errors and inconsistencies by removing the bad items from the PST file. This helps you get back an error-free PST Outlook data file. However, to use the tool, you need to find its location. Below, we will explain how to locate ScanPST.exe on your system.
TIP: If ScanPST.exe is missing or fails to recover lost or corrupt Outlook mailbox items, try the free demo version of Outlook PST Repair Tool to resolve the issue.
The ScanPST location is fixed by default. It can be found in the Outlook installation directory. However, the location of the installation directory may vary based on the Outlook and Windows version you’ve installed on your computer.
For instance, 32-bit Outlook is installed in the Program Files (x86) directory while 64-bit Outlook client is installed in the Program Files directory on your Windows PC. This may further vary if you use 32-bit or 64-bit Windows OS.
Below are the paths where you can find ScanPST.exe for Outlook 2021, 2019, 2016, and Microsoft 365 on Windows (both 32-bit and 64-bit versions):
| For Outlook 2021, 2019, and 2016 Click-to-Run installation on a 32-bit version of Windows | C:\Program Files(x86)\Microsoft Office\root\Office16 |
| For Outlook 2021, 2019, and 2016 Click-to-Run installation on a 64-bit version of Windows | C:\Program Files\Microsoft Office\root\Office16 |
| For Outlook 2021, 2019, and 2016 MSI-based installation on a 32-bit version of Windows | C:\Program Files(x86)\Microsoft Office\Office16 |
| For Outlook 2021, 2019, and 2016 MSI-based installation on a 64-bit version of Windows | C:\Program Files\Microsoft Office\Office16 |
| For Outlook 2013 Click-to-Run installation on a 64-bit version of Windows | C:\Program Files\Microsoft Office 15\root\office15 |
| For Outlook 2013 Click-to-Run installation on a 32-bit version of Windows | C:\Program Files(x86)\Microsoft Office 15\root\office15 |
| For Outlook 2013 MSI-based installation on a 64-bit version of Windows | C:\Program Files\Microsoft Office\Office15 |
| For Outlook 2013 MSI-based installation on a 32-bit version of Windows | C:\Program Files(x86)\Microsoft Office\Office15 |
| For Outlook 2010 on a 64-bit version of Windows | C:\Program Files\Microsoft Office\Office14 |
| For Outlook 2010 on a 32-bit version of Windows | C:\Program Files\Microsoft Office(x86)\Office14 |
| For Outlook 2007 on a 64-bit version of Windows | C:\Program Files\Microsoft Office\Office12 |
| For Outlook 2007 on a 32-bit version of Windows | C:\Program Files(x86)\Microsoft Office\Office12 |
| Other typical location | C:\Program Files\Common Files\System\Mapi\1033 |
| Other typical location | C:\Program Files\Common Files\System\MSMAPI\1033 |
| Other typical locations (for Windows NT and Windows 2000) | C:\Program Files\Common Files\System\Mapi\1033\NT |
| Other typical locations (for Windows 95 and Windows 98) | C:\Program Files\Common Files\System\Mapi\1033\95 |
Note: Here, ‘C:’ is the disk drive where Program Files and Program Files(x86) folders reside. The destination path, as stated above, should be followed to know the ScanPST.exe location.
Steps to Repair Corrupt PST File using Outlook ScanPST
Once you have located the ScanPST, follow these steps to repair the corrupt Personal Folders file (PST) with ScanPST.exe:
Note: Before using the tool, close Microsoft Outlook, and other applications.
Step 1: Double-click on SCANPST.exe.
Step 2: In the Microsoft Outlook Inbox Repair Tool window, click Browse to select the PST file you want to repair.
Step 3: Once the file is selected, click Start to initiate the scanning process.
Step 4: If any errors are found, click Repair to fix those errors.
The repair process may take a while to complete. Wait for the tool to finish the repair. ScanPST.exe may freeze or stop responding. You must wait for the tool to respond. However, if it does not respond after a while or crashes, it indicates that the tool can’t repair the PST or the PST is either large or severely damaged.
ScanPST.exe has a few notable limitations, such as:
- It can handle and fix only minor corruption and integrity errors
- It does not support an encrypted PST file
- It may fail to repair a PST file larger than 2 GB
- It may delete or remove mail items that it deems corrupt or bad
- It cannot fix structural damage in PST files
- It may fail to detect and resolve all errors
- It does not help recover any deleted mail items
Note: ScanPST.exe can only fix minor corruption and integrity errors. Also, it does not support an encrypted or PST file larger than 2 GB.
Manual Guide: SCANPST.EXE Missing Location Manual
What If ScanPST.exe Is Missing or Doesn’t Work?
If the ScanPST tool doesn’t work or you can’t find the location of ScanPST, you can use an PST repair software, such as Stellar Repair for Outlook. This software is recommended by MS Outlook experts to fix PST file corruption and integrity errors. It enables you to save the repaired mail items in PST, EML, MSG, RTF, HTML and PDF file formats . Plus, the software also provides an option to export the repaired mailbox items to Microsoft 365 directly. The PST file repair software also offers ‘Find’ functionality to search and scanPST locations in the selected volume. The free version of the software provides a preview of emails, calendars, attachments, folders, etc. This feature-rich PST repair tool supports all MS Outlook versions.
Conclusion
ScanPST.exe is a useful tool provided by Microsoft to help you address minor issues with Outlook data files, such as PST. To use this tool, you need to first locate it on your system. Above, we have mentioned the locations of ScanPST.exe based on the Outlook and Windows versions. However, it has several limitations that may impact its effectiveness and lead to further damage or data loss. To repair the corrupt PST file safely without the risk of data loss, you can use an Outlook PST repair tool, such as Stellar Repair for Outlook.
Recommended For You:
Error: ScanPST.exe entry point not found
Error: ScanPST.exe Tool does not recognize the file
Error: Outlook PST in use and cannot be accessedFix the Missing Repair Button in SCANPST
Was this article helpful?
YES1
NO
The ScanPST.exe is a free tool provided by Microsoft, comes with MS Office suite. It is also known as an Inbox repair tool which can be used to fix errors from Outlook data files (.pst). The location of scanpst.exe depends on your Outlook version.
Default Locations of Microsoft Inbox Repair Tool (scanpst.exe)
Most of the Outlook users were unaware where scanpst.exe is located and cannot find scanpst.exe path. So here in this blog, I am going to tell where to find Inbox repair tool scanpst.exe in Outlook 2016, 2013, 2010, 2007, 2003 and 2002. Easily find out the default path for scanpst.exe for your Outlook version also even if you are using a 64-bit version of Window.
Where is scanpst exe Located in Outlook 2016?
- C:\Program Files\Microsoft Office\Office16\ // For 32-bit Windows
- C:\Program Files (x86)\Microsoft Office\Office16\ // For 64-bit Windows
- C:\Program Files\Microsoft Office\Office16\ // For 64-bit Outlook
What is the Default Location of Scanpst.exe for Outlook 2013?
- C:\Program Files\Microsoft Office\Office15\ // For 32-bit Windows
- C:\Program Files (x86)\Microsoft Office\Office15\ // For 64-bit Windows
- C:\Program Files\Microsoft Office\Office15\ // For 64-bit Outlook
Where to Find Inbox Repair Tool in Outlook 2010?
- C:\Program Files\Microsoft Office\Office14\ // For 32-bit Windows
- C:\Program Files (x86)\Microsoft Office\Office14\ // For 64-bit Windows
- C:\Program Files\Microsoft Office\Office14\ // For 64-bit Outlook
How to Get the Scanpst.exe Location for Outlook 2007?
- C:\Program Files\Microsoft Office\Office12\ // For 32-bit Windows
- C:\Program Files (x86)\Microsoft Office\Office12\ // For 64-bit Windows
Where do I Find Scanpst.exe in Outlook 2003?
- C:\Program Files\Common Files\System\MSMAPI\<locale ID>\ // For 32-bit Windows
- C:\Program Files (x86)\Common Files\System\MSMAPI\<locale ID>\ // For 64-bit Windows
What is scanpst.exe File Location for Outlook 2002/XP?
- C:\Program Files\Common Files\System\MAPI\<locale ID>\
Note: Above you can find scanpst.exe locations for all editions of Outlook and Windows (32-bit & 64-bit) including Windows 10, Windows 8.1, 8, 7, Vista and XP.
Conclusion: In this blog, we have discussed all possible locations available for Outlook scanpst.exe (Inbox repair tool). You can check how to use scanpst.exe in our other post. We hope you got the above information very helpful so give your feedback by commenting on the post.
Summary:- Have you ever faced corruption in your Microsoft Outlook mailbox? Since corruption is nearly unavoidable, it may happen at any time. Thankfully, Microsoft provides you with the Inbox Repair tool to handle and fix corruption within the PST file. This tool, commonly known as the scanpst.exe utility, can scan corrupt PST files for errors and fix the header corruption issues. But if the PST File is severely corrupted then you will need PST File Recovery Tool. Whenever you install the Microsoft Outlook client on your local system, the Inbox Repair tool also gets installed automatically. It is difficult for some users to find ScanPST Locations on their machines. Therefore, in this article, you can locate Inbox Repair Tool or ScanPST.exe in MS Outlook 2016, 2013, 2010, 2003, and XP.
Download Buy Now
Locate SCANPST on Windows for Outlook
Before helping you learn how to use the Inbox Repair tool, I’ll show you how to locate its executable (.exe) file on your local system. It’s very important to locate the scanpst.exe utility before you can run it on your system. The scanpst location basically depends upon the Outlook version and Windows operating system you’re using. Since there are various versions of Microsoft Outlook clients available in the market, the Inbox Repair Tool location always varies. Below I’m showing you the SCANPST path as per the Outlook version and Windows operating system you’re using:
Location of ScanPST in Microsoft Outlook 2016
32-bit Windows: C:\Program Files\Microsoft Office\Office16\
64-bit Windows: C:\Program Files (x86)\Microsoft Office\Office16\
64-bit Outlook: C:\Program Files\Microsoft Office\Office16\
Inbox Repair Tool Path in Microsoft Outlook 2013
32-bit Windows: C:\Program Files\Microsoft Office\Office15\
64-bit Windows: C:\Program Files (x86)\Microsoft Office\Office15\
64-bit Outlook: C:\Program Files\Microsoft Office\Office15\
Path of ScanPST.exe in Microsoft Outlook 2010
32-bit Windows: C:\Program Files\Microsoft Office\Office14\
64-bit Windows: C:\Program Files (x86)\Microsoft Office\Office14\
64-bit Outlook: C:\Program Files\Microsoft Office\Office14\
Microsoft Outlook 2007 ScanPST Path
32-bit Windows: C:\Program Files\Microsoft Office\Office12\
64-bit Windows: C:\Program Files (x86)\Microsoft Office\Office12\
Microsoft Outlook 2003 Inbox Repair Tool Location
32-bit Windows: C:\Program Files\Common Files\System\MSMAPI\<locale ID>\
64-bit Windows: C:\Program Files (x86)\Common Files\System\MSMAPI\<locale ID>\
Scan PST in Microsoft Outlook 2002/XP
C:\Program Files\Common Files\System\MAPI\<locale ID>\
How to Use the Inbox Repair Tool?
Check Out this video to Repair PST files using Inbox Repair tool
Once you’ve successfully located the scanpst.exe utility, double-click its executable file to launch the Microsoft Inbox Repair tool. Now follow the simple steps shown below:
- On the Microsoft Inbox Repair tool window, click the Browse button and select the corrupt PST file.

- The selected PST file will be listed in the edit box.
- The scanning process is being conducted on your system.
- Within a couple of minutes, the selected PST file will be scanned successfully.
- Finally, click the Repair button to repair the PST file.


Now click the Start button to scan the corrupt PST file.

Don’t cancel it.

You can now check the error report.

Key Attributes of the Inbox Repair Tool
- It checks whether the tables are correctly associated with the folders or not.
- In the case of missing messages or subfolders, the Inbox Repair tool removes that row.
- It scans every row of the table and checks whether the messages or the subfolders are present in the system or not.
- It smartly validates the messages as well as the mailbox folder.
- If the validation fails, it removes them from the table considering to avoid severe corruption.
Limitation
- Inbox Repair Tool might stop working and responding
- The Inbox Repair tool can only fix header corruption issues.
- It may not work if the size of your PST file is large.
Conclusion
After finding the ScanPST Location you can fix PST file corruption issues. But if you’re still encountering error messages, this means corruption is severe and the Inbox Repair tool can’t fix it. In such a situation, you should use the PST File Recovery Tool to restore the maximum possible data from it. We hope the above article will help you to locate the path of Outlook inbuilt ScanPST.exe utility on your Windows system.
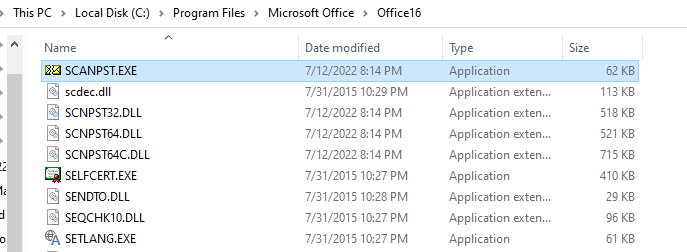
As a tech blogger, I would be happy to guide you on finding the Scanpst.exe file on Windows 10. The Scanpst.exe file is a tool provided by Microsoft to repair and diagnose issues with Outlook PST (Personal Storage Table) files. Here are the steps to locate the Scanpst.exe file on Windows 10:
1. Open File Explorer: You can open File Explorer by pressing the Windows key + E on your keyboard or by clicking on the folder icon in the taskbar.
2. Navigate to the Local Disk (C:): In File Explorer, click on “This PC” or “My Computer” in the left-hand panel. Then, double-click on the “Local Disk (C:)” drive to access your system drive.
3. Search for Scanpst.exe: Once you’re in the system drive, locate the “Program Files” folder. Double-click on it to open it. Inside the “Program Files” folder, look for the “Microsoft Office” folder and open it. If you have a 32-bit version of Office installed, you will find the Scanpst.exe file directly in the “Microsoft Office” folder. However, if you have a 64-bit version of Office installed, you need to access the “Office16” folder for the Scanpst.exe file.
4. Access the Scanpst.exe file: If you have a 32-bit version of Office, you will find the Scanpst.exe file directly in the “Microsoft Office” folder. Double-click on Scanpst.exe to launch the application. If you have a 64-bit version of Office, open the “Office16” folder and search for the Scanpst.exe file there. Once found, double-click on it to run the application.
Please note that the steps provided assume a default installation of Microsoft Office on Windows 10. However, if you have installed Office in a different location or customized the installation, the Scanpst.exe file may be located in a different directory. In such cases, you can use the Windows search function to search for “Scanpst.exe” to find its exact location on your system.
Remember to always backup your Outlook PST files before running the Scanpst.exe tool, as it modifies the files during the repair process.
Video Tutorial:How do I access the repair tool in Windows 10?
Why can’t I find my PST file?
As a tech blogger, I’ll address the issue of not being able to find your PST file without mentioning that I am an AI language model. Here are a few possible reasons and steps to consider:
1. Incorrect file path: Double-check the file path you are looking in. PST files are typically located within the Outlook folder in the user’s profile directory. On Windows, the default location is usually “C:\Users\[Username]\Documents\Outlook Files.”
2. Hidden files: PST files might be hidden by default on your system. Ensure that you have enabled the option to show hidden files and folders. In File Explorer on Windows, go to the “View” tab, and check the “Hidden items” box in the “Show/hide” section.
3. Outlook data file corruption: If the PST file is corrupted, it might not be recognized or displayed by Outlook. In such cases, you may need to repair the PST file using the built-in Inbox Repair Tool (scanpst.exe). This tool is included with Microsoft Office and can be found in the installation directory. Run the tool, select the corrupted PST file, and follow the steps to repair it.
4. PST file in a different location: It’s possible that you or a previous user has set a custom or non-default location for the PST file. If you’re sure it’s not in the default location, use your system’s search functionality to locate the file by searching for “*.pst”, which should show all PST files on your computer.
5. Outlook profile misconfiguration: Sometimes, the issue might be with the Outlook profile settings, which can cause PST files to appear missing. To check and correct this, open the Outlook application and go to the “File” tab. Under the “Info” section, click on “Account Settings” > “Account Settings.” In the “Data Files” tab, ensure that the PST file you’re looking for is listed. If not, you can add it manually by clicking on “Add.”
6. File deletion or relocation: It’s possible that the PST file was accidentally deleted or moved to a different location. Check your Recycle Bin for deleted PST files. If you recently migrated to a new computer or reinstalled Outlook, ensure that you have successfully transferred or restored your PST file from a backup.
Remember, these are general steps to consider when you can’t find your PST file, and the actual resolution may vary depending on the specific circumstances. If you’re uncertain or unable to locate your PST file, it’s always a good idea to seek further assistance from official support channels or consult a professional.
Where can I find PST repair tool?
As a tech blogger, I understand the importance of finding reliable and efficient tools to address various technical issues. When it comes to finding a PST repair tool, you have a few options to consider:
1. Microsoft Official Website: The first place to check for a PST repair tool is on the official Microsoft website. Microsoft provides their own tool called “Scanpst.exe” or “Inbox Repair Tool” which is specifically designed to repair Outlook PST files. You can download it from the Microsoft support website and follow the provided instructions to fix your PST file.
2. Third-Party Software: There are several reputable third-party software vendors that offer PST repair tools with more advanced features and capabilities compared to the basic Microsoft tool. Some popular options include Stellar Phoenix Outlook PST Repair, SysTools Outlook Recovery, and DataNumen Outlook Repair. You can visit their websites to learn more about their products, features, and pricing.
3. Online Forums and Communities: Another option is to visit online forums and communities dedicated to technology and specifically Outlook or email-related discussions. Places like Microsoft Community, Reddit, or specialized tech forums often have threads discussing PST repair tools, recommendations, and reviews. Taking part in these discussions can provide you with insights from people who have faced similar issues and found effective solutions.
4. Tech Blogs and Websites: As a tech blogger myself, I understand the value of information sharing in the tech community. Many tech blogs and websites review software tools, including PST repair tools. By searching for reviews or “best PST repair tools” on reliable tech blogs, you can explore expert opinions and recommendations to help you make an informed decision.
Remember, it’s essential to be cautious and verify the credibility of any software you decide to download or purchase. Reading user reviews, checking for certifications, and researching the reputation of the software vendor are all important steps. Additionally, always ensure you have a backup of your PST file before attempting any repairs to prevent any data loss.
These suggestions should help you in your search for a reliable PST repair tool, allowing you to address any issues you may be experiencing with your Outlook data.
Does Windows 10 have a recovery tool?
Yes, Windows 10 does have a built-in recovery tool called “Windows Recovery Environment” (WinRE). This tool is designed to help users troubleshoot and recover from various system issues. Here are the steps to access the recovery tool in Windows 10:
1. Start by shutting down your computer completely.
2. Turn it back on and as soon as you see the manufacturer’s logo (such as Dell or HP), press and hold the “F8” or “Shift+F8” key repeatedly until you see the “Advanced Startup Options” screen.
3. On the “Advanced Startup Options” screen, select “Troubleshoot”.
4. In the next screen, choose “Advanced options”.
5. Among the advanced options, you’ll find the “System Restore” feature, which allows you to restore your computer to a previous working state. This can be helpful if you’ve encountered a software issue or driver conflict.
6. Additionally, you can use the “Startup Repair” option to automatically fix any startup-related problems.
7. If you’re still experiencing issues, you can go back to “Advanced options” and select “Go back to the previous version of Windows”. This option is available if you’ve recently upgraded to a new version of Windows 10 and the update caused system instability.
8. Another useful feature is “Reset this PC”, which allows you to refresh or reset your computer while keeping or removing your personal files, respectively. This can be handy when you want to start fresh without reinstalling the entire operating system.
It’s worth noting that the steps to access the Windows Recovery Environment may vary slightly depending on your computer manufacturer or the version of Windows 10 you are using. However, the general process described here should help you access the recovery tools on most Windows 10 machines.
How do I open Microsoft repair tool?
To open the Microsoft repair tool, also known as the Microsoft Support and Recovery Assistant, you can follow these steps:
1. Go to the official Microsoft Support and Recovery Assistant website. You can do this by searching for “Microsoft Support and Recovery Assistant” in your preferred search engine.
2. On the website, you should find a download link to get the tool. Click on the download link to start downloading the setup file.
3. Once the download is complete, locate the downloaded file on your computer and double-click on it to run the setup.
4. The setup wizard will guide you through the installation process. Follow the on-screen instructions to complete the installation.
5. After the installation, you should see an icon or shortcut for the Microsoft Support and Recovery Assistant on your desktop or in your Start menu. Double-click on it to open the tool.
6. When the tool opens, you may need to provide permission or grant it administrative rights to run certain diagnostic tests or perform repairs.
7. Once the tool is running, you will usually be presented with a series of options and prompts to help diagnose and fix various Microsoft product-related issues. Follow the instructions provided by the tool to address your specific problem.
It is important to note that the steps to open the Microsoft repair tool may vary slightly depending on the version of the tool or changes made by Microsoft. Therefore, it is always recommended to refer to the official Microsoft Support and Recovery Assistant website for the most up-to-date information and instructions.
How do I copy an Outlook PST file in Windows 10?
To copy an Outlook PST file in Windows 10, follow these steps:
1. Open Windows File Explorer by pressing the Windows key + E on your keyboard or by clicking on the File Explorer icon in the taskbar.
2. Navigate to the location where your Outlook PST file is saved. By default, it is usually located in the Documents folder or a subfolder named “Outlook Files.”
3. Once you locate the PST file, right-click on it and select the “Copy” option from the context menu. Alternatively, you can also use the keyboard shortcut Ctrl + C to copy the file.
4. Next, decide where you want to copy the PST file. It could be an external hard drive, a network location, or even another folder on your computer. Navigate to the desired destination using the File Explorer.
5. Right-click on the target location and select the “Paste” option from the context menu. Alternatively, you can use the keyboard shortcut Ctrl + V to paste the copied PST file.
6. The PST file will now be copied to the selected destination. The time it takes to complete the copy process will depend on the size of the file and the speed of your storage.
Please note that copying the PST file doesn’t remove it from the original location. It creates a duplicate copy at the destination you specified.