
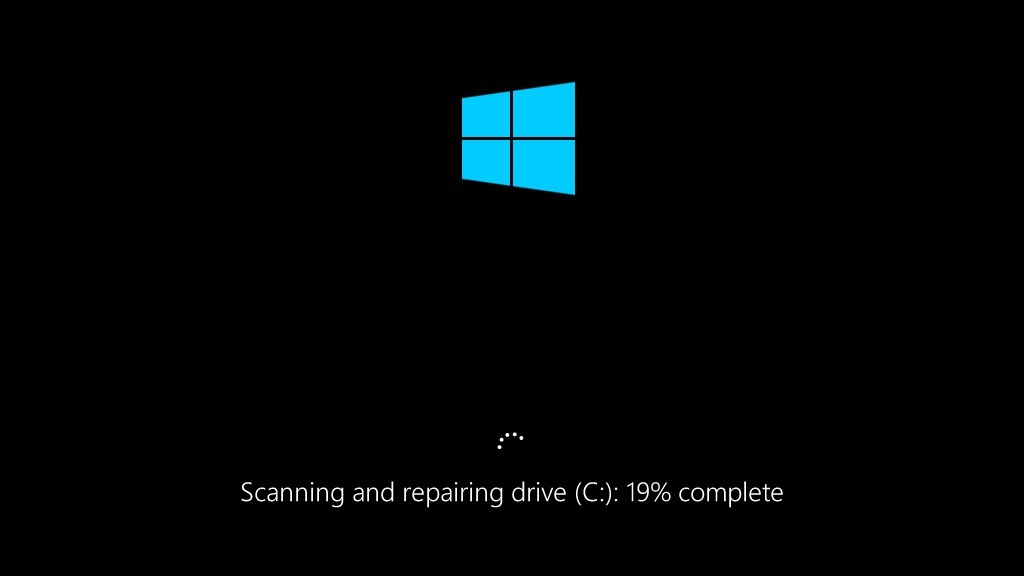
Процесс сканирования и восстановления регулярно зависает при попытке загрузки компьютера. Это вполне может быть
вызвано неправильным выключением компьютера, или поврежденными секторами на жестком диске, или множеством других
причин. Несколько пользователей Windows 10 сообщали, что цикл сканирования и восстановления зависал на несколько
минут или даже часов. Кроме того, иногда при включении компьютера, они получали сообщение: «Сканирование и
восстановление диска остановлено». Если вы столкнулись с ошибкой сканирования и восстановления диска в Windows
10, не волнуйтесь, вы сможете исправить это с помощью методов, описанных в этом руководстве.
- Часть 1: Причины зависания при сканировании и восстановлении диска
-
Часть 2: Решение проблемы с зависанием при сканировании и восстановлении диска в Windows
10- Способ 1: Проверьте состояние диска
- Способ 2: Используйте средство проверки ошибок Windows
- Способ 3: Дождитесь завершения сканирования и восстановления
- Способ 4: Отключите автоматическое восстановление
- Способ 5: Отключите функцию быстрого запуска
- Способ 6: Отключите проверку диска при загрузке
- Способ 7: Запустите утилиту SFC
- Способ 8: Войдите в безопасный режим и запустите CHKDSK
- Способ 9: Используйте функцию Восстановление системы Windows
- Способ 10: Переустановите систему
- Бонус: Восстановление данных с компьютера, зависшего при сканировании и восстановлении диска, и его запускHOT
- Часто задаваемые вопросы о сканировании и восстановлении
Часть 1: Причины зависания при сканировании и восстановлении диска
Некоторые пользователи Windows 10 при включении компьютера могут столкнуться с зависанием на этапе сканирования
и восстановления диска; в некоторых случаях это может занять несколько минут или даже часов. Проблема зависания
сканирования и восстановления диска на 100% имеет под собой множество причин. Например:
- Вы неправильно выключили свой компьютер, например, принудительно выключили его или отключили питание во
время использования. - На жестком диске могут быть поврежденные сектора.
- Возможно, ваш компьютер подвергся вирусной атаке.
- Драйверы ваших устройств имеют неправильную конфигурацию.
Часть 2: Решение проблемы с зависанием при сканировании и восстановлении диска в Windows 10
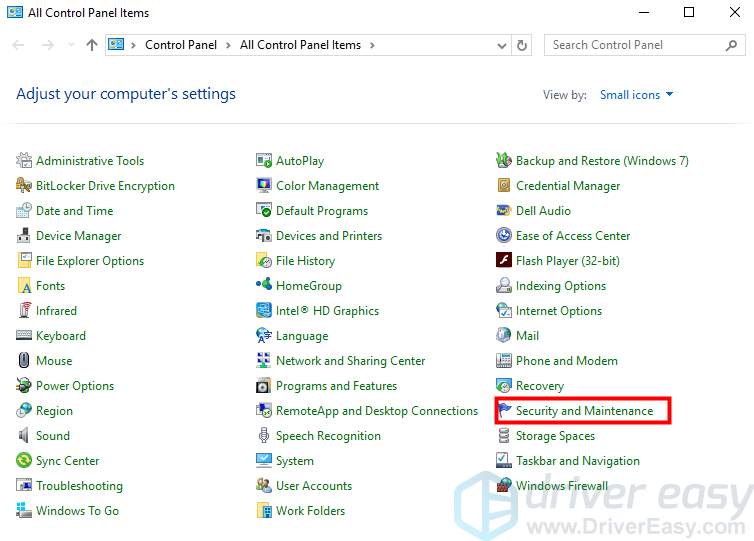
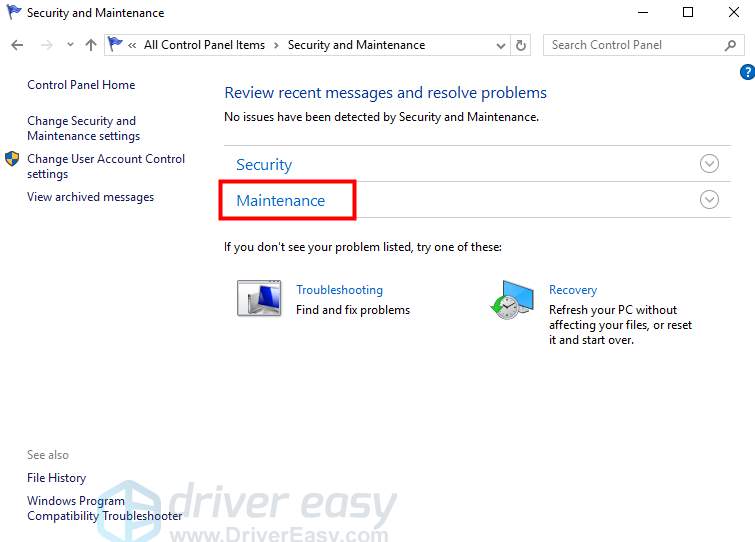
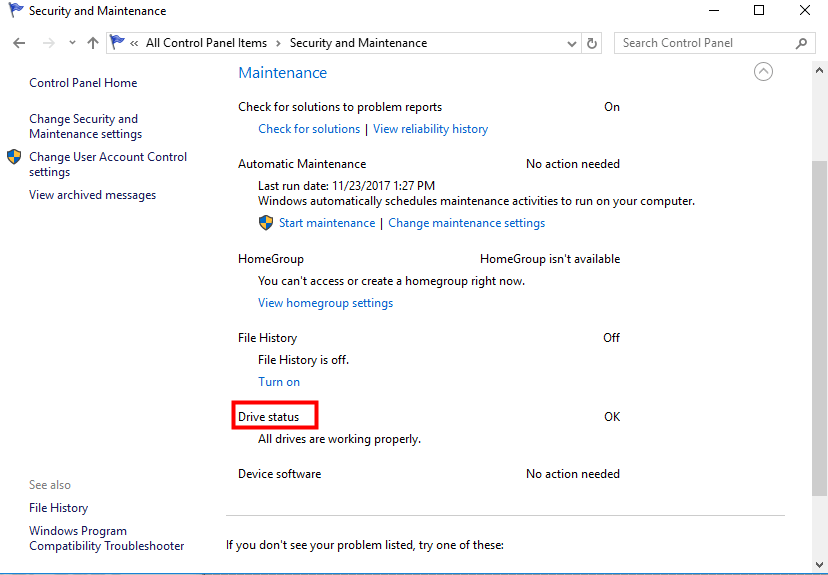
Способ 1: Проверьте состояние диска
Если с диском возникли проблемы, Windows выявит и отобразит их для дальнейшего устранения в разделе «Состояние
диска».
Шаг 1: На Панели управления перейдите в раздел Система и безопасность.
Шаг 2: Далее выберите «Центр безопасности и обслуживания», и в разделе «Состояние диска» вы сможете
увидеть зарегистрированные проблемы и ссылку для их устранения.
Способ 2: Используйте средство проверки ошибок Windows
Шаг 1: Перейдите в Проводник Windows и найдите устройства и диски.
Шаг 2: Щелкните правой кнопкой мыши по диску, который Windows сканирует и восстанавливает при запуске, и
выберите пункт Свойства.
Шаг 3: Откройте вкладку «Сервис» и нажмите кнопку «Проверить» в разделе «Проверка на наличие ошибок».
Шаг 4: Windows обнаружит ошибки, а затем нажмите «Восстановить диск», чтобы исправить их.
Шаг 5: Если ошибок не обнаружено, на следующем экране появится запрос. Нажмите «Проверить диск» для
повторного сканирования и исправления.
Шаг 6 : Перезагрузите компьютер и проверьте, устранена ли проблема с зависанием при сканировании и
восстановлении диска.
Способ 3: Дождитесь завершения сканирования и восстановления
Какое количество времени должно занимать сканирование и восстановление накопителя? Это зависит от обстоятельств.
Если на диске присутствуют лишь незначительные неполадки, этот цикл не займет много времени. Тем не менее, для
завершения сканирования и восстановления диска может потребоваться несколько часов, если диск находится в плохом
состоянии.
Способ 4: Отключите автоматическое восстановление
Шаг 1: Нажмите кнопку питания, чтобы включить компьютер, и когда вы увидите логотип Windows, снова
удерживайте нажатой кнопку питания, чтобы выключить компьютер. Повторите это дважды.
Шаг 2: Включите свой компьютер и на этот раз не прерывайте процесс запуска. Ваш компьютер войдет в среду
восстановления Windows.
Шаг 3: На экране «Выбор действия» перейдите в раздел Диагностика > Дополнительные параметры.
Шаг 4: Откройте командную строку и введите “bcdedit” и запомните значения «identifier» и
«recoveryenabled». Как правило, это «{current}» и «Yes».
Шаг 5: Отключите автоматическое восстановление, введя: bcdedit/set {current} recoveryenabled no.
Шаг 6 : Перезагрузите компьютер.
Способ 5: Отключите функцию быстрого запуска
Шаг 1: Щелкните правой кнопкой мыши по кнопке «Пуск» и перейдите к Поиску.
Шаг 2: В Панели управления нажмите на “Электропитание”.
Шаг 3: Нажмите на опцию слева “Действия кнопок питания”.
Шаг 4: Далее выберите «Изменение параметров, которые сейчас недоступны».
Шаг 5: Снимите флажок «Включить быстрый запуск (рекомендуется)» и сохраните изменения.
Способ 6: Отключите проверку диска при загрузке
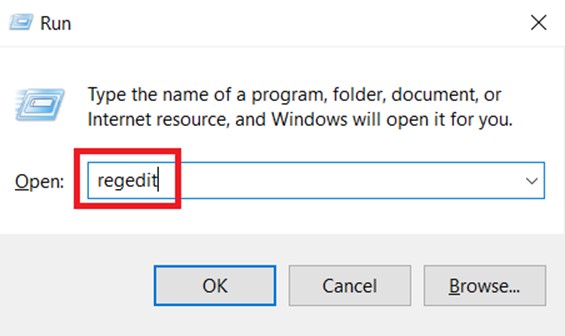
Шаг 1: Загрузите компьютер в безопасном режиме и введите “regedit” в диалоговом окне «Выполнить».
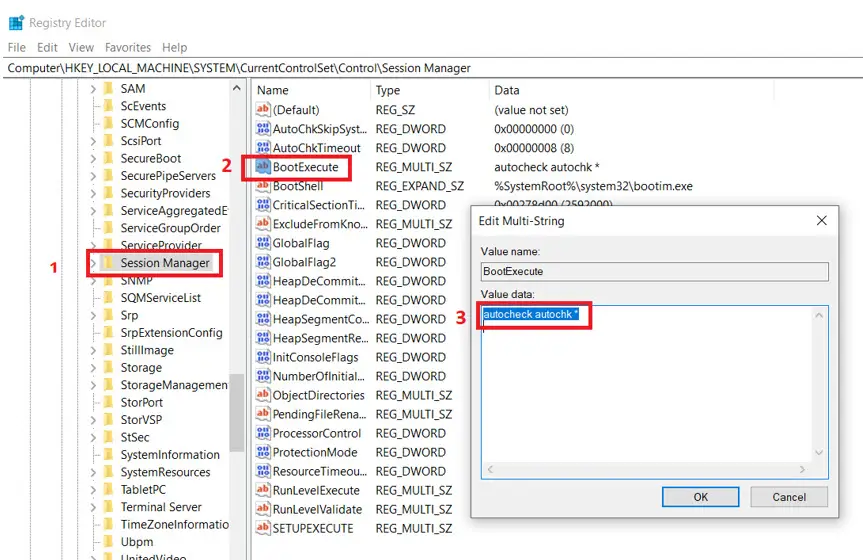
Шаг 2: Перейдите в Диспетчер сеанса Windows (HKEY_LOCAL_MACHINE > SYSTEM > CurrentControlSet >Control >
Session Manager) и нажмите на «BootExecute».
Шаг 3: Затем в появившемся окне измените данные значения на: autocheckautochk/k:C * и нажмите «OK».
Шаг 4: Перезагрузите компьютер, чтобы проверить, удалось ли выполнить сканирование и восстановление диска
на этот раз.
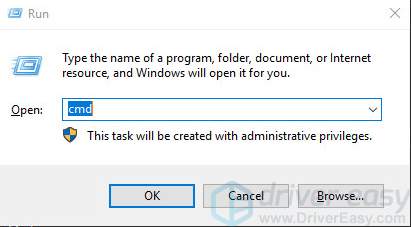
Способ 7: Запустите утилиту SFC
Шаг 1: Откройте командную строку от имени администратора.
Шаг 2: Введите “sfc/scannow”, чтобы проверить и восстановить поврежденные системные файлы.
Шаг 3: Средство проверки системных файлов проверит вашу систему на наличие таких файлов и, если найдет,
восстановит их из папки %WinDir%\System32\dllcache.
Способ 8: Войдите в безопасный режим и запустите CHKDSK
Шаг 1: Нажмите кнопку питания, чтобы включить компьютер, и когда вы увидите логотип Windows, снова
удерживайте нажатой кнопку питания, чтобы выключить компьютер. Повторите это дважды.
Шаг 2: Включите свой компьютер и на этот раз не прерывайте процесс запуска. Ваш компьютер войдет в среду
восстановления Windows.
Шаг 3: На экране «Выбор действия» перейдите в раздел Диагностика > Дополнительные параметры.
Шаг 4: Выберите Параметры загрузки, затем нажмите Перезагрузить и нажмите клавишу F5
Шаг 5: Кликните по значку Этот компьютер, щелкните правой кнопкой мыши по диску, который зависает при
сканировании и восстановлении, а затем выберите «Свойства» > «Сервис»> «Выполнить проверку».
Способ 9: Используйте функцию Восстановление системы Windows
Шаг 1: Нажмите и удерживайте кнопку питания, несколько раз принудительно выключите компьютер, и вы
войдете в среду восстановления Windows.
Шаг 2: Далее перейдите в раздел Диагностика > Дополнительные параметры.
Шаг 3: Выберите “Восстановление системы” и нажмите “Далее”, чтобы выбрать точку восстановления системы.
Шаг 4: Нажмите “Готово”, чтобы продолжить.
Способ 10: Переустановите систему
Шаг 1: Перейдите в Настройки > Обновление и безопасность и нажмите на Восстановление.
Шаг 2: Появится сообщение с запросом о том, следует ли перейти в окно Безопасность Windows. Нажмите “Да”.
Шаг 3: Появится опция «Новый запуск».
Шаг 4: Нажмите на кнопку «Начало работы», а затем на кнопку «Далее».
Шаг 5: Это приведет к удалению всех приложений, которые не связаны с Windows 10.
Шаг 6: Нажмите “Далее”, чтобы загрузить самую последнюю версию Windows 10. Установите Windows, и проблема
со сканированием и восстановлением диска, застрявшем на 10%, будет устранена.
Бонус: Восстановление данных с компьютера, зависшего при сканировании и восстановлении диска, и
его запуск
Надеемся, что описанные выше методы помогли вам устранить проблему с зависанием при сканировании и
восстановлении диска. Однако могут быть случаи, когда диск C (системный диск) значительно поврежден, и не
получается произвести загрузку Windows, несмотря на все попытки восстановления. Вам понадобится программное
обеспечение для восстановления данных, такое как Tenorshare 4DDiG data recovery для
создания загрузочного носителя, чтобы восстановить все файлы с нерабочего ПК.
Основные особенности ПО для восстановления данных 4DDiG включают в себя:
- Загрузка и восстановление данных с поврежденного компьютера
- Поддержка более 1000 типов файлов и различных файловых систем, включая фотографии, видео, документы,
аудио и другие. - Поддержка извлечения данных с флэш-накопителей, жестких дисков, карт памяти, цифровых фотоаппаратов и
видеокамер, а также с других устройств хранения данных. - Восстановление всех потерянных или удаленных данных с Windows / Mac
- Наши показатели успешности восстановления данных являются одними из лучших в отрасли, поскольку данные
восстанавливаются при различных сценариях их утраты.
Чтобы восстановить не загружающийся ноутбук с помощью 4DDiG, сделайте следующее: найдите другой работающий
компьютер, пустой USB-накопитель или CD/DVD емкостью более 1,5 Гб.
- Подключите USB-накопитель
- Создайте загрузочный диск
- Загрузите вышедший из строя компьютер и восстановите данные
Запустите программное обеспечение 4DDiG на своем компьютере и подключите USB-накопитель. Выберите
«Восстановить данные из сбойной системы» в главном меню, а затем нажмите «Начать», чтобы продолжить.
Выберите внешний USB/DVD-привод, чтобы создать загрузочный диск, затем нажмите «Создать». Через
некоторое время загрузочный диск будет успешно создан, и тогда вы сможете вернуться к своему вышедшему
из строя компьютеру, чтобы начать восстановление данных.
Вставьте флэш-накопитель или CD/DVD-диск в вышедший из строя компьютер, затем перезагрузите его. Когда
вы увидите на экране логотип бренда компьютера, нажимайте соответствующую клавишу до тех пор, пока не
войдете в настройки BIOS вашего устройства. После входа в BIOS переключитесь на вкладку загрузки с
помощью клавиш со стрелками и выберите загрузочное устройство. Затем ваша сбойная система начнет
загружать файлы, пожалуйста, дождитесь настройки. 4DDiG запустится автоматически, и вы сможете выбрать
местоположение для начала восстановления данных.
Часто задаваемые вопросы о сканировании и восстановлении
1. Сколько времени должно занимать сканирование и восстановление диска?
Сканирование и восстановление на вашем компьютере может занять более 2 часов, в зависимости от объема диска
и обнаруженных проблем. Обычно процесс перестает обновляться примерно на 10% или 11% и после резко доходит
до 100%.
2. Как мне обойти сканирование и восстановление диска C?
Чтобы обойти сканирование и восстановление диска C, загрузите компьютер в безопасном режиме и запустите
утилиту проверки системных файлов, как упоминалось выше. Это поможет завершить сканирование и восстановление
системы.
3. Как мне отключить сканирование и восстановление диска C при каждом запуске Windows 10?
Чтобы отключить сканирование и восстановление диска C, вы можете воспользоваться одним из следующих
способов:
- Запустите утилиту CHKDSK в безопасном режиме
- Используйте средство проверки на наличие ошибок Windows
- Загрузите ПК в безопасном режиме и воспользуйтесь командой Repair-Volume-DriveLetter
- Проверьте состояние диска
В итоге
Остановившаяся процедура сканирования и восстановления диска явно указывает на проблемы с вашим диском. Порядок
действий очевиден: либо исправьте ошибки, либо запустите Windows без их устранения. Определите вашу проблему и
выберите наиболее подходящее решение из приведенных выше. Мы надеемся, что хотя бы один из указанных нами
способов окажется вам полезным. Также не забудьте использовать Tenorshare
4DDiG для загрузки и восстановления данных, прежде чем устранять проблему.
Tenorshare 4DDiG Data Recovery
4DDiG — это ваш непревзойденный выбор для восстановления всех потерянных данных на компьютере Windows / Mac после различных сценариев потери, таких как удаление, форматирование, RAW и т.д. с более высокой вероятностью успеха.
Скачать Бесплатно
Скачать Бесплатно
Купить Сейчас
Купить Сейчас
Some Windows 10 users recently have reported that Windows was scanning and repairing drive on booting, and the process stuck for minutes or even hours. And some users have reported that every time they power on PC, they get this message. If you also get this error on your Windows 10, don’t worry. You can fix it with the methods in this post, as they have helped other users with this problem.
Why Windows is scanning and repairing drive on booting?
If your computer didn’t turn off properly without warning (the reason could be a power failure, a forced shutdown, etc.), when you start the machine next time, you probably get this message.
When Windows is running, the hard disk and the RAM (Random Access Memory) are writing and reading data. Computer shutting down unexpectedly can cause you to loose the data stored in RAM. It even can cause the hard disk damage. So when you boot your computer next time, Windows will scan the drive automatically and try to repair the issues that might occur due to computer shutting down suddenly.
IMPORTANT: It’s always recommended not to force to turn off the computer when it’s being used, as this may cause you to loose the data whatever you’re working on.
How you can stop Windows scanning and repairing drive?
The scanning and repairing process can take a long time. You may see it stuck there longer than you expect. If you don’t need to use Windows urgently, you can wait until the process is done. If you don’t have the patience or time to wait so long, you can bypass the auto-scanning and use other methods to scan and repair the drive manually. And if you get this message during every startup, it’s recommended you follow the instructions too.
There are four methods to get rid of this annoying process. Two methods work on Windows 10 Normal Mode, and two methods work when you can’t boot into Windows successfully. You can choose the method depending on your case.
Methods apply to Normal Mode:
Method 1: Use Windows Error checking tool
Method 2: Check the drive status
Methods work when Windows doesn’t boot successfully:
Method 3: Run CHKDSK command in Safe Mode
Method 4: Run Repair-Volume -DriveLetter command in Safe Mode
Method 1: Use Windows Error checking tool
You can use the Windows Error checking tool in drive Properties to scan and repair the drive issues.
Follow these steps:
1) Click the File Explore at the task bar.
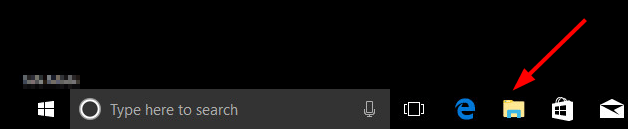
2) Click This PC then expand Devices and drives.

3) Right-click the drive that Windows is scanning and repairing. You can tell it from the scanning screen. For example, if you see “Scanning and repairing drive (C:)” on the screen, right-click (C): drive then click Properties.
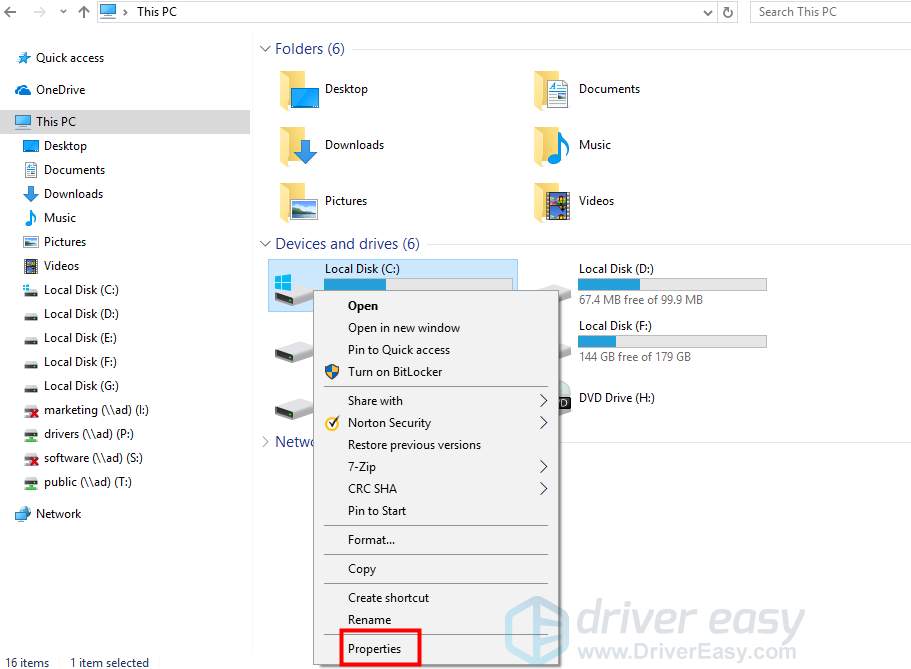
4) Go to Tools tab and click the Check button under Error checking.
5)
If Windows found errors on this drive, you’ll see the following screen pop up. Click Repair drive to scan the drive.
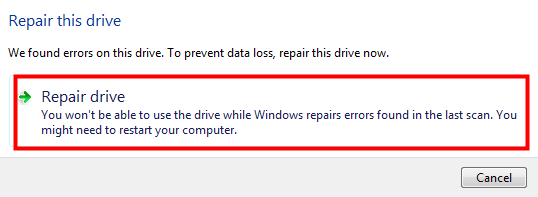
If no errors are found, the following screen prompts. Click Scan drive anyway. Then Windows will scan and repair the drive.

6) Reboot your PC and check to see if the issue is resolved.
Method 2: Check the drive status
If there are problems with the drive, Windows will detect it and allows you to scan and repair it. You can fix the issue by checking the drive status. To do so:
1) Open Control Panel.
2) View by Small icons, click Security and Maintenance.
3) Click Maintenance.
4) Under Drive status, you may see issues listed here and a link that allows you to click to repair the drive. Click the link.
Method 3: Run CHKDSK command in Safe Mode
CHKDSK is a useful command that you can use to check the drive for system file errors and fix the errors. If you can’t boot into Windows successfully, use this command in Safe Mode.
Follow steps below:
1) Start Windows 10 in Safe Mode.
2) On your keyboard, type Windows logo key and R key at the same time to invoke the run command.
3) Type cmd and press Shift+Ctrl+Enter to open command prompt in administrator mode. (Do not click OK or just press Enter key as that won’t allow you to open command prompt in administrator mode.)
4) Type the following command line and press Enter key on your keyboard.
Note: The letter x means the drive that you want to scan and repair for. If you want to scan and repair C:, replace x with c.
chkdsk x: /f
Screenshot for your reference:
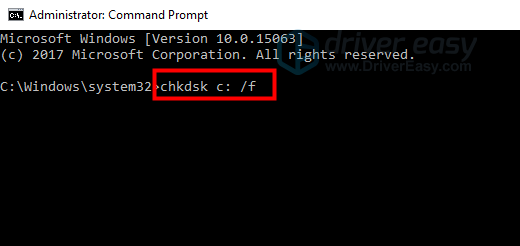
5) After the scanning and repairing process is done, restart your PC and check too see if the problem is resolved.
Method 4: Run Repair-Volume -DriveLetter command in Safe Mode
This method is to use PowerShell to run command Repair-Volume -DriveLetter to scan and fix the hard disk errors. Follow steps below:
1) Start Windows 10 in Safe Mode.
2) Type powershell in the search box to bring up the menu. Right-click Windows PowerShell and click Run as administrator to open PowerShell in administrator mode.
3) Type the following command line and press Enter key on your keyboard.
Note: The letter x means the drive that you wish to scan and repair for. If you’re intend to repair C: drive, replace it with c.
repair-volume -driveletter x
Screenshot for your reference:
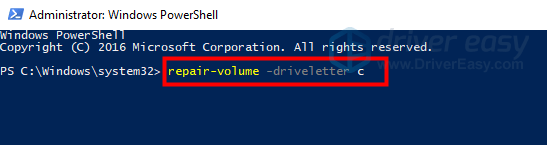
4) After the process completes, restart your PC and check to see if the problem is resolved.
How to recover your data
If your files are missing or corrupted due to this issue, you can use a recovery software to recover the data easily. It’s recommended you find a program with good reputation. If you don’t know such software yet, you can use Stellar Phoenix Windows Data Recovery so you don’t need to spend further time on searching.
Stellar Phoenix Windows Data Recovery is a known data recovery software around the world. With the friendly user interface, you can use it to recover any deleted, lost and corrupted data of your drive with just a few clicks.
Hopefully the methods in this post help you fix the problem. If you have any questions, please comment below. We’re happy to hear of any suggestions and ideas.
References:
RAM definition in Wikipedia
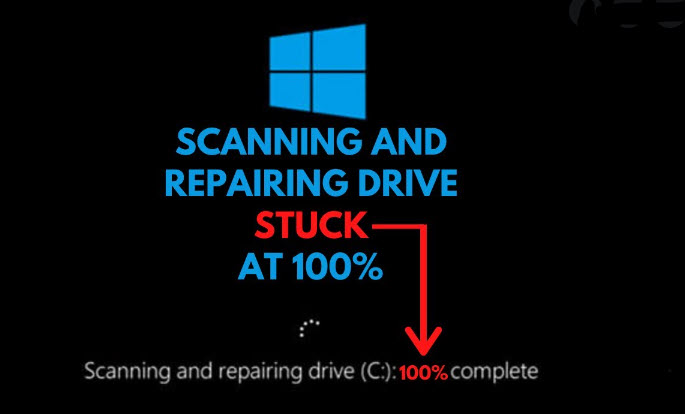
Is your Windows PC stuck after showing scanning and repairing drive C 100 complete? Multiple users have reported this error, and the problem doesn’t always occur at 100%. It can happen at 10% or 20%, or even 50%. There’s no specified number. It is a complex issue to deal with for amateur Windows users. So, stick around and learn the fixes.
The scanning and repairing drive stuck at 100% is a notorious Windows error. It can occur for several reasons and can last from a few minutes to several hours. More or less, the error can take your entire workday to resolve. So, in the following guide, we have discussed the details and a few ways to fix it.
What are the Reasons Behind the Error on Windows?
This is a well-known Windows error. Although, the percentage it occurs can vary.
- The forced shutdown of the Windows PC is one of the biggest reasons behind this error. Some users neglect to shut down PC manually. Instead, they long-press the Power button to turn it off. It may be easier, but bad for system files. It could lead to data corruption.
- The corrupted sectors in your hard drive can be responsible for this error. Having corrupted sectors in the hard drive is a big problem. It can give rise to several issues.
- Lastly, run the CHKDSK /F command while logging on to Windows. Most people don’t get it but running the command from the System Drive is wrong. The user will face CHKDSK cannot run because the volume is in use by another process error. You will have another opportunity to run the command when rebooting the PC. At that moment, the screen will show, Scanning and Repairing Drive.
So, these are the main reasons for the disk scanning stuck problem on your Windows PC. It is a popular Windows error that has been troubling users for generations. The problem was apparent on Windows 7, and it is still causing havoc on Windows 11.
If you have already acknowledged the error on Windows and followed the reasons behind it. Then, this is the time to learn the solutions that can eliminate it.
1) Wait for the Process to Finish
Ironically, we are asking the user to wait for the process to finish, which is suspiciously taking a long time to end.
But before jumping into the troubleshooting steps, confirm if the process is truly stuck. If you have waited for an hour, wait for 30 more minutes.
As in some rare cases, the process took close to an hour instead of a few minutes. It did get finished by itself. However, an impatient user would have jumped to a conclusion without knowing all the facts.
2) Check the File System
The scanning and repairing of drive C 100 complete can also happen due to corrupted system files. So, running the System File Checker will detect the corrupted files and then repair them. But, to do it, you need to access Safe Mode.
- Turn on your computer, and as soon as the start-up gets initiated, hold the Power button to turn off the computer. Do this three times, and your computer will enter Automatic Repair.
- Click on the Advanced Options below.
- Then, navigate to Troubleshoot >> Advanced Options.
- Click on See More Recovery Options at the bottom of the following screen.
- Then, click on Start-Up Settings and followed by a click on Restart.
- Now, the Start-Up Settings menu will appear on the screen. You can select; either Safe Mode(F4) or Safe Mode with Networking(F5).

Now, the PC will reboot. After that, as the computer turns on, it will have a dark screen, and the screen will who Safe Mode at the bottom.
- Now, type cmd in the search box. Do right-click on the Command Prompt and select the Run as Administrator option.
- The command window will pop up. Type the following and hit Enter to execute.
sfc/scannow
Now, scanning will begin. This process will take several minutes; wait patiently. Do not close the command window until the verification message appears on the screen.
3) Disable Check Disk on Booting
If the previous method didn’t help and the scanning and repairing drive C 100% complete error still appears when starting your Windows PC, disable Check Disk on booting. You can modify the registry in Safe Mode to disable CHKDSK.
1. So, enter Safe Mode using the steps mentioned in the previous method.
2. Now, press the Windows + R keys on your keyboard, and the RUN dialog box will appear.
3. Type, regedit, and hit Enter to click OK.
4. On the popped-up window, select the Session Manager and double-click on BootExecute on the right side to continue.
HKEY_LOCAL_MACHINE\SYSTEM\CurrentControlSet\Control\Session Manager
5. Another small window will pop up. Here, you need to change the Value Data to autocheck autochk /k:c* and click OK to save the change.
After this, exit the Windows Safe Mode and reboot your computer. The steps should fix the scanning and repairing loop you are facing.
4) Run CHKDSK in Safe Mode
Besides the previous solutions, the only other way to fix this problem involves running the CHKDSK command in Safe Mode. So, if the problem is still bothering you, use this method.
- As usual, open Windows in Safe Mode and run the Command Prompt with Administrator privilege.
- In the command window, type chkdsk c:/f and hit Enter to execute.
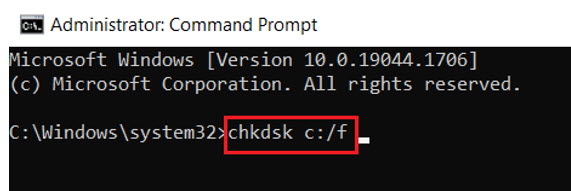
Let the process continue. You may get a message stating that the process should continue when the operating system starts the next time. So, type Y to continue.
After the repair process is complete, reboot the computer, and everything should be back to normal again.
5) Run System Restore
Finally, you can use the system restore when you have run out of all the resources. It is an optional solution. If you go with this method, you will definitely lose all the data from the system drive. So, this is not a recommended option for most users.
If the situation is critical and you have no other means available, initiating the system restore is the best way to resolve the problem. You will lose all the recent files. At least the problem won’t be there after the system restore. Having created a system restore point in advance will be helpful.
- Turn on your computer, and as soon as the start-up gets initiated, hold the Power button to turn off the computer. Do this three times, and your computer will enter Automatic Repair.
- Click on the Advanced Options below.
- Then, navigate to Troubleshoot >> Advanced Options.
- Select System Restore. In the following screen, click Next.
- Then, you have to select a system restore point. Lastly, click on the Finish button to proceed.
After the system restore is complete, reboot the computer. The scanning and repairing drive C stuck loop won’t appear anymore.
Wrapping It Up
So, there it is. The best and most effective methods for fixing Windows when the screen is scanning and repairing drive C 100 complete.
This is a problematic Windows issue, and you mustn’t rush into anything and implement some unverified fixes. This could make things worse. If you are having the problem, go through our list of fixes, and hopefully, you will be able to get the Windows back to normal before the entire day is wasted.
Did you notice After the Recent windows 10 upgrade Laptop/PC stuck at scanning and repairing drive C: for minutes or even hours? Or some other users report every time they power on PC windows 10 scanning and repairing drive C: stuck at any point 20% or even 99%. This is mostly because System files get corrupted while the Windows 10 upgrade process. Again if previously windows didn’t shut down properly or the System Shutdown unexpectedly due to the interrupted power supply that may also cause this issue.
Some other reasons such as corrupted Master boot record file (MBR), Bad sector or Error on HDD, which mostly cause windows 10 stuck on repairing disk errors, This might take over an hour to complete or Windows Stuck on Startup repair, Automatic Repair for an hour. If you are struggling with this startup error windows 10 stuck scanning and repairing drive here we have 5 working solutions apply to get rid of this startup error.
Post Contents :-
- 1 Fix scanning and repairing drive c stuck
- 1.1 Boot into Safe mode
- 1.2 Disable Fast startup Feature
- 1.3 Run SFC Utility
- 1.4 DISM command
- 1.5 Run CHKDSK to Fix Disk Drive Errors
- 1.6 User suggested
Usually, Windows starts automatic repair when it fails to boot twice consecutively. And sometimes an error occurs during the repair process making it unable to proceed further and so it gets stuck in a loop. If your PC has entered this state, you obviously cannot access the bootloader settings, which are responsible for starting the repair process. To change it, you need to boot from a bootable media with the appropriate operating system you have installed.
Boot into Safe mode
You need to boot from Windows installation media. If you have an installation DVD with Windows 10, you can use it otherwise you can Create an installation DVD / Bootable USB using the windows media creation tool.
- Boot from installation media skip the first screen and click on repair your computer as shown below image.
- Next Choose Troubleshoot > Advanced option > Choose to Startup Settings -> Restart and press F4 To boot into safe mode and F5 to enable the safe mode with networking.
Note: If Windows fail to boot into safe mode that causes simply access Advanced options -> and open the command prompt. Then perform the command below, shown on the next step.
Disable Fast startup Feature
Several Windows users after disable the fast startup feature the error is gone for them.
- Open the control panel go to All Control Panel Items then Power Options
- Click on change what the power buttons do then change settings that are currently unavailable.
- Here, uncheck Turn on fast startup (recommended), Click ok and apply to make save the change.
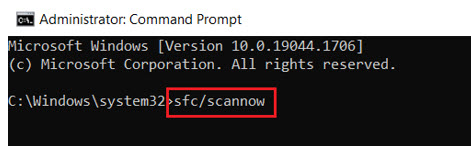
Run SFC Utility
The next thing you must check if the corrupted system files are causing the issue. Run the system file checker utility following steps below that scan for corrupted system files. If found any the sfc utility automatically restores them with correct ones.
- Simply open the command prompt with administrative privilege.
- Run sfc /scannow command to scan and restore missing corrupted system files.
- Sfc utility will scan your system for missing or corrupted system files if found any the utility will restore them from a special compressed folder located on %WinDir%\System32\dllcache.
- Wait until the scanning process is 100% complete.
DISM command
If Sfc Scan results, Windows Resource Protection found corrupt files but was unable to fix some of them, Then Run DISM command: DISM /Online /Cleanup-Image /RestoreHealth which repairs system image and allow sfc to do its job. After complete 100% scanning process again, run the System File Checker.
Run CHKDSK to Fix Disk Drive Errors
Then run the chkdsk command to check for disk drive errors. Or you can add extra parameters to force CHKDSK to forcefully repair disk errors.
chkdsk C: /f /r
Note: Here command Chkdsk stands for Check disk Errors, C: is the Drive letter, /r for Locates bad sectors and recovers readable information and /f Fixes errors on the disk.
Press Y to confirm to run chkdsk on the next start and restart your PC. This will check the disk drive for errors and fix them if found any. Wait until 100% complete the process after this will automatically restart and start Windows normally without any stuck at startup.
User suggested
Also, some users suggest On safe mode, Right-click on the Start menu and select Powershell (Admin). Then type repair-volume -driveletter x (Note: replace X with your Windows installed drive C:) wait for 100% complete the scanning process. After that, restart Windows. This helps them to fix Windows 10 scanning and repairing drive C stuck at 100.
Summary:
Windows automatically suggest to run Scan and Repair to fix any kind of corruption in USBs or external drives when the drive is connected . What if disk checking process itself stuck? How to fix error checking scanning and repairing drive is stuck? With the help of various troubleshooting steps given in the article, you can easily fix the issue on hard drives (C drive) and externals drives (USB).
Quick Navigation
What is Error Checking Scan and Repair?
What Makes Error Checking Scan and Repair To Get Stuck?
How to Fix the Error Check Scan and Repair Stuck?
Fix the Error Checking Scanning and Repairing Stuck in Windows C Drive
Fix the Error Checking Scanning and Repairing USB Drive Stuck
Frequently Asked Questions
About Error Checking Scan and Repair
Scan and repair function is a disk checking process that comes under Windows Automatic Repair which is also known as start-up repair. Generally, when you start your laptop or PC, Automatic Repair runs automatically to fix any issues with booting. Similarly, whenever any external drive or USB with bad sectors or virus are inserted, your Windows asks to scan and repair it.
Error check Scanning and Repairing can get stuck, when you are trying to repair USB drives, hard drives, or any other external drives. Windows displays an error message There’s a problem with this drive. Scan the drive now and fix it. If the Scanning and repairing drive process gets stuck, it means that Windows cannot read the drive. However, Drive corruption can be due to several reasons but, what makes the Error checking Tool to stop working or stuck during the repair process?
What Causes Error Checking Scan and Repair to Get Stuck?
The problem is usually encountered when you abruptly shut down the PC due to power failure or force shutdown. Sometimes the issue may occur if you shutdown your PC after long time (when you restart the PC after shutting down it irregularly by keeping it in sleep mode for long days).
There are some other reasons that leads to the Error Checking Scan and Repairing drive stuck. Most common reasons are bad sectors on external drives, virus/ malware, incorrect driver configuration and severe damage to the file system can lead to the error.
How to Fix Error Checking USB Drive Scanning and Repairing Stuck Issue?
When Scanning and Repairing Drive C or D (USB) Stuck at 0%, 10%, 11%…100%, below given are the simple troubleshooting methods that help you fix the scanning and repairing drive stuck issue.
Wait for a While:
Be it on Windows C drive or D(USB), if Error checking scan and repair taking too much to scan doesn’t mean it is stuck. Minor issues on drive can be fixed in less time by scan and repair. If there are major issues on drive, scanning and repairing drive may take longer than expected time, sometimes it may take hours to complete the process. At times, you can find some of your files deleted by chkdsk scan and from Scan Fix. Therefore, make sure you keep a backup of your important files and data.
Let us see various methods to fix Scan and Repair stuck based on the type of the drive you are encountering the issue with.
Based on the Drive |
Solutions |
|
Fix Error Checking USB Drive Scanning and Repairing Stuck – For Hard Drives |
1. Check a Disk Connection
2. Stop Windows from Scanning and Repairing the Drive 3. Disable Automatic Repair 4. Enter Safe Mode and Run CHKDSK |
|
Fix Error Checking USB Drive Scanning and Repairing Stuck – For USBs/External drives |
1. Check the Drive Connection 2. Run CHKDSK Scan in the Safe Mode 3. Windows Error Checking Tool 4. Disable the Check Drive on Booting 5. Fix issue using Windows PowerShell |
Fix Error Checking USB Drive Scanning and Repairing Stuck – For Hard Drives
Check Disk Connection
If you have moved your PC recently this may cause displacement of computer disks. Hence, leads to improper working of Scanning and repairing drive and stuck might be the connection issues between the disk and the computer. In such cases, verify the cable and port to make sure the disks have been connected to the PC properly.
Stop Windows from Scanning and Repairing the Drive
You can easily stop Scanning and repairing process in Automatic Repair. With this, you can easily bypass Scanning and repair by pressing any key.
Step 1: As you are stuck at Scanning and repairing drive, shut down the computer using power button.
Step 2: Now, again Start the computer and you will see the Preparing Automatic Repair screen >> Diagnosing your PC
Step 3: Here, before the disk checking starts, press any key such as the spacebar or others to disable the disk checking.
Disable Automatic Repair
To avoid problems like Scanning and repairing being stuck you can easily disable Automatic Repair. To perform these steps, you will need to enter in the Windows Recovery Environment (WinRE) or the Windows installation media. However, Windows installation media will not be available to everyone, follow the steps to disable automatic repair in WinRE.
Step 1. Shut down computer. Press power button for 10 seconds.
Step 2. Once again start the computer. Once you see that Windows has started, hold down the power button for 10s again and turn off the device. Repeat this until you see computer in WinRE.
Step 3. Once you see, Choose an option screen, select Troubleshoot >> Advanced options >>Command Prompt
Step 4. Enter bcdedit and remember the values for identifier and recoveryenabled under Windows Boot Loader, Mostly, it’s {current} and Yes.
Step 5. To disable Automatic Repair, enter bcdedit /set {current} recoveryenabled no.
{current} indicates the current OS and change the value yes to no will abort Automatic Repair.
Now, Restart the computer without Automatic repair enabling Scan and Repair drive function.
Enter in Safe Mode and Check the drive
Usually, Scanning and repairing drive gets stuck due to disk errors like bad sectors and file system errors. You can choose to enter Safe Mode and run CHKDSK to fix the errors, this will make scan and repair work effectively without being stuck. Also, Safe Mode starts the computer with only required services and drivers.
Step 1. Hold down the power button for 10s to shut down the computer. Repeat this until you see computer in WinRE.
Step 2. On the Choose an option screen, select Troubleshoot >> Advanced options >> Startup Settings >> Restart.
Step 3. After system restarts, a list of options appears. Select 5 or press F5 to enable Safe Mode with Networking.
Step 4. Go to This PC, right-click the drive (C or USB drive) that Windows is stuck at scanning and repairing, then choose Properties.
Step 5. Go to the Tools tab >> choose Check.
Fix Error Checking USB Drive Scanning and Repairing Stuck – For USBs/External drives
When you are trying to fix any error on USB and external drives, it becomes important to keep your data safe. Before heading to the solutions to fix corrupt USB drive, it is recommended to recover your data from the trouble causing USB.
When the USB drive is not detected or recognized, the best solution is to make use of a third party tool and recover files from USB drive.
SFWare USB recovery tool is the most recommended tool to recover data unreadable or unrecognized USB. The software not only helps you recover data but also scan the drive for any bad sectors and recover files without any hassle. With its unique design and advanced data recovery algorithms it can efficiently recover inaccessible data from the USB drive.
Check the Drive connection
Any incorrect or improper connection of USB could lead to the problem Scanning and Repairing drive being stuck. Therefore, ensure the USB drive connection is secure before heading into any troubleshooting steps given below. In few cases, you might even encounter USB not recognized error as well.
You can try re-inserting the USB or unplug all the externally connected drives and restart your PC to check if the problem still exists.
Run CHKDSK in Safe Mode
Running a CHKDSK scan is one of the quickest and easiest ways to check the computer drive for system file errors. Therefore, this would reduce Scanning and repairing drive getting stuck in the process.
Step 1. Hold down the power button for 10s to shut down the computer. Repeat this until you see computer in WinRE.
Step 2. On the Choose an option screen, select Troubleshoot >> Advanced options >> Startup Settings >> Restart.
Step 3. After system restarts, a list of options appears. Select 5 or press F5 to enable Safe Mode.
Step 4. Now, go to Windows start and type cmd in the search box. Command Prompt >> select Run as administrator.
Step 5. Once command window appears, type the chkdsk command & hit Enter.
Step 6. if any errors appear on the drive, type chkdsk/scan & hit Enter.
This will scan the drive and fix if there is a problem with this drive.
Note: If you see …queued for offline repair, it means the drive severely corrupt and PC needs to reboot and need Automatic Repair for scanning and repairing the problematic drive.
Step 7. Next, type the command chkdsk /spotfix and tap the Y key when prompted.
Now, restart your system and wait until the scanning and repairing USB drive process gets completed.
Use Windows Error checking Tool to fix error checking USB drive scanning and repairing stuck
Windows Error-checking tool checks and automatically fixes the issues that can lead to scanning and repairing stuck problem.
Step 1: Click on the File Explorer >> This PC >> expand Devices & drives.
Step 2: Right click on the USB drive causing scanning and repairing to be stuck and choose Properties. Click on the Tools tab >> under Error Checking >> click the Check button.
Step 3: if you USB drive has any error, you’ll be asked to repair a drive.
Disable the Check Drive on Booting and fix scanning and repair USB drive stuck
If you find that there is no issue in your USB drive & still the scanning & repairing stuck error is appearing, then you should try modifying a registry & disabling the CHKDSK on booting.
Step 1: Enter into Safe Mode (follow the steps given in above solutions) >> press the Windows+ R keys together to launch the Run dialog & type regedit, and click OK.
Step 2: Tap Yes when asked for permission to make changes.
Step 3: Go to a Session Manager >> BootExecute in the right column.
Step 4: on the next window, change a Value data to the autocheckautochk /k:C * & hit OK to confirm the changes.
Now, finally exit the Safe Mode & restart your PC to verify whether the issue of scanning & repairing the drive stuck is solved or not.
Fix error checking USB drive scanning and repairing stuck using Windows PowerShell
In this method we use PowerShell to run a Repair-Volume-DriveLetter command to scan and fix the drive errors that might lead to Error Checking Scanning and repairing stuck.
Step 1: Enter you PC into Safe Mode as mentioned in the above solutions
Step 2: Type Powershell on the search box >> Run as Administrator.
Step 3: Now, on the opened panel, type the repair-volume -driveletter x command & hit Enter
Finally, restart your computer and check for the error scanning repairing USB drive stuck
Conclusion:
Error Checking Scanning and Repairing drive stuck is not an uncommon error. The usually occurs when the drive is severely corrupt and unable to scan the drive. With the help of above-mentioned methods, you can easily fix the issue and fix the errors in hard drive and external drives like USB, SD cards as well.
Frequently Asked Questions:
How long does it take to scan and repair a USB drive?
The process of Scan and Repair, repairing a drive varies from drive to drive. If the computer is scanning and repairing a hard drive, it may exceed more than expected hours to complete. If the computer is scanning and repairing a USB, the process depends on bad sectors and corruption on USB file system. And it may get stuck around 11% or 20% or abruptly completes 100%.
How do I fix scanning and repairing C drive stuck at 100 %?
The easiest way to fix scanning and repairing C drive stuck at 100% is to stop Windows from Scanning and Repairing the Drive. Perform the hard shutdown by holding the power button for 5 to 10 seconds and when Windows restart press any key to cancel the scan and repair process.
Does scanning and repairing drive delete files?
Scan and Fix process only scans the drive and repair if any file system error, bad sectors and logical errors are encountered. The whole process doesn’t delete any of the files from the drive. However, if the drive is severely damaged or corrupt, there might be the changes of files getting deleted from the drive. To keep your data safe, is always recommended to keep a backup of your files or make use of any data recovery software.
Is it safe to scan and fix hard drive?
Yes, it is absolutely safe to use Scan and repair function to fix errors in the drives. The process works on both hard drives and external drives like USB, SD card etc. with the hep of Scan and Repair, you can easily fix any bad sectors on the drive and minor file system damage on the drive.