
Updated on Apr 28, 2025
Quick Navigation:
- What’s ScanDisk?
- Run ScanDisk Software — EaseUS Partition Master to Check Disk Errors
- Run ScanDisk in Windows Properties
- Run ScanDisk — CHKDSK in Command Prompt
What is ScanDisk? Can you run the ScanDisk command to scan and repair drive issues in Windows 10? If you want to apply ScanDisk on newer Windows versions after MS-DOS (like Windows NT, Windows 9x, and Windows 3.x), you should turn to its successor CHKDSK, which you can find in [1] Windows Properties, [2] Command Prompt, and [3] EaseUS Partition Master — a third-party partition manager for earlier and newer Windows operating system.
Follow the quick navigation to check disk in:
- EaseUS Partition Master
- Windows Properties
- Command Prompt
What’s ScanDisk?
Also known as Scan Disk, ScanDisk is a DOS-based Windows utility for automatically detecting and correcting hard drive issues and file system errors. It was first introduced in MS-DOS 6.2, so ScanDisk has had a long history now. Despite that ScanDisk can improve the performance of your hard drive and help maintain the Windows file system, it is too old to retain in the later Windows operating systems, which has been fully replaced by the upgraded utility called CHKDSK (pronounced Check Disk).
That is to say, according to different Windows operating systems, you got different ways to evoke the tool to perform its duty.
ScanDisk is available and executable in:
- Windows 95 and 98
- Windows 3.x and MS-DOS
*Windows NT is another senior operating system but it’s not shipped with ScanDisk. Most often you can use various third-party utilities to check disk integrity for Windows NT.
In later Windows OS — Windows XP, Vista, 7, 8, 8.1, 10, ScanDisk is replaced by CHKDSK.
Learn more about ScanDisk:
- 1. ScanDisk checks exclusively the FAT-formatted hard disks, like FAT12, FAT16, and FAT32.
- 2. ScanDisk can recognize compressed volumes and long filenames.
- 3. ScanDisk can automatically repair cross-linked files and lost clusters.
- 4. You must boot the computer to Safe Mode to run ScanDisk.
- 5. Windows 95 OSR2 and Windows 98 run ScanDisk automatically if the computer is shut down improperly.
Being the successor of ScanDisk in newer Windows operating systems after Windows XP, EaseUS Partition Master and CHKDSK are developed to monitor your disk drive’s health.
Run ScanDisk Software — EaseUS Partition Master to Check Disk Errors
No matter it’s the outdated Windows OS or the morden computers running Windows 10, the default Windows program to scan and check hard drive errors is usually time-consuming and the result is rarely satisfied. As you can see, the command line method is somewhat higher-leveled, and any mistake of the parameters is prone to cause new issues on the drive. Hence, have you thought about another perfect alternative for the cliche ScanDisk or the plain CHKDSK?
You should. If you ask for a simpler, quicker but more effective way to replace the CHKDSK, use EaseUS Partition Master. It’s a third-party partition magic tool that manages hard drives and partitions in every to improve performance and prolong lifespan. For EaseUS partition manager software, it’s all too easy to handle the job of scanning and repairing hard disk errors.
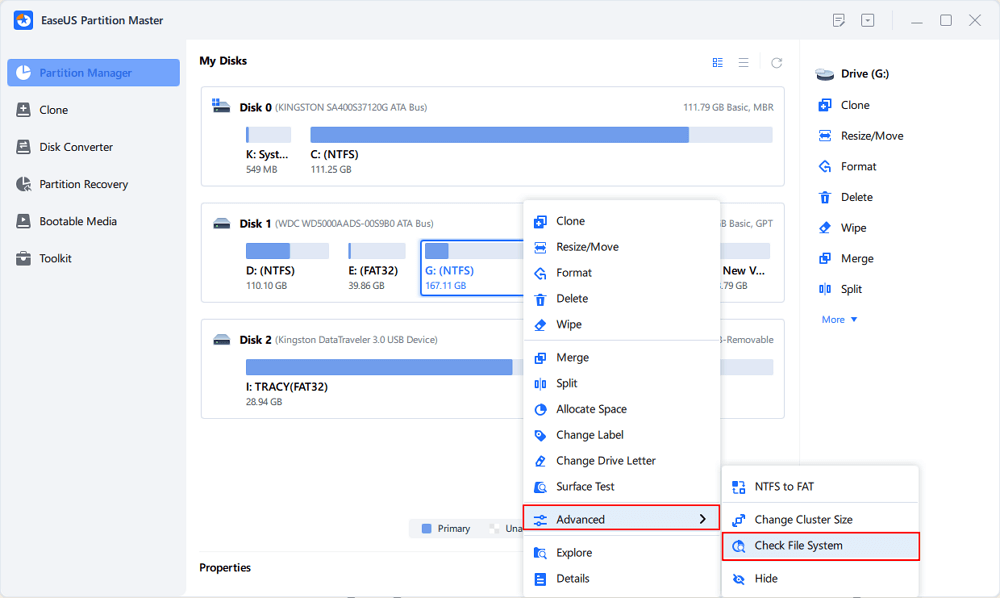
Step 1. Open EaseUS Partition Master on your computer. Then, locate the disk, right-click the partition you want to check, and choose «Advanced» > «Check File System».
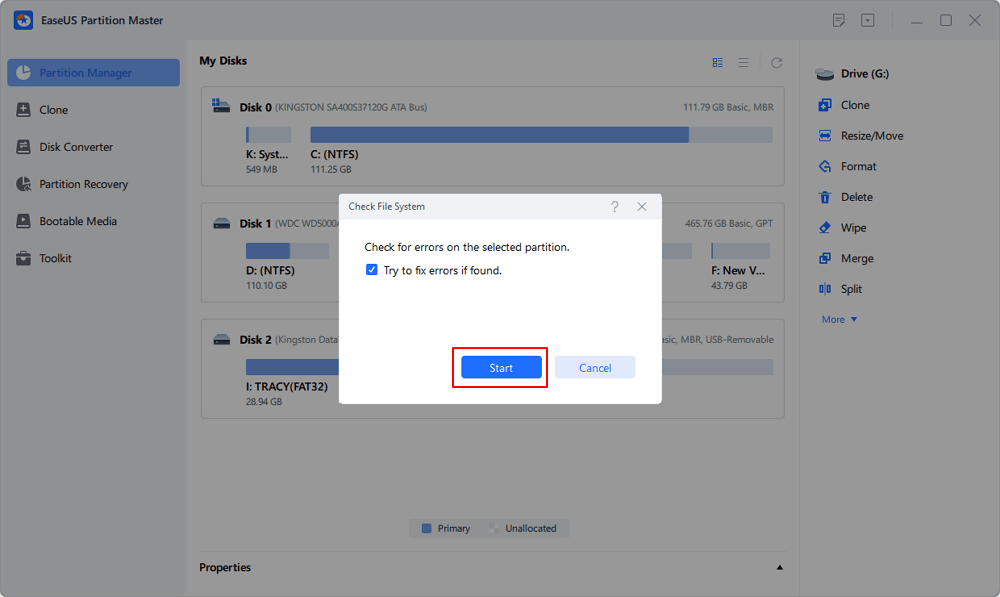
Step 2. In the Check File System window, keep the «Try to fix errors if found» option selected and click «Start».
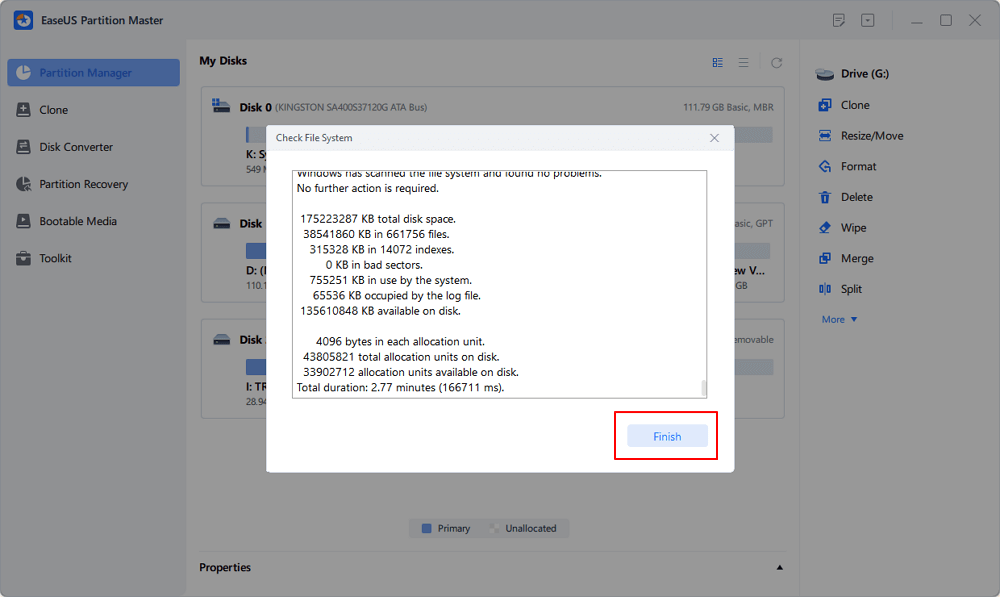
Step 3. The software will begin checking your partition file system on your disk. When it completes, click «Finish».
Run ScanDisk in Windows Properties
As aforementioned, in newer Windows platforms, what you use to scan and check hard drive issues and file system errors is not ScanDisk anymore but its alternative — Windows Properties with Error Checking feature.
Step 1. Open Windows File Explorer (Windows + E keys) > right-click on the drive you want to check and repair > select Properties.
Step 2. In the Properties window, switch to the Tools tab. Under the Error checking section, click Check.
Step 3. In the Error Checking window, click Scan drive.
The scanning process usually takes 10 minutes to a few hours depending on the size of the selected drive. Windows will try to repair the drive errors automatically while the next time you restart the computer.
Guide: How to Check Total Hard Disk Size
At times, you need to find out the disk space in total (including used space & free space) on your computer HDD or SSD. The common way for us to access a hard drive to check information is via…
Run ScanDisk — CHKDSK in Command Prompt
CHKDSK starts scanning the file system on the disk drive and analyzing the integrity of the files, file system, and file metadata on the drive. It repairs issues if there were found any.
Using CHKDSK to check, scan and repair hard drive errors is becoming much easier due to the intuitive user interface in the program. There are two ways for Windows users to access the CHKDSK utility, including Windows Properties and Windows Command Prompt.
Step 1. Press Windows + X keys to open the task menu > select Command Prompt (Admin). Click Yes if the User Account Control prompt appears.
Step 2. In the command window, type the command line chkdsk c: /f /r /x and press Enter.
- c: is the drive letter you selected to scan
- /f instructs CHKDSK to fix any errors that were discovered during the scan
- /r tells CHKDSK to locate and fix bad sectors on the drive
- /x asks CHKDSK to dismount the drive before the process begins
This article provides detailed information about scandisk command. If this passage solved your problem, you can also click the button below to share it with other friends in need!
Встроенная утилита CHKDSK.exe (check disk) используется в Windows для проверки диска на ошибки. Сhkdsk проверяет файловую систему на физические и логические ошибки, находит поврежденные секторы (bad sectors) и исправляет найденные проблемы.
Содержание:
- Проверка и восстановление диска с помощью команды chkdsk
- Просмотр результатов проверки Chkdsk в Windows
Проверка и восстановление диска с помощью команды chkdsk
Чтобы проверить жесткий диск на ошибки, запустите командную строку с правами администратора и выполните:
chkdsk E: /F /R
Данная команда:
- Выполнит проверку диска E:\
- Исправит автоматически найденные ошиьки (/F)
- Попытаться восстановить данные при обнаружении поврежденных секторов, она попытается восстановить информации (/R).
Полная проверка диска может занять длительное время в зависимости от емкости носителя и количества файлов. После окончания проверки диска вы увидите подробную статистику диска, информацию о поврежденных секторах и файлах, предпринятых действиях по восстановлению.
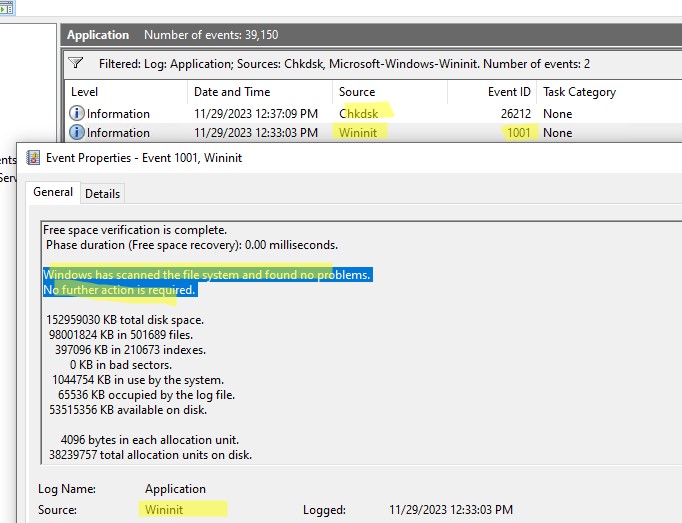
Если утилита chkdsk не обнаружила проблем на диске, появится сообщение:
Windows has scanned the file system and found no problems.
No further action is required.

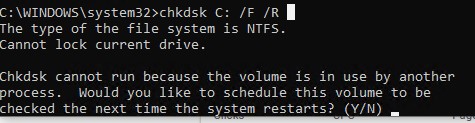
Утилита chkdsk не позволяет выполнить online проверку системного диска (C:\). При запуске команды chkdsk C: /F /R появится уведомление:
Cannot lock current drive. Chkdsk cannot run because the volume is in use by another process. Would you like to schedule this volume to be checked the next time the system restarts? (Y/N).
Невозможно выполнить команду Chkdsk, так как указанный том используется другим процессом. Следует ли выполнить проверку этого тома при следующей перезагрузке системы?
Чтобы запланировать проверку диска при следующей загрузке Windows, нажмите
Y
->
Enter
.
This volume will be checked the next time the system restarts
.
Чтобы отменить запланированную проверку диска, выполните:
chkntfs /x c:
Чтобы отключить топ перед проверкой, добавьте атрибут /X в команде chkdsk. В этом случае Windows принудительно закрое все открытые файловые дескрипторы, отмонтирует диск и выполнит проверку на ошибки.
Если вам нужно выполнить проверку большого NTFS тома, но вы не хотите блокировать диск, можно сначала просканировать диск на ошибки:
chkdsk E: /f /offlinescanandfix
Утилита найдет ошибки и сохранит их в файл $corrupt для дальнейшего исправления
Чтобы исправить найденные ошибки, не тратя время на полное сканирование тома, выполните:
chkdsk D: /spotfix
Это существенно сократит время недоступности тома для пользователя при исправлении ошибок.
В консоли PowerShell для проверки диска можно использовать командлет Repair-Volume как аналог команды chkdsk:
Repair-Volume -driveletter C -scan
Также рекомендуем перед проверкой проверить SMART состояние жестких дисков с помощью встроенных PowerShell командлетов из модуля управления дисками:
Get-PhysicalDisk | Sort Size | FT FriendlyName, Size, MediaType,SpindleSpeed, HealthStatus, OperationalStatus -AutoSize

Просмотр результатов проверки Chkdsk в Windows
Chkdsk при онлайн сканировании диска выводит результаты прямо в консоль. Если вы запланировали проверку диска при загрузке Windows, то результаты можно получить только из журнала событий Windows (Event Viewer).
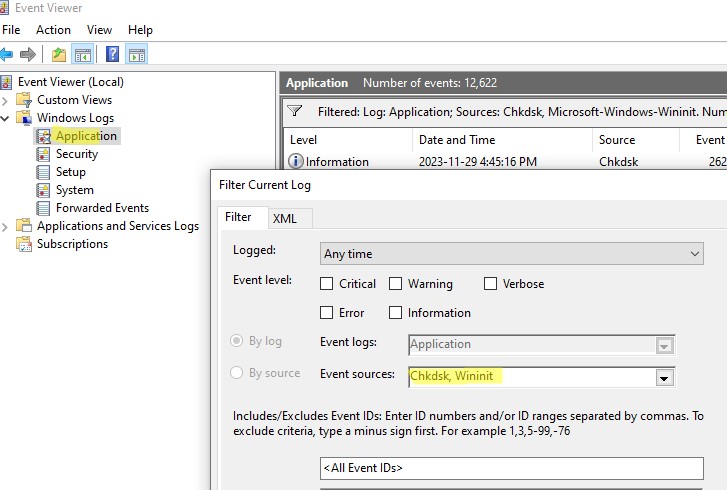
- Откройте консоль Event Viewer (
Eventvwr.msc
) и перейдите в раздел Windows Logs -> Application; - Щелкните правой клавишей по разделы Application и выберите Filter Current Log. В поле Event Source выберите Chkdsk и Wininit и нажмите ОК;

- Подробные результаты проверки диска содержатся в описании события. Обратите внимание, что у онлайн событий проверки диска будет указан источник Chkdsk. Если выполнялась офлайн проверка диска при загрузке Windows, у такого события будет источник Wininit и EventID 1001.

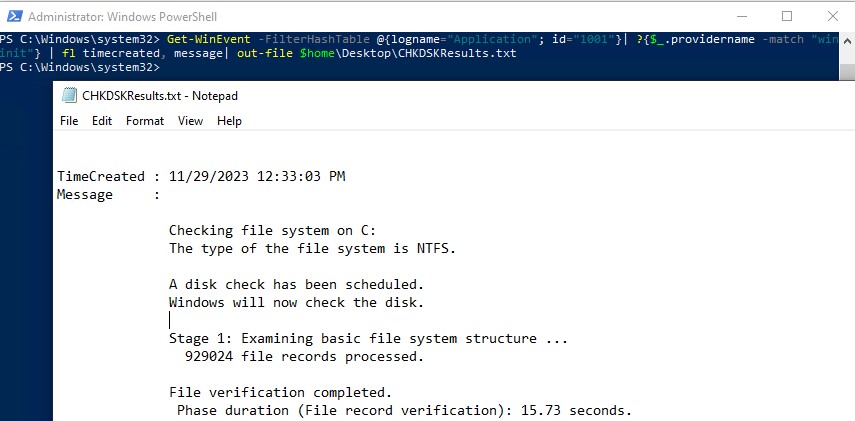
Можно получить лог проверки диска с помощью PowerShell командлета Get-WinEvent. Например, чтобы выгрузить результаты последних 5 проверок диска в текстовый файл CHKDSK_SCAN.txt на рабочем столе, выполните команду:
Get-WinEvent -FilterHashTable @{logname="Application"; id="1001"}| ?{$_.providername –match "wininit"} | fl timecreated, message| out-file $home\Desktop\CHKDSKResults.txt
Открыть полученный файл с логом chkdsk:
notepad.exe $home\Desktop\CHKDSKResults.txt
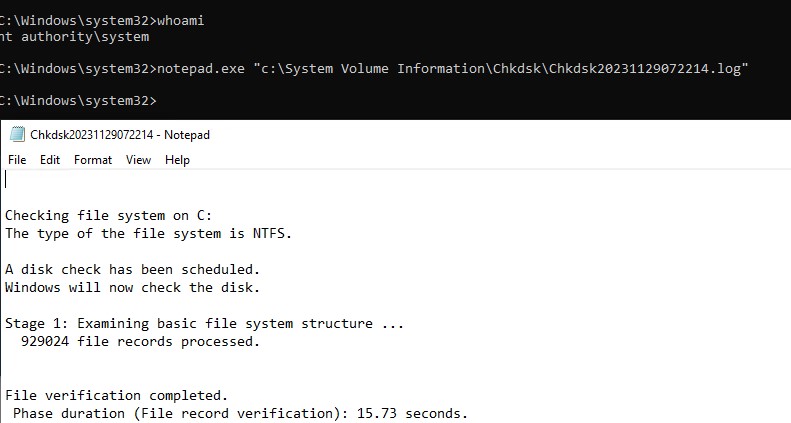
Если размер лога Chkdks очень большой, журнал событий может обрезать его. В этом случае можно открыть полный лог проверки диск в System Volume Information. Чтобы получить доступ к этой папке, нужно запустить командную строку от имени SYSTEM (проще всего с помощью утилиты psexec):
.\PsExec.exe -i -s cmd.exe
После этого можно открыть лог chkdsk:
notepad.exe "c:\System Volume Information\Chkdsk\Chkdsk20231129072214.log"
Повлиять на стабильность работы операционной системы может множество факторов, начиная от повреждения системных файлов и заканчивая аппаратными неполадками. При этом по характеру проблем иногда можно установить их причину, например, ошибки чтения/записи, пропажа раздела или «превращение» в RAW могут косвенно указывать на наличие ошибок файловой системы, повреждение ее логической структуры или появлению на диске так называемых битых секторов. По вполне понятным причинам физические повреждения не подлежат устранению, однако данные, записанные в проблемные сектора, могут быть перемещены в «здоровую» область диска, а сами участки с повреждениями помечены особыми маркерами, чтобы операционная система больше не пыталась записывать в них информацию. С повреждениями логической структуры всё намного проще, в большинстве случаев вызванные ими неполадки удается устранить без особых помех, воспользовавшись штатной утилитой CHKDSK.
Chkdsk в Windows 10, для чего он нужен и как его использовать
Основным предназначением этого консольного инструмента в Windows является поиск и устранение неполадок жестких дисков и внешних Flash-накопителей. Будучи запущенным с соответствующими параметрами, CHKDSK исправляет логические ошибки, маркирует bad-сектора и перемещает записанные в них данные в неповрежденные области диска. Проверка диска/раздела с помощью этого инструмента не представляет особой сложности, хотя определенные нюансы его использования всё же имеются. Чтобы проверить, скажем, раздел D, необходимо открыть от имени администратора командную строку или консоль PowerShell и выполнить в ней такую команду:
chkdsk d:

Запущенная без параметров, утилита проверит раздел на предмет ошибок и выведет соответствующее сообщение. Если ошибки будут найдены, CHKDSK предложит исправить их, выполнив команду с параметрами /F и /R, в некоторых случаях утилита может предложить выполнить команду chkdsk с параметром /scan, чтобы найти проблемы и поставить их в очередь на исправление. Лучше, однако, использовать /F и /R, так как ключ /scan служит для оперативного сканирования томов и применим только в файловой системе NTFS. Итак, чтобы исправить ошибки диска D, выполните такую команду:
chkdsk d: /f /r
Ключ F исправляет логические ошибки, ключ R выполняет поиск поврежденных секторов и переносит их содержимое. Это что касалось пользовательских томов и подключенных носителей. А вот с системным томом всё не так однозначно. Существует вероятность, что при попытке проверить раздел C вы получите сообщение «Не удается открыть том для прямого доступа». Здесь можно предложить два решения: мягкое и жесткое. Первое предполагает запуск утилиты с параметром /scan, вот так:
chkdsk C: /scan


Второе решение более трудоемкое, но и зато и более эффективное. Чтобы получить монопольный доступ к системному разделу, загрузите компьютер с установочного диска, а затем произведите проверку chkdsk, предварительно определив букву тома, так как в загрузочной среде буквы разделов отличаются. Диск C, к примеру, в среде WinPE имеет букву D. Параметры /f и /r используем в случае необходимости.

До этого момента мы проверяли тома, которым присвоена буква, а теперь представьте, что нужно проверить раздел, не имеющий буквы, допустим, «Зарезервировано системой». Как быть в этом случае? Вариантов опять же несколько. Вы можете присвоить букву тому в оснастке управления дисками, воспользоваться сторонними программами вроде Acronis Disk Director, умеющими выполнять проверку томов без буквы либо прибегнуть к услугам посредника — встроенной консольной утилиты mountvol, позволяющей монтировать разделы без буквы.


Алгоритм действий следующий. Выполните в запущенной от имени администратора командной строке mountvol и найдите в выведенном списке разделы с меткой «НЕТ ТОЧЕК ПОДКЛЮЧЕНИЯ». Как правило, первым в списке располагается зарезервированный раздел. Копируем его ID вместе с \\?\Volume и формируем такую команду, заменив значение в фигурных скобках своим:
Chkdsk \\?\Volume{xxxxxxxx-xxxx-xxxx-xxxx-xxxxxxxxxxxx}
Если надо, указываем после Chkdsk ключи /f и /r. В случае добавления последних, так как том является системным, утилита попросит отключить его, введя Y и нажав ввод. В случае обнаружения ошибок их исправления будет выполнено при следующей загрузке Windows. По большому счету это всё, что нужно знать пользователю о применении Chkdsk. Если вы хотите знать больше об этом инструменте, дополнительную информацию найдете на официальном сайте компании Microsoft.
Checking the status of our hard drive is a fundamental task if we want to keep our computer in good condition and avoid future problems. If you are a user of Windows 10, you may have wondered how to perform these types of checks, or even heard of a somewhat old term, ‘Scandisk’. Let’s break down step by step how you can check and fix errors on your drives in this version of Windows.
The Scandisk command may sound old-fashioned, but it still lives on to some extent under another name: CHKDSK. While the latter is still used today, the functionality has been the same for several generations of the operating system. Here’s how to use the CHKDSK command and how it replaces Scandisk in Windows 10.
What is CHKDSK and why does it replace Scandisk?
CHKDSK, which stands for ‘Check Disk’ in English, is a tool that Microsoft included in its operating system since very old versions such as MS-DOS. This utility replaces Scandisk, which was used in older versions of Windows such as 95, 98 and earlier versions. The basic function of CHKDSK is to scan the hard drive for logical and physical errors., and then proceed to repair it if necessary.
CHKDSK also has the ability to scan for bad sectors on your hard drive. These errors can occur due to different factors such as unexpected power outages, file crashes, or even continuous disk usage over time. So if you notice that your computer is starting to slow down or certain applications are not working as they should, running CHKDSK could resolve many of these hard drive-related issues. hardware.
When you should run CHKDSK
CHKDSK is a powerful tool, but It is not necessary to run it on a daily basisIt is intended for use in times when you suspect that something is wrong with your hard drive, such as when your computer takes longer than usual to start, when applications do not respond, or if you notice that the overall performance of the system is lower than usual.
Another key time to run CHKDSK is after a sudden shutdown or system crash. Certain sudden power interruptions can cause errors in files or disk sectors, it is important to carry out this check as soon as possible after an incident of this type.
Advantages of using CHKDSK
- Automatic error resolution: CHKDSK can detect and fix problems without user intervention.
- Locating bad sectors: If there are bad sectors, CHKDSK will mark them so that they will not be used in the future.
- Preventive Maintenance: Running CHKDSK periodically can prevent performance issues.
How to run CHKDSK
There are several ways to run CHKDSK, but the most common and simple It is through File Explorer in Windows 10. Here we will show you the different methods you can use to run this utility.
Run CHKDSK from File Explorer
The simplest way to run CHKDSK is through Windows File Explorer. This is an accessible and convenient option for most users.
Step 1: Open File Explorer (Windows + E) and go to the ‘This PC’ section.
Step 2: Select the drive you want to scan, usually this will be the C: drive.
Step 3: Right click on the drive and select ‘Properties’.
Step 4: In the ‘Tools’ tab, you will see an option that says ‘Check’. Click on it.
Step 5: The system will inform you if it found any problems. If you wish, you can proceed with the manual analysis by clicking ‘Scan drive’.
Run CHKDSK from the console (Command Prompt or PowerShell)
If you want more advanced control over CHKDSK and how it runs, You will be able to use the console commandsand Symbol of the system o PowerShellThese are more technical methods that allow for a greater level of detail in the process.
Step 1: Open the start menu and search for ‘cmd’ or ‘PowerShell’. Run either as administrator.
Step 2: Once the window opens, type the following command: chkdsk C: / f / r. This command will mean the following:
- /F: Orders to repair the detected errors
- / r: Locates bad sectors and recovers readable information
Step 3: The tool may ask you to schedule the scan for the next Boot from the system if you are trying to analyze the C: drive. Accept by typing ‘S’.
Step 4: Restart your computer and CHKDSK will run automatically before Windows boots.
Additional CHKDSK Commands
CHKDSK has a number of switches or parameters that allow you to further customize the disk scan. Here are some additional commands you can use:
- /x: Disassemble the unit before starting the test.
- /l:[size]: Change the size of the log file.
- /scan: Run an online scan.
Alternatives to CHKDSK
While CHKDSK is a very useful tool that comes with Windows itself, There are some alternatives that offer additional functions in the management and repair of hard drives.Tools like EaseUS Partition Master and MiniTool Partition Wizard allow you to manage your hard drive partitions, perform checks and error repairs without having to delve into the complexities of the command prompt.
EASEUS Partition Master
EASEUS Partition Master is a very complete disk and partition management software. It offers a user-friendly graphical interface to manage partitions, and one of the most useful functions is the ability to scan and repair file system errors in a very simple way.
The best thing about EaseUS is that you can perform these tasks without having to deal with text commands or typing anything into a terminal. You just need to select the partition or drive you want to analyze and the program will do everything for you.
MiniTool Partition Wizard
Another option you can consider is MiniTool Partition WizardThis software is very similar to EaseUS Partition Master. It has advanced features such as hard drive cloning, partition recovery or partition format conversion, but it also includes a useful function to scan and fix errors on hard drives.
Resolving common errors with CHKDSK
CHKDSK is not always able to solve all problems on its own. If you notice that CHKDSK gets stuck or cannot be repaired, it may be a sign that your hard drive is physically failing or that there is a more serious problem with the file system. In these cases, the following solutions may help you:
- Restart analysis from safe mode.
- Try the third-party utilities mentioned above.
- Check if the problem is a physical failure of the disk by checking the temperatures or noise of the disk.
If you’ve tried everything we’ve explained and your drive is still having problems, it may be time to consider replacing your hard drive.
CHKDSK is one of the main allies to keep your hard drive in an optimal state, but it is not the only solution. There are graphical alternatives such as EaseUS and MiniTool that make the job much easier without the need for technical knowledge. For most users, running CHKDSK from Explorer is more than enough, but if you have more serious problems, you can always resort to more advanced methods or try professional alternatives.
I’m Alberto Navarro and I’m passionate about everything related to technology, from cutting-edge gadgets to software and video games of all kinds. My interest in digital began with video games and continued in the world of digital marketing. I have been writing about the digital world on different platforms since 2019, sharing the latest news in the sector. I also try to write in an original way so that you can stay up to date while having fun.
I studied Sociology at university and completed my studies with a Master’s in Digital Marketing. So if you have any questions, I’ll share with you all my experience in the world of digital marketing, technology and video games.
Сценарий: У вас системные ошибки, и их необходимо исправить.
Утилита проверки и исправления ошибок на жёстком диске Microsoft CHKDSK (“проверка диска”) была представлена более 30 лет назад, но используется до сих пор. Даже пользователи последних версий операционной системы Microsoft могут воспользоваться данной командой, чтобы выполнить проверку своих жёстких дисков на ошибки и их исправление при необходимости. Ниже приведена инструкция по запуску CHKDSK в Windows 10.
Если после использования утилиты CHKDSK у вас всё ещё возникают ошибки, попробуйте альтернативные программы.
Сначала выберите “Поиск в Windows” и выполните поиск Командной строки, введя “cmd”. Щёлкните по ярлыку правой кнопкой мыши и выберите “Запуск от имени администратора” в контекстном меню.
После входа в качестве администратора, вы окажетесь в Командной Строке Windows, знакомой пользователям операционных систем до Windows NT. Введите команду “chkdsk”, нажмите пробел, а затем букву диска, который вы желаете проверить или исправить. В нашем случае, это внешний диск “L”.
Выполнение команды CHKDSK без аргументов лишь покажет состояние диска, и не исправит ошибки, присутствующие на разделе. Чтобы попросить CHKDSK исправить ошибки на диске, нужно указать параметры. После ввода буквы диска введите следующие параметры, каждый из которых отделён пробелом: “/f /r /x”.
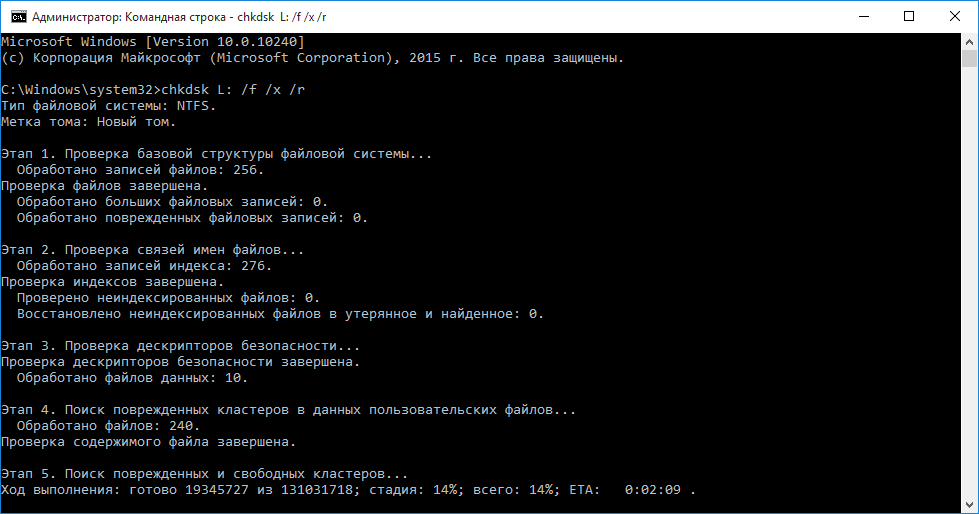
Параметр “/f” указывает CHKDSK выполнить исправление найденных ошибок; “/r” указывает программе обнаружить повреждённые секторы на диске и восстановить информацию, которую возможно прочитать; “/x” заставляет диск размонтироваться перед началом процесса. Дополнительные параметры доступны для более специализированных заданий, и подробно расписаны на web-сайте Microsoft.
В итоге полная команда, которую требуется ввестив Командную Строку, выглядит так:
chkdsk [Диск:] [параметры]
В нашем случае:
chkdsk L: /f /r /x
Стоит отметить, что CHKDSK должен заблокировать диск, поэтому не удастся выполнить проверку системного загрузочного диска, если компьютер работает. В нашем случае целевой диск – внешний, поэтому процесс начнётся сразу после ввода команды. Если целевой диск – загрузочный, система спросит вас, хотите ли вы запустить команду перед следующей загрузкой. Введите “yes”, перезагрузите компьютер, и команда запустится до загрузки операционной системы, получив полный доступ к диску.
Выполнение команды CHKDSK может занять продолжительное время, особенно на больших дисках. При завершении программа подытожит результаты, такие как общий объём места на диске, размещение байтов, а также самое главное – информацию о найденных и исправленных ошибках.
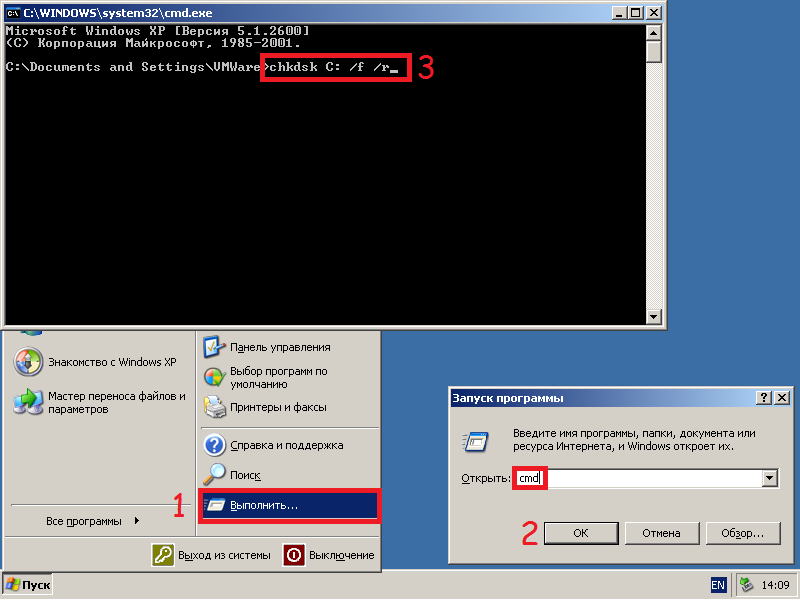
Команда CHKDSK доступна во всех версиях Windows, поэтому пользователи как Windows 7, так и Windows XP, могут выполнить приведённые выше шаги для инициализации проверки жёсткого диска. В случае использования старых версий Windows, можно выполнить следующее:
- Нажать “Пуск – Выполнить…”
- Ввести cmd
- Ввести chkdsk [Диск:] [параметры]
Этапы “CHKDSK”
5 главных этапов описаны ниже:
Этап 1. Проверка базовой структуры файловой системы…
На первом этапе файлы с записями в MFT (главная файловая таблица) сравниваются и проверяются.
Этап 2. Проверка связей имен файлов…
На данном этапе проверяются директории и структура. Они проверяются на соответствие размеру файла и временной метки информации.
Этап 3. Проверка дескрипторов безопасности…
На последнем этапе проверки (3), файлы и папки проверяются на наличие дескрипторов безопасности, включая информацию о владельце прав NTFS.
Четвёртый и пятый этапы выполняются только при наличии аргумента /r!
Этап 4. Поиск поврежденных кластеров в данных пользовательских файлов…
Секторы кластера, включая данные, проверяются на возможность использования.
Этап 5. Поиск поврежденных и свободных кластеров…
На пятом этапе секторы кластера проверяются на отсутствие данных.
Если невозможно решить проблемы с жёстким диском, используя “CHKDSK”, рекомендуется использовать утилиты для работы с жёстким диском соответствующих производителей.
Также в Windows можно получить доступ к графическому интерфейсу CHKDSK
Для выполнения проверки с использованием графического интерфейса, выполните следующее:
Щёлкните правой кнопкой мыши по диску, который вы хотите проверить. Выберите Свойства – Сервис – Выполнить проверку.
Это графический интерфейс “CHKDSK”. Две опции соответствуют параметрам “/f” и “/r”.
Alignment Tool, Backup & Recovery, Disk Wiper, Drive Copy, ExtFS for Windows, GPT Loader, Hard Disk Manager, HFS+ for Windows, Migrate OS to SSD, Partition Manager, Virtualization Manager, Продукты для Windows, Частные
Tags: check, check disk, chkdsk, disk, windows, диск, инструкция, общее, ошибки, проблема, проверить
Loading…