
What does CHKDSK /F /R do? How to use CHKDSK to repair the hard drive errors on Windows 10/8/7? Here is the full guide.
| Workable Solutions | Step-by-step Troubleshooting |
|---|---|
| What is CHKDSK command | CHKDSK (Check Disk Utility) can be used to check and fix any errors on the targeted disk. You can run it from the Command Prompt/PowerShell…Full steps |
| What does CHKDSK /F /R /X mean | CHKDSK /F can fix disk errors. CHKDSK /R does the same thing as CHKDSK /F only it also checks for bad sectors on the disk and recovers any readable information…Full steps |
| CHKDSK Alternative — Run a partition tool to fix disk error (1 Step) | Download EaseUS partition tool for free and use it to check and repair the corrupted file systems with clicks. No need to type commands manually…Full steps |
| Use CHKDSK manually | Run CHKDSK /F /R /X from the Command Prompt/Power shell or via the Properties window…Full steps |
What Is CHKDSK Command
In computing, CHKDSK (short for «check disk») is a system tool and command in DOS, Digital Research FlexOS, IBM/Toshiba 4690 OS, IBM OS/2, Microsoft Windows and related operating systems. It verifies the file system integrity of a volume and attempts to fix logical file system errors. — explained by Wikipedia
CHKDSK, also known as Microsoft Check Disk, is a utility that can be used in almost all Windows versions. The CHKDSK command is used to scan through your entire hard drive to find and fix any errors. For example, when your computer freezes, you cannot access a certain disk due to a corrupted file system, then you can use the CHKDSK commands to check and fix the drive errors.
💡💡💡It can be difficult to run CHKDSK /f /r /x commands for beginners. Hence, for beginners, you can use a professional alternative. Without giving any commands, you can check the disk for errors, check bad sectors, and check file system errors. Click the blue button to obtain the CHKDSK alternative — EaseUS Partition Master.
What Does CHKDSK /F /R /X Command Mean
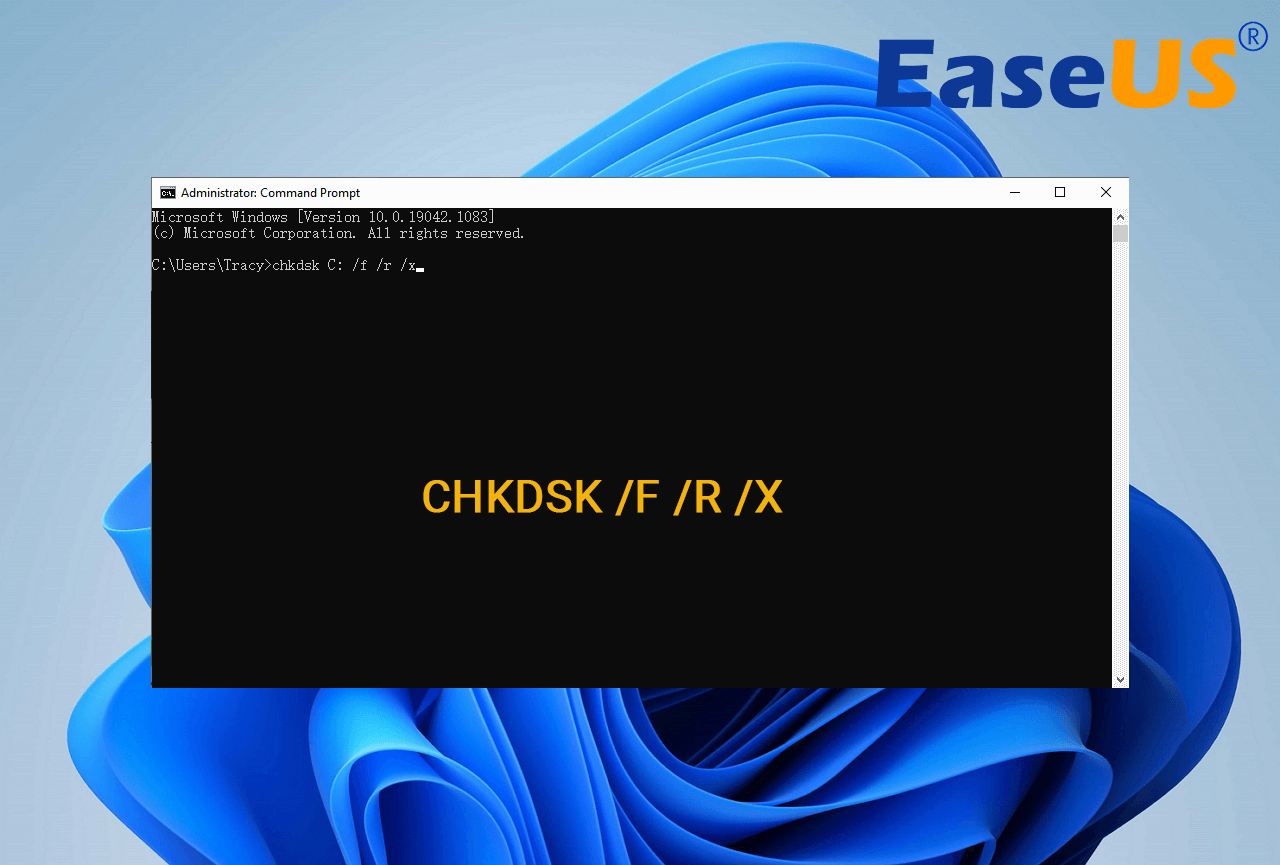
What is CHKDSK /F /R /X? The primary function of CHKDSK /F /R /X is to scan the integrity of the file system and file system metadata on a disk volume and fix any logical file system errors that it finds. Besides, CHKDSK also can be used for detecting bad sectors on the target disk that occur because of physical damage. Then, it automatically fixes these errors as well.
CHKDSK /F VS CHKDSK /R VS CHKDSK /X, What’s The Difference
CHKDSK can fix two types of disk errors: logical errors and physical errors. Based on the disk error types, you can use the different CHKDSK commands and switches to fix hard drive errors. CHKDSK /F, CHKDSK /R, and CHKDSK /X are the most commonly used CHKDSK commands. What is the difference between CHKDSK /F /R and /X?
- CHKDSK /F: Check for disk errors, not bad sectors.
- CHKDSK /R: Locate the bad sectors on the target hard disk and try to recover the readable information from the bad sectors (implies /F).
- CHKDSK /X: Forces the volume to dismount first, if necessary. It also includes the functionality of /f.
When to use chkdsk /f, chkdsk /r, and chkdsk/x? You want to see existing errors, use CHKDSK /f command, you want recover readable information from back sectors, use CHKDSK /R, and dismount problematic disk, use CHKDSK /X.
If you feel like the provided information about CHKDSK, and it did help you have a better undersanding CHKDSK command lines, please share this guide to help more people around you!
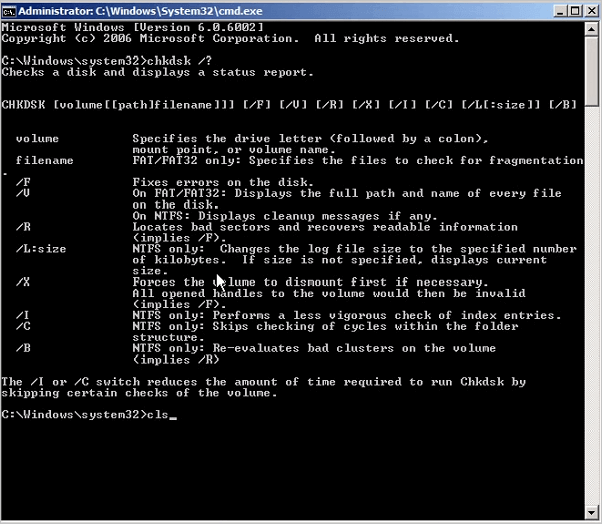
What Does Each CHKDSK Parameter Means?
The syntax of the CHKDSK command is: chkdsk volume /f /v /r /x /i /c
- If used without parameters, CHKDSK displays only the volume’s status and does not fix any errors.
- If used with the /f, /r, /x, or /b parameters, it fixes errors on the volume.
What do the parameters ( /f /r /x… ) mean? Here are some common CHKDSK parameters and their meanings:
| Parameters | Details of the Parameters |
|---|---|
| /f | Fixes errors on the disk. The disk must be locked. If CHKDSK cannot lock the drive, a message appears that asks you if you want to check the drive the next time you restart the computer. |
| /r | Locates bad sectors and recovers readable information. The disk must be locked. It includes the functionality of /f, with the additional analysis of physical disk errors. |
| /x | Forces the volume to dismount first, if necessary. All open handles to the drive are invalidated. It also includes the functionality of /f. |
| /b | NTFS only. It clears the list of bad clusters on the volume and rescans all allocated and free clusters for errors. It includes the functionality of /r. Use this parameter after imaging a volume to a new hard disk drive. |
| /v | Displays the name of each file in every directory as the disk is checked. |
| /scan | NTFS only. It runs an online scan on the volume. |
| /i | NTFS only. It performs a less vigorous check of index entries, which reduces the amount of time required to run CHKDSK. |
| /c | NTFS only. It does not check cycles within the folder structure, which reduces the amount of time required to run CHKDSK. |
Run CHKDSK /F /R /X Alternative Tool to Fix and Repair Disk Errors
If you are not so tech-savvy and know little about computers, we highly recommend you try a professional CHKDSK /f /r /x alternative tool — EaseUS Partition Master to fix hard drive errors efficiently. It perfectly replaces CMD as reliable disk management tool and releases you from typing the commands manually.
EaseUS partition tool makes it effortless to repair disk errors. Follow the steps to check and repair your file system error:
Step 1. Open EaseUS Partition Master on your computer. Then, locate the disk, right-click the partition you want to check, and choose «Advanced» > «Check File System».
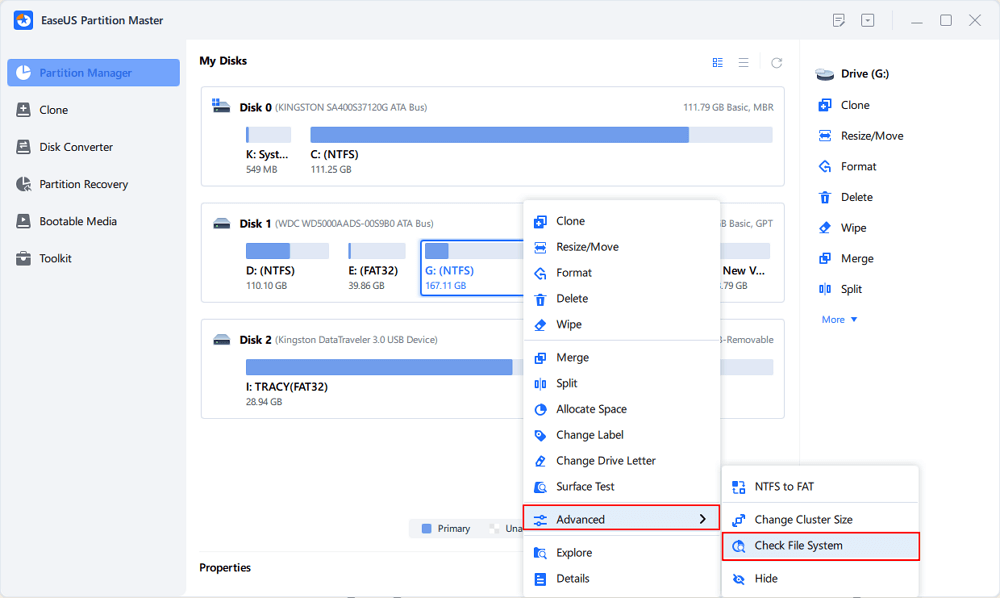
Step 2. In the Check File System window, keep the «Try to fix errors if found» option selected and click «Start».
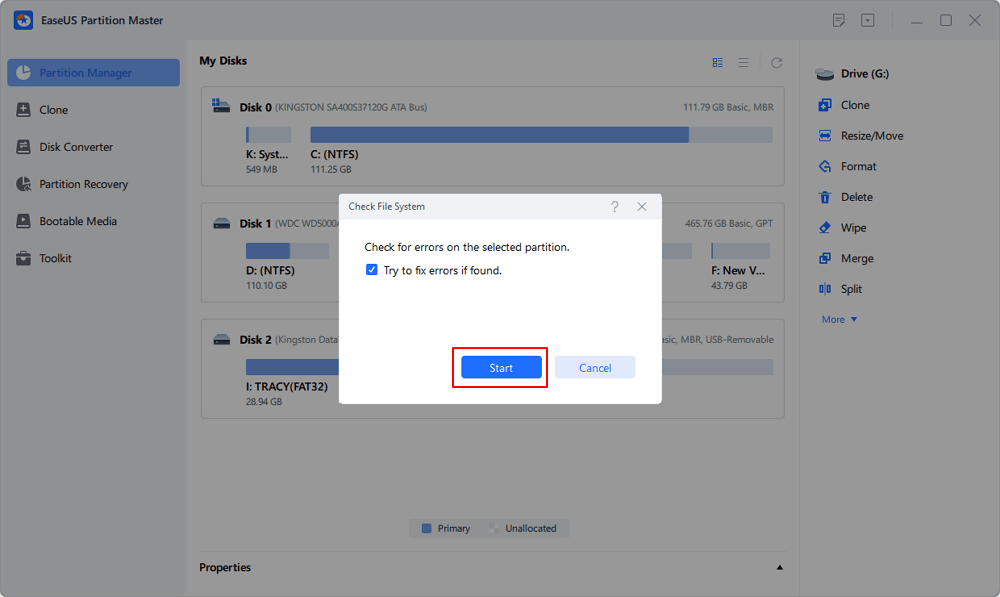
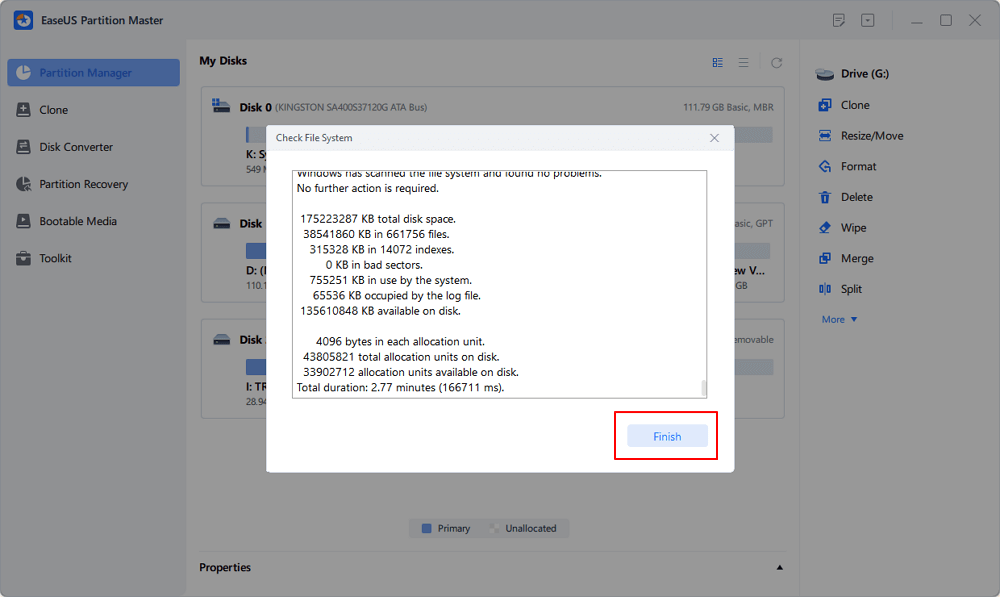
Step 3. The software will begin checking your partition file system on your disk. When it completes, click «Finish».
Fixing disk error and repair internal file system error with EaseUS Partitoin Master is so easy It is one of the best repair tool for hard drives, especially the best Toshiba External Hard Drive Repair Tool and Seagate Hard Drive Repair Tool. Share this tip to help more of your friends to rescue their problematic storage devices now:
How to Run CHKDSK /F /R /X Command to Fix Disk Errors on Windows 10/8/7
If you don’t like to use the simple third-party CHKDSK tool, you can run CHKDSK in a harder way via 3 methods: using Command prompt, Windows PowerShell, and disk check tool.
1. Run CHKDSK in Command Prompt
Whenever you find your hard drive performs poorly or Windows asks you to repair drive errors, you can try to run CHKDSK to do the job. Here’s how to run CHKDSK /f on Windows 10/8.1/8/7.
Use CHKDSK /F /R on Windows 10
Note: If you can’t boot into Windows 10 to run CHKDSK, fix the UEFI boot issue in Windows 10 with 5+ solutions.
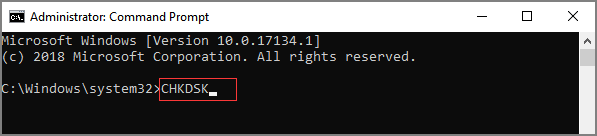
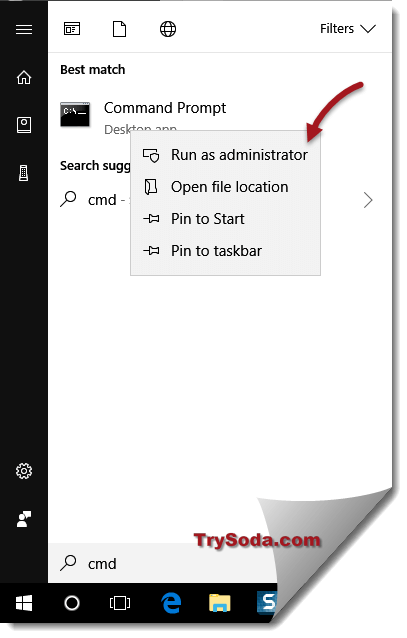
Step 1. Press the Windows key and type cmd.
Step 2. Right-click «Command Prompt» and choose «Run as administrator».
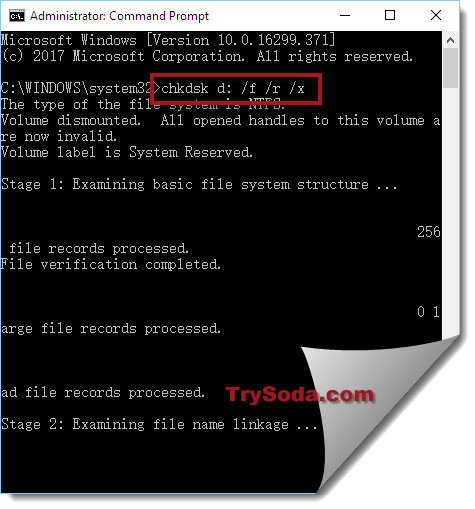
Step 3. Enter the following command and press Enter: chkdsk C: /f /r /x. Replace «C» with the drive letter of the partition you want to repair.

Do not interrupt CHKDSK and wait patiently for the process to end.
Aside from applying CHKDSK to fix disk errors, here are some tutorials that you may follow to learn more details about this command:
Run CHKDSK on Windows 8.1/8
To run the utility from Command Prompt for Windows 8.1/8 users, here are the instructions:
Step 1. Press the Windows and C key to open the Charm bar.
Step 2. Select «Search» and type cmd.
Step 3. Right-click on «Command Prompt» and click «Run as administrator.»
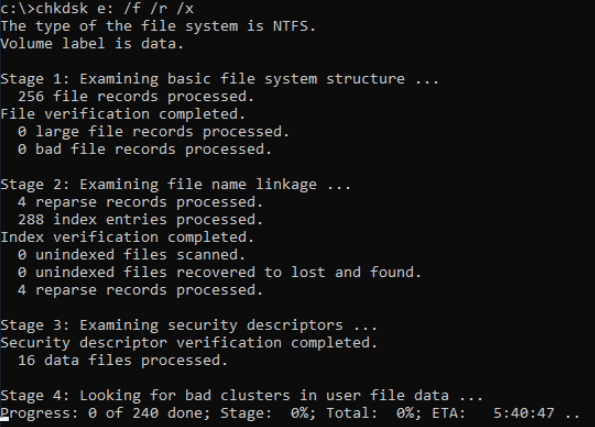
Step 4. When Command Prompt launches, type the command below and press «Enter»: chkdsk E: /f /r /x.
Run CHKDSK on Windows 7 CMD
If you are a Windows 7 user, you can run the CHKDSK command by the following steps:
Step 1. Click «Start». Type cmd at the search box.
Step 2. Right-click on cmd.exe and click «Run as Administrator». Enter your Administrator password if necessary.
Step 3. When cmd.exe opens, type the command below and press «Enter»: chkdsk c /f /r.
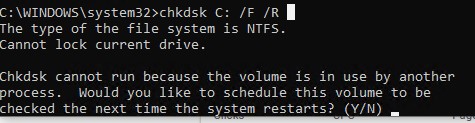
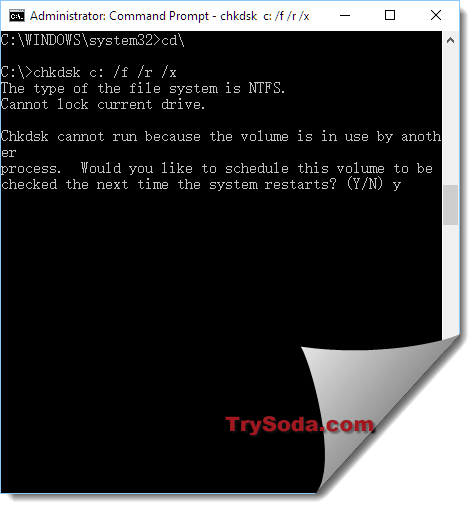
If you receive the «Chkdsk cannot run because the volume is in use by another process.» message, type Y to restart the computer and let the utility to run a scan at the next boot of your PC.
Extended Reading:
If you are looking for a guide to run CHKDSK to check and fix disk errors on Wnidows 11, try this recommended guide page and you’ll learn how to do so.
Check and Fix Disk Error in Windows 11
Are you looking to check disk errors in Windows 11? If yes, you might need a guide on checking and fixing disk errors in Windows 11. We have compiled the best methods for you.
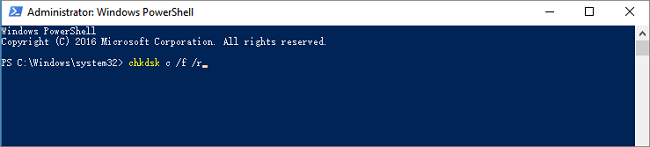
2. Use CHKDSK/F/R in Windows PowerShell
If the Command Prompt not working in Windows 10, you can also run the CHKDSK /F or /R command in Windows PowerShell to fix hard drive errors.
Step 1. Click the Search button and type PowerShell.
Step 2. Right-click the PowerShell and choose Run as administrator.
Step 3. Type chkdsk c /f /r to start fixing disk error. Replace C with the drive letter of the target disk.
3. Run CHKDSK Alternative — CheckDisk in Properties Window
Running the Check Disk tool from the Windows desktop is easy. Follow the steps below to run CHKDSK in Windows 10. It works the same way on Windows 8 and Windows 7.
Step 1. Open This PC in File Explorer > right-click the HDD/SSD you want to scan > choose «Properties».
Step 2. Under the Tools tab > click the «Check» button under the Error-checking section.
Step 3. Next, you can choose to Scan drive if wanted or Repair drive if errors were found.
Step 4. When the scanning finishes, click on the Show Details link to see the CHKDSK log in Event Viewer.
Conclusion
Any time you have hard drive errors or corrupted files, the CHKDSK can be a lifesaver. You can use the disk error checker that comes with every Windows version with the full guide above.
Or you can use the ultimate disk management tool — EaseUS Partition Master to repair organize your hard drive to enhance system performance easily.
FAQs About CHKDSK /F /R That You May Be Interested In
You may encounter CHKDSK related problems; what to do then? Here are the common issues of CHKDSK errors; read on to figure out the solutions.
1. Is CHKDSK R safe?
It’s safe to run the CHKDSK /R command under normal circumstances as long as you’re using the syntax properly. There are different parameters with CHKDSK; you can check the CHKDSK parameters and choose the one that suits your problem to fix disk errors.
2. How long does chkdsk /f /r take?
It depends.
- chkdsk -f should take under an hour on that hard drive.
- chkdsk -r will take some time. It could take over an hour, maybe two, three, or more, depending on your partitioning.
You can interrupt the scan, but not recommended. Canceling or interrupting CHKDSK should not leave the volume any more corrupt than it was before CHKDSK was run. You can start it again, and it will check and repair any remaining corruption on the volume.
3. What to do when CHKDSK is stuck or frozen?
- Restart your computer.
- Press Esc or Enter to stop chkdsk from running.
- Run the Disk Cleanup utility to clear out junk files.
- Open an elevated CMD, type sfc /scannow, and press Enter to run the System File Checker.
- Restart and exit chkdsk again during the startup by pressing Esc or Enter.
- Open CMD as admin, type Dism /Online /Cleanup-Image /RestoreHealth, and press Enter to repair the Windows image.
- Run CHKDSK again.
The scan should be able to run to completion this time.
4. CHKDSK /F /R VS CHKDSK /R /F on Windows
What’s the difference between CHKDSK /F /R and CHKDSK /R /F commands on Windows computer?
This is no much difference between chkdsk /f /r and chkdsk /r /f. The only difference is the sequence of two parameters /f and /r. /f means to fix errors on target disk and /r means to locate bad sectors and recover readable information. Mostly, the correct form should be chkdsk /f /r. Basically, when we don’t know if the target drive contains bad sectors, we would suggest that you run the overall CHKDSK command: chkdsk /f /r /x together.
Встроенная утилита CHKDSK.exe (check disk) используется в Windows для проверки диска на ошибки. Сhkdsk проверяет файловую систему на физические и логические ошибки, находит поврежденные секторы (bad sectors) и исправляет найденные проблемы.
Содержание:
- Проверка и восстановление диска с помощью команды chkdsk
- Просмотр результатов проверки Chkdsk в Windows
Проверка и восстановление диска с помощью команды chkdsk
Чтобы проверить жесткий диск на ошибки, запустите командную строку с правами администратора и выполните:
chkdsk E: /F /R
Данная команда:
- Выполнит проверку диска E:\
- Исправит автоматически найденные ошиьки (/F)
- Попытаться восстановить данные при обнаружении поврежденных секторов, она попытается восстановить информации (/R).
Полная проверка диска может занять длительное время в зависимости от емкости носителя и количества файлов. После окончания проверки диска вы увидите подробную статистику диска, информацию о поврежденных секторах и файлах, предпринятых действиях по восстановлению.
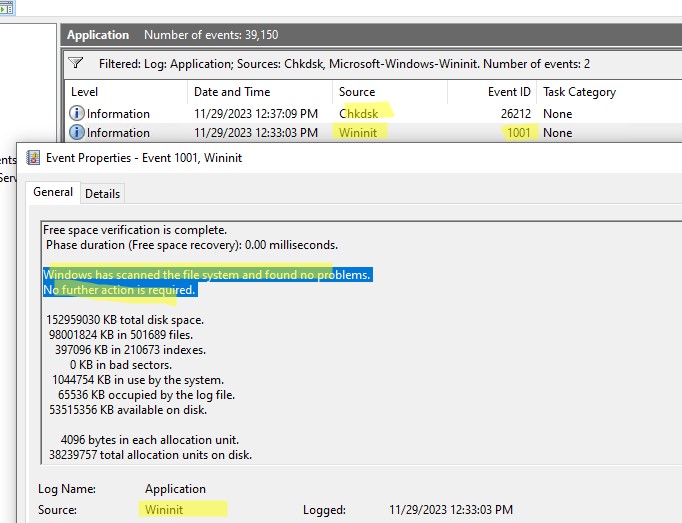
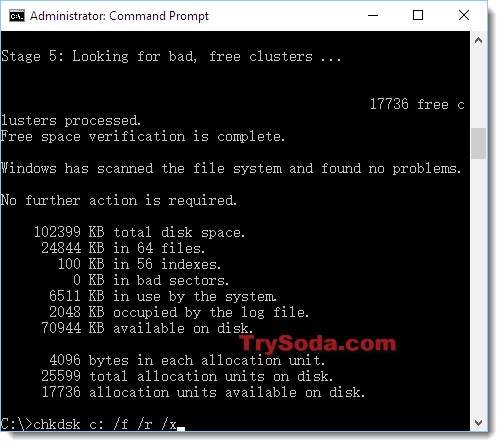
Если утилита chkdsk не обнаружила проблем на диске, появится сообщение:
Windows has scanned the file system and found no problems.
No further action is required.

Утилита chkdsk не позволяет выполнить online проверку системного диска (C:\). При запуске команды chkdsk C: /F /R появится уведомление:
Cannot lock current drive. Chkdsk cannot run because the volume is in use by another process. Would you like to schedule this volume to be checked the next time the system restarts? (Y/N).
Невозможно выполнить команду Chkdsk, так как указанный том используется другим процессом. Следует ли выполнить проверку этого тома при следующей перезагрузке системы?
Чтобы запланировать проверку диска при следующей загрузке Windows, нажмите
Y
->
Enter
.
This volume will be checked the next time the system restarts
.
Чтобы отменить запланированную проверку диска, выполните:
chkntfs /x c:
Чтобы отключить топ перед проверкой, добавьте атрибут /X в команде chkdsk. В этом случае Windows принудительно закрое все открытые файловые дескрипторы, отмонтирует диск и выполнит проверку на ошибки.
Если вам нужно выполнить проверку большого NTFS тома, но вы не хотите блокировать диск, можно сначала просканировать диск на ошибки:
chkdsk E: /f /offlinescanandfix
Утилита найдет ошибки и сохранит их в файл $corrupt для дальнейшего исправления
Чтобы исправить найденные ошибки, не тратя время на полное сканирование тома, выполните:
chkdsk D: /spotfix
Это существенно сократит время недоступности тома для пользователя при исправлении ошибок.
В консоли PowerShell для проверки диска можно использовать командлет Repair-Volume как аналог команды chkdsk:
Repair-Volume -driveletter C -scan
Также рекомендуем перед проверкой проверить SMART состояние жестких дисков с помощью встроенных PowerShell командлетов из модуля управления дисками:
Get-PhysicalDisk | Sort Size | FT FriendlyName, Size, MediaType,SpindleSpeed, HealthStatus, OperationalStatus -AutoSize

Просмотр результатов проверки Chkdsk в Windows
Chkdsk при онлайн сканировании диска выводит результаты прямо в консоль. Если вы запланировали проверку диска при загрузке Windows, то результаты можно получить только из журнала событий Windows (Event Viewer).
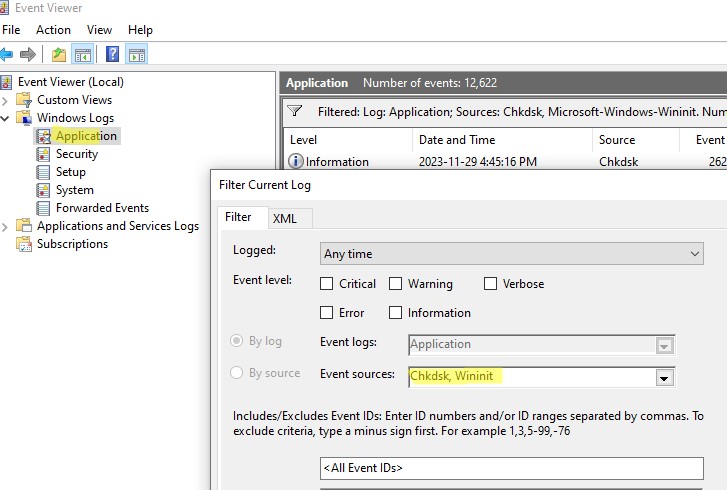
- Откройте консоль Event Viewer (
Eventvwr.msc
) и перейдите в раздел Windows Logs -> Application; - Щелкните правой клавишей по разделы Application и выберите Filter Current Log. В поле Event Source выберите Chkdsk и Wininit и нажмите ОК;

- Подробные результаты проверки диска содержатся в описании события. Обратите внимание, что у онлайн событий проверки диска будет указан источник Chkdsk. Если выполнялась офлайн проверка диска при загрузке Windows, у такого события будет источник Wininit и EventID 1001.

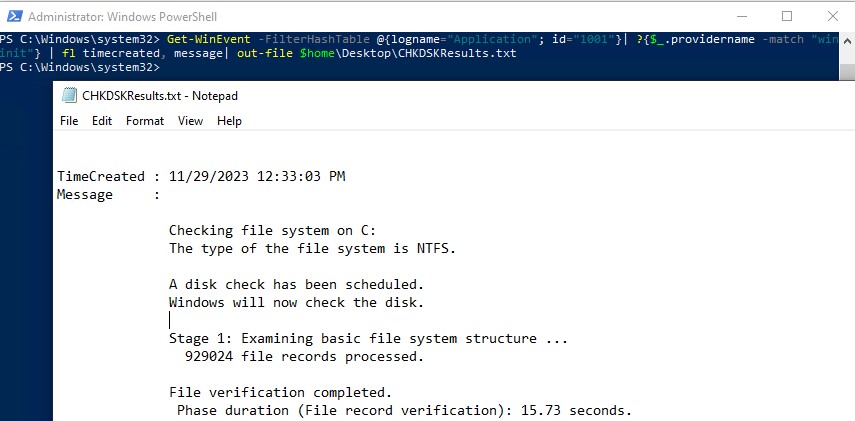
Можно получить лог проверки диска с помощью PowerShell командлета Get-WinEvent. Например, чтобы выгрузить результаты последних 5 проверок диска в текстовый файл CHKDSK_SCAN.txt на рабочем столе, выполните команду:
Get-WinEvent -FilterHashTable @{logname="Application"; id="1001"}| ?{$_.providername –match "wininit"} | fl timecreated, message| out-file $home\Desktop\CHKDSKResults.txt
Открыть полученный файл с логом chkdsk:
notepad.exe $home\Desktop\CHKDSKResults.txt
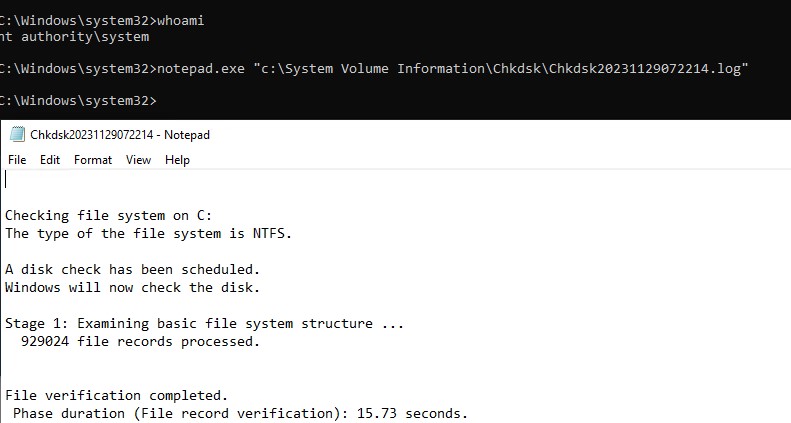
Если размер лога Chkdks очень большой, журнал событий может обрезать его. В этом случае можно открыть полный лог проверки диск в System Volume Information. Чтобы получить доступ к этой папке, нужно запустить командную строку от имени SYSTEM (проще всего с помощью утилиты psexec):
.\PsExec.exe -i -s cmd.exe
После этого можно открыть лог chkdsk:
notepad.exe "c:\System Volume Information\Chkdsk\Chkdsk20231129072214.log"
CHKDSK is a command used in Command Prompt to scan, check, and repair hard drives in our computers. In Windows 11 or Windows 10, using chkdsk is no different from using it in any previous version of Windows. However, you will need to give the Command Prompt (CMD) administrative privileges to use the chkdsk command.
Run CHKDSK in Windows 11/10 from Command Prompt
If your target hard drive is not a boot drive, meaning that the drive isn’t where your Windows is located, using CHKDSK in Command Prompt will scan and repair the target drive immediately.
- Go to Start Menu. Type CMD.
- From the search result, right click Command Prompt, then click Run as administrator.

- If “User Account Control” ask for permission, click Yes to proceed.
- In the command prompt, type:
chkdsk [driveletter] /f /r /x
- For example:
chkdsk C: /f /r /x

- Chkdsk will then run to scan the selected disk for errors and repair them automatically. It may take hours if you have a huge and messy drive.
Why do we need the parameters “/f /r /x” when doing chkdsk?
- If you enter CHKDSK without the parameters, the command itself will only scan the disk and show you the disk’s status. It won’t repair anything. To allow it to fix errors it finds, “/f” is needed.
- If you want it to also locate bad sectors on the drive and recover readable information, “/r” is needed.
- To force it to dismount the drive before checking the disk, “/x” is needed. This is recommended to make sure there is no running application in that particular drive that may interfere with the CHKDSK process.
- If you need more info on other parameters you can use, go to this chkdsk docs from microsoft.
Run CHKDSK in Windows 10/11 Before Boot
If you want to CHKDSK your primary drive where you store and boot your Windows, usually C: drive, CHKDSK will need to run before booting into Windows. This is because CHKDSK cannot be run if the drive is in use, especially if there are any system core files on the drive that Windows relies on to work.
Note: If you cannot even boot into Windows, skip this method and go to the next one.
Here’s how you can set CHKDSK to run before boot in Windows 11/10:
- Follow step 1-4 in the instruction above.
- In the command prompt, enter chkdsk commands with the parameters. For example:
chkdsk C: /f /r /x
- If chkdsk detects that the drive you want to scan is a boot drive, it will shows “Cannot lock current drive. Chkdsk cannot run because the volume is in used by another process“, and ask if you would like to schedule the drive to be checked the next time you reboot/restart your computer.
- Type and enter Y.
- Restart your computer.
- Chkdsk will run automatically during your next boot before booting into Windows.
If you cannot even boot into Windows
If you are facing a serious issue where you can’t even boot into Windows, you can force your PC to boot into recovery mode and open Command Prompt from the recovery mode.
For more info about how to launch CMD on boot, read: How to Startup Repair Windows 11/10 using Command Prompt.
When do you need to run chkdsk for your drives?
You can run CHKDSK gradually and as frequently as you like. Unlike defragmenting, CHKDSK won’t harm your drive in any way no matter how frequently you run it. If you have not run it for a while, it’s recommended that you run CHKDSK for each of your hard drives once a month.
If you encounter freezes, hangs, drives, or CPU running at 100% all the time in Windows, run CHKDSK. There may be errors on the disk that cause all the problems.
Why is chkdsk stuck at a certain percentage for a long time?
CHKDSK may take some time to finish. We are talking about several hours here depending on the size of the disk and how much space it was used. Try to wait it out. We usually let our system run CHKDSK overnight.
If CHKDSK is still stuck at a certain percentage even after 10 hours of running, try to restart the run. It may indicate that your drive is starting to fail. Backup immediately and replace the drive as soon as possible before it completely breaks down.
Checking the status of our hard drive is a fundamental task if we want to keep our computer in good condition and avoid future problems. If you are a user of Windows 10, you may have wondered how to perform these types of checks, or even heard of a somewhat old term, ‘Scandisk’. Let’s break down step by step how you can check and fix errors on your drives in this version of Windows.
The Scandisk command may sound old-fashioned, but it still lives on to some extent under another name: CHKDSK. While the latter is still used today, the functionality has been the same for several generations of the operating system. Here’s how to use the CHKDSK command and how it replaces Scandisk in Windows 10.
What is CHKDSK and why does it replace Scandisk?
CHKDSK, which stands for ‘Check Disk’ in English, is a tool that Microsoft included in its operating system since very old versions such as MS-DOS. This utility replaces Scandisk, which was used in older versions of Windows such as 95, 98 and earlier versions. The basic function of CHKDSK is to scan the hard drive for logical and physical errors., and then proceed to repair it if necessary.
CHKDSK also has the ability to scan for bad sectors on your hard drive. These errors can occur due to different factors such as unexpected power outages, file crashes, or even continuous disk usage over time. So if you notice that your computer is starting to slow down or certain applications are not working as they should, running CHKDSK could resolve many of these hard drive-related issues. hardware.
When you should run CHKDSK
CHKDSK is a powerful tool, but It is not necessary to run it on a daily basisIt is intended for use in times when you suspect that something is wrong with your hard drive, such as when your computer takes longer than usual to start, when applications do not respond, or if you notice that the overall performance of the system is lower than usual.
Another key time to run CHKDSK is after a sudden shutdown or system crash. Certain sudden power interruptions can cause errors in files or disk sectors, it is important to carry out this check as soon as possible after an incident of this type.
Advantages of using CHKDSK
- Automatic error resolution: CHKDSK can detect and fix problems without user intervention.
- Locating bad sectors: If there are bad sectors, CHKDSK will mark them so that they will not be used in the future.
- Preventive Maintenance: Running CHKDSK periodically can prevent performance issues.
How to run CHKDSK
There are several ways to run CHKDSK, but the most common and simple It is through File Explorer in Windows 10. Here we will show you the different methods you can use to run this utility.
Run CHKDSK from File Explorer
The simplest way to run CHKDSK is through Windows File Explorer. This is an accessible and convenient option for most users.
Step 1: Open File Explorer (Windows + E) and go to the ‘This PC’ section.
Step 2: Select the drive you want to scan, usually this will be the C: drive.
Step 3: Right click on the drive and select ‘Properties’.
Step 4: In the ‘Tools’ tab, you will see an option that says ‘Check’. Click on it.
Step 5: The system will inform you if it found any problems. If you wish, you can proceed with the manual analysis by clicking ‘Scan drive’.
Run CHKDSK from the console (Command Prompt or PowerShell)
If you want more advanced control over CHKDSK and how it runs, You will be able to use the console commandsand Symbol of the system o PowerShellThese are more technical methods that allow for a greater level of detail in the process.
Step 1: Open the start menu and search for ‘cmd’ or ‘PowerShell’. Run either as administrator.
Step 2: Once the window opens, type the following command: chkdsk C: / f / r. This command will mean the following:
- /F: Orders to repair the detected errors
- / r: Locates bad sectors and recovers readable information
Step 3: The tool may ask you to schedule the scan for the next Boot from the system if you are trying to analyze the C: drive. Accept by typing ‘S’.
Step 4: Restart your computer and CHKDSK will run automatically before Windows boots.
Additional CHKDSK Commands
CHKDSK has a number of switches or parameters that allow you to further customize the disk scan. Here are some additional commands you can use:
- /x: Disassemble the unit before starting the test.
- /l:[size]: Change the size of the log file.
- /scan: Run an online scan.
Alternatives to CHKDSK
While CHKDSK is a very useful tool that comes with Windows itself, There are some alternatives that offer additional functions in the management and repair of hard drives.Tools like EaseUS Partition Master and MiniTool Partition Wizard allow you to manage your hard drive partitions, perform checks and error repairs without having to delve into the complexities of the command prompt.
EASEUS Partition Master
EASEUS Partition Master is a very complete disk and partition management software. It offers a user-friendly graphical interface to manage partitions, and one of the most useful functions is the ability to scan and repair file system errors in a very simple way.
The best thing about EaseUS is that you can perform these tasks without having to deal with text commands or typing anything into a terminal. You just need to select the partition or drive you want to analyze and the program will do everything for you.
MiniTool Partition Wizard
Another option you can consider is MiniTool Partition WizardThis software is very similar to EaseUS Partition Master. It has advanced features such as hard drive cloning, partition recovery or partition format conversion, but it also includes a useful function to scan and fix errors on hard drives.
Resolving common errors with CHKDSK
CHKDSK is not always able to solve all problems on its own. If you notice that CHKDSK gets stuck or cannot be repaired, it may be a sign that your hard drive is physically failing or that there is a more serious problem with the file system. In these cases, the following solutions may help you:
- Restart analysis from safe mode.
- Try the third-party utilities mentioned above.
- Check if the problem is a physical failure of the disk by checking the temperatures or noise of the disk.
If you’ve tried everything we’ve explained and your drive is still having problems, it may be time to consider replacing your hard drive.
CHKDSK is one of the main allies to keep your hard drive in an optimal state, but it is not the only solution. There are graphical alternatives such as EaseUS and MiniTool that make the job much easier without the need for technical knowledge. For most users, running CHKDSK from Explorer is more than enough, but if you have more serious problems, you can always resort to more advanced methods or try professional alternatives.
I’m Alberto Navarro and I’m passionate about everything related to technology, from cutting-edge gadgets to software and video games of all kinds. My interest in digital began with video games and continued in the world of digital marketing. I have been writing about the digital world on different platforms since 2019, sharing the latest news in the sector. I also try to write in an original way so that you can stay up to date while having fun.
I studied Sociology at university and completed my studies with a Master’s in Digital Marketing. So if you have any questions, I’ll share with you all my experience in the world of digital marketing, technology and video games.
В этой инструкции для начинающих по шагам показано, как проверить жесткий диск на ошибки и поврежденные сектора в Windows 7, 8.1 и Windows 10 через командную строку или в интерфейсе проводника. Также описаны дополнительные инструменты проверки HDD и SSD, присутствующие в ОС. Установка каких-либо дополнительных программ при этом не требуется.
Несмотря на то, что существуют мощные программы для проверки дисков, поиска бэд-блоков и исправления ошибок, их использование в большинстве своем, будем мало понятно обычному пользователю (и, более того, может даже навредить в некоторых случаях). Встроенная же в систему проверка с помощью ChkDsk и других системных инструментов, сравнительно проста в использовании и достаточно эффективна. См. также: Как проверить SSD на ошибки, анализ состояния SSD.
Примечание: если причиной того, что вы ищите способ проверить HDD стали непонятные звуки, издаваемые им, посмотрите статью Жесткий диск издает звуки.
Как проверить жесткий диск на ошибки через командную строку
Для проверки жесткого диска и его секторов на ошибки с использованием командной строки, ее для начала потребуется запустить, причем от имени Администратора. В Windows 8.1 и 10 вы можете сделать это, кликнув правой кнопкой мыши кнопке «Пуск» и выбрав пункт «Командная строка (администратор)». Другие способы и для других версий ОС: Как запустить командную строку от имени администратора.
В командной строке следует ввести команду chkdsk буква_диска: параметры_проверки (если ничего не понятно, читаем дальше). Примечание: Check Disk работает только с дисками, отформатированными в NTFS или FAT32.
Пример работающей команды может выглядеть следующим образом: chkdsk C: /F /R— в этой команде будет проверен на ошибки диск C, при этом ошибки будут исправляться автоматически (параметр F), будет проведена проверка поврежденных секторов и попытка восстановления информации (параметр R). Внимание: проверка с использованными параметрами может занять несколько часов и как будто «зависать» в процессе, не выполняйте её, если не готовы ждать или если у вас ноутбук не подключен к розетке.

В случае, если вы попробуете проверить жесткий диск, который в настоящее время используется системой, вы увидите сообщение об этом и предложение выполнить проверку после следующей перезагрузки компьютера (до загрузки ОС). Введите Y для того, чтобы согласиться или N, чтобы отказаться от проверки. Если при выполнении проверки вы видите сообщение о том, что CHKDSK недопустим для дисков RAW, то может помочь инструкция: Как исправить и восстановить диск RAW в Windows.
В остальных случаях сразу будет запущена проверка, по итогам которой вы получите статистику проверенных данных, найденных ошибок и поврежденных секторов (у вас она должна быть на русском языке, в отличие от моего скриншота).

Полный список доступных параметров и их описание вы можете получить, запустив chkdsk с вопросительным знаком в качестве параметра. Однако для простой проверки на ошибки, а также проверки секторов будет достаточно команды, приведенной в предыдущем абзаце.
В тех случаях, когда проверка обнаруживает ошибки на жестком диске или SSD, но не может их исправить, это может быть связано с тем, что работающая Windows или программы в настоящее время используют диск. В данной ситуации может помочь запуск оффлайн-сканирования диска: при этом диск «отключается» от системы, выполняется проверка, а затем снова монтируется в системе. Если же отключить его невозможно, то CHKDSK сможет выполнить проверку при следующей перезагрузке компьютера.
Чтобы выполнить оффлайн проверку диска и исправление ошибок на нем, в командной строке от имени администратора выполните команду: chkdsk C: /f /offlinescanandfix (где C: — буква проверяемого диска).

Если вы увидите сообщение о том, что нельзя выполнить команду CHKDSK, так как указанный том используется другим процессом, нажмите Y (да), Enter, закройте командную строку и перезагрузите компьютер. Проверка диска начнется автоматически при начале загрузки Windows 10, 8 или Windows 7.
Дополнительная информация: при желании, после проверки диска и загрузки Windows, вы можете просмотреть журнал проверки Check Disk с помощью просмотра событий (Win+R, ввести eventvwr.msc) в разделе Журналы Windows — Приложение, выполнив поиск (правый клик по «Приложение» — «Поиск») по ключевому слову Chkdsk.

Проверка жесткого диска в проводнике Windows
Самый простой способ проверки HDD в Windows — использовать проводник. В нем, кликните правой кнопкой мыши по нужному жесткому диску, выберите пункт «Свойства», а затем откройте вкладку «Сервис» и нажмите «Проверить». В Windows 8.1 и Windows 10 вы, скорее всего, увидите сообщение о том, что сейчас проверка этого диска не требуется. Однако, вы можете запустить ее принудительно.
В Windows 7 присутствует дополнительная возможность включить проверку и исправление поврежденных секторов, отметив соответствующие пункты. Отчет о проверке вы все так же можете найти в просмотре событий приложений Windows.
Проверка диска на ошибки в Windows PowerShell
Проверить жесткий диск на ошибки можно не только с помощью командной строки, но и в Windows PowerShell.
Для того, чтобы проделать эту процедуру, запустите PowerShell от имени администратора (можно начать набирать PowerShell в поиске на панели задач Windows 10 или в меню Пуск предыдущих ОС, после чего кликнуть правой кнопкой мыши по найденному элементу и выбрать пункт «Запустить от имени администратора».
В Windows PowerShell используйте следующие варианты команды Repair-Volume для проверки раздела жесткого диска:
- Repair-Volume -DriveLetter C (где C — буква проверяемого диска, в этот раз без двоеточия после буквы диска).

- Repair-Volume -DriveLetter C -OfflineScanAndFix (аналогично первому варианту, но для выполнения оффлайн-проверки, как это описывалось в способе с chkdsk).
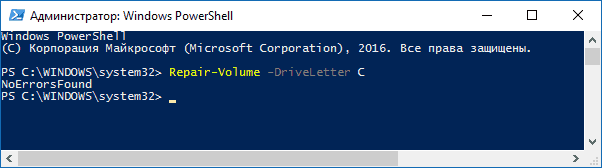
Если в результате выполнения команды вы увидите сообщение NoErrorsFound, это означает, что ошибки на диске найдены не были.
Дополнительные возможности проверки диска в Windows 10
Помимо перечисленных выше вариантов, вы можете использовать некоторые дополнительные встроенные в ОС средства. В Windows 10 и 8 обслуживание дисков, в том числе их проверка и дефрагментация происходят автоматически по расписанию, в то время, когда вы не пользуетесь компьютером или ноутбуком.
Чтобы просмотреть информацию о том, были ли найдены какие-либо проблемы с дисками, зайдите в «Панель управления» (сделать это можно, кликнув правой кнопкой мыши по Пуску и выбрав нужный пункт контекстного меню) — «Центр безопасности и обслуживания». Откройте раздел «Обслуживание» и в пункте «Состояние диска» вы увидите информацию, полученную в результате последней автоматической проверки.

Еще одна возможность, которая появилась в Windows 10 — утилита диагностики хранилища (Storage Diagnostic Tool). Для использования утилиты, запустите командную строку от имени администратора, затем используйте следующую команду:
stordiag.exe -collectEtw -checkfsconsistency -out путь_к_папке_сохранения_отчета
Выполнение команды займет некоторое время (может показаться, что процесс завис), при этом будут проверены все подключенные диски.

А после завершения выполнения команды, в указанном вами расположении будет сохранен отчет о выявленных проблемах.

Отчет включает в себя отдельные файлы, содержащие:
- Информацию проверки chkdsk и информацию об ошибках, собранную fsutil в текстовых файлах.
- Файлы реестра Windows 10, содержащие все текущие значения реестра, относящиеся к подключенным накопителям.
- Файлы журналов просмотра событий Windows (события собираются в течение 30 секунд при использовании ключа collectEtw в команде диагностики дисков).
Для рядового пользователя собранные данные могут не представлять интереса, однако в некоторых случаях может оказаться полезной для диагностики проблем работы накопителей системным администратором или другим специалистом.
Если при проверке у вас возникают какие-либо проблемы или требуется совет, пишите в комментариях, а я, в свою очередь, постараюсь вам помочь.