
Last Updated :
21 Sep, 2022
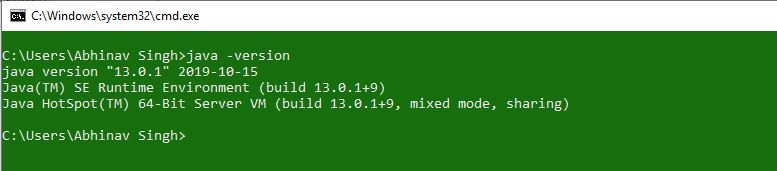
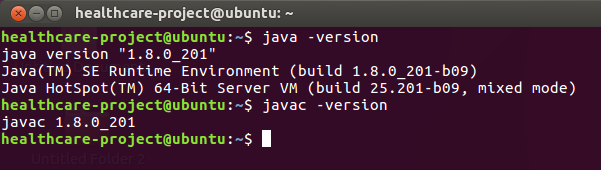
Prerequisite: Introduction to Scala Before, we start with the process of Installing Scala on our System, we must have first-hand knowledge of What the Scala Language is and what it actually does? Scala is a general-purpose, high-level, multi-paradigm programming language. It is a pure object-oriented programming language which also provides the support to the functional programming approach. There is no concept of primitive data as everything is an object in Scala. It is designed to express the general programming patterns in a refined, succinct, and type-safe way. Scala programs can convert to bytecodes and can run on the JVM(Java Virtual Machine). Scala stands for Scalable language. It also provides the JavaScript runtimes. Scala is highly influenced by Java and some other programming languages like Lisp, Haskell, Pizza etc. Scala is a very compatible language and thus can very easily be installed into the Windows. The most basic requirement is that we must have Java 1.8 or a greater version installed on our computer. Verifying Java Packages: The first thing we need to have is a Java Software Development Kit(SDK) installed on the computer. We need to verify this SDK packages and if not installed then install them. Just go to the Command line(For Windows, search for cmd in the Run dialog( + R). Now run the following command:
java -version
Once this command is executed the output will show the java version and the output will be as follows:
In case we are not having the SDK installed then download the latest version according to the computer requirements from oracle.com and just proceed with the installation.
Downloading and Installing Scala:
Downloading Scala: Before starting with the installation process, you need to download it. For that, all versions of Scala for Windows are available on scala-lang.org
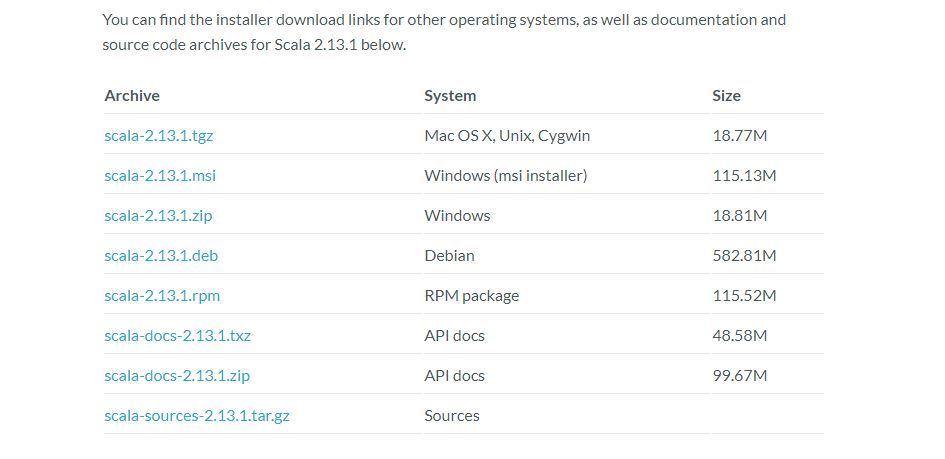
Download the Scala and follow the further instructions for the installation of Scala. Beginning with the Installation:
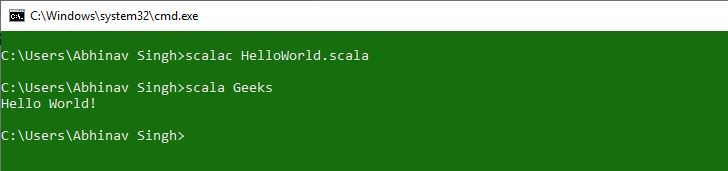
After completing the installation process, any IDE or text editor can be used to write Scala Codes and Run them on the IDE or the Command prompt with the use of command:
scalac file_name.Scala
scala class_name
Here’s a sample Program to begin with the use of Scala Programming: Let’s consider a simple Hello World Program.
scala
// Scala program to print Hello World!
object Geeks
{
    // Main Method
    def main(args: Array[String])
    {
        // prints Hello World
        println("Hello World!")
    }
}
Output:
Scala, a high-level programming language that combines object-oriented and functional programming models has gained significant popularity due to its performance and ability to exchange make use of information with Java.
In this post, we will cover you through the step-by-step process of installing Scala on your Windows 10 machine.
Prerequisites
Before start download Scala Windows make sure you have the following:
- Windows 10 operating system installed.
- Java Development Kit (JDK) version 8 or later. Refer to our guide on how to install Java on Windows system.
Installing Scala on Windows 10
Following are the steps described below on how to install Scala Windows 10 operating system:
Step 1: Download Scala
Open your browser, navigate to the official website of Scala, and select the latest stable version of Scala.
Click on the “Windows” link and download the installer file. For example scala-x.x.x-windows.zip file.
Find the downloaded zip file usually located in the “Download” folder on your computer.
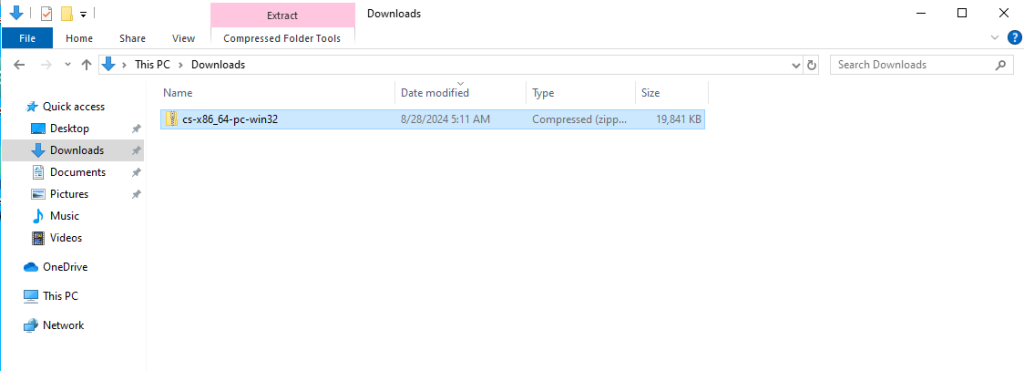
Right-click on the ZIP file and select “Extract All”. Choose a suitable destination folder, for example C:\scala.
Step 3: Set Environment Variables
Right-click on the “Start” button and select “System”. Click on “Advanced system settings” then click on the “Environment Variables” button.
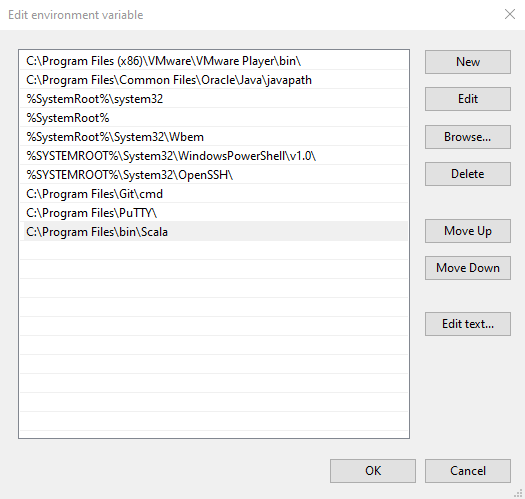
Under “System variables” locate the “Path” variable and click “Edit”.
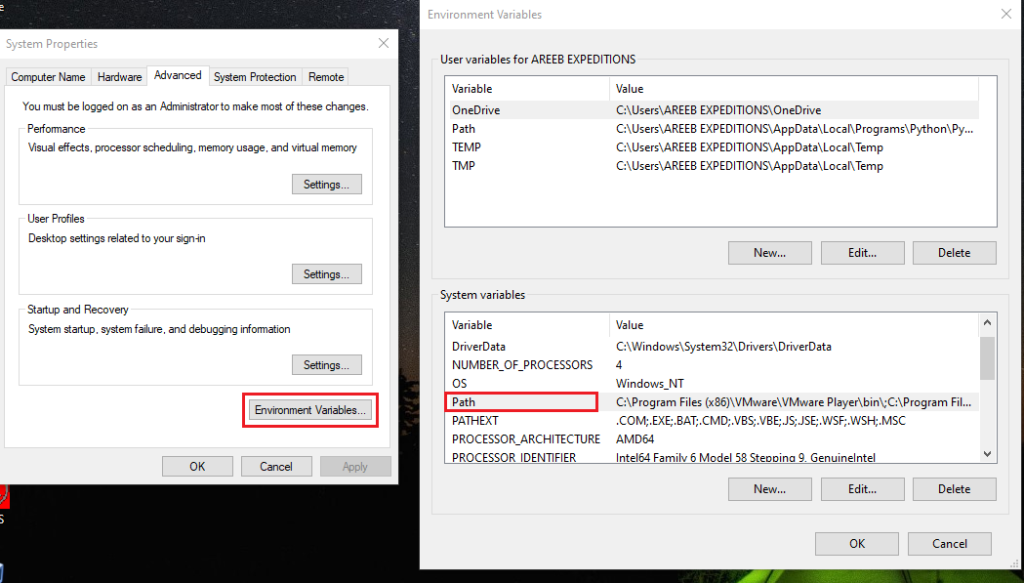
Add the path to the “bin” directory within your Scala installation like C:\scala\bin. Click “OK” to save changes.
Step 4: Verify Installation
Press Windows + R on your keyboard then type “cmd” and press “Enter”. You can also open Command Prompt by typing the cmd from the “Start Menu”.
In the command prompt, enter the following command:
scala
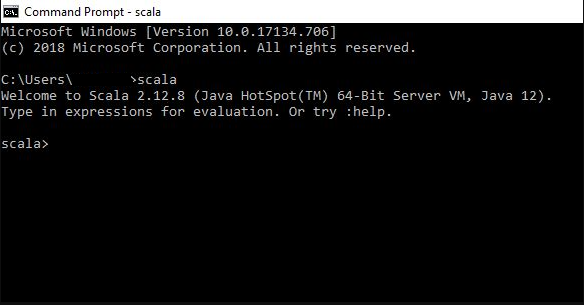
If the installation was successful you should see the Scala REPL (Read-Eval-Print Loop) prompt.
Install Scala on Our Windows 10 VPS!
With Ultahost, Hosting Windows 10 VPS easily installs Scala. Enjoy ultra-fast SSD NVME speeds with no dropouts and slowdowns.
Basic Usage of Scala
To run the simple program use the following code in the command prompt:
println("Hello, World!")
To use variables and data types write the following code:
val name = "Bob"
var age = 15
If you want to write the functions on Scala you can do this with the following:
def greet(name: String): String = {
  s"Hello, $name!"
}
Common Issues
The following are the common issues encountered while installing Scala on Windows 10 system:
- Java not found: Ensure you have the JDK installed and its path is set in the environment variables.
- Environment variable issues: Double-check if the Scala bin directory is added correctly to the PATH variable.
- Incompatible Scala version: If you encounter issues try using a different Scala version.
By addressing these common issues you can resolve most installation problems and start coding in Scala.
Important Considerations
The following are the important considerations after installing Scala on the Windows 10 operating system:
- Consider using a package manager like Chocolatey or Scoop to simplify the installation process.
- Scala can be integrated with popular IDEs like IntelliJ IDEA, Eclipse, or NetBeans. These IDEs provide features like code completion, debugging, and build automation.
- For managing Scala projects consider using tools like SBT (Simple Build Tool) or Maven.
Conclusion
By following these steps you should have successfully installed Scala on your Windows 10 machine. You can now start exploring the language’s features and building your Scala applications.
Installing Scala on Windows can be a simple process for beginners. Upgrading to an Ultahost cheap VPS hosting provides a more streamlined and efficient solution which is the ideal environment for Scala development. This eliminates compatibility issues and simplifies the installation process.
FAQ
What is Scala?
Scala is a programming language that combines object-oriented and functional programming.
Why should I install Scala on Windows 10?
Installing Scala allows you to develop software and run Scala programs on your Windows 10 computer.
What are the system requirements for installing Scala on Windows 10?
You will need Windows 10 Java installed and sufficient disk space to install Scala.
How do I download Scala for Windows 10?
Visit the official Scala website and download the Scala binaries for Windows.
Do I need Java to install Scala?
Yes, Java is required to run Scala on your system.
How do I check if Scala is installed correctly on Windows 10?
Open the Command Prompt and type scala to verify the installation.
Can I uninstall Scala from Windows 10 easily?
Yes, you can uninstall Scala from the Control Panel like any other program.
Scala, a powerful programming language known for its functional and object-oriented features, is widely used for building scalable and high-performance applications. If you’re new to Scala and eager to get started with programming in this language, you’ll first need to set up Scala on your system. In this comprehensive guide, we’ll walk you through the step-by-step process of installing Scala on different operating systems, ensuring you’re ready to embark on your Scala programming journey.
Before you begin the installation process, ensure that you have the following prerequisites:
- Access to a computer running Windows, macOS, or Linux.
- Internet connection to download the Scala distribution.
- Java Development Kit (JDK) installed on your system. Scala requires Java to be installed in order to run.
To install Scala, you’ll first need to download the Scala distribution. Follow these steps to download Scala:
- Visit the official Scala website at scala-lang.org .
- Navigate to the «Download» section of the website.
- Choose the appropriate distribution for your operating system (Windows, macOS, or Linux) and download the Scala installer package.
Follow these steps to install Scala on a Windows system:
- Double-click the downloaded Scala installer package to start the installation process.
- Follow the on-screen instructions in the installer wizard to proceed with the installation.
- Choose the installation directory and any additional configuration options as required.
- Once the installation is complete, Scala should be installed on your Windows system.
Follow these steps to install Scala on a macOS system:
- Open the downloaded Scala installer package (.dmg file).
- Drag the Scala icon into the «Applications» folder to install Scala on your system.
- Once the installation is complete, Scala should be available in the «Applications» folder on your macOS system.
Follow these steps to install Scala on a Linux system:
-
Open a terminal window.
-
Navigate to the directory where the downloaded Scala installer package is located.
-
Use the package manager appropriate for your Linux distribution to install Scala. For example, on Ubuntu, you can use the following command:
sudo apt-get install scala -
Once the installation is complete, Scala should be installed on your Linux system.
After installing Scala, you can verify that it has been installed correctly by opening a terminal or command prompt and typing the following command:
scala -version This command will display the version of Scala installed on your system. If Scala is installed successfully, you’re ready to start writing and executing Scala code!
Congratulations! You’ve successfully installed Scala on your system and are now ready to dive into Scala programming. Whether you’re building web applications, data processing pipelines, or distributed systems, Scala’s expressive syntax and powerful features make it an excellent choice for a wide range of applications. Happy coding!
Overview
Setting up a Scala development environment is a crucial first step for programmers eager to explore the language’s powerful features. Scala, known for its seamless integration of object-oriented and functional programming, requires a carefully configured environment. Setting up a Scala development environment involves installing the Scala programming language and a build tool like sbt (Scala Build Tool).
How to Setup Scala Environment
Setting up a Scala development environment involves several steps, including installing the Java Development Kit (JDK), Scala itself, and optionally, a build tool like sbt (Scala Build Tool). Here’s a detailed guide on how to set up a Scala environment:
Step 1: Install Java Development Kit (JDK)
-
Visit the Oracle JDK or OpenJDK Website:
- Go to the official Oracle JDK website: Oracle JDK or OpenJDK: OpenJDK.
-
Download and Install JDK:
- Download the most recent version of the JDK that is compatible with your operating system.
- Adhere to the installation guidelines presented on the website.
-
Verify Installation:
-
Open a terminal or command prompt and run:
-
Ensure that the installed JDK version is displayed.
-
Step 2: Install Scala
-
Visit the Scala Download Page:
- Go to the official Scala download page: Scala Download.
-
Choose Scala Version and Download:
- Select the Scala version that suits your needs.
- Download the installer or archive for your operating system.
-
Install Scala:
- Adhere to the installation guidelines specified for your operating system.
-
Verify Installation:
-
Open a terminal or command prompt and run:
-
Ensure that the installed Scala version is displayed.
-
Step 3: Install a Build Tool (Optional, but Recommended)
-
Visit the sbt Website:
- Go to the sbt website: sbt Download.
-
Download and Install sbt:
- Follow the instructions to download and install sbt on your machine.
-
Verify Installation:
-
Open a terminal or command prompt and run:
-
Ensure that the installed sbt version is displayed.
-
Step 4: Create a Simple Scala Project
-
Choose a Text Editor or IDE:
- Select a text editor or an IDE for Scala development (e.g., IntelliJ IDEA, Visual Studio Code, or Eclipse).
-
Create a Project Directory:
-
Open a terminal or command prompt, create a new project directory, and navigate into it:
-
-
Create a Scala File:
- Inside your project directory, create a file named Hello.scala with some Scala code.
Step 5: Compile and Run the Scala Program
-
Using sbt:
-
If you’re using sbt, run:
-
-
Without sbt:
-
If you’re not using sbt, manually compile and run the program:
-
Checking Java Installation
Checking the Java installation is an essential step when setting up the Scala environment, as Scala runs on the Java Virtual Machine (JVM). Here’s how you can check if Java is installed on your system for Scala:
Using the Command Line:
-
Open a Terminal or Command Prompt:
- For Windows, either Command Prompt or PowerShell can be utilized.
- On macOS or Linux, use the Terminal.
-
Run the Following Command:
-
Check the Output:
- If Java is installed, you’ll see information about the installed Java version.
- For example:
Interpreting the Output
-
Version Information:
The first line displays the version of the installed JDK.
-
Runtime Environment:
The second line provides details about the runtime environment.
-
VM Information:
The third line shows information about the Java Virtual Machine.
Troubleshooting
- If the command is not recognized, Java might not be installed, or the system may not recognize the java command. Ensure that the JDK is installed correctly, and the Java executable is included in your system’s PATH.
- If Java is not installed, follow the installation instructions provided by Oracle or the OpenJDK website.
Scala for Eclipse
Scala support for Eclipse is provided through the Scala IDE plugin, which is designed to enhance the Eclipse IDE for Scala development. Here are the steps to set up Scala for Eclipse using the Scala IDE plugin:
Step 1: Prerequisites
Ensure that you have the following prerequisites installed on your machine:
-
Java Development Kit (JDK):
- Scala runs on the Java Virtual Machine (JVM), so make sure you have a JDK installed. You can download it from Oracle or use OpenJDK.
-
Eclipse IDE:
- Download and install the Eclipse IDE. The «Eclipse IDE for Java Developers» edition is suitable.
- Eclipse IDE Download: https://www.eclipse.org/downloads/
Step 2: Install Scala IDE Plugin
-
Open Eclipse:
- Launch the Eclipse IDE that you’ve installed.
-
Install Scala IDE:
- In Eclipse, go to Help -> Eclipse Marketplace.
-
Search for Scala IDE:
- In the Eclipse Marketplace dialog, search for «Scala IDE.»
-
Install Scala IDE:
- Select «Scala IDE for Eclipse» from the search results.
- Click the «Go to the full listing» link and then click the «Go to the website» link.
- Follow the instructions to install the Scala IDE plugin.
-
Restart Eclipse:
- After installation, restart Eclipse to apply the changes.
Step 3: Create a Scala Project
-
Open the Scala Perspective:
- In Eclipse, go to Window -> Perspective -> Open Perspective -> Other….
- Select «Scala» and click «OK.»
-
Create a New Scala Project:
- In the Scala perspective, go to File -> New -> Project… -> Scala -> Scala Project.
- Enter a project name and click «Finish.»
-
Configure Build Path:
- Right-click on the newly created project, go to Build Path -> Configure Build Path…
- Ensure that the Java and Scala libraries are included in the build path.
Step 4: Write and Run Scala Code
-
Create a Scala Class:
- Right-click on the src folder within your Scala project.
- Go to New -> Class.
- Enter a class name and select the option to include the public static void main(String[] args) method.
-
Write Scala Code:
- Write your Scala code in the editor. The Scala IDE provides syntax highlighting, content assist, and other features.
-
Run Scala Program:
- Right-click on the Scala file.
- Choose Run As -> Scala Application.
Step 5: Additional Tips
-
Content Assist and Type Checking:
- Scala IDE provides features like content assist and real-time error highlighting.
- Use Ctrl + Space for content assist.
-
Debugging:
- Debug Scala applications in Eclipse using the built-in debugger.
-
Manage Dependencies:
- For managing dependencies in your Scala projects, consider using tools like sbt.
Installing Scala in Windows
Installing Scala on Windows is a straightforward process. Here’s a step-by-step guide to help you set up Scala on your Windows machine:
Pre-requisites
Prior to starting, make sure you have the following requirements:
- Java Development Kit (JDK):
- Scala runs on the Java Virtual Machine (JVM), so you need to have the JDK installed.
- Download the latest JDK from Oracle or use an alternative like OpenJDK.
Step 1: Download Scala
-
Visit the Scala Download Page:
- Go to the official Scala download page at https://www.scala-lang.org/download/.
-
Choose the Appropriate Package:
- Select the version of Scala that you want to install.
- Choose the Windows option, typically provided as an MSI installer.
-
Download Scala:
- Click on the download link to start downloading the Scala installer.
Step 2: Install Scala
-
Run the Installer:
- Locate the downloaded Scala installer (usually an MSI file) and double-click to run it.
-
Follow Installation Wizard:
- The Scala installer will guide you through the installation process.
- Choose the installation directory and follow the on-screen instructions.
-
Complete Installation:
- Complete the installation by clicking «Next» and then «Finish» when the installation is complete.
Step 3: Verify Installation
-
Open a Command Prompt:
- Open the Command Prompt by pressing Win + R, typing cmd, and pressing Enter.
-
Check Scala Version:
-
In the Command Prompt, type the following command to check the Scala version:
-
You should see information about the installed Scala version if the installation was successful.
-
-
Check Java Version:
-
Additionally, check the Java version using the command:
-
Ensure that the installed Java version is displayed.
-
Step 4: Set up Environment Variables (Optional)
-
Configure PATH Environment Variable:
- To run Scala and sbt (Scala Build Tool) commands from any directory, you can add Scala’s bin directory to the system PATH.
- Find the location where Scala is installed (e.g., C:\Program Files\Scala\bin), copy the path.
-
Add to PATH:
- Right-click on «This PC» or «Computer» on your desktop or File Explorer.
- Select «Properties» -> «Advanced system settings» -> «Environment Variables…»
- Under «System variables,» find and select the «Path» variable, then click «Edit…»
- Click «New» and add the path to Scala’s bin directory.
- Click «OK» to close the windows.
Step 5: Test Scala Installation
-
Open a New Command Prompt:
- Close any existing Command Prompt windows and open a new one.
-
Run Scala REPL:
- Type scala in the Command Prompt and press Enter.
- You should enter the Scala REPL (Read-Eval-Print Loop) environment.
-
Exit REPL:
- Type :q and press Enter to exit the Scala REPL.
Conclusion
- Before installing Scala, ensure you have the Java Development Kit (JDK) installed on your machine.
- Visit the Scala website, download the installer or archive, and follow the installation instructions for your operating system.
- Consider installing sbt (Scala Build Tool) to streamline project management and dependency handling.
- Use a text editor or IDE to create a new Scala project, write a simple Scala program, and compile/run it using tools like sbt.
- Verify the Scala and sbt installations by checking their versions, and ensure that Java is correctly configured in your environment.
Installation of Scala Programming Language, Welcome to the world of Scala Programming Language Tutorials. In these Tutorials, one can explore How to Download and install Scala on Linux, Unix, and Windows OS. Learn More advanced Tutorials on How to install Scala on Linux, Unix, and Windows OS by taking an example from India’s Leading Apache spark training institute which Provides advanced Apache spark course for those tech enthusiasts who wanted to explore the technology from scratch to advanced level like a Pro.
We Prwatech the Pioneers of Apache Spark training offering advanced certification course and Installation of Scala Programming Language to those who are keen to explore the technology under the World-class Training Environment.
Today we will learn how to download Scala and then install Scala on Linux, Unix, and Windows OS. Scala runs on top of JVM, so you should have JDK 1.8 or higher version installed all ready to proceed with Scala installation. Since you are here to learn Scala, I am assuming that you know how to install Java on your system.
Download and Install Scala on Linux systems
Scala installation on Linux, Ubuntu, Mac OS X or any Unix based system is the same, so the below steps should work for any *nix system.
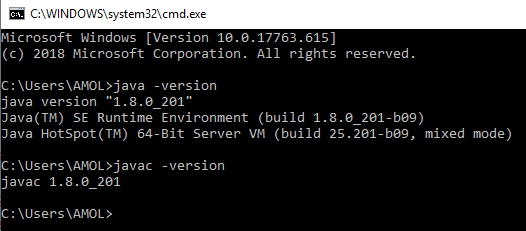
Verify the JDK installation on your machine. Open the shell/terminal and type java -version and javac -version.
Download Scala Binaries from http://www.scala-lang.org/download/. As of writing, this post-Scala version is 2.11.8, so you should be getting a downloaded file as scala-2.11.8.tgz. Unzip the scala-2.11.8.tgz file using the following command as shown below.
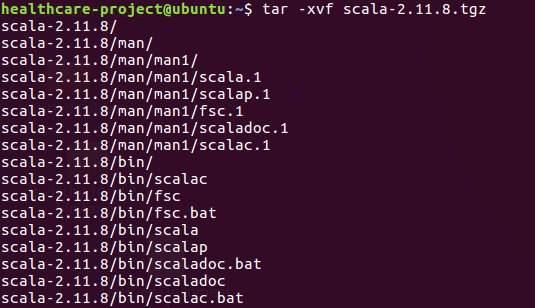
Now we are in the home directory where Scala binaries are present. Just go to the bin directory.

Now enter the scala shell as shown below.

This is the Scala REPL shell in which we can type programs and see the outcome right in the shell.
Prerequisite for Scala installation on windows
Verify the JDK installation on your windows machine by typing the following commands in the command prompt. JDK version should be 1.8 or above.
Scala download and installation can be done in the following ways:
1. First, download the Scala setup from https://www.scala-lang.org/download/2.11.8.html and click on scala-2.11.8.msi extension
2.Double Click or Open scala-2.11.8.msi file and select Run. The Setup Wizard appears, click on Next and complete the installation process. Scala installer will set the Path environment variable too so that you can run it from anywhere.
Steps for Scala download and installation
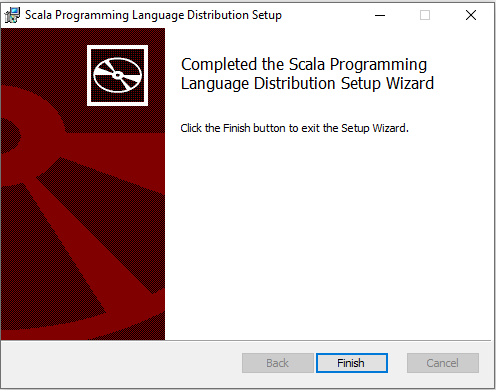
Click on next button
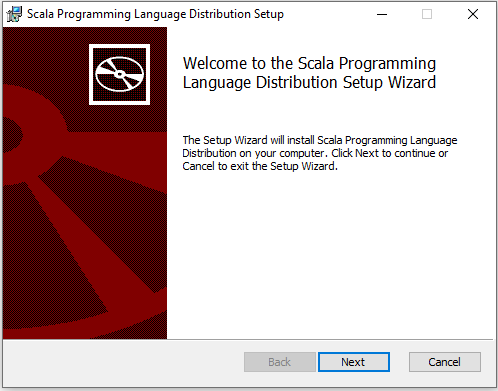
Accept the license and click on Next
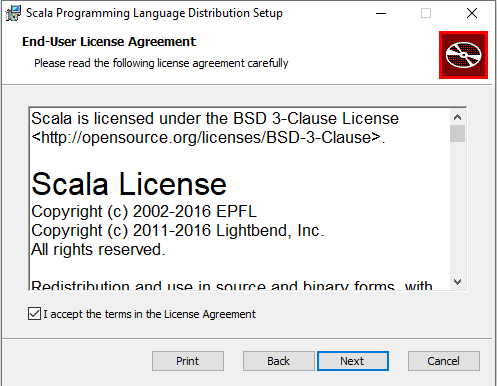
Click on Next

Click on Install

Wait a moment until status to complete
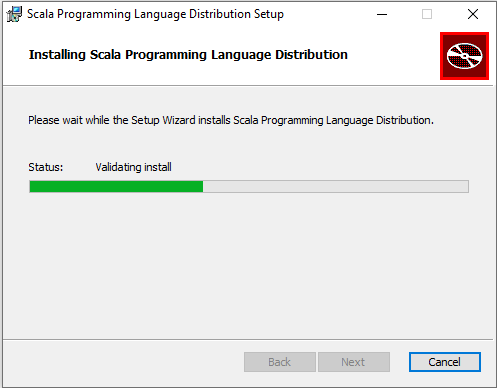
And finally, click on Finish
Open the command prompt and navigate to the bin directory of the installed scala by typing scala as shown below:

Scala sample program example:
Let us see how to write and execute a program in the shell. Below is a simple class student that we can define in the Scala shell.
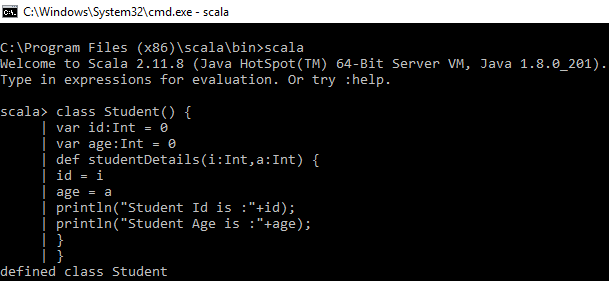
Output: defined class Student
Here we create a Student class and print the student details in the student details method by passing student id and age as a parameter. If there are no errors in the code, then a message “defined class Student” is displayed.
Create the student object and invoke the student details method bypassing the student id and age.
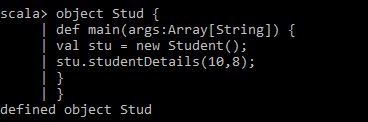
Returns: defined object Stud
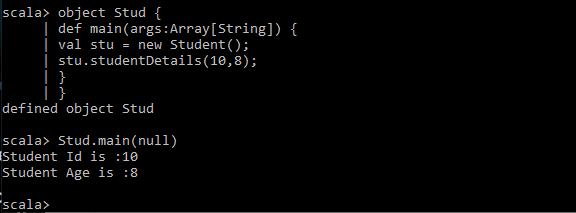
Now run the code by typing Stud.main(null) and you will see below output as shown in the image.
That’s all for now for download and install scala on different operating systems, we will look into more Scala features in coming posts.
Intellij IDE:
For beginners in scala language, the most popular way to get Scala is either using Scala through sbt, the Scala build tool, or to use Scala through an IDE. By considering you have installed JDK 8 or above, you can install scala by installing an IDE such as IntelliJ, or sbt, Scala’s build tool
IntelliJ is an IDE for programmers who want to get started with scala in IntelliJ. You can build a scala project with IntelliJ and sbt. You can also test scala in IntelliJ.
To download IntelliJ click on the link and choose download Community Edition.
Once the download is complete install it and choose scala plugin available into IntelliJ software.
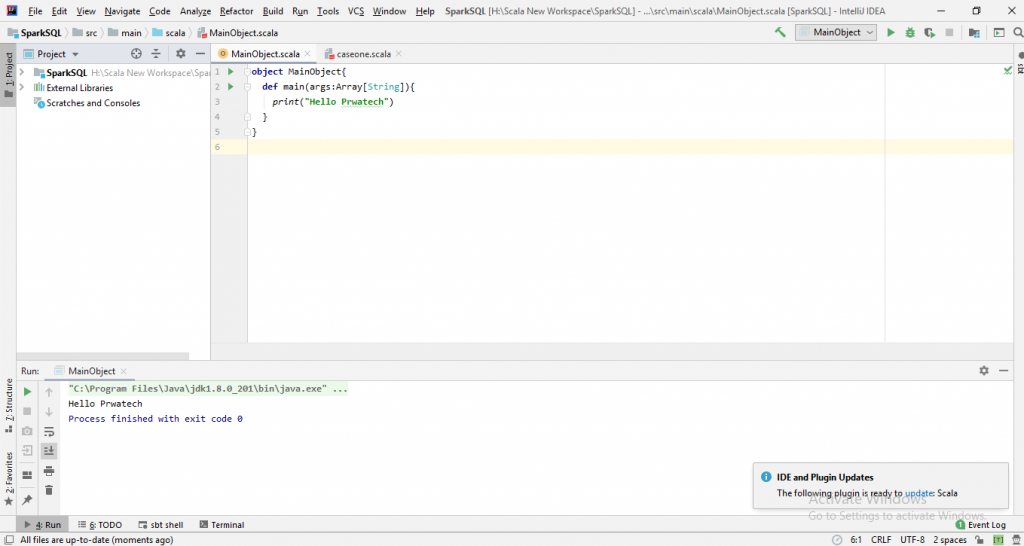
The “Hello Prwatech” output you can see after run MainObject.scala program given below:
Looking forward to learning more advanced tutorials on Apache Spark course then get it done from India’s leading Apache spark Training institute who can help you to learn the technology from 0 to advanced Level like a Pro.