

This tutorial will show you how to enable or disable letting apps use advertising ID for relevant ads for your account or all users in Windows 11.
Windows generates a unique advertising ID for each user on a device, which app developers and advertising networks can then use for their own purposes, including providing more relevant advertising in apps. When the advertising ID is enabled, apps can access and use it in much the same way that websites can access and use a unique identifier stored in a cookie. Thus, app developers (and the advertising networks they work with) can associate personal data they collect about you with your advertising ID and use that personal data to provide more relevant advertising and other personalized experiences across their apps.
The advertising ID setting applies to Windows apps using the Windows advertising identifier. The advertising ID setting does not apply to other methods of interest-based advertising delivered by Microsoft or third parties, such as cookies used to provide interest-based display ads on websites. Third-party products accessed through or installed on Windows may also deliver other forms of interest-based advertising subject to their own privacy policies. Microsoft delivers other forms of interest-based ads in certain Microsoft products, both directly and by partnering with third-party ad providers.
Reference:
Turning the advertising ID off will not reduce the number of ads you see, but it may mean that ads are less interesting and relevant to you. Turning it back on will reset the advertising ID.
Contents
- Option One: Turn On or Off Advertising ID for Current User in Settings
- Option Two: Turn On or Off Advertising ID for Current User using REG file
- Option Three: Enable or Disable Advertising ID for All Users in Local Group Policy Editor
- Option Four: Enable or Disable Advertising ID for All Users using REG file
Option One
Turn On or Off Advertising ID for Current User in Settings
1 Open Settings (Win+I).
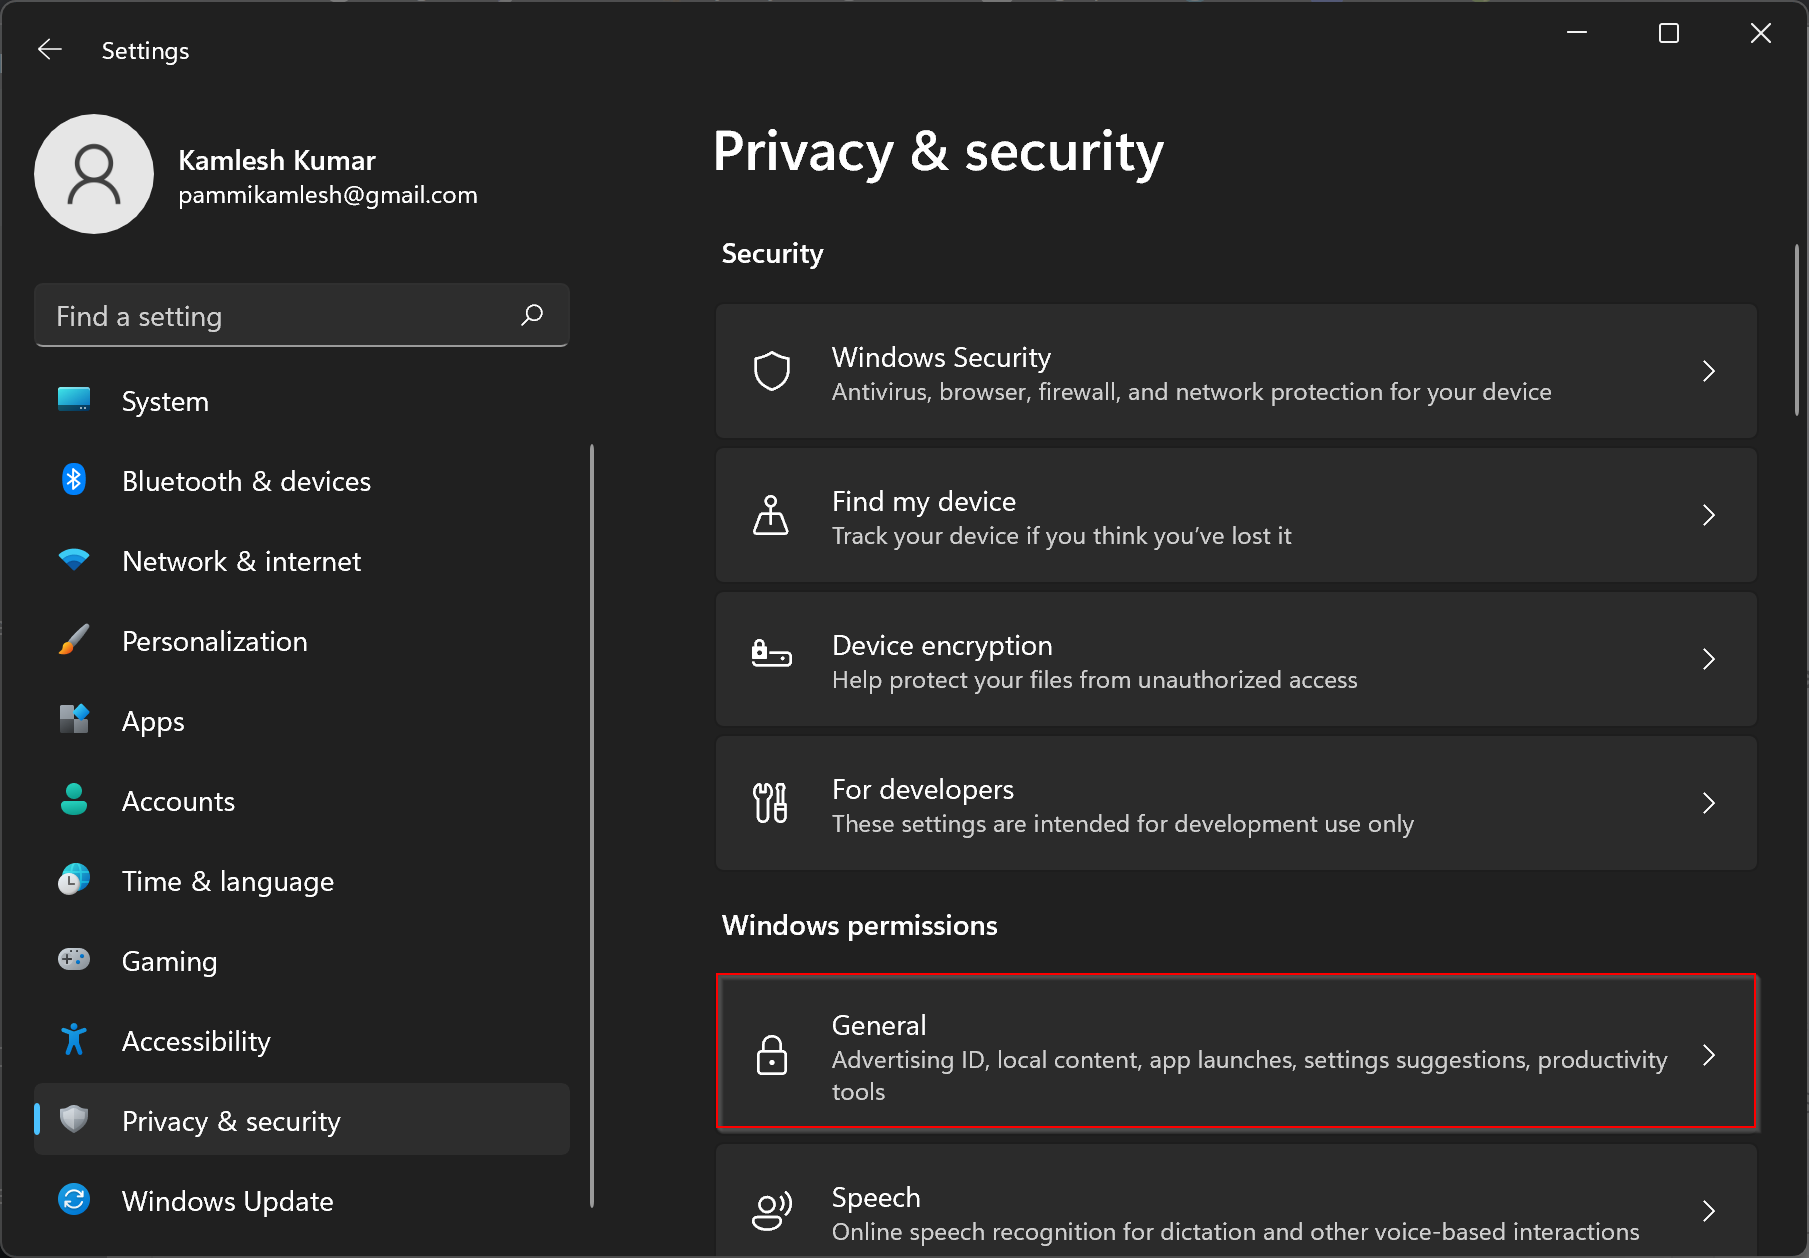
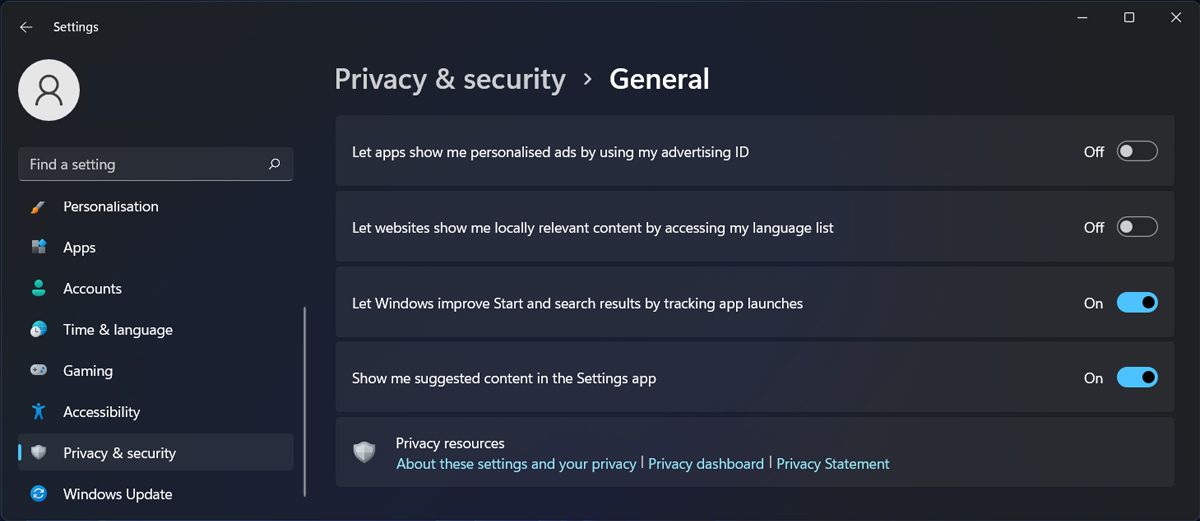
2 Click/tap on Privacy & security on the left side, and click/tap on General on the right side. (see screenshot below)

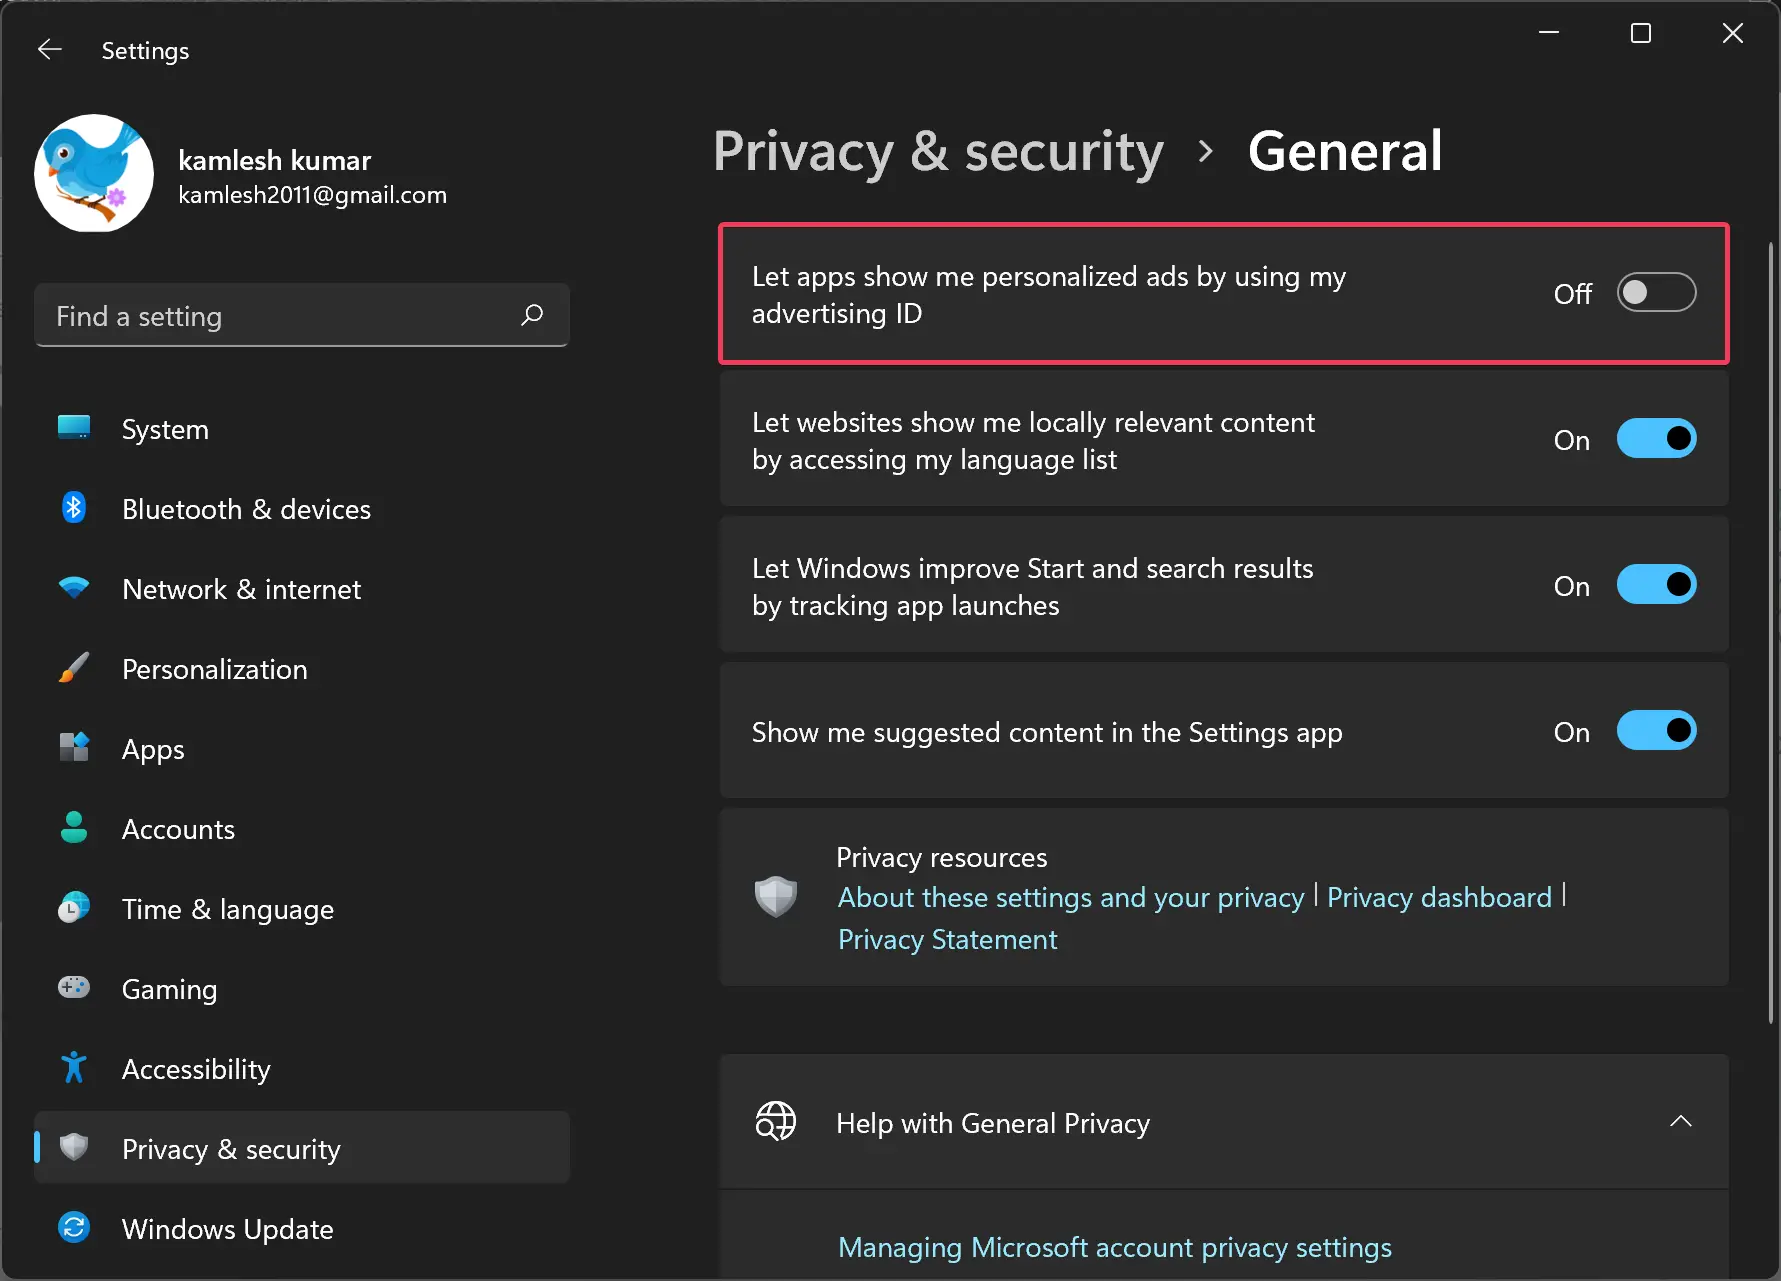
3 Turn On (default) or Off Let apps show me personalized ads by using my advertising ID for what you want on the right side. (see screenshot below)

4 You can now close Settings if you like.
Option Two
Turn On or Off Advertising ID for Current User using REG file
1 Do step 2 (on) or step 3 (off) below for what you want.
2 Turn On Advertising ID
This is the default setting.
A) Click/tap on the Download button below to download the REG file below, and go to step 4 below.
Turn_ON_Avertising_ID_for_current_user.reg
(Contents of REG file for reference)
Code:
Windows Registry Editor Version 5.00

[HKEY_CURRENT_USER\Software\Microsoft\Windows\CurrentVersion\AdvertisingInfo]
"Enabled"=dword:00000001
3 Turn Off Advertising ID
A) Click/tap on the Download button below to download the REG file below, and go to step 4 below.
Turn_OFF_Avertising_ID_for_current_user.reg
(Contents of REG file for reference)
Code:
Windows Registry Editor Version 5.00

[HKEY_CURRENT_USER\Software\Microsoft\Windows\CurrentVersion\AdvertisingInfo]
"Enabled"=dword:00000000
4 Save the .reg file to your desktop.
5 Double click/tap on the downloaded .reg file to merge it.
6 When prompted, click/tap on Run, Yes (UAC), Yes, and OK to approve the merge.
7 You can now delete the downloaded .reg file if you like.
Option Three
Enable or Disable Advertising ID for All Users in Local Group Policy Editor
You must be signed in as an administrator to use this option.
The Local Group Policy Editor is only available in the Windows 11 Pro, Enterprise, and Education editions.
All editions can use Option Four to configure the same policy.
1 Open the Local Group Policy Editor (gpedit.msc).
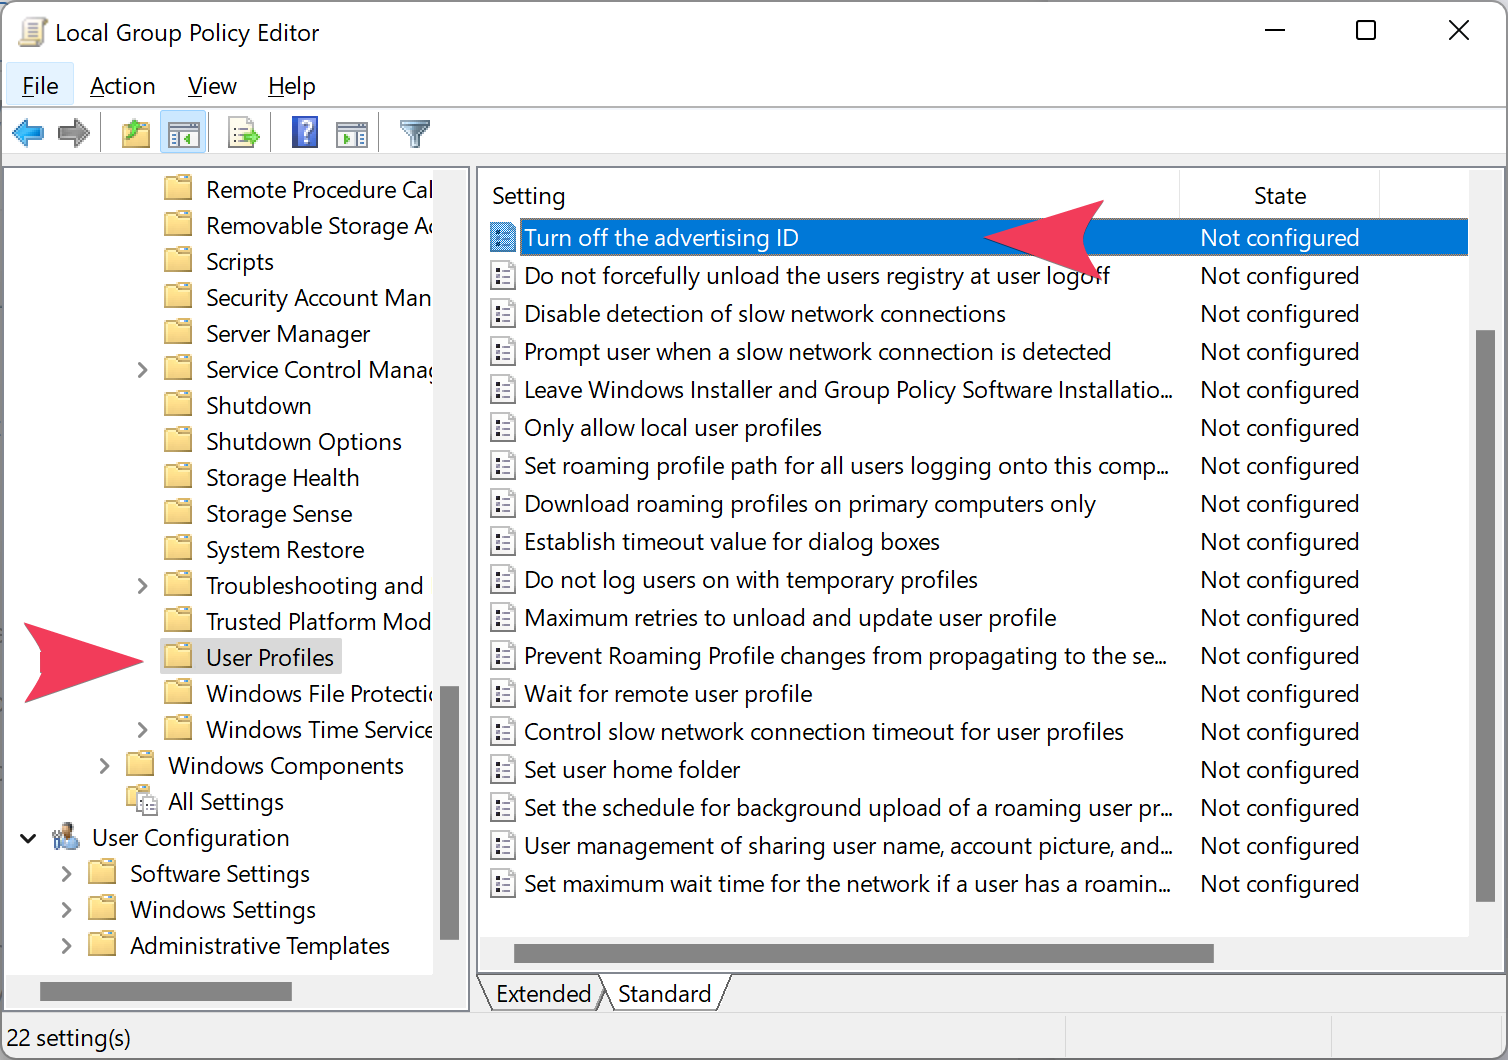
2 Navigate to the policy location below in the left pane of the Local Group Policy Editor. (see screenshot below)
Computer Configuration\Administrative Templates\System\User Profile

3 In the right pane of User Profile, double click/tap on the Turn off the advertising ID policy to edit it. (see screenshot above)
4 Do step 5 (enable) or step 6 (disable) below for what you would like to do.
5 Enable Advertising ID for All Users
This is the default setting to allow using Option One and Option Two.
A) Select (dot) Not Configured, click/tap on OK, and go to step 7 below. (see screenshot below)

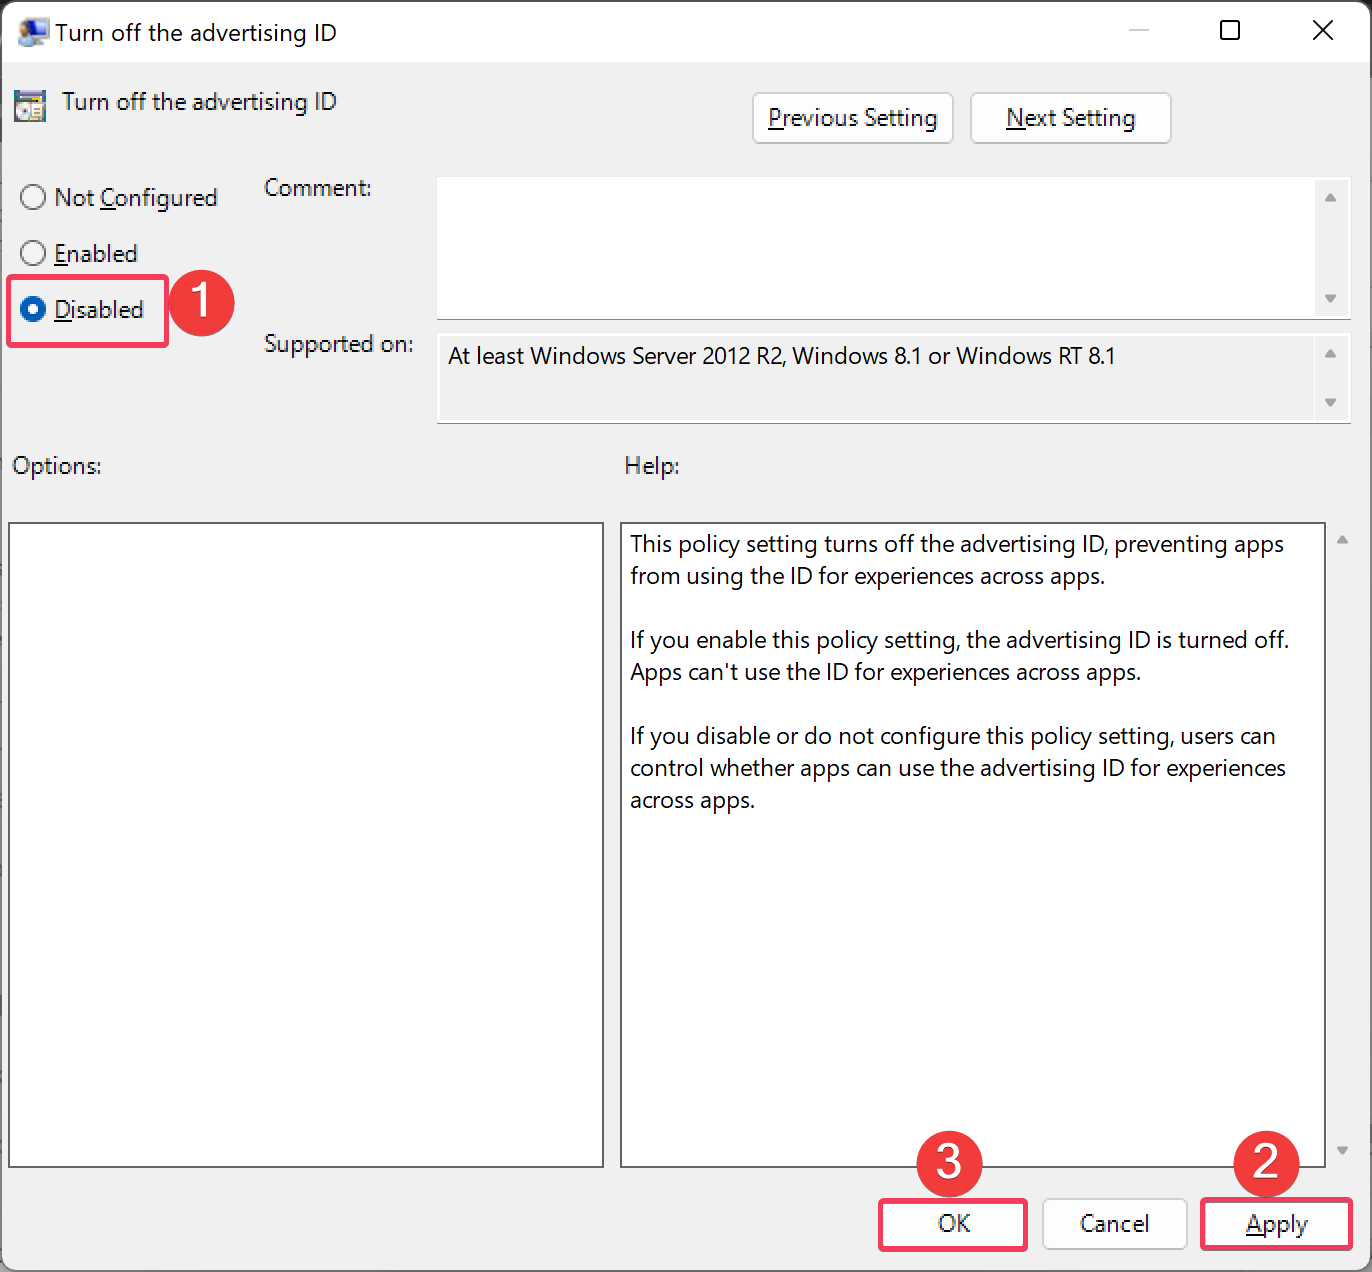
6 Disable Advertising ID for All Users
This will disable (gray out) and prevent using Option One and Option Two.
A) Select (dot) Enabled, click/tap on OK, and go to step 7 below. (see screenshot below)
7 You can now close the Local Group Policy Editor if you like.
Option Four
Enable or Disable Advertising ID for All Users using REG file
You must be signed in as an administrator to use this option.
1 Do step 2 (enable) or step 3 (disable) below for what you would like to do.
2. Enable Advertising ID for All Users
This is the default setting to allow using Option One and Option Two.
A) Click/tap on the Download button below to download the file below, and go to step 4 below.
Enable_Avertising_ID_for_all_users.reg
(Contents of REG file for reference)
Code:
Windows Registry Editor Version 5.00

[HKEY_LOCAL_MACHINE\SOFTWARE\Policies\Microsoft\Windows\AdvertisingInfo]
"DisabledByGroupPolicy"=-
3. Disable Advertising ID for All Users
This will disable (gray out) and prevent using Option One and Option Two.
A) Click/tap on the Download button below to download the file below, and go to step 4 below.
Disable_Avertising_ID_for_all_users.reg
(Contents of REG file for reference)
Code:
Windows Registry Editor Version 5.00

[HKEY_LOCAL_MACHINE\SOFTWARE\Policies\Microsoft\Windows\AdvertisingInfo]
"DisabledByGroupPolicy"=dword:00000001
4 Save the REG file to your desktop.
5 Double click/tap on the downloaded REG file to merge it.
6 When prompted, click/tap on Run, Yes (UAC), Yes, and OK to approve the merge.
7 You can now delete the downloaded REG file if you like.
That’s it,
Shawn Brink
-
Turn_OFF_Avertising_ID_for_current_user.reg
Turn_OFF_Avertising_ID_for_current_user.reg
666 bytes
· Views: 602
-
Turn_ON_Avertising_ID_for_current_user.reg
Turn_ON_Avertising_ID_for_current_user.reg
666 bytes
· Views: 508
-
Disable_Avertising_ID_for_all_users.reg
Disable_Avertising_ID_for_all_users.reg
680 bytes
· Views: 591
-
Enable_Avertising_ID_for_all_users.reg
Enable_Avertising_ID_for_all_users.reg
654 bytes
· Views: 365
Для работы проектов iXBT.com нужны файлы cookie и сервисы аналитики.
Продолжая посещать сайты проектов вы соглашаетесь с нашей
Политикой в отношении файлов cookie
В мире, где Windows 10 и Windows 11 стали надёжными спутниками в работе и
развлечениях, есть одно «но» — встроенная реклама, которая порой
действует на нервы. Эти операционные системы от Microsoft, несмотря на свои преимущества, иногда могут
превратиться в рекламные платформы, подсовывая назойливые подсказки и
всплывающие окна.
Можно, конечно,
прибегнуть к сторонним инструментам для отключения этих рекламных объявлений
одним кликом, но это не всегда лучшее решение. Такие «инструменты
конфиденциальности» часто зависят от других настроек Windows, и использование этих универсальных
средств, многие из которых вмешиваются в реестр, может привести к сложностям в
понимании того, почему другие настройки ведут себя неожиданно.
Лучше всего взять
дело в свои руки и отключить рекламу самостоятельно. Это даст полный контроль
над процессом и упростит дальнейшее устранение возможных проблем. Большинство
этих рекламных объявлений можно легко отключить через меню настроек Windows.
Однако стоит
помнить, что Microsoft имеет
тенденцию возвращать рекламу в новые места и восстанавливать
«рекомендуемые» приложения с обновлениями Windows. Это означает, что время от времени может
потребоваться проверить настройки, чтобы убедиться, что всё остаётся
по-прежнему. Хотя предложенные шаги могут не убрать всю рекламу, они должны
заметно уменьшить её количество.
С течением
времени Стартовое меню в операционных системах Windows претерпело значительные изменения. Несомненно,
некоторые из нововведений были полезными, но среди них также появились и
недостатки, такие как «предложения» от Microsoft, которые иногда могут быть навязчивыми и
направлены на продвижение продуктов компании. Особенно заметно это становится,
если вы предпочитаете браузеры, отличные от Edge, и получаете рекомендации перейти на продукты Microsoft.
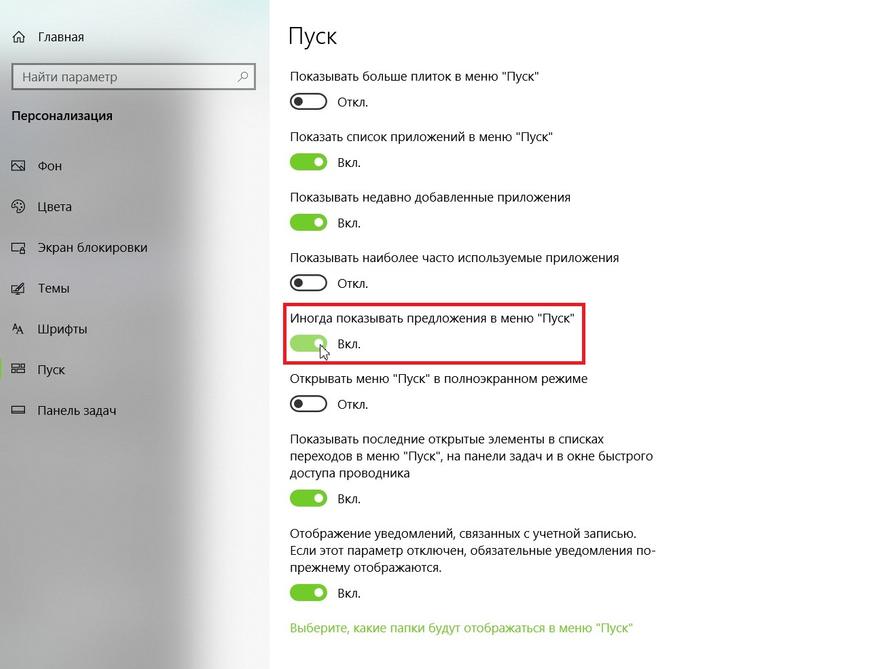
Для пользователей
Windows 10 процесс отключения
этих рекламных предложений довольно прост. Вам нужно лишь зайти в раздел
«Настройки», затем перейти в категорию «Персонализация» и
выбрать вкладку «Старт». Здесь вы найдете опцию «Иногда
показывать предложения в меню «Пуск»», которую можно отключить, сняв
галочку.
В случае Windows 11, этот процесс несколько отличается.
Настройка называется «Показывать рекомендации для советов, ярлыков, новых
приложений и прочего» и находится в аналогичном разделе.
Если вас
беспокоят живые плитки в Стартовом меню Windows 10, особенно те, которые установлены по умолчанию
и не приносят пользы, вы можете легко их отключить. Просто кликните правой
кнопкой мыши по ненужной плитке, выберите «Дополнительно» и затем
«Отключить живую плитку». Таким образом, вы уберете анимацию и
сделаете ее обычным ярлыком. Если же вы хотите полностью удалить приложение, то
просто выберите «Удалить» после щелчка правой кнопкой мыши по плитке.
Экран блокировки
в Windows, к сожалению, тоже
не лишён недостатков. Если на экране блокировки установлено отображение
изображения или слайд-шоу, Microsoft часто добавляет на экран текстовые сообщения. Иногда это «интересные
факты» о местности, изображённой на фотографии, а иногда —
«советы» по использованию устройства, например, предложения перейти
на Edge или использовать
учётную запись Microsoft
вместо локальной учётной записи.
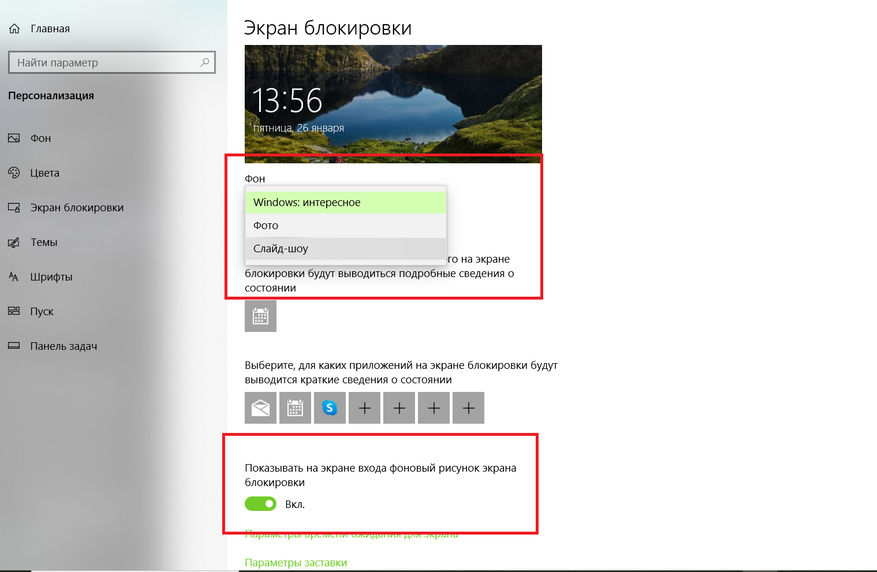
Для того чтобы
экран блокировки показывал только выбранное вами изображение без дополнительных
предложений и советов, необходимо выполнить несколько простых шагов. Сначала
зайдите в раздел «Настройки», затем выберите
«Персонализация» и перейдите к «Экрану блокировки». Здесь
вам нужно будет изменить настройку фона с «Windows» на опцию «Изображение» или
«Слайд-шоу».
После этого
отключите функцию «Получать интересные факты, советы и другие сведения от Windows и Cortana на экране блокировки», чтобы убрать лишние
элементы и сосредоточиться исключительно на вашем фото.
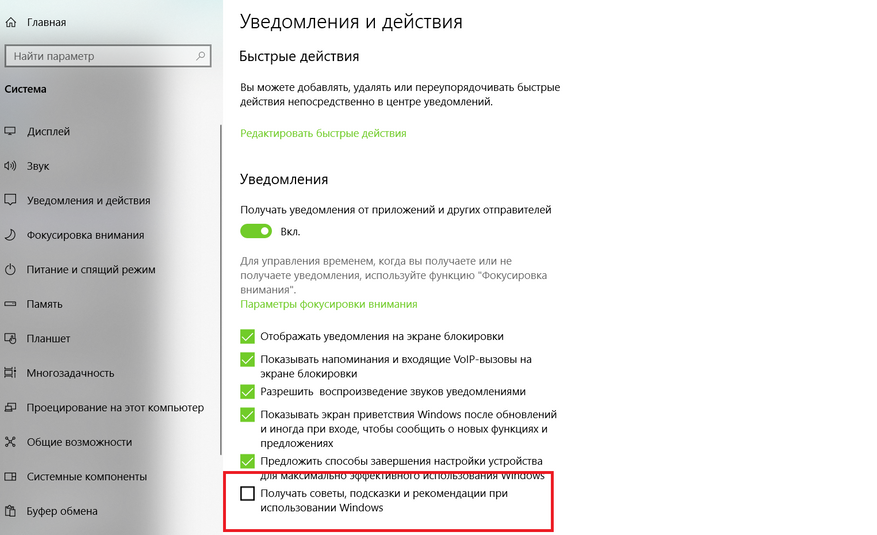
Иногда в Windows могут появляться всплывающие уведомления,
убеждающие перейти на Edge
или присоединиться к программе Microsoft Rewards. Чтобы
избавиться от них в Windows
10 для этого перейдите в раздел «Настройки», выберите
«Система» и затем «Уведомления и действия». Здесь найдите и
отключите опцию «Получать советы, подсказки и предложения при
использовании Windows».
Кроме того, вы можете отказаться от функции
«Показать приветствие Windows», которая запускает обучающие туры после обновлений, а также от
«Предложений по завершению настройки устройства».
В Windows 11 процесс управления этими уведомлениями
слегка отличается. Здесь вам нужно открыть «Настройки», перейти в
«Систему» и затем в «Уведомления». Прокрутите вниз до
раздела «Дополнительные настройки» и отключите там «Показать
приветствие Windows»,
«Предложения по максимальному использованию Windows» и «Получение советов и
предложений».
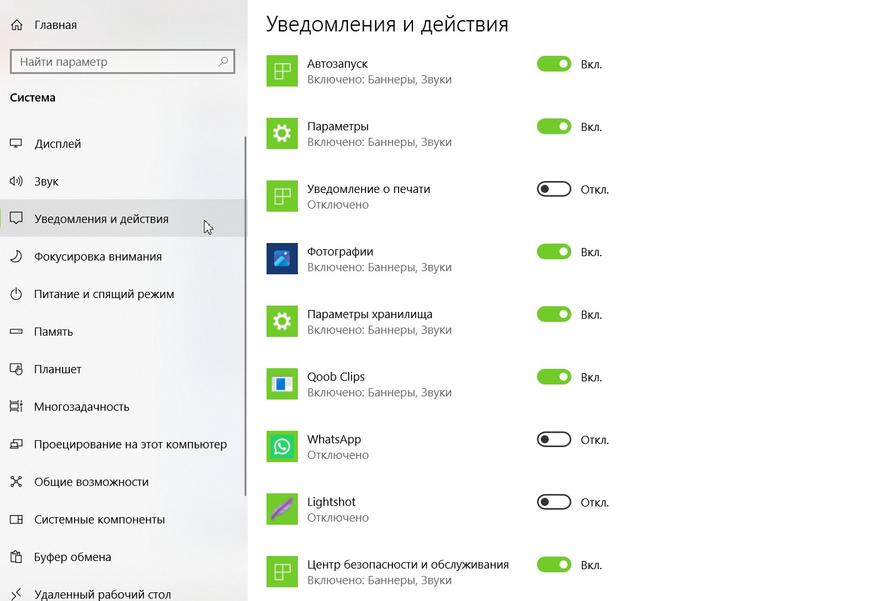
Стоит помнить,
что некоторые «рекламные» уведомления, которые появляются на экране,
могут не иметь отношения к Microsoft. Они могут быть связаны с предустановленным программным обеспечением
(блотваром), установленным производителем вашего компьютера. Если вы
сталкиваетесь с навязчивыми уведомлениями, откройте «Настройки» >
«Система» > «Уведомления» и прокрутите вниз до списка
приложений. Выясните, приходят ли сообщения от каких-либо из этих приложений. Есть
ли среди них приложения, которые вы не узнаёте?
В Windows 11 сложно определить, для чего
предназначено каждое приложение, поэтому может потребоваться поиск в интернете
для получения дополнительной информации. Например, работая на ноутбуке Dell, можно обнаружить, что такие приложения,
как SupportAssist, My Dell и Partner Promo, добавлены производителем. В случае с Lenovo ThinkPad есть Lenovo Vantage. Эти программы можно отключить (и
удалить).
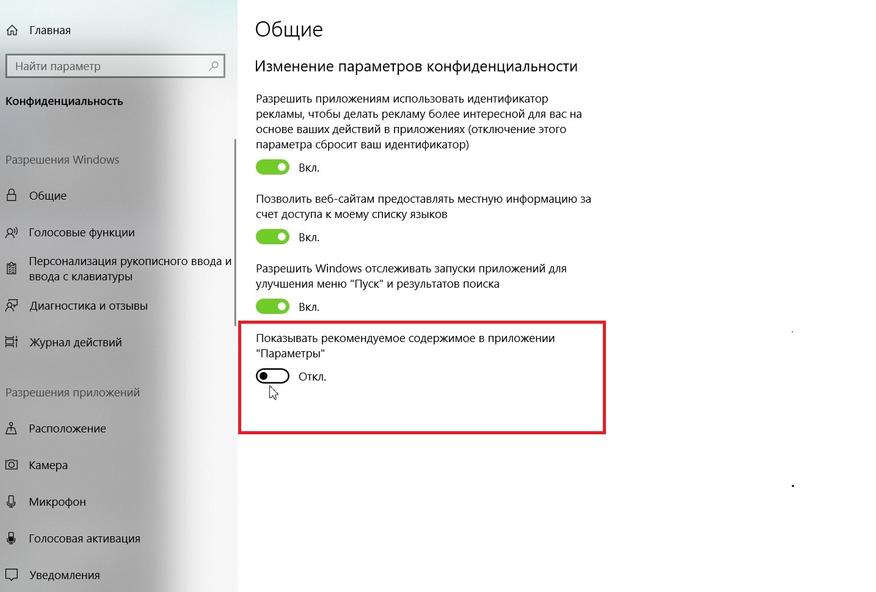
Microsoft начал
использовать приложение «Настройки» в качестве рекламного пространства для
предложения своих приложений пользователям.
Если вы не хотите видеть эти рекомендации,
просто перейдите в «Настройки» > «Конфиденциальность»
> «Общие» и отключите опцию «Показывать рекомендуемое
содержимое в приложении «Параметры»».
Это позволит
избежать ненужных предложений и сосредоточиться на настройках, которые
действительно важны для вас.
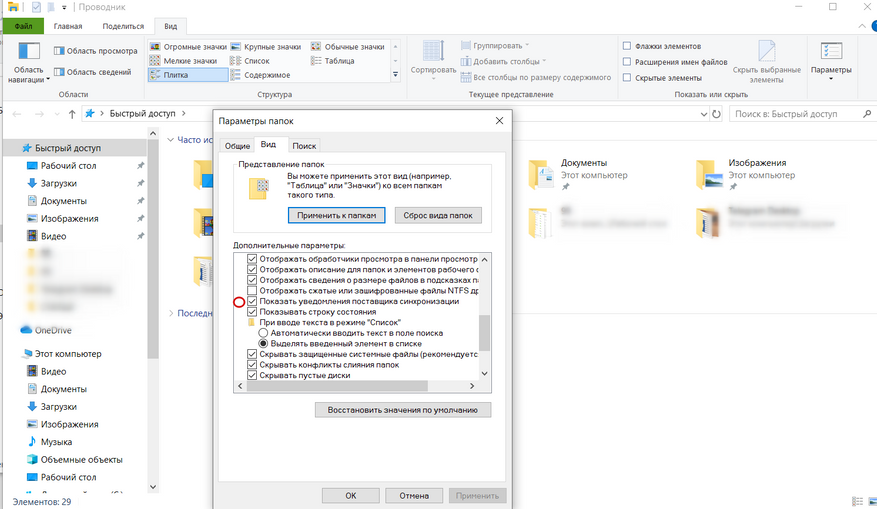
Кажется, что ни
один уголок Windows не
остался без рекламы, и даже Проводник не стал исключением. В своих попытках
заинтересовать пользователей подпиской на OneDrive и Office 365, Microsoft начала
продвигать эти сервисы прямо во время просмотра файлов на жёстком диске. Но от
этих рекламных уведомлений можно избавиться.
В Проводнике Windows 10 щелкните «Вид» >
«Параметры» > «Изменить параметры папок и поиска». В Windows 11 откройте меню с тремя точками и
щелкните «Параметры». Затем в появившемся окне перейдите на вкладку
«Вид». Прокрутите вниз до опции «Показывать уведомления
синхронизируемого провайдера» и снимите эту галочку. Это должно
предотвратить появление рекламных уведомлений в Проводнике в будущем.
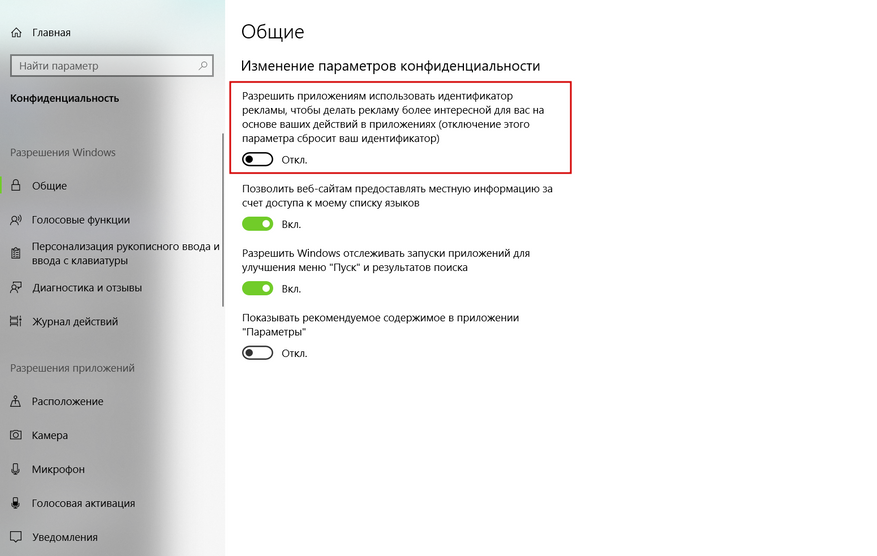
Windows
использует рекламный идентификатор (Advertising ID), чтобы отслеживать
интересы пользователя и показывать более релевантную рекламу в приложениях. В
процессе отключения встроенной рекламы в Windows также может быть полезно отключить эту функцию.
В Windows 10 перейдите в «Настройки» >
«Конфиденциальность» > «Общие» и отключите опцию
«Позволять приложениям использовать мой рекламный идентификатор»,
если вы предпочитаете видеть ненаправленную рекламу.
В Windows 11 эта опция называется «Позволить
приложениям показывать мне персонализированную рекламу с использованием моего
рекламного идентификатора». Отключение этой функции поможет снизить
уровень персонализации рекламы, которую вы видите в приложениях.
Итак, мы
рассмотрели ряд способов, как избавиться от встроенной рекламы в Windows 10 и Windows 11. Отключение рекламы в Стартовом меню, на экране
блокировки, в уведомлениях, Проводнике, а также отказ от персонализированной
рекламы — все эти меры помогут сделать вашу работу на компьютере более
комфортной и менее раздражающей.
Помните, что хотя
некоторые из этих настроек могут казаться малозначительными, в совокупности они
могут значительно улучшить ваш пользовательский опыт. Ведь в конце концов,
каждый из нас хочет, чтобы его компьютер служил надежным инструментом для
работы и развлечений, а не был источником нежелательной рекламы и беспокойства.
Сделайте эти
простые настройки, и вы заметите, как ваша повседневная работа на компьютере
станет более приятной и продуктивной.
In case you don’t know, Microsoft hooks up every machine that is running Windows 10 with an Advertising ID which helps them in providing Windows 10 users with relevant ads. These ads are delivered to users in the Action Center, Start Menu as well as the ads inside the UWP Applications.
What makes these advertisements relevant is that they keep track of your browsing trends, likes and dislikes, with the help of the Advertising ID. However, if you are not fond of advertisements and you do not want this feature of Microsoft to track your usage, worry not for you actually have the option to disable targeted ads on your Windows 10 computer by turning off the Advertising ID. And you can do that during Windows 10 Setup or using the Group Policy Editor. For more details, refer to the instructions provided below for each one of the methods.
Option 1 – Turn off Advertising ID during Windows 10 setup
If you are about to install Windows 10, then during the installation process, your computer boots into the Install and Configure Windows 10 screen with Cortana that assist you during the setup. Once you reach the last page which is “Choose privacy settings for your device”, you will see the Advertising ID of your computer. Under the Advertising ID, you have to disable or toggle off the “Apps can use advertising ID to provide more personalized advertising in accordance with the privacy policy of the app provider” option. After you disable it, click on the Accept button to proceed with the installation. After that, the copy of your Windows 10 you are using will have the Advertising ID disabled by default.
Option 2 – Turn off Advertising ID via Group Policy Editor
- First, tap the Win + R keys to launch the Run utility.
- Then, type “gpedit.msc” in the field and click OK or tap Enter to open the Group Policy Editor.
- Next, navigate to this group policy setting: Computer Configuration > Administrative Templates > System > User Profiles
- Now double click on the “Turn off the advertising ID” option and set the radio button to Enabled. Once you do, you will see the following description on your screen:
“This policy setting turns off the advertising ID, preventing apps from using the ID for experiences across apps. If you enable this policy setting, the advertising ID is turned off. Apps can’t use the ID for experiences across apps. If you disable or do not configure this policy setting, users can control whether apps can use the advertising ID for experiences across apps.”
Note that setting the radio button to Enabled or Not Configured will turn off the data collection of the Advertising ID.
- Finally, exit the Group Policy Editor and then restart your computer to apply the changes made successfully.
Do You Need Help with Your Device?
Our Team of Experts May Help
Troubleshoot.Tech Experts are There for You!
GET HELP
Troubleshoot.Tech experts work with all versions of Microsoft Windows including Windows 11, with Android, Mac, and more.
Share this article:
You might also like
What is Windows ImageAcquisition High CPU & Disk usage? The Windows Image Acquisition is the driver model in charge of the communication between the graphics hardware and the operating system. There are times when it causes high disk and CPU usage in Windows 10 systems which results in slow performance of the computer. To fix this issue, read on as this post will help you in addressing the problem.
The cause of this problem might have something to do with the hardware or the drivers. And so if your computer becomes slow because of the Windows Image Acquisition process, here are some suggestions that might be of help. You can try to restart the Windows Image Acquisition service, run a System File Checker Scan, disconnect & reconnect imaging hardware as well as update and reinstall the drivers and updating the graphics drivers.
For a complete set of instructions, follow the given options below.
Option 1 – Try restarting the Windows Image Acquisition Service
- Tap the Win + R keys to open the Run dialog box.
- Then type “services.msc” in the field and hit Enter to open the Windows Services Manager.
- From there, look for the Windows Image Acquisition Service and check on its service Status.
- If the Service Status is blank, right-click on it and select Start. And if the service Status is Running right-click on it and select Restart. After that, check if your computer’s performance is now back to normal.
Option 2 – Try running a System File Checker scan
As you know, running a System File Checker scan can help in replacing missing files as well as repair the corrupted ones which might be the reason behind the problem.
- Tap Win + R to launch Run.
- Type in cmd in the field and tap Enter.
- After opening Command Prompt, type in sfc /scannow
The command will start a system scan which will take a few whiles before it finishes. Once it’s done, you could get the following results:
- Windows Resource Protection did not find any integrity violations.
- Windows Resource Protection found corrupt files and successfully repaired them.
- Windows Resource Protection found corrupt files but was unable to fix some of them.
- Restart your computer after the scan is completed.
Option 3 – Try disconnecting and reconnecting the imaging hardware and then update and reinstall its drivers
It could be that the hardware that calls for the Windows Image Acquisition service has some issues which are why disconnecting and reconnecting the imaging hardware like scanners, printers, cameras can help in fixing the problem. In addition, you can also boot your computer in a Clean Boot State so that you can find the problematic hardware by hit and trial method. Refer to the steps below to do so:
- Log onto your PC as an administrator.
- Type in MSConfig in the Start Search to open the System Configuration utility.
- From there, go to the General tab and click “Selective startup”.
- Clear the “Load Startup items” check box and make sure that the “Load System Services” and “Use Original boot configuration” options are checked.
- Next, click the Services tab and select the “Hide All Microsoft Services” check box.
- Click Disable all.
- Click on Apply/OK and restart your PC. (This will put your PC into a Clean Boot State. And configure Windows to use the usual startup, just simply undo the changes.)
Option 4 – Try updating the Graphics drivers
- First, boot your computer into Safe Mode.
- After that, tap the Win + R keys to launch Run.
- Type in devmgmt.msc into the box and tap Enter or click OK to open the Device Manager.
- After that, a list of device drivers will be displayed. From there, look for the Display Adapters and click on them.
- After that, right-click on each entry under the Display Adapters and select the “Uninstall Device” option from the menu.
- Now restart your computer.
- After restarting your computer, go to the Settings app and Check for Updates in the Windows Update section.
Note: You also have the option to go directly to the website of your graphics card manufacturers like NVIDIA, Intel, or AMD and go to the section called Drivers then check if there’s a new available update – if there is, download and install it.
Read More
Both the DISKPART utility and the Disk Management are useful tools in Windows 10 that manage the disk space allocation, and so on. But these tools are not without errors as you could also encounter some when you run them. Recently, some users reported getting an error that says, “The selected disk is not a fixed MBR disk when trying to use the DISKPART utility”. Here’s the exact message of the error:
“The selected disk is not a fixed MBR disk. The ACTIVE command can only be used on fixed MBR disks.”
This kind of error only occurs when you try to activate a disk partition on a UEFI system partition. However, the command works only if your computer is based on BIOS/MBR. The UEFI method has no concept of the active partition and since you have a UEFI system, the disk type is GPT instead of MBR. To simply put it, your BIOS needs the MBR disk type while the UEFI needs the GPT disk type.
To fix the “The selected disk is not a fixed MBR disk when trying to use the DISKPART utility” error, there are various potential fixes you can try. You might have to disable Secure Boot, convert the disk to MBR or fix the Boot Manager. For more instructions, follow the options provided below.
Option 1 – Disable the Secure Boot in the BIOS
Disabling the Secure Boot in the BIOS settings is definitely recommended to resolve the issue. To disable Secure Boot, here’s what you have to do:
- First, boot your computer into Windows 10.
- Next, go to Settings > Windows Update. From there, check if there is anything that you have to download and install if you see any available updates. Usually, OEMs send and update the list of trusted hardware, drivers, and operating systems for your computer.
- After that, go to the BIOS of your computer.
- Then go to Settings > Update & Security > Advanced Startup options. If you click on Restart Now, it will restart your computer and give you all the advanced options.
- Next, select Troubleshoot > Advanced Options. As you can see, this screen offers you further options including System restore, Startup repair, Go back to the previous version, Command Prompt, System Image Recovery, and UEFI Firmware Settings.
- Select the UEFI Firmware Settings which will take you to the BIOS.
- From there, go to the Security > Boot > Authentication tab where you should see Secure Boot. Note that every OEM has its own way of implementing the options so it varies.
- Next, set Secure Boot to Disabled and set Legacy Support to On or Enabled.
- Save the changes made and exit. Afterward, your computer will reboot.
Option 2 – Try converting the disk to MBR
You can try to change the File System of the drive from GPT to MBR but before you do so, make sure that you create a backup copy of your data to an external drive. Once you have that covered, follow the steps below.
- Create a bootable Windows 10 media and boot your computer from it.
- Next, click on the “Repair your computer” option on the first Windows 10 installation setup window.
- Afterward, select the operating system partition from the given options and click on Next.
- Now select Command Prompt within the System Recovery options box and execute this command to initiate the Diskpart utility: diskpart
- Then type either one of these commands to view the list of all the Disk connects or the partitions on those disks formed: list disk or list volume
- After that, execute another one of these commands depending on the command you previously entered to select the disk or partition you want to select: select disk # or select volume #
- Now execute this command to clean your drive: clean
- Finally, execute this last command to convert the selected disk or partition as MBR: Convert MBR
- Restart your computer and check if the error is fixed.
Option 3 – Try to fix the Boot Manager
- You can start by booting into the installation environment for Windows 10 from an installation media.
- After that, click on Repair your computer and on the blue screen, select Troubleshoot and then select the Advanced options menu.
- From there, select Command Prompt and once you open it, enter each one of the commands given below by sequence.
- bootrec /FixMbr
- bootrec /FixBoot
- bootrec /RebuildBcd
- Once you’re done executing the commands given above, type “exit” to close the Command Prompt window and then restart your computer and see if it fixed error code 0xc000014c.
Read More
In case you don’t know, Windows now comes with an all-new Light Mode theme which gives a light accent color to the Taskbar, Start, and Notification Area. Aside from that, it also brings new improvements and features. This new theme is somewhere between dark and completely white and in this post, you will be guided on how you can enable this new feature in your Windows 10 computer.
Although the Light Mode sure looks stunning and a lot of users love it, it actually switches all the apps plus the Taskbar and Start Menu to the light mode which was not the case before. In addition, the icons in the system tray area, as well as the notification center, are also inverted. To resolve that, there are several ways you can customize the light mode theme as well as activate it in the Windows 10 v1903. How? Refer to each one of the options given below.
Option 1 – Via Theme settings
Windows 10 brought a new theme called “Windows (Light)” which will enable the light mode automatically and will set the accent colors to automatic. This will also apply the new Windows 10 wallpaper on your desktop. To enable Windows (Light), all you have to do is right-click on the desktop and select Themes from the left menu. After that, select the Windows (Light) option under the Change Themes section. This will apply to the Windows (Light) mode.
Option 2 – Via Color settings
The second and more customizable way to activate the light mode is via Settings. Aside from the Light and Dark, Windows also introduced a Custom color option which allows you to decide the default Windows and App mode independently. To enable Light mode via Settings, refer to the steps below.
- First, open Settings and go to Personalization.
- After that, select “Colours” from the left menu.
- Next, select Light under the “Choose your color” section to activate the light mode in Windows 10. This will activate light mode all over your computer.
Note: If after activating light mode, you find that you don’t like it and you want to keep things as they were before (Light App Mode and Dark Windows Mode), you can achieve that using the Custom option. All you have to do is select Custom from the drop-down menu to decide the default Windows and app mode independently. After that, select light under the default app mode and dark under the default Windows mode so that you can keep things as they were before the update. On the other hand, you can also try the opposite version of the light Windows mode and Dark app mode since Windows increased the level of customizability which allows users to use an option of a completely light mode.
Read More
If you are trying to install a Feature Update in Windows 10 but you got the error code 0x80190001, then it means that there is something wrong with the installation files. The installation files are either corrupted or some of them failed to be downloaded. On the other hand, the issue might also have something to do with a driver issue.
When you encounter error 0x80190001, you will see the either of following error message on your screen:
“Something went wrong
Couldn’t download Windows 10, please check your network settings and try again. You can contact Microsoft support for help with this error. Here’s the error code 0x80190001”.
Or:
“An unexpected error was encountered while attempting to download files required for the upgrade”.
Here are some fixes that could help you resolve the error 0x80190001. Follow them carefully.
Option 1 – Run the Network Troubleshooter
As mentioned in the error message the issue might have something to do with the network settings of your computer so you can try to run the Network Troubleshooter and then try updating or installing Windows 10 again.
Option 2 – Update Network drivers
- Tap the Win + R keys to launch Run.
- Type in msc into the box and tap Enter or click OK to open the Device Manager.
- After that, look for Network Adapters from the list of device drivers displayed. Once you find it, expand it to see the Network drivers.
- Right-click on it and select the option “Uninstall device” – do the same thing for the other Network drivers.
- Restart your PC so Windows can detect and reinstall the drivers you just uninstalled.
Option 3 – Use Storage Sense to clean up temporary and junk files
- Open Setting > System > Storage from the WinX Menu.
- From there, you will see a list of all the local and connected storage devices along with the details on the free space.
- Now make sure that the Storage Sense feature is turned On then go find a link that says “Free Up Space” and click it to open.
- After that, a screen which is the built-in program in Windows 10 will appear and will scan your computer for the following junk files so you can free up disk space:
- Windows Upgrade Log Files
- The system created Windows Error Reporting Files
- Thumbnails
- Temporary Internet Files
- Previous Windows Installation Files
- Delivery Optimisation Files
- DirectX Shader Cache
Note: Once you’re done freeing up space on your drive, try to run the setup file again.
Option 4 – Delete the contents in the SoftwareDistribution folder
The Software Distribution folder in the Windows operating system is a folder that can be found in the Windows directory and is used to store files temporarily which might be required to install the Windows Update on your PC. Thus, it is required by the Windows Update and maintained by WUAgent. A lot of users tried deleting the files in this folder to fix the problem and so far it has worked. Like them, you can try clearing the Windows Update cache by simply deleting the contents of the folder named “SoftwareDistribution” since Windows apparently can’t clear and re-download the update contents once they are corrupted. Thus, deleting the contents of this folder will make Windows download the contents again which will fix the problem. To do that, follow the steps below.
- Open the WinX Menu.
- From there, open Command Prompt as admin.
- Then type in the following command – don’t forget to hit Enter right after typing each one of them.
net stop wuauserv
net stop bits
- After entering these commands, it will stop the Windows Update Service and the Background Intelligent Transfer Service.
- Next, go to the C:/Windows/SoftwareDistribution folder and get rid of all the folders and files thereby tapping the Ctrl + A keys to select them all and then click on Delete. Note that if the files are in use, you won’t be able to delete them.
- Once all the contents in the Software Distribution folder are deleted, restart your PC and then go back to Command Prompt and input the following commands again.
net start wuauserv
net start bits
Since the folder has already been flushed, it will be populated afresh the instant your restart your computer and open Windows Update.
Option 5 – Run the Windows Update Troubleshooter
You might also want to run the Windows Update Troubleshooter as it is also known to help users resolve Windows Update errors like error 0x80190001.
Option 6 – Try to disable your antivirus program
Disabling the antivirus program or any security software installed in your computer is always a good idea you can try when the Windows Update process does not go smoothly. So before you try updating your computer again, make sure to disable the antivirus or security program and once the Windows Update is done, don’t forget to enable the antivirus program back again.
Option 7 – Try to use the Media Creation tool
The Media Creation tool in Windows allows you to use the ISO installation file to make a bootable device that you can use to install Windows on your PC. Note that this is kind of different from the usual installation process as it could erase your computer’s current settings and data on the primary drive. Thus, before you proceed, you need to backup all your data into some removable drive and then use the Media Creation Tool to make a bootable drive.
- After making the bootable drive, you need to plug it into your computer and then reboot.
- Next, tap the F10 or Esc key to open the boot options.
- Now set the boot priority of the removable drive the highest. Once the setup comes forth, follow the next onscreen instructions and install Windows without any problems.
Read More
There are instances when you have to connect to another Windows 10 PC via remote connection from another Windows 10 PC. However, when you encountered an error saying, “Your password may have expired or the remote pc might not accept blank passwords” while doing so then read on as this post will walk you through how you can fix it.
Here is the full content of the error message:
“Your password may have expired, or the remote PC might not accept blank passwords. Try connecting again. If this keeps happening, ask your admin or tech support for help.”
It is unknown what the exact cause of the error message is as it could involve several factors. Even so, there are still various potential fixes you can try to fix this kind of error. You can try to check if your password has expired or troubleshoot any issues with the network. You could also use a remote desktop application or configure the settings of firewall or restart the remote desktop service. For more details, refer to each one of the given options below. But before you proceed, make sure that you have someone to help assist you on the other side to help you troubleshoot the issue.
Option 1 – Try to check if the password has expired
The first thing you can do to fix the problem is to check if the password has expired as it could be the reason why you’re experiencing this problem. You have to make sure that you are using a user account that is on the remote computer and then check if the user account password has not expired yet. And if your PC is not within your access, then you can just ask someone to verify the password for you.
Option 2 – Try to troubleshoot network issues
To troubleshoot network-related issues that might be the one that triggers the error, you need to run the Network Troubleshooter. To get started, refer to these steps:
- Open the Search bar on your computer and type in “troubleshoot” to open the Troubleshoot settings.
- Next, scroll down and select the “Network Adapter” option from the right pane.
- Then click on the Run Troubleshooter” button.
- After that, your computer will check for any possible errors and will pinpoint the root cause of the problem if possible.
- Restart your computer.
Option 3 – Try to use a remote desktop software
A number of users reported that the issue occurred when they used the universal app for Remote Desktop and they were able to fix it by switching to the Remote Desktop application. Thus, you can try to switch to the remote desktop software and see if it fixes the problem or not.
Option 4 – Try to configure Firewall settings
You might also want to configure the settings of the Firewall as it could also help in fixing the problem. It is possible that the firewall is blocking the incoming connection on the remote computer. To check if whether the firewall is the culprit or not, follow the steps below.
- Go to Windows Security and then go to Firewall and network application.
- Next, click on the Advanced Settings link. This will open the classic Windows Defender Firewall and Advanced Security application.
- From there, look for the rule named “Remote Desktop – User Mode (TCP-In)” under inbound rules and check if it has been disabled or not.
- If the rule is disabled, you have to enable it.
- Once done, check if the error is now fixed or not.
Option 5 – Try to restart the Remote Desktop service
If none of the four given options given above worked, you might want to restart the Remote Desktop service as it can help you in fixing the problem. To do so, follow these steps:
- Tap the Win + R keys to open the Run dialog box and type “services.msc” in the field and hit Enter to open the Windows Services Manager.
- Next, from the list of services, look for the Remote Desktop Service and right-click on it, and then click on the Restart option.
- Once done, check it was able to fix the “Your password may have expired or the remote pc might not accept blank passwords” error or not.
Read More
This post will guide you on what to do if your keyboard shortcuts or hotkeys are not working on your Windows 10 computer. A lot of users use hotkeys as they make things easier for them as they use their computer. However, there are instances when these hotkeys suddenly stop working. It’s actually one of the most common problems with keyboards. And so to resolve this problem, you can try out some suggestions prepared on this post.
Option 1 – Clean the keyboard keys physically
Your keyboard might not be working properly due to some dirt or other corrosion. First, you need to shut down your computer and then unplug the keyboard if you are using a desktop computer and then prepare it for cleaning. After that, use a small cotton ear cleaning tool to get between the creases and clean them. You can dip it slightly in alcohol to make it more efficient in cleaning dust and dirt. And if you can, you have the option to pull apart the keyboard completely and then wipe away all the corrosion from the inside. Once you’re done, put the keyboard back together and then plug it back into your PC. Now turn your PC on and check if the hotkeys are now working.
Option 2 – Try running the Hardware and Devices Troubleshooter
The first thing you can do to fix the problem is by running the Hardware Troubleshooter. Although it won’t make much of a difference, there’s still a possibility that it could automatically fix the problem with these function keys. To use it, refer to these steps:
- The first thing you need to do is click on Start and then on the gear-like icon to pull up the window for Settings.
- After opening Settings, look for the Update and Security option and select it.
- From there, go to the Troubleshoot option located on the left-hand side of the list.
- Next, select Hardware and Devices from the list and open the Troubleshooter and run it. Once it is doing its job, wait for it to complete the process and then restart the system.
- After the system restarts, check if the problem’s now fixed. If not, refer to the next option given below.
Option 3 – Try connecting the keyboard to a different USB port
The problem might have something to do with the USB port that’s currently in use by your keyboard. It could be that it’s not working so it makes sense to unplug it and attach it to another USB port. You can also clean the USB port on both ends to ensure that they are not affected by corrosion.
Option 4 – Uninstall previously installed keyboard software
If you have been previously using another keyboard, it might be better if you make sure that the software for the old device has been removed since there are instances when multiple software can cause problems due to similarities in actions.
Option 5 – Update the keyboard driver
You can also update the keyboard driver to fix the problem. There are cases when an outdated or corrupted driver can fix the problem. To do so, follow the steps below.
- Tap the Win + R keys to open the Run dialog box.
- Then type “devmgmt.msc” in the field and hit Enter to open the Device Manager.
- From there, look for the keyboard driver and click on it.
- Next, right-click on the keyboard driver and select the Update driver option.
- After that, click the “Search automatically for updated driver software” option to proceed.
Option 6 – Reinstall the keyboard driver
If updating the keyboard driver didn’t help, then you might want to reinstall it. How? Follow the steps below.
- Tap the Win + R keys to launch Run.
- Type in MSC into the box and tap Enter or click OK to open the Device Manager.
- After that, a list of device drivers will be displayed. Look for keyboard driver, right-click on it and then select “Uninstall device”.
- After that, unplug the device and restart your PC.
- Then plug your device back in. Assuming your device is connected to your PC, open the Device Manager again.
- Next, click on the Action button and click the Scan for hardware changes button. That should fix the problem.
Note: You could also completely uninstall the driver and go directly to the manufacturer’s website and download the latest driver for your hardware and then install it.
Option 7 – Enable Human Interface Device (HID) Service
Another thing to consider is the Human Interface Device Service. If this service is disabled, then no wonder why your hotkeys are not working. Thus, you need to enable this service. Refer to the following steps to do that:
- Tap the Win + R key to launch the Run dialog box.
- Then type “services.msc” in the field and hit Enter to open Services.
- After opening Services, scroll down until you see the Human Interface Device service.
- Double click on HID and make sure that its Startup Type is set to “Automatic” and then click OK.
- Restart your PC and check if the hotkeys are now working or not.
Option 8 – Try resetting the keyboard
You might also want to try resetting the keyboard as it can also help in fixing the problem. Setting it back to its default state will surely help.
Read More
Error 0xA00F4244 or 0x200F4244 is when Windows can not detect the WEB camera in your system and it is usually accompanied by the message: We can’t find or start your camera.
There could be several reasons for this error and in this guide, we will cover all of them in order to help you to get back on track and start using your WEB camera which is perhaps now more required than ever in this world we live in.
-
Check privacy settings
With the latest Microsoft Windows updates come the latest issues and it is not strange that privacy settings can become reset or changed when an update is applied. This is a quick fix to this issue and can be the sole reason why you get this error, go to Windows settings, then to privacy and check to see if the WEB camera is turned OFF, if this is the case turn it back ON and make sure that option Allow apps to access your camera is also set to ON.
-
Check if the camera is enabled
Sometimes it is by mistake, sometimes by an update but the web camera could be disabled in the device manager of Windows. Right-click on the Windows Start button and click on device manager to open it up, find and expand the cameras category. Right-click on your camera, if it is disabled, you will have the option to enable the camera, if it is enabled and Windows is detecting that it is working fine you will have the option to disable it.
-
Check antivirus settings
Antivirus and firewall applications are in today’s world and life-essential piece of software but they can sometimes create more harm than good, from stopping windows updates to killing important services of applications and preventing internet access being just some examples of their paranoid behavior. Try disabling or turning your protection software OFF and see if your WEB camera will miraculously come back to life. If this is the case, somewhere in the settings of software there is an option that controls this aspect, try to locate it and set it in that way so you are able to use your camera.
-
Reinstall camera driver
If the previous three solutions failed to produce a satisfactory solution then reinstalling the camera driver might fix the problem. Go to your manufacturer’s camera website and download the latest driver for your camera. Go to the device manager and uninstall the driver for the camera, then apply the latest driver and reboot the system.
-
Check connections and cable
Sometimes an issue is not due to software nature, sometimes it is hardware. Try checking connections and plug the camera in another USB port, twist and turn the cable a little to see is issue cable-related.
-
Check to see if the application supports your camera
If Windows has detected the camera and is not reporting any issues with it check your application to see if it can detect your camera and that it supports it fully. Sometimes newer applications tend to support only newer camera models. Try to use the camera in other software as well to see if the problem is with the application you are using.
-
Try camera on another computer
If everything else fails, try the camera on another computer to see if it will work there. If the camera is not working there as well it is probably malfunctioned and broken for good. If it does work there, try to find out what is different in that computer in comparison to yours, maybe it is some service running in the background, certain application configuration, Windows version itself, USB port version, or something else.
Read More
As you know, one of the most useful web browsers all over the globe is Google Chrome. However, it is not without flaws as you could encounter errors while using it. One of these errors is the ERR_UNSAFE_PORT error. This kind of error is caused by the data being accessed using a port that isn’t recommended. When you encounter this kind of error in Chrome, you will see the following error message on your screen:
“The webpage is not available, The webpage at <Address> might be temporarily down or it may have moved permanently to a new address. Error code: ERR_UNSAFE_PORT”
In this post, you will be guided on how you can fix the ERR_UNSAFE_PORT error in Google Chrome on your Windows 10 computer. You can try to set allowed ports or reset or reinstall Google Chrome. For more details, refer to the given options below.
Option 1 – Try to set allowed ports
- To get started, open Google Chrome.
- After that, go to the Shortcut tab and type the following after the whole address in the field named Target: —explicitly-allowed-ports=xxx
- It should look like this “C:/Documents and Settings/User/Local Settings/Application Data/Google/Chrome/Applicationchrome.exe —explicitly-allowed-ports=6666”.
- Now click on Apply and click OK to save the changes made.
Option 2 – Reset Chrome
Resetting Chrome can also help you fix the error. This means that you will be restoring its default settings, disabling all the extensions, add-ons, and themes. Aside from that, the content settings will be reset as well and the cookies, cache, and site data will also be deleted. To reset Chrome, here’s what you have to do:
- Open Google Chrome, then tap the Alt + F keys.
- After that, click on Settings.
- Next, scroll down until you see the Advanced option, once you see it, click on it.
- After clicking the Advanced option, go to the “Restore and clean up option and click on the “Restore settings to their original defaults” option to reset Google Chrome.
- Now restart Google Chrome
Option 3 – Try to clean reinstall Chrome
There are instances when programs leave files behind after you’ve uninstalled them and the same thing can happen to Chrome so before you reinstall Chrome, you have to make sure that you have deleted the User Data folder. To do so, refer to the following steps:
- Hit the Win + R keys to open the Run dialog box.
- Next, type “%USERPROFILE%AppDataLocalGoogleChromeUser Data” in the field and hit Enter to open the User Data folder.
- From there, rename the default folder and name it something else, e.g. “Default.old”.
- After that, install Google Chrome again and check if the issue is now fixed.
Read More
There is a built-in tool in Windows 10 the Disk Cleanup Utility which can help you restore hard disk space by removing temporary files, Thumbnails, old Windows files, Windows Upgrade logs, Delivery optimization files, and many more. However, from time to time, this built-in tool also experiences some issues. One of these issues is when it gets stuck on Windows Update Cleanup. Read on to find out what you can do in such a case.
When the Disk Cleanup Utility is stuck on the Windows Update Cleanup, the process could be slow and take a long time to complete when purging the files. If this happens, click on Cancel to close the dialog box. After that, try running the Disk Cleanup Tool again as administrator and check if the files that you want to clean is still there or not. If it isn’t there, then this means that the cleanup has been done, otherwise, you need to refer to the options given below.
Option 1 – Try to manually delete the contents in the SoftwareDistribution folder
- Open the WinX Menu.
- From there, open Command Prompt as admin.
- Then type in the following command – don’t forget to hit Enter right after typing each one of them.
net stop wuauserv
net start cryptSvc
net start bits
net start msiserver
- After entering these commands, it will stop the Windows Update Service, Background Intelligent Transfer Service (BITS), Cryptographic, and the MSI Installer
- Next, go to the C:/Windows/SoftwareDistribution folder and get rid of all the folders and files thereby tapping the Ctrl + A keys to select them all and then click on Delete. Note that if the files are in use, you won’t be able to delete them.
After resetting the SoftwareDistribution folder, you need to reset the Catroot2 folder to restart the services you just stopped. To do that, follow these steps:
- Type each one of the following commands.
net start wuauserv
net start cryptSvc
net start bits
net start msiserver
- After that, exit Command Prompt and restart your computer and then try to run Windows Update once more.
Option 2 – Try to manually delete the contents of the Windows.old folder
The Windows.old folder is the one that holds the older version of Windows when you upgrade. It comes really useful when you want to revert to the previous version of Windows 10. Thus, you can delete the Windows.old files in case the cleanup tool is stuck.
Option 3 – Try running Disk Cleanup in a Clean Boot State or Safe Mode
Another thing you can try is to restart your computer in a Clean Boot State or Safe Mode. Chances are, there are some programs that are preventing the Disk Cleanup Utility tool to run properly. After you restart your computer in a Clean Boot State or Safe Mode, try to run the Disk Cleanup tool again and then see if it now works or not.
Option 4 – Run the Windows Update Troubleshooter
You might also want to run the Windows Update Troubleshooter as it could also help in fixing this issue. To run it, go to Settings and then select Troubleshoot from the options. From there, click on Windows Update and then click the “Run the troubleshooter” button. After that, follow the next on-screen instructions and you should be good to go.
Option 5 – Run the DISM tool to fix the corruption in the Component Store
You can try running the Deployment Imaging and Servicing Management or DISM tool to fix the Wdf01000.sys Blue Screen error. Using this built-in tool, you have various options such as the “/ScanHealth”, “/CheckHealth”, and “/RestoreHealth”.
- Open the Command Prompt with admin privileges.
- Then type in the following commands and make sure to hit Enter right after you type each one of them:
- Dism /Online /Cleanup-Image /CheckHealth
- Dism /Online /Cleanup-Image /ScanHealth
- exe /Online /Cleanup-image /Restorehealth
- Do not close the window if the process takes a while as it will probably take a few minutes to finish.
Read More
Windows 10 has displayed one of the most efficient and user-friendly interfaces. However there have been many issues on the backend of this commonly praised operating system: For example, Windows Update is still a wonky and error-laded system application. One example of this error is Windows Update Error 0x80073712 which stands in the way of users just wanting to keep their PCs updated hassle-free.
The error code 0x80073712 signifies that a file needed by Windows Update to function is either damaged, missing, or corrupted. However, this does not mean that your Windows version will forever stay as-is with no mode to update it. Windows Update Error 0x80073712 is perfectly fixable with the set of provided steps below and some of Windows’ built-in troubleshooting steps:
Solution 1: Open Windows Update Troubleshooter
- Open the Windows Update Troubleshooter by pressing the Window Key and “S” keys simultaneously.
- Enter the word “Troubleshoot” in the search box and select the Troubleshoot result
- On the new window, select “Windows Update” to troubleshoot.
- Run the troubleshooter, then open Windows Update and try to install the update again.
Solution 2: Run the DISM tool
- Open the command prompt by pressing Windows Key and “S” key simultaneously
- Enter “cmd” in the search box. Right Click command prompt among the results and select “Run as administrator”
- In the Command Prompt window type the following and press the Enter key after every command
DISM.exe /Online /Cleanup-image /Scanhealth
DISM.exe /Online /Cleanup-image /Restorehealth
- To close the Administrator: Command prompt window, type Exit, and then press Enter.
- Run Windows Update again.
Solution 3: Rename the Software Distribution folder
- Open the command prompt as previously mentioned
- Input the following command pressing Enter after every line
net stop wuauserv
net stop cryptSvc
net stop bits
net stop msiserver
rename c:windowsSoftwareDistribution softwaredistribution.old
net start wuauserv
net start cryptSvc
net start bits
net start msiserver
exit - Restart the PC and run the updater if it works again.
Solution 4: Restart Windows Update Services
- Press the Windows logo key and R together to open Run -> Input services.msc -> and press Enter
- Search for the Windows Update service -> Check its status
- If it is not indicated, right-click on the service and select Start to force start your Windows Update
- If you see an error, locate the Startup Type option and set it to Automatic
- Now you should reboot your computer and see if your Windows Update is OK
Solution 5: Fix Registry Issues
If after all the aforementioned solutions, you still experience problems with Windows Update, the problem may lie in the registry that is either damaged or corrupted. You may choose to do manual editing of your Windows registry by opening your Windows registry editor. But doing so is risky as one wrong letter may do incalculable damage to your system. To do so safely for more inexperienced users., we recommend using a third-party registry cleaner/tools, many of which can be found online.
Read More
Copyright © 2023, ErrorTools. All Rights Reserved
Trademark: Microsoft Windows logos are registered trademarks of Microsoft. Disclaimer: ErrorTools.com is not affiliated with Microsoft, nor claims direct affiliation.
The information on this page is provided for information purposes only.
When you set up Windows 11/10, a unique advertising ID for each user on your PC is generated. App developers and advertising networks use this advertising ID for their own purposes to provide more relevant advertising in apps. When the advertising ID is enabled, apps can access and use it the same way as websites can access and use a unique identifier stored in a cookie. Location-based apps can easily track and access your location and provide you with more targeted ads and services to you.
This might also be a privacy issue, as advertising networks can collect your personal data and activities. Although this feature applies to Windows apps using the Windows advertising identifier, it can be accessed and used by third-party networks that don’t abide by policies.
In this gearupwindows article, we will guide you on enabling and disabling Advertising ID in Windows 11 and 10. Here is how to do it.
How to Enable or Disable Device Advertising ID in Windows 11 using Settings?
To turn on or off the device advertising ID on Windows 11, do the following:-
Step 1. First, open the Settings app by pressing Windows + I keys on the keyboard.
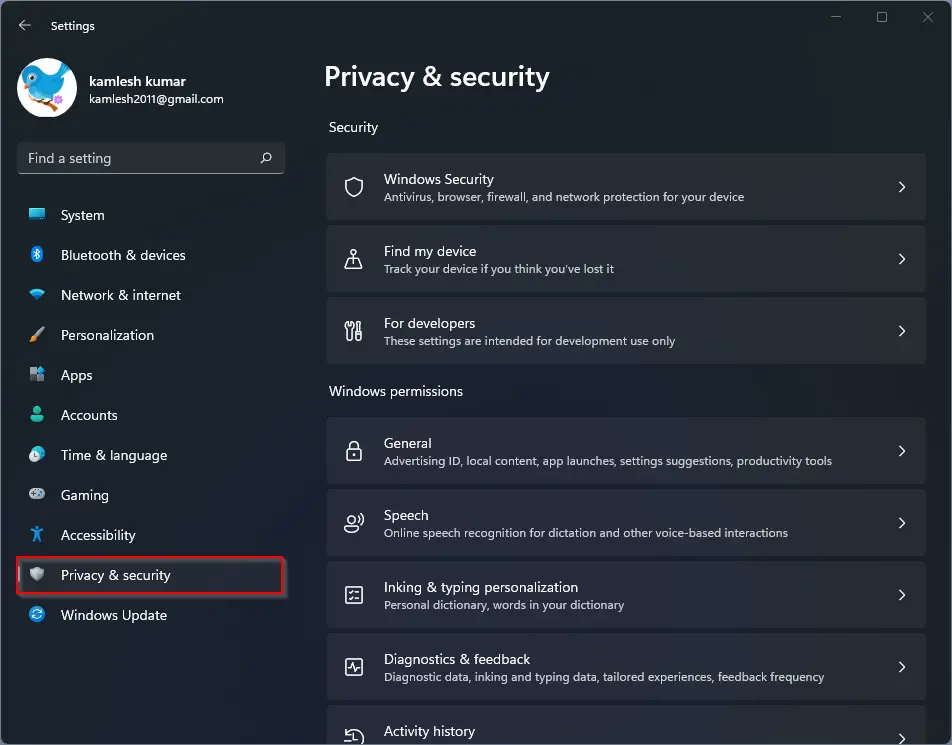
Step 2. Then, select Privacy & security in the left sidebar.
Step 3. After that, click General under the “Windows permissions” section.
Step 4. Then, on the General settings page, toggle the button to the Off position beside “Let apps show me personalized ads by using my advertising ID” to disable this function. To enable this feature, you need to turn on this toggle.
How to Stop Targeted Ads in Windows 10 through Settings?
To delete or stop your advertising identifier ID on Windows 10, use the following steps:-
Step 1. Open the Settings app.
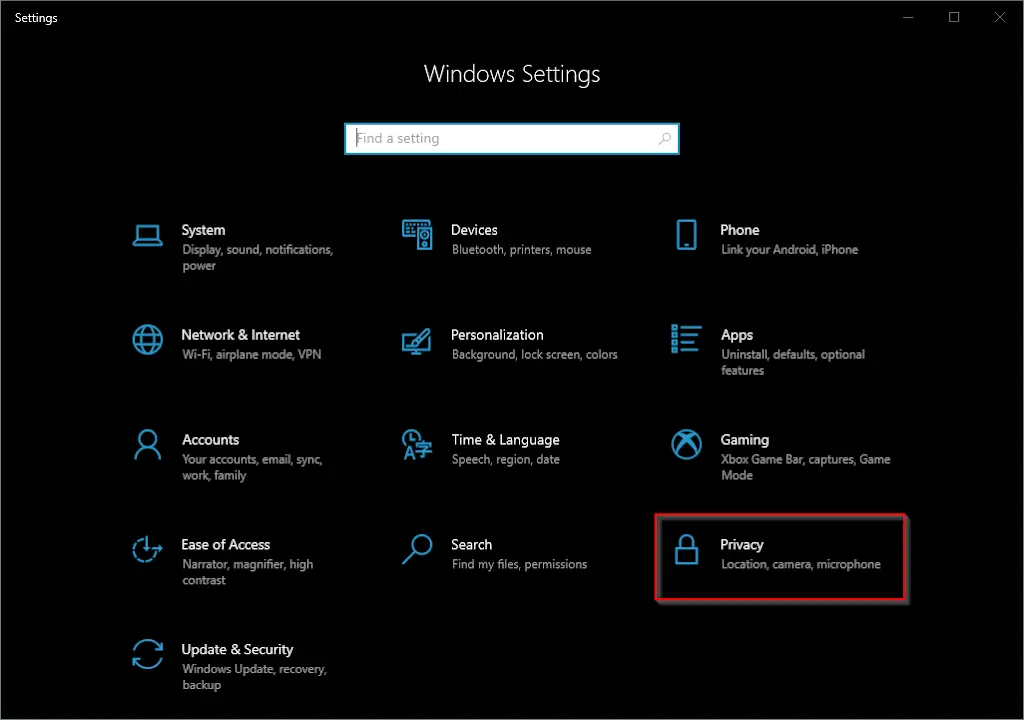
Step 2. Then, click on the Privacy option.
Step 3. After that, select General in the left sidebar.
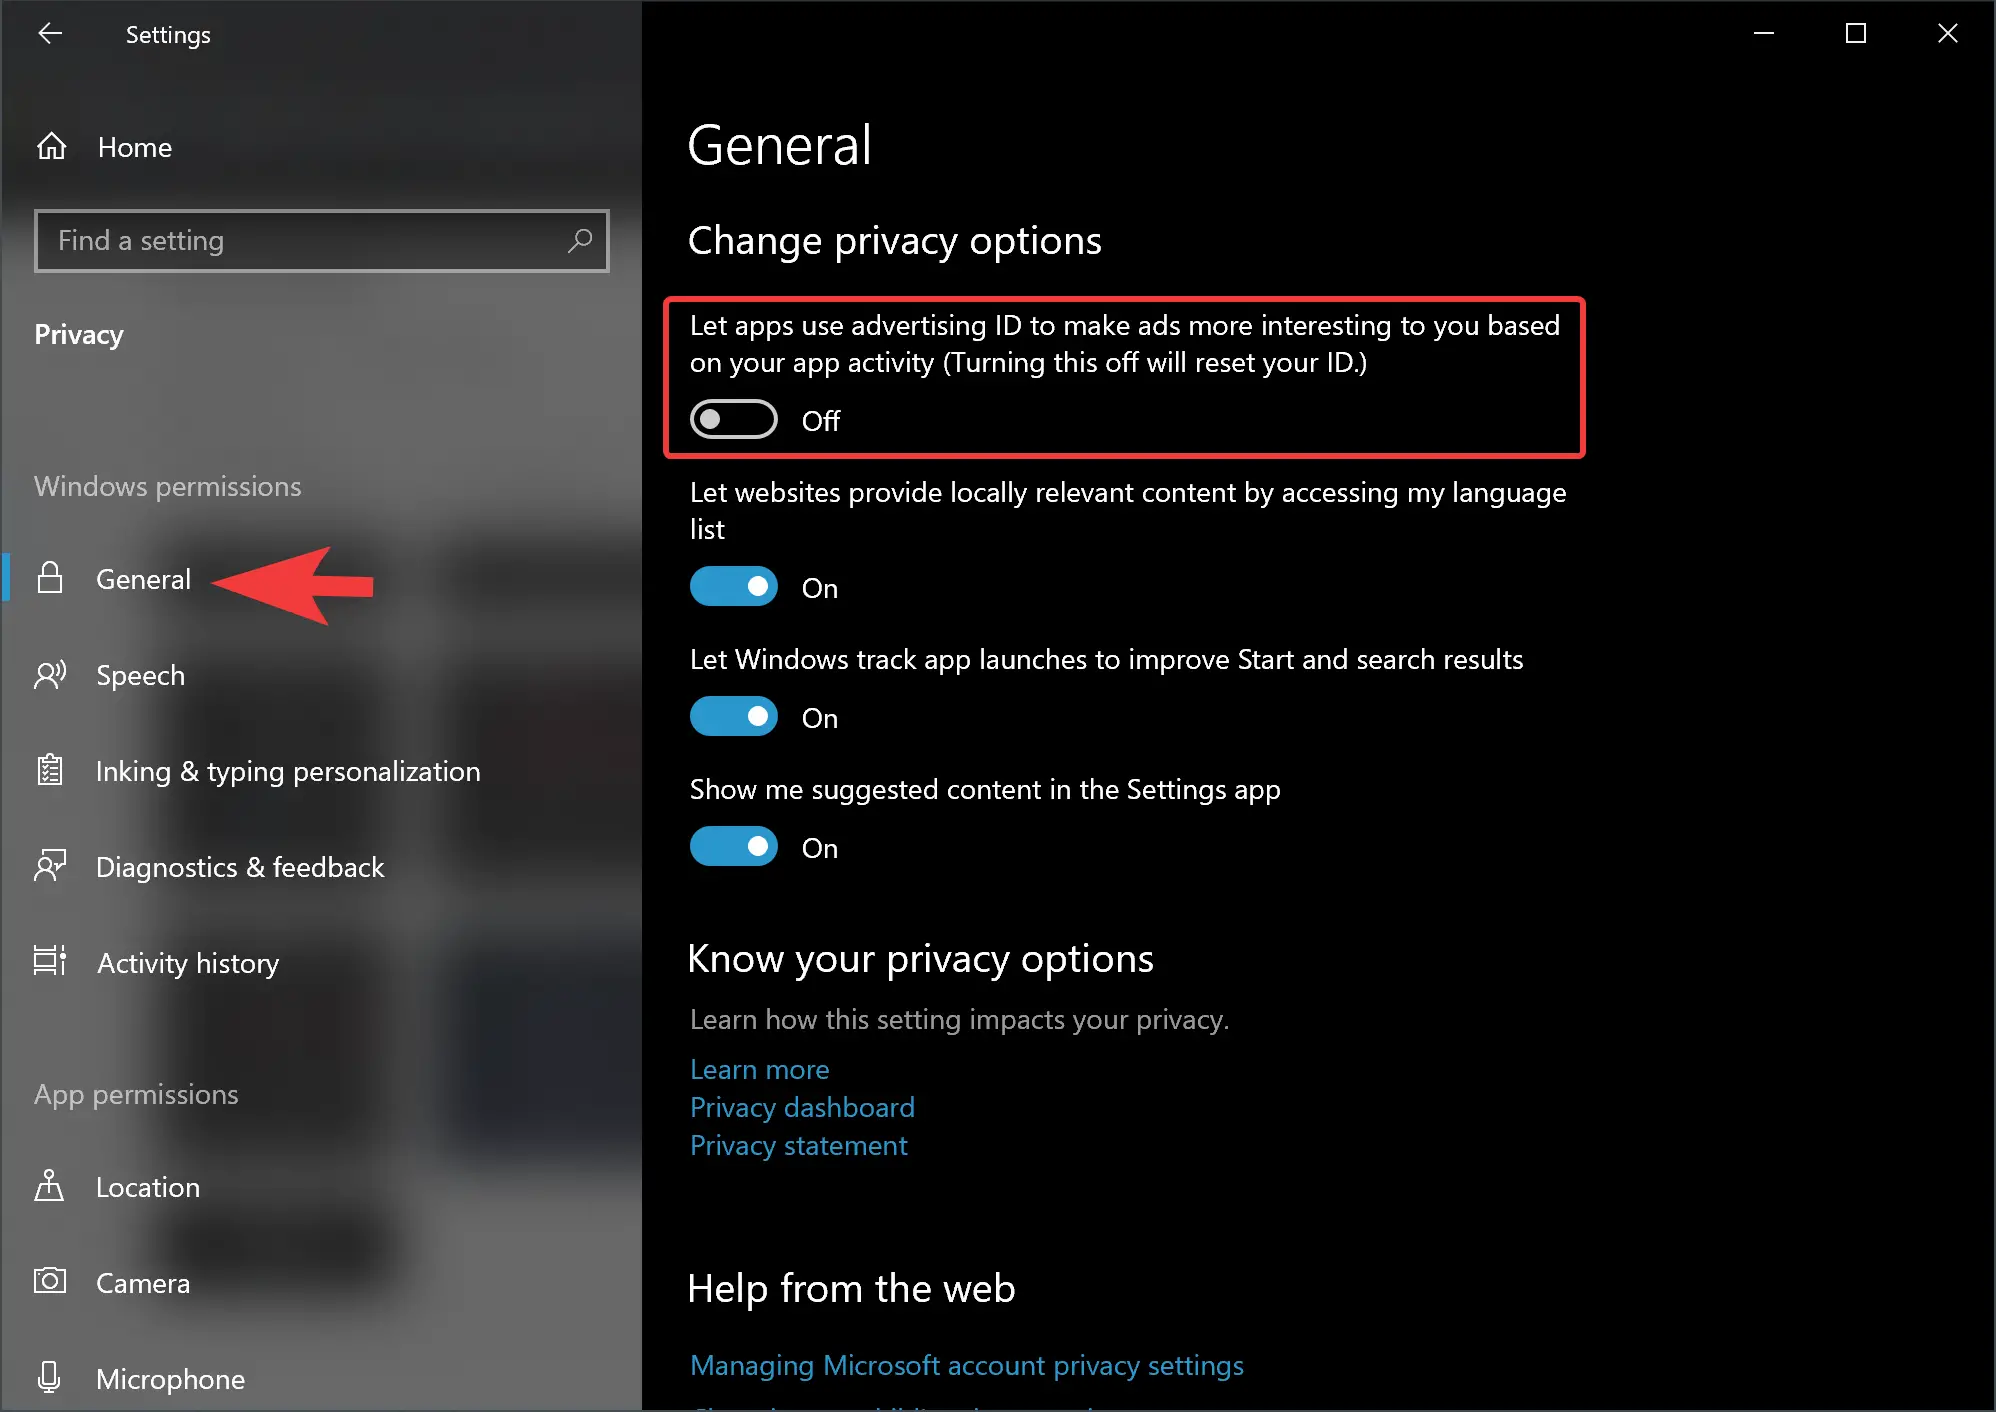
Step 4. On the right side, under the “Change privacy options” section, turn off/on the “Let app use Advertising ID to make ads more interesting to you based on your app activity” toggle switch.
After disabling the advertising ID, you’ll continue to see ads through the experience, but they won’t be based on your activities.
How to Enable or Disable Advertising ID using Group Policy on Windows 11 or 10?
If you’re running the Pro version of Windows 11 or 10, you can also prevent tailored advertising using the Local Group Policy Editor.
Step 1. First, using the Windows + R keyboard shortcut, open the Run command.
Step 2. Then, type gpedit.msc and click OK to open the Local Group Policy Editor.
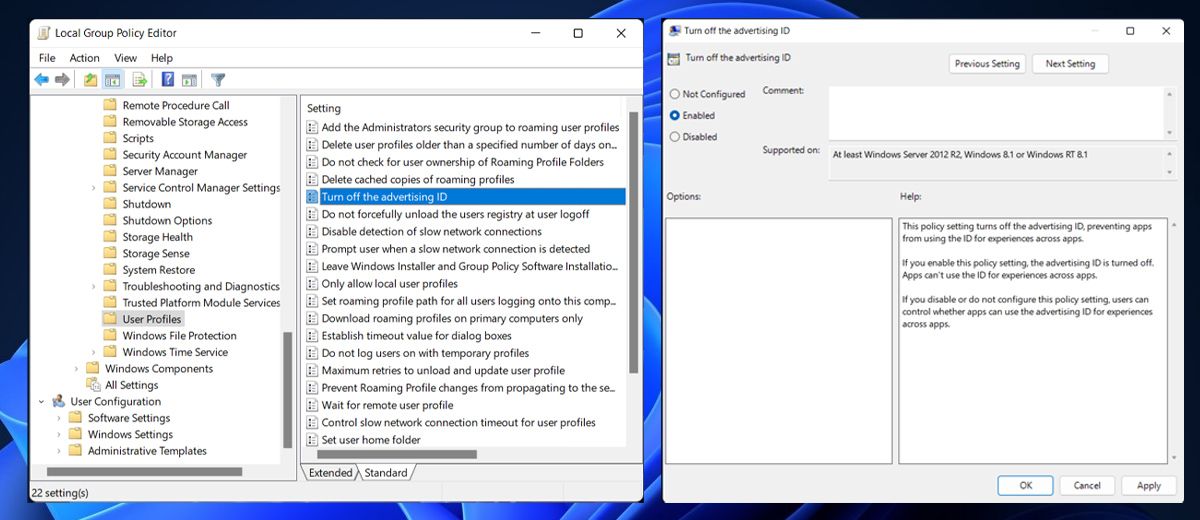
Step 3. When the Local Group Policy Editor window appears on your computer, browse the following path:-
Computer Configuration > Administrative Templates > System > User Profile
Step 4. On the right side, double-click the policy Turn off the advertising ID.
Step 5. Select the Disabled option.
Step 6. Then, click Apply.
Step 7. Finally, hit the OK button to exit.
After completing the above steps, Microsoft Store apps will no longer show relevant ads on your Windows 11 or 10 PC.
If you change your mind and want to roll back the previous settings, use the above steps, and in step 5 above, select the Not Configured option.
You might be interested in Ashampoo Antispy and O&O ShutUp10++, which allow you to control privacy on Windows 11 and 10 computers.
Conclusion
In conclusion, while the Advertising ID feature in Windows 11 and 10 allows for more personalized ads and services, it also raises privacy concerns as personal data can be collected by advertising networks. Fortunately, users can easily enable or disable the Advertising ID feature in Windows through the Settings app or the Local Group Policy Editor. Additionally, third-party privacy control tools like Ashampoo Antispy and O&O ShutUp10++ can provide users with greater control over their privacy on their Windows devices. It’s important for users to understand and take advantage of these options to ensure their personal data is protected.
Sign in to your MUO account

It turns out that it’s getting harder to use your computer without anyone tracking your activity. And Windows plays its part in showing you “relevant” or “personalized” ads by using the Advertiser ID.
But what is Advertiser ID, how does it work, and how can you stop it from tracking your activity?
What Is Windows Advertiser ID?
Advertiser ID is a unique code, assigned by Windows for every user on a device. This way, Windows can show different ads for different people that log in on the same device.
When the feature is enabled, it works similarly to browser cookies, as advertising companies and app developers can use the ID to collect data and display personalized ads in the apps that you’re using. For example, location-based apps will access your location and show ads for nearby businesses.
Now, if you’ve decided to turn off advertiser ID, we’ll show you several methods you can use. Before going through the instructions below, check if your Windows account has administrative rights, so you can change your system settings.
1. Turn Off Advertiser ID During Windows Installation
You can turn off the Advertiser ID feature right from the start. When installing the Windows 11 operating system, Windows lets you choose your privacy settings. All you have to do is turn off the toggle for Advertiser ID.
Now, if you’ve missed the chance when setting up Windows 11, you can still turn it off using the methods below.
2. Turn Off Advertiser ID From Windows Settings
Windows 11 is big on privacy and allows you to adjust your settings to control your data easily. Here’s how you can disable the advertising ID feature:
- Press Win + I to bring up Windows Settings.
- From the left pane, select Privacy & security.
- Head to Windows Permission and click General.
- Turn off the toggle next to Let apps show me personalised ads by using my advertising ID.
3. Turn Off Advertiser ID With Group Policy
Windows Group Policy is another tool that helps you manage your user and system configuration. Here’s how you can use it to disable advertiser ID:
- In the Start menu search bar, search for group policy and select Run as administrator.
- In the Group Policy window, head to Computer Configuration > Administrative Templates> System > User Profile.
- In the right pane, locate and open Turn off the advertising ID.
- Select the Enabled option.
- Click Apply > OK to save your system settings.
- Restart your computer.
4. Turn Off Advertiser ID With the Windows Registry
You can also edit the Windows Registry to turn off the advertiser ID.
- In the Start menu search bar, search for registry editor and select Run as administrator.
- In the Registry window, navigate to HKEY_CURRENT_USER > Software > Microsoft > Windows > CurrentVersion > AdvertisingInfo.
- In the right pane, open the Enabled key.
- Set Value data to 0.
- Click OK and restart your computer.

If you’ve changed your mind and want Windows to show relevant ads again, go through the above steps again and set Value data to 1.
Does Windows Show Fewer Ads With Advertiser ID Turned Off?
Turning off the advertiser ID doesn’t stop Windows from displaying ads. According to Microsoft, disabling the advertiser ID doesn’t reduce the number of ads you’ll see, but it will make them less relevant to you.
Also, Windows will use the data to display ads on the apps you’ve downloaded from Microsoft Store. For any other apps, you should check their privacy settings and stop them from collecting data about you.
Stop Microsoft From Using Your Information
The truth is, you can’t make your activity invisible while using a device that’s connected to the internet. However, turning off Windows advertiser ID will help you protect your privacy.
Protecting your data isn’t as easy as you might think, but there are a few tools you can use to protect your online privacy, no matter which device you’re using.