
Преамбула. Обновляю серверную инфраструктуру. Купил несколько б/у серверов Supermicro не дорого. И надо бы их настроить. Как? Ну а как еще? Через IPMI, не цеплять же к ним древние KVM, чтобы подключить к монитору, клавиатуре и мыши. И … ожидаемо встал на грабли. IPMI есть, а логинов и паролей к нему нет.
На нескольких подошел стандартный логин/пароль Supermicro:
ADMIN
/
ADMIN
(регистр имеет значение)
Значит надо как-то узнать или сбросить логины и пароли. Стал разбираться и нашел, что есть четыре рабочих способа это сделать с разной степенью возни.
Содержание:
- Пароль IPMI на наклейке производителя (BMC)
- Аппаратный сброс пароля на сервере Supermicro
- Сброс паролей IPMI через BIOS
- Сброс пароля с помощью утилиты IPMICFG от Supermicro
Пароль IPMI на наклейке производителя (BMC)
Как описано в документации к серверам, на корпусе должны быть две наклейки с логинами и паролями, которые задаются производителем BMC. В каждом сервере Supermicro они представлены на специальных табличках.
Расположение этой табличка может быть, например здесь.
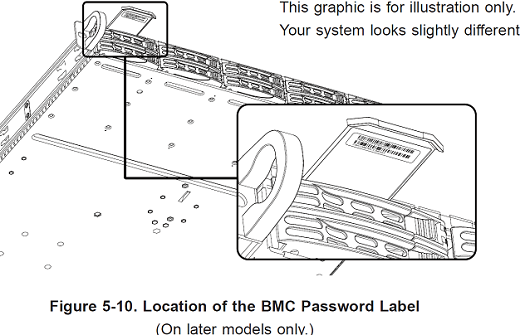
Но, как правильно указано на рисунке, это касается только поздних моделей, выпущеных после ноября 2019 года. У моих серверов такой выдвижной таблички не было. Второе место – на материнской плате. Этот способ я использовать не стал.
Аппаратный сброс пароля на сервере Supermicro
Сбросить пароль администратора IPMI на сервере Supermicro можно аппаратным способом при наличии физического доступа к нему:
- Выключить сервер и отключить кабель питания.
- С помощью маленькой плоской отвёртки открутить кнопку сброса IPMI на задней панели сервера.
- Нажать и удерживать кнопку сброса IPMI в течение 10–15 секунд.
- Вставить кабель питания обратно в сервер и включить его.
- Войти в IPMI через веб-браузер и ввести
ADMIN
в качестве логина и пароля (для устройств, сделанных после ноября 2019 года — уникальное имя пользователя и пароль с бирки). - Перейти в меню IPMI в раздел «Конфигурация», затем выбрать «Конфигурация пользователя».
- Выбрать своё имя пользователя и изменить пароль на более безопасный, чем ADMIN по умолчанию.
- Сохранить изменения и выйти из IPMI.
Этот способ я тоже не использовал. Раз нет таблички, то и ADMIN/ADMIN скорее всего не восстановились бы.
Сброс паролей IPMI через BIOS
В серверах Supermicro используется AMI BIOS. Подключаем к серверу монитор и клавиатуру, перезагружаемся. Для входа в BIOS Setup нажать
Del
. Но там оказалось, что можно настроить IP для IPMI, перезапустить IPMI и всё. Опять же, повторюсь, это в тех серверах, которые ко мне попали. Значит и этот способ мне не подошел бы, скорее всего.
Сброс пароля с помощью утилиты IPMICFG от Supermicro
Если с IPMI возникли проблемы, но возможность входа в систему сохраняется, можно выполнить перезагрузку IPMI контроллера (cold reset) или сброс пароля IPMI из запущенной ОС при помощи утилиты IPMICFG для Windows.
Если на сервере отсутствует ОС, можно загрузиться с любого LIveCD, например WinPE.11_10_Strelec_2025.02.05_Eng с сайта Sergey Strelec https://sergeistrelec.name/ . Для записи образа на загрузочную USB флешку используем
Rufus
.
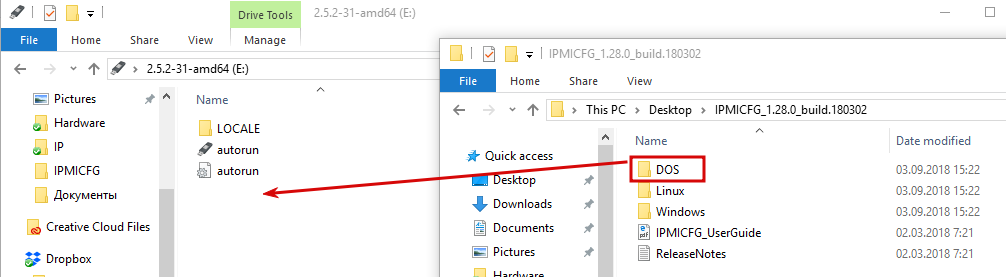
- Загружаем ОС на сервере
- Качаем с официального ftp-сервера Supermicro архив
IPMICFG
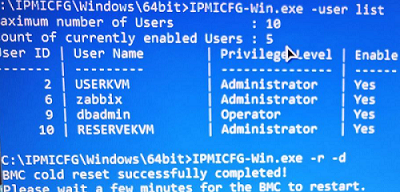
(https://www.supermicro.com/wftp/utility/IPMICFG/) и распаковать на диске - В командной строке от администратора получаем ID пользователей:
C:\IPMICFG\Windows\64Bit\IPMICFG-Win.exe –user list
ID пользователя ADMIN представлен в графе User ID и равняется
2
.
- Задать новый пароль
C:\IPMICFG\Windows\64Bit\IPMICFG-Win.exe –user setpwd 2 password
, где
2
— ID пользователя ADMIN, а
password
— новый пароль.
На моих северах пользователь ADMIN был просто … удален. Видимо из соображений безопасности. Но были оставлены другие пользователи с административными правами. Я использовал именно эту команду, но пароль поменялся у пользователя USERKVM
- В случае успешного выполнения команды появится сообщение Done.

Обращаю внимание, что максимальная длина пароля зависит от версии IPMI:
- IPMI v1.5 поддерживает пароль не более 16 символов
- IPMI v2.0 – 20 символов
Выполняем холодную перезагрузку Baseboard Management Controller (BMC) (потребуется пару минут):
C:\IPMICFG\Windows\64Bit\IPMICFG-Win.exe -r -d
Полный список доступных параметров IMPICFG можно вывести с помощью ключа:
C:\IPMICFG\Windows\64Bit\IPMICFG-Win.exe –help
И перезагружаем сервер целиком. После сможете подключиться к серверу по IPMI через Web интерфейс или IPMIview
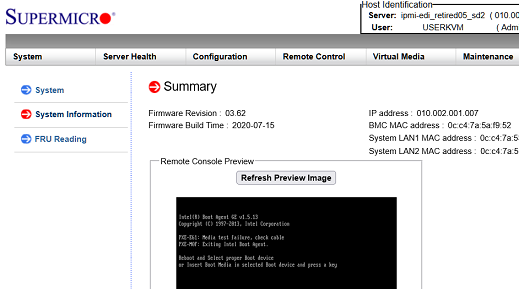
Осталось навести порядок — удалить всех лишних пользователей, создать пользователя ADMIN и т.д.
Are you trying to reset the Supermicro IPMI password?
IPMI provides remote access to multiple users at different locations for networking. The default username and password are ADMIN / ADMIN.
At Bobcares, we get requests to reset the IPMI password as a part of our Server Management Services.
Today, let’s look at how our Support Engineers reset the IPMI password.
How to reset the Supermicro IPMI password
Let’s discuss how our Support Engineers reset the password using different methods.
An Overview:
- Reset IPMI Password via the web interface
- Reset IPMI Password via Windows servers
- Reset IPMI Password via Linux servers
- Reset IPMI Password via physical access to the server
- Reset IPMI Password via BIOS Setup
- Reset IPMI Password Using DOS LiveCD/USB
- Reset IPMI Password Using IPMI Module Reset
How to Reset IPMI Password via the web interface
Recently, one of our customers contacted us to change the default admin password. Let’s see how our Support Engineers reset the password from the web interface.
The password can be reset from the panel only if we know the password.
1. First, we log in to the web console using the administrator account.
2. In the menu layout, we select Configuration. Then, select the Users menu.
3. Now we select the ADMIN user then we select the Modify User button.
4. In Modify User, we tick the checkbox Change Password.

5. Now, we enter the password twice.
6. Finally, click on modify. A success confirmation prompt pops up.
Subscribe to our newsletter for the latest updates, news, and features.
How to Reset IPMI Password via Windows servers
We can also reset the IPMI password from the Windows server. Initially, we log in to the server.
1. First, we download the IPMI Configuration utility. We download it based on the OS architecture.
2. Now, we unzip the downloaded file. Next, we open a command prompt as administrator. Then, move to the directory.
3. We reset to the default password using the command,
C:\Users\Administrator\Downloads\64bit>IPMICFG-Windows.exe -fd Reset to the factory default completed.Since the factory reset is done, we will assign the IP address, Subnet Mask, and gateway. We turn DHCP off if we are going to use a static IP. Else, we leave DHCP ON. We use the below commands.
C:\Users\Administrator\Downloads\64bit>IPMICFG-Windows.exe -dhcp off Successfully disable DHCP. C:\Users\Administrator\Downloads\64bit>IPMICFG-Windows.exe -m x.x.x.x IP=x.x.x.x C:\Users\Administrator\Downloads\64bit>IPMICFG-Windows.exe -k 255.255.255.xxx Subnet Mask=255.255.255.x C:\Users\Administrator\Downloads\64bit>IPMICFG-Windows.exe -g x.x.x.x Gatway=x.x.x.x4. Now, we can log in via default username and password. Now, we can change the password from the panel or leave it as is.
How to Reset IPMI Password via Linux servers
To reset the password for Linux servers, we download the ipmitool. For that, we use the command.
yum -y install ipmitoolThen, we use the below command to reset the admin password.
modprobe ipmi_devintf ipmitool -I open user set password 2 NEW_PASSWORDWe replace NEW_PASSWORD with the required password.
Thus, we reset the password.
How to Reset IPMI Password via physical access to the server
We provide the below steps to our customers if they have physical access to the server.
1. Initially, download the latest IPMICFG utility released by Supermicro.
2. Then, copy the extracted contents to the server.
3. Open a command window as an administrator.
4. Change directory to the ipmicfg-win.exe appropriate for your architecture (32-bit or 64-bit)
5. Get the user ID of the IPMI user whose password you want to set:
ipmicfg-win.exe -user list6. Set a new password for that user:
ipmicfg-win.exe -user setpwd 2 New_PasswordLogin to the IPMI web GUI using the password you just set.
How to Reset IPMI Password via BIOS Setup
Follow these steps to access the BIOS during boot to check for default credentials for devices manufactured before November 2019:
- First, restart the server and press the appropriate key (usually Del, F2, or F10) during boot to enter the BIOS setup.
- Then, look for a tab or section labeled IPMI Configuration or similar. This location may vary depending on the motherboard model.
- Here, we will find the default username and password displayed (often ADMIN / ADMIN).
- If we make any changes, ensure to save them before exiting. Otherwise, exit without saving.
How to Reset IPMI Password Using DOS LiveCD/USB
This method involves creating a bootable USB drive with DOS and using the IPMICFG utility to reset the BMC.
- First, download Rufus from its official website.
- Then, insert a USB drive into the computer.
- Open Rufus and select the USB drive.
- Now, choose FreeDOS as the partition scheme and start formatting the USB.
- Then, go to Supermicro’s website and download the IPMICFG utility package.
- Extract the contents and copy the DOS folder to the bootable USB drive.
- After that, insert the USB drive into the Supermicro server.
- Then, restart the server and press the boot menu key (usually F11) to select the USB drive as the boot device.
Once we boot into DOS, we will see a command prompt. So, change the directory to where we copied IPMICFG:
CD IPMICFGThen, run the following command to reset to factory defaults:
IPMICFG.EXE -fdNow, we have to wait for a few moments as it resets. After resetting, we may need to disable DHCP and set a static IP address:
IPMICFG.EXE -dhcp off
IPMICFG.EXE -m xxx.xxx.xxx.xxx # Set static IP
IPMICFG.EXE -k 255.255.255.xxx # Set subnet mask
IPMICFG.EXE -g xxx.xxx.xxx.xxx # Set gateway
Finally, set a new password for the ADMIN user:
ipmicfg.exe -user setpwd 2 NEW_PASSWORDNow, reboot the server to apply changes.
How to Reset IPMI Password Using IPMI Module Reset
This method lets us reset the BMC settings directly using commands locally or through a VPN connection.
- First, ensure we have access to the server either physically or through a secure VPN connection.
- If not already installed, download and install the correct version of IPMICFG for the OS.
- Then, run the following command to reset to factory defaults:
ipmicfg –fdMThis command will reset all settings, including user accounts, back to defaults.
- After resetting, we have to reconfigure network settings as previously described.
Do You need any assistance resetting the Supermicro IPMI password?- We’ll help you]
Conclusion
In short, we’ve discussed how our Support Engineers change the IPMI password on Linux and Windows servers, as well as how we change the password on the web interface and the physical server.
PREVENT YOUR SERVER FROM CRASHING!
Never again lose customers to poor server speed! Let us help you.
Our server experts will monitor & maintain your server 24/7 so that it remains lightning fast and secure.
GET STARTED
var google_conversion_label = «owonCMyG5nEQ0aD71QM»;
Проблема: недоступен веб интерфейс IPMI, но сервер продолжает работать как ни в чем не бывало без ошибок и зависаний. Самая частая проблема, которая может наблюдаться на многих платформах.
Зачастую можно столкнутся с ситуацией, при которой Вы утеряли свой пароль от IPMI. Это вполне нормальное явление и в данной статье мы рассмотрим, как вы можете самостоятельно задать новый пароль своему IPMI интерфейсу. Для этого пройдите пошаговую инструкцию.
У Supermicro имеется ряд утилит, которые помогут Вам в работе с серверами данной компании. Одна из них называется «IPMICFG». Данная утилита поможет Вам выполнить сброс всех настроек на заводские. Если Вы не хотите менять настройки сервера, то она так же поможет изменить пароль на новый, чтобы вы могли войти в веб интерфейс или через программу IPMIView (подробное описание использования программы найдете в нашей базе данных — https://my.fairyhosting.com/knowledgebase.php?action=displayarticle&id=106). Утилита позволит Вам вносить изменения в: настройки работы контроллера,изменить параметры сети, режим работы вентиляторов, список пользователей и их роли и т. д. Данный способ выполнен благодаря платформе DOS. Почему DOS? Данный пример самый простой и быстрый способ, для достижения результата. К тому же он очень подходит, если у Вас нету доступа к ОС.
Данная программа доступна для скачивания на официальном сайте Supermicro. Для скачивания пройдите по ссылке здесь. — https://www.supermicro.com/en/solutions/management-software/ipmi-utilities#SMCIPMITool
Нажмите на ссылку «Download SMCI™ Software» для скачивания установочной программы.
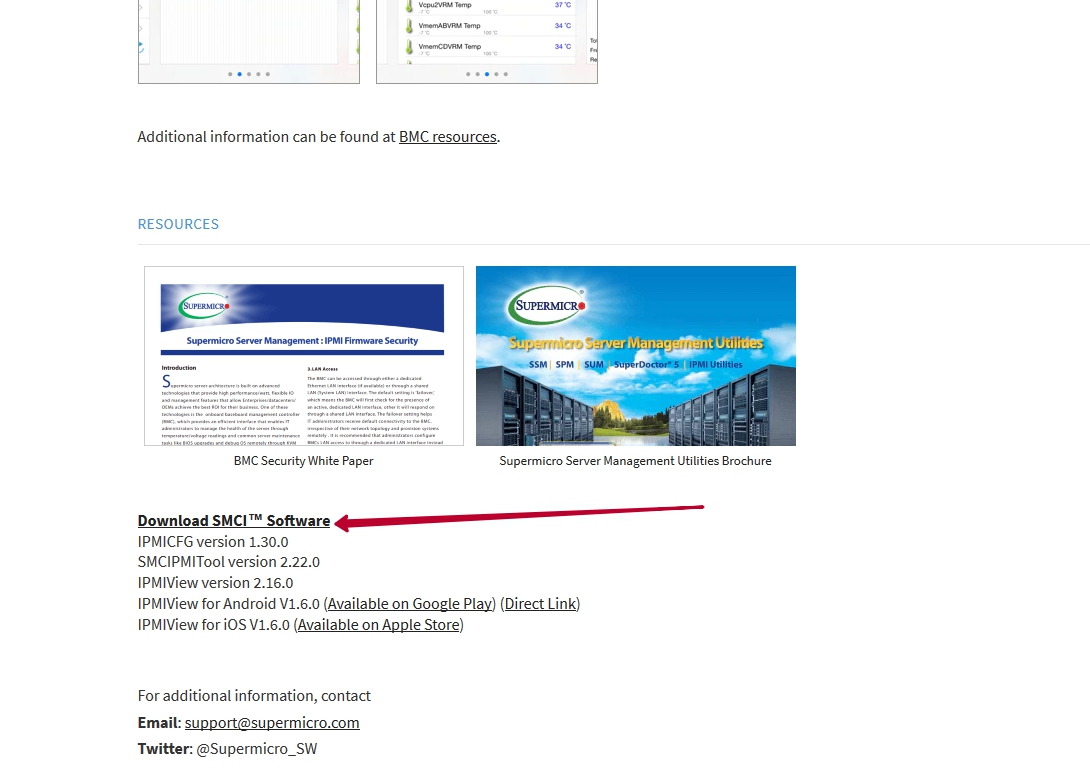
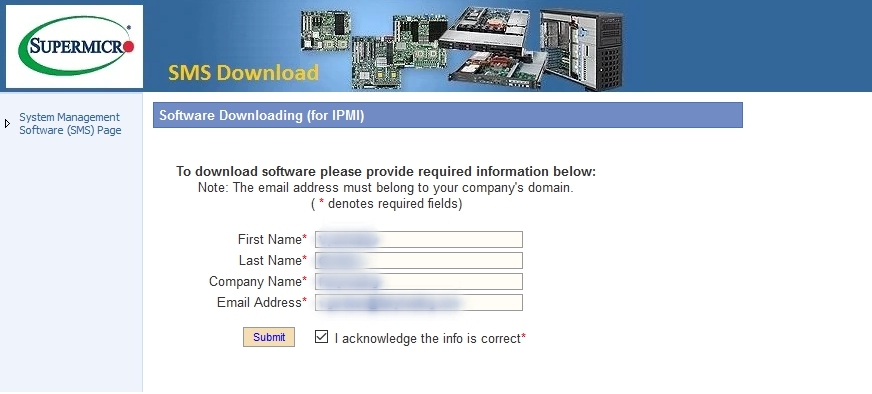
Для получения файла скачки программы необходимо заполнить стандартную форму, которую предполагает Supermicro – Имя и Фамилия, Имя компании, адрес электронной почты. (Любые данные)
Далее будет предоставлен список программ, которые Вы можете скачать для операционных систем Windows/Linux. Напротив программы IPMICFG нажмите кнопку для принятия условий пользования «Accepr EULA»
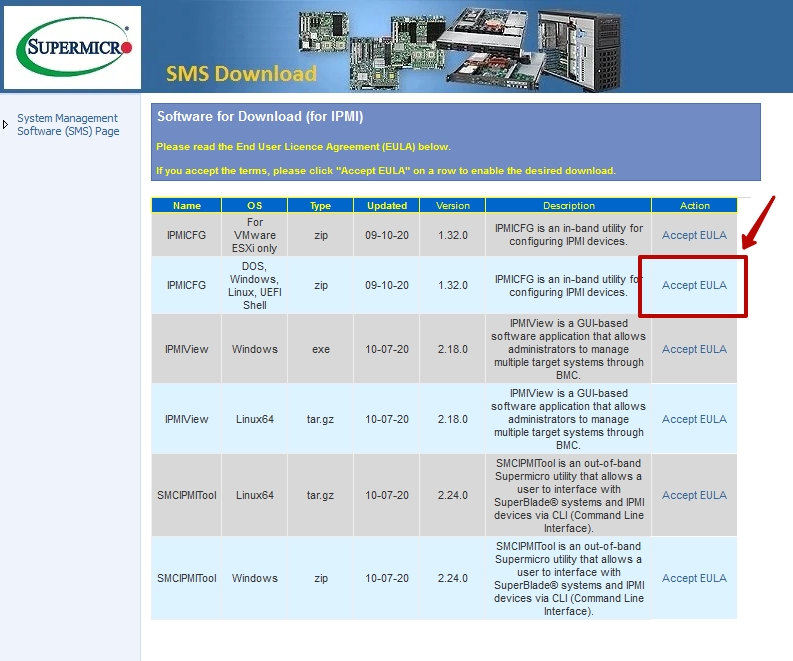
После того, как Вы примите условия, нажмите ещё раз для скачивания файла на Ваш компьютер.

Разархивировав скаченный архив, Вы увидите папку «IPMICFG_1.32.0_build.200910». Там найдете PDF инструкцию, по использованию утилиты и 3 других папки «DOS, Linux, Windows». В нашем примере пригодится только папка «DOS». Отложите её, она нам далее понадобится.
Итак, первым делом необходимо создать загрузочную флешку DOS с помощью программы Rufus. Скачайте бесплатную программу с официального сайта — http://rufus.akeo.ie/
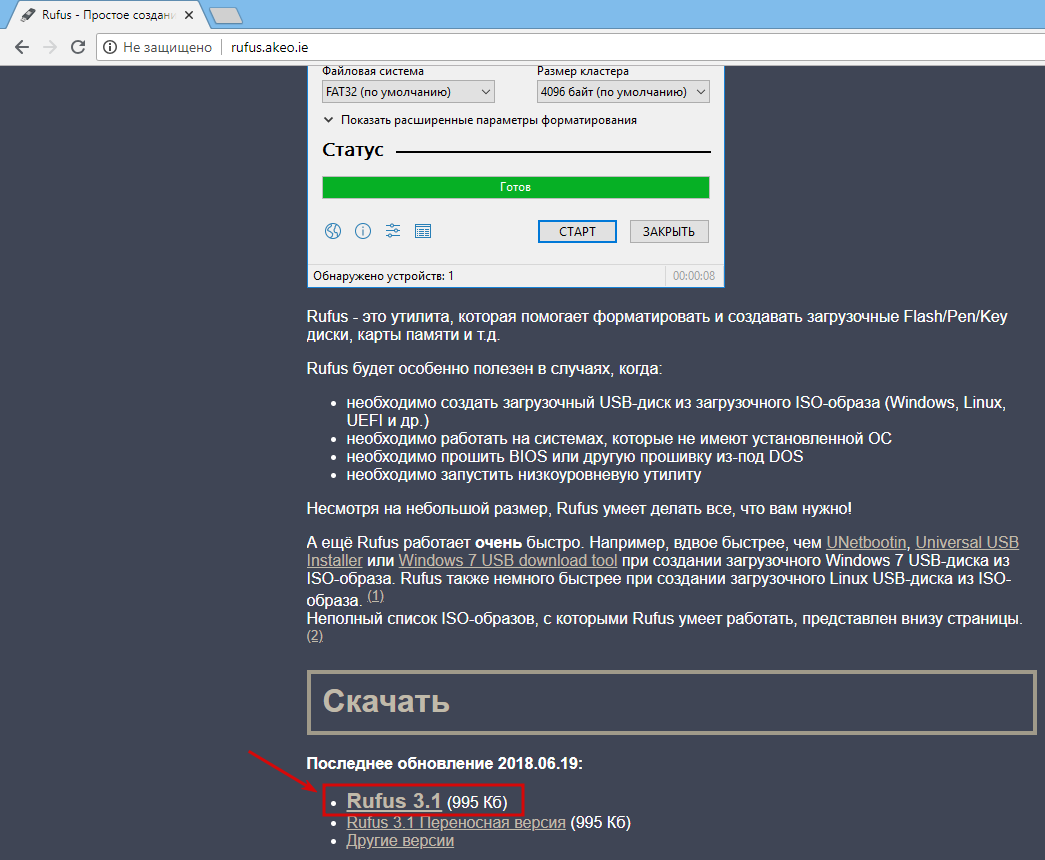
Программа не требует установки и готова сразу к использованию.
В поле DEVICE выберите USB накопитель, который нужно сделать загрузочным.
Внимание! Все файлы с флешки будут удалены, имейте это ввиду!
В поле FILE SYSTEM укажите FAT32.
Напротив галочки «Create a bootable disk using» укажите FreeDOS.
Остальные поля трогать не нужно. Нажмите «START». Процесс создания загрузочного USB не займет у Вас больше нескольких секунд.
После этого появится надпись «READY». После этого откройте USB на вашем компьютере и поместите туда, скаченную ранее папку «DOS». Теперь Вы можете загрузится с данной флешки, установив загрузку с неё в BIOS.
Теперь у нас имеется всё, чтобы поменять пароль на нужный нам. Для этого загружаемся с флешки и переходим в каталог «DOS», в котором и находится наша утилита.
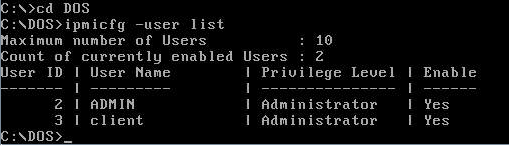
Для этого необходимо выполнить команду: cd DOS

Выполняем команду:
ipmicfg -user list
Видим в списке пользователей ADMIN и client. Из примера, у пользователя ADMIN ID=2, а уровень доступа Администратор. У пользователя client ID=3 и уровень доступа Администратор тоже.
Смена пароля выполняется командой: ipmicfg –user setpwd 2 ADMIN (где «2» ID пользователя, «ADMIN» — новый пароль).
Если все получится, то вы увидите надпись «DONE».

На этом сброс пароля завершен, можете пользоваться IPMI. Не забудьте поменять пароль на новый (Configuration->Users->выбор пользователя->Modify User->Change Password->Modify).
В случае с Windows OS
Для пользователей Windows, при наличии доступа к операционной системе, имеется возможность установить утилиту. Она позволяет изменить пароль администратора, сетевые настройки и полностью сбросить основные настройки на заводские.
Данную программу легко найти, введя в поле для поиска слово «IPMI»
Howto Reset Supermicro IPMI to Defaults
Last Updated On
Introduction
This guide details howto reset Supermicro IPMI or Intelligent Platform Management Interface to defaults or to reset the login details via bootable USB device or from within a Windows or Linux Operating system.
Resetting IPMI using Bootable USB Device
1) Create a bootable USB stick, you can do this using Rufus from on a windows machine. Just select FreeDOS and Rufus will create a bootable USB memory stick with FreeDOS on it.
2) Next we need Supermicro’s IPMI CFG Utility it can be downloaded from Supermicro’s website here: https://www.supermicro.com/SwDownload/SwSelect_Free.aspx
3) Open the zip file and extract the directory called “DOS” and copy it to the bootable USB stick
4) Insert the bootable USB drive into your Supermicro machine and boot from USB. You can normally invoke a boot menu using the F11 key
5) Running the command below will reset the IPMI to factory defaults:
ipmicfg –fde
6) Although it will instantly say its been completed you need to leave the server running for another 20 seconds or so for the IPMI to finish resetting. If you run this command below straight away it should give you an error and will only complete once the IPMI reset is finished.
ipmicfg -m
Using IPMI CFG on a Windows Server
Resetting the ADMIN password
1) Login to your windows server and download the following:

ftp://ftp.supermicro.com/utility/IPMICFG/IPMICFG_1.29.0_build.181029.zip
2) Unzip your download and place either the 32-bit, 64-bit, or both directories somewhere accessible to you from a command prompt. In this example I am using 64-bit so I just copied that directory. Boot up the Administrator command prompt and ‘cd’ into the appropriate directory.
C:\Users\Administrator\Desktop\64bit>IPMICFG-Windows.exe -fd
Reset to the factory default completed.

The default login of ADMIN/ADMIN should then work.
Setting the IP via Windows using IPMI CFG
You can use the following commands to set an IPMI on the IPMI via IPMICFG in Windows
C:\Users\Administrator\Desktop\64bit>IPMICFG-Windows.exe -dhcp off
Successfully disable DHCP.
C:\Users\Administrator\Desktop\64bit>IPMICFG-Windows.exe -m x.x.x.x
IP=x.x.x.x
C:\Users\Administrator\Desktop\64bit>IPMICFG-Windows.exe -k 255.255.255.xxx
Subnet Mask=255.255.255.x
C:\Users\Administrator\Desktop\64bit>IPMICFG-Windows.exe -g x.x.x.x
Gatway=x.x.x.x
Using ipmitool within a Linux Operating System
Resetting the IPMI password
You can reset the IPMI password an IP from within a linux operating system.
1) Download ipmitool using yum or apt-get depending on the distribution you are using:

yum install ipmitool or apt-get install ipmitool
2) Check the IPMI is detected by running the following:
ipmitool lan print 1
If you see the following error:
Could not open device at /dev/ipmi0 or /dev/ipmi/0 or /dev/ipmidev/0: No such file or directory
Then run the following to fix it:
modprobe ipmi_devintf
modprobe ipmi_si
3) To reset the management controller: (It will delete the users, including ADMIN, so in some cases it might be worth omitting this step)
ipmitool mc reset [ warm | cold ]
Creating a new user via ipmitool in linux
To create a new user with admin privilege level, run the following commands:
ipmitool user set name 2 admin
ipmitool user set password 2
ipmitool channel setaccess 1 2 link=on ipmi=on callin=on privilege=4
ipmitool user enable 2
To set a new IPMI IP using ipmitool in linux
To set a new IP run the following commands:
ipmitool lan set 1 ipsrc static
ipmitool lan set 1 ipaddr {YOUR DESIRED IP}
ipmitool lan set 1 netmask {YOUR NETMASK}
ipmitool lan set 1 defgw ipaddr {YOUR GATEWAY}
Useful IPMICFG Commands
A couple of other command that can be useful when using ipmicfg are:
Show IP and MAC:
ipmicfg -m
Set IP addr
ipmicfg -m 127.0.0.1
Set subnet mask
ipmicfg -k 255.255.255.0

Generally speaking, the default username and password for Supermicro IPMI is ADMIN / ADMIN. Since Supermicro platforms are plentiful, it is best practice to change the default, especially if you are going to colo the server. All too often, the server runs in the field fine for a year or two, then comes the need to perform some maintenance. When the time comes, it is easy to have forgotten the username and password. This just happens. In fact, I had a machine at home that had a 643 day uptime (Supermicro X8ST3-F if you were wondering) that I recently had to log into. I could not remember the password for the life of me. This guide will show you how to use ipmicfg to reset a lost password. The guide does assume you have physical access to the machine. I will do another guide shortly on how to reset the IPMI password under Linux and Windows. Bookmark this page, you never know when you will need it.
Update 2020: Default Passwords Changed
As a quick note here, due to SB327, the Supermicro default password is no longer “ADMIN”. Instead, it is now a randomized unique password. You can read more about this in: Why Your Favorite Default Passwords Are Changing. Check out the video here if you want to learn about why as you go through the procedure in this piece:
Ipmicfg is still a tool we recommend to change the ADMIN password over ipmitool. You can also use Supemicro SUM and the python scripts we mention in the above piece. Below, you can find the ipmicfg version we reference which still works.
Test Configuration
For this guide, I am using the new SSD test configuration.
- CPUs: 2x Intel Xeon E5-2690 CPUs
- Motherboard: Supermicro X9DR7-LN4F
- Memory: 8x 4GB Kingston unbuffered ECC 1333MHz DIMMs
- SSD: Corsair Force3 120GB
- Power Supply: Corsair AX850 850w 80 Plus Gold
- Chassis: Norco RPC-4220
- Operating System: FreeDOS
For those wondering, I utilized a USB DVD drive and my LiveCD that was updated with IPMIcfg and the new Supermicro X9DR7-LN4F BIOS for flashing.
How to Reset Supermicro IPMI Username and Password to Default
This guide will show how to use a DOS LiveCD or USB to modify IPMI users and reset the IPMI BMC to factory defaults. The first step is to get ipmicfg. Supermicro has a package that includes DOS, Windows and Linux versions. The current revision is 1.02.

Since we have physical access to this machine, we are using a DOS LiveCD to do the IPMI Password reset.

The IPMICFG.EXE that one can see above is the tool that we will use. One of the first things that you should do is make sure you get the IPMI IP address and MAC address. Use ipmicfg -m to get this information. It may be a good idea to write this down.

One of the most useful tools is just creating a new user. During this process, you need three pieces of information:
- User Number
- User Name
- Password
- Privileges
The first three are fairly easy. The fourth is a bit harder. IPMI security allows you to use

The next thing I will generally do is create a new user. The below creates a user with the username Patrick and the password Password. The user is created in the third spot. User 1 is anonymous and user 2 is ADMIN if that is still active. As will be obvious, it is easy to create a user with an IPMI password that you can use to login.

One thing you may want to consider is making an operator user. Using ipmicfg -user level 3 3 we can turn Patrick (user 3) into an operator (privilege level 3) in that order.

If this does not work, you can use ipmicfg -user level 3 4 and then see Patrick changed to an Administrator.

All that is well and good, but there is a way to reset the unit to factory defaults, thereby resetting the IPMI password and user to ADMIN / ADMIN. Use ipmicfg -fd and in a few seconds, the BMC will restart. It should be noted, while you are restoring to factory defaults, you will not be able to use other commands.
As you can see, the Patrick user we created is no longer there. The factory default username and password have been re-enabled.

Hopefully, that quick guide helps those who have a Supermicro server or motherboard with IPMI that they are locked out of. The total process takes a few minutes at most.