
Applies ToWindows 11 Windows 10 Windows 8.1
Back up the registry manually
-
Select Start , type regedit.exe in the search box, and then press Enter. If you are prompted for an administrator password or for confirmation, type the password or provide confirmation.
-
In Registry Editor, locate and click the registry key or subkey that you want to back up.
-
Select File > Export.
-
In the Export Registry File dialog box, select the location to which you want to save the backup copy, and then type a name for the backup file in the File name field.
-
Select Save.
Restore a manual back up
-
Select Start , type regedit.exe, and then press Enter. If you are prompted for an administrator password or for confirmation, type the password or provide confirmation.
-
In Registry Editor, click File > Import.
-
In the Import Registry File dialog box, select the location to which you saved the backup copy, select the backup file, and then click Open.
Need more help?
Want more options?
Explore subscription benefits, browse training courses, learn how to secure your device, and more.
-
Home
-
News
- How to Reset the Registry to Default Windows 10/11 (3 Ways)
How to Reset the Registry to Default Windows 10/11 (3 Ways)
By Shirley | Follow |
Last Updated
If the Windows registry becomes confusing due to unexpected circumstances or human operations, how should you restore it to the default values? Now read this post on MiniTool to see detailed instructions on how to reset the registry to default.
The Windows registry is used to manage resources and store configuration settings for applications on the Windows operating system. Additionally, changes made to Control Panel settings, Windows components, etc. are also updated in the registry. If you are not very familiar with the registry, you are likely to operate incorrectly and cause problems with the registry. In this case, you may need to restore the registry to its default values.
How to reset the registry to default? Is it possible to restore the whole registry to default? Keep reading to find the answers.
How to Reset the Registry to Default Windows 10/11
Way 1. Restore the Registry to Default by Resetting the PC
Since the registry stores a lot of information about Windows-specific configurations, if you want to completely reset the entire registry, you can only reinstall Windows by resetting the computer.
Tips:
Although resetting your computer allows you to choose to save personal files, it is highly recommended that you do a system backup in case of unexpected situations. You can use MiniTool ShadowMaker Trial to do that. It provides you with a 30-day free trial.
MiniTool ShadowMaker TrialClick to Download100%Clean & Safe
Here is how to reset your PC.
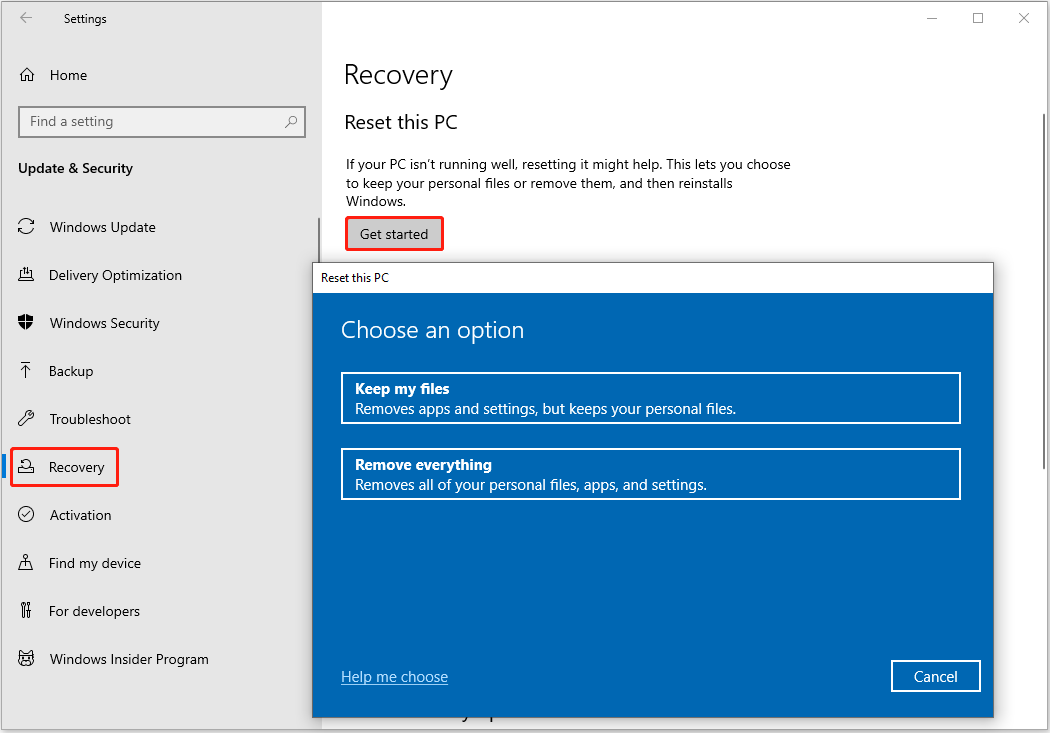
Step 1. Press the Windows + I key combination to open Settings.
Step 2. Click Update & Security.
Step 3. Move on to the Recovery tab, then click the Get started button under Reset this PC.
Step 4. In the new window, choose whether to keep your personal files. Then follow the on-screen instructions to complete the necessary actions.
After that, the Windows registry should be restored to default.
Way 2. Reset the Registry to Default Using System Restore
If you simply made incorrect changes to an application or other computer configuration, you can use System Restore to restore the system to the state before the changes were made. And, the registry will be restored to the state it was in before the changes were made.
Please note that performing a system restore requires that you have created a system restore point before making the erroneous changes.
How to perform a system restore? Follow the guide below.
Step 1. In the Windows search box, type create a restore point and then click it from the best match result.
Step 2. In the new window, under System Protection, click System Restore.
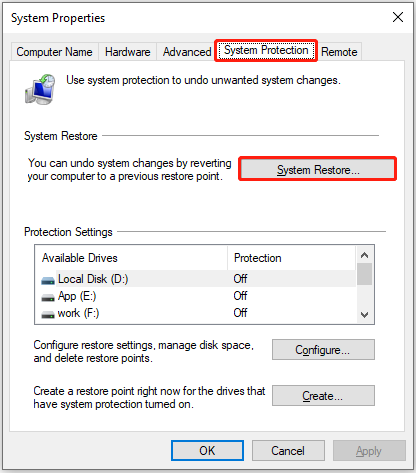
Step 3. Next, you need to finish the process according to the instructions on the screen.
Tips:
Windows claims that system restore only restores system files and settings and does not affect personal files. However, some users still experienced data loss. If you encounter the same situation, you can use free data recovery software, MiniTool Power Data Recovery, to recover files after system restore.
MiniTool Power Data Recovery FreeClick to Download100%Clean & Safe
See Also: Fix Windows Could Not Update Registry Data in the Installation
Way 3. Reset Windows Registry Permissions to Default From Backups
Restoring the registry from a backup file works if you mistakenly changed some registry values. Generally, before modifying the registry, it is recommended to export the original registry to avoid unexpected situations. If you have registry backup reg. files, you can use Registry Editor to import them.
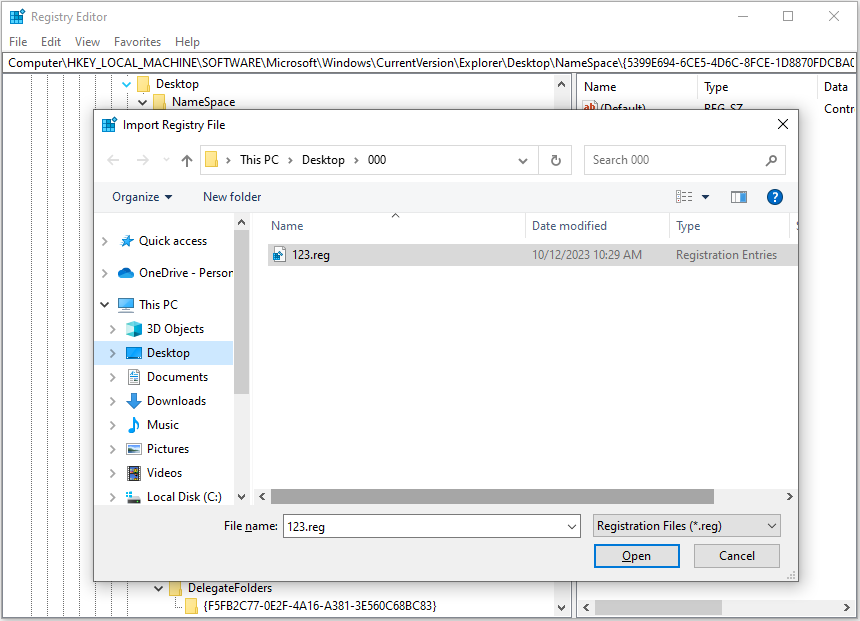
First, open Registry Editor by using the Windows search box.
Second, click File > Import. Then select the target .reg file to open. If there are multiple .reg files, you need to import them one by one.
Wrapping Things Up
In a word, this post explains how to reset the registry to default by resetting the PC, performing a system restore, and importing the backup .reg files.
If you have found any other ways to reset Windows registry permissions to default, or you have any questions about MiniTool software, do not hesitate to contact us via [email protected].
About The Author
Position: Columnist
Shirley graduated from English major and is currently an editor of MiniTool Team. She likes browsing and writing IT-related articles, and is committed to becoming a professional IT problem solver. The topic of her articles are generally about data recovery, data backup, and computer disk management, as well as other IT issues. In spare time, she likes watching movies, hiking and fishing.
The Windows Registry is home to lots of data containing information about how the OS behaves. Most changes that you make on your system affect the registry, so it regularly adjusts, adds, and removes values.
If you’ve accidentally messed up the registry by making a manual mistake or some other error, you might wonder how to reset the registry to default. Let’s look at the various methods for resetting the registry in Windows and how to prevent these issues in the future.
The Only Way to Fully Reset the Registry
Unfortunately, there’s no simple method to reset only the registry. Because the registry contains so much data about your specific Windows configuration, you can’t reset the registry to a clean state without rendering your system inoperable.
As a result, the only true way to reset the Windows Registry to default is to reset your Windows PC. The process of resetting Windows reinstalls the operating system, which will naturally reset the registry.
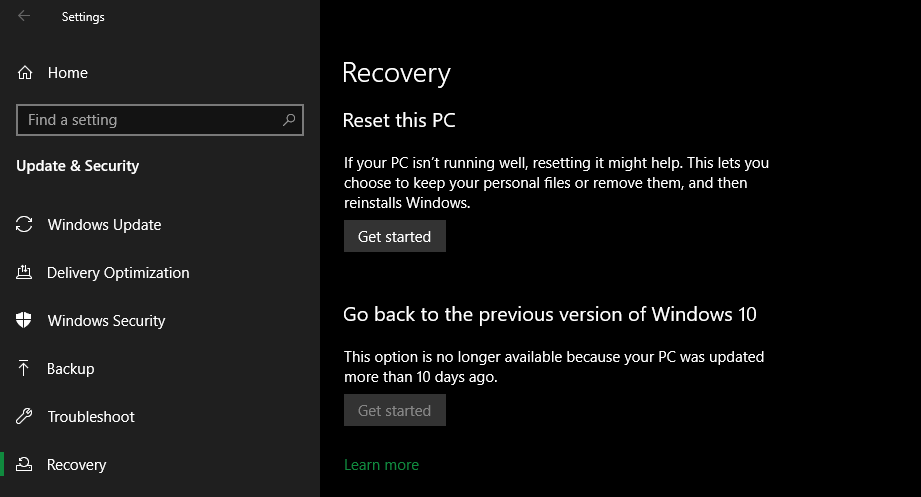
To reset your Windows PC, open Settings from the Start menu or with Win + I, then go to Update & Security > Recovery and click Get Started under Reset this PC.
This will give you the option to only reinstall Windows while keeping your files, or nuke everything and start from scratch. You’ll also be able to choose between reinstalling Windows using recovery data from your system, or downloading a fresh copy over the internet.
No matter which combination of these options you choose, you’ll fully reinstall Windows, which will reset the registry. It’s obviously not convenient, but if you want to reset your entire registry to its default settings, this is the only method.
However, there are other ways to go back in time with the registry, or give yourself a backup in case of future problems. Let’s consider those.
Reset Recent Registry Changes Using System Restore
System Restore is a recovery feature built into Windows. Whenever you make changes like installing an app or a major update, Windows creates a restore point. You can later use these restore points to undo the changes if they cause issues.
Using a restore point will undo any changes to app, drivers, and system updates since that point in time. This includes the tweaks that such actions make to the registry, allowing you to reset some parts of the registry that you’ve recently modified. This method isn’t perfect for resetting the registry, though.
It won’t let you entirely reset the registry, unless you created a restore point as soon as you started using your brand-new computer. Even for less drastic resets, you might not have a restore point from right before you made changes. Windows lets you make a restore point manually, but that doesn’t help if you’re already having a problem.
Reset Some of the Registry From a File Backup
The Registry Editor makes it easy to export registry entries to keep them as a backup, share them with others, or similar. This is another case where you’re out of luck if you didn’t export anything from the registry before you wanted to reset it.
For the future, though, it’s good to know how to export registry entries and import them later to restore the backup. First, open the Registry Editor by typing registry into the Start menu to find the utility. You’ll need to provide administrator permissions to launch it.
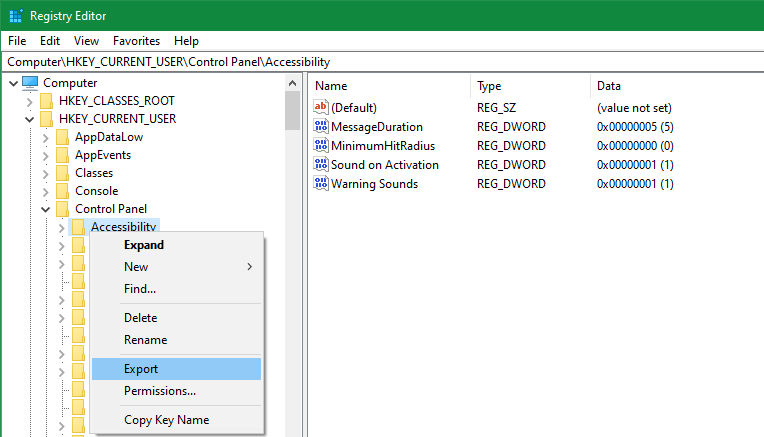
Now, in the left panel, right-click on the registry value you want to back up for later and choose Export. Give the exported file a name and choose where to save it on your system, and you’ll get a file ending in .reg.
To later restore this file, you can go to File > Import in the Registry Editor window and locate it on your computer. For a simpler method, just double-click on the .reg file to merge it into your own registry.
While you can right-click on Computer and choose Export to back up the entirety of your registry, this isn’t very practical. Remember that the registry contains a huge number of entries that change regularly. Trying to merge an entire past registry into your current one is likely to cause problems, so you shouldn’t do this.
Backing up and restoring individual registry entries is great for safety when you make minor changes, but it’s not practical for resetting the whole registry to default.
How to Fix Registry Problems
Presumably, you’re looking to reset the Windows Registry to default because of issues on your system. And while the reset and System Restore options above are your best options for serious problems, Windows also includes some utilities to help scan for and fix corrupted system files. You might not need to do a full reset, so try these tools first.
Windows used to include a tool called ScanReg that checked for registry issues, but this isn’t available in modern versions. Instead, you can use an SFC scan, which checks for invalid system files and tries to repair them when possible.
To run SFC, type cmd into the Start Menu to show the Command Prompt tool, then right-click it and choose Run as administrator, since you need to open an elevated prompt to run this command. Provide admin permissions, then enter the following:
sfc /scannow
This will perform a full scan of your system, which can take some time. When it’s done, you’ll see a summary of the results. In case you need help with this tool or it finds problems that it can’t fix, see our guide to using SFC and DISM.
How to Prevent Registry Damage in the Future
To avoid another situation where you want to reset the registry to default, you should take care when making any changes to it. Only make manual tweaks if you’re sure what you’re doing; don’t follow random guides containing registry tips unless you’re sure you can trust them.
It’s also wise to have backups ahead of time. If you didn’t already have System Restore set up, make sure you do now. That could save you a lot of time in case of registry troubles in the future.
Finally, don’t use registry cleaners. These usually cause more problems than they fix, so stay away from them.
Restore the Registry When Needed
Now you know the primary method of resetting the Windows registry, along with other ways to undo registry changes. And with a bit of care, you can avoid this problem in the future so you don’t have to spend time resetting your system.
In general, unless you have a specific reason to be in the registry, it’s best to stay away.
Image Credit: Sinart Creative/Shutterstock
Реестр Windows – это сердце и душа операционной системы. Он представляет собой набор баз данных, содержащих информацию о конфигурации ОС, а также приложений и служб, работающих на ней. При неправильном обращении один только реестр может привести к повреждению системных файлов, а значит, и самой ОС.
По разным причинам вам может понадобиться внести изменения в реестр Windows. Однако может наступить момент, когда некоторые функции Windows перестанут работать так, как нужно. Тогда вам может понадобиться восстановить все параметры реестра Windows до значений по умолчанию. Кроме того, может потребоваться отмена пользовательских разрешений, которые были предоставлены с помощью списков контроля доступа (ACL), которые также можно вернуть к значениям по умолчанию.
Если вы хотите вернуть реестр Windows и разрешения к значениям по умолчанию без переустановки ОС, вы можете воспользоваться приведенным ниже руководством.
Интересно: Как создать резервную копию реестра Windows?
- Загрузить SubInACL
- Запустите загруженный пакет для установки SubInACL.
- Запустится мастер установки.
Нажмите Next.
Примите условия лицензирования.

- Нажмите «Install now.»

- Нажмите Finish, когда установка завершится.

- Теперь найдите «Notepad» в меню «Пуск» и нажмите «Run as administrator .»

Вставьте следующие команды в Блокнот:
Эти команды предоставляют группам пользователей «Администраторы» и «Система» полный контроль над определенными разделами реестра и системным диском ©.subinacl /subkeyreg HKEY_LOCAL_MACHINE /grant=administrators=f subinacl /subkeyreg HKEY_CURRENT_USER /grant=administrators=f subinacl /subkeyreg HKEY_CLASSES_ROOT /grant=administrators=f subinacl /subdirectories %SystemDrive% /grant=administrators=f subinacl /subkeyreg HKEY_LOCAL_MACHINE /grant=system=f subinacl /subkeyreg HKEY_CURRENT_USER /grant=system=f subinacl /subkeyreg HKEY_CLASSES_ROOT /grant=system=f subinacl /subdirectories %SystemDrive% /grant=system=f
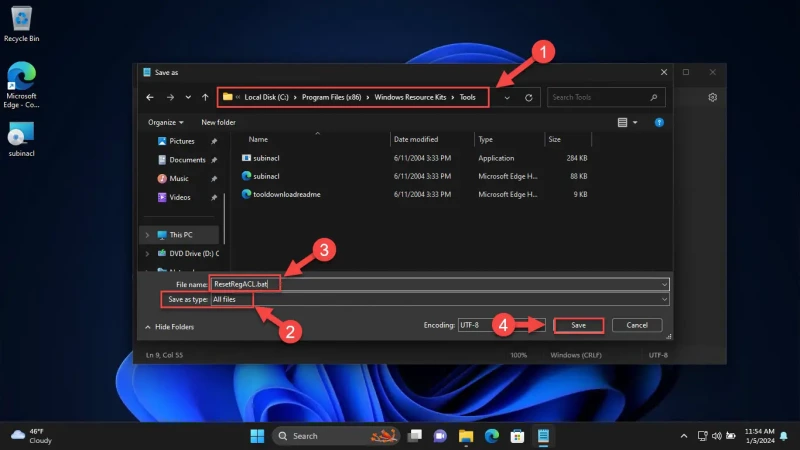
- Нажмите Файл и затем нажмите «Сохранить как».
В окне «Сохранить как» перейдите к месту установки SubInACL.
Установите «Тип файла» на «Все файлы». - Введите пользовательское имя файла, а затем «.bat», что сохранит файл как пакетный файл.
Нажмите Сохранить.
- Нажмите клавишу Win + R, чтобы открыть командное окно Run.
Введите «cmd» и нажмите CTRL + Shift + Enter для запуска повышенных привелегий командной строки. - Используйте команду
cdдля изменения рабочего каталога на место, где был установлен SubInACL.cd /d "[PathToInstallationLocation]"
Теперь введите имя пакетного файла, включая его расширение «.bat», как в этом примере:

После выполнения этих шагов пакетный файл и инструмент SubInACL начнут свою работу, которая заключается в восстановлении разрешений реестра до значений по умолчанию.
Этот процесс может занять некоторое время, и вы сможете наблюдать за его ходом в командной строке.
После завершения процесса вы можете закрыть командную строку, после чего рекомендуется перезагрузить систему.
Приведенный выше метод позволяет сбросить разрешения реестра до значений по умолчанию. Однако если вы хотите полностью сбросить реестр Windows, необходимо использовать другой подход.
Сброс реестра Windows к настройкам по умолчанию
Существует множество способов полностью сбросить реестр Windows и вернуть его к значениям по умолчанию. Если ваша операционная система столкнулась с проблемами, вы можете воспользоваться любым из приведенных ниже способов сброса реестра.
Сброс реестра Windows с помощью системного сброса
Сброс компьютера восстанавливает все системные настройки, а также реестр Windows до значений по умолчанию. Однако вы можете выбрать, сохранять ли ваши личные файлы и данные.
Сброс Windows можно выполнить как локально, когда для восстановления настроек используются те же системные файлы, так и из облака, когда свежие файлы загружаются с серверов Microsoft Последний вариант может занять больше времени в зависимости от подключения к Интернету.
Я рекомендую выполнить облачный сброс, который можно выполнить с помощью следующих шагов:
- Нажмите клавишу Win + i, чтобы открыть приложение «Настройки».
Нажмите Система. - Перейдите к настройкам Восстановления.

- Нажмите «Сброс ПК»

Откроется мастер сброса ПК.
- Выберите «Сохранить мои файлы»

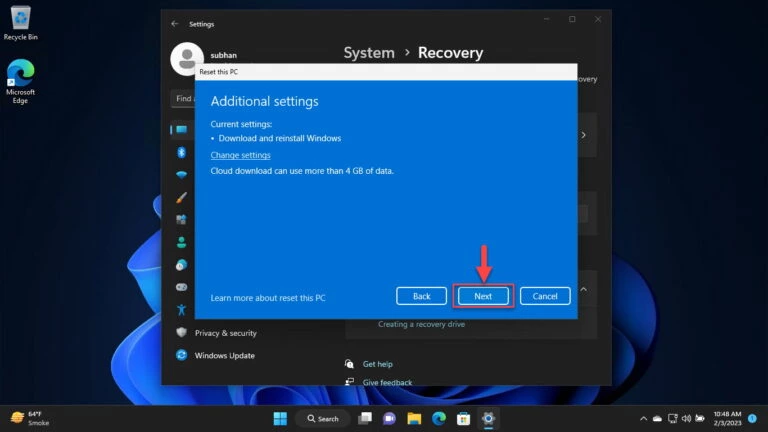
- Выберите «Загрузка из облака»
- Нажмите Следующее.
- Нажмите Сброс .
Сейчас мастер начнет загрузку свежих файлов с серверов Microsoft, а затем сбросит ваш компьютер. Этот шаг может занять некоторое время в зависимости от вашего подключения к Интернету, и ваш компьютер может перезагрузиться.
После этого реестр Windows также будет возвращен к настройкам по умолчанию.
Сброс реестра Windows с помощью восстановления системы
При возникновении проблем с компьютером можно восстановить систему до прежнего состояния. Таким образом, все изменения, сделанные в это время, будут отменены. Конечно, для этого необходимо иметь точку восстановления системы, когда реестр Windows уже находился в состоянии по умолчанию.
Для восстановления компьютера в более раннее состояние выполните следующие действия:
- Нажмите клавишу Win + R, чтобы открыть командное окно «Выполнить».
- Наберите
sysdm.cpl, чтобы открыть окно свойств системы. - Перейдите на вкладку «Защита системы» и нажмите «Восстановление системы .«Теперь запустится мастер восстановления системы.
- Выберите «Выбрать другую точку восстановления» и нажмите Следующее.

- Проверьте опцию «Показать больше точек восстановления .»
- Выберите точку восстановления, в которой реестр Windows находился в состоянии по умолчанию, и нажмите Следующее.
- На экране подтверждения нажмите Завершить.
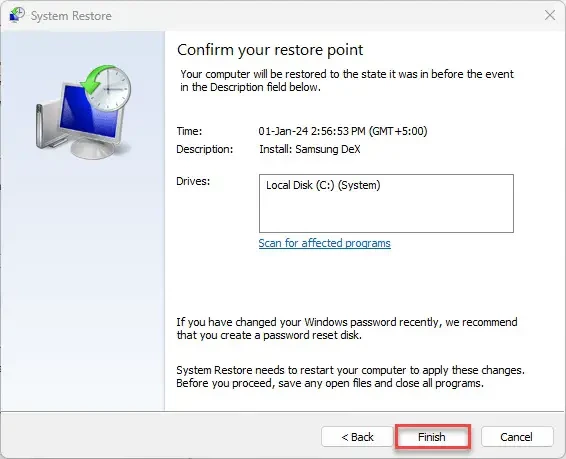
Теперь операционная система начнет процесс восстановления. После завершения процесса реестр Windows должен быть возвращен к настройкам по умолчанию, если в выбранной точке восстановления установлены значения реестра по умолчанию.
Заключение
Переустановка Windows или восстановление компьютера до состояния, когда реестр Windows имел значения по умолчанию, автоматически сбрасывает разрешения реестра или ACL реестра. Однако если вы используете SubInACL для сброса только разрешений реестра, то остальные значения реестра останутся прежними.
- To restore the Windows Registry to its defaults, reset the operating system from Settings > System > Restore, using cloud reset, or restore the computer to an earlier state.
- You may use SubInACL – A Microsoft command-line tool (deprecated, but available from archives) – to reset Registry permissions (ACL).
The Windows Registry is the heart and soul of the operating system. It is a collection of databases that contain the configuration information for the OS, as well as the apps and services running on it. If not properly handled, the Registry alone can be responsible for corrupting system files, and hence, the OS itself.
You may often need to make changes to the Windows Registry for different reasons. However, there may come a time when certain Windows functions will no longer work as they should. This is when you might want to restore all the Windows Registry settings to their default values. Moreover, user permissions might also need to be revoked that were granted using Access Control Lists (ACLs), which can also be reverted to its defaults.
In case you want to reset the Windows Registry and its permissions to their default values without having to reinstall the OS, you may use the guide below.
Table of Contents
Reset Registry permissions (ACL) using SubInACL
Registry permissions refer to the access granted to the user accounts so that they are allowed to make changes to the Registry. In case you want to revoke that access, you can restore the default values using SubInACL – a command-line tool by Microsoft used to manage Windows Registry.
Although SubInACL has been deprecated by Microsoft, it can still be downloaded from their archives. At the moment, there is no alternative for this tool. Nonetheless, after having tested it on the latest operating systems (Windows 11), it can be concluded that it works and is safe to use.
Here are the steps to revert Windows Registry permissions to its default values using SubInACL:
Note: The process involves making changes to the Windows Registry. Misconfiguration of critical values in the system’s registry could be fatal for your operating system. Therefore, we insist that you create a system restore point or a complete system image backup before proceeding forward with the process.
You can also use our top selection of disk imaging and backup software so you never lose your data or operating system again.
-
Click the link below to download SubInACL:
Download SubInACL from Microsoft Archive
-
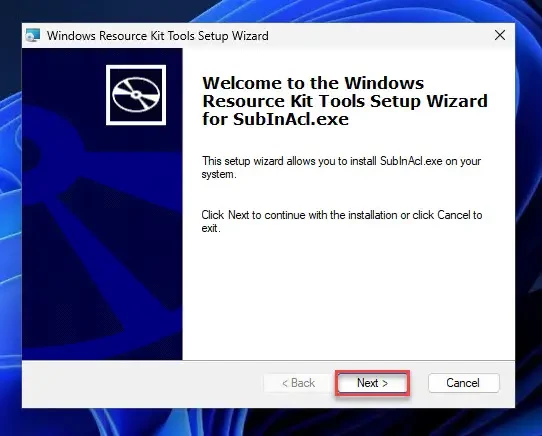
Run the downloaded package to install SubInACL.
The installation wizard will launch.
-
Click Next.
Proceed to install SubInACL -
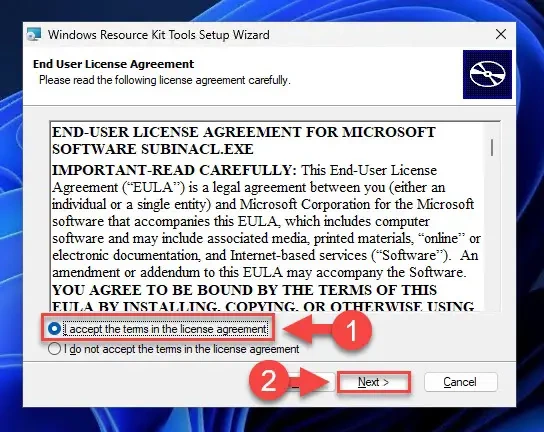
Accept the licensing terms.
Agree to the license agreement -
Note down the installation path and click “Install now.”
Install SubInACL -
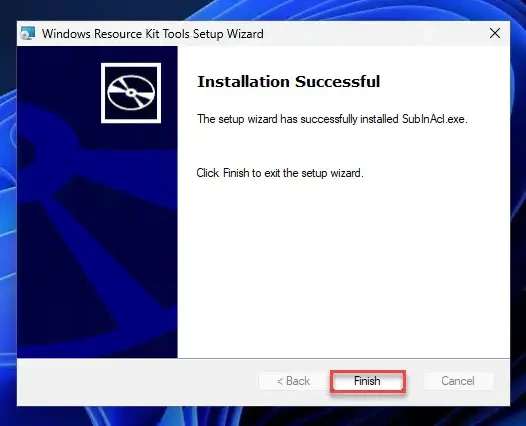
Click Finish when the installation completes.
Close the installation wizard -
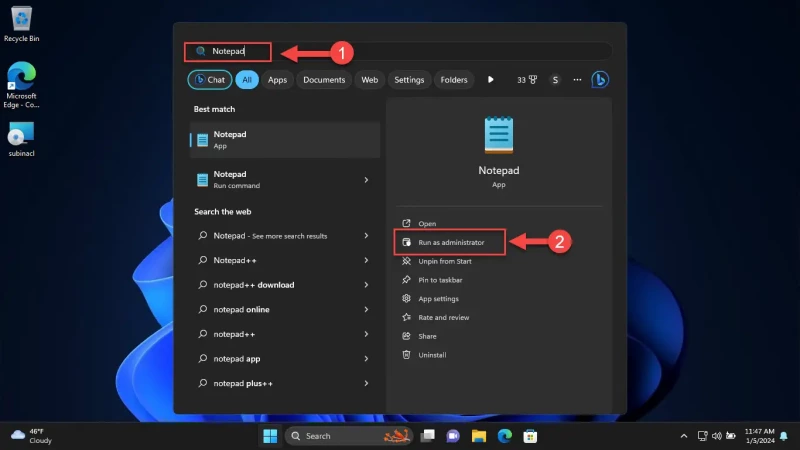
Now search for “Notepad” in the Start menu and click “Run as administrator.”
 To Defaults 5")
Run Notepad with elevated rights -
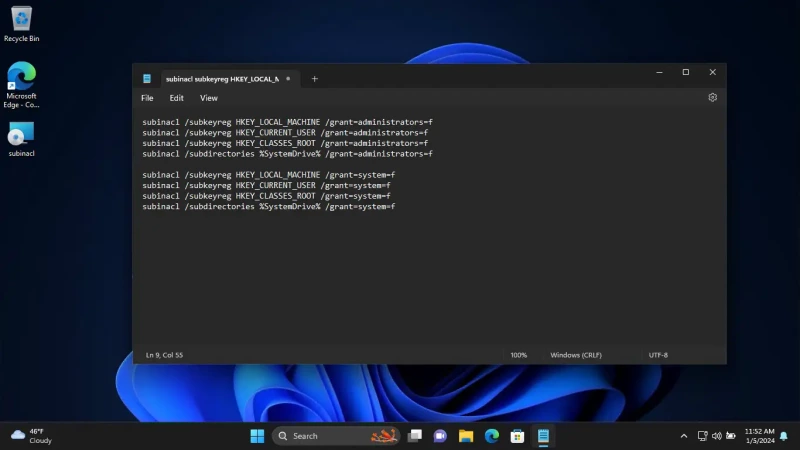
Paste the following commands in Notepad:
These commands grant both the “Administrators” and the “System” user groups Full Control of certain Registry hives and the system (C) drive.
subinacl /subkeyreg HKEY_LOCAL_MACHINE /grant=administrators=f
subinacl /subkeyreg HKEY_CURRENT_USER /grant=administrators=f
subinacl /subkeyreg HKEY_CLASSES_ROOT /grant=administrators=f
subinacl /subdirectories %SystemDrive% /grant=administrators=f
subinacl /subkeyreg HKEY_LOCAL_MACHINE /grant=system=f
subinacl /subkeyreg HKEY_CURRENT_USER /grant=system=f
subinacl /subkeyreg HKEY_CLASSES_ROOT /grant=system=f
subinacl /subdirectories %SystemDrive% /grant=system=f
Paste commands in Notepad -
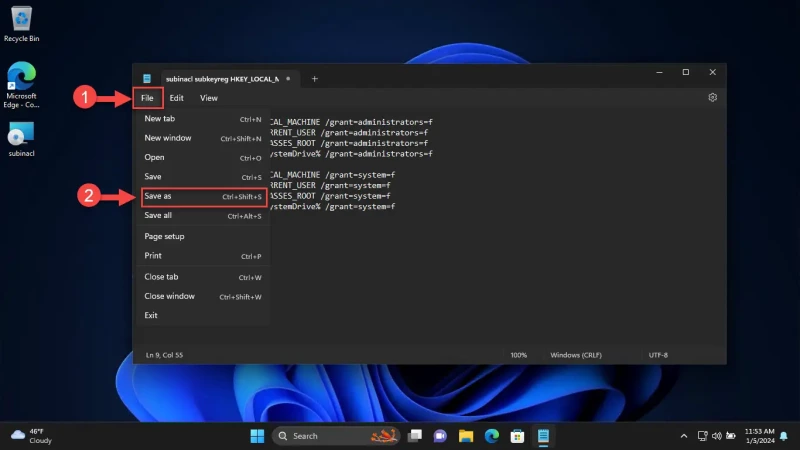
Click File and then click “Save as.”
Save as file -
In the “Save as” window, navigate to the location where SubInACL was installed.
-
Set”File type” to “All files.”
-
Enter a custom name for the file followed by “.bat“, which will save the file as a batch file.
-
Click Save.
Save Notepad file as a batch file -
Now press the Windows key + R to open the Run Command box.
-
Type in “cmd” and press CTRL + Shift + Enter to launch an elevated Command Prompt.
-
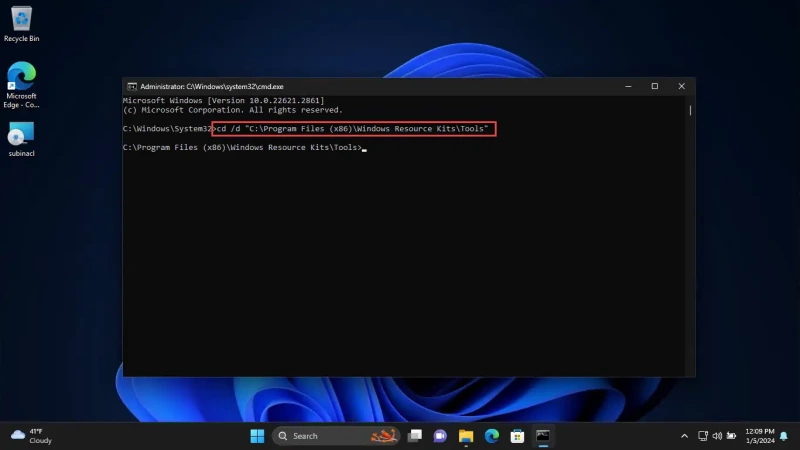
Now use the “cd” command to change the working directory to the location where SubInACL was installed.
cd /d "[PathToInstallationLocation]"
Change directory to SubInACL installation location -
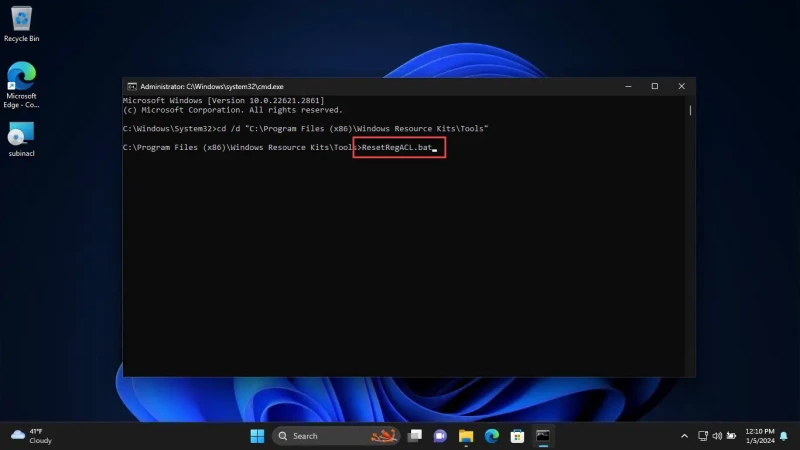
Now enter the name of the batch file, including its extension “.bat”, as in this example:
Execute the batch file
 To Defaults 1")
 To Defaults 2")
 To Defaults 3")
 To Defaults 4")
 To Defaults 5")
 To Defaults 6")
 To Defaults 7")
 To Defaults 8")
 To Defaults 9")
 To Defaults 10")
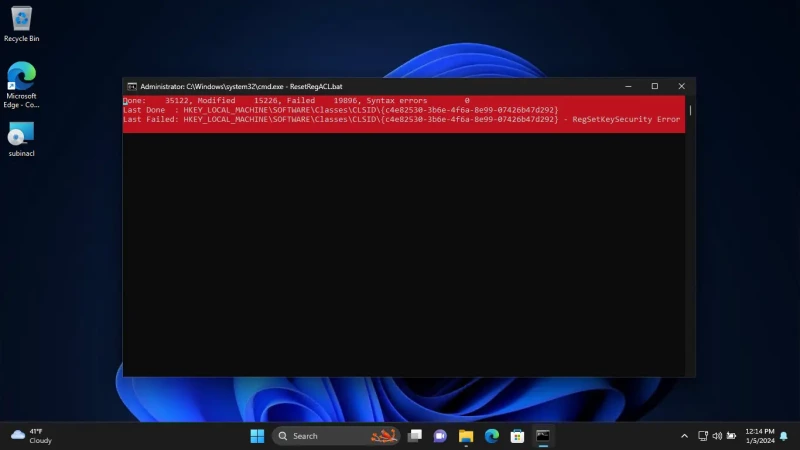
After performing these steps above, the batch file and the SubInACL tool will start its function, which is restoring the Registry permissions to its default values.
This process can take some time, and you will be able to see its progress inside the Command Prompt.
 To Defaults 11")
Once the process is complete, you may close the Command Prompt, and a system reboot is advised.
The method given above resets the Registry permissions to its default values. However, if you want to reset the Windows Registry completely, a different approach will need to be taken.
Reset Windows Registry to default settings
There are multiple ways to reset the Windows Registry entirely and bring it back to its default values. If your operating system is encountering issues, then you can adopt any of the methods below to reset the Registry.
Reset Windows Registry with system reset
Resetting the PC restores all system settings as well as the Windows Registry to its defaults. However, you can choose whether you want to keep your personal files and data.
A Windows reset can be performed both locally, where the same system files are used to restore the settings, or from the cloud, where fresh files are downloaded from Microsoft Servers. The latter might take a bit more time depending on your internet connectivity.
I suggest that you perform a cloud reset, which can be performed with these steps:
-
Press the Windows Key + i to open the Settings app.
-
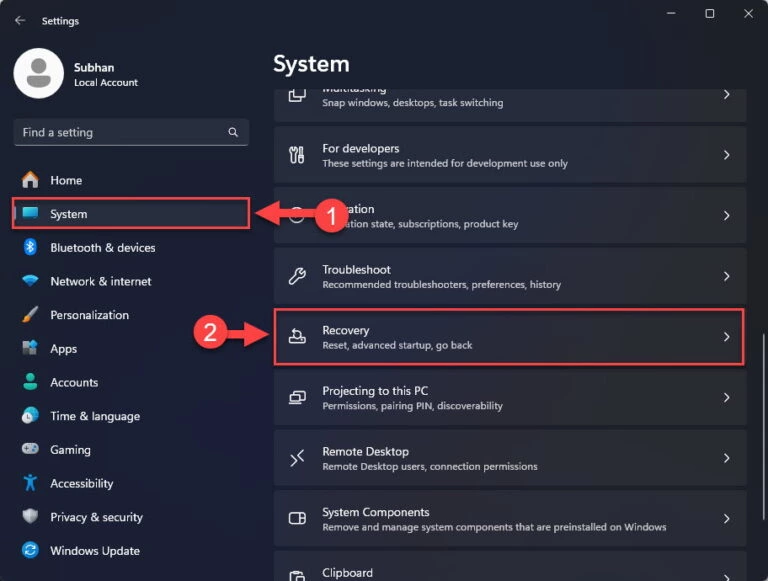
Click System.
-
Now go to Recovery settings.
 To Defaults 12")
Open Recovery settings -
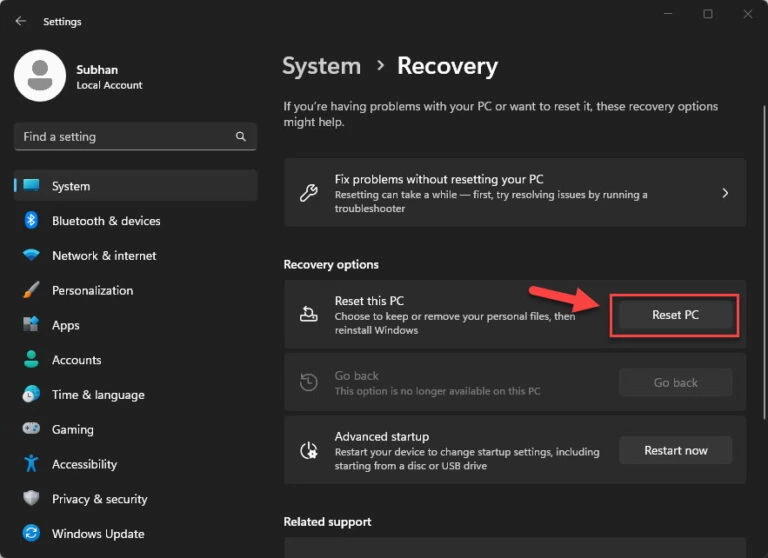
Click “Reset PC.”
 To Defaults 13")
Reset PC The reset PC wizard will now open.
-
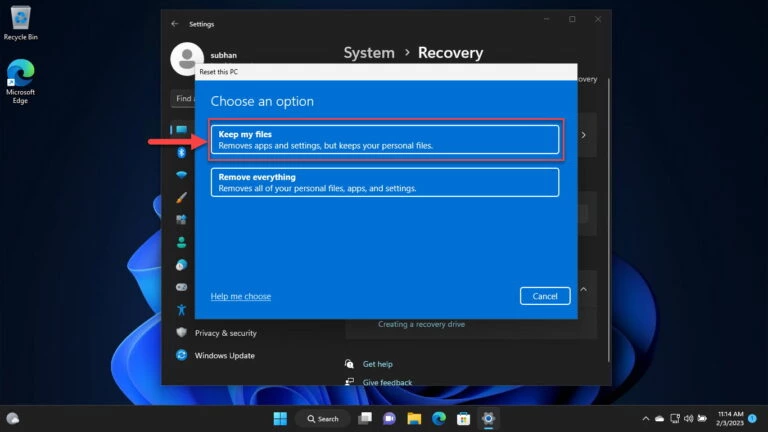
Select “Keep my files.”
Keep files and data -
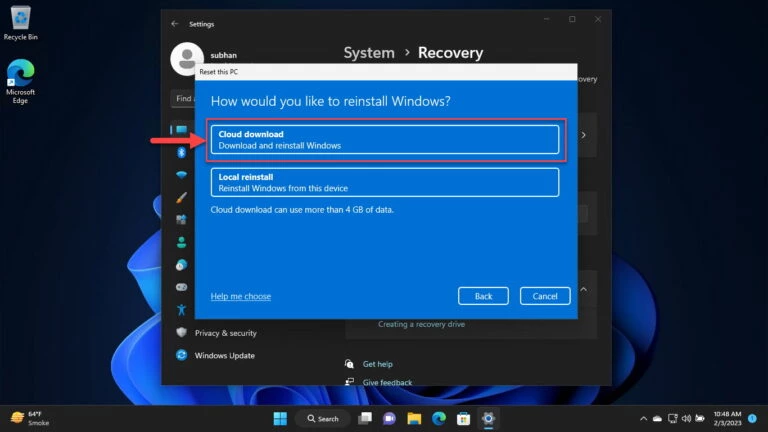
Select “Cloud download.”
Cloud download -
Click Next.
proceed with resetting Windows -
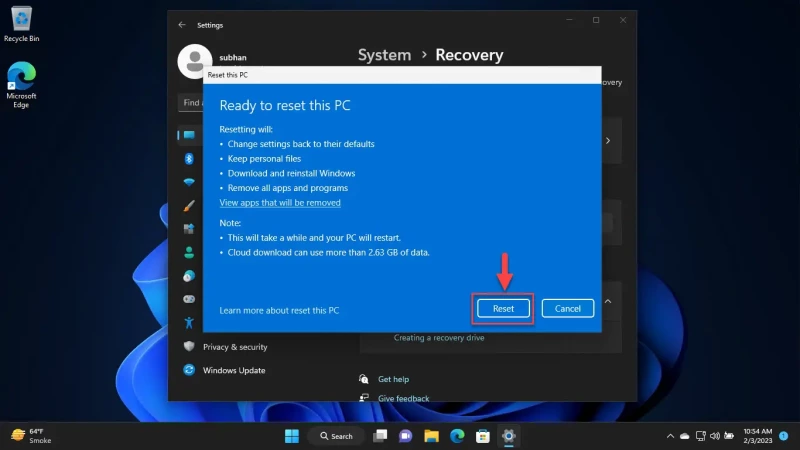
Click Reset.
Reset Windows from Cloud while keeping files
 To Defaults 12")
 To Defaults 13")
 To Defaults 14")
 To Defaults 15")
 To Defaults 16")
 To Defaults 17")
The wizard will now begin downloading fresh files from Microsoft servers and then reset your computer. This step can take a while depending upon your internet connection, and your PC may restart.
Once done, your Windows Registry will also be reverted to its default settings.
Reset Windows Registry with system restore
You can also restore the system to an earlier state if you are encountering issues with your PC. This way, any changes made during this time will be undone. Of course, for this to happen, you must have a system restore point when the Windows Registry was already in its default state.
To restore your computer to an earlier state, use these steps:
-
Press the Windows key + R to open the Run Command box.
-
Type in “sysdm.cpl” to open the System Properties applet.
-
Switch to the “System protection” tab and click “System Restore.”
 To Defaults 18")
Open System Restore settings The System Restore wizard will now launch.
-
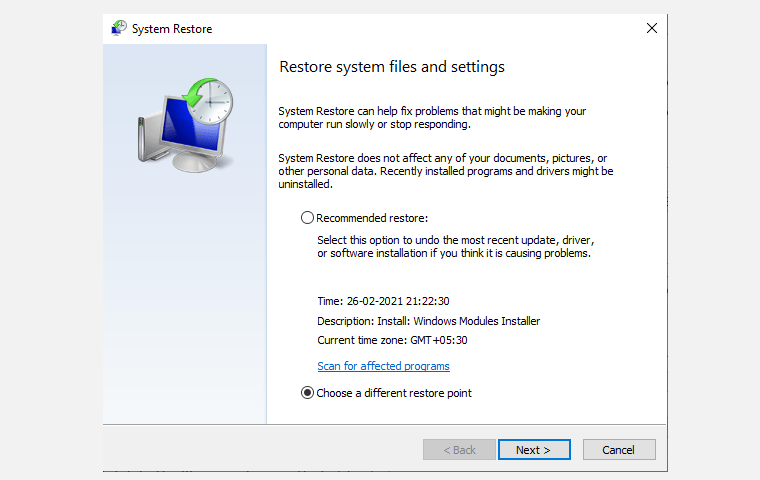
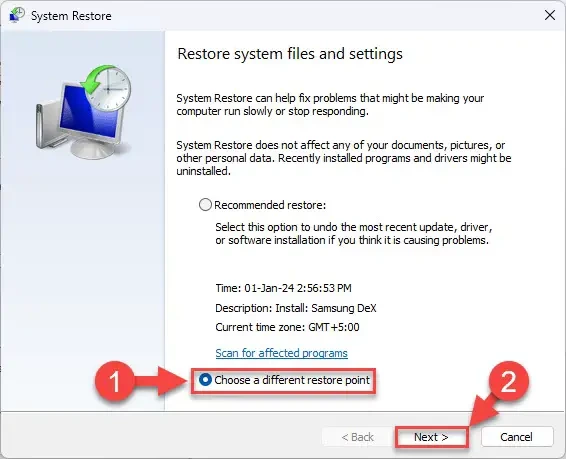
Select “Choose a different restore point” and click Next.
Choose a different restore point -
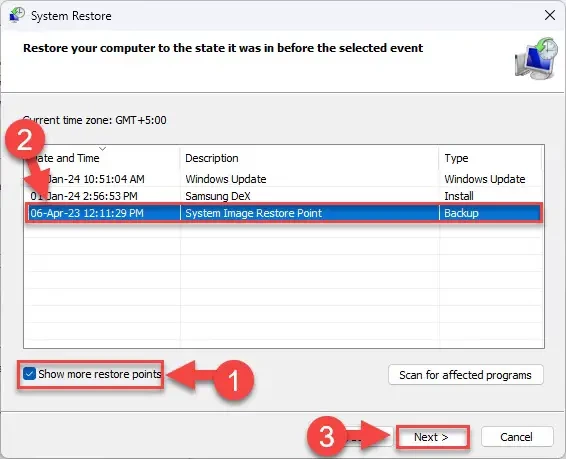
Check the option “Show more restore points.”
-
Select a restore point where the Windows registry was in its default state, and click Next.
Select a restore point -
On the confirmation screen, click Finish.
Complete the restoration process
 To Defaults 18")
 To Defaults 19")
 To Defaults 20")
 To Defaults 21")
The operating system will now begin its restoration process. Once completed, the Windows Registry should be reverted to its default settings, provided that the selected restoration point has the default Registry values.
Takeaway
Resetting Windows or restoring the PC to an earlier state where the Windows Registry was in its default values automatically resets the Registry permissions, or the Registry ACLs as well. However, if you use SubInACL to reset the Registry permissions only, then the rest of the Registry values will remain as-is.
Depending on what you want to achieve, you can apply the respective method to restore your Registry defaults from above.