Сброс настроек клавиатуры windows 10

Загрузить PDF

Загрузить PDF

Из данной статьи вы узнаете, как сбросить настройки клавиатуры на компьютере с Windows и Mac OS X. Для этого можно восстановить настройки клавиатуры по умолчанию. Также можно изменить языковые настройки, если на клавиатуре нет определенных символов.

  1. Step 1 Откройте меню «Пуск» и в строке поиска введите диспетчер устройств.

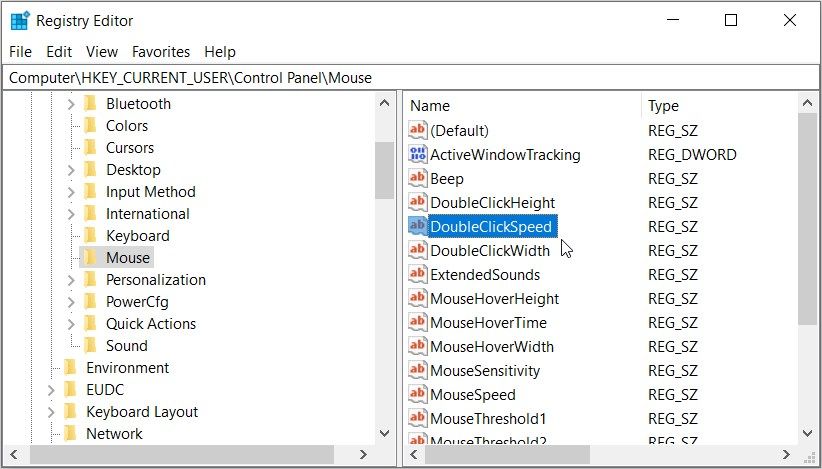
    Начнется поиск программы «Диспетчер устройств», с помощью которой можно сбросить настройки компьютерных комплектующих.

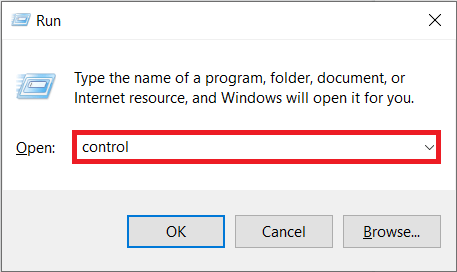
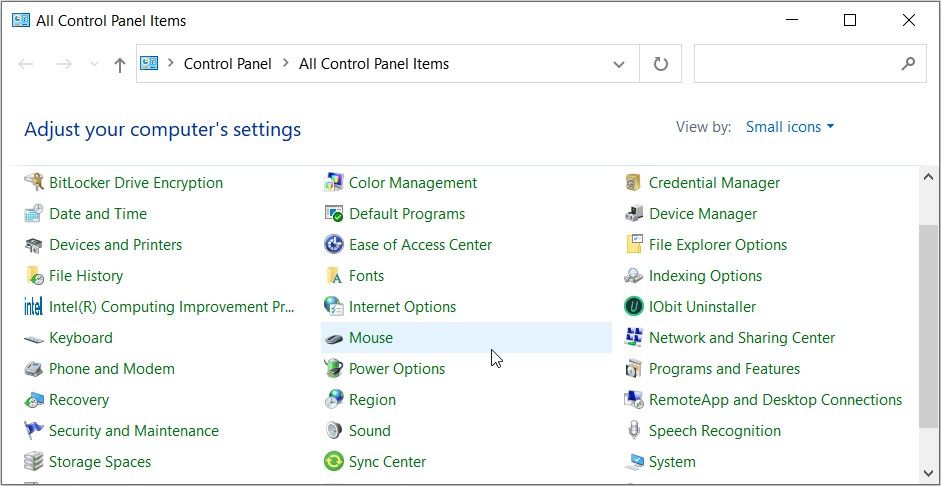
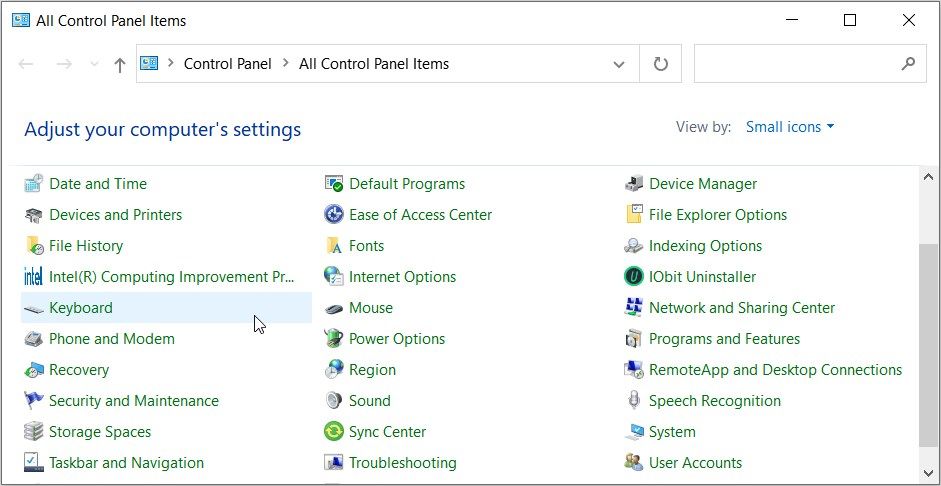
    • Если клавиатура не позволяет ввести название программы, прокрутите вниз, щелкните по папке «Windows», нажмите «Панель управления», откройте меню «Просмотр» и выберите «Крупные значки» (вместо «Категория»), а затем нажмите «Диспетчер устройств».
  2. Step 2 Нажмите «Диспетчер устройств» icon.

    Он находится в верхней части меню «Пуск».

  3. Step 3 Прокрутите вниз и разверните раздел Клавиатура.

    Для этого щелкните по значку

    Android 7 Expand Less

    слева от «Клавиатура». Откроется список клавиатур, подключенных к компьютеру.

  4. Step 4 Выберите клавиатуру, настройки которой нужно сбросить.

    Для этого щелкните по имени клавиатуры.

    • Здесь также можно выделить беспроводную клавиатуру.
  5. Step 5 Щелкните по значку «Удалить».

    Он выглядит как красный символ «X» в верхней части окна.

  6. Step 6 Нажмите Да, когда появится запрос.

    Клавиатура будет удалена из Диспетчера устройств.

  7. Step 7 Нажмите «Обновить конфигурацию оборудования».

    Это значок в виде монитора в верхней правой части окна Диспетчера устройств. Клавиатура снова появится в Диспетчере устройств.

  8. Step 8 Еще раз выделите клавиатуру.

    Для этого щелкните по имени клавиатуры.

  9. Step 9 Щелкните по «Обновить драйверы».

    Этот значок в виде прямоугольника с направленной вверх стрелкой находится в верхней части окна.

  10. Step 10 Нажмите Автоматический поиск обновленных драйверов.

    Это первая опция во всплывающем окне. Windows приступит к поиску новых драйверов клавиатуры.

  11. Step 11 Установите новые драйверы.

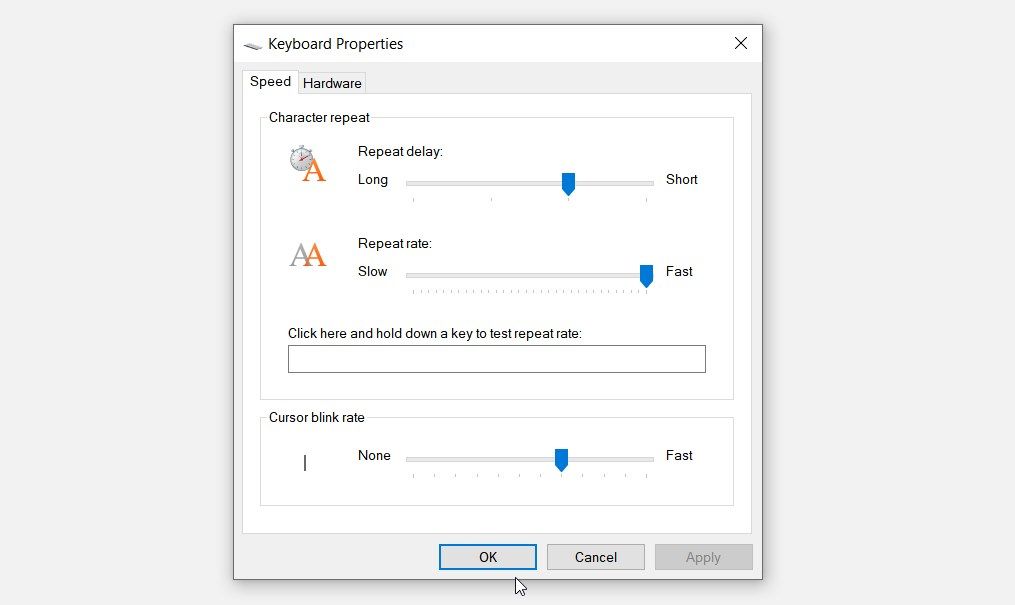
    Если для вашей клавиатуры доступны новые драйверы, они будут установлены автоматически.

    • Если новых драйверов нет, нажмите «Закрыть» в нижнем правом углу окна, когда появится запрос.
  12. Step 12 Перезагрузите компьютер.

    Откройте меню «Пуск», щелкните по значку

    Windows Power

    , а затем нажмите «Перезагрузка». Когда компьютер перезагрузится, настройки клавиатуры будут сброшены.

    Реклама

  1. Step 1 Откройте меню Apple icon.

    Щелкните по логотипу Apple в верхнем левом углу экрана. Откроется выпадающее меню.

  2. Step 2 Нажмите Системные настройки.

    Эта опция находится в верхней части выпадающего меню.

  3. Step 3 Щелкните по Клавиатура.

    Этот значок в виде клавиатуры находится в нижней части окна «Системные настройки».

  4. Step 4 Щелкните по вкладке Клавиатура.

    Она находится в верхнем левом углу окна.

  5. Step 5 Нажмите Клавиши-модификаторы.

    Эта опция находится в нижней правой части окна.

  6. Step 6 Нажмите Настройки по умолчанию > OK.» src=»https://www.wikihow.com/images_en/thumb/a/ac/Reset-a-Keyboard-Step-19.jpg/v4-460px-Reset-a-Keyboard-Step-19.jpg» width=»460″ height=»345″ loading=»lazy»></p>
<div class= 
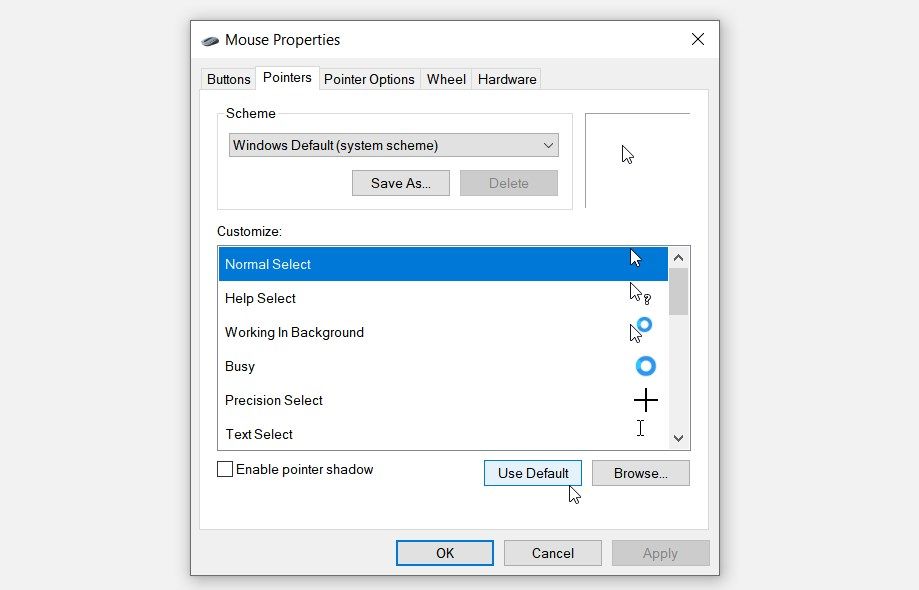
Картинка с сайта: ru.wikihow.com

Эта опция находится в нижнем левом углу окна. Будут сброшены все настройки клавиш-модификаторов (например, клавиши Command).

  • Step 7 Перейдите на вкладку Текст.

    Она находится в верхней части окна.

  • Step 8 Выберите сочетание клавиш, которое нужно удалить.

    Щелкните по сочетанию клавиш в левой части окна.

  • Step 9 Щелкните по -.

    Эта кнопка находится под списком сочетаний клавиш. Выделенное сочетание будет удалено.

    На заметку: сделайте это для каждого сочетания клавиш, которое нужно удалить.

  • Step 10 Щелкните по вкладке Сочетания клавиш.

    Она находится в верхней части окна.

  • Step 11 Нажмите Настройки по умолчанию.

    Эта кнопка находится в нижнем правом углу окна. Будут восстановлены стандартные сочетания клавиш для работы с текстом.

  • Step 12 Перезагрузите компьютер.

    Откройте меню «Apple», нажмите «Перезагрузить», а затем нажмите «Перезагрузить», когда будет предложено. Когда компьютер перезагрузится, клавиатура должна нормально работать.

    Реклама

    1. Step 1 Откройте меню «Пуск» icon.

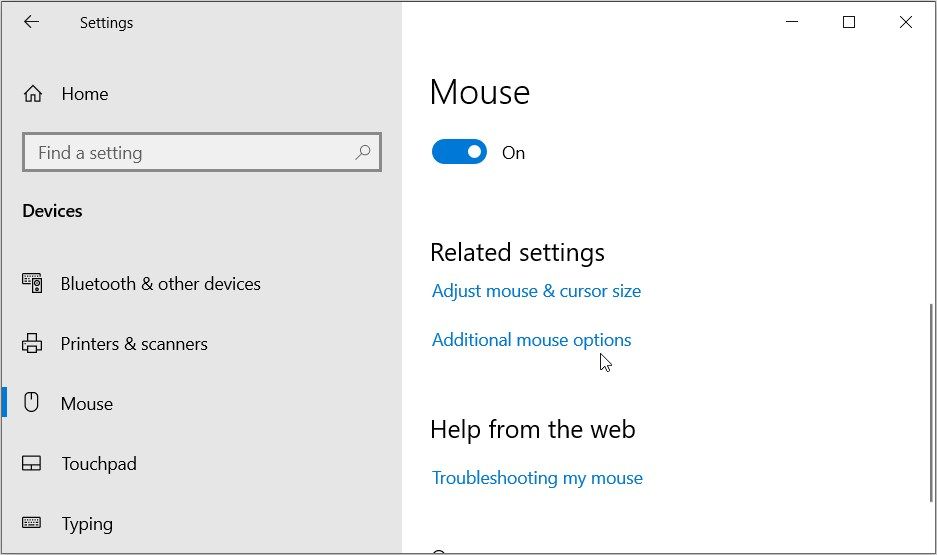
      Щелкните по логотипу Windows в нижнем левом углу экрана.

    2. Step 2 Нажмите «Параметры» icon.

      Щелкните по значку в виде шестеренки в нижней левой части меню «Пуск».

    3. Step 3 Щелкните по Время и язык.

      Этот значок в виде часов находится посередине экрана.

    4. Step 4 Перейдите на вкладку Регион и язык.

      Она находится в левой части страницы.

    5. Step 5 Выберите язык.

      Выберите язык, который нужно удалить.

    6. Step 6 Удалите язык.

      Нажмите «Удалить» под выделенным языком.

    7. Step 7 Измените язык, используемый по умолчанию.

      Выберите язык, который будет использоваться по умолчанию, а затем нажмите «Использовать по умолчанию».

      Реклама

    1. Step 1 Откройте меню Apple icon.

      Щелкните по логотипу Apple в верхнем левом углу экрана. Откроется выпадающее меню.

    2. Step 2 Нажмите Системные настройки.

      Эта опция находится в выпадающем меню.

    3. Step 3 Щелкните по Язык и регион.

      Вы найдете эту опцию в верхней части окна «Системные настройки».

    4. Step 4 Выберите язык, который нужно удалить.

      Сделайте это на левой панели окна.

    5. Step 5 Щелкните по -.

      Эта кнопка находится под списком языков. Выделенный язык будет удален.

      • Первый язык списка является языком, который используется по умолчанию. Чтобы изменить этот язык, перетащите другой язык на первую строчку списка.

      Реклама

    1. Step 1 Выключите клавиатуру.

      На клавиатуре нажмите и удерживайте кнопку питания не менее трех секунд.

    2. Step 2 Откройте меню Apple icon.

      Щелкните по логотипу Apple в верхнем левом углу экрана. Откроется выпадающее меню.

    3. Step 3 Нажмите Системные настройки.

      Эта опция находится в верхней части выпадающего меню.

    4. Step 4 Щелкните по Bluetooth.

      Этот значок

      Mac Bluetooth

      находится посередине окна «Системные настройки».

      • Если Bluetooth выключен, нажмите «Включить Bluetooth» в левой части окна.
    5. Step 5 Нажмите и удерживайте кнопку питания на клавиатуре.

      Не отпускайте кнопку, когда клавиатура включится.

    6. Step 6 Выберите клавиатуру.

      Удерживая нажатой кнопку питания, щелкните по имени клавиатуры в меню «Bluetooth».

    7. Step 7 Отпустите кнопку питания, когда будет предложено ввести код.

      Как только система попросит ввести код сопряжения устройств, отпустите кнопку питания.

      На заметку: если код сопряжения вводить не нужно, а клавиатура автоматически подключилась к компьютеру, отпустите кнопку питания и пропустите следующий шаг.

    8. Step 8 Введите код сопряжения.

      Введите код своей клавиатуры, а затем нажмите Return. Клавиатура подключится к компьютеру.

      Реклама

    Советы

    • Если клавиатура работает на батарейках, пользуйтесь батарейками, которые рекомендует производитель клавиатуры.

    Реклама

    Предупреждения

    • Если сбросить настройки клавиатуры, можно решить проблемы с клавиатурой, но также можно лишиться всех пользовательских настроек клавиатуры.

    Реклама

    Об этой статье

    Эту страницу просматривали 133 408 раз.

    Была ли эта статья полезной?

    The keyboard is one of the two input devices (the other being a mouse) that we use to communicate with our computers. From taking 5 seconds for finding every key to barely having to look at the keyboard, we have all gotten used to the QWERTY key layout. Many modern keyboards, especially gaming ones, provide users with the flexibility to create their own key shortcut/hotkey combinations to help them navigate through the computer more swiftly. Be it a gamer or a regular working professional, personalized key shortcuts can prove useful to each and every one. Although, as users continue adding new hotkey combinations, the keyboard’s default state gets lost. A time may arise when restoring the keyboard to its default settings may be necessary. 

    Another reason why users may need to revert back to the keyboard’s default state is if the device starts misbehaving. For example, certain shortcut combinations and keys stop working, irregular keypresses, etc. In that case, first, check out the following article – Fix Keyboard Not Working on Windows 10, and hopefully one of the solutions will help get things back on track. However, if none of the solutions explained in the article worked and you have made up your mind to reset your keyboard to default settings, we have three different methods for you.

    How To Reset Your Keyboard To Default Settings

    Table of Contents

    Check if it is a Physical issue? 

    Before resetting, we should make sure that the keyboard issues such as double typing aren’t due to any physical defects. An easy way to test this is to boot the computer into safe mode and check the keyboard’s performance. If it continues to behave strangely in safe mode too, the issue may be hardware-related rather than due to some software and no amount of resetting will help, instead, you will need to pay your local computer store a visit.   

    1. Open the Run command box by pressing Windows key + R, type msconfig and press Enter to open the System Configuration application.

    msconfig | How To Reset Your Keyboard To Default Settings In Windows 10?

    2. Switch to the Boot tab and under Boot options, tick the box next to Safe boot. Ensure the Safe boot type is selected as Minimal.

    3. Click on Apply followed by OK to save the changes and exit the window.

    Switch to the Boot tab and under Boot options, tick the box next to Safe boot

    When prompted, click on the Restart button to boot into safe mode or manually restart your computer. Now, check if your keyboard works fine. You can undertake an online key test (Key-Test) for the sake of it. If it doesn’t work alright, try thoroughly cleaning the keyboard (use a hairdryer to blow dust out from within the keyboard), inspect the connecting cable for any tears, plug in a different keyboard if you have one handy, etc. 

    3 Ways to Reset Your Computer Keyboard to Default Settings

    Once you have confirmed the issue isn’t hardware related, we can move on to the software side of things. One of the easiest ways to reset or refresh a hardware device is to uninstall its drivers and install the latest ones. Also, you may need to check the keyboard’s calibration and if any keyboard-related features such as sticky keys or filter keys aren’t messing with its performance. Another way to wipe the current settings is to change the computer language. 

    Method 1: Reinstall the Keyboard Drivers

    Unless you have been living under a rock or have just started using a Windows computer, you might already be aware of device drivers. If not, check out our article on the same – What is a Device Driver? How Does It Work?. These drivers are regularly updated along with the operating system and can be rendered corrupt due to a variety of reasons. The native Device Manager application or a third-party application can be used to maintain the drivers. One can also visit their keyboard manufacturer’s website, download the latest drivers and manually install them.   

    1.  Either right-click on the Start button or press Windows key + X and select Device Manager from the Power User menu.

    2. Expand Keyboards by clicking on the tiny arrow to its right.

    3. Right-click on your computer keyboard and select Uninstall Device from the ensuing context menu.

    Right-click on your computer keyboard and select Uninstall Device | How To Reset Your Keyboard To Default Settings In Windows 10?

    4. A pop-up message requesting you to confirm your action will appear. Click on Uninstall to continue. Restart your computer.

    Click on Uninstall to continue

    5. Once the computer has restarted, open Device Manager once again and click on the Scan for hardware changes button.

    Click on Action then click on Scan for hardware changes | How To Reset Your Keyboard To Default Settings In Windows 10?

    6. Now, your keyboard will be relisted in the Device Manager. Right-click on it and this time around, select Update driver.

    Right-click on Keyboard select Update driver.

    7. On the next window, choose Search automatically for drivers.

    choose Search Automatically for drivers. | How To Reset Your Keyboard To Default Settings In Windows 10?

    If the automatic installation process fails, choose the second option and manually locate and install the keyboard drivers (You will need to download them from the manufacturer’s site beforehand).

    Also Read: How to Disable Laptop Keyboard on Windows 10

    Method 2: Check Keyboard Settings

    Windows, along with allowing some basic tinkering with the keyboard, includes a few built-in features for the same. A miscalibration of the keyboard settings may be causing irregular key responses or one of the enabled features may be interfering. Follow the below steps to restore your computer keyboard to its default settings and to disable all related features. 

    1. Press Windows key + R to launch the Run command box, type control or control panel, and hit enter to open the application.

    Type control in the run command box and press Enter to open the Control Panel application

    2. Adjust the icon size to your preference and locate the Keyboard item. Once found, click on it.

    locate the Keyboard item. Once found, click on it. | How To Reset Your Keyboard To Default Settings In Windows 10?

    3. In the following Keyboard Properties window, adjust the Repeat Delay and Repeat rate sliders on the Speed tab to calibrate your computer keyboard. The default keyboard settings are as shown in the below picture.

    adjust the Repeat Delay and Repeat rate sliders on the Speed tab

    4. Click on Apply followed by Ok to save any modifications that were made. 

    5. Next, launch Windows Settings using the hotkey combination of Windows key + I and open Ease of Access settings.

    Locate and click on Ease of Access | How To Reset Your Keyboard To Default Settings In Windows 10?

    6. Switch to the Keyboard settings page (under Interaction) and turn off keyboard features such as Sticky Keys, Filter Keys, etc.

    turn off keyboard features such as Sticky Keys, Filter Keys, etc.

    Also Read: Windows 10 Tip: Enable or Disable On-Screen Keyboard

    Method 3: Change Keyboard Language 

    If reinstalling drivers and disabling keyboard features didn’t prove fruitful, we will be resetting it by switching to a different language and then reverting back to the original. Changing languages is known to reset keyboard settings to their default state. 

    1.  Press the Windows key + I to open the Settings application

    2. Click on Time & Language.

    Time & Language. | How To Reset Your Keyboard To Default Settings In Windows 10?

    3. Using the navigation menu on the left pane, move to the Language page. 

    4. First, under Preferred languages click on the ‘+ Add a language’ button. 

    under Preferred languages click on the ‘+ Add a language’ button. 

    5. Install any other English language or anyone that you can easily read and understand. Untick optional language features as we will be switching back to the original language immediately.

    untick optional language features | How To Reset Your Keyboard To Default Settings In Windows 10?

    6. Click on the newly added language to view available options and then on the upward-facing arrow to make it the new default language.

    Click on the newly added language to view available options

    7. Now, put your computer to sleep. In the case of laptops, simply close the lid.

    8. Press any random key on the keyboard to activate your computer and open Settings > Time & Language again. 

    9. Set the original language (English (United States)) as your default again and restart your computer to bring the changes into effect. 

    Apart from the above soft-reset methods, users can visit their manufacturer’s website or simply Google how to hard reset their keyboards. The procedure is unique to each but a general method includes unplugging the keyboard and leaving it unplugged for about 30-60 secs. Press and hold the Esc key while reconnecting the cable to hard reset. 

    Reset your Mac keyboard

    Resetting the keyboard on a macOS device is relatively easy as a built-in option for the same is present. Similar to Windows, one can also change their computer language in order to reset the keyboard. 

    1. Open System Preferences (click on the Apple logo icon present at the top-right corner & then select it) and click on Keyboard

    2. In the following window, click on the Modifier Keys… button. 

    3. If you have multiple keyboards hooked up to your mac computer, use the Select keyboard drop-down menu and choose the one you would like to reset. 

    4. Once selected, click on the Restore Defaults options at the bottom-left. 

    To change your mac computer’s language – Click on Region and Language in the System Preferences application and then on the + icon at the bottom-left corner to add a new language. Set the new one as primary and perform a system restart.

    Recommended:

    • Shut Down or Lock Windows Using Keyboard Shortcuts
    • Laptop Keyboard Not Working Properly [SOLVED]
    • How to Enable Stereo Mix on Windows 10?

    We hope you were able to bring your keyboard back to its default settings by following our guide on how to reset your keyboard to default settings in Windows 10? For any more keyboard-related assistance, get in touch with us at info@techcult.com or in the comments down below. 

    Resetting your keyboard on Windows 10 can solve many pesky problems, like unresponsive keys or weird characters showing up when you type. It’s a pretty straightforward process that involves accessing your computer’s settings and making a few adjustments. By the end of this guide, you’ll have your keyboard back to normal in no time.

    Resetting your keyboard on Windows 10 can help fix many issues such as unresponsive keys or incorrect characters appearing when typing. Follow these easy steps to get your keyboard back to its default settings.

    Step 1: Open the Settings App

    To start, click on the Start menu and select the gear icon to open the Settings app.

    The Settings app is your go-to place for making changes to your computer. Once you’re in, you’ll see a bunch of options that let you tweak your system to your liking.

    Step 2: Go to Time & Language

    In the Settings app, select «Time & Language» to proceed.

    This section allows you to manage your language settings, including your keyboard layout. It’s crucial for ensuring your keyboard functions correctly.

    Step 3: Click on Region & Language

    Next, navigate to the «Region & Language» tab on the left side of the screen.

    This tab is where you can adjust both regional and language settings. It’s essential for setting the correct keyboard layout and language preferences.

    Step 4: Select Your Language

    Under «Preferred languages,» find your language and click on it. Then select «Options.»

    Here, you can add or remove keyboard layouts. Make sure you have the correct layout for the language you’re using.

    Step 5: Add a Keyboard

    Click «Add a keyboard» and choose the default layout for your language.

    Adding a keyboard layout is simple. Just pick the one that matches your region and language to ensure all the keys work as expected.

    Step 6: Remove Other Keyboards

    Remove any other keyboard layouts that you don’t use by clicking on them and selecting «Remove.»

    Having multiple layouts can sometimes cause conflicts. Stick with just one layout to avoid any confusion.

    Step 7: Restart Your Computer

    Finally, restart your computer to apply the new settings.

    A reboot helps to ensure all changes take effect. Once your computer is back on, your keyboard should be reset.

    After completing these steps, your keyboard settings will be restored to their default state, and any issues should be resolved.

    Tips for Resetting Keyboard on Windows 10

    • Make sure you know the correct keyboard layout for your language to avoid any typing issues.
    • If you frequently switch between languages, consider keeping only the necessary keyboard layouts.
    • Update your computer regularly to minimize any software-related keyboard problems.
    • If issues persist, consider checking for driver updates specific to your keyboard model.
    • Use the on-screen keyboard in the Settings app to test if the keys are functioning properly before and after the reset.

    Frequently Asked Questions

    Why is my keyboard typing the wrong characters?

    This usually happens if the keyboard layout is set to a different language. Resetting the keyboard layout to your preferred language should fix it.

    How do I add multiple languages to my keyboard?

    You can add multiple languages by going to «Time & Language» in the Settings app, then selecting «Region & Language» and adding new languages under «Preferred languages.»

    Can I reset my keyboard without restarting my computer?

    While it’s possible, restarting your computer ensures that all changes take effect properly.

    What if my keyboard is still not working after the reset?

    You might need to update your keyboard driver. Go to Device Manager, find your keyboard, and update the driver software.

    Is there a quick way to switch between keyboard layouts?

    Yes, you can use the keyboard shortcut Alt + Shift to switch between different keyboard layouts you’ve added.

    Summary

    1. Open the Settings App.
    2. Go to Time & Language.
    3. Click on Region & Language.
    4. Select Your Language.
    5. Add a Keyboard.
    6. Remove Other Keyboards.
    7. Restart Your Computer.

    Conclusion

    Resetting your keyboard on Windows 10 doesn’t have to be a headache. By following these simple steps, you can quickly get your keyboard back to its default settings and fix any issues you’re facing. Remember, the key (pun intended) is to ensure you have the correct keyboard layout selected for your language. If problems persist, consider checking for driver updates or consulting Microsoft’s support. This straightforward guide should have you typing away smoothly again in no time. For more tips and tech tricks, be sure to explore other helpful articles. Happy typing!

    Matt Jacobs has been working as an IT consultant for small businesses since receiving his Master’s degree in 2003. While he still does some consulting work, his primary focus now is on creating technology support content for SupportYourTech.com.

    His work can be found on many websites and focuses on topics such as Microsoft Office, Apple devices, Android devices, Photoshop, and more.

    After configuring some system settings unknowingly, you might realize that the mouse or keyboard doesn’t perform as expected. In such instances, it’s hard to know which settings you should tweak to resolve the issue.

    An easy way out would be to reset the mouse or keyboard settings to their default. So, let’s dive in and check out how you can reset these settings.

    How to Reset the Mouse Settings to Their Defaults

    Person using a computer mouse

    Let’s start by checking out how you can reset the mouse settings.

    Using the Run Command Dialog Box

    The Run command dialog box is an incredible tool that can help you access most of the apps on your PC. In this case, we’ll use it to quickly access the «Mouse Properties» screen. From there, you can go ahead and reset the mouse settings.

    Here are the steps you need to follow:

    1. Press Win + R to open the Run command dialog box.
    2. Type control mouse and press Enter to open the Mouse Properties window.
    3. Navigate to the Pointers tab.
    4. Press the Use Default button in the bottom-right corner of the screen.
    5. Click Apply and then click OK.
    Pressing the Use Default button on the Mouse Properties window

    Using the Control Panel

    You can always use the Control Panel to troubleshoot PC issues or tweak some system settings. Now, here’s how this tool can help you reset the mouse settings:

    1. Type Control Panel in the Start menu search bar and select the Best match.
    2. Click the View by drop-down menu and select Small icons.
    3. Scroll down and select mouse from the list.
    Selecting mouse from the Control Panel menu items

    Next, navigate to the Pointers tab and then press the Use Default button. Finally, press Apply and then press OK.

    Using the System Settings

    The Windows system settings can also help you reset the mouse settings. Here are the steps you need to follow:

    1. Press Win + I key to access the system settings.
    2. Select Devices from the options.
    3. Click Mouse on the left side and then select Additional mouse options on the right.
    Selecting Additional mouse options on the Mouse settings window

    Navigate to the Pointers section and then press the Use default button. Press Apply, press OK, and then close the system settings.

    Use the Registry Editor

    You can also reset the mouse settings to their default by editing the Windows Registry. However, you’ll need to tweak a couple of Registry values manually.

    Bear in mind that the Registry Editor is quite a sensitive tool. This means you might end up causing issues to your device if you tweak the wrong Registry keys. So, be sure to back up your Windows Registry first before you proceed.

    Here’s how to reset the mouse settings using the Registry Editor:

    1. Type Registry Editor in the Start menu search bar.
    2. Right-click on the Best match result and select Run as administrator.
    3. Type the following command in the address bar and press Enter.
    Computer\HKEY_CURRENT_USER\Control Panel\Mouse

    Double-click on the DoubleClickSpeed option on the right-hand side.

    Selecting the DoubleClickSpeed option

    The default value for the «DoubleClickSpeed» option should be 200. So, set the Value data for this option to 200 and then press OK.

    From there, apply the same steps and set the Value data for the other Registry values as follows:

    • ActiveWindowsTracking: 0
    • Beep: No
    • DoubleClickHeight: 4
    • ExtendedSounds: No
    • MouseHoverHeight: 4
    • MouseHoverTime: 100
    • MouseHoverWidth: 4
    • MouseSensitivity: 20
    • MouseSpeed: 1
    • MouseThreshold1: 6
    • MouseThreshold2: 10
    • MouseTrails: 0
    • SnapToDefaultButton: 0
    • SwapMouseButtons: 0

    Finally, close the Registry Editor and then restart your device to save these changes.

    How to Reset the Keyboard Settings to Their Defaults

    A lady using a Windows PC while holding a cup

    Now, we’ll take look at how to reset the keyboard settings.

    Using the Run Command Dialog Box

    You can easily reset the Windows keyboard settings via the Run command dialog box. But bear in mind that you’ll have to tweak a couple of settings manually.

    Here are the steps you need to follow:

    1. Press Win + R to open the Run command dialog box.
    2. Type control keyboard and then press Enter.
    3. Navigate to the Speed tab.
    The Keyboard Properties window

    Place the Repeat delay slider button on the third mark (the marks are indicated below the slider). From there, place the Repeat rate slider button on the last mark (the «Fast» option) and the Cursor blink rate slider button on the eighth mark.

    When you finish applying these changes, click Apply and then click OK.

    Using the Control Panel

    Alternatively, you can reset the keyboard settings via the Control Panel. This also involves tweaking some settings manually.

    Here are the steps to follow:

    1. Press Win + R to open the Run command dialog box.
    2. Type Control Panel and press Enter.
    3. Click the View by drop-down menu and select Small icons.
    4. Scroll down and select Keyboard from the list.
    Selecting Keyboard from the Control Panel menu items

    Navigate to the Speed section. From there, place the Repeat delay slider on the third mark, the Repeat rate slider on the last mark, and the Cursor blink rate on the eighth mark. Finally, press Apply and then press OK.

    Using the System Settings

    Alternatively, reset the keyboard settings via the Windows system settings. This also involves configuring a few settings manually.

    Here are the steps you need to follow:

    1. Press Win + I to open the system settings.
    2. Click Devices and then select Typing from the options on the left.
    3. Turn on all the buttons under the Spelling and Typing sections.
    The Typing Settings window

    From there, click Advanced keyboard settings in the «More keyboard settings» section.

    Click the Override for default input method drop-down menu and select Use language list (recommended). From there, tick the Emoji panel box.

    The Advanced Keyboard Settings window

    While you’re on the «Advanced keyboard settings» screen, click on Language bar options. Next, select the Docked in the taskbar option and then check the Show text labels on the Language bar box.

    Click Apply and then click OK to save these changes. This should take you back to the «Advanced keyboard settings» screen.

    Click the Input language hot keys option. Select the Press the CAPS LOCK key option, click Apply, and then click OK.

    Use the Registry Editor

    A person using a Windows computer on a brown desk

    You can also easily reset the keyboard settings using the Registry Editor. Here are the steps you need to follow:

    1. Press Win + R to open the Run command dialog box.
    2. Type Regedit and press Enter to open the Registry Editor.
    3. Type the following command in the address bar and press Enter:
    Computer\HKEY_CURRENT_USER\Control Panel\Keyboard

    Double-click on the KeyboardSpeed option on the right-hand side.

    Selecting the KeyboardSpeed option

    The default Value data for the «KeyboardSpeed» option should 31. If it’s something else, change it to 31 and then press OK.

    From there, apply the same steps and set the Value data for the other values as follows:

    • InitialKeyboardIndicators: 2
    • KeyboardDelay: 1

    Finally, close the Registry Editor and restart your device to apply the changes.

    Your Mouse and Keyboard Issues Are Now Resolved

    You might often want to customize your device by tweaking some system settings. However, tweaking the wrong settings could cause issues on your PC. Now you know how to put everything back to its default settings and start anew.

    From there, you can check out cool hacks, such as how to use multiple keyboards and mice on a Windows computer.

    Is your laptop
    keyboard not functioning like it used to? Is it taking too long to respond to
    your keystrokes? Does nothing happen when you press some of the keys? Did the
    keyboard stop working?

    In this post,
    you’ll learn how to reset your keyboard settings to make those pesky keyboard
    issues go away by.

    Is
    It a Hardware Problem?

    First, you should
    determine if what you have isn’t a hardware issue. After all, no amount of
    resetting can fix a broken laptop keyboard.

    There are a
    couple of ways you can go about it. One, you can physically inspect your
    keyboard for obvious defects. The other would be by booting in Safe Mode.

    Press Windows + R to open Run. Type MSCONFIG and click OK.

    This will launch System Configuration. Go to the Boot tab. Under Boot Options, tick Safe Boot
    and hit OK.

    If you’re
    prompted to reboot your computer, click Restart.

    Only essential
    programs are running when Windows is in Safe Mode. So if your keyboard is
    working fine while in this mode, you can blame your keyboard problems on software.

    If not, you may
    need to bring your laptop to a service center for proper inspection and
    diagnosis.

    Is
    It a Software Issue?

    But if it really
    is a software problem, then there are a couple of things you can do. You can
    try reinstalling our keyboard driver.

    Reinstalling
    the Keyboard

    Open Control Panel. Go to Hardware and Sound > Devices and Printers > Device Manager.

    Note: You can also access Device
    Manager by doing a quick search.

    Once Device
    Manager is open, expand Keyboards
    and right-click on your device. Click Uninstall
    Device
    .

    Restart your
    computer. While it’s rebooting, Windows will reinstall the keyboard using the
    latest drivers. This might cause your laptop keyboard keys to work again.

    Adjusting
    the Settings

    If that does not
    work, the issue might be with keyboard settings. If any of the keyboard
    settings are off, it can cause repeat delay errors or register incorrect
    keystrokes.

    To access your
    keyboard settings, open Control Panel.
    Type KEYBOARD in the search bar.

    This will bring
    up Keyboard Properties in the search
    results. Click Keyboard to open.

    Using Keyboard
    Properties, you can speed up or slow down your keyboard’s response rate. Use
    the sliders to calibrate your keyboard to your liking.

    The image above
    shows the default keyboard settings. If your current settings are far off, it
    could cause your keyboard to either lag or be faster than normal.

    Once finished,
    click OK.

    Additional
    keyboard settings can be found in Windows
    Settings
    . Go to Settings > Ease of Access > Keyboard.

    Turn off any of
    the computer keyboard features that could be interrupting your workflow.
    Additional keyboard settings can be toggled by clicking Change Other Typing Options.

    The Best Way to Reset a Keyboard in Windows 10

    If you’ve
    attempted all the fixes above but nothing works, you can try resetting your
    keyboard.

    The way you do
    that is by making changes to the language setting. Go to Windows Settings > Time
    & Language
    > Region and
    Language
    .

    Under Preferred Languages, add a new
    language. Any language will do. Once added, click on the new language. It
    should now display a few options including up and down arrow buttons. Click the
    up arrow to make it the primary language.

    This process will
    put the new language on top and the old one (presumably English – United
    States) at the bottom. Repeat the process, this time moving English – United
    States back on top.

    Doing so will
    reset your keyboard laptop. You can now delete the language you added. You can
    also click Options and check if US QWERTY is available under Keyboards.

    If nothing else
    works, use an external keyboard until you find a permanent solution to your
    problem.

    Related Posts

    • Why Your GPU Fans Aren’t Spinning and 10 Ways to Fix
    • What Are Ortholinear Keyboards (And Should You Get One)?
    • Got a New Computer? Here Are The 10 Things You Should Do
    • What Is Dual-Channel Memory (RAM)?
    • Razer Mouse or Keyboard Not Showing Up in Razer Synapse? Try These 6 Fixes

    Понравилась статья? Поделить с друзьями:
    0 0 голоса
    Рейтинг статьи
    Подписаться
    Уведомить о
    guest

    0 комментариев
    Старые
    Новые Популярные
    Межтекстовые Отзывы
    Посмотреть все комментарии
  • Журнал обновлений windows 11 22h2
  • Восстановление образа системы windows 10 dism
  • Windows server 2008 настройка терминального сервера
  • Как включить спящий режим в windows 10 через реестр
  • Точка входа в процедуру createfile2 не найдена в библиотеке dll kernel32 dll windows 7 x64