
Все способы:
- Вариант 1: Сброс разрешения монитора
- Вариант 2: Возврат заводским настройкам отображения
- Способ 1: Штатные «Параметры»
- Способ 2: Меню монитора
- Вариант 2: Удаление кеша настроек из реестра
- Вопросы и ответы: 0
Вариант 1: Сброс разрешения монитора
Если нужно сбросить настройки разрешения монитора на компьютере с Windows 10, можно воспользоваться как разделом с параметрами экрана штатных «Параметров», так и выполнить полный сброс, удалив и переустановив программное обеспечение графического адаптера в «Безопасном режиме». Во втором случае сбросятся все настройки графики, которые были ранее выставлены пользователем. О том, как это правильно сделать, мы писали ранее в отдельном материале.
Подробнее: Сброс параметров разрешения экрана в Windows 10
Вариант 2: Возврат заводским настройкам отображения
Что касается настроек цвета, насыщенности и других параметров отображения содержимого на экране, есть возможность выполнить сброс на уровне самой системы или с помощью встроенных настроек монитора.
Способ 1: Штатные «Параметры»
Данный вариант довольно трудоемкий, поскольку придется менять настройки отображения вручную. По сути, вы вернете цветовую тему, размер шрифта и другие параметры к значениям по умолчанию. Если нужно сделать именно это, тогда придется обратиться к предустановленным возможностям операционной системы.
Когда нужно сбросить не системные настройки, а именно параметры, сразу переходите к следующему варианту решения ситуации – в этом случае взаимодействовать придется непосредственно с монитором. Однако это актуально только для персональных компьютеров, поскольку все настройки дисплея на ноутбуках в большинстве случаев происходят только через системные «Параметры».
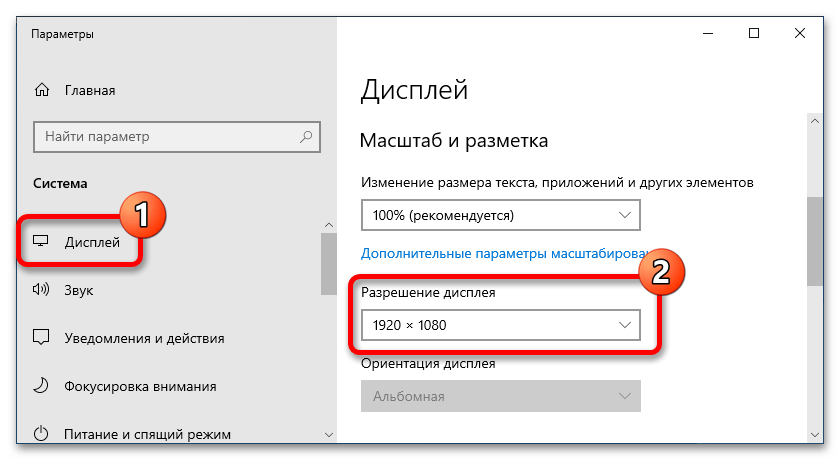
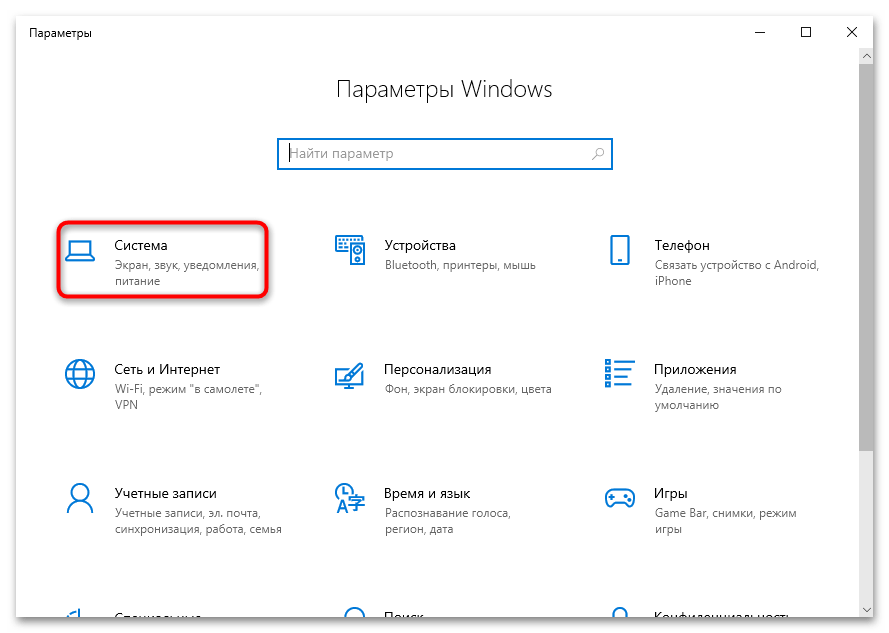
- Для начала перейдите в подраздел «Параметры экрана» штатных «Параметров». Для этого можно запустить соответствующее приложение и выбрать раздел «Система».

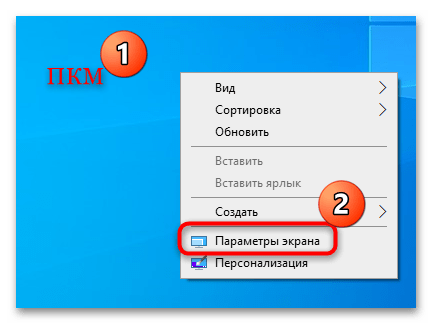
Также можете кликнуть правой кнопкой мышки по свободной области рабочего стола и выбрать нужный пункт из контекстного меню.
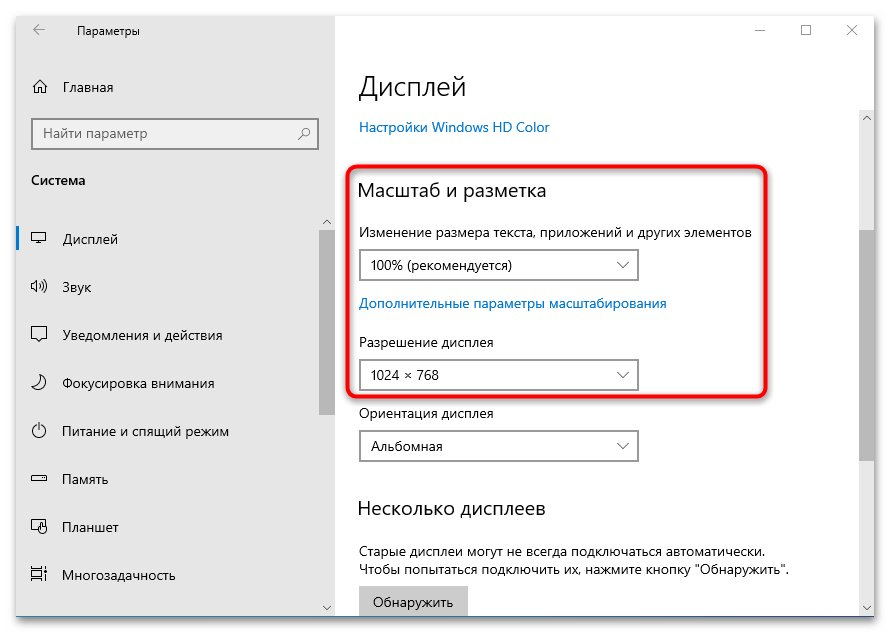
- Для начала стоит разобраться в таких параметрах, как масштаб и разметка. Как правило, в меню «Изменение размера текста, приложений и других элементов» и «Разрешение дисплея» можно найти пункт «Рекомендуется» — обычно такие параметры наиболее подходящие и выбираются системой автоматически по умолчанию до тех пор, пока пользователь самостоятельно их не изменит.
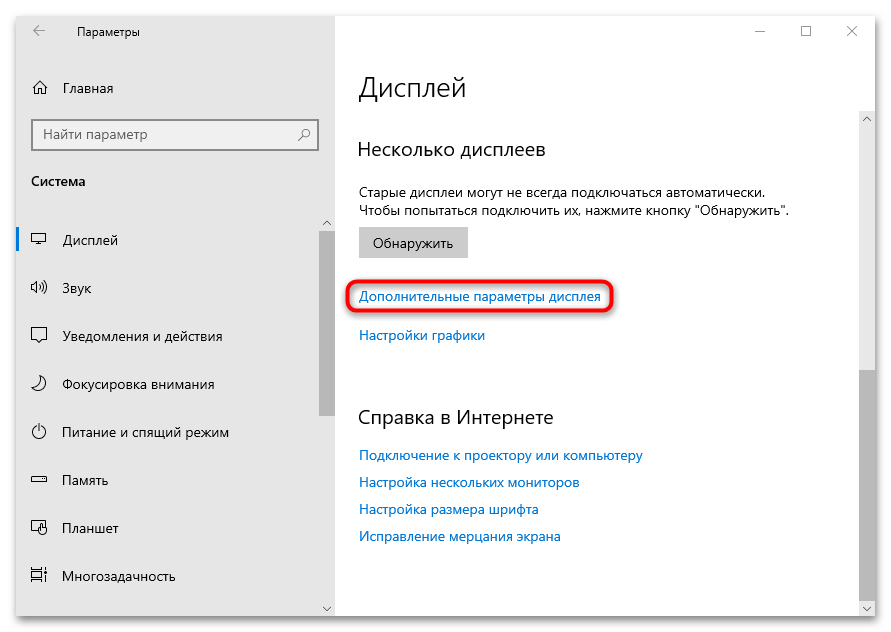
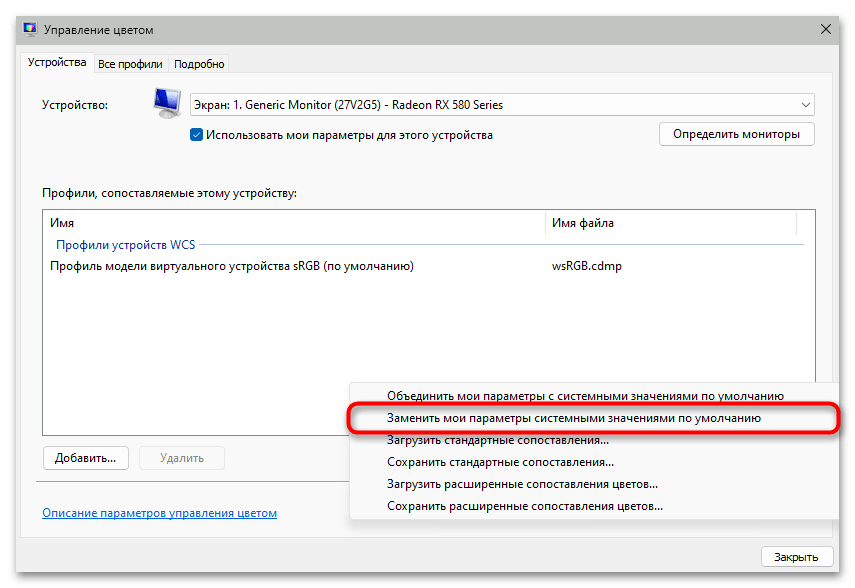
- Что касается цвета и цветовых режимов, вернуть оригинальные настройки можно также через данный раздел. Для этого кликните по строке «Дополнительные параметры дисплея» в блоке «Несколько дисплеев».
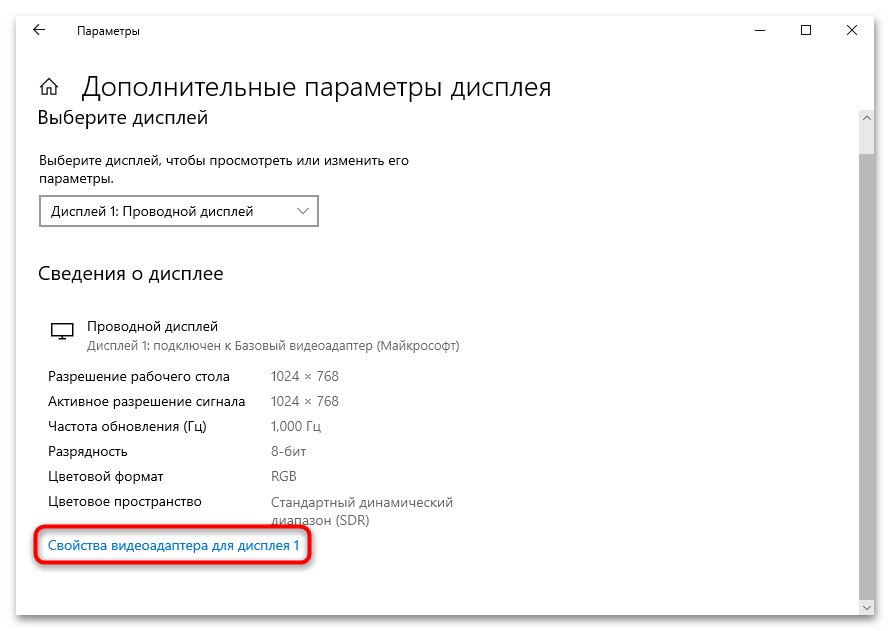
- Затем щелкните по ссылке «Свойства видеоадаптера».
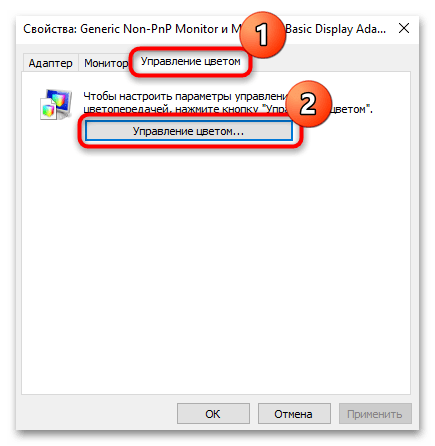
- В новом окне переключитесь на вкладку «Управление цветом» и выберите одноименную кнопку.
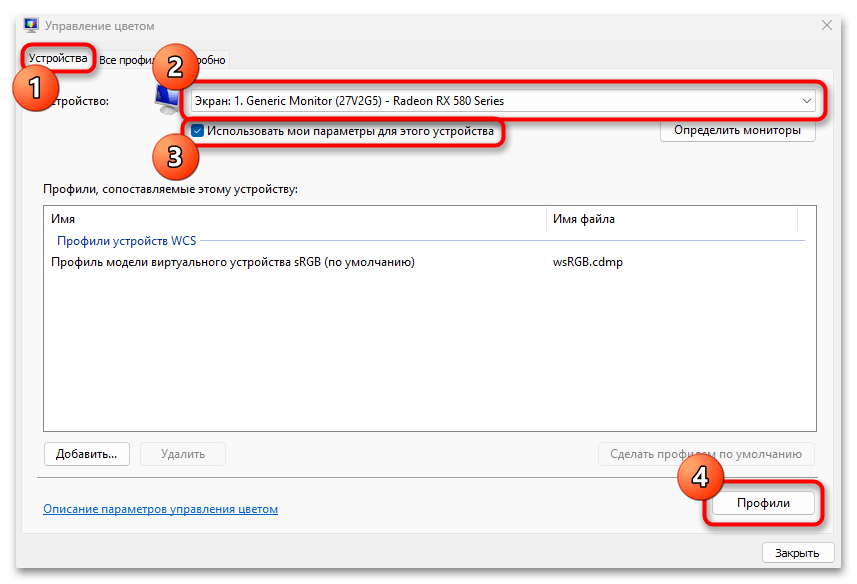
- Из меню «Устройства» выберите ваш монитор, затем нажмите на кнопку «Профили».
- В появившемся списке нажмите на пункт «Заменить мои параметры системными значениями по умолчанию».
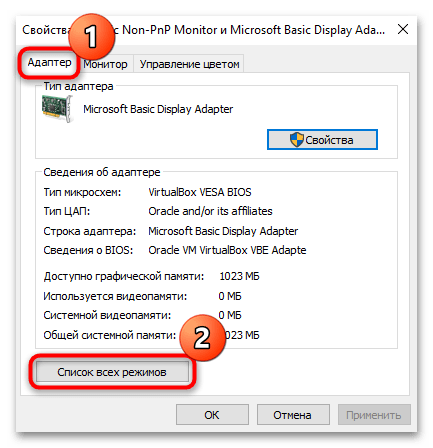
К слову, в окне со свойствами видеоадаптера вы сможете выбрать частоту обновления экрана, если такая возможность поддерживается монитором, а также определиться с режимами (вкладка «Адаптер», кнопка «Список всех режимов»). Стандартная частота отображения — 60 Гц, но обычно чем это значение выше, тем лучше.
Как уже говорилось, мы разобрали основные параметры отображения на уровне системы и настроек ее интерфейса. В некоторых, более радикальных случаях прибегают к сбросу настроек операционной системы до заводских – таким образом, вернутся все параметры, которые были изначально, в том числе внешний вид интерфейса, элементов, цветового решения. Но при этом установленные приложения будут удалены, хотя пользовательские файлы можно сохранить. Этот вариант подойдет для решения различных серьезных проблем в работе Windows 10.
Читайте также: Возвращаем Windows 10 к заводскому состоянию
Способ 2: Меню монитора
Когда нужно сбросить настройки монитора, можно воспользоваться встроенным меню от производителя и аппаратными клавишами, с помощью которых регулируются его параметры. Алгоритм зависит от модели устройства, но, как правило, в любом встроенном меню предусматривается пункт «Сброс» — с его помощью и происходит возврат настроек к изначальным.
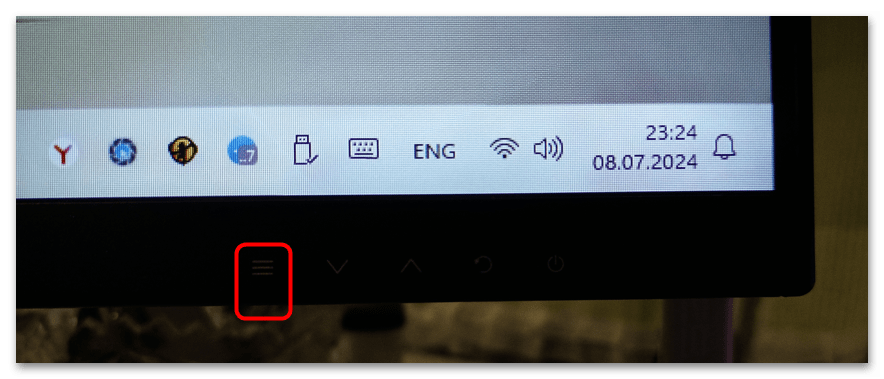
- Нажмите на клавишу для вызова меню монитора. Она может располагаться на нижней или боковой части корпуса.
- С помощью кнопок для навигации перейдите в тот раздел, где находится функция. В нашем случае раздел так и называется – «Сброс».
- Выберите функцию «Сброс» — после этого экран может моргнуть, а все настройки восстановятся.
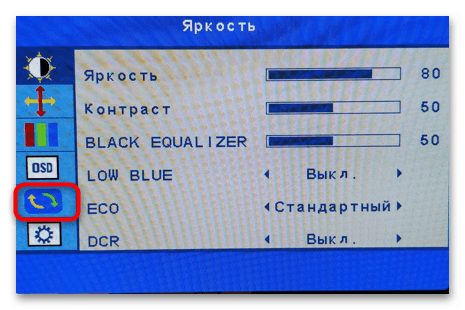

Сброс произойдет только тех параметров, которые были ранее изменены через меню монитора, например яркость, контрастность, цвет, язык меню, выравнивание, выбор источника сигнала и др.
Вариант 2: Удаление кеша настроек из реестра
Также стоит упомянуть вариант, когда требуется очистить системный реестр от записей, которые связаны с настройками монитора. Если ключи по каким-то причинам оказались повреждены или остались от ранее подключенного устройства, могут возникать различные проблемы и ошибки, связанные с работой внешнего дисплея, вплоть до прекращения функционирования выходного сигнала. Попробуйте очистить кеш настроек не только для того, чтобы устранить сбои, но и сбросить параметры дисплея.
Имейте в виду, что редактирование системного реестра возможно только после входа в систему под учетной записью администратора.
Читайте также: Авторизация в учетной записи Администратора в Windows 10
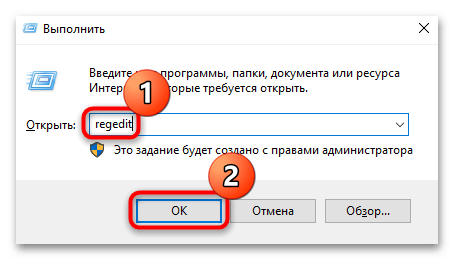
- Одновременно нажмите на клавиши «Win + R», в поле окна «Выполнить» введите команду
regeditи нажмите на кнопку «ОК» или клавишу «Enter». - Разверните ветку
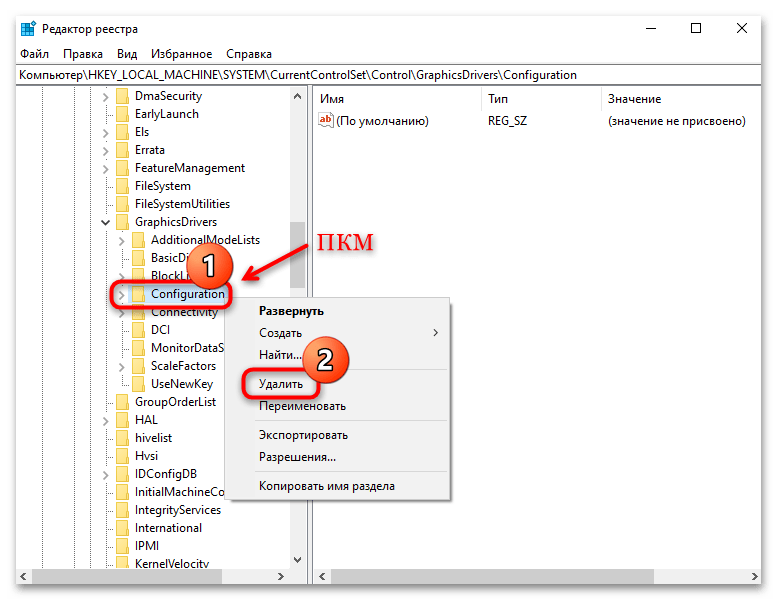
HKEY_LOCAL_MACHINE\SYSTEM\CurrentControlSet\Control\GraphicsDrivers\или скопируйте и вставьте путь в адресную строку, расположенную вверху, затем нажмите на клавишу ввода. - На панели слева найдите подраздел «Configuration», щелкните по нему правой кнопкой мыши и выберите из меню пункт «Удалить».
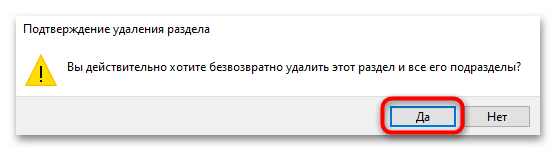
- Подтвердите действие.

Аналогичным образом сотрите еще два подраздела: «Connectivity» и «ScaleFactors».
После выполненных действий обязательно перезагрузите компьютер, чтобы новые параметры вступили в силу.
Наша группа в TelegramПолезные советы и помощь
Restoring Default Display Color Settings in Windows 11/10
Published
5 min read
Restoring default display color settings in Windows 10 and 11 can be essential for users who wish to revert any changes made to their display or for those who experience issues with their color calibration. Whether adjusting to incorrect colors, brightness, contrast, or saturation levels, restoring default settings can help ensure that your display appears as intended and reduces strain on your eyes. This article provides a comprehensive guide on how to reset these settings in both Windows 10 and Windows 11.
Understanding Display Color Settings
Before diving into the practical steps of restoring default display color settings, it’s important to understand what these settings are and how they affect your computer’s visual output.
Display color settings involve the configuration of your monitor’s color balance, brightness, contrast, and gamma levels. These adjustments can be made through the operating system’s built-in settings, the graphics card control panel, or through on-screen display settings found on the monitor itself. Incorrect configurations can result in unwanted visual artifacts like oversaturation, muted colors, or improper brightness levels, impacting your overall experience.
Signs You Might Need to Restore Display Color Settings
- Color Distortion: If colors appear washed out, overly bright, or too dark, you may need to reset your settings.
- Eye Strain: Unpleasant color settings might result in discomfort during extended use.
- Inaccurate Color Representation: If images or videos look unrealistic, it could be a sign of improper display settings.
- Changes Made by Software: Occasionally, software installations can adjust display settings without your knowledge.
How to Reset Display Color Settings in Windows 10 and 11
The process of restoring default display color settings is largely consistent between Windows 10 and Windows 11. We’ll break it down step-by-step for each.
Resetting Through Windows Settings
-
Open Display Settings:
- Right-click on the desktop and select “Display settings” from the context menu.
- Alternatively, you can navigate to “Settings” from the Start menu, then select “System” and choose “Display.”
-
Adjust Colors:
- Scroll down to find the “Windows HD Color” or “Advanced display settings” link. Click on it.
- If you see an option for “Color Calibration,” select it. This will guide you through the process of resetting colors.
-
Use the Color Calibration Tool:
- Windows provides a built-in color calibration tool to help you fine-tune the settings.
- Follow the on-screen instructions. It will guide you through adjusting the gamma, brightness, contrast, and color balance.
-
Reset to Default:
- In the calibration tool, at any point, you can revert back to default settings by navigating back to the main settings screen and selecting “Reset” or “Restore defaults.”
-
Confirm Changes:
- Make sure to apply any changes you make, and take a moment to visually confirm that colors appear correct.
Resetting Through Graphics Card Control Panel
An alternative and often necessary method involves the graphic card’s control panel, particularly if you have made adjustments through it in the past.
-
Open Graphics Control Panel:
- Right-click on the desktop and look for options like “NVIDIA Control Panel,” “AMD Radeon Settings,” or “Intel Graphics Settings,” depending on your graphics hardware.
-
Locate Color Settings:
- Navigate to the display or color settings section. This may be listed as “Display,” “Color,” or something similar, depending on your graphics card.
-
Restore Defaults:
- Look for a button or link that says “Restore Defaults” or “Reset All Settings.” This will revert any changes back to the factory default.
-
Apply Changes:
- Ensure that you apply the changes and exit the control panel. After resetting the graphics settings, check back in the Windows display settings to confirm that your settings have reverted correctly.
Reset Via Monitor Settings
In addition to software methods, physical monitor settings can often be reset directly.
-
Use Monitor Buttons:
- Most monitors come with on-screen displays (OSD) that can be accessed through dedicated buttons.
- Press the menu button or equivalent button on your monitor.
-
Navigate to Color Settings:
- Use the arrow keys to navigate to the display or color settings section. This is usually found under a “Settings” or “Picture” menu.
-
Select Factory Reset:
- You should see an option for “Factory Reset” or “Reset to Default.” Select this option.
- Confirm any prompts asking if you’re sure about resetting.
-
Adjust After Resetting:
- After resetting the monitor, you may need to adjust your brightness and contrast again, as they often default to a different setting.
Checking Your Results
After restoring your default display settings, it’s crucial to confirm that everything is displaying as you want it.
- Visual Confirmation: Open high-quality images or videos and check color accuracy.
- Use Color Calibration Tools: Windows has a built-in calibration tool that can be used again to verify the colors are set appropriately.
- Monitor Health: If you notice any persistent issues after resetting settings, consider checking for hardware issues or cable malfunctions.
Additional Tips for Color Management
While restoring default settings can resolve many issues, here are additional tips for ensuring optimal display quality:
- Keep Drivers Updated: Always ensure that your graphics drivers are up-to-date. Manufacturer updates often fix bugs and improve performance.
- Use Color Profiles: Windows allows you to manage ICC color profiles to fine-tune how colors are displayed. This is especially useful for graphic designers.
- Check Windows Updates: Sometimes, updates may include fixes that impact color management.
- Calibration Tools: Professional calibration tools are available for purchase and can provide extremely accurate color representation.
- Ambient Light: Consider the lighting in your environment as it can significantly influence how colors appear on your monitor.
Conclusion
Restoring default display color settings in Windows 10 and 11 is a straightforward process that can dramatically improve your user experience. By leveraging built-in Windows settings, graphics card control panels, and physical monitor adjustments, you can easily revert to factory settings and eliminate color-related issues. Understanding your display settings and making periodic adjustments or checks is vital for maintaining an optimal viewing experience. If problems persist even after resetting, it’s wise to examine other factors, such as hardware issues or updates that may solve the underlying issues at hand.
By following the steps outlined above, users can ensure their monitors display accurate colors for work, gaming, or leisure. Armed with this knowledge, you can comfortably navigate the world of display settings on Windows and keep your visual experience as vivid and enjoyable as intended!
-
Home
-
News
- Full Guide – How to Reset Display Settings Windows 10
By Tina |
Last Updated
How to reset Display settings Windows 10? Have you ever encountered this error? This post from MiniTool will show you how to reset display settings Windows 10. Besides, you can visit MiniTool to find more Windows tips and solutions.
Once after updating Windows, you may find your desktop on Windows desktop is messing up. This would be an annoying thing. But, if your desktop is messing up, you can choose to reset display settings Windows 10.
However, there is no such button or keyboard shortcut to reset or revert to previous display settings in Windows 10. You have to set each setting manually.
So, in this post, we will show you how to reset display settings to default Windows 10.
How to Reset Display Settings Windows 10?
This post will show you how to reset display settings to default Windows 10.
How to Reset Display Settings Windows 10 – Themes
First of all, we will show you how to reset display settings Windows 10 – themes.
Now, here is the tutorial.
- Press the Windows and I keys together to open Windows Settings.
- Then click Personalization.
- In the Personalization window, go to the Themes tab.
- Then click on Windows 10 theme to apply it.

After that, you have reset the Themes in display settings Windows 10.
How to Reset Display Settings Windows 10 – Colors
In order to reset display settings Windows 10, you also need to change the colors of the display.
Now, here is the tutorial.
- Open Windows Settings.
- Choose Personalization > Colors.
- On the right pane, go to the Choose your color
- Then select Light or Dark to continue.
- If you want to use a different color for Apps and Taskbar, select Custom.
- Select the blue color under the Choose your accent color section if you want to use the default Windows 10 color.
After that, you have reset the display settings of Color to default Windows 10.
How to Reset Display Settings Windows 10 – Display Size
Here is the tutorial.
- Open Windows Settings.
- Go to System.
- Select Display, and select an appropriate scaling percentage under Scale and layout.
How to Reset Display Settings Windows 10 – Text Size
Here is the tutorial.
- Go to Windows Settings.
- Choose Ease of Access > Display.
- Adjust the slider to change the size of text Windows 10.
How to Reset Display Settings Windows 10 – Turn Off Custom Scaling
In order to reset display settings Windows 10, you can choose to turn off custom scaling.
Now, here is the tutorial.
- Open Windows Settings.
- Then choose System.
- Click Display from the sidebar, and then click Advanced Scaling settings.
- Clear previous settings and choose Apply.
After that, you have reset display settings Windows 10 successfully.
Apart from the above settings, to reset display settings Windows 10, you also need to do other settings, such as turning off Night Light, turning off Tablet Mode, turning off Magnifier, and so on.
To sum up, this post has shown how to reset display settings Windows 10. If you need to reset display settings to default Windows 10, you can try these solutions. If you have any better ideas to reset display settings Windows 10, you can share them in the comment zone.
About The Author
Position: Columnist
Tina is a technology enthusiast and joined MiniTool in 2018. As an editor of MiniTool, she is keeping on sharing computer tips and providing reliable solutions, especially specializing in Windows and files backup and restore. Besides, she is expanding her knowledge and skills in data recovery, disk space optimizations, etc. On her spare time, Tina likes to watch movies, go shopping or chat with friends and enjoy her life.
Download Windows Speedup Tool to fix errors and make PC run faster
Windows 11/10 offers many customization options, including display settings. Sometimes, changing display settings can lead to unexpected results. In this case, you need to reset them. In this article, I will show you how to reset the Graphics or Display settings to default in Windows 11/10.

To reset Graphics or Display settings to default in Windows 11, you have to reset the following display settings to their default values.
- Display resolution and scale
- Display calibration for HDR video
- Night light preferences
- Color settings
- Contrast theme and color filters
- Mouse pointer settings
Let’s start.
1] Display resolution and scale
To restore the default display resolution and scale, follow these steps:

- Open Windows 11 Settings.
- Go to System > Display.
- Select the Recommended display resolution and scale settings under the Scale & layout section.
2] Display calibration for HDR video
If you have messed up the display calibration for HDR video, you can reset it to the default values by following these steps:

- Open Windows 11 Settings.
- Go to System > Display > HDR.
- Expand the Display calibration for HDR video tab.
- Click Restore default.
Read: How to clear the Display cache in Windows
3] Night light preferences
In Windows 11, Night Light remains off by default. Since you are restoring all the display settings to their default values, you have to turn off Night Light and set its strength to the default.

Here is how to do that:
- In Windows 11 Settings, go to System > Display.
- Turn off the Night Light if it is turned on.

Now, click on the Night light tab to open its settings. If you have set any schedule for the Night light, turn it off. Move the Strength slider to 48, as 48 is the default value of Night Light’s strength.
4] Color settings

Now, restore the color settings to default. In Windows 11 Settings, go to Personalization > Colors. Select Light in the “Choose your mode” option and turn on the Transparency effects.

If you have also changed the color management settings, use the Color Management app to restore the default display color settings.
5] Contrast theme and color filters

Check if you have activated the Contrast theme. If so, disable it.

To disable Color Filters, go to Accessibility > Color filters. If the Color filters switch is on, click Reset to reset the intensity, then turn off the switch.
It is best to go to Personalization > Themes and select the default Windows theme to reset colors and backgrounds.
6] Mouse pointer settings
The last step is to reset your mouse pointer style. Follow these steps:

- Open Windows 11 Settings.
- Select Accessibility > Mouse pointer and touch.
- Expand the Mouse pointer style tab and select the white mouse cursor.
- Now, move the mouse pointer size slider to the left.
This is all about what you can do to restore default display settings in Windows 11. However, if you experience any display or screen issues, you can either roll back the display driver or perform its clean installation by completely removing and reinstalling it.
How do I go back to normal mode in Windows 11?
If you are in a Clean Boot state, use MSConfig to enable all the disabled services and restart your computer. After restarting your device, you will be in normal mode. To get out of Safe Mode, open MSConfig and uncheck the Safe Boot checkbox under the Boot tab. Click OK and restart your computer.
How do I change my Windows 11 theme back to normal?
To change your Windows 11 theme back to normal, apply the default theme to your system. Open Windows 11 Settings and go to Personalization > Themes. Now, select the Windows 11 default light theme. If it is already active, switch to another theme, then switch back to the light theme.
Read next: Accidentally deleted Graphics card driver in Windows.
Anand Khanse is the Admin of TheWindowsClub.com, a 10-year Microsoft MVP (2006-16) & a Windows Insider MVP (2016-2022). Please read the entire post & the comments first, create a System Restore Point before making any changes to your system & be careful about any 3rd-party offers while installing freeware.
1. Press the Windows key + I on your keyboard to open the Settings app.
2. Click on System.
3. Click on Display on the left side.
4. On the right side, scroll down and click on the Advanced display settings link.
5. Scroll down and click on the Reset button under the «Reset Display Settings» section.
6. Click on the Reset button in the confirmation window that appears.
7. Your display settings will now be reset to the default settings.
How do I fix display settings in Windows 10?
How do I reset my graphics on Windows 10?
If you’re experiencing issues with your graphics card, you may need to reset your graphics settings in Windows 10. To do this, you’ll need to access the Advanced Settings menu.
To reset your graphics settings in Windows 10:
1. Right-click on your desktop and select «Display Settings.«
2. Click on the «Advanced Settings» link.
3. Under the «Troubleshoot» tab, you’ll see an option to «Reset your graphics settings.«
4. Click on this option and follow the prompts to reset your graphics settings.
5. Once you’ve reset your graphics settings, restart your computer and check to see if the issue has been resolved.
What is the shortcut for reset display settings in Windows 10?
There is no specific shortcut for resetting display settings in Windows 10, but you can typically do so by opening the Display Settings menu and selecting the «Restore default display settings» option.
There are a few different ways that you can reset your display settings, depending on what you would like to achieve. If you simply want to reset the resolution or refresh rate of your display, you can usually do this directly from your computer’s operating system settings. If you want to reset your display to its factory default settings, you will need to access the display’s menu system and navigate to the reset option. Please note that resetting your display to its factory settings will erase any customizations that you have made, such as custom color profiles or display calibration settings.
How do I get my screen back to normal?
There are a few things that you can try in order to get your screen back to normal:
1. Restart your computer – This is often the first and simplest step to try when troubleshooting any issue with your computer.
2. Check your display settings – You can check your display settings by going to the Control Panel and selecting «Display.» From here, you can adjust the resolution, refresh rate, and other settings.
3. Update your drivers – Outdated or corrupt drivers can often cause issues with your display. You can update your drivers by going to the manufacturer’s website and downloading the latest drivers for your specific graphics card.
4. Run a virus scan – A virus or other malware infection could be causing your display issues. Running a virus scan with your antivirus software can help to identify and remove any malicious software.
How do I reset my computer screen to normal?
If you are having trouble with your computer screen, there are a few things you can try to reset it to normal. First, try restarting your computer. If that does not work, try adjusting your screen resolution. If your screen is still not displaying correctly, you may need to contact a computer technician for further assistance.
How do I get my computer screen back to normal?
There are a few things that you can do in order to get your computer screen back to normal. First, you can try restarting your computer. If that doesn’t work, you can try adjusting your computer’s resolution. Finally, if neither of those options work, you can contact a professional for help.
How do I reset my display settings?
If you’re having trouble with your display, you can try resetting your display settings. To do this, go to your display settings and select the «Reset Display Settings» option. This will reset your display settings to their default values. If this doesn’t fix your problem, you may need to contact your display manufacturer for further assistance.
What is Ctrl Windows Shift B?
Ctrl Windows Shift B is a keyboard shortcut that toggles the display of the sidebar in Windows Explorer.
How do I reset my graphics driver?
If you’re experiencing issues with your graphics driver, you may need to reset it. To do this, you’ll need to access your computer’s BIOS menu. Once you’re in the BIOS menu, look for the option to reset your graphics driver. This option is usually located under the «Advanced» or «Display» settings. Once you’ve found the option, select it and follow the prompts to reset your graphics driver.
How do I fix screen resolution problems?
There are a few things you can do to fix screen resolution problems:
1. Check your display settings
2. Adjust your screen resolution
3. Update your graphics drivers
1. Check your display settings
The first thing you should do is check your display settings. You can do this by going to the Control Panel and clicking on Display.
2. Adjust your screen resolution
If your screen resolution is set too low, you may see black bars on the sides of your screen. To fix this, you can try adjusting your screen resolution.
3. Update your graphics drivers
If you’re still having problems, you may need to update your graphics drivers. You can do this by going to the website of your graphics card manufacturer and downloading the latest drivers.
How do I restore default display settings in Windows 11?
There are a few ways to restore default display settings in Windows 11. The easiest way is to use the built-in «Reset this PC» feature. To do this, go to Settings > Update & Security > Recovery. Under «Reset this PC,» click «Get started» and follow the prompts.
Another way to restore default display settings is to use the Display Settings app. To do this, go to Start > Settings > System > Display. Under «Scale and layout,» click the «Advanced scaling settings» link. On the next page, click the «Restore default scaling» link.
If neither of these methods work, you can try resetting the display driver. To do this, go to Start > Device Manager. Find the display driver, right-click it, and select «Uninstall.» Restart your computer and Windows will automatically reinstall the driver.
How do I fix my computer screen?
If your computer screen is displaying an image incorrectly or is otherwise not functioning properly, there are a few potential solutions you can try. First, check to make sure that all the connections between your computer and monitor are secure. If you are using a desktop computer, this means making sure that the monitor is properly plugged into the power outlet and the computer. If you are using a laptop, this means making sure that the laptop is properly plugged into the power outlet and the monitor (if you are using an external monitor). If the connections are secure and the problem persists, try restarting your computer. If the problem still persists, there may be an issue with your computer’s graphics card or drivers. In this case, you may need to contact a computer technician for assistance.
How do I change Windows back to classic view?
To change Windows back to classic view, you will need to go to the «Control Panel» and select «Appearance and Themes.» From there, you will be able to select the «Taskbar and Start Menu» option. Once you are in the Taskbar and Start Menu Properties window, you will need to select the «Classic Start menu» option and then click «OK.«