
Все способы:
- Вариант 1: Доступ к рабочему столу есть
- Вариант 2: Доступа к рабочему столу нет
- Шаг 1: Запуск компьютера в безопасном режиме
- Шаг 2: Отключение графического драйвера
- Шаг 3: Переустановка драйвера видеокарты
- Вопросы и ответы: 0
Вариант 1: Доступ к рабочему столу есть
Если вы имеете доступ к рабочему столу операционной системы, можете сбросить разрешение экрана компьютера до рекомендуемого посредством специального меню параметров Windows 10.
- Щелкните по пустому месту рабочего стола правой кнопкой мыши и в появившемся контекстном меню выберите пункт «Параметры экрана».
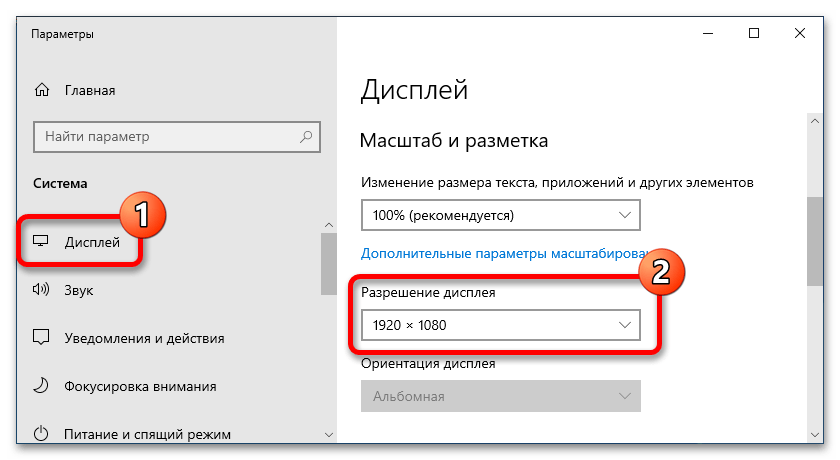
- В появившемся окне параметров, находясь во вкладке «Дисплей», щелкните по выпадающему списку «Разрешение дисплея», расположенному в блоке «Масштаб и разметка».
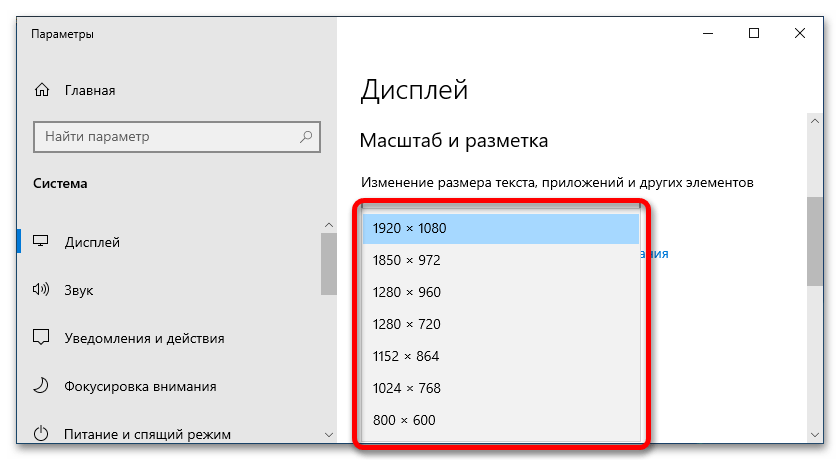
- В отобразившемся перечне доступных разрешений выберите подходящее вам. Рекомендуется указывать физическое значение вашего монитора.

Сразу после этого экран на несколько секунд потемнеет, а затем разрешение изменится.
Примечание! Это не единственный способ изменить разрешение в операционной системе. Если им у вас воспользоваться не получилось, обратитесь за помощью к другой статье на нашем сайте, в которой подробно рассмотрены все доступные методы.
Подробнее: Как изменить разрешение экрана в Windows 10
Вариант 2: Доступа к рабочему столу нет
Иногда необходимость сброса разрешения монитора в Windows 10 появляется вследствие возникновения ошибок операционной системы, связанных с некорректным отображением элементов графического интерфейса. В таком случае не всегда есть возможность воспользоваться предыдущим вариантом решения проблемы, необходимо будет произвести ряд манипуляций для нормализации работы устройства.
Шаг 1: Запуск компьютера в безопасном режиме
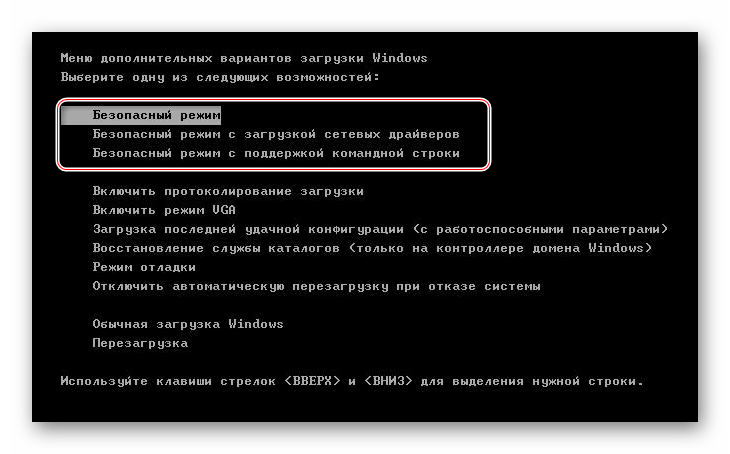
Первостепенно необходимо запустить компьютер в безопасном режиме, чтобы разрешение экрана сбросилось до изначального. Если часть функций операционной системы осталась в рабочем состоянии, вы можете это сделать посредством ее инструментов. На эту тему у нас написана отдельная статья, с которой вы можете ознакомиться, перейдя по ссылке ниже.
Подробнее: Как зайти в безопасный режим в Windows 10

Если войти в безопасный режим из операционной системы у вас не получилось, можно воспользоваться специальной функцией BIOS, нажав горячую клавишу во время перезапуска компьютера. Но прежде, возможно, потребуется произвести некоторые настройки в самой утилите ввода / вывода. На эту тему у нас на сайте написана отдельная статья, при необходимости ознакомьтесь с ней.
Подробнее: Как зайти в безопасный режим через BIOS
Шаг 2: Отключение графического драйвера
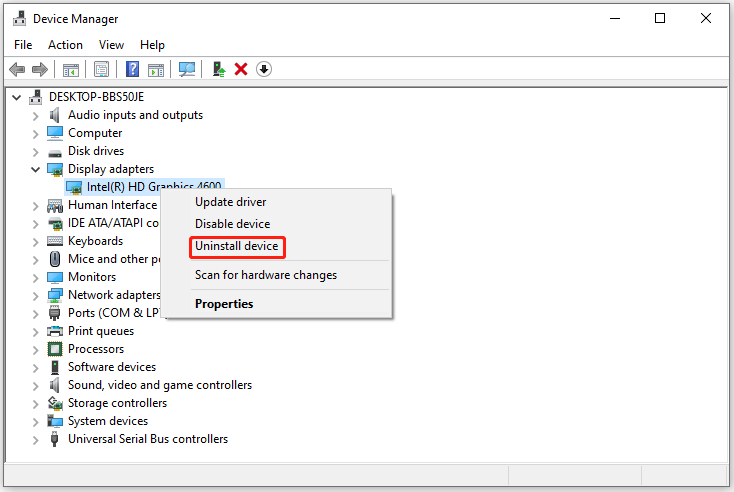
После входа на рабочий стол Windows 10 в безопасном режиме необходимо отключить установленный графический драйвер. Вместо него автоматически активируется нативное решение от компании Microsoft, обеспечивающее связь системных компонентов с установленной в вашем компьютере видеокартой. Для реализации задуманного выполните следующие действия:
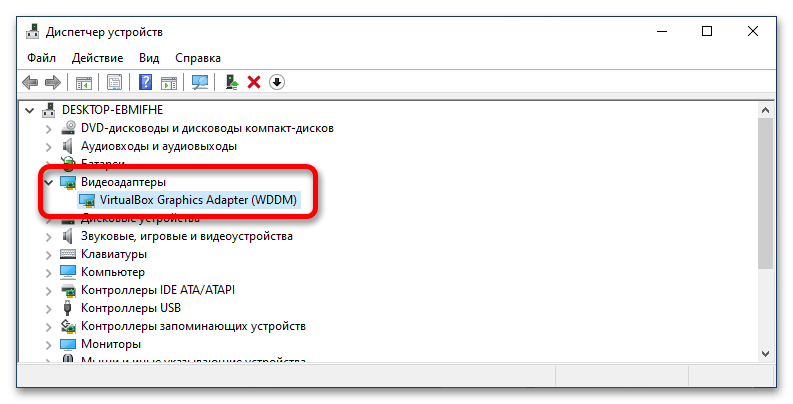
- Откройте «Диспетчер устройств» любым доступным способом. Проще всего это сделать через поиск. Установите курсор в соответствующее поле на панели задач, введите запрос и кликните левой кнопкой мыши по одноименному приложению в результатах выдачи.
Читайте также: Как открыть «Диспетчер устройств» в Windows 10
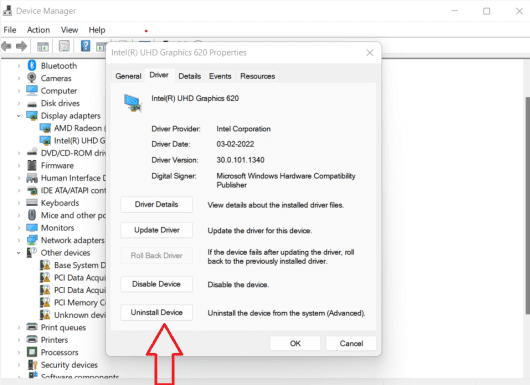
- В отобразившемся на экране окне разверните ветвь «Видеоадаптеры» и откройте свойства установленного драйвера вашего оборудования. Для этого дважды кликните по названию видеокарты левой кнопкой мыши.
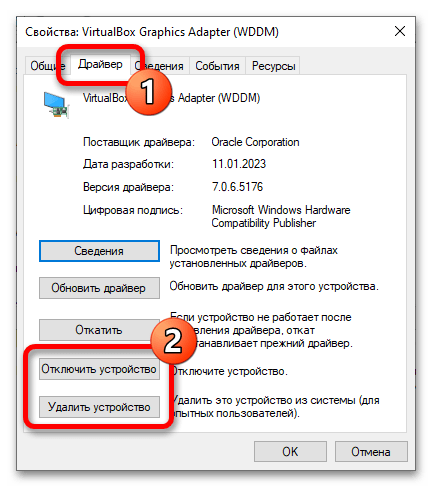
- В новом меню перейдите во вкладку «Драйвер» и щелкните по кнопке «Отключить устройство». Если это не повлечет за собой появления диалогового окна, воспользуйтесь кнопкой «Удалить устройство».
- В появившемся на экране всплывающем окне подтвердите свое действие, щелкнув по кнопке «Да».
На некоторое время экран станет черным, а после отключения проприетарного драйвера активируется штатный и изображение снова появится.
Важно! Если описанным способом отключить драйвер через «Диспетчер устройств» не получится, его необходимо удалить полностью. Сделать это можно с помощью как штатных утилит, так и программного обеспечения от сторонних разработчиков. Второй вариант предпочтительнее, так как после выполнения основной процедуры будут очищены также остаточные файлы. При необходимости ознакомьтесь с соответствующей статьей на нашем сайте, в которой подробно описываются все доступные методы выполнения поставленной задачи.
Подробнее: Как удалить драйверы в Windows 10
Шаг 3: Переустановка драйвера видеокарты
После отключения или удаления драйвера видеокарты работа операционной системы нормализуется, компьютер можно перезапустить, чтобы выйти из безопасного режима. Но после повторного входа в учетную запись драйвер будет оставаться нативным, соответственно, поддержка всех функций видеокарты в нем отсутствует. Чтобы это исправить, потребуется инсталлировать проприетарную версию. Ее рекомендуется устанавливать вручную, скачав с официального сайта инсталляционный файл. Это обеспечит надежность работы и исключит риски занести в систему вирус.
Если вы не знаете, как переустановить графический драйвер, воспользуйтесь ссылкой ниже, чтобы перейти на тематическую статью на нашем сайте. В ней вы найдете руководство для устройств AMD и NVIDIA.
Подробнее: Как переустановить драйвер видеокарты
Обратите внимание! После завершения процедуры переустановки драйвера, если разрешение экрана будет некорректно, повторно воспользуйтесь первым вариантом из этой статьи, чтобы настроить его вручную.
Наша группа в TelegramПолезные советы и помощь
1. Press the Windows key + I on your keyboard to open the Settings app.
2. Click on System.
3. Click on Display on the left side.
4. On the right side, scroll down and click on the Advanced display settings link.
5. Scroll down and click on the Reset button under the «Reset Display Settings» section.
6. Click on the Reset button in the confirmation window that appears.
7. Your display settings will now be reset to the default settings.
How do I fix display settings in Windows 10?
How do I reset my graphics on Windows 10?
If you’re experiencing issues with your graphics card, you may need to reset your graphics settings in Windows 10. To do this, you’ll need to access the Advanced Settings menu.
To reset your graphics settings in Windows 10:
1. Right-click on your desktop and select «Display Settings.«
2. Click on the «Advanced Settings» link.
3. Under the «Troubleshoot» tab, you’ll see an option to «Reset your graphics settings.«
4. Click on this option and follow the prompts to reset your graphics settings.
5. Once you’ve reset your graphics settings, restart your computer and check to see if the issue has been resolved.
What is the shortcut for reset display settings in Windows 10?
There is no specific shortcut for resetting display settings in Windows 10, but you can typically do so by opening the Display Settings menu and selecting the «Restore default display settings» option.
There are a few different ways that you can reset your display settings, depending on what you would like to achieve. If you simply want to reset the resolution or refresh rate of your display, you can usually do this directly from your computer’s operating system settings. If you want to reset your display to its factory default settings, you will need to access the display’s menu system and navigate to the reset option. Please note that resetting your display to its factory settings will erase any customizations that you have made, such as custom color profiles or display calibration settings.
How do I get my screen back to normal?
There are a few things that you can try in order to get your screen back to normal:
1. Restart your computer – This is often the first and simplest step to try when troubleshooting any issue with your computer.
2. Check your display settings – You can check your display settings by going to the Control Panel and selecting «Display.» From here, you can adjust the resolution, refresh rate, and other settings.
3. Update your drivers – Outdated or corrupt drivers can often cause issues with your display. You can update your drivers by going to the manufacturer’s website and downloading the latest drivers for your specific graphics card.
4. Run a virus scan – A virus or other malware infection could be causing your display issues. Running a virus scan with your antivirus software can help to identify and remove any malicious software.
How do I reset my computer screen to normal?
If you are having trouble with your computer screen, there are a few things you can try to reset it to normal. First, try restarting your computer. If that does not work, try adjusting your screen resolution. If your screen is still not displaying correctly, you may need to contact a computer technician for further assistance.
How do I get my computer screen back to normal?
There are a few things that you can do in order to get your computer screen back to normal. First, you can try restarting your computer. If that doesn’t work, you can try adjusting your computer’s resolution. Finally, if neither of those options work, you can contact a professional for help.
How do I reset my display settings?
If you’re having trouble with your display, you can try resetting your display settings. To do this, go to your display settings and select the «Reset Display Settings» option. This will reset your display settings to their default values. If this doesn’t fix your problem, you may need to contact your display manufacturer for further assistance.
What is Ctrl Windows Shift B?
Ctrl Windows Shift B is a keyboard shortcut that toggles the display of the sidebar in Windows Explorer.
How do I reset my graphics driver?
If you’re experiencing issues with your graphics driver, you may need to reset it. To do this, you’ll need to access your computer’s BIOS menu. Once you’re in the BIOS menu, look for the option to reset your graphics driver. This option is usually located under the «Advanced» or «Display» settings. Once you’ve found the option, select it and follow the prompts to reset your graphics driver.
How do I fix screen resolution problems?
There are a few things you can do to fix screen resolution problems:
1. Check your display settings
2. Adjust your screen resolution
3. Update your graphics drivers
1. Check your display settings
The first thing you should do is check your display settings. You can do this by going to the Control Panel and clicking on Display.
2. Adjust your screen resolution
If your screen resolution is set too low, you may see black bars on the sides of your screen. To fix this, you can try adjusting your screen resolution.
3. Update your graphics drivers
If you’re still having problems, you may need to update your graphics drivers. You can do this by going to the website of your graphics card manufacturer and downloading the latest drivers.
How do I restore default display settings in Windows 11?
There are a few ways to restore default display settings in Windows 11. The easiest way is to use the built-in «Reset this PC» feature. To do this, go to Settings > Update & Security > Recovery. Under «Reset this PC,» click «Get started» and follow the prompts.
Another way to restore default display settings is to use the Display Settings app. To do this, go to Start > Settings > System > Display. Under «Scale and layout,» click the «Advanced scaling settings» link. On the next page, click the «Restore default scaling» link.
If neither of these methods work, you can try resetting the display driver. To do this, go to Start > Device Manager. Find the display driver, right-click it, and select «Uninstall.» Restart your computer and Windows will automatically reinstall the driver.
How do I fix my computer screen?
If your computer screen is displaying an image incorrectly or is otherwise not functioning properly, there are a few potential solutions you can try. First, check to make sure that all the connections between your computer and monitor are secure. If you are using a desktop computer, this means making sure that the monitor is properly plugged into the power outlet and the computer. If you are using a laptop, this means making sure that the laptop is properly plugged into the power outlet and the monitor (if you are using an external monitor). If the connections are secure and the problem persists, try restarting your computer. If the problem still persists, there may be an issue with your computer’s graphics card or drivers. In this case, you may need to contact a computer technician for assistance.
How do I change Windows back to classic view?
To change Windows back to classic view, you will need to go to the «Control Panel» and select «Appearance and Themes.» From there, you will be able to select the «Taskbar and Start Menu» option. Once you are in the Taskbar and Start Menu Properties window, you will need to select the «Classic Start menu» option and then click «OK.«
Если во время работы вы столкнулись с какой-либо проблемой драйвера видеокарты: черный или пустой экран несмотря на то, что есть все признаки того, что Windows работает, разрешение экрана не вернулось к необходимому после выхода из игры или возникла иная ситуация, вызванная сбоем видеокарты, вы можете перезапустить драйвер видеокарты — горячими клавишами и не только.
В этой инструкции о способах перезапуска драйвера видеокарты в Windows 11 и Windows 10, а также о том, что следует при этом учитывать.
Горячие клавиши перезапуска драйвера видеокарты
Windows + Ctrl + Shift + B — сочетание клавиш для быстрого перезапуска драйвера видеокарты, предусмотренное в Windows 11 и Windows 10.

Эти горячие клавиши сбрасывают настройки графического адаптера к значениям по умолчанию, что потенциально может решить проблемы с черным экраном или другими проблемами изображения.
В процессе сброса драйвера:
- На какое-то время на экране пропадет изображение, длительность может отличаться на разных компьютерах.
- Ваши программы и открытые в них документы не будут закрыты.
Учитывайте, что в некоторых случаях после перезапуска драйвера с помощью указанного сочетания клавиш можно получить нежелательный эффект: изображение пропадёт и не будет восстановлено до перезагрузки системы, для чего, возможно, потребуется использовать кнопку выключения на ПК или ноутбуке.
Другие способы перезапуска драйвера видеокарты
В случае, если вариант с горячими клавишами по какой-то причине вам не подходит или требуются дополнительные способы, вы можете выполнить сброс драйвера видеокарты следующими методами:
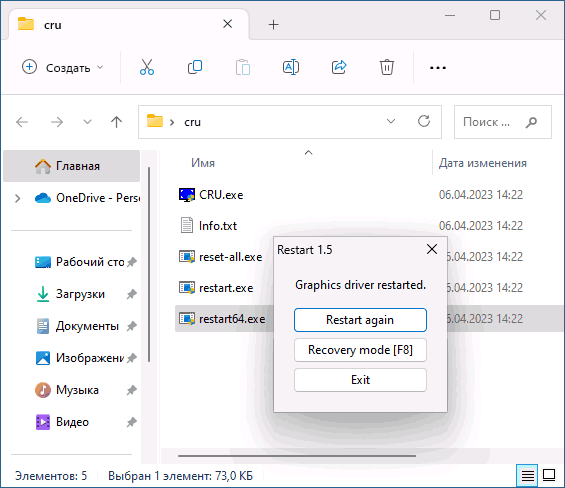
- Скачать утилиту Custom Resolution Utility (CRU) и распаковать архив в удобное расположение. После чего использовать файл restart64.exe (для x64 версий Windows) или restart.exe (для 32-бит Windows) для перезапуска драйвера видеокарты. Сразу после запуска файла, драйвер будет перезапущен и только после этого появится окно инструмента с возможностью закрытия (Exit) или повторного перезапуска (Restart again).

- Вы можете использовать PowerShell или Терминал Windows от имени администратора (запустить можно через контекстное меню кнопки «Пуск») и следующие две команды:
pnputil /enum-devices /class Display
pnputil /restart-device "полученный ID"
в первой получаем нужный ID устройства, во второй — выполняем сброс, указав ранее полученный ID.

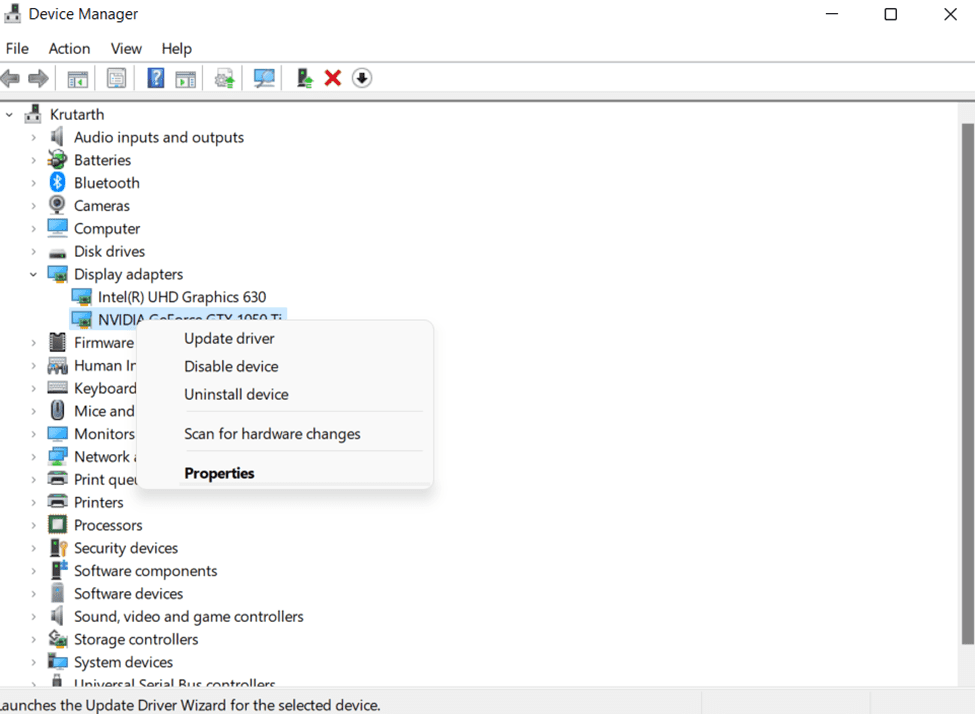
- Открыть диспетчер устройств, нажав правой кнопкой мыши по кнопке «Пуск» и выбрав нужный пункт контекстного меню. В разделе «Видеоадаптеры» нажать правой кнопкой мыши по видеокарте, для которой нужно сбросить драйвер и удалить устройство, не удаляя драйвер (изображение кратковременно может пропасть), после чего в меню выбрать «Действие» — «Обновить конфигурацию оборудования» для повторной установки того же драйвера, что был установлен ранее.

- Переустановить драйверы видеокарты: при этом драйвер будет перезапущен. Также при переустановке обычно выполняется и сброс параметров драйвера (в некоторых случаях, например, для NVIDIA потребуется отметить опцию «Выполнить чистую установку»).


Надеюсь, один из способов помог решить проблему с изображением, а сам сброс прошел без каких-либо ошибок и проблем.
Как сбросить настройки видеокарты?
- Перезагрузите или включите компьютер. …
- Нажмите кнопку, как показано на экране, чтобы войти в BIOS. …
- Прокрутите вниз до «Video BIOS Cacheable». Нажмите клавиши «+» и «-», чтобы изменить настройку на «Включено».
- Нажмите «F10»; затем выделите «Да» и нажмите «Enter», чтобы сбросить кэш BIOS на видеокарте NVIDIA.
Как мне сбросить настройки дисплея?
Проведите по экрану влево, чтобы перейти на вкладку «Все». Прокрутите вниз, пока не найдете текущий домашний экран. Прокрутите вниз, пока не увидите кнопку «Очистить настройки по умолчанию» (рисунок A). Коснитесь Очистить значения по умолчанию.
Проблема может заключаться в том, что драйверы либо повреждены, либо их необходимо обновить. Проблема также может быть связана с драйверами дисплея и другими обновлениями.
Чтобы изменить настройки графической производительности для приложения:
- Запустите приложение «Настройки».
- Перейдите в раздел Система> Дисплей> (прокрутите вниз)> Настройки графики.
- Найдите классическое приложение или универсальное приложение, для которого установите предпочтения.
- Щелкните добавленное приложение в списке и нажмите Параметры.
- Выберите предпочтительный режим исполнения и нажмите «Сохранить».
18 центов 2019 г.
Как сбросить настройки графического процессора AMD?
Выполните следующие действия, чтобы восстановить заводские настройки Radeon по умолчанию:
- Откройте «Настройки Radeon ™», щелкнув правой кнопкой мыши на рабочем столе и выбрав «Настройки AMD Radeon».
- Щелкните «Настройки».
- Щелкните «Восстановить заводские настройки по умолчанию».
- Щелкните Да для подтверждения. ПРИМЕЧАНИЕ! …
- По завершении закройте настройки Radeon.
Как вернуть экран компьютера к нормальному цвету?
Чтобы вернуть нормальный цвет экрана:
- Откройте «Настройки» и перейдите в «Удобство доступа».
- Выберите Цветовые фильтры.
- Справа установите переключатель «Включить цветные фильтры» в положение «Выкл.».
- Снятие флажка с надписью: «Разрешить сочетание клавиш для включения или выключения фильтра».
- Закройте настройки.
25 ян. 2021 г.
Как сбросить разрешение экрана без монитора?
Чтобы войти в режим низкого разрешения в Windows 10 и изменить в нем настройки, выполните следующие действия.
- Перезагрузите компьютер.
- Нажмите Shift + F8 до появления логотипа Windows.
- Щелкните Просмотреть дополнительные параметры восстановления.
- Нажмите Устранение неполадок.
- Нажмите Дополнительные параметры.
- Щелкните Параметры запуска Windows.
- Нажмите «Перезагрузить».
19 сред. 2015 г.
Почему я не могу изменить разрешение экрана?
Изменить разрешение экрана
Откройте «Пуск», выберите «Настройки»> «Система»> «Дисплей»> «Расширенные настройки дисплея». После того, как вы переместите ползунок, вы можете увидеть сообщение, в котором говорится, что вам нужно выйти, чтобы изменения применились ко всем вашим приложениям. Если вы видите это сообщение, выберите Выйти сейчас.
Почему мои настройки дисплея не сохраняются?
Исправление 1. Измените разрешение экрана.
Для этого:… В разделе «Разрешение» щелкните раскрывающееся меню и выберите самое низкое разрешение из всех подключенных мониторов. Затем нажмите Применить> ОК. Перезагрузите компьютер и проверьте, устранена ли проблема «Невозможно сохранить настройки отображения».
Как исправить настройки дисплея в Windows 10?
Просмотр настроек дисплея в Windows 10
- Выберите «Пуск»> «Настройка»> «Система»> «Дисплей».
- Если вы хотите изменить размер текста и приложений, выберите нужный вариант в раскрывающемся меню в разделе «Масштаб и макет». …
- Чтобы изменить разрешение экрана, используйте раскрывающееся меню в разделе Разрешение экрана.
Как изменить настройки графики на моем ноутбуке?
Изменение настроек видеокарты для использования выделенного графического процессора на компьютере с Windows.
- Щелкните правой кнопкой мыши на рабочем столе и выберите «Свойства графики» или «Параметры графики Intel». …
- В следующем окне щелкните вкладку 3D и установите для параметров 3D значение «Производительность».
Как мне получить доступ к настройкам моей видеокарты?
Щелкните правой кнопкой мыши на рабочем столе и выберите «Свойства графики». Это откроет панель управления графикой и мультимедиа Intel. Щелкните Расширенный режим и ОК.
Как мне переключиться со встроенной графики на видеокарту?
Переключение на выделенный графический процессор компьютера: для пользователей AMD
- Щелкните правой кнопкой мыши рабочий стол Windows и выберите «Параметры AMD Radeon».
- Внизу выберите Предпочтения.
- Выберите Дополнительные настройки Radeon.
- Выберите «Настройки приложения с переключаемой графикой» в разделе «Питание» в левом столбце.
- Partition Wizard
- Partition Magic
- [Two Ways] How to Reset Graphics Driver on Windows 10/11?
By Vicky | Follow |
Last Updated November 04, 2021
If display issues frequently happen, this indicates that your graphics driver has some problems. To remove these problems quickly, you can try resetting this driver, and here is a tutorial on that from MiniTool Partition Wizard.
Are you always stuck in the black screen, freezing screen when you are using your computer? If these display issues frequently happen, a guess we have is that your graphics driver has some problems. In this case, you can try restarting your graphics drivers to clear cache data or other problems.
Well, how to reset graphics driver on Windows 10/11? There are two ways, and keep reading to check them.
How to Reset Graphics Driver Windows 10/11?
You can reset your graphics driver using either Windows shortcut or Device Manager, and the detailed steps are below.
Reset Graphics Driver via Windows Shortcut
Using the Windows shortcut Win + Ctrl + Shift + B is the easiest way to restart graphics driver on Windows 10 and Windows 11. Although it is quite easy, there are some important things to be noticed:
- Do not apply this way when you have unsaved works on your computer.
- Do not use this way repeatedly, which might destroy your system.
Once you press these keys together, your screen will turn black for a second and will become normal in less than a second. If this Windows shortcut is not working, or in other words, nothing happens after you press these keys, please check if the Windows key is disabled.
Reset Graphics Driver via Device Manager
How to reset graphics driver Windows 10/11? If the above way does not work due to some reasons like Ctrl key not working, you can reset your graphics driver via the Windows built-in tool “Device Manager”.
Here are the steps:
Step 1: Open Device Manager on Windows 10/11.
(This is feasible on both Windows 10 and Windows 11) right-click the Windows icon on the taskbar and then choose the Device Manager option from the menu.
Step 2: On the Device Manager window, locate and expand the Display adapters entry.
Step 3: Right-click the listed item and then choose the Uninstall Device option. Then, confirm that you want to uninstall it.
Step 4: Once the uninstallation completes, restart your computer.
Wait patiently. In this case, Windows should install the required graphics driver automatically. Then, see if the display issue is solved or will appear again.
Bottom Line
Now you know how to reset graphics driver on Windows 10/11, and it is your turn to try restarting your graphics driver if you are stuck in display issues. If you run into any questions when implementing the Windows + Ctrl + Shift + B shortcut or using Device Manager, you can leave them in the comment zone, and we will reply to you as soon as possible.
Tip: Do you want to manage your disk or partitions on Windows 10/11 easily? You can give MiniTool Partition Wizard a try. It is a safe and reliable disk management tool that comes with the features like Create Partition, Format Partition, Extend Partition, Data Recovery, OS Migration, and so on. At the time of this writing, MiniTool offers a discount on this tool.
Free Download
About The Author
Position: Columnist
Vicky is a website editor who has been writing tech articles since she was graduated from university. Most of her articles talk about Windows PC and hard disk issues. Some of her articles also touch on YouTube usage and issues.
During her spare time, she likes to spend time reading, watching videos, and sitting on her Yoga mat to relax.
Microsoft представила новую страницу настроек графики для систем с несколькими графическими процессорами, которая позволяет вам управлять настройками графической производительности ваших приложений. В этом посте мы покажем вам, как сбросить настройки графического процессора для приложений по умолчанию в Windows 10.
Настройки могут повысить производительность приложения или сэкономить заряд батареи. Изменения могут не вступить в силу до следующего запуска приложения.
Приложениям всегда разрешается выбирать, какой графический процессор использовать, поэтому вы можете увидеть дополнительные приложения, которые не соответствуют установленным вами предпочтениям. В этом случае найдите параметр в самом приложении, чтобы выбрать предпочтение.
Сбросить настройки графического процессора для приложений по умолчанию
Вы можете выполнить эту задачу двумя способами;
- Через редактор реестра
- Через приложение «Настройки»
Давайте посмотрим на описание процесса применительно к каждому из методов.
1]Сбросить настройки графического процессора для приложений через приложение «Настройки»
Чтобы сбросить настройки графического процессора для приложений через приложение «Настройки», выполните следующие действия:
- нажмите Клавиша Windows + I , чтобы открыть Настройки.
- Выбирать Система.
- Нажмите на Отображать на левой панели.
- Прокрутите вниз и нажмите на Настройки графики ссылка на правой панели.
- Щелкните приложение по умолчанию в списке, для которого вы хотите сбросить настройки производительности графического процессора.
- Нажмите на Сброс / Удалить.
2]Сбросить настройки графического процессора для приложений через редактор реестра
Поскольку это операция реестра, рекомендуется создать резервную копию реестра или создать точку восстановления системы в качестве необходимых мер предосторожности. После этого сделайте следующее:
- Нажмите Клавиша Windows + R для вызова диалогового окна «Выполнить».
- В диалоговом окне «Выполнить» введите
notepadи нажмите Enter, чтобы открыть Блокнот. - Скопируйте и вставьте приведенный ниже код в текстовый редактор.
Windows Registry Editor Version 5.00

[-HKEY_CURRENT_USERSOFTWAREMicrosoftDirectX]
- Теперь щелкните Файл вариант в меню и выберите Сохранить как кнопка.
- Выберите место (желательно на рабочем столе), в котором вы хотите сохранить файл.
- Введите имя с .reg расширение (например, Reset_GPU_Pref_AllApps.reg).
- выбирать Все файлы от Сохранить как тип выпадающий список.
- Дважды щелкните сохраненный файл .reg, чтобы объединить его.
- При появлении запроса нажмите Беги> да (ОАК)> Да> Ok чтобы одобрить слияние.
- Теперь вы можете удалить файл .reg, если хотите.
Вот и все!
Нажмите правой кнопкой мыши по рабочему столу и выберите Настройки Графики. Выберите опцию 3D. Нажмите кнопку Сбросить на изначальные.
Как вернуть стандартные настройки монитора Windows 10?
В пустом пространстве рабочего стола нужно щёлкнуть правой кнопкой мыши и выбрать пункт «Разрешение экрана». После этого в открывшемся окне нажать на «Дополнительные параметры». Появится меню, где нужно проследовать во вкладку «Диагностика» и нажать кнопку «Изменить параметры».
Как сбросить настройки мыши в Windows 10?
Откройте настройки Windows, нажмите на опцию «Устройства», чтобы открыть соответствующие настройки, выберите «Мышь» из списка опций, нажмите «Дополнительные настройки» на вкладке «Указатели». , нажмите «Использовать по умолчанию» и сохраните изменения.
Как сбросить настройки цвета Windows 10?
Откройте Дополнительные параметры дисплея на странице Параметры-Система-Дисплей. Там кликните на «Свойства видеоадаптера…» и выберите Управление цветом. Отключите цветовой профиль для монитора. Закройте окно.
Как вернуть монитор к заводским настройкам?
2) на мониторе для входа в экранное меню (OSD). Нажмите кнопку 1 или кнопку 2, чтобы выделить пункт Другое в меню, и нажмите кнопку 3 для выбора. Нажмите кнопку 1 или кнопку 2, чтобы выделить пункт Сброс к заводским настройкам в меню, и нажмите кнопку 3 для выбора. Нажмите кнопку 3 для подтверждения сброса.
Как вернуть настройки экрана по умолчанию?
Использование «горячих» клавиш
- Ctrl + Alt + ↑ — восстанавливает изначальное положение экрана.
- Ctrl + Alt + ↓ — переворачивает экран по вертикали.
- Ctrl + Alt + → — поворачивает картинку на 90° вправо.
- Ctrl + Alt + ← — поворачивает ее на 90° влево.
Как настроить чувствительность мыши в Windows 10?
В ОС Windows найдите и откройте Изменение скорости перемещения и значка указателя. В окне Свойства мыши откройте вкладку Параметры указателя. В поле Скорость перемещения щелкните и удерживайте нажатым ползунок, перемещая указатель мыши влево или вправо, чтобы настроить скорость перемещения указателя.
Как сбросить Сенсу на мышке?
| 24.09.2020 | Игорь К.
…
Сброс настроек
- Перейдите на вкладку «Button» в программе.
- Кликните по расположенной в нижнем углу справа кнопке «Reset».
- Подтвердите свои намерения вернуть значения характеризующих работу манипулятора параметров в «заводское» состояние — кликните «ОК» в окошке-запросе.
Как сбросить настройки цвета Nvidia?
NVIDIA®
- Нажмите правой кнопкой мыши по рабочему столу и выберите Панель управления Nvidia.
- Выберите опцию Параметры 3D.
- Нажмите кнопку Восстановить в правом верхнем углу.
Как сбросить все настройки на мониторе LG?
Вход в меню: При включении удерживать нажатой кнопку «Menu». После этого настройки монитора сбросятся на заводские.
После загрузки компьютера с чистой Windows 10 нелишним будет выполнение следующей процедуры:
- вызываем командный интерпретатор Win+R;
- вводим «cleanmgr»;
- выполняем команду;
- нажимаем по пиктограмме «Очистить системные файлы».
Как восстановить компьютер к заводским настройкам?
Windows. Откройте «Параметры Windows» (они скрываются за значком шестеренки в меню «Пуск»), выберите «Обновление и безопасность», а затем — «Восстановление». Чтобы сбросить настройки до заводских, нажмите «Начать» под «Вернуть компьютер в исходное состояние».
Что делать если при возврате компьютера в исходное состояние произошла ошибка?
Если они были удалены полностью или частично, может появиться ошибка, извещающая о том, что произошла проблема при возврате ПК в исходное состояние. В таком случае необходимо запустить командную строку от имени администратора, после чего написать в ней команду sfc /scannow и нажать Enter.
Следующая инструкция обязательно пригодится владельцам компьютеров с двумя видеоадаптерами — интегрированным и дискретным. А таких — подавляющее большинство. Достаточно заглянуть в диспетчер устройств, пункт «Видеоадаптеры», чтобы увидеть графические модули. С помощью новых настроек Windows 10 можно значительно повысить производительность в играх, нужных приложениях. Сейчас покажем, как это сделать!

Как выбрать предпочтительный видео адаптер?
Для начала стоит убедиться на 100%. что в Вашем компьютере действительно больше одной видеокарты:
- Кликаем по значку «Пуск» правой кнопкой мышки, в появившемся списке находим «Диспетчер устройств»:
- Раскрываем раздел «Видеоадаптеры»:
В конкретном примере, Intel(R) HD Graphics 4000 — встроенная в процессор (интегрированная) графика, которая отличается пониженным энергопотреблением и слабой производительностью. NVIDIA NVS 5200M — дискретный модуль, который эффективен в играх, но быстрее посадит батарею ноутбука.
Зачастую, в подобной ситуации на ПК установлено специальное программное обеспечение от производителей, позволяющее управлять параметрами устройства — выбирать автоматический режим, с упором на качество или быстродействие.
Но теперь в Windows 10 можно вручную указывать для конкретного приложения, какой видеоадаптер лучше использовать. Это отличная функция, поскольку самостоятельно система не всегда принимает правильное решение.
Вот, что нужно сделать:
- Открываем параметры Виндовс 10 — через «Пуск» (значок шестерёнка) или комбинацией клавиш Win + I ;
- Переходим в раздел «Система»:

- Сразу же оказываемся на вкладке «Дисплей». В основной части окна перемещаемся в самый низ и кликаем по ссылке «Настройки графики»:

- Сверху есть возможность добавить в перечень классическое приложение или из Microsoft Store. Нажимаем «Обзор» — в первом случае открывается «Проводник» Виндовс и необходимо указать путь к файлу запуска игры/программы:

- Во втором случае — отобразятся все установленные приложения из магазина Майкрософт:
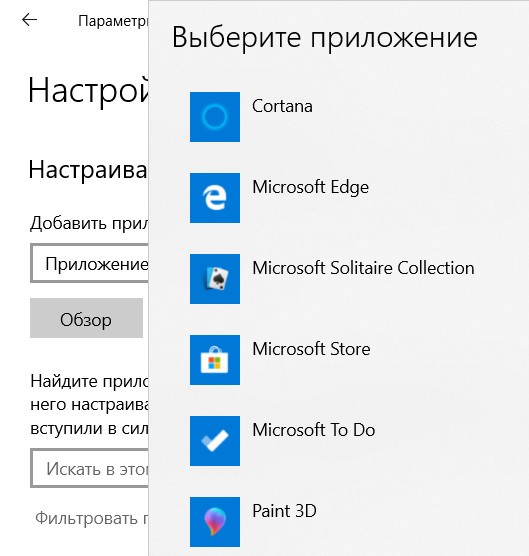
- После добавления нужного ПО, оно появиться в общем списке. Клик по названию — и появляется две кнопки. Нас интересуют «Параметры»:

- Осталось только отметить подходящую опцию. Если сомневаетесь, то лучше оставляйте по умолчанию. Но для игр и графических приложений лучше указать значение «Высокая производительность»:

Вот так всё просто! Но если возникли сложности с пониманием текстовой инструкции, рекомендуем посмотреть ролик с нашего Youtube канала.
Видео
- Как сбросить пароль Windows 10 — онлайн, через реестр, командную строку
- Как исправить ошибку обновления 0x800705b4 в Windows 10
- WHEA_UNCORRECTABLE_ERROR — как исправить ошибку в Windows 10 8 7
- Где находится «Автозагрузка» в Windows 10, как очистить для ускорения ПК
Вам помогло? Поделитесь с друзьями — помогите и нам!
Графические драйверы могут быть неотъемлемой частью правильного функционирования вашей системы, и даже незначительные проблемы с драйверами могут привести к нарушению работы.
Сегодня я расскажу, что вам нужно знать об этом процессе, в том числе о том, как выполнить чистую переустановку драйверов графического процессора и какие проблемы это позволяет решить.
Основы графических драйверов
В оборудовании ПК «драйвер» – это уровень программного обеспечения, который позволяет вашему оборудованию правильно взаимодействовать с операционной системой.
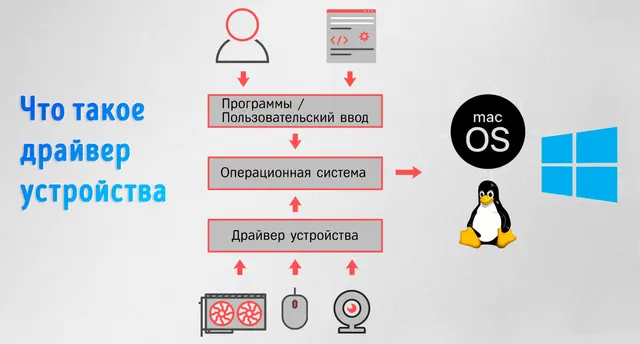
По этой причине многие драйверы зависят от устройства и ОС, а в случае сложных устройств, таких как дискретная графическая карта, они регулярно обновляются для повышения производительности и исправления ошибок.
Хотя общие драйверы ввода, звука и дисплея существуют, всегда лучше получить драйвер для конкретного устройства у производителя вашего оборудования, если таковой имеется.
Из-за сложности графических карт и графических драйверов вы можете ожидать регулярных обновлений драйверов до тех пор, пока данное поколение не достигнет конца срока службы, примерно через 6+ лет после выпуска (обычно).
К сожалению, вся эта сложность увеличивает вероятность того, что вещи сломаются, и если вы здесь, возможно, вы уже знаете это из личного опыта.
Я расскажу о распространенных причинах, по которым вам может потребоваться сбросить настройки драйвера графического процессора, а затем пошаговое руководство, как это сделать.
Зачем нужен сброс настроек графического драйвера
Обновление графического процессора (того же производителя)
Если вы обновляете графический процессор до более новой видеокарты того же производителя, вы можете обнаружить, что ранее установленные драйверы… работают!
Если это так, и вы не замечаете никаких проблем, не стесняйтесь продолжать.
Тем не менее, рекомендуется устанавливать новые драйверы графического процессора каждый раз, когда вы устанавливаете новую видеокарту, и если вы этого не сделаете, это может привести к следующей проблеме.
Очистка ошибочных настроек графического процессора или кэша
Если по какой-либо причине вы столкнулись с неправильными настройками графического процессора или поврежденным кэшем графического процессора, вам может потребоваться сбросить настройки графического драйвера.
Однажды у меня возникла эта проблема после того, как мой компьютер принудительно перезагрузился во время игры в Street Fighter V.
Принудительный перезапуск во время высокой загрузки графического процессора испортил что-то в управлении питанием графического процессора, и это привело к постоянным сбоям, пока я не выполнил полную переустановку своих драйверов.
Если у вас часто происходят сбои, сброс настроек графического драйвера – хорошее место для начала.
Модернизация графического процессора (другой производитель)
Если вы переходите с Nvidia на AMD, с AMD на Nvidia или с любого из этих поставщиков на Intel… удалите старые драйверы.
Вам не нужны два конфликтующих графических драйвера в одной операционной системе. Хотя это вряд ли приведёт к катастрофическим повреждениям или чему-то в этом роде, это вызовет проблемы, особенно когда вы начнёте увеличивать использование графического процессора.
Конфликтующие драйверы также могут привести к таким вещам, как синие экраны (BSOD) и принудительные перезапуски, с которыми вы действительно не хотите иметь дело, если вам это не нужно.
Общее устранение неполадок с графикой
И последнее, но не менее важное: иногда возникают странные проблемы с графикой, и вы полагаете, что чистая переустановка драйверов решит их.
Это возможно, если ваша проблема связана с программным обеспечением, а не с аппаратным обеспечением. Если что-то, что должно работать, не работает, переустановка драйвера графического процессора – довольно хороший способ устранить неполадки и сузить потенциальную причину.
Как сбросить настройки графического драйвера
-
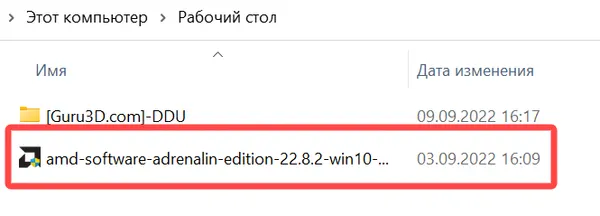
Заранее загрузите новые/текущие драйверы
Прежде чем продолжить, убедитесь, что на ваш рабочий стол загружены последние стабильные драйверы для выбранной видеокарты.
Где скачать новейшие графические драйверы:
- NVIDIA
- AMD
- Intel
Выбрав нужный драйвер устройства и загрузив его, поместите установочные файлы в такое место, где их можно будет легко найти позже – подойдёт даже рабочий стол.
-
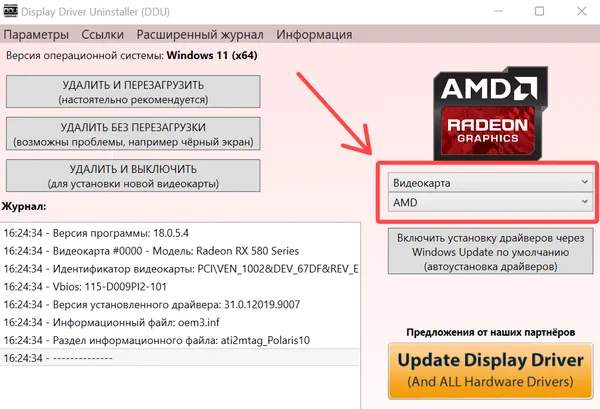
Загрузите программу удаления драйвера дисплея (DDU)
Теперь зайдите на Guru3D.com и скачайте последнюю версию DDU. Программа удаления драйверов дисплея – это то, на что это похоже: специальный инструмент для удаления графических драйверов.
В отличие от встроенных решений для удаления, DDU полностью удалит все старые файлы и настройки, гарантируя, что новая установка драйвера будет максимально свежей и чистой.
Скачав ZIP-файл DDU, распакуйте его в удобную для поиска папку по вашему выбору. Здесь тоже может быть достаточно вашего рабочего стола.

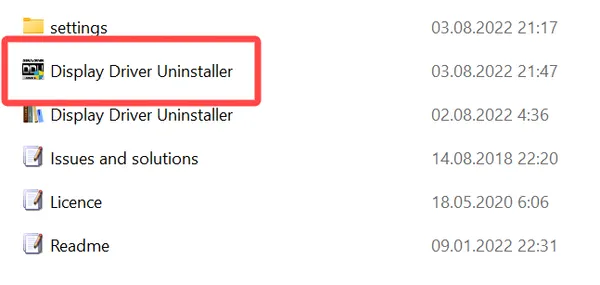
Открытие исполняемого файла покажет, что это самораспаковывающийся архив 7Zip, который извлечёт файлы в выбранный вами каталог – текущий по умолчанию.

Внутри этой новой папки DDU вы найдёте файл Display Driver Uninstaller.exe, который нужно запустить, чтобы очистить драйверы графического процессора.
-
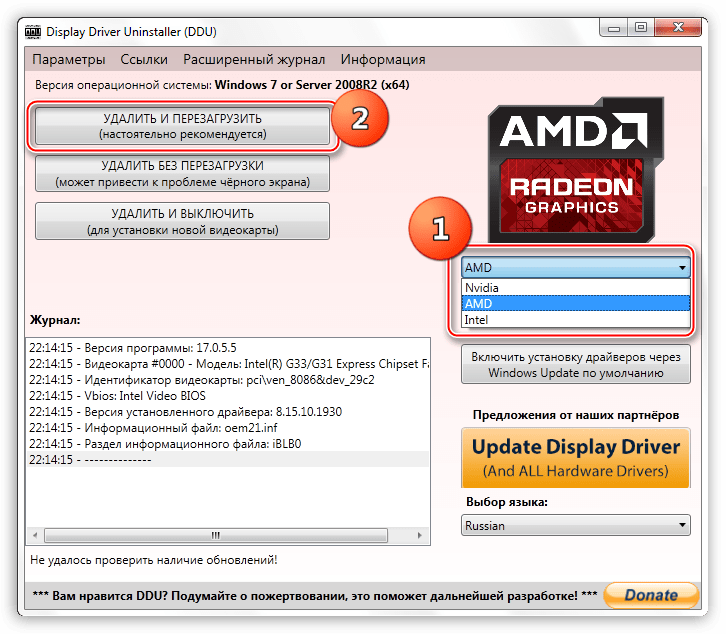
Запустите DDU

При первом запуске DDU вы увидите следующий экран. Проверьте Параметры конкретного поставщика в соответствии с имеющимся у вас графическим процессором.

-
Необязательно: Запустите Windows в безопасном режиме
После прохождения этого диалога вам также будет предложено перезагрузиться в безопасном режиме.
За мой многолетний опыт работы с этой утилитой, я никогда не чувствовал необходимости использовать её в безопасном режиме, поскольку всё, что происходит, если вы этого не сделаете, – это несколько мерцаний черного экрана во время удаления.
Windows вернётся к своим универсальным драйверам дисплея, когда ваши исходные драйверы будут удалены.
Однако, если вы хотите быть особенно уверены, что это сработает, вы можете запустить этот процесс в безопасном режиме.
После перезагрузки снова откройте Display Driver Uninstaller.exe и действуйте, как описано ниже.
-
Удалите старые драйверы
В DDU вам будет представлено окно состояния с указанием вашего текущего графического процессора и драйвера графического процессора.
Параметры очистки вверху будут недоступны, пока вы вручную не выберете драйвер, который хотите удалить – для этого используйте два раскрывающихся списка в правом верхнем углу.

После того, как вы выбрали «Видеокарта» и марку графического процессора, тема окна изменится, и вы сможете продолжить выбранную операцию.
Проблема «черного экрана», упомянутая во втором варианте, – это просто мерцание во время удаления – это не вызовет никаких долгосрочных проблем, чтобы выполнить чистый процесс без перезагрузки, особенно если вы делаете это из безопасного режима.
Какой бы вариант вы ни выбрали, DDU сделает всё остальное за вас. Как только он будет закрыт и ваш компьютер потенциально перезагрузится, всё, что осталось сделать, это…
-
Запустите новую установку и перезагрузите компьютер
Теперь, что вам нужно сделать, это запустить исполняемый файл драйвера и позволить ему сделать всё остальное.

После этого вам, скорее всего, будет предложено ещё раз перезагрузить компьютер. Сделайте это и поздравляю: вы готовы работать со свежим драйвером!
Если были проблемы с программным обеспечением, которые мешали работе вашего графического процессора, они будут исправлены сейчас.
Если ваши проблемы не устранены, вы можете иметь дело с другими проблемами, такими как перегрев графического процессора или даже выход из строя графического процессора.
Вы также можете иметь дело с проблемой, характерной для этого конкретного драйвера – в этом случае найдите последний стабильный драйвер, который, как вы помните, работал правильно, и используйте его с этим руководством вместо последней загрузки.


Часто задаваемые вопросы
Какая температура предельна для графического процессора?
Не все проблемы с графическим процессором связаны с программным обеспечением. Иногда вы можете просто иметь дело с обычным перегревом старого графического процессора, но как узнать, перегревается ли ваша видеокарта?
В качестве общей отправной точки я бы не стал беспокоиться, пока температура графического процессора не превысит 95 градусов Цельсия.
Однако, это может меняться в зависимости от марки графического процессора и конкретного графического процессора, который вы используете, поскольку некоторые графические процессоры сделаны с запасом термостойкости, и могут работать при температуре выше 100°C, – отметка, которая должна быть похоронным звоном для большинства аппаратных средств ПК.
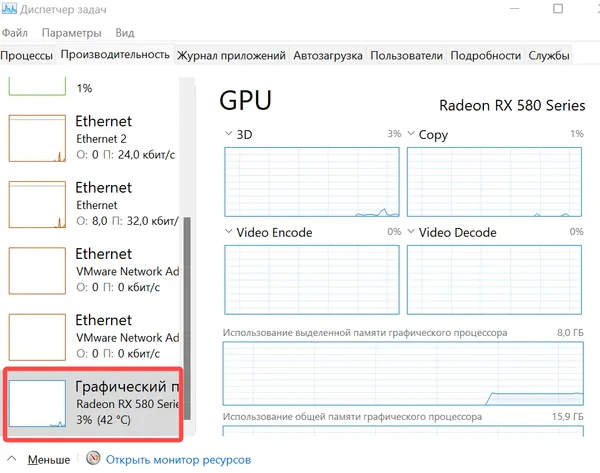
Если вам нужно программное обеспечение для мониторинга температуры графического процессора, попробуйте сначала использовать диспетчер задач Windows (Ctrl + Shift + Esc).
Для получения более подробных показаний температуры и производительности вам может пригодиться специальное программное обеспечение. В качестве отправной точки я рекомендую программное обеспечение для управления вашей видеокартой (EVGA, MSI и т.д.).
Как долго работают графические процессоры?
Как долго должен работать GPU?
Что ж, если вы правильно о ней заботитесь, видеокарта должна прослужить пять или более лет без особых проблем.
Но, как и в случае с остальной частью вашего компьютера, ответ будет зависеть от того, насколько хорошо вы заботитесь о видеокарте.
Как узнать, в каком состоянии графический процессор?
Наконец, пришло время рассмотреть пугающую возможность, особенно если вы прошли через приведенное выше руководство и всё ещё испытываете проблемы. Как узнать, не выходит ли из строя ваш GPU?
Что ж, если вы следовали этому руководству и ваши проблемы не устранены, возможно, вы имеете дело с некоторыми более серьёзными аппаратными проблемами, а не с программными.
Принятие таких мер, как чистка ПК и графического процессора от пыли (обязательно удерживая вентиляторы на месте во время продувки), должно помочь, если проблема заключается в обычном перегреве, но это не всегда может быть так просто.
Но, определенно не спешите с этим выводом, пока вы не сделаете всё возможное для своей видеокарты. Это означает, что вы должны пройти это руководство в безопасном режиме, попробовать старые стабильные драйверы, которые, как вы помните, работают правильно, и даже устранить неполадки в самой Windows.
Однако, иногда вам может просто не повезти, и, возможно, пришло время обновить видеокарту.
К счастью, цены на графические процессоры начали снижаться и нормализоваться после нехватки чипов, так что, надеюсь, это не будет дорогим обновлением, если вам придётся пройти через это.
Использование ПК с Windows иногда может вызывать разочарование. Система может перестать работать, и вы можете не знать ее причины. Представьте, что вы выполняете важное задание, и система внезапно зависает. 🙄
Вы не можете ни продолжить работу, ни перезапустить систему. Это время, когда вы можете проверить наличие проблемы на вашем устройстве. Это внезапное зависание может быть связано с неустойчивым разрешением, нехваткой оперативной памяти, поврежденными файлами или проблемой с вашей видеокартой.
Вы думаете о том, почему ваша система внезапно рушится посреди работы?
Для этого вам нужно сначала понять основы графической карты и ее функции на вашем ПК или ноутбуке.
Что такое графическая карта?
Графическая карта, также известная как карта дисплея, видеокарта, карта VGA или графический адаптер, представляет собой карту расширения, которая в основном работает для создания выходных изображений для вашего устройства. Ваш GPU (графический процессор) является основным компонентом, который выполняет вычисления для графической карты.
Графическая карта также может быть одной из причин, по которой ваша система выходит из строя. Тем не менее, графическая карта обычно выдает вам ранние предупреждения о замене графической карты до того, как она полностью выйдет из строя. Итак, сначала мы должны изучить способы, которыми ваша графическая карта сигнализирует о том, что она умирает.
Симптомы неисправности видеокарты
№1. Глюки экрана
Ваша видеокарта вызывает проблемы, когда вы начинаете видеть странные цвета по всему экрану. Вы также можете обнаружить, что экран разрывается или на нем появляются полосы. Это может быть признаком того, что ваша видеокарта сталкивается с какой-то проблемой.
№ 2. Заикание
Когда ваша видеокарта работает неправильно, вы можете обнаружить, что ваш экран заикается. Экран может внезапно зависнуть, и вы также не сможете найти выход. Если заикание сопровождается другими предупреждающими знаками, перечисленными ниже, есть вероятность, что причиной всех этих проблем является ваша видеокарта.
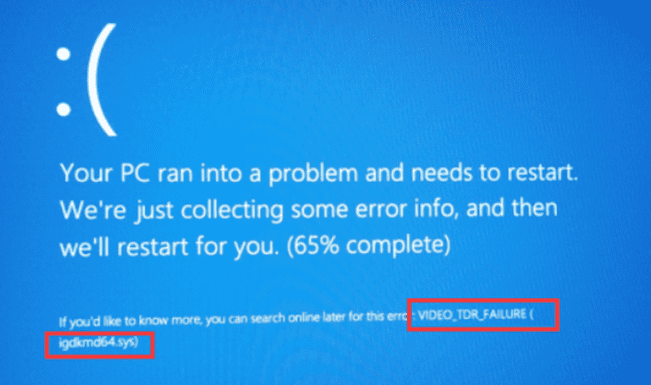
№3. Синий экран
Если ваша система перестает работать и перед вами появляется пустой синий экран, вам нужно предположить, что проблема связана с вашей графической картой. Каждый раз, когда вы начинаете какую-либо работу, связанную с визуальной графикой, ваша система может перестать работать, и перед вами появится синий экран.
Если вы столкнулись с какой-либо или всеми из этих проблем, вы можете быть уверены, что ваша графическая карта требует устранения неполадок.
Какие шаги вам нужно выполнить, чтобы ваша работа возобновилась, а ваша видеокарта перестала создавать проблемы? Давайте обсудим их.
Решения для устранения проблем с видеокартой
Перезагрузите видеокарту
Вы можете использовать комбинацию клавиш Windows + Ctrl + Shift + B одновременно на вашем устройстве. Это перезапустит вашу видеокарту. Любые текущие приложения или игры не будут закрыты при использовании этого ярлыка. Экран может стать черным, и вы также можете услышать звуковой сигнал. Это сочетание клавиш работает со всеми графическими картами, от AMD до NVIDIA.
Удалите и переустановите графические драйверы
Сначала вам придется удалить, а затем переустановить графические драйверы на вашем устройстве для устранения неполадок.
Графический драйвер можно удалить через диспетчер устройств. Диспетчер устройств — это панель, которая позволяет вам устанавливать и удалять устройства и драйверы в вашей системе.
Шаги для удаления графического драйвера:
- Нажмите клавишу Windows + R на вашем устройстве. Это запустит окно меню «Выполнить».
- В этом поле меню введите devmgmt.msc. Как только вы нажмете кнопку ввода, откроется окно диспетчера устройств.
- Вы получите список перед вами. Оттуда вы можете дважды щелкнуть категорию «Видеоадаптеры». Может появиться список всех устройств, активных в вашей системе. Щелкните правой кнопкой мыши имя вашей видеокарты и выберите вариант удаления устройства.
- После этого появится диалоговое окно подтверждения. Вы можете нажать на опцию «Удалить программное обеспечение драйвера для этого устройства».
- Нажмите на кнопку удаления.
Это приведет к удалению графического драйвера с вашего устройства.
Теперь вы можете использовать различные способы переустановки графического драйвера.
После завершения удаления вы можете переустановить графический драйвер, следуя этим инструкциям:
Разрешить автоматическую установку графического драйвера
После завершения удаления вы можете перезагрузить устройство, и Windows автоматически переустановит графический драйвер для вашей видеокарты. Однако эта самостоятельная переустановка не гарантирует установку последней версии графического драйвера на ваше устройство.
Переустановите графический драйвер с помощью Driver Easy
Загрузите программное обеспечение Driver Easy на свое устройство. Запустите приложение и просканируйте свое устройство с помощью приложения. Он просканирует все драйверы, вызывающие проблему, и на экране появится возможность их обновить. Вы можете отредактировать все эти графические драйверы, что решит вашу проблему с вашим графическим драйвером.
Вы можете выполнить любой из шагов, упомянутых выше, и переустановить графический драйвер на вашем устройстве. После этого ваша видеокарта может перестать создавать проблемы.
Обновите графический драйвер
Обновление графического драйвера может быть одним из способов решения проблем с видеокартой. Ниже приведены шаги, которые необходимо выполнить:
- Нажмите Windows + R на вашем устройстве.
- На экране появится диалоговое окно запуска. Вы должны ввести devmgmt.msc в поле и нажать кнопку ввода.

- Это отобразит список всех видеоадаптеров на вашем экране. Щелкните правой кнопкой мыши имя вашей видеокарты и выберите «Свойства».
- В раскрывающемся меню выберите вкладку «Драйверы». Нажмите на опцию обновления драйвера, которая появится позже.
- Система запросит поиск доступных обновленных драйверов.
- Следуйте инструкциям, которые появляются на экране.
Ваш графический драйвер может быть обновлен и перестанет создавать проблемы.
Сброс видеокарты из биоса
Сброс вашей графической карты из BIOS может оказаться полезным. Следовательно, вы можете попробовать это.
Ниже приведены шаги, которые необходимо выполнить для сброса видеокарты из BIOS:
- Перезагрузите устройство. Вы можете начать сброс вашей видеокарты в BIOS, нажав клавишу Esc на клавиатуре вашего ПК. Появится окно сообщения с предложением нажать «F10», чтобы начать процесс.
- Вы можете дважды нажать клавишу F10, чтобы начать настройку BIOS на вашем устройстве. На экране появится выпадающее меню. Оттуда вы можете выбрать «Расширенные функции набора микросхем». Вы можете использовать клавиши на клавиатуре для перемещения между этими опциями.
- На экране появится еще один список опций. Вы можете выбрать опцию «Video BIOS Cacheable».
- Затем вы можете нажать клавиши + и –, чтобы включить настройку BIOS.
- После этого вы можете нажать клавишу F10 на клавиатуре. Нажмите на опцию «Да», которая появляется на экране. Этот процесс сбросит вашу графическую карту в BIOS.
Вывод
Это все шаги, которые вы можете выполнить для сброса, переустановки или устранения неполадок, вызванных вашей видеокартой. После того, как вы выполните их, ваша графическая карта может перестать создавать проблемы. Если проблема не устранена, вы можете обратиться за профессиональной помощью, поскольку проблема может быть связана с другими факторами, а не с вашей видеокартой.
Вы также можете посмотреть, как исправить ошибку «драйвер дисплея перестал отвечать».
Как вы уже знаете, Windows 10 включает специальную функцию игрового режима, которая при определенных обстоятельствах повышает производительность игр. С недавними обновлениями теперь можно быстро сбросить настройки игрового режима. Это полезно, если функция работает не так, как ожидалось.
Игровой режим — новая функция Windows 10, созданная специально для геймеров. Новый режим перераспределяет ресурсы процессора и графики (GPU), чтобы сделать игру более быстрой и плавной, повышает производительность и приоритет игр. Игровой режим впервые появился в Windows 10 Creators Update build 14997. Официально функция вышла с выпуском Windows 10 Build 15007 Insider Preview.

Чтобы включить режим игры, вам нужно изменить некоторые настройки в приложении «Параметры». Давайте посмотрим, как восстановить настройки для игрового режима по умолчанию.
Чтобы сбросить настройки режима игры в Windows 10, выполните следующие действия.
- Откройте приложение «Параметры» нажав сочетание клавиш Win + I
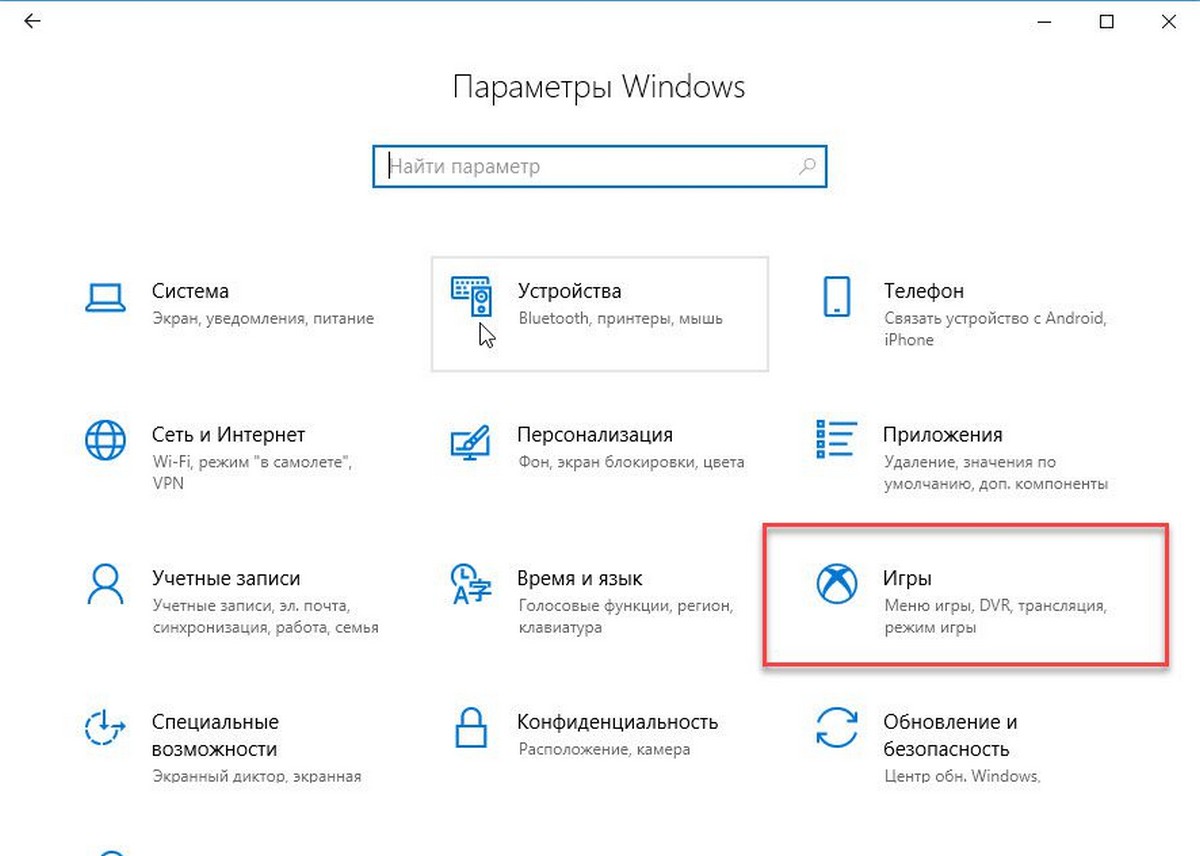
- Перейдите в Игры → Режим Игры.
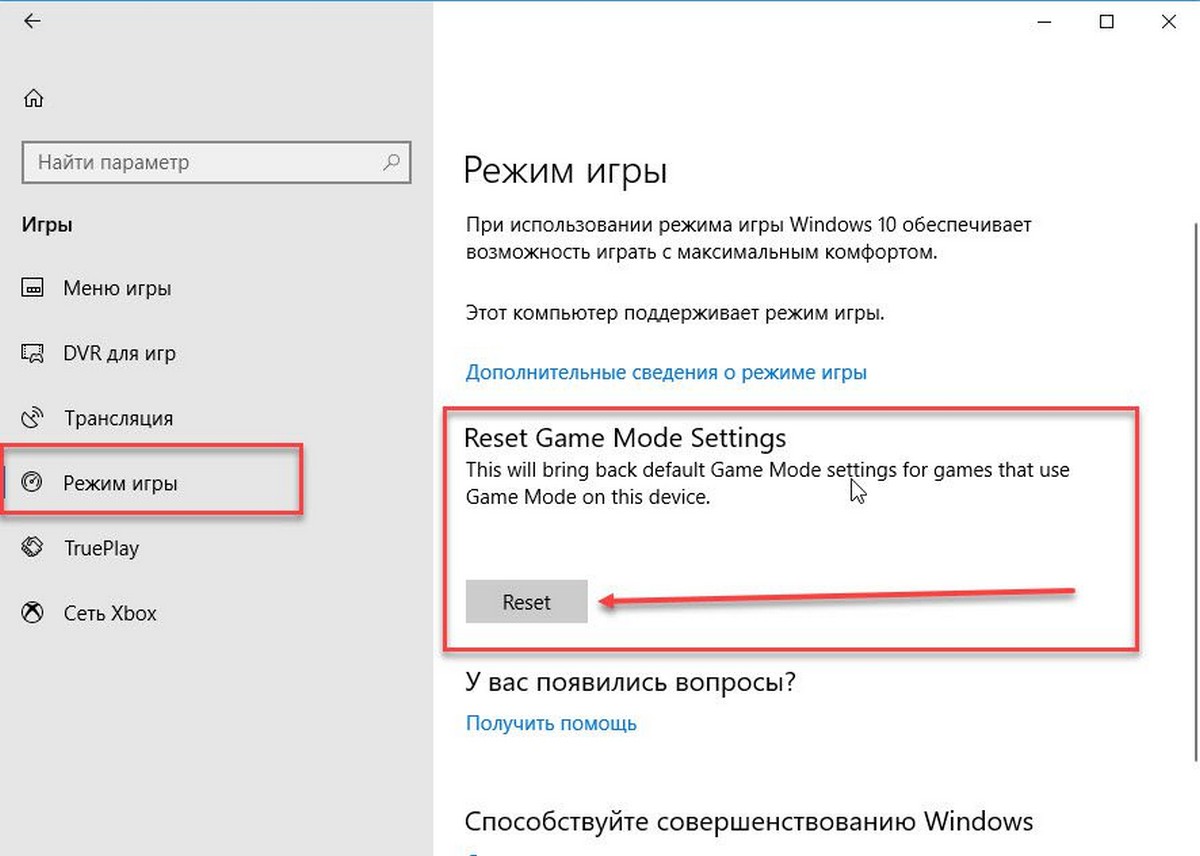
- Справа нажмите кнопку «Сброс» в разделе «Сбросить настройки режима игры».
Возможность перезапуска игрового режима новая для Windows 10 Build 17063, которая представляет собой предстоящее обновление функции Redstone 4. На момент написания этой статьи эта сборка доступна только для Fast Ring Insiders, поэтому вам нужно быть инсайдером, чтобы попробовать эту новую функцию. Окончательная версия Windows 10 «Redstone 4», как ожидается, будет выпущена в марте 2018 года, так что она все еще находится на расстоянии нескольких месяцев.
Помимо сброса насроек игрового режима, Redstone 4 принесет ряд новых и интересных функций, в том числе Timeline, Fluent Design, улучшения для Cortana, OneDrive. Кроме того, это будет первая версия Windows 10, которая не будет включать HomeGroup, поскольку эта функция удаляется Microsoft.
Итак, в следующий раз, когда вы столкнетесь с проблемой в Режиме Игры, попробуйте сбросить настройки, используя новую опцию в приложении «Параметры».
The color settings in a Windows computer certainly matter a lot especially when it comes to printing pictures. Users who are found or edit photos for a living change their computer’s color settings in order to ensure that the printout looks like the actual colors. However, those settings might not be appropriate for computer display and you can really tell right away that there something’s not right in the display. You might also notice some weird tint which isn’t easy to get rid of. You can’t actually tell the difference at first, not until you look at some other computers and then wonder what’s wrong with yours so, in this guide, you will know how to restore the display color settings back to their default state on your Windows 10 PC.
Make sure to follow each one of the steps laid out below carefully to restore the default Display Color settings.
Step 1: Set the Color Management Settings to default.
- In the Start search box, type in “color management”. Once you see it in the search results, open it.
- Once you’ve pulled up the Color Management window, go to the Advanced tab. From there, make sure that every single option is set to default – from all the options in both the “Windows Color System” and “ICC rendering intent to WCS gamut mapping”.
Note: You also have the option to reset it for everyone by simply clicking on the “Change system defaults” button.
- Finally, you can also try to calibrate your display.
Step 2: Set the Graphics Properties to default.
After making changes in the Color Management settings, you need to also set the Graphics Properties to default.
- Start by right-clicking on any empty space on your desktop.
- Then select the Graphics properties from the context menu. From the Graphics properties window, you will see that most sections have to restore defaults.
Step 3: Try using Nvidia Color Settings for Desktop
The next thing you can try is using the Nvidia Color Settings if you have Nvidia graphics installed on your Windows 10 PC. Just the Control Panel to reset the color settings.
- From the system tray, launch the Nvidia control panel.
- Next, go to Display > adjust desktop color settings.
- From there, select the display and then select the Nvidia Settings.
- After that, change the options accordingly in order to get the correct combination though you can always leave them to default.
Do You Need Help with Your Device?
Our Team of Experts May Help
Troubleshoot.Tech Experts are There for You!
GET HELP
Troubleshoot.Tech experts work with all versions of Microsoft Windows including Windows 11, with Android, Mac, and more.
Share this article:
You might also like
NVIDIA is undeniably the market leader as a Graphics Card manufacturer. Recently, NVIDIA came about a feature known as NVIDIA Share. This feature allows users to carry out a number of tasks such as streaming, recording, and sharing their gameplay with other users. NVIDIA Share allows users to take multiple snapshots of the gameplay which brings in capabilities to get the memories of the moments that happen during an awesome game. However, as of late, there were reports that NVIDIA Share is not working or responding. So if you are one of the users who are currently facing this issue, then read on as this post will guide you in resolving it. Make sure to follow the options given below carefully for a successful result.
Option 1 – Try to update the drivers from the official site of NVIDIA
The first thing you can do is to update the drivers from the official site of NVIDIA. And in case you don’t know the type of Nvidia graphics card that your computer is on, follow the steps below:
- Tap the Win + R keys to open the Run dialog box.
- Next type in “dxdiag” in the field and click OK or hit Enter to open the DirectX Diagnostic Tool.
- From there, you can see what type of Nvidia graphics card that your system is on.
- Take note of your graphics card information and then look for the best drivers for your operating system. Once you’ve downloaded and installed the file, restart your PC.
Option 2 – Try to roll back the driver to the previous version
If the first option didn’t work for you, then it’s time to roll back the device drivers. It is most likely that after you updated your Windows computer that your driver also needs a refresh.
- Tap the Win + R keys to launch the Run window and then type in the “msc” command and hit Enter to open the Device Manager window.
- Under the Device Manager, you will see a list of drivers. From there, look for the NVIDIA Drivers and expand them.
- Next, select the driver entries that are labeled appropriately.
- Then select each one of them and double click to open a new mini window.
- After that, make sure that you’re on the Driver tab and if you are not, just navigate to it then click the Roll Back Driver button to switch back to the previous version of the NVIDIA Drivers.
- Now restart your computer to successfully apply the changes made.
Option 3 – Try disabling NVIDIA Share
If the first two options given above didn’t work then you might want to try disabling NVIDIA Share. In case you didn’t make any modifications to the driver, chances are either your driver is out of date or there are some issues with the installation of the drivers. For you to find out, you need to first check if your NVIDIA drivers are really up to date. Once you’ve confirmed it, you can now disable the NVIDIA Share feature. Just refer to the steps below to do that.
- Search for the NVIDIA GeForce Experience in the search box and then click on the appropriate result to open it.
- After you open the NVIDIA GeForce Experience, go to the General tab.
- Next, scroll down to the NVIDIA Share section and then select the toggle to turn off this feature.
- Now restart your computer and try to check if there are any updates available for the NVIDIA Graphics card and install them again if there are any.
Read More
If you suddenly encounter an error message saying, “ File Record Segment is Unreadable ” on a blue screen while booting your PC, it means that your hard drive is in an error state. This particular blue screen of death error might have a lot of bad sectors or might have reached its end.
The workarounds you can try to resolve the issue is by locating the bad sectors or checking your hard drive for any discrepancies in the mapping and fix them. Follow the detailed instructions laid out below for these workarounds.
Option 1 – Try to check for any bad sectors and wrong configurations in your hard drive
The first thing you have to check is the boot files on your PC. As you know, your PC boots from these files and if there is anything wrong with any one of them or if one of them ends up getting corrupted, you will most likely see the blue screen of death error or a prompt with an error message saying, “File record segment is unreadable”. According to some users who reported this issue, new hard drives aren’t exempted from this error. That’s why it is recommended that you carry out this solution no matter what kind of scenario you are in. You will have to launch the Command Prompt in recovery mode and see if you can fix the problem by executing the check disk commands.
- Upon booting, restart your PC and tap F11 to go to the recovery environment then select Troubleshoot.
- Next, click Advanced from the given options and select Command Prompt.
- After opening Command Prompt, execute the commands listed below, and don’t forget to hit Enter right after you type in each one of them and if you have installed Windows to some different directory, you must replace “C” with the name of the drive you’ve installed Windows with.
- chkdsk C: /r /x
- chkdsk C: /f
Note: The Chkdsk function might take a while before it finishes its operations so you need to be patient and wait until the entire process is completed. And depending on the situation, it might even take a day at most so patience is really the key here.
Option 2 – Try connecting the hard drive to a different computer
If option 1 didn’t work for you and you’re still seeing the error, you can try connecting the hard drive to a different computer and then copy the data first. Make it a priority to salvage the data just in case the hard drive won’t make it in the future.
After replicating your hard drive, you can then try running the chkdsk commands that are listed in option 1 above in the new computer you’re connecting your hard drive to and make sure that you key in the correct drive letter that’s assigned to the hard drive you’re using. After executing the chkdsk commands, plug your hard drive back into the previous computer and then check if you can now boot it without any issues.
Option 4 – Replace the faulty hard drive
If none of the options provided above really worked out then maybe it’s time to consider getting a replacement for your hard drive. In about 50% of the cases about this error, some unfortunate users were left with no choice but to replace the hard drive since the problem is with the hard drive itself. Hard drives have a complex running mechanism which includes a head and the disk that rotates accordingly so you can check if the cables connected to the hard drive are connected properly and if it is in a correct position or not. In addition, you also have to make sure that the SATA adapters where the hard drive is connected are working properly.
If the drive is showing problems in the I/O operation, there is little chance for you to use it as a normal hard drive. If the hard drive is in warranty, get it checked and replace it. If not, you might consider taking it to the service center for the specialists to take a look into it.
Read More
As you can notice in Blue Screen errors, most of them point out a file that’s related to the errors. One of these files is the Storport.sys file which is a system file related to the storage of data in the storage unit of a computer. This file is created by the Microsoft Storage Port Driver. So if this file ends up getting dragged on Blue Screen errors, there can be a number of reasons for why it’s happened. Blue Screen errors related to the Storport.sys file may include conflicts with the hardware, incompatible firmware issues, corrupted drivers, missing or corrupted system files, to name a few.
Here are some of the common Blue Screen errors related to the Storport.sys file:
- KMODE_EXCEPTION_NOT_HANDLED
- KERNEL DATA INPAGE
- PAGE FAULT IN A NONPAGED AREA
- SYSTEM THREAD EXCEPTION NOT HANDLED
- IRQL NOT LESS OR EQUAL
- SYSTEM SERVICE EXCEPTION
Microsoft Windows is the one that provides the Storport.sys file a storage port driver that is suited especially for the use of high-performance buses like fiber channel buses and RAID adapters. There are a number of advantages in using Storport instead of the SCSI Port, according to Microsoft:
- “Improved performance, both in terms of throughput and the system resources that are utilized.
- Improved Miniport driver interface that addresses the needs of high-end storage vendors, particularly host-based RAID and fiber channel vendors.”
If you encounter any of the above-mentioned Blue Screen of Death errors, then here are some troubleshooting options that might help but before you get to them, you can try to perform a System Restore first especially if you have the habit of creating System Restore points. This might fix the problem. To perform a system restore, refer to these steps:
- First, tap the Win + R keys to open the Run dialog box.
- After that, type in “sysdm.cpl” in the field and tap Enter.
- Next, go to the System Protection tab then click the System Restore button. This will open a new window where you have to select your preferred System Restore point.
- After that, follow the on-screen instructions to finish the process and then restart your computer and check if the problem is fixed or not.
If System Restore didn’t help in fixing the Blue Screen error, now’s the time for you to resort to the troubleshooting tips provided below but before you get started, make sure that you create a System Restore point first. In addition, you also have to boot into Safe Mode with Networking before you carry out the troubleshooting steps below.
Option 1 – Try to update or rollback your device drivers
The first thing you can try to fix the Storport.sys Blue Screen error is to either update or roll back the device drivers. It is most likely that after you updated your Windows computer that your driver also needs a refresh. On the other hand, if you have just updated your device drivers then you need to roll back the drivers to their previous versions. Whichever applies to you, refer to the steps below.
- Open the Devices Manager from the Win X Menu.
- Then locate the device drivers and right-click on them to open the Properties. Note that the main drivers that might be the cause behind the Storport.sys Blue Screen error will be listed under the “ID ATA/ATAPI controllers” section as well as the “Storage controllers” section.
- After that, switch to the Driver tab and click on the Uninstall Device button.
- Follow the screen option to completely uninstall it.
- Finally, restart your computer. It will just reinstall the device drivers automatically.
Note: You can also directly download the relevant drivers of your computer from the manufacturers’ website. So if you have an SSD, the issue might be due to an old storage driver.
Option 2 – Try to recreate the Storport.sys file
If the first option didn’t work, the next thing you can do is to recreate the Storport.sys file. Every time your Windows 10 PC boots up, it looks for all the system drivers in place and if it is unable to find them, it tries to create them. This is why if you remove your corrupt driver file, chances are, you might get a fixed file recreated just for you. How? Refer to the steps below.
- Boot your Windows 10 PC in Safe Mode.
- Then open File Explorer and navigate to this location: C:/Windows/System32/drivers
- From there, look for the file named sys and rename it to Storport.old.
Note: As you can see, the file’s extension has changed from .sys to .old.
- Now restart your computer and check if the Storport.sys Blue Screen error is now fixed.
Option 3 – Run System File Checker or SFC scan
System File Checker or SFC is a built-in command utility that helps in restoring corrupted files as well as missing files. It replaces bad and corrupted system files to good system files. To run the SFC command, follow the steps given below.
- Tap Win + R to launch Run.
- Type in cmd in the field and tap Enter.
- After opening Command Prompt, type in sfc /scannow
The command will start a system scan which will take a few whiles before it finishes. Once it’s done, you could get the following results:
- Windows Resource Protection did not find any integrity violations.
- Windows Resource Protection found corrupt files and successfully repaired them.
- Windows Resource Protection found corrupt files but was unable to fix some of them.
Reboot your PC.
Option 4 – Try to run the DISM commands
You might want to repair potentially corrupted files in your system as having them could also trigger the Storport.sys Blue Screen error. To repair these corrupted system files, you can run the DISM commands:
- Tap the Win + X keys and click on the “Command Prompt (Admin)” option.
- After that, input each one of the commands listed below sequentially to execute them:
- Dism /Online /Cleanup-Image /CheckHealth
- Dism /Online /Cleanup-Image /ScanHealth
- Dism /Online /Cleanup-Image /RestoreHealth
- Once you’ve executed the commands given above, restart your computer and check if the dxgkrnl.sys Blue Screen error is now fixed.
Option 5 – Run the Blue Screen Troubleshooter
Troubleshooting Blue Screen of Death errors wouldn’t be complete without the Blue Screen troubleshooter. As you know, it is a built-in tool in Windows 10 that helps users in fixing BSOD errors like Storport.sys. It can be found on the Settings Troubleshooters page. To use it, refer to these steps:
- Tap the Win + I keys to open the Settings panel.
- Then go to Update & Security > Troubleshoot.
- From there, look for the option called “Blue Screen” on your right-hand side and then click the “Run the troubleshooter” button to run the Blue Screen Troubleshooter and then follow the next on-screen options. Note that you might have to boot your PC into Safe Mode.
Read More
One of the worst problems users can encounter on their computers is Blue Screen of Death errors as some of them are quite hard to fix. One of them is the “The driver detected a controller error” Blue Screen error. It could be followed by “DeviceIdeIdeport0 OR”, “on deviceharddisk0dr0”, or “DR3” or the name of the drive or port that’s causing the problem. If you are one of the users who encountered this error, then the suggestions provided in this post would definitely help you in fixing the problem.
Option 1 – Try to disconnect and reconnect all hardware and cables
A lot of users reported that they were able to fix the problem by disconnecting and reconnecting cables and hardware like scanners, printers, cameras can help in fixing the problem. In addition, you can also boot your computer in a Clean Boot State so that you can find the problematic hardware by hit and trial method. Refer to the steps below to do so:
- Log onto your PC as an administrator.
- Type in MSConfig in the Start Search to open the System Configuration utility.
- From there, go to the General tab and click “Selective startup”.
- Clear the “Load Startup items” check box and make sure that the “Load System Services” and “Use Original boot configuration” options are checked.
- Next, click the Services tab and select the “Hide All Microsoft Services” check box.
- Click Disable all.
- Click on Apply/OK and restart your PC. (This will put your PC into a Clean Boot State. And configure Windows to use the usual startup, just simply undo the changes.)
Option 2 – Update the device drivers
Updating the outdated device drivers in your computer can also help in fixing the problem. To do so, refer to these steps:
- First, boot your computer into Safe Mode.
- After that, tap the Win + R keys to launch Run.
- Type in devmgmt.msc into the box and tap Enter or click OK to open the Device Manager.
- After that, a list of device drivers will be displayed. From there, look for any outdated device drivers and click on each one of them.
- After that, right-click on each entry of the device drivers and select the “Uninstall Device” option from the menu.
- Now restart your computer.
- After restarting your computer, go to the Settings app and Check for Updates in the Windows Update section.
Option 3 – Try to update the BIOS
Updating the BIOS can help you fix the ATTEMPTED_WRITE_TO_READONLY_MEMORY BSOD error but as you know, BIOS is a sensitive part of a computer. Even though it is a software component, the functioning of the hardware depends on it largely. Thus, you must be careful when modifying something in the BIOS. So if you don’t know much about it, it’s best if you skip on this option and try the other ones instead. However, if you are well-versed in navigating the BIOS, then follow the steps below.
- Tap the Win + R keys to open the Run dialog box.
- Next, type “msinfo32” in the field and press Enter to open System Information.
- From there, you should find a search field on the bottom where you have to search for the BIOS version and then press Enter.
- After that, you should see the developer and version of the BIOS installed on your PC.
- Go to your manufacturer’s website and then download the latest version of BIOS on your computer.
- If you are using a laptop, make sure that you keep it plugged in until you have updated the BIOS.
- Now double click on the downloaded file and install the new BIOS version on your computer.
- Now restart your computer to apply the changes made.
Option 4 – Try running the Blue Screen Troubleshooter
You might also want to run the Blue Screen troubleshooter. It is one of the built-in tools in Windows 10 that helps users in fixing system issues including Blue Screen errors. It can be found in the Settings Troubleshooters page. To use it, refer to these steps:
- Tap the Win + I keys to open the Settings panel.
- Then go to Update & Security > Troubleshoot.
- From there, look for the option called “Blue Screen” on your right-hand side and then click the “Run the troubleshooter” button to run the Blue Screen Troubleshooter and then follow the next on-screen options. Note that you might have to boot your PC into Safe Mode.
Option 5 – Try running the Memory Diagnostic Tool
The Memory Diagnostic tool in windows can help resolve the “The driver detected a controller error” Blue Screen error by checking and automatically fixing any memory-based issues. To run it, refer to these steps:
- Tap the Win + R keys to open Run and type mdsched.exe and hit Enter to open the Windows Memory Diagnostic Tool.
- After that, it will give two options such as:
- Restart now and check for problems (Recommended)
- Check for problems the next time I start my computer
- Once your computer has restarted, perform a basic scan or you could also go for the “Advanced” options such as “Test mix” or “Pass count”. Simply tap the F10 key to start the test.
Note: After you select your preferred option, your computer will restart and check for memory-based issues. If it finds any issues, it will automatically fix them and if there’s no issue found, then it’s most likely not a memory-based issue so you should try the other options given below.
Option 6 – Replace your motherboard
If your computer is still under warranty, you should consider replacing your computer’s motherboard in case the options given above failed to work in fixing the Blue Screen error.
Read More
As you know, Microsoft’s Windows Media Creation Tool is a useful tool that helps you download and install the latest version of the Windows 10 operating system. However, there are times when it could encounter some problems during the update process. One of these programs is the following error message:
“0x8007001F-0x20006, The installation failed in the SAFE_OS phase with an error during REPLICATE_OC operation.”
The error pointed out the “Safe OS phase”. It is the phase that’s initiated to install all the required Windows Updates. Thus, the possible cause for this error could have something to do with an interrupted download, internet connection, and many more. Although this error could be caused by a lot of factors, fixing it shouldn’t be that hard. You can try to reset the Windows Update Components or delete the Windows Update cache. You could also disable both the Firewall and your antivirus program temporarily or run the Windows Update in a Clean Boot state, as well as run the Windows Update troubleshooter. To get started troubleshooting the error, follow each one of the suggestions provided below.
Option 1 – Try to reset the Windows Update components
Resetting the Windows Update components could help you resolve the Windows Update error 0x8007001f – 0x20006. How? Refer to the following steps:
- Open Command Prompt with admin privileges.
- After that, type each one of the following commands and hit Enter after you key in one after the other.
- net stop wuauserv
- net stop cryptsvc
- net stop bits
- net stop msiserver
Note: The commands you entered will stop the Windows Update components such as Windows Update service, Cryptographic services, BITS, and MSI Installer.
- After disabling WU components, you need to rename both the SoftwareDistribution and Catroot2 folders. To do that, type each one of the following commands below, and don’t forget to hit Enter after you type one command after the other.
- ren C:WindowsSoftwareDistribution SoftwareDistribution.old
- ren C:WindowsSystem32catroot2 Catroot2.old
- Now, restart the services you’ve stopped by entering another series of commands. Don’t forget to hit Enter after you key in one command after the other.
- net start wuauserv
- net start cryptsvc
- net start bits
- net start msiserver
- Exit Command Prompt and then restart your computer.
Option 2 – Try to delete the Windows Update Cache
You might also want to delete the Windows Update cache since there are times when existing corrupt or incomplete Windows Update files can cause some problems in downloading and installing Windows Updates. To achieve this, simply delete the “$Windows.~BT” & “$Windows.~WS” folders in your computer. Once you’re done, try to run Windows Update again and see if the error is now fixed.
Option 3 – Try to temporarily disable anti-virus and Windows Defender Firewall
As mentioned, the error could be due to the antivirus program or the Windows Defender Firewall installed on your computer. Thus, disabling them or any security software installed in your computer is always a good idea you can try when you’re not able to access the shared drive on your computer. There are times when you encounter problems like error 0x8007001f – 0x20006 due to interference of antivirus or security programs. Thus, you have to disable both your antivirus program and Windows Defender Firewall for the meantime and check if it fixes the error or not
Option 4 – Run the Windows Update in a Clean Boot State
It is possible that some third-party application is the one that’s causing the problem so it’s best if you put your computer in a Clean Boot state. During this state, you can start the system with a minimum number of drivers and startup programs that will surely help you in isolating the root cause of the issue.
- Log onto your PC as an administrator.
- Type in MSConfig in the Start Search to open the System Configuration utility.
- From there, go to the General tab and click “Selective startup”.
- Clear the “Load Startup items” check box and make sure that the “Load System Services” and “Use Original boot configuration” options are checked.
- Next, click the Services tab and select the “Hide All Microsoft Services” check box.
- Click Disable all.
- Click on Apply/OK and restart your PC. (This will put your PC into a Clean Boot State. And configure Windows to use the usual startup, just simply undo the changes.)
- After that, try to run Windows Update again.
Note: If you are able to install the app without any trouble at all then it means that the error is caused by some third-party application on your computer. You need to look for the culprit and uninstall it once you found it.
Option 5 – Run the Windows Update Troubleshooter
You might also want to run the Windows Update Troubleshooter as it could also help in fixing error 0x8007001f – 0x20006. To run it, go to Settings and then select Troubleshoot from the options. From there, click on Windows Update and then click the “Run the troubleshooter” button. After that, follow the next on-screen instructions and you should be good to go.
Read More
If you are using a dual monitor setup on your computer and you wish to change the Primary and Secondary monitor in Windows 10, then you’ve come to the right place as this post will guide you on how exactly you can do that.
A lot of users use more than one monitor to be more productive so having dual monitors helps a lot. So if you have more than one monitor, know that you can actually select any monitor as the primary monitor after installing Windows. Changing the primary and secondary monitor in Windows 10 does not really require you to install any third-party application since you can get the job done by simply making some alterations in the Windows 10 Settings panel. You won’t have any problem in making such alterations since it is quite simple – from modifying the wallpaper to scaling and so on.
To get started, follow the instructions given below carefully.
Step 1: First, tap the Win + I key combination to open the Windows 10 Settings app and go to System and click the Display tab.
Step 2: Next, look for the Identify button located on your right-hand side and then click on it. This button will help you check which one is the primary and the secondary monitor.
Step 3: After that, select the desired monitor that you want to set as the primary one from the drop-down menu.
Step 4: After that, mark the checkbox for the “Make this my main display” option.
Step 5: After choosing the primary monitor, this will automatically set the other monitor as the secondary monitor. Restart your computer.
So that’s how you change the primary and secondary monitor on your Windows 10 computer. Note that you can always go back to the previous setting of your monitor by following the same instructions provided above.
Read More
Modem Error 633 error is a dial-up error that usually occurs when using a USB modem with a Windows computer. The Modem Error 633 error message is displayed as the following:
“Error 633: The Modem is already in use or not configured properly.”
Solution
Error Causes
This error can be triggered due to several reasons such as:
- A software program conflicts with the USB modem
- The modem is not configured properly
- The Telephon.ini file is missing or damaged
- There is some issue with the way Windows is managing the communication (COM) ports on your computer.
Further Information and Manual Repair
If you experience the Modem Error 633 on your PC, you don’t have to panic. Though this error does not pose any major threats like data loss, it may hamper your ability to use the internet therefore it is advisable to resolve the error.
Repairing the Modem Error 633 is quite easy. There are a number of ways to fix this error. So, let’s get started:
Solution 1: Delete Incompatible Software and Non-Present Modems
- Click on the start menu and go to the ‘Control Panel’. Now choose the option ‘Phone and Modem’.
- Here you will see three tabs, the dialing rules, modems, and advanced. Choose the tab ‘Modems’. As you click on it, you will see modems installed on your PC. To repair the Modem Error 633, select and remove all the incompatible software and modems that are not present and click ‘OK’.
- Now to bring the changes into effect, restart your system with the modem plugged in and try connecting to the internet again.
Solution 2: Change the Communication Ports
If the error occurs because the modem is not properly configured, then this solution is possibly the best way to resolve this error. Here’s what you need to do:
- Click on the Start menu and choose My Computer.
- Now click on the option ‘Manage’ to open the Computer Management Window.
- Once it opens, click the option ‘Device Manager and then expand the option modems. Click on Properties, then the Advanced tab, and the Advanced Port Settings button.
- As you click on the Advanced Port Settings, then click on the COM Port Number drop-down box.
- Choose a new Communication Port. However, make sure it is not already in use.
- Once you make changes, click ‘OK’ and then restart your PC.
- Now Open Device Manager again. Open the Modern Properties Window and then Click the Diagnostics tab.
- After that view the command response window to verify if the error is fixed. If yes, then create a new dial-up connection and connect to the internet with ease.
Solution 3: Disable the Startup items
- Another way to resolve Modem Error 633 on your PC is to go to the start menu and type ‘msconfig’ into the search box and then press ‘enter’.
- Open the misconfig.exe program. As you open it, you will see 4 tabs, General, Boot, Service, Start-up, and Tools.
- Now click on the ‘Start-up’, ‘Disable All’, and then press Apply.
- After you press Apply, a window will pop up asking to restart the computer.
- Confirm it and click restart.
- Once the computer restarts now try connecting to the internet again. This will hopefully resolve the Modem Error 633.
Read More
In case you don’t know, the Title bar comes with the Maximize, Minimize, as well as the Close button. However, there are instances when you might notice that the Title bar, Maximize, Minimize and Close buttons are missing in the File Explorer. This kind of problem might be due to some glitch in the computer, or it could also be caused by some built-in tool or an installed program in your computer. Moreover, there are also other factors that you have to consider such as corruption in the system files as well as errors in the user profile which is generated on a domain network, and so on.
There are several suggestions you can check out to fix the problem. You can try to boot your computer in a Clean Boot State to see if a third-party program is the root cause of the problem. You can also try to run built-in tools like System File Checker and the DISM tool. You could also get the video buffer emptied, reset or reinstall the program, or recreate the User Profile.
Option 1 – Put your computer in a Clean Boot State
As pointed out, it is possible that some third-party program or service is the one that’s behind the problem. To isolate this possibility and to identify the culprit, you have to put your computer into a Clean Boot State. To do so, follow the steps below.
- Log onto your PC as administrator.
- Type in MSConfig in the Start Search to open the System Configuration utility.
- From there, go to the General tab and click “Selective startup”.
- Clear the “Load Startup items” check box and make sure that the “Load System Services” and “Use Original boot configuration” options are checked.
- Next, click the Services tab and select the “Hide All Microsoft Services” check box.
- Click Disable all.
- Click on Apply/OK and restart your PC. (This will put your PC into a Clean Boot State. And configure Windows to use the usual startup, just simply undo the changes.)
- You need to disable one third-party app after the other to really isolate the issue. And once you’ve narrowed down the problem, you can either disable the third-party app that’s causing the problem or remove it.
Option 2 – Run System File Checker scan
You might also try running the System File Checker or SFC scan to fix the issue. System File Checker is a command utility built into your computer that helps restore corrupted files and missing files. Refer to the following steps to run it:
- Hit the Win + R keys to launch Run.
- Type in cmd in the field and tap Enter.
- After opening Command Prompt, type in sfc /scannow
The command will start a system scan which will take a few whiles before it finishes. Once it’s done, you could get the following results:
- Windows Resource Protection did not find any integrity violations.
- Windows Resource Protection found corrupt files and successfully repaired them.
- Windows Resource Protection found corrupt files but was unable to fix some of them.
- Restart your computer and see if the System32 folder still pops up at startup or not.
Option 3 – Try running the DISM tool
You can try running the Deployment Imaging and Servicing Management or DISM tool to fix the Windows Upgrade problem. Using this built-in tool, you have various options such as the “/ScanHealth”, “/CheckHealth”, and “/RestoreHealth”.
- Open the Command Prompt with admin privileges.
- Then type in the following commands and make sure to hit Enter right after you type each one of them:
- Dism /Online /Cleanup-Image /CheckHealth
- Dism /Online /Cleanup-Image /ScanHealth
- exe /Online /Cleanup-image /Restorehealth
- Do not close the window if the process takes a while as it will probably take a few minutes to finish.
Option 4 – Try to empty the Vide buffer
These kinds of problems could also be due to bad data in the Video Buffer. Thus, you can try to empty the Video buffer to resolve the problem. All you have to do is tap the Shift + Ctrl + Win key + B keys on your keyboard. After that, leave your computer idle for about 10 seconds until you notice it blink once. Now you try using your computer as usual and see if the glitch is now fixed or not.
Option 5 – Try to reset or reinstall the program
Another thing you can do to fix the issue is to reset or reinstall the program where you encounter the problem. Chances are, you are running the application in the Full-screen mode but you can exit it by simply tapping the Esc or F11 key. However, if nothing changed, then consider resetting or reinstalling the program. Just go to the Windows 10 Settings app and navigate to Apps > Apps & Features. From there, look for the entry of the application you’re having problems with and select it and then click on the Advanced options. After that, click on the Reset button under the Reset section.
Option 6 – Try recreating the User Profile
You might also want to try recreating the User Profile on your computer since some errors in the creation of a User Profile can result in problems like this one. Thus, you have to try deleting the User Profile and then recreate it.
Read More
Recently, a lot of users reported to Microsoft about getting an error code 0x80096004 while trying to update their Windows 10 computers. This kind of Windows Update error occurs during the initial download and verification process. It also affects the Windows features (FODs) and when you encounter this error, you will also see this error code, “TRUST_E_CERT_SIGNATURE”. This error code indicates that the signature of the certificate could not be confirmed. This is caused by a broken certificate store or a corrupt copy of the Windows operating system is installed.
Here’s the complete error message:
“There were some problems installing updates, but we’ll try again later. If you keep seeing this and want to search the web or contact support for information, this may help: (0x80096004).”
To fix Windows Update error 0x80096004, you can check out the options provided below.
Option 1 – Delete the contents in the Software Distribution folder and Catroot2 folder
- Open the WinX Menu.
- From there, open Command Prompt as admin.
- Then type in the following command – don’t forget to hit Enter right after typing each one of them.
net stop wuauserv
net start cryptSvc
net start bits
net start msiserver
- After entering these commands, it will stop the Windows Update Service, Background Intelligent Transfer Service (BITS), Cryptographic, and the MSI Installer
- Next, go to the C:/Windows/SoftwareDistribution folder and get rid of all the folders and files thereby tapping the Ctrl + A keys to select them all and then click on Delete. Note that if the files are in use, you won’t be able to delete them.
After resetting the SoftwareDistribution folder, you need to reset the Catroot2 folder to restart the services you just stopped. To do that, follow these steps:
- Type each one of the following commands.
net start wuauserv
net start cryptSvc
net start bits
net start msiserver
- After that, exit Command Prompt and restart your computer, and then try to run Windows Update once more.
Option 2 – Run the Windows Update Troubleshooter
Running the built-in Windows Update troubleshooter is one of the things you can first check out as it is known to automatically resolve any Windows Update errors like error code 0x80096004. To run it, Refer to these steps:
- Tap the Win + I keys to open Settings.
- From there, click Update and Security and go to the Troubleshoot section.
- Next, select Windows Update and click the “Run the troubleshooter” button and wait until it’s finished, and then try to run Windows Update again.
Option 3 – Try to temporarily disable anti-virus and Windows Defender Firewall
As mentioned, the error could be due to the antivirus program or the Windows Defender Firewall installed on your computer. Thus, disabling them or any security software installed in your computer is always a good idea you can try when you’re not able to access the shared drive on your computer. There are times when you encounter problems like Error Code 0x80096004 due to interference of antivirus or security programs. Thus, you have to disable both your antivirus program and Windows Defender Firewall for the meantime and check if it fixes the error or not.
Option 4 – Try to replace the DLL file with a trusted source
You can also try to replace the crypt32.dll file as it could help in fixing the Windows Update error. Just make sure that you get one from a trusted source.
- First, you need to get the new DLL file from another computer with preferably the same file version number.
- After that, you need to boot your PC into Safe Mode and navigate to the paths listed below and then replace the file using a USB drive or other external storage devices.
- x86: This PC > C:/Windows/System32
- x64: This PC > C:/Windows/SysWOW64
- Next, type “cmd” in the Cortana search box and right-click on Command Prompt, and select “Run as administrator” to open it with administrator privileges.
- Now type the “regsvr32 crypt32.dll” command and hit Enter.
- Restart your PC and check if the error is now fixed.
Option 5 – Try downloading and installing the Windows Updates manually
Error Code 0x80096004 might be due to a Windows Update that has failed. So if it is not a feature update and only a cumulative update, you can download the Windows Update and install it manually. But first, you need to find out which update has failed, and to do so, refer to the following steps:
- Go to Settings and from there go to Update and Security > View Update History.
- Next, check which particular update has failed. Note that Updates that have failed to install will be displayed under the Status column which has a label of “Failed”.
- After that, go to the Microsoft Download Center and look for that update using its KB number and once you find it, download and then install it manually.
Note: You can also use the Microsoft Update Catalog, a service from Microsoft that provides a list of software updates that can be distributed over a corporate network. With the help of this service, it can be easier for you to find Microsoft software updates, drivers as well as fixes.
Option 6– Run System File Checker or SFC scan
System File Checker or SFC is a built-in command utility that helps in restoring corrupted files as well as missing files. It replaces bad and corrupted system files to good system files. To run the SFC command, follow the steps given below.
- Tap Win + R to launch Run.
- Type in cmd in the field and tap Enter.
- After opening Command Prompt, type in sfc /scannow
The command will start a system scan which will take a few whiles before it finishes. Once it’s done, you could get the following results:
- Windows Resource Protection did not find any integrity violations.
- Windows Resource Protection found corrupt files and successfully repaired them.
- Windows Resource Protection found corrupt files but was unable to fix some of them.
Reboot your PC.
Option 7 – Try to run the Windows Update Service in a Clean Boot State
There are some instances that some conflicting programs installed in your computer might be the one that’s causing Windows Update error. To identify which program is causing the problem, you need to put your computer in a Clean Boot State. To do so, follow the steps below.
- Log onto your PC as an administrator.
- Type in MSConfig in the Start Search to open the System Configuration utility.
- From there, go to the General tab and click “Selective startup”.
- Clear the “Load Startup items” check box and make sure that the “Load System Services” and “Use Original boot configuration” options are checked.
- Next, click the Services tab and select the “Hide All Microsoft Services” check box.
- Click Disable all.
- Click on Apply/OK and restart your PC. (This will put your PC into a Clean Boot State. And configure Windows to use the usual startup, just simply undo the changes.)
- Now try to run the Windows Update Service again and see if Windows Update error 0x80096004 is now gone.
Read More
There are times when system files get corrupted and if the Windows Update process finds the system’s integrity questionable, chances are, the update, upgrade or the installation may fail and you will only be getting an error code 0x80073712 instead of completing the process.
The error code 0x80073712 indicates that a file needed by the Windows setup or the Windows Update is most likely missing or damaged. To resolve the problem, here are some suggestions you can try.
Option 1 – Try running the DISM Tool
Running the DISM Tool helps in repairing the Windows System Image as well as the Windows Component Store in Windows 10. Using this built-in tool, you have various options such as the “/ScanHealth”, “/CheckHealth”, and “/RestoreHealth”.
- Open the Command Prompt as admin.
- Then type in this command: exe /Online /Cleanup-image /Restorehealth
- Do not close the window if the process takes a while as it will probably take a few minutes to finish.
After you run this tool, a log file is created at C:WindowsLogsCBSCBS.log. On the other hand, if the Windows Update client is already broken, you will be prompted to use a running Windows installation as the repair source or use a Windows side-by-side folder from a network share, as the source of the files. Although the chances of this happening are less, if it turns out to be the case, you need to run an advanced command in the DISM tool to repair a broken Windows Update. Just repeat the process above but use the following command instead:
DISM.exe /Online /Cleanup-Image /RestoreHealth /Source:C:RepairSourceWindows /LimitAccess
Option 2 – Try running the System File Checker
System File Checker or SFC is a built-in command utility that helps in restoring corrupted files as well as missing files. It replaces bad and corrupted system files with good system files that might be causing the error 0x80073712. To run the SFC command, follow the steps given below.
- Tap Win + R to launch Run.
- Type in cmd in the field and tap Enter.
- After opening Command Prompt, type in sfc /scannow
The command will start a system scan which will take a few whiles before it finishes. Once it’s done, you could get the following results:
- Windows Resource Protection did not find any integrity violations.
- Windows Resource Protection found corrupt files and successfully repaired them.
- Windows Resource Protection found corrupt files but was unable to fix some of them.
Option 3 – Try running the Chkdsk utility
You can also try running the Chkdsk utility to resolve the Windows Update error 0x80073712. If your hard drive has issues with integrity, the update will really fail as the system will think that it’s not healthy and that’s where the Chkdsk utility comes in. The Chkdsk utility repairs hard drive errors that might be causing the problem.
- Open Command Prompt with admin privileges.
- After opening Command Prompt, execute the commands listed below, and don’t forget to hit Enter right after you type in each one of them and if you have installed Windows to some different directory, you must replace “C” with the name of the drive you’ve installed Windows with.
- chkdsk C: /r /x
- chkdsk C: /f
Note: The Chkdsk function might take a while before it finishes its operations so you need to be patient and wait until the entire process is completed.
Option 4 – Try running the Windows Update Troubleshooter
Running the built-in Windows Update troubleshooter could also help you resolve the Windows Update error 0x80073712. To run it, go to Settings and then select Troubleshoot from the options. From there, click on Windows Update and then click the “Run the troubleshooter” button.
Option 5 – Try running Microsoft’s online troubleshooter
You also have the option to run Microsoft’s online troubleshooter which could help you fix Windows Update errors.
Read More
Copyright © 2023, ErrorTools. All Rights Reserved
Trademark: Microsoft Windows logos are registered trademarks of Microsoft. Disclaimer: ErrorTools.com is not affiliated with Microsoft, nor claims direct affiliation.
The information on this page is provided for information purposes only.