
- Компьютеры
- Cancel
22:30 24.02.2019
Не сохраняются изменения курсора мыши в Windows 10 после перезагрузки
Чтобы изменения курсора мыши оставались полсе перезагрузки необходимо файл с изображением курсора поместить в папку \Windows\Cursors
read more at Константин Лимонов
If you are working and your mouse cursor disappears on Windows 10. The disappearance of the mouse cursor from the screen is a huge issue for users. It can be a confusing and very annoying issue whether you’re just surfing the internet, playing a video game, or working on a document.

But worry not this article will help you to resolve the issues of why the cursor disappears and provide you the detailed instructions and solutions on how to fix the issues. We will walk you through the process of getting your cursor back on screen and making sure it does not disappear unexpectedly again in the future, with everything from basic troubleshooting tips to more complex solutions.
Now let’s get started and see how to resolve the Windows 10 cursor disappearing issue.
Quick Fixes When the Cursor Disappears in Windows 10
- Press CTRL + ALT + DEL to navigate using the up and down arrow and press enter. Check whether the mouse appears or not.
- Press CTRL + ALT + DEL and try to restart or shut down the system may resolve the issue.
Why Curse Disappears from the Screen?
There may be many reasons for the disappearing of the mouse cursor, It can be due to an outdated version or if it is wireless, the battery got exhausted. some of the issues are:
- Driver Issues: The Outdated mouse or touchpad drivers lead to the cursor disappearance. Ensure that your drivers are up to date by navigating the official website and updating the latest drivers for your hardware.
- Cursor Setting: In Windows 10 /11, there are many settings related to the cursor visibility. To check and adjust these settings, go to Settings > Devices > Mouse or Touchpad» and make sure that the cursor toggle button is set to be visible.
- Power Settings: In many cases, power-saving settings cause the disappearance of the mouse. Adjust the power settings by navigating to Settings> System> Power sleep and then customize power plan settings to prevent the system from turning off the mouse or touchpad to save power.
- Malware or Virus: Malware and viruses can also cause strange behaviour in our computer, including cursor disappearance. Run the full system scan with antivirus software to check for and remove any malicious software.
Different Methods to Fix When Cursor Disappears in Windows 10
There are many ways in which we can check the properties of the mouse in Windows. We use a function key for enabling the Mouse/ Touchpad. If the mouse disappears use function keys. All systems have different mouse-enabling keys (FN+F6 is used for ACER laptops). Also, you can refer to the manual of the system for more details.
For now, Let’s see the first method to Fix When the Cursor Disappears in Windows 10.
Method 1: Basic steps to Fix When the Cursor Disappears
If you’re using a wired mouse you can use the following steps to fix the issue.
1. Try to Reconnect your mouse
try reconnecting your mouse cable or mouse sensor to reconnect your mouse.
2. Check for the Cable or Batteries
For the wired mouse, check the cables and ensure whether it doesn’t have signs of damage. For wireless mouse, if the pointer disappears try to use new batteries and see if this solves the issue.
3. Check on another USB Port
The mouse might have disappeared simply because the USB port is defective. So, try using a different port and see if this resolves the «mouse cursor not available» problem.
Method 2: Unhide the Mouse Pointer from Settings to Fix When the Cursor Disappears
When you are typing and your mouse disappears then it is due to mouse settings.
Step 1: Press the Win +R and open the command box.
Step 2: In the control box type control mouse and then press enter to enter into the Mouse properties.
Step 3: Currently your mouse will not work so navigate to the pointer Option tab using the tab key repeatedly.
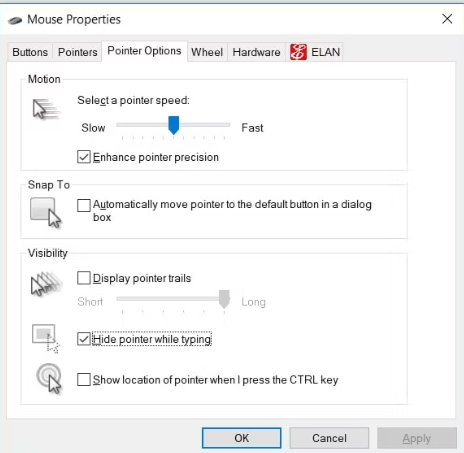
Step 4: navigate using the arrow key and uncheck the hide pointer while typing the box.
Step 5: Now, click on the Apply button and after that click on the dialogue button.
Method 3: Try to Enable the Touchpad to Fix When the Cursor Disappears
Step 1: Press the keys Win+R and open the command dialogue box.
Step 2: Now, type control mouse and then press enter to open the Properties window of the mouse.
Step 3: Navigate to the button tab using the tab key.
Step 4: Now use the navigation/arrow keys to navigate to the touchpad.
Step 5: Now use the navigation keys to Enable Device option and press the key Spacebar to select the option.
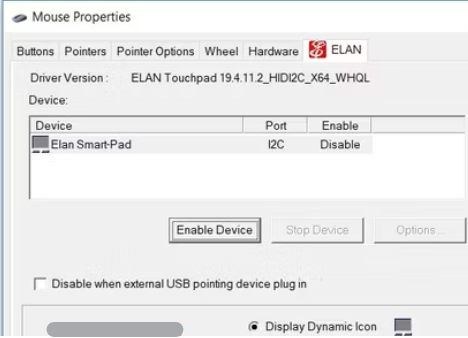
Step 6: At last click on the Apply option using the Tab and then press the spacebar for applying the new settings.
Method 4: Disable the Tablet Mode to Fix When the Cursor Disappears
Note: This method is only applicable to touch screen devices
Step 1: For Touch screen devices open the Notification Center.
Step 2: Now press on the Tablet Mode and disable it. When disabling the widget it will turn to grey.
Method 5: Run the Built-in TroubleShooters to Fix When the Cursor Disappears
Step 1: Press the Windows button search for settings and press enter.
Step 2: Using the navigation keys search for Troubleshoot in setting search bar and press enter.
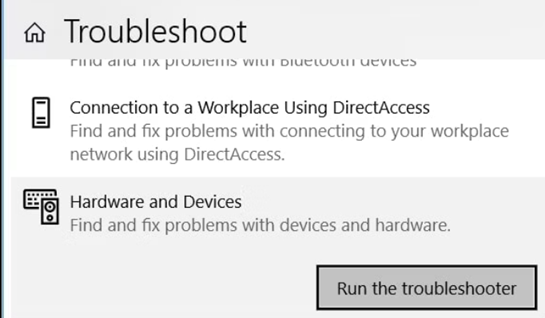
Step 3: Use the tab button to move the option on the right-hand side pane and from there use the arrow navigation keys to navigate to the the options hardware and devices troubleshooter.
Step 4: Now press enter when the device troubleshooter is highlighted. Use the tab key to highlight the option Run the troubleshooter button and press enter to continue.
Method 6: Updating and reinstalling the Mouse Driver to Fix When the Cursor Disappears
If the mouse driver are not properly updated or corrupted mouse drivers in the system also causes the issues. This issue can be resolved by either updating or reinstalling the drivers.
Step 1: On the keyboard press Win + X and use the navigation arrow keys to select the device manager and press enter.
Step 2: Use the tab key and down arrow key to navigate to the option Mice and other pointing devices.
Step 3: Now use the down-pointing arrow to select the mouse drivers.
Step 4: User the keys shift + F10 to right-click on the driver.
Step 5: Using the down-pointing arrow key select the update driver and press enter.
Step 6: Then follow the instructions and use the option Search automatically for the updated driver option.
If the issue is still there then try to reinstall the mouse drivers by following the below steps.
Step 7: As above again open the Device Manager.
Step 8: Press shift+F10 to Right-Click on the mouse driver and then select the option to uninstall the device.
Step 9: Now use the down arrow key to navigate to the option Mice and other pointing devices option.
Step 10: Now at last select the option scan for the hardware changes from the option and press enter.
Step 11: When the process finishes Restart your system to save the changes.
Useful keyboard shortcuts to use when Cursor Disappears
Some common keyboard shortcuts you can use when your mouse cursor disappears:
- Alt + Tab: Switch between open applications.
- Ctrl + Esc or Windows Key: Open the Start menu.
- Alt + F4: Close the active window or exit a program.
- Ctrl + Shift + Esc: Open Task Manager to manage running applications.
- Windows Key + D: Show or hide the desktop.
- Windows Key + L: Lock your computer.
- Windows Key + R: Opens the Run dialog box.
- Windows Key + E: Open File Explorer.
- Windows Key + S: Open search.
So these are some effective solutions to fix When the Cursor Disappears in Windows 10. These methods will benefit you in such situations allowing you to discover the cause of the problem and providing you a handful of solutions for getting your cursor back on screen and making sure it does not disappear unexpectedly again in the future.
Also Read
- How to Fix Right-Click Not Working in Windows 11?
- How to Fix Blue Screen of Death Errors On Windows 11?
- How to Fix Ctrl+C and Ctrl+V Not Working in Windows?
- How to Fix a Missing Wi-Fi Option in Windows 11?
- How to Troubleshoot Audio and Mic-Related Issues in Your System?
Fix Mouse Settings Keep Changing in Windows 10: Every time you reboot your PC your mouse settings revert back to default and in order to keep your preferred settings you need to keep your PC ON forever is really absurd. Users are reporting a new problem with Windows 10 Mouse settings, for instance, you changed the mouse speed settings to slower or quicker according to your preferences then these settings are immediately reflected but only until you reboot your PC because after the restart these settings are back to default and there is nothing you can do about it.

The main cause seems to be the outdated or corrupted Mouse drivers but also after Windows 10 upgrade or update the default value of the Synaptics Device registry key is automatically changed which delete user settings on reboot and in order to fix this issue you need to change the value of the key to default. Don’t worry troubleshooter is here to Fix Mouse settings reset by itself on Windows 10 with the below-listed methods.
Table of Contents
Make sure to create a restore point just in case something goes wrong.
Method 1: Disable Delete User Settings On Upgrade
1.Press Windows Key + R then type regedit and hit Enter to open Registry Editor.
2.Navigate to the following Registry Key:
Computer\HKEY_LOCAL_MACHINE\SOFTWARE\Synaptics\SynTP\Install
3.Make sure to highlight Install key in the left window pane then find “DeleteUserSettingsOnUpgrade” key in the right window pane.

4.If the above key is not found then you need to create a new one, right-click on the right window pane
then select New > DWORD (32-bit value).
5.Name the new key as DeleteUserSettingsOnUpgrade then double-click on it and change it’s value to 0.
6.Reboot your PC and this will Fix Mouse Settings Keep Changing in Windows 10 but if not then continue.
Method 2: Uninstall Mouse Driver
1.Press Windows Key + R then type devmgmt.msc and hit Enter to open Device Manager.

2.Expand Mice and other pointing devices.
3.Right-click on your Mouse device and select Uninstall.
4.If asked for confirmation then select Yes.
5.Reboot your PC and Windows will automatically install the device drivers.
Method 3: Re-insert USB Mouse
If you have a USB Mouse then take it out from the USB Port, reboot your PC and then re-insert it. This method may be able to fix Mouse Settings from Keep Changing in Windows 10.
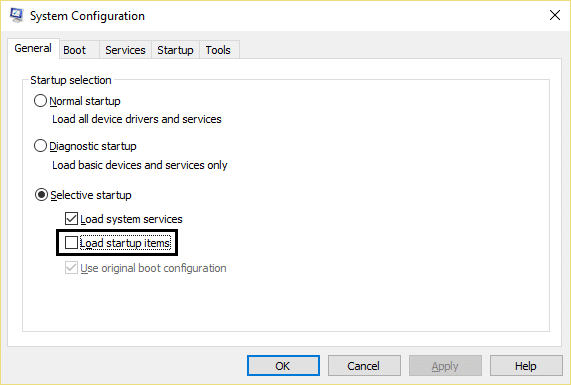
Method 4: Perform a Clean Boot
Sometimes 3rd party software can conflict with Windows Store and therefore, you should not be able to install any apps from Windows apps store. In order to Fix Mouse Settings Keep Changing in Windows 10, you need to perform a clean boot in your PC and diagnose the issue step by step.
Recommended for you:
- Fix There are no more endpoints available from the endpoint mapper
- How to Fix Internet Explorer 11 Not Responding
- Fix The file is too large for the destination file system
- How to change Auto-save time in Word
That’s it you have successfully Fix Mouse Settings Keep Changing in Windows 10 but if you still have any queries regarding this post feel free to ask them in the comment’s section.

Несколько простых способов решения проблемы: переустановите мышь, перезагрузите компьютер и установите последние обновления Windows.
У вас возникли проблемы с курсором в Windows 10? У нас есть решения, которые помогут вам быстро вернуть его.
Как вернуть исчезнувший курсор
Чтобы определить, в чем проблема, и узнать, как ее устранить, попробуйте следующие способы. Мы упорядочили их по степени простоты/быстроты выполнения, поэтому вы можете начать с самого начала и двигаться вниз, пока не найдете подходящее решение.
Совет: Клавиша Tab – ваш верный друг, когда нет курсора. С ее помощью вы можете перемещаться по различным частям программы, используя только клавиатуру. Когда вы остановитесь на том, что нужно включить или отключить, нажмите пробел или ввод. Перемещаться между вкладками можно также используя клавиши со стрелками.
1. Если у вас проводная мышь, отключите ее от компьютера, а затем снова подключите, возможно, даже в другой порт USB. Если у вас беспроводная мышь, извлеките ее из USB-порта и выключите мышь, затем подключите ее обратно, подождите минуту и снова включите.
Этого может быть достаточно, чтобы установить новое соединение с Windows и заставить курсор снова появиться.
Если для беспроводной мыши это не помогло, можно попробовать настроить ее как новое устройство.
2. Перезагрузите компьютер. Это еще один простой способ вернуть исчезнувший курсор.
Один из быстрых способов сделать это, если курсор не активен, – нажать Win+D, чтобы выйти на рабочий стол, а затем набрать Alt+F4, чтобы открыть опции выключения.
Примечание: попробуйте это сделать, даже если вам кажется, что это не сработает. Перезагрузка устраняет многие проблемы, и такой способ вполне может сработать, независимо от причины исчезновения курсора и от того, полностью ли он исчезает с экрана или пропадает только периодически, когда наезжает на определенную программу.
3. Проверьте наличие обновлений через Windows Update. Это один из первых шагов, который необходимо предпринять, прежде чем переходить к более конкретным мерам по устранению неполадок, описанным ниже. Обновление от Microsoft может помочь решить проблему с исчезающим курсором мыши или исправить другие неполадки, с которыми вы сталкиваетесь в работе мыши.
Раздел «Проверка обновлений» проще всего найти через строку поиска.
4. Запустите встроенное средство устранения неполадок устройства. Добраться до него без мыши очень просто: откройте с помощью Win+R окно «Выполнить» и введите эту команду:
msdt.exe -id DeviceDiagnostic
Следуйте указаниям на экране, чтобы проверить аппаратные проблемы.
5. Курсор или сама мышь могли быть отключены Windows, другой программой или даже случайно, если на ноутбуке есть физический переключатель для их отключения.
У нас есть несколько вариантов почему курсор не виден:
Если вы используете ноутбук, проверьте, нет ли переключателя рядом с тачпадом, или попробуйте воспользоваться одной из функциональных клавиш, например F6 или F9 (возможно, при выборе клавиши вам придется нажать и удерживать Fn). Внимательно осмотрите клавиатуру на предмет подсказок о том, какая кнопка управляет тачпадом на вашем ноутбуке.
Проверьте настройки мыши, встроенной в ноутбук. Найдите «Настройки тачпада» в строке поиска рядом с кнопкой «Пуск». Откройте ее и нажмите клавишу Tab несколько раз, пока не выделится кнопка в верхней части. С помощью клавиши пробела выключите ее, а затем снова включите, чтобы обновить связь Windows с ней.
Откройте окно «Выполнить» (Win+R), введите «control mouse», перейдите на вкладку «Параметры устройства» (если вы ее видите; у вас она может называться по-другому), используя клавишу со стрелкой вправо, и выберите «Включить».
6. Удалите драйвер мыши или тачпада, а затем дайте Windows автоматически установить его заново. Это поможет вернуть курсор, если проблема заключается в несовместимом или неправильном драйвере устройства.
Вот как это сделать:
1. Откройте «Диспетчер устройств». Лучше всего использовать команду «Выполнить»: devmgmt.msc.
2. Нажмите Tab, чтобы перейти к категориям, а затем стрелку вниз, чтобы перейти к «Мыши и иные указывающие устройства».
3. Разверните/откройте меню с помощью клавиши со стрелкой вправо.
4. С помощью стрелки вниз выделите нужную мышь.
5. Нажмите Alt, затем «a», затем «u», чтобы вызвать опцию «Отмена установки».
6. Подтвердите выбор, нажав пробел при выделенной опции «Отмена установки».
7. Перезагрузите компьютер (см. шаг 2 выше).
7. Проверьте наличие устаревших или отсутствующих драйверов. Хотя это может показаться повторением предыдущего шага, Windows не всегда устанавливает лучший драйвер для вашего устройства.
Хотя без курсора это сложно сделать, лучше всего посетить веб-сайт компании и загрузить последнюю версию драйвера. Здесь также помогут утилиты для обновления драйверов: держите мышь включенной и используйте одну из таких программ для сканирования на наличие обновлений.
Совет: если у вас сенсорная панель или мышь базового уровня, этот шаг можно пропустить. Но если курсор не отображается на продвинутой или игровой мыши, стоит приобрести самый свежий драйвер производителя.
8. Если у вас ПК с сенсорным экраном, отключите режим планшета. При его включении курсор может быть вообще не виден.
Нажмите на кнопку в области уведомлений, которая находится в правом нижнем углу панели задач. Появится меню, где вы сможете найти пункт «Режим планшета». Когда этот режим включен, индикатор будет синего цвета, а когда выключен — серого.
9. Отключите или включите аппаратное ускорение в Chrome. Этот параметр вы могли не менять с момента установки Chrome, но некоторые пользователи заметили, что его включение или выключение приводит к исчезновению курсора.
Если это не помогло, попробуйте переключить переключатель на противоположную настройку, перезапустите Chrome, а затем верните все на свои места.
10. Запретите курсору исчезать при наборе текста. Если это единственный случай, когда вы замечаете, что курсор исчезает случайным образом, причина проста: вы включили в настройках мыши функцию «Скрывать указатель при вводе текста».
Отключите этот параметр в «Свойствах мыши». С помощью этой команды можно быстро перейти к управлению мышью из окна «Выполнить»:
control mouse
После этого с помощью Shift+Tab перейдите в меню вкладок, дважды нажмите клавишу со стрелкой вправо, чтобы перейти в раздел «Параметры указателя», перейдите по вкладке вниз к переключателю «Скрывать указатель при вводе текста» и нажмите пробел, чтобы выключить его, а затем ввод, чтобы сохранить и выйти.
11. Установите для схемы указателя значение «Нет» и отключите тень указателя. Некоторым пользователям, по какой-то причине, удается снова увидеть курсор после выполнения этих действий. Возможно, это не относится к вашей ситуации, но проверить стоит.
Обе эти настройки находятся в том же окне «Свойства мыши», о котором говорилось в шаге 10. Вернитесь туда, перейдите в раздел «Указатели», с помощью Tab внизу выберите в выпадающем меню пункт «Нет» и снимите флажок с пункта «Включить тень указателя».
12. Если вы используете графический планшет Wacom, отключите функцию Windows Ink, чтобы курсор не исчезал при использовании пера: «Пуск» > «Планшет Wacom» > «Свойства планшета Wacom» > «ОТОБРАЖЕНИЕ» (MAPPING) и снимите флажок с пункта «Использовать Windows Ink».
Если вы не хотите идти этим путем, вы можете заставить Windows показывать алмазный указатель: Откройте «Настройки» через Win+i, найдите «Pen & Windows Ink» и включите «Показать курсор».
13. Используете несколько мониторов? Может быть, проектор? Хотя в большинстве случаев это маловероятно, но курсор может быть на одном из этих экранов.
Если это так, то его перемещение на несколько сантиметров не поможет вернуть его на экран. Чтобы найти курсор, несколько раз переместите мышь влево или вправо, пока он не появится на основном экране.
14. Используйте Ctrl+Alt+Del, чтобы вызвать этот экран. Некоторые пользователи сообщали о том, что если просто открыть этот экран и затем выйти из него, то такое действие временно помогало.
Это не постоянное решение проблемы, но, возможно, такой способ вам поможет, если другие способы не принесли результатов, а переустанавливать Windows нет желания.
15. Вот несколько других, менее вероятных решений, которые вы можете попробовать, если курсор не отображается в Windows 10:
- Найдите и удалите вредоносное ПО;
- Отключите все USB-устройства и перезагрузите компьютер;
- Выключите компьютер на несколько минут, а затем запустите его снова;
- Используйте программу для очистки реестра, чтобы устранить проблемы в реестре;
- Запустите восстановление системы, чтобы отменить недавние изменения в системе.
Причины исчезновения курсора
Постоянно исчезающий курсор – это не аппаратная проблема, поэтому нет необходимости покупать новую мышь. Она вызвана различными факторами, связанными с программным обеспечением, а значит, существует множество потенциальных решений, которые следует изучить.
Курсор может не работать вообще или исчезать в определенных ситуациях, при этом кнопки мыши могут продолжать работать.
Вот лишь несколько ситуаций, когда пользователи замечали исчезновение курсора мыши:
После обновления Windows;
- Только в одной программе, например в Chrome;
- Только при наборе текста;
- После выхода из спящего режима;
- При прокрутке пальцами на сенсорной панели ноутбука.
FAQ
Как изменить курсор мыши в Windows 10?
Чтобы изменить схему курсора мыши, найдите «Параметры мыши» > «Дополнительные параметры мыши» > «Свойства мыши» > вкладка «Указатели». Вы также можете настроить размер и цвет.
Как изменить чувствительность мыши в Windows 10?
Чтобы изменить чувствительность мыши, откройте «Настройки» > «Устройства». Выберите «Мышь» > «Дополнительные параметры мыши». В апплете панели управления «Свойства мыши» измените чувствительность с помощью ползунка и проверьте ее, дважды щелкнув по значку тестовой папки.
Как делать скриншоты в Windows 10?
Самый простой способ сделать скриншот в Windows 10 – это использовать комбинацию клавиш Windows+PrtSc. По умолчанию скриншоты хранятся в папке «Изображения» > «Скриншоты».