
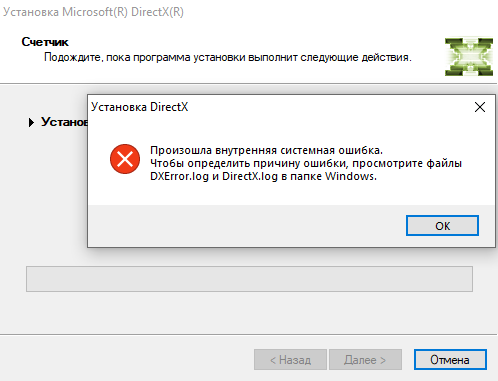
Некоторые пользователи Windows 11 и 10, устанавливающие недостающие библиотеки DirectX с помощью веб-установщика от Майкрософт, могут получить сообщение об ошибке «Произошла внутренняя системная ошибка, посмотрите файлы DXError.log и DirectX.log в папке Windows».
В этой инструкции подробно о том, чем может быть вызвана такая ошибка при установке DirectX и как её исправить.
Версии Windows с ограниченным набором компонентов
Одна из самых частых причин ошибки установки DirectX «Произошла внутренняя системная ошибка, посмотрите файлы DXError.log и DirectX.log в папке Windows» (An internal system error occurred в англоязычных версиях ОС) — использование версии системы, в которой по умолчанию отсутствуют некоторые системные компоненты.

Речь идёт о компонентах для работы с мультимедиа (Media Feature Pack). Среди таких версий ОС:
- Windows 11 и 10 N и KN
- Варианты Windows LTSC и LTSB
- Некоторые «сборки» Windows
Информацию о системе можно получить в Параметры — Система — О системе в Windows 11, где в поле «Выпуск» будет указано, какая именно версия у вас установлена.
Решение для данного случая — попробовать установить Media Feature Pack (Компоненты для работы с мультимедиа):
- Включить соответствующие компоненты в Панель управления — Программы и компоненты — Включение или отключение компонентов Windows:

- Для N и KN редакций последних версий Windows 11/10 — установить компоненты в Параметры — Система — Дополнительные компоненты (в Windows 11) или Параметры — Приложения — Приложения и возможности — Дополнительные компоненты (в Windows 10).
- Скачать и установить Media Feature Pack вручную (подходит не для любых версий Windows)

После установки рекомендую выполнить перезагрузку компьютера, после чего снова попробовать выполнить установку DirectX.
Другие варианты
Если у вас установлена «обычная» версия Windows 11/10 — Домашняя или Pro, указанные выше компоненты включены, при этом вы всё равно получаете рассматриваемое сообщение об ошибке:
- Изучите содержание файлов журналов DXError.log и DirectX.log, возможно, их содержимое (в частности, сообщения об ошибках и сбоях) позволят разобраться, на каком этапе и почему возникает ошибка.

- Попробуйте использовать оффлайн-установщик предыдущих версий библиотек DirectX вместо Веб-установщика или наоборот.
- По некоторым отзывам может помочь запуск установщика в режиме совместимости с предыдущими версиями Windows, что можно сделать, открыв свойства исполняемого файла (правый клик по файлу — свойства) и настроив режим совместимости на соответствующей вкладке.

- Потенциальной причиной может оказаться повреждение или изменение системных файлов, можно попробовать их восстановить. Запустите командную строку от имени администратора и по порядку выполните команды
dism /online /cleanup-image /restorehealth
sfc /scannow
- Есть непроверенная лично рекомендация (создайте точку восстановления, если решите попробовать): зайти в редактор реестра в раздел
HKEY_LOCAL_MACHINE\SOFTWARE\Microsoft\DirectX
и изменить значение параметра InstalledVersion: удалить первые «00», ввести 08 08 (появится вторая строка с двумя 0), а значение Version — на 4.09.00.0904, сохранить изменения и перезагрузить компьютер.


И, наконец, в крайнем случае можно попробовать выполнить «Обновление на месте» (опять же, при условии, что у вас установлена «обычная» потребительская версия Windows), после чего вновь попробовать установить DirectX.
Если один из способов помог решить проблему в вашем случае, буду благодарен комментарию о том, какой именно — это может пригодиться другим пользователям, столкнувшимся с той же ошибкой.
Many multimedia and video applications that run on Windows PCs require the DirectX application programming interface to function properly. This technology allows these applications to function smoothly by allocating RAM, video storage, and processor resources. However, recent reports indicate that some individuals are having problems installing DirectX on their computers. In case you’re also dealing with an identical problem, this guide is for you.
What is DirectX in Windows?
DirectX is basically a collection of application programming interfaces (APIs) that Microsoft uses to handle multimedia-related tasks such as gaming, video playback, and graphics rendering. By default, DirectX comes pre-installed on your Windows PC. However, if it corrupts somehow, you should reinstall it on your computer.
What causes DirectX Not Installing issues in Windows?
If you are not able to use DirectX on Windows 11/10, this could be because of different reasons. Some possible reasons include –
- DirectX is already installed: As stated earlier, DirectX may come pre-installed on your computer. That’s the reason why you are encountering issues when installing DirectX manually on your PC.
- Compatibility issues: There are many versions of DirectX, each one compatible with a specific Windows version. If you try to install an incompatible version, the installation will fail on some odd error codes. There’s a possibility that you have recently upgraded your Windows OS and as a result of this, your device is now not compatible with the existing DirectX version.
- You have downloaded a corrupt DirectX setup file: At times, when you download the DirectX setup file, this may download incorrectly. This happens only when you are connected to an unstable internet connection.
- Drivers must have corrupted somehow: Apart from the above reasons, DirectX might also fail to install when some of your device drivers have corrupted somehow, especially Graphics cards or any other hardware components.
If DirectX is failing to install on your computer, you may try out the following solutions one after another.
1] Install the previous version of DirectX if required
The latest version of DirectX is not supported by many applications. It’s sometimes necessary to download older versions like DirectX8. To determine what version of DirectX you have, do the following:
- Right-click on Start and select Run to open the dialog box.
- Type
dxdiagin the text box and press Enter to launch the DirectX Diagnostic Tool. - On the next page, you will find the DirectX version in the System tab.

- If you want to install an older version, you can download it here. However, if you would like your device to run without lags and freezes, you should always use the latest version.
2] Update your graphics card drivers
In many cases, you will find that your DirectX version is incompatible with the graphics card driver. The reason may be that the auto-update feature has been disabled. To solve this problem, make sure that regular system updates are being applied.
- Press the Windows + R keys to open the Run dialog box.
- Type
devmgmt.mscon it and press Enter. This will open the Device Manager window. - Now click on Display Adapter, and it will show you the available display drivers.
- Right-click the Intel HD adapter and select Update.

- Click on Search automatically for updated driver software. You’ll need an internet connection for this step.
- It will let you know if the latest drivers are already installed, but if not, it keeps downloading and installing the updates.
3] Install .NET Framework using Command Prompt
If none of the above solutions work, you might have to download and install the .NET Framework using the Command Prompt. This will be accomplished using the Windows deployment image service:
- Open Command Prompt as an administrator.
- Type the following command and hit enter:
DISM /Online /Enable-Feature /FeatureName:NetFx3 /All /LimitAccess /Source:D:sourcessxs
- Once the process is complete, wait for it to finish. When it is done, restart your computer.
Read Next:
- Fix: This Driver Can’t be released to Failure Error on Windows 11/10
- How to Fix Xbox One error 0x87e00064 on Windows 11/10
При установке DirectX может возникнуть системная ошибка с упоминанием файлов DXError.log и DirectX.log. Причина кроется, как правило, в несовместимости между установщиком и ОС, устаревших видеодрайверах или антивирусе, который по ошибке препятствует установке библиотек.
Решение DirectX-ошибки с файлами DXError.log и DirectX.log
Устранить ошибку относительно легко, задействовав нижеуказанные способы.
Способ №1 Установка DirectX в режиме совместимости
Установщик DirectX может быть несовместим с операционной системой. Такое происходит, например, если он прикладывается к устаревшей программе или видеоигре. Но проблемы совместимости легко исправляются:
- Нажмите ПКМ на файл dxsetup.exe и выберите «Исправление проблем с совместимостью».
- На экране диагностики нажмите пункт «Использовать рекомендованные параметры».
- После подбора оптимальных настроек совместимости кликните на кнопку «Проверить приложение».
Если проблема заключалась в несовместимости с ОС, установка библиотек пройдет без проблем.
Способ №2 Деактивация антивируса
Антивирусные программы по ошибке могут блокировать процесс установщика DirectX. Делают это не только сторонние антивирусы, но и системный вариант. Последний можно отключить через параметры ОС Windows:
- Нажмите WIN+S для вызова поисковой строки.
- Пропишите запрос «Безопасность Windows» и выберите найденный результат.
- Перейдите в раздел «Защита от вирусов» и выберите пункт «Управление настройками».
- Задайте параметру «Защита в режиме реального времени» значение «Выкл.».
Теперь нужно закрыть все окошки и запустить установку DirectX еще раз.
Способ №3 Обновление видеодрайверов
Проблемы при установке библиотек DirectX могут возникать из-за устаревших драйверов видеокарты. Обновить видеодрайвера можно через Диспетчер устройств, но чтобы получить наиболее актуальную версию, нужно обратиться к официальным сайтам производителей ГПУ.
- NVIDIA;
- AMD;
- INTEL.
После установки драйверов обязательно перезагрузите ПК.
Если ошибка с DXError.log и DirectX.log не исчезает
В таком случае стоит выполнить чистую загрузку ОС Windows, т.е. провести установку библиотек DirectX без стороннего ПО в системе.
- Нажмите WIN+S и найдите компонент «Конфигурация системы».
- Перейдите во вкладку «Службы».
- Поставьте галочку у опции «Не отображать службы Майкрософт» и нажмите «Отключить все».
- Перейдите во вкладку «Автозагрузка» и нажмите на ссылку «Открыть диспетчер задач».
- Деактивируйте все приложения, которые будут показаны в списке.
- Перезагрузите ПК.
Проверьте наличие ошибки с логами DXError.log и DirectX.log. Чтобы включить деактивированное ПО, достаточно вернуться в окошко конфигурации системы и нажать «Включить все».
DirectX is an Application Programming Interface (API) for creating and managing graphic images and multimedia effects in applications such as games or active web pages that run on the Microsoft Windows operating system. Earlier DirectX was limited to certain fields like DirectSound, DirectPlay but with the upgraded Windows 10, DirectX has also been upgraded to DirectX 13, 12 and 10 as a result of which, it has become an essential part of Microsoft Windows operating system. However, if you’re unable to install DirectX on Windows 10 then don’t worry as today we are going to discuss how to fix this issue.

Table of Contents
DirectX has its Software Development Kit (SDK), which consists of runtime libraries in binary form, documentation, and headers used in coding. These SDK are free to download and use. But sometimes, when you try to install these SDKs or DirectX on your Windows 10, you face errors. The most common cause of the issue seems to be .NET Framework might be interfering with the installation of DirectX. This guide lists several methods using which you may be able to Install DirectX on Windows 10 without any errors.
1.Make Sure All the System requirements are Met
DirectX is an advanced feature, and all the computers may not be able to install it correctly. To install the DirectX properly on your computer, your computer needs to meet some mandatory requirements.
Given below are the requirements to install DirectX on your computer:
- Your Windows system must be at least 32-bit operating system
- The graphics card must be compatible with your DirectX version you are installing
- RAM and CPU must have enough space to install DirectX
- NET Framework 4 must be installed in your PC
If any of the above requirements are not fulfilled, you will not be able to install DirectX on your computer. To check these properties of your computer, follow the steps mentioned below:
1.Right click on the This PC icon. A menu will pop-up.
2.Click on the Properties option from the right-click context menu.

3.The system properties window will show up.
After completing the steps mentioned above, you will get to know if all the basic requirements to install DirectX on your computer are met or not. If all the requirements are not met, then fulfill all the basic requirements first. If all the basic requirements are met, then try other methods to fix Unable To Install DirectX on Windows 10 issue.
2.Check DirectX Version on Windows 10 is Latest
Sometimes, when you try to install DirectX on Windows 10, you are unable to do so as DirectX12 comes pre-installed on most of Windows 10 PC.
To check if DirectX is pre-installed on your Windows 10 and if installed then which version of DirectX is there, you need to follow the below steps:
1.Open dxdiag on your computer by searching for it using search bar.
2.If you find the search result, it means DirectX is installed on your computer. To check its version, hit the enter button at the top result of your search. DirectX diagnostic tool will open up.

3.Visit System by clicking on the System tab available at the top menu.

4.Look for the DirectX version where you will find the DirectX version installed on your computer. In the above image DirectX 12 is installed.
3.Update Graphics Card Driver
It is possible that unable to install DirectX on your Windows 10 problem is arising because of outdated or corrupt Graphics card drivers, as you know DirectX is related to multimedia and any problem in Graphics card will lead to installation error.
So, by updating the Graphics card driver, your DirectX installation error may be resolved. To update the Graphics card driver follow the below steps:
1.Open Device Manager by searching for it using the search bar.
2.Hit the enter button at the top result of your search. Device Manager will open up.

3.Under Device Manager, locate and click on Display Adapters.
4.Under Display adapters, right-click on your Graphics card and click on Update driver.

5.Choose Search automatically for updated driver software option so that your windows can search for updates available automatically for the selected driver.

6.Your Windows will start searching for the updates.

7.If the Windows finds any update, it will start updating it automatically.

8.After the Windows has successfully updated your driver, the dialog box shown below will appear displaying the message that Windows has successfully updated your drivers.

9.If no update is available for the driver, then the dialog box shown below will appear displaying the message that the best drivers for your device are already installed.

10.Once the graphic card driver will update successfully, restart your computer.
4.Reinstall Graphics Card Driver
After completing the above-mentioned steps, when your computer restarts try to install DirectX on your Windows 10 again. If it doesn’t work, try unsintalling and then installing drivers.
5. Reinstall Previous Windows Updates
Sometimes, previous updates cause a problem while installing DirectX on your Windows 10. If this is the case, then you need to uninstall the previous updates and then re-install it again.
To uninstall the previous updates follow the steps mentioned below:
1.Press Windows Key + I to open Settings and click on Update & Security option.
2.From the left hand menu click on Windows update option.
3.Then under the Update status click on View installed update history.

4.Under View update history, click on Uninstall updates.
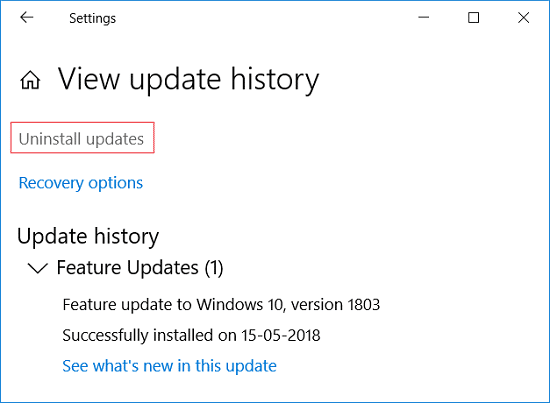
5.A page will open up that has all the updates. You have to search for the DirectX update, and then you can uninstall it by right-clicking on that update and choosing the uninstall option.

6.Once the update is uninstalled, restart your computer.
After completing the above steps, once the computer restarts, your previous update will be uninstalled. Now try to install DirectX on Windows 10 and you might be able to do so.
6. Download Visual C++ Redistributable
Visual C++ redistributable is a vital component of DirectX Windows 10. So, if you are facing any error while installing DirectX on your Windows 10, it may be connected to Visual C++ redistributable. By downloading & reinstalling Visual C++ redistributable for Windows 10, you may be able to fix unable to install the DirectX issue.
To download and reinstall visual C++ redistributable, follow the steps mentioned below:
1.Go to the Microsoft site to download the Visual C++ redistributable package.
2.The screen shown below will open up.

3.Click on the Download button.

4.The page shown below will open up.

5.Choose the download according to your operating system that is if you have a 64-bit operating system then check the checkbox next to x64.exe and if you have a 32-bit operating system then check the checkbox next to vc_redist.x86.exe and click Next button available at the bottom of the page.
6.Your selected version of visual C++ redistributable will start downloading.

7.Once the download is completed, double-click on the downloaded file.

8.After completing the above steps, try to reinstall DirectX on your Windows 10 and it might be installed without creating any error.
7. Install .Net Framework using Command Prompt
.Net Framework is also one of the important parts of DirectX, and you may be facing an error in installing DirectX because of .Net Framework. So, try to resolve your issue by installing the .Net Framework. You can install the .Net Framework easily using the Command prompt.
To install the .Net Framework using the command prompt, follow the steps mentioned below:
1.Search for command prompt using the Start Menu search.
2.Right-click on Command Prompt from the search result & select Run as administrator option.
3.Click on Yes when asked for confirmation and the Administrator command prompt will open up.
4.Enter the command mentioned below in the command prompt and press Enter button.
DISM /Online /Enable-Feature /FeatureName:NetFx3 /All /LimitAccess /Source:D:sourcessxs

6.The .Net Framework will start downloading. The installation will start automatically.
8.Once the installation is completed, restart your computer.
After completing the above steps, the .Net Framework will be installed, and the DirectX error may also disappear.
Recommended: How to Re-Install DirectX in Windows 10
Hopefully, using any one of the mentioned methods, you may be able to fix Unable to Install DirectX on Windows 10 issue, but if you still have any questions regarding this tutorial then feel free to ask them in the comment section.
Все способы:
- Не устанавливается DirectX
- Причина 1: Антивирус
- Причина 2: Система
- Вопросы и ответы: 53
Многие пользователи при попытке установить или обновить компоненты DirectX сталкиваются с невозможностью инсталляции пакета. Зачастую, такая проблема требует немедленного устранения, так как игры и другие программы, использующие DX, отказываются нормально работать. Рассмотрим причины и решения ошибок при установке DirectX.
Не устанавливается DirectX
Ситуация до боли знакомая: возникла необходимость установить библиотеки DX. После скачивания установщика с официального сайта Microsoft мы пытаемся его запустить, но получаем сообщение примерно вот такого вида: «Ошибка установки DirectX: произошла внутренняя системная ошибка».
Текст в диалоговом окне может быть другой, но суть проблемы остается та же: пакет инсталлировать невозможно. Это происходит из-за блокировки доступа установщика к тем файлам и ключам реестра, которые требуется изменить. Ограничить возможности сторонних приложений может как сама система, так и антивирусное программное обеспечение.
Причина 1: Антивирус
Большинство бесплатных антивирусов, при всей своей неспособности перехватывать настоящие вирусы, зачастую блокируют те программы, которые необходимы нам, как воздух. Платные их собратья также иногда грешат этим, особенно знаменитый Касперский.
Для того, чтобы обойти защиту, необходимо отключить антивирус.
Подробнее:
Отключение антивируса
Как отключить Kaspersky Anti-Virus, 360 Total Security, Dr.Web, Avast, Microsoft Security Essentials.
Поскольку таких программ великое множество, то сложно давать какие-либо рекомендации, поэтому обратитесь к мануалу (если есть) или на сайт разработчика ПО. Впрочем, есть одна хитрость: при загрузке в безопасный режим большая часть антивирусов не запускаются.
Подробнее: Как зайти в безопасный режим на Windows 10, Windows 8, Windows XP
Причина 2: Система
В операционной системе Windows 7 (и не только) есть такое понятие, как «права доступа». Все системные и некоторые сторонние файлы, а также ключи реестра заблокированы для редактирования и удаления. Это сделано для того, чтобы пользователь случайно не нанес своими действиями вред системе. Кроме того, такие меры могут защитить от вирусного ПО, которое «нацелено» на эти документы.
Когда у текущего пользователя нет прав на совершение указанных выше действий, любые программы, пытающиеся получить доступ к системным файлам и веткам реестра, не смогут этого сделать, произойдет сбой установки DirectX. Существует иерархия пользователей с разным уровнем прав. В нашем случае достаточно быть администратором.
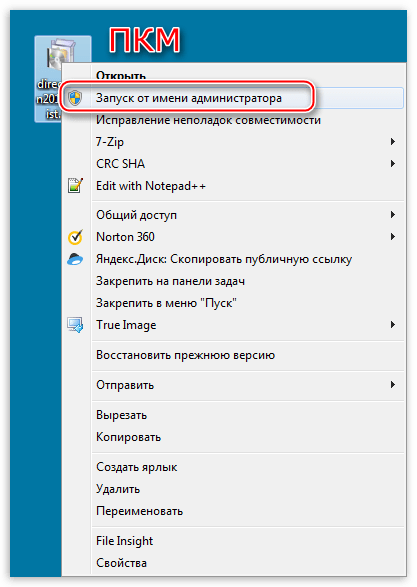
Если Вы единолично пользуетесь компьютером, то, скорее всего, у Вас есть права администратора и нужно просто сообщить ОС, что Вы разрешаете установщику совершать необходимые действия. Сделать это можно следующим способом: вызвать контекстное меню проводника, кликнув ПКМ по файлу инсталлятора DirectX, и выбрать «Запустить от имени администратора».
В том случае, если «админских» прав у Вас нет, то нужно создать нового пользователя и присвоить ему статус администратора, либо дать такие права своей учетной записи. Второй вариант предпочтительнее, поскольку требует совершить меньше действий.
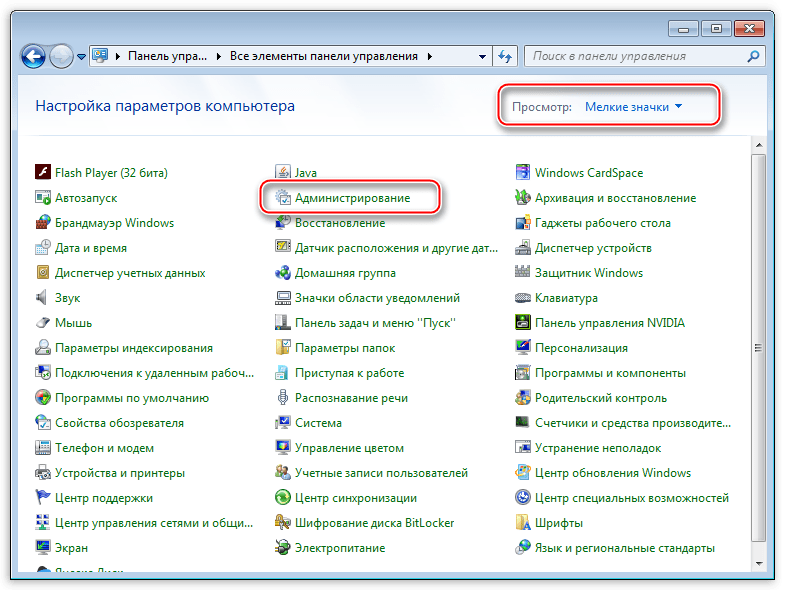
- Открываем «Панель управления» и переходим к апплету «Администрирование».

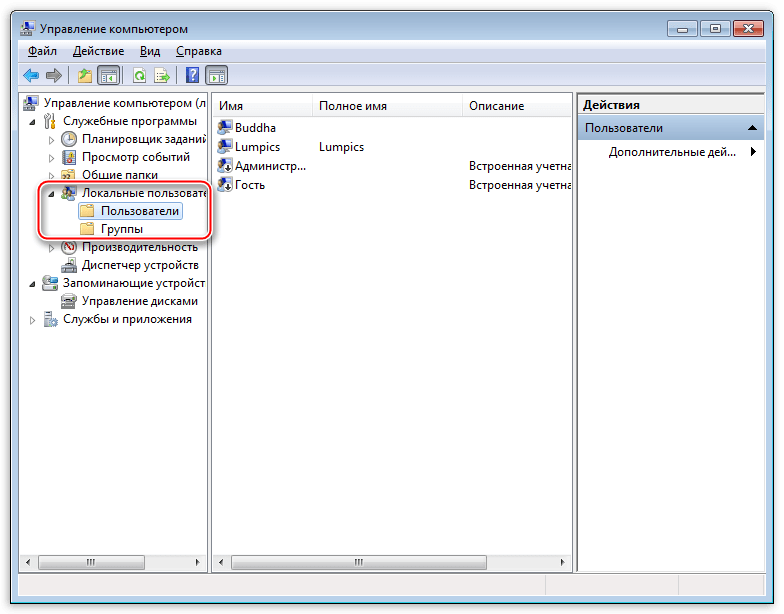
- Далее идем в «Управление компьютером».
- Затем раскрываем ветку «Локальные пользователи» и переходим в папку «Пользователи».

- Дважды кликаем по пункту «Администратор», снимаем галочку напротив «Отключить учетную запись» и применяем изменения.

- Теперь, при очередной загрузке операционной системы мы видим, что в окне приветствия добавился новый пользователь с именем «Администратор». Данная учетная запись по умолчанию не защищена паролем. Кликаем по значку и входим в систему.
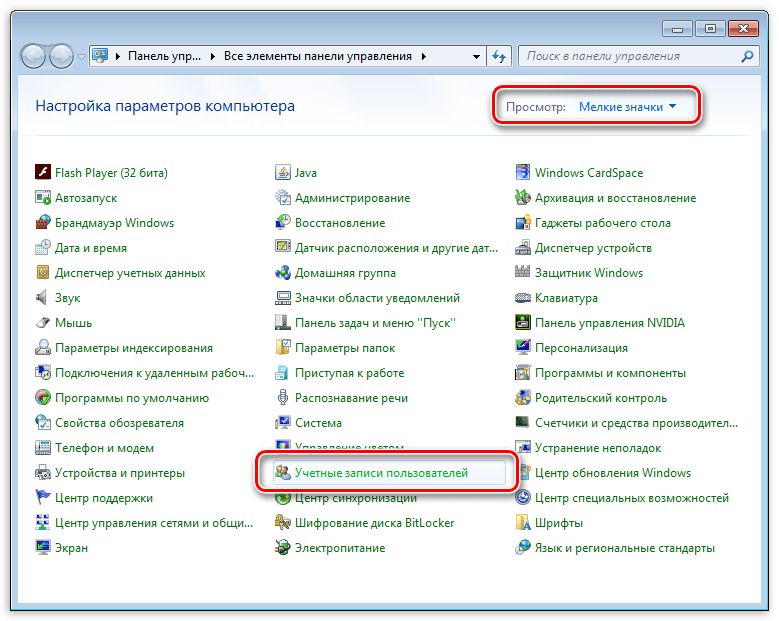
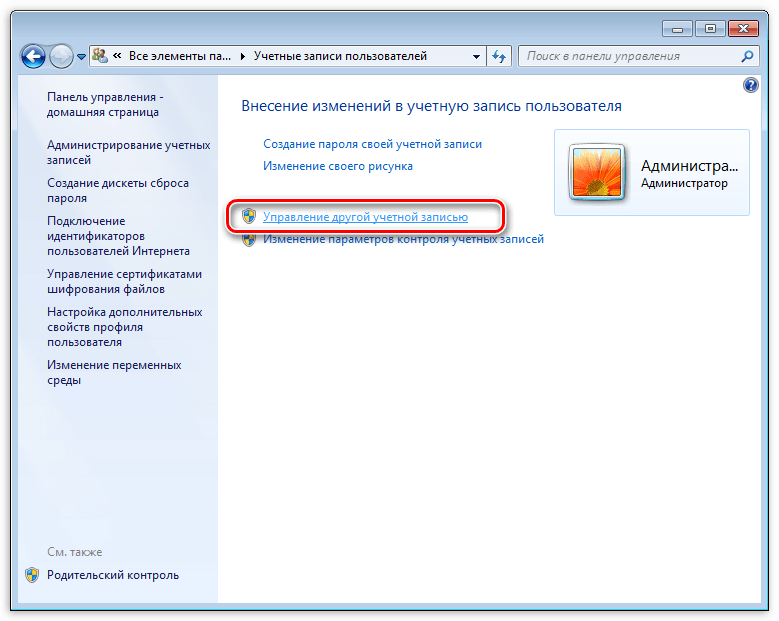
- Снова идем в «Панель управления», но на этот раз переходим к апплету «Учетные записи пользователей».

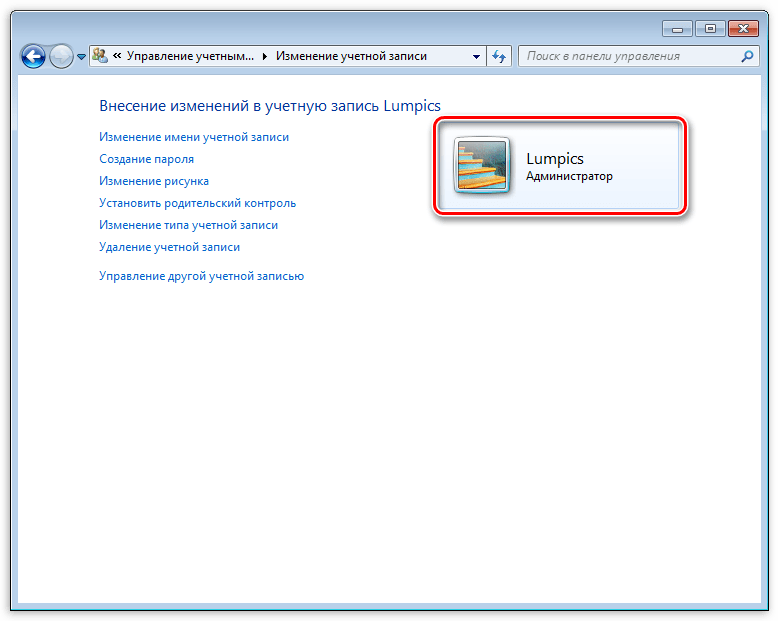
- Далее переходим по ссылке «Управление другой учетной записью».
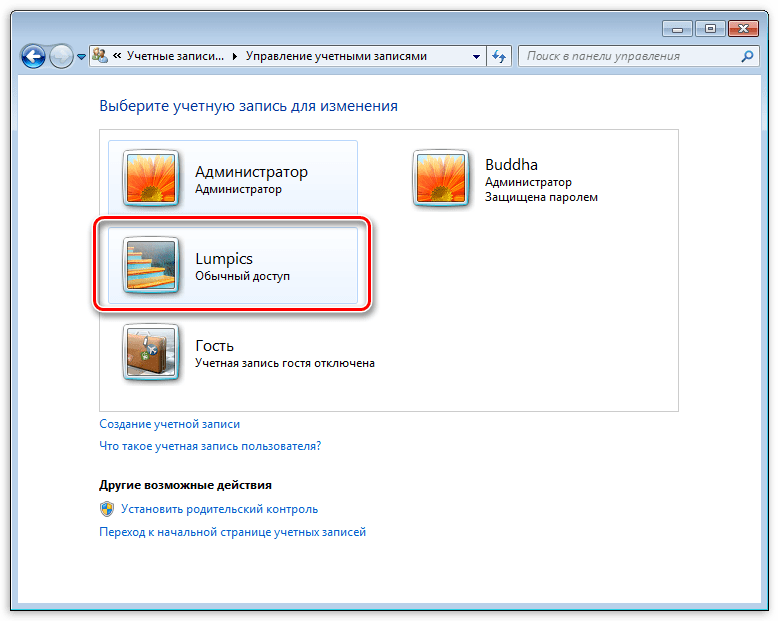
- Выбираем свою «учетку» в списке пользователей.
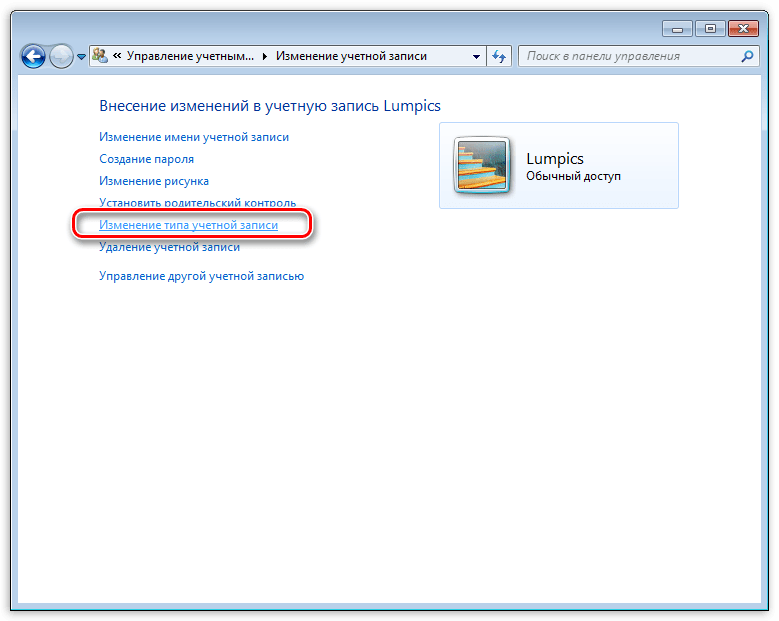
- Идем по ссылке «Изменение типа учетной записи».
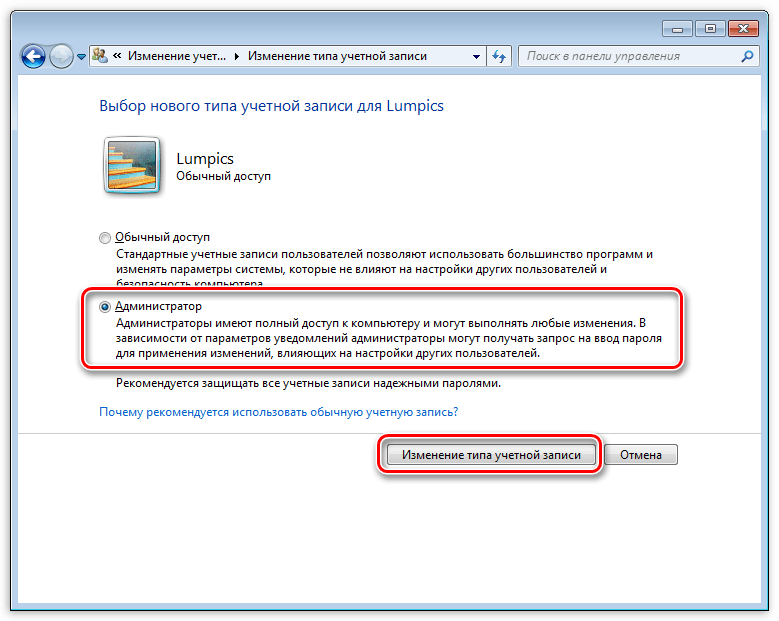
- Здесь переключаемся на параметр «Администратор» и нажимаем кнопку с названием, как в предыдущем пункте.
- Теперь наша учетная запись имеет нужные права. Выходим из системы или перезагружаемся, входим под своей «учеткой» и устанавливаем DirectX.


Обратите внимание, что Администратор имеет исключительные права для вмешательства в работу операционной системы. Это значит, что любое ПО, которое будет запущено, сможет внести изменения в системные файлы и параметры. Если программа окажется вредоносной, то последствия будут весьма печальные. Учетную запись Администратора, после совершения всех действий, необходимо отключить. Кроме того, не будет лишним переключить права для своего пользователя обратно на «Обычные».
Теперь Вы знаете, как действовать, если во время установки DX появляется сообщение «Ошибка настройки DirectX: произошла внутренняя ошибка». Решение может показаться сложным, но это лучше, чем пытаться инсталлировать пакеты, полученные из неофициальных источников или переустанавливать ОС.
Наша группа в TelegramПолезные советы и помощь