
SAP GUI 7.50 and 7.60 Download for Windows
SAP GUI versions 7.50 and 7.60 are free to download from SAP Marketplace only you need to have S-Login and Password.
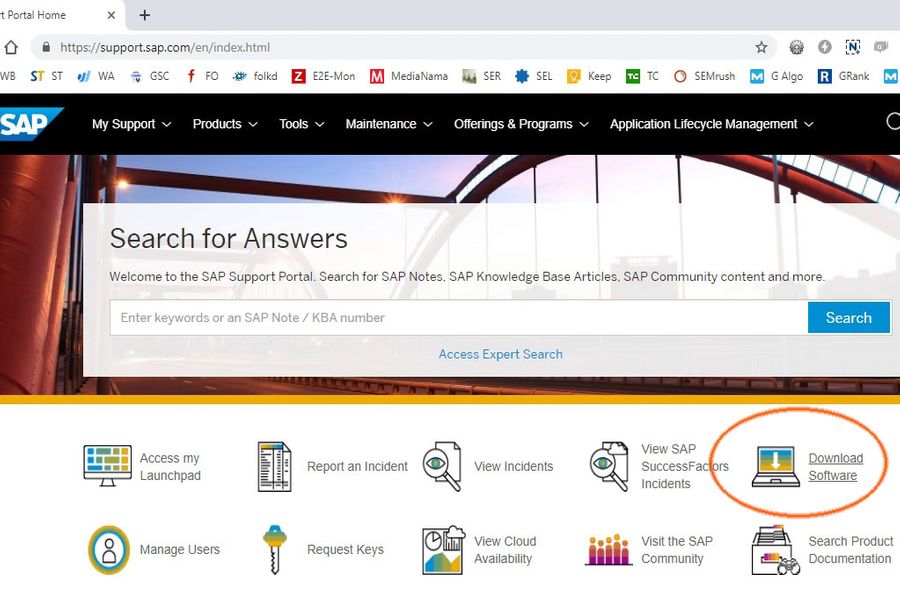
3. Login with S-user and Password provided by SAP.
Software Download Window will open-up
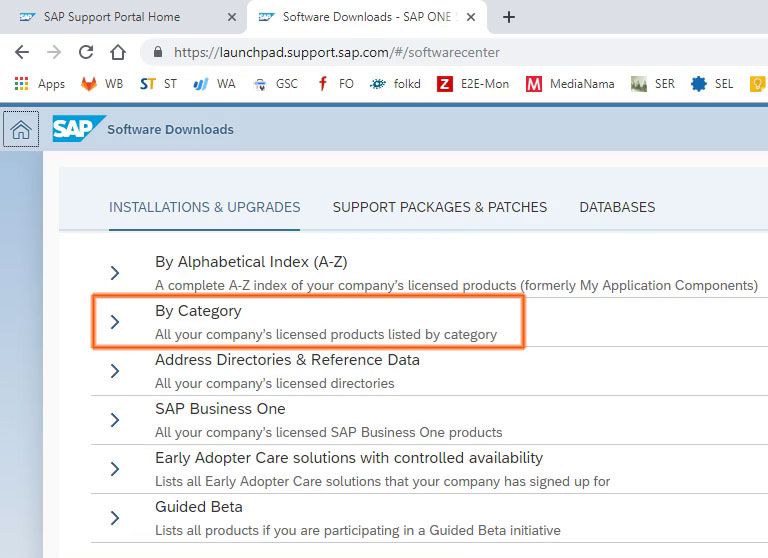
4. Click on “By Category”
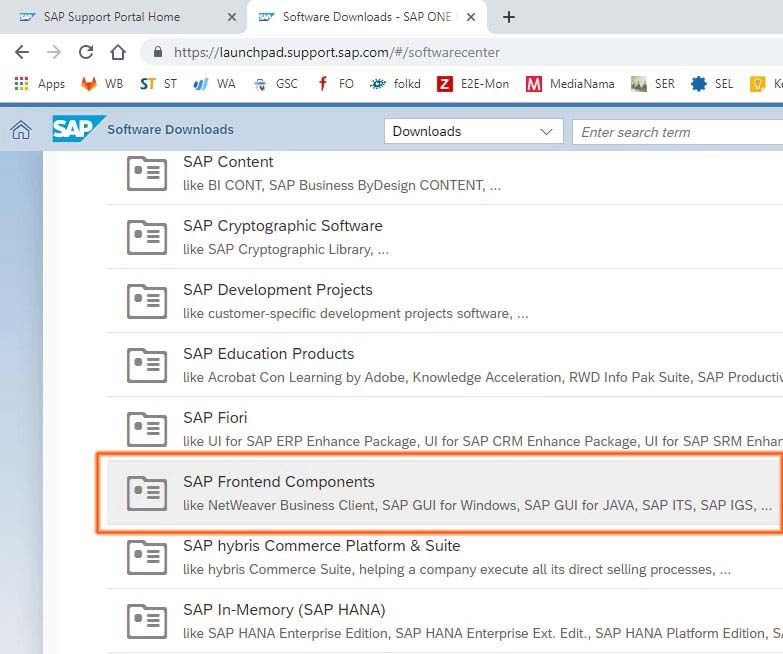
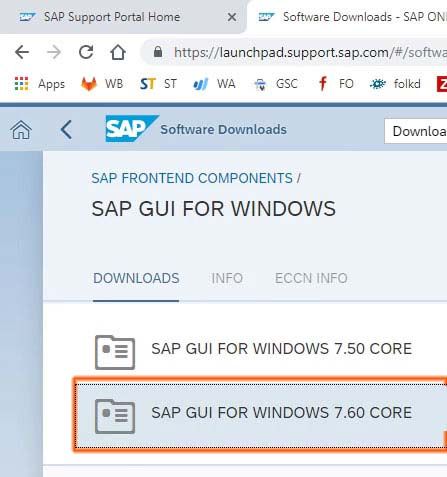
5. Select SAP FRONTEND COMPONENTS
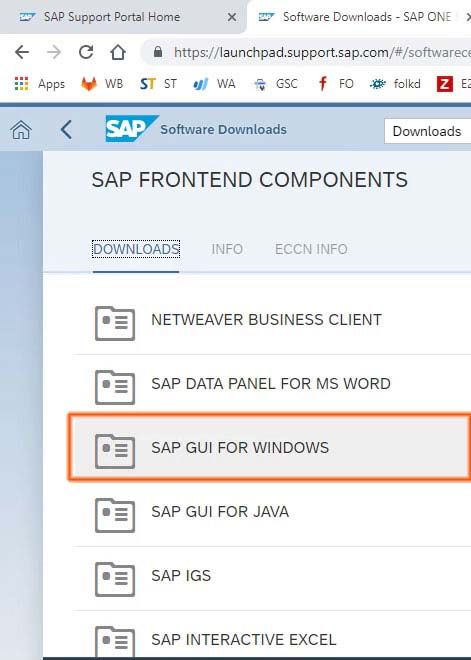
5. Select SAP GUI FOR WINDOWS
6. Select SAP GUI FOR WINDOWS 7.6.0 CORE or 7.5.0 CORE as per as your requirement (Here we are downloading SAP GUI 7.6 version)
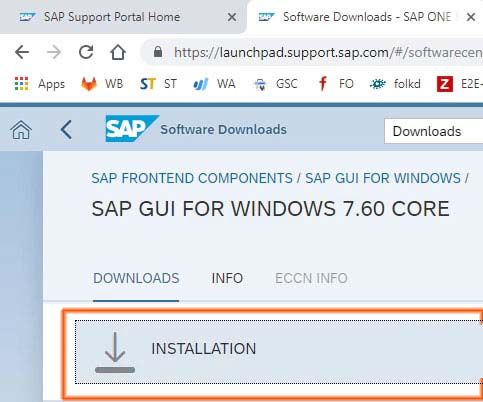
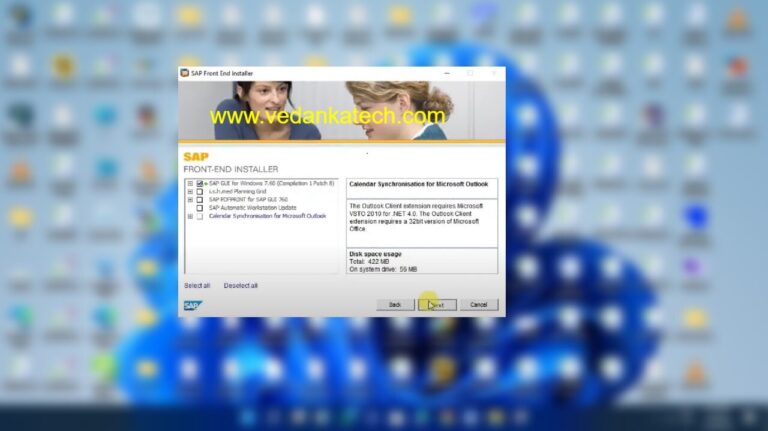
8 Select INSTALLATION
9 Select “50148617_6” to start download
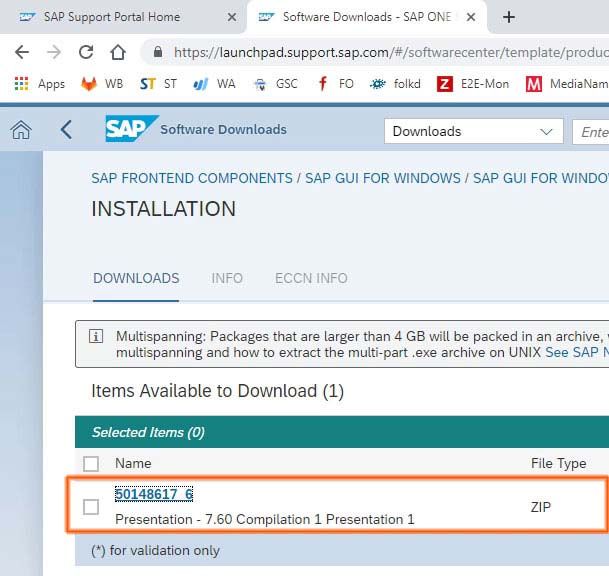
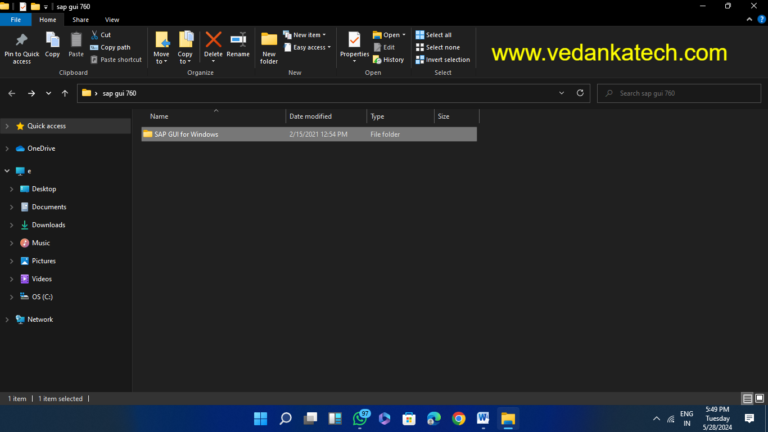
Now the SAP GUI 7.6 will be download in a zip file.
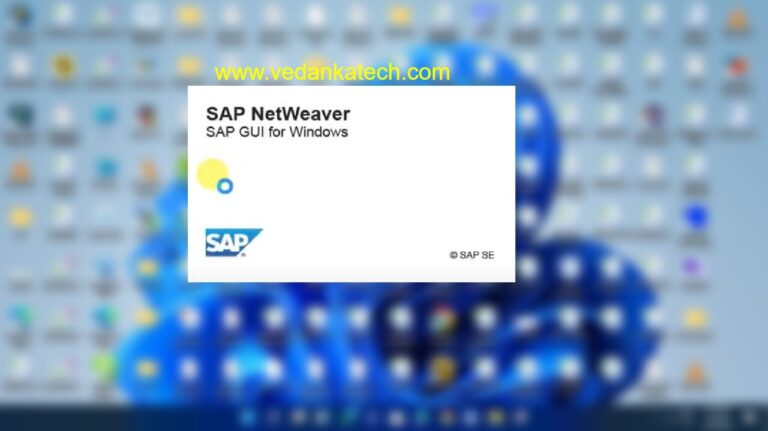
SAP GUI Installation
1. Extract the zip file in which SAP GUI 7.6 is downloaded.
2. Go to the folder location
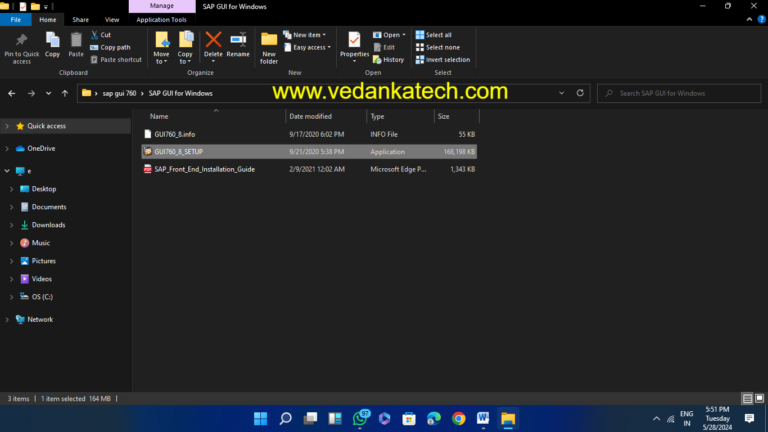
50148617_6 (1) >> BD_NW_7.0_Presentation_7.60_Comp._1_ >> PRES1 >> GUI >> WINDOWS >>Win32
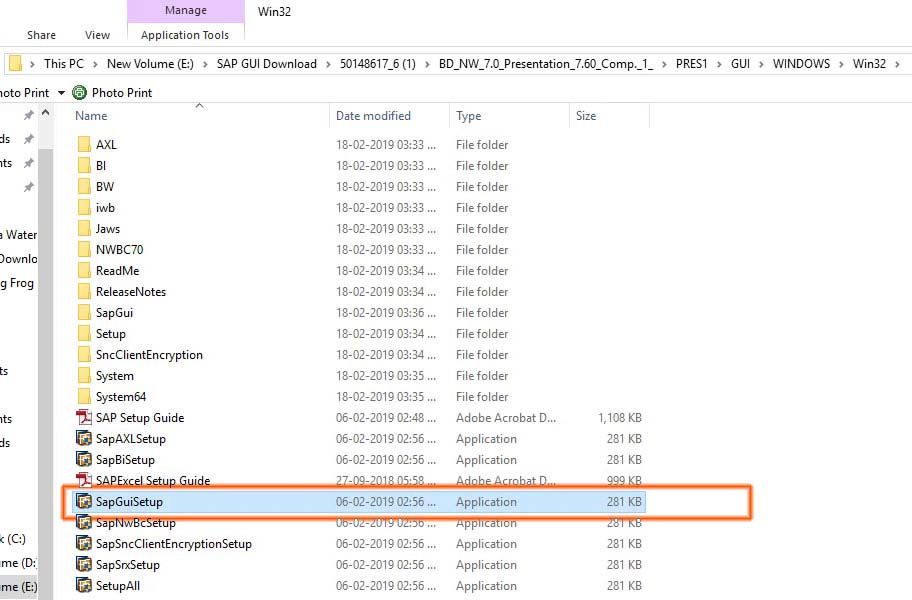
3. Double click on SapGuiSetup.exe
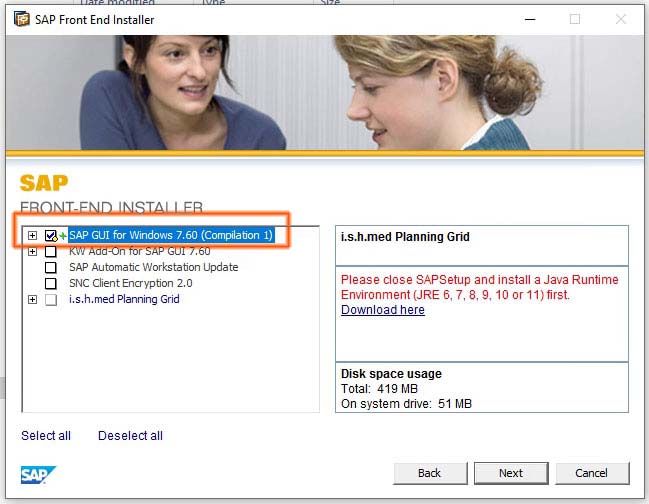
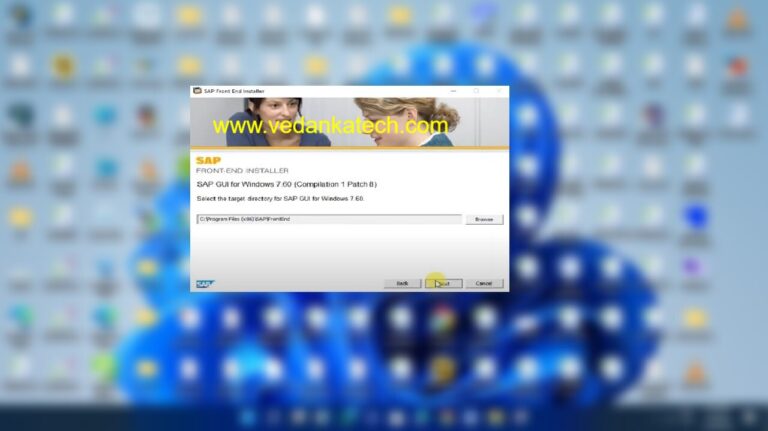
4. Select SAP GUI for Windows 7.60 and click on Next to start the installation
Configure SAP GUI for Application Server
Once you have downloaded and installed the software now we need to configure it-
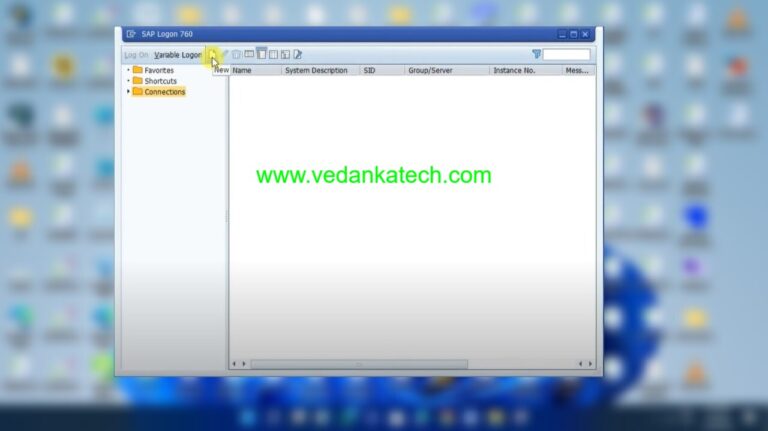
1. Click on Create icon and select Connection as shown in the figure below:

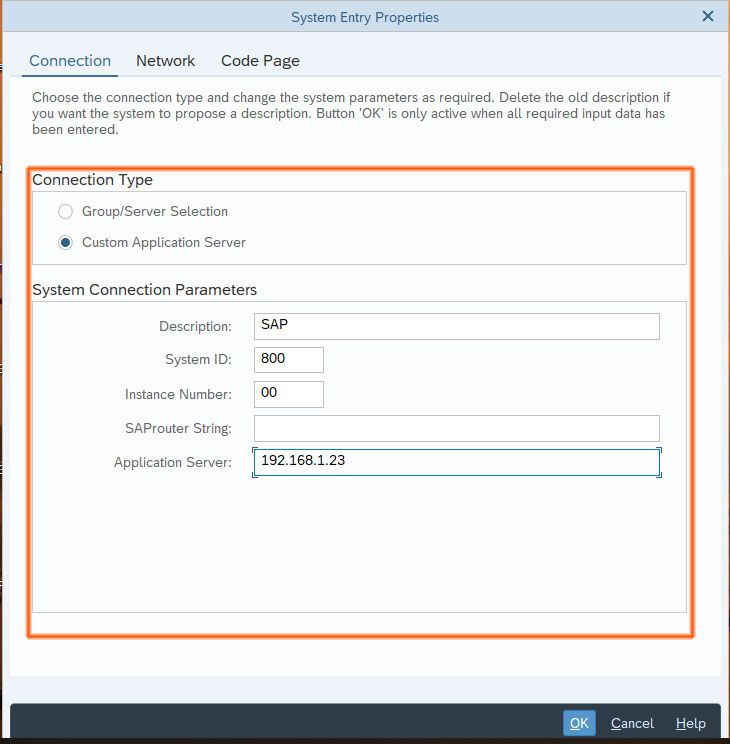
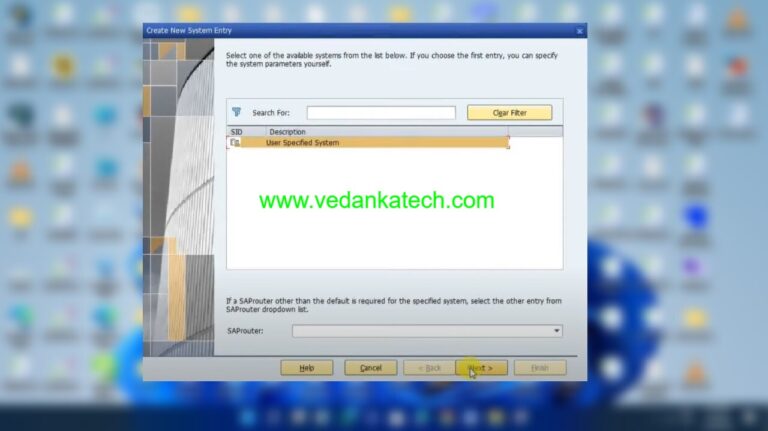
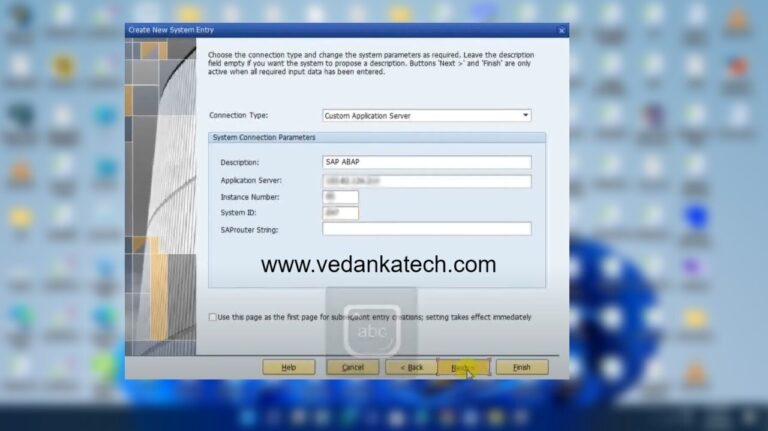
2. Fill Application Server details and click on OK button
- Connection Type: Custom application server
- Description: Name of the application server instance
- System ID: SAP application server ID provided at the time of installation
- Instance number: Instance number of the application server can be found at “/usr/sap/sid/DVEBGMS00” where the last two digits are instance number
- Application Server: — IP address of application server
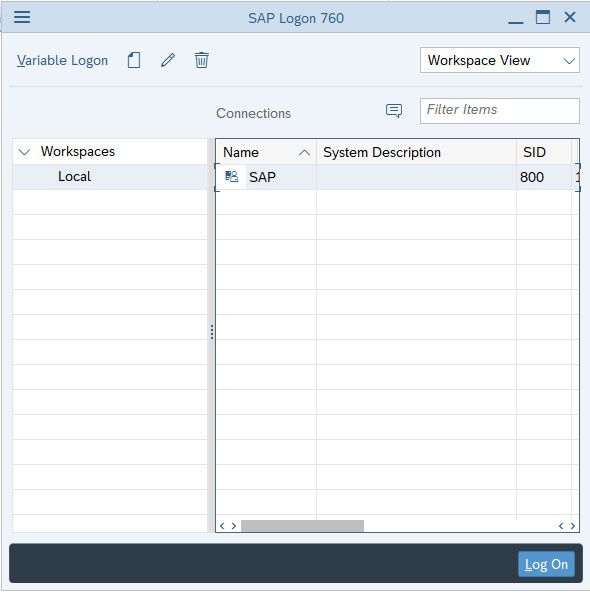
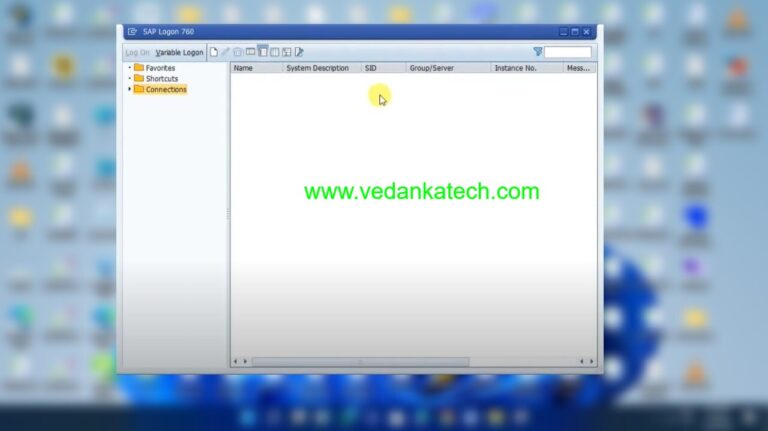
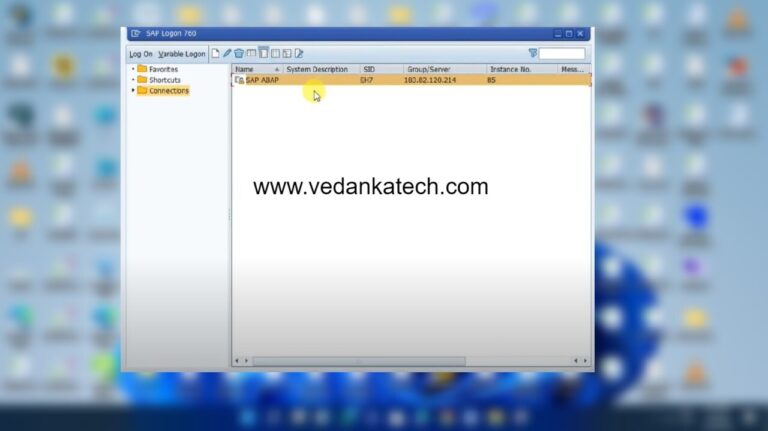
3. The created system will be listed on SAP GUI Logon PAD
Next: Create SAP Logon Shortcut
Video
In this article I’ll show you:
1. How to install SAP Frontend or SAP GUI on Windows.
2. How to configure SAP GUI/SAP Logon entries.
SAP GUI is used in the presentation layer as sap user interface to R/3 application server.
In this example I use SAP GUI version 7.20. Before installing SAP GUI, You download latest version of SAP GUI 7.20 base software and patch from SAP Marketplace and extract in your local folder. I use windows operating system as the example here.
Here are the steps for installing SAP GUI 7.20.
1. Locate to your extract folder and call SAPGUISetup.exe (run as administrator).
| Installing SAP GUI 7.20 |
2. Wait until initial screen come.

|
| Initial screen SAP GUI 7.20 installer |
3. Choose the components you want to install.

You can see detailed component usage on the right column.

4. Locate the installation folder and next.

|
| Installation folder SAP GUI 7.20 |
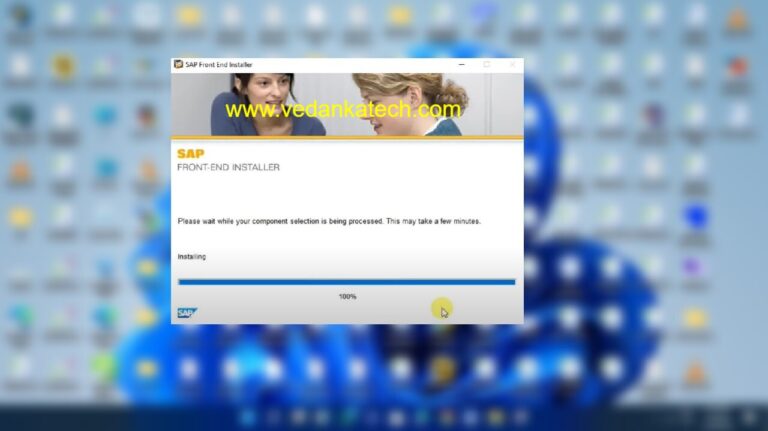
5. The installation will continue.

|
| Installation in progress SAP GUI version 7.20 |
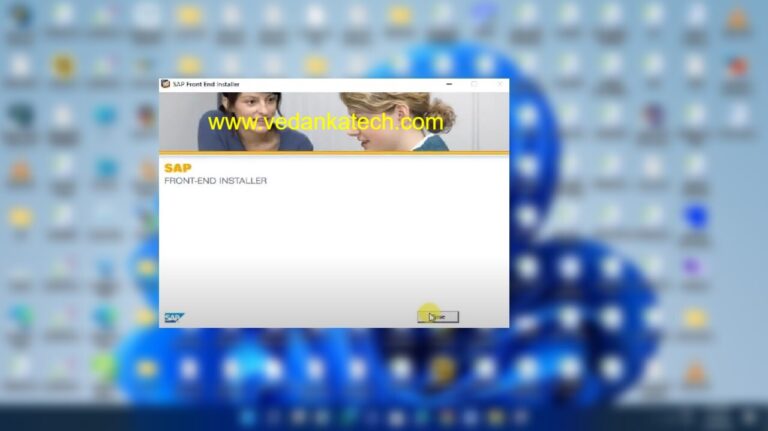
6. Wait until installation is finished.
|
| Installation SAP GUI finish |
Now you’re ready for the following:
How to Configure SAP Logon Entries:
1. Call your SAP Logon icon.
2. Choose add entry,

3. And enter the following information.
Description: the description of your SAP System
Application Server: IP Address or your hostname of your SAP Application Server.
Instance Number: Your SAP system number when installing SAP Dialog Instance or Central Instance.

|
| Configuring SAP Logon entries |
Using SAP Logon Group.
Before using this feature you have to setup SAP Logon Group as described in article Distributing SAP User using Logon Group.
To use a SAP Logon Group choose Connection Type Group/Server Selection.
Message Server is your IP Address of your SAP Central Instance.

|
| Configuring SAP Logon entries |
4. On next screen choose your LAN option.
if you’re connected in LAN you can choose High Speed Connection.
but if you’re in WAN, better you choose Low Speed Connection.

|
| SAP GUI connection option |
5. Choose Default for the following option.

|
| SAP Logon option |
6. Your SAP Logon entries is ready to use.

|
| Configuring SAP Logon entries |
You can change more SAP GUI setting using this shortcut.
1. You’ll be show Screen Option to change your SAP GUI appearance.

|
| Change SAP GUI appearance |
2. Choose you option you want to change

|
| SAP GUI appearance option. |
For complete SAP GUI tutorial you can download in Installation Guide section in SAP Market place.
More information about SAP GUI installation also available in this book:
 SAP Administration - Practical Guide.
To install the SAP Logon 750, follow below SAP installation steps: Download and unzip the installer,
How to install SAP GUI 750
To install the SAP Logon 750, follow below SAP installation steps:
- Download and unzip the installer,
- Start the installer SetupAll,
- Follow the installer wizard instructions,
- Reboot computer,
- Repeat operation with patch file,
- Start SAP logon,
- Add server in SAP 750 server list.
See below in detail these steps explained with screenshots.
If you are looking for a SAP front end installer to download, or a SAP IDES access, check the excellent Michael Management Corporation.
SAP front end installer and IDES SAP access for practice
The first step is to download the corresponding files, which must be an installer and a patch. The files are taking more than 1 gigabyte of disk space when compressed, therefore make sure that you have enough space and a good enough connection before download and install.
Once downloaded, start unzipping the file by right clicking on the archive in the file explorer.
Select the folder in which the files should be extracted. Make sure that at least 2 gigabytes of disk space is available for the whole files to be extracted.
The compressed archive unzipping will take some time, as there are nearly 2 gigabytes of data to create.
Start the installer SetupAll
Once the archive has fully been extracted, navigate to the folder SAP install folder > PRES1 > GUI > WINDOWS > WIN32 > SetupAll.exe and run the executable file to start the SAP GUI 750 installation.
Follow the installer wizard instructions
The SAP GUI installer wizard will guide you through the installation.
Start by clicking next.
The second screen will let you select which components have to be installed. Make sure to select the SAP GUI for Windows 7.40 and the install SAP GUI desktop icon / shortcuts.
Make sure the disk space mentioned in the installer is available on the disk.
After that, select an installation folder, which is by default the program files folder. It is necessary to have at least a gigabyte of free space, and maybe more depending on the options selected in the wizard.
Another screen will ask for NetWeaver installation directory, it can be left as default.
And the same will be requested for the Business Explorer installation.
The SAP GUI components will be installed on your computer, operation that might take some time, depending on the computer capabilities.
Once the installation is complete, however, do not start right away with SAP, and remember first to install the latest patch for the GUI version.
A reboot will be requested right away by the SAP installer. Do not hesitate to do it right now, otherwise it will be requested again before starting the next operation, the patch installation.
Repeat operation with patch file
The same operations have to be followed in order to install the SAP patch corresponding to the GUI version. However, the file size is much smaller, with 152MB for the archive. Start by unzipping the compressed file on the computer.
The patch folder will only include one executable file, that can be executed directly.
Once the installation of the patch file has been completed, you can safely leave the installer.
Start SAP logon
Back on the desktop after the SAP GUI 750 installation, the SAP Logon icon should be available on Windows quick start menu.
You can now open the SAP 750 GUI interface, add server in SAP 750, and start a new SAP session.
If you need a SAP system for your trial or training, and access excellent training, see below for an access to a Michael Management Corporation environment. SAP access can be acquired for as low as 99$/month, and they work great.
You will not be able to find a free SAP server access for practice, as it doesn’t exist but you can rent one at below link for as long as you need.
SAP front end installer and IDES SAP access for practice
How to download and install SAP GUI for MAC OS and Linux?
There is no SAP MAC OS or SAP Linux native version existing, but there is a good way to install SAP GUI for MAC OS or Linux using the SAP JAVA GUI, which will work on MAC OS as the SAP GUI version.
Start by the SAP GUI MAC OS X download called the SAP JAVA GUI, which you can get as one of the SAP online system available.
Then, simply follow the instructions for the SAP system installation of the SAP JAVA GUI for SAP MAC OS X or for SAP Linux, until you are able to run the SAP GUI on your local system using the SAP JAVA GUI!
After you’ll have finished to download SAP GUI for Java all you have to do is to install the SAP JAVA GUI and access your SAP system from the Java interface – Java being a multi-platform language that allows for programs to be launched on any platform that supports the Java language.
How to Install the SAP GUI: SAP GUI for Java PC/Windows, MAC/iOS and even Linux
SAP GUI guide: questions and answers
- Can I install SAP on Windows 10?
- Yes, you can install SAP GUI on Windows 10. Start by the SAP GUI download and installation, and add your SAP servers to the list.
- Can I learn SAP online?
- Yes, you can learn SAP online by following the Learning Path that matches your professional aspiration, such as becoming a SAP financial consultant or working as an SAP Ariba specialist in procurement – there are hundreds of Learning Path available for you to learn!
- Can I learn SAP on my own?
- You can definitely learn SAP on your own by following the Learning Path corresponding to your professional aspirations. There are thousands of courses to learn SAP online on your own.
- Does SAP GUI require Java?
- The SAP GUI interface only requires JAVA for MAC OS or Linux installations.
- How can I install SAP for free?
- You can install the SAP GUI for free. However, you will need a SAP system access to be able to use that SAP GUI as it must connect to a SAP server.
- How do I download SAP GUI for Windows 750?
- Get a SAP front end installer and install it on your local Windows system.
- How do I download SAP GUI?
- Simply get a SAP front end installer to perform a SAP GUI download and installation on your computer.
- How do I install SAP GUI on Windows 10?
- To install SAP GUI on Windows 10 you should get a SAP front end installer and perform the required installation steps.
- How does SAP GUI work?
- The best way to make the most of your SAP GUI is to follow a SAP GUI training online.
- How hard is it to learn SAP?
- It can be simple to learn SAP online by following the right Learning Path that matches your upskilling aspirations. Usually within a week of training you can get a certificate and be able to work on SAP; the most difficult part is to get experience and to understand the industry basics behind the SAP best practices that you will learn on the SAP courses.
- Is SAP GUI free?
- Yes, SAP GUI download and installation is free, however you must have a SAP IDES access or other SAP server access to be able to use the SAP GUI.
- SAP GUI installation
- How to download SAP GUI? Simply get the SAP front end installer and execute the installation steps on your computer.
- What protocol does SAP GUI use?
- SAP GUI uses the TCP/IP protocol, and all you need to use it is an IP address from a computer connected to the Internet to access a SAP server that is usually remotely hosted.
- Which SAP course is best?
- Depending on the Learning Path that you intend to follow, the best SAP course for your target skills might be very different. It is most important to choose the right training to learn SAP online with the best courses.
- Which is better CLI or GUI?
- To access SAP it will surely be better to use a GUI (Graphical User Interface) than a CLI (Command Line Interface) to view your invoices and other SAP documents!
Frequently Asked Questions
- How to start login after installing SAP GUI 750?
- Back on the desktop after installing the SAP GUI 750, the SAP logon icon should appear in the Windows Quick Launch menu. You can now open the SAP 750 GUI, add a server to SAP 750, and start a new SAP session.
- What are the differences in the installation process between SAP GUI 740 and 750?
- Key differences in installation may include updated software requirements and enhanced security features in SAP GUI 750.
How To Install SAP GUI 750 On Windows 10
Установка SAP GUI for Windows
Доброго времени суток, Коллеги. Сегодня я хочу рассмотреть такую тему как установку SAP GUI for Windows на локальный компьютер. Данное приложение позволяет осуществлять доступ к различным системам SAP в рамках корпоративной сети (и не только). В данной статье я отвечу на следующие вопросы:
- Как и где скачать SAP GUI for Windows ?
- Как установить SAP GUI for Windows ?
- Какие есть настройки в SAP GUI for Windows ?
- Как создать подключение к SAP ?
Я считаю, что проще всего искать необходимые приложения по алфавиту (рисунок 1):
| Рисунок 1. SAP software center |
Далее выбираем букву «G» и затем выбираем вкладку «SAP GUI FOR WINDOWS» (рисунок 2):
| Рисунок 2. Выбор версии SAP GUI |
Note: Если вы используете MAC OS, то необходимо скачивать SAP GUI FOR JAVA
Далее выбираем версию SAP GUI, которую необходимо скачать (Обычно доступна только самая последняя версия). Выбираем INSTALLATION и скачиваем дистрибутив просто нажав на него левой кнопкой мыши. Скорее всего всплывёт окно, где будет необходимо повторно ввести имя своего S-user и пароль. Поздравляю! Мы скачали наш SAP GUI!
После того, как мы скачали SAP GUI for Windows, необходимо выполнить его установку на наш компьютер. Для этого переходим в папку, куда скачан SAP GUI и переходим в папку C:\Downloads\50148617_6\BD_NW_7.0_Presentation_7.60_Comp._1_\PRES1\GUI\WINDOWS\Win32
В этой папке запускаем файл SetupAll.exe.
На экране установщика выбираем программу SAP GUI for Windows и жмём далее до конца (рисунок 3), остальные настройки опциональны:
| Рисунок 3. Окно установщика |
Итак, SAP GUI установлен! После завершения установки, можно запустить приложение SAP Logon (рисунок 4):
| Рисунок 4. SAP Logon |
Для того, чтобы настроить программу, необходимо нажать значок вверху окна рядом с надписью SAP Logon 760 и нажать кнопку «Опции…» (рисунок 5):
| Рисунок 5. Настройки SAP Logon |
Появятся несколько разделов настроек SAP Logon. Нажав на каждую вкладку, мы получим описание данного раздела настроек, поэтому рассматривать каждую группу не имеет смысла (рисунок 6):
| Рисунок 6. Настройки SAP Logon |
Для того, чтобы добавить систему в список SAP Logon, необходимо нажать правую кнопку мыши на свободное место в области списка доступных систем и нажать кнопку «Добавить новую запись» или нажать Ctrl + N. В появившемся окне необходимо заполнить следующие поля (рисунок 7):
| Рисунок 7. Настройка подключения к SAP |
Описание: Любое описание системы, чтобы разделять несколько подключений между собой
Сервер приложений: существующее имя сервера (DNS-имя или IP адрес)
Номер инстанции: существующий номер инстанции
ИдСистемы: определённый ID системы
Далее нажимаем кнопку «Готово». Подключения к SAP успешно настроено! На этом статья по настройке SAP Logon завершена.
Большое спасибо за внимание!
Следите за выходом новых статей в телеграм-канале: t.me/sapbasisjr
6 Columns with Active Background
24GUI0807 – A Guide to install and access SAP Logon / Upgrade SAP GUI
A Guide to install and access SAP Logon / Upgrade SAP GUI
SAP Logon serves as the portal to the vast world of SAP ECC (ERP Central Component), enabling seamless access to crucial business processes and data. In this blog, we’ll unravel the essence of SAP Logon and guide you through the installation and access process, empowering you to harness the full potential of SAP ECC effortlessly.
Understanding SAP Logon
SAP Logon is the doorway to SAP systems, providing users with a user-friendly interface to connect to various SAP environments. It simplifies access to SAP ECC, allowing users to execute transactions, run reports and manage business operations seamlessly.
Step-by-Step Installation Guide
- Preparing for Installation
Before diving into the installation process, ensure that your system meets the necessary requirements and procure the SAP GUI software from authorized sources.
- Installation Process
Download SAP GUI: Access the SAP GUI installer package from the SAP Service Marketplace or your SAP administrator.
Run the Installer: Extract the downloaded files and run the setup.exe file to initiate the installation process.
Follow the Wizard: Navigate through the installation wizard, selecting preferred language, accepting the license agreement, choosing installation components and specifying the installation directory.
Completion: Upon successful installation, finalize the process and launch SAP Logon from the Start menu or desktop.
3. Configuring SAP Logon for ECC Access
Adding a New Connection: Within SAP Logon, create a new connection by clicking the “New” button and selecting “User Specified System.”
Enter Connection Details: Provide a descriptive name for the connection and input the ECC system’s hostname or IP address, instance number, and System ID (SID).
Configure Connection Options: Review the connection details and save the configuration.
4. Accessing SAP ECC
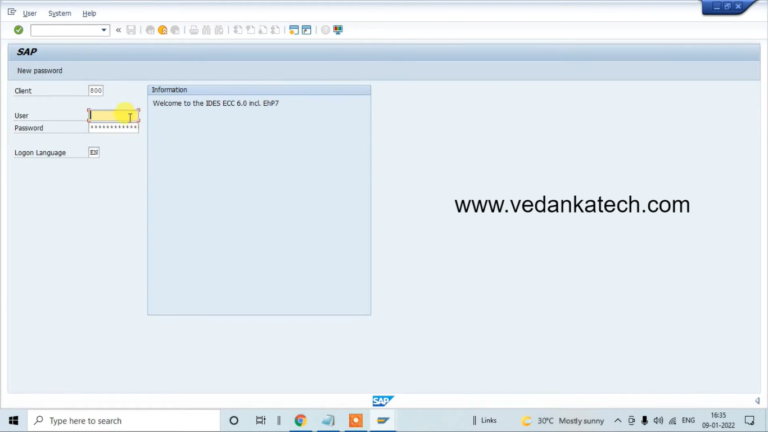
Select the New Connection: Locate the newly created connection in SAP Logon and double-click to initiate the login process.
Enter User Credentials: Input the client number, SAP username, password, and preferred language.
Log In: Confirm the credentials and log in to SAP ECC, gaining access to the SAP Easy Access screen.
Navigating SAP ECC Interface
Upon successful login, acquaint yourself with the SAP ECC interface, comprising the menu bar, toolbars, and the SAP Easy Access menu. Explore the hierarchical structure of transactions and reports to streamline your operations within SAP ECC.
Author : Aniket Pawar, 9373518385
24GUI0807 – A Guide to install and access SAP Logon / Upgrade SAP GUI
A Guide to install and access SAP Logon / Upgrade SAP GUI
SAP Logon serves as the portal to the vast world of SAP ECC (ERP Central Component), enabling seamless access to crucial business processes and data. In this blog, we’ll unravel the essence of SAP Logon and guide you through the installation and access process, empowering you to harness the full potential of SAP ECC effortlessly.
Understanding SAP Logon
SAP Logon is the doorway to SAP systems, providing users with a user-friendly interface to connect to various SAP environments. It simplifies access to SAP ECC, allowing users to execute transactions, run reports and manage business operations seamlessly.
Step-by-Step Installation Guide
- Preparing for Installation
Before diving into the installation process, ensure that your system meets the necessary requirements and procure the SAP GUI software from authorized sources.
- Installation Process
Download SAP GUI: Access the SAP GUI installer package from the SAP Service Marketplace or your SAP administrator.
Run the Installer: Extract the downloaded files and run the setup.exe file to initiate the installation process.
Follow the Wizard: Navigate through the installation wizard, selecting preferred language, accepting the license agreement, choosing installation components and specifying the installation directory.
Completion: Upon successful installation, finalize the process and launch SAP Logon from the Start menu or desktop.
3. Configuring SAP Logon for ECC Access
Adding a New Connection: Within SAP Logon, create a new connection by clicking the “New” button and selecting “User Specified System.”
Enter Connection Details: Provide a descriptive name for the connection and input the ECC system’s hostname or IP address, instance number, and System ID (SID).
Configure Connection Options: Review the connection details and save the configuration.
4. Accessing SAP ECC
Select the New Connection: Locate the newly created connection in SAP Logon and double-click to initiate the login process.
Enter User Credentials: Input the client number, SAP username, password, and preferred language.
Log In: Confirm the credentials and log in to SAP ECC, gaining access to the SAP Easy Access screen.
Navigating SAP ECC Interface
Upon successful login, acquaint yourself with the SAP ECC interface, comprising the menu bar, toolbars, and the SAP Easy Access menu. Explore the hierarchical structure of transactions and reports to streamline your operations within SAP ECC.
Author : Aniket Pawar, 9373518385