
Все способы:
- Способ 1: Включение Windows Sandbox
- Способ 2: Активация виртуализации
- Способ 3: Переустановка компонентов Microsoft Visual C++
- Дополнительные решения проблемы
- Вопросы и ответы: 1
Способ 1: Включение Windows Sandbox
«Песочница» в Windows 10 представляет собой временную среду с рабочим столом для изолированного запуска сторонних приложений. По умолчанию она доступна только в таких редакциях, как Windows 10 Pro и Enterprise, но при желании ее можно активировать и в Домашней редакции операционки. Для этого потребуется специальный скрипт, за счет которого встроенная утилита DISM установит все необходимые программные компоненты в систему.
Перед тем как переходить к включению «Песочницы» через скрипт, отметим, что процедура не всегда завершается успешно, и гарантировать полную работоспособность невозможно. Лучше предварительно создать точку восстановления, чтобы была возможность откатить состояние системы в случае непредвиденных обстоятельств.
Подробнее:
Инструкция по созданию точки восстановления Windows 10
Откат к точке восстановления в Windows 10
Если ранее виртуальная среда уже включалась, то это могло произойти не совсем правильно, отчего возникают проблемы с использованием функции. Ниже мы предлагаем руководство по созданию скрипта, который должен работать:
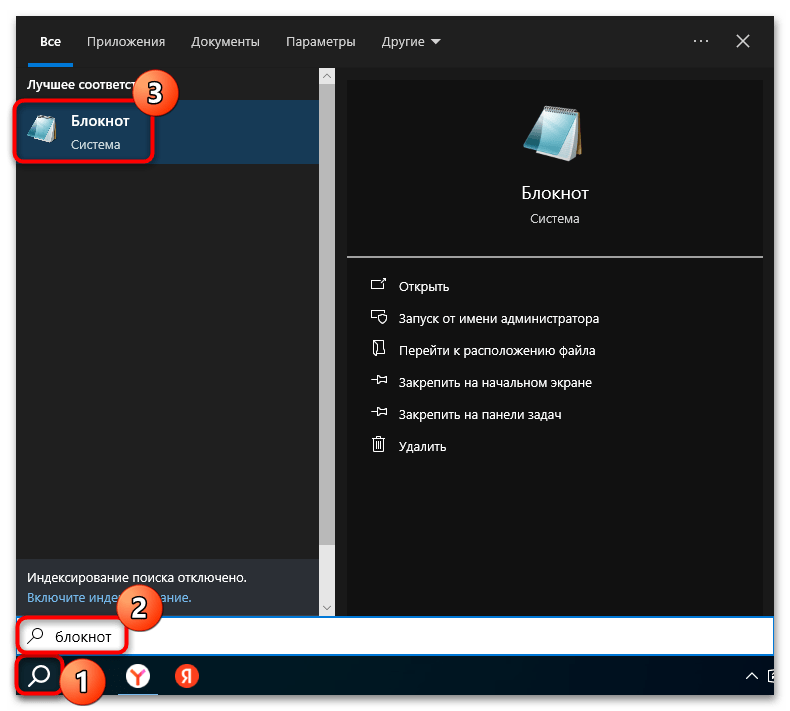
- Запустите встроенный «Блокнот». Найти его можно в главном меню или с помощью строки системного поиска.
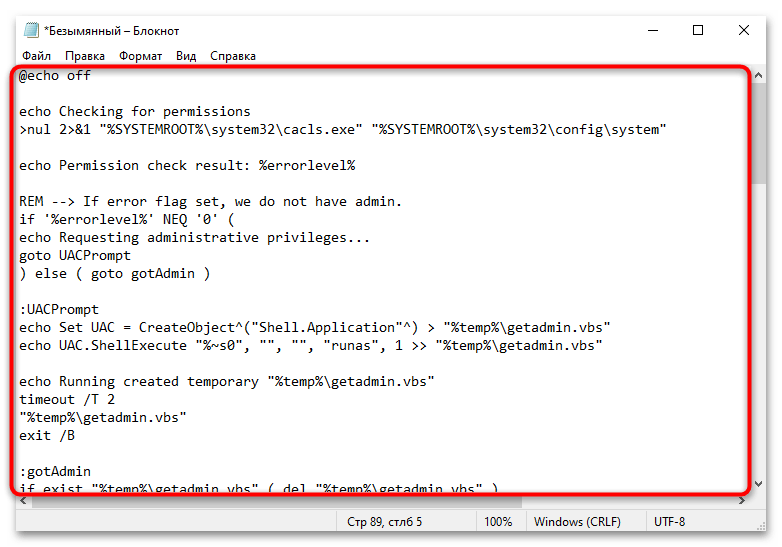
- В окне редактора вставьте такое содержимое:
@echo off

echo Checking for permissions

>nul 2>&1 "%SYSTEMROOT%\system32\cacls.exe" "%SYSTEMROOT%\system32\config\system"

echo Permission check result: %errorlevel%

REM --> If error flag set, we do not have admin.

if '%errorlevel%' NEQ '0' (

echo Requesting administrative privileges...

goto UACPrompt

) else ( goto gotAdmin )

:UACPrompt

echo Set UAC = CreateObject^("Shell.Application"^) > "%temp%\getadmin.vbs"

echo UAC.ShellExecute "%~s0", "", "", "runas", 1 >> "%temp%\getadmin.vbs"

echo Running created temporary "%temp%\getadmin.vbs"

timeout /T 2

"%temp%\getadmin.vbs"

exit /B

:gotAdmin

if exist "%temp%\getadmin.vbs" ( del "%temp%\getadmin.vbs" )

pushd "%CD%"

CD /D "%~dp0"

echo Batch was successfully started with admin privileges

echo .

cls

GOTO:menu

:menu

Title Sandbox Installer

echo Select Action

echo 1 Install

echo 2 Uninstall

echo 3 Exit

set /p uni= Enter your option:

if %uni% ==1 goto :in

if %uni% ==2 goto :un

if %uni% ==3 goto :ex

:in

cls

Title Install Sandbox

pushd "%~dp0"

dir /b %SystemRoot%\servicing\Packages\*Containers*.mum >sandbox.txt

for /f %%i in ('findstr /i . sandbox.txt 2^>nul') do dism /online /norestart /add-package:"%SystemRoot%\servicing\Packages\%%i"

del sandbox.txt

Dism /online /enable-feature /featurename:Containers-DisposableClientVM /LimitAccess /ALL /NoRestart

goto :remenu

:un

cls

Title Uninstall Sandbox

pushd "%~dp0"

Dism /online /disable-feature /featurename:Containers-DisposableClientVM /NoRestart

dir /b %SystemRoot%\servicing\Packages\*Containers*.mum >sandbox.txt

for /f %%i in ('findstr /i . sandbox.txt 2^>nul') do dism /online /norestart /remove-package:"%SystemRoot%\servicing\Packages\%%i"

del sandbox.txt

goto :remenu

:remenu

cls

echo Restart computer?

echo 1 Yes

echo 2 No

set /p uni= Input 1 or 2:

if %uni% ==1 goto :re

if %uni% ==2 goto :ex

:re

shutdown /r /t 0 /f

goto :ex

:ex
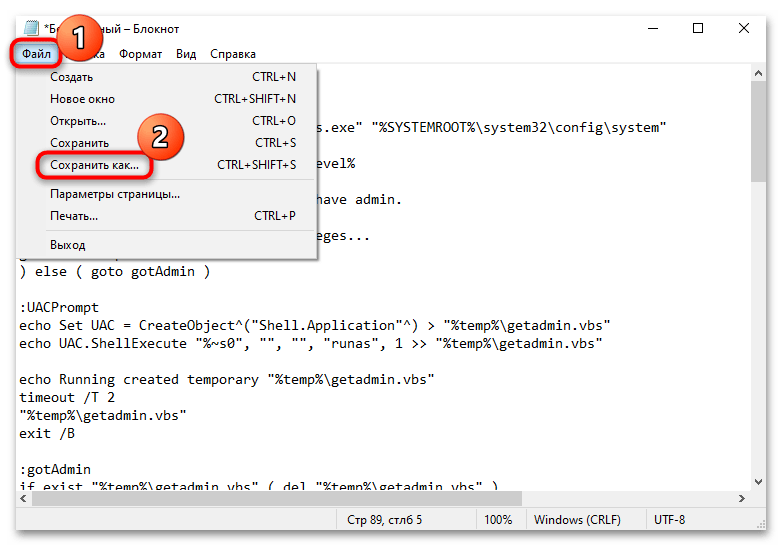
exit - Кликните по вкладке «Файл» в «Блокноте», затем выберите пункт «Сохранить как».
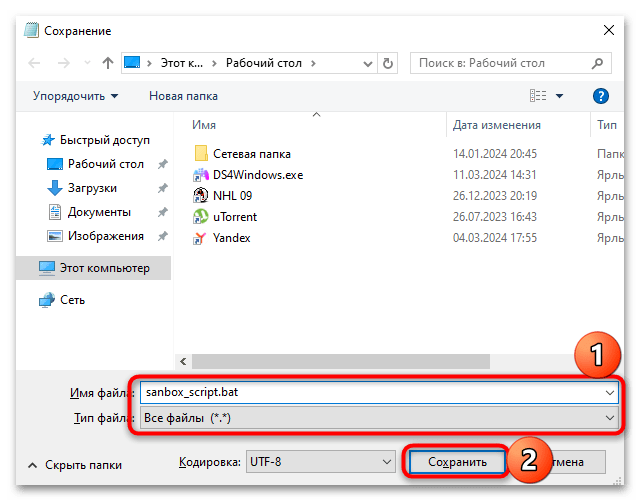
- В открывшемся окне укажите путь, куда будет сохранен будущий скрипт, затем в меню «Тип файла» выберите «Все файлы» и задайте имя документу, обязательно прописав его расширение —
.bat. - Запустите скрипт и дождитесь окончания установки необходимых компонентов. После потребуется перезагрузить компьютер и проверить, работает ли «Песочница» в данной редакции ОС.
При активации функции Windows Sandbox в редакции Windows 10 Home нет гарантий, что она будет работать стабильно. В некоторых случаях все дело в самой операционке, и сделать с этим вряд ли что-то получится (разве что перейти на другую редакцию для использования инструмента). Иногда же проблема кроется в недостатке других компонентов либо в отключенных службах виртуализации. Если после создания и запуска скрипта у вас отобразилось сообщение, что «Песочницу» не удалось инициализировать, попробуйте воспользоваться нашими рекомендациями ниже, чтобы исправить ситуацию.
Способ 2: Активация виртуализации
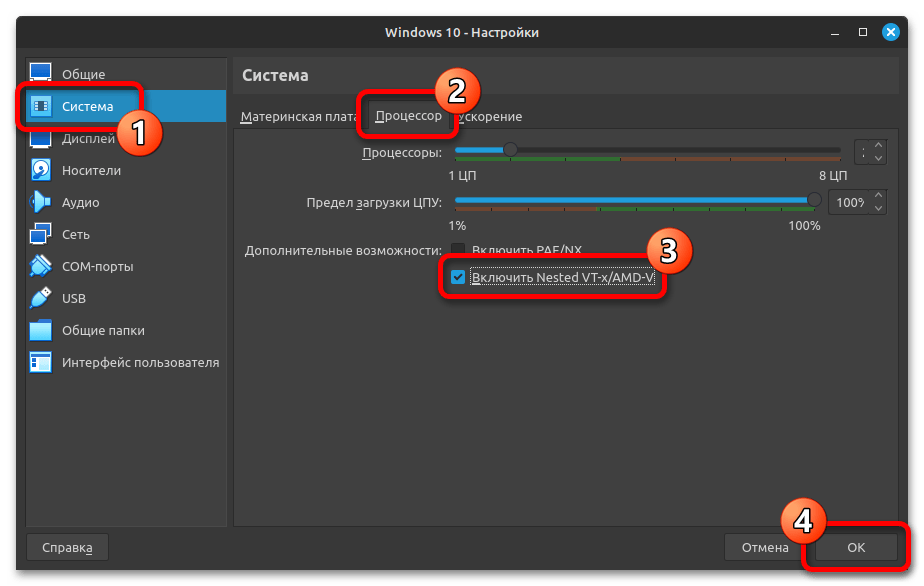
В первую очередь проверьте, активна ли виртуализация. Делается это с помощью встроенных средств системы или через BIOS/UEFI компьютера. Но в ситуации с Windows 10 Home рекомендуем воспользоваться вторым вариантом, поскольку программный компонент Hyper-V, отвечающий за виртуализацию на основе гипервизора, попросту может отсутствовать в редакции Home. О том, как активировать виртуализацию для процессоров AMD и Intel, ранее мы писали более развернуто.
Подробнее: Включаем виртуализацию в BIOS

Если процессор не поддерживает виртуализацию, тогда запустить «Песочницу» в Домашней редакции «десятки» вряд ли получится.
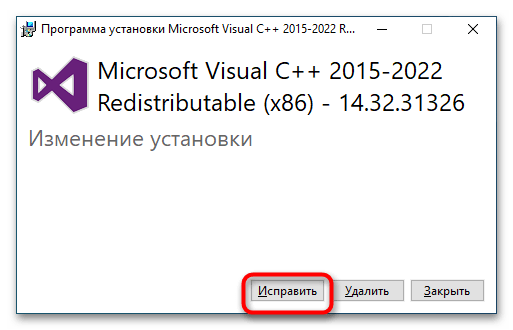
Способ 3: Переустановка компонентов Microsoft Visual C++
Для корректной работы многим компонентов системы требуется наличие файлов библиотеки Microsoft Visual C++. Windows Sandbox – не исключение, поэтому проверьте, присутствуют ли нужные данные. Если нет, их потребуется дополнительно установить. Также дело может быть в том, что они повреждены. В любом случае после запуска инсталлятора будет предложено восстановить недостающие файлы.
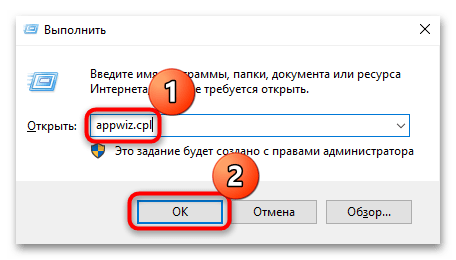
- Если ранее компоненты библиотеки Microsoft Visual C++ были установлены, перед переустановкой их нужно удалить с компьютера, чтобы избежать возможного конфликта ПО. Если софт не инсталлировался, сразу переходите к Шагу 4 данной инструкции. Для начала потребуется открыть раздел «Программы и компоненты»: одновременно нажмите на клавиши «Win + R», затем введите команду
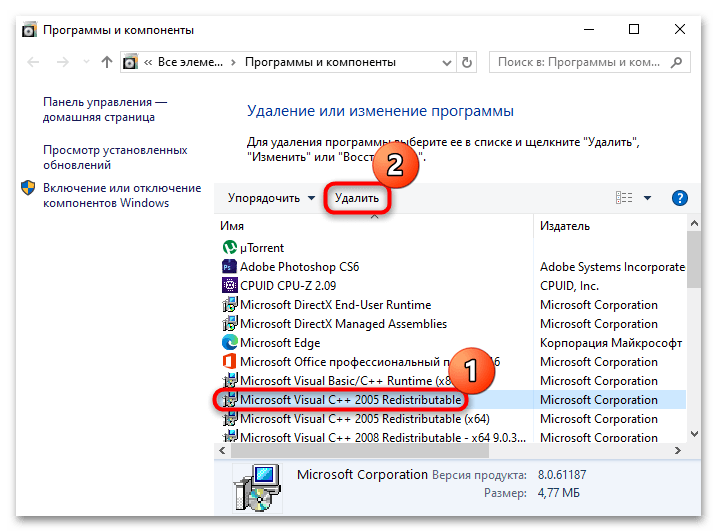
appwiz.cplи нажмите на кнопку «ОК». - Найдите строку «Microsoft Visual C++» с версией софта, выделите ее и нажмите на кнопку «Удалить». Если компонентов несколько, проделайте процедуру с каждым из них и перезагрузите компьютер.
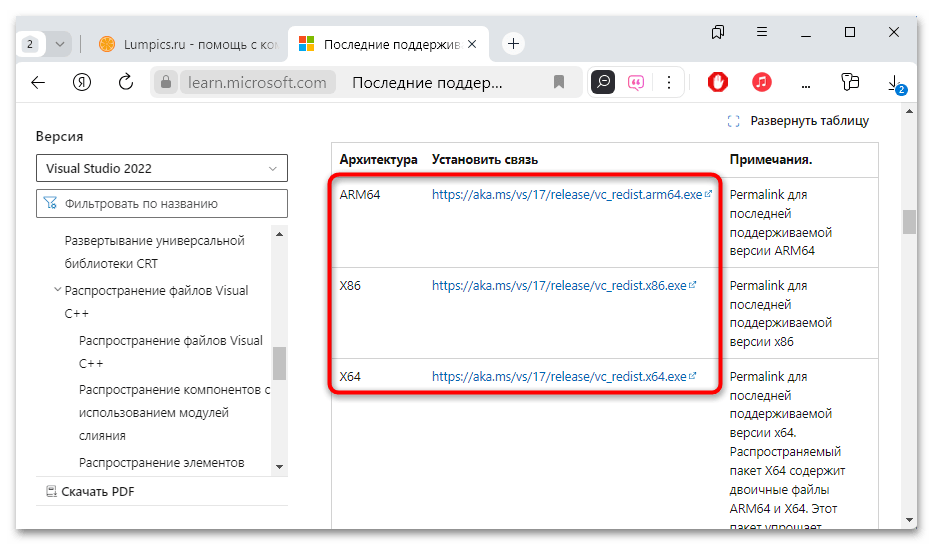
- Перейдите по ссылке ниже, чтобы скачать инсталлятор библиотеки с официального сайта компании Microsoft. Причем загружать нужно тот файл, который соответствует разрядности вашей системы.
Скачать Microsoft Visual C++ с официального сайта

Читайте также: Определяем разрядность используемой ОС Windows 10
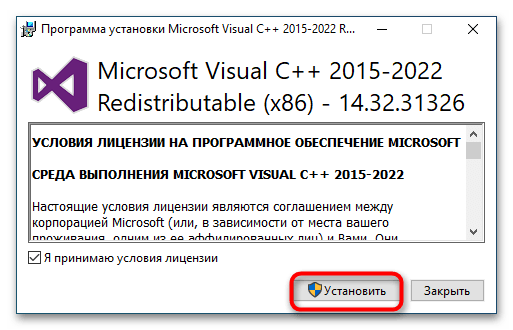
- Далее останется запустить скачанный файл и установить нужное программное обеспечение, следуя инструкциям пошагового мастера.
Если же установщик нашел файлы библиотек, но оказалось, что они повреждены, он предложит их восстановить.
Дополнительные решения проблемы
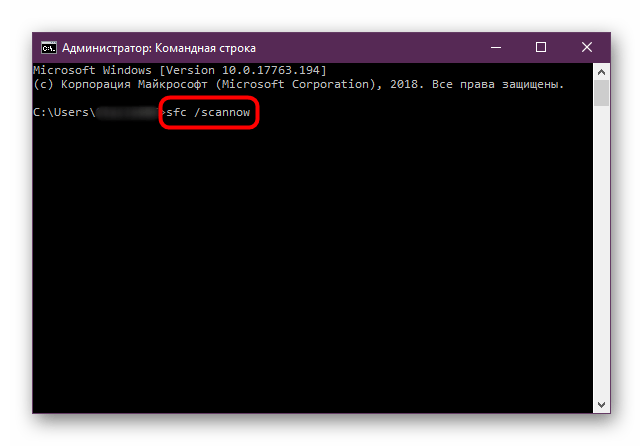
Если предлагаемые выше способы не помогли, тогда следует проверить целостность системных файлов, поскольку при их повреждении системные функции и компоненты могут работать некорректно. Для этого в Windows предусматривается специальная утилита, которая запускается через консоль «Командная строка». Более детально о способах восстановления данных системы мы писали в отдельном материале.
Подробнее: Как проверить целостность системных файлов в Windows 10
Также можете проверить наличие актуальных версий драйверов для устройств и программных компонентов системы, от чего во многом зависит и работа самой операционки. В этом помогут как встроенные возможности «десятки», так и сторонние приложения для проверки и обновления ПО.
Подробнее: Как проверить обновления драйверов в Windows 10
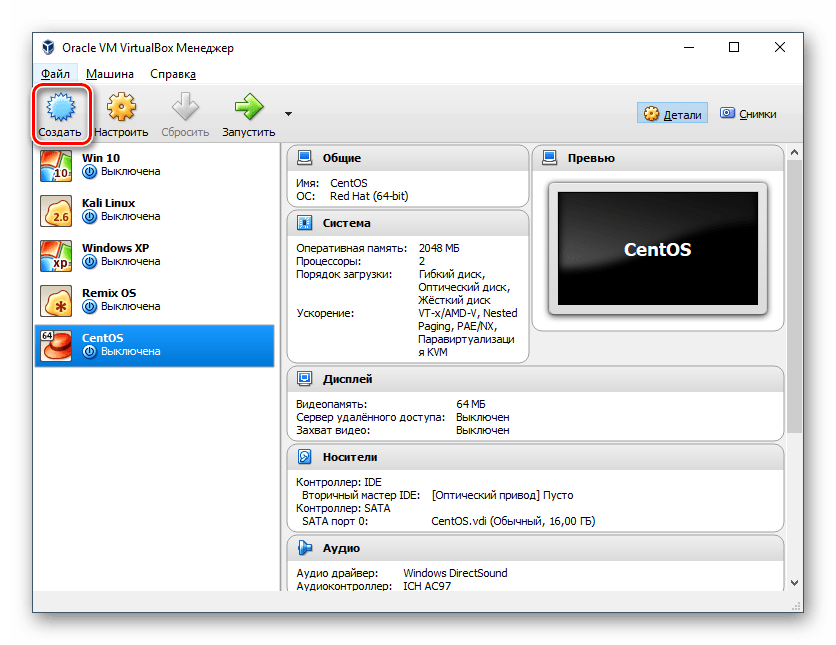
В качестве альтернативного варианта, если так вышло, что в Windows 10 Home не удалось установить «Песочницу», которая свойственна другим редакциям системы, есть смысл воспользоваться виртуальной машиной VirtualBox или VMWare. Установите на нее Виндовс 10, после чего запустите подозрительный софт. Принцип будет тем же — вы откроете приложение в безопасной для основной ОС среде, поскольку действия, совершаемые внутри виртуалки, не влияют на хостовую Windows. Добавим, что такие эмуляторы требуют виртуализации, поэтому ваш процессор должен ее поддерживать.
Подробнее: Включение виртуализации в Windows 10 через виртуальную машину
Несмотря на то что такой метод кажется довольно трудоемким, иногда он является единственным выходом.
Подробнее: Как установить Windows 10 в VirtualBox
Наша группа в TelegramПолезные советы и помощь
Being an avid Windows 10 user, you may encounter multiple error messages on your system every now and then. The issues can occur by the 3rd party software you are using or the existing ones crashing down. But out of so many complications that people face in the computing world, one that hits nowadays are Windows 10 Sandbox Problems.
Well, for those who have no idea about Windows Sandbox, it is a built-in small desktop environment in order to safely running applications in isolation. It has been launched last year and just generates a new lightweight (100MB) installation of Windows to run a program. Now, let’s see how to fix some of the Sandbox errors that have been around for quite some time now.
Windows 10 Sandbox Problems
Here is How to fix Windows 10 Sandbox Problems –
1] Windows 10 Sandbox Mode Missing
To run Windows 10 Sandbox on your system, ensure that the device is running Windows 10, version 1903. But users are continuously reporting of missing this important feature. So, in order to get hands on to this tool, it has to be manually activated. Before you proceed with the activating, ensure that CPU virtualization is enabled. It is one of the most critical hardware-based functions that is required to operate this new feature of Windows.
Hence, first, you need to find out whether CPU virtualization is activated, if not, then enable it. Here is the sequence of steps to activate Windows Sandbox –
Check Status of CPU Virtualization
- Right-click on the taskbar, and then select Task Manager.
- Now, switch to the Personalization tab and select CPU on the left pane. On the lower right hand of the screen check to see if Virtualization is Enabled (Essential to run Windows 10 Sandbox).
- If the Virtualization is Enabled, you are good to go. If not you will have to start up the BIOS to enable it and this is how you need to proceed further.
Enable CPU Virtualization in BIOS
- Press Win logo+I hotkey simultaneously to open Windows Settings application.
- Click Update & Security.
- Go to Recovery subsection on the left sidebar.
- Switch to the right pane and beneath the Advanced startup heading, click Restart now.
- Choose Troubleshoot.
- Perform a click on Advanced Options.
- Select UEFI Firmware Settings.
- Hit Restart. Find Advanced menu or tab. (In some computers, you will find it as Configuration or Advanced Mode).
- Lastly, look for the setting that displays Virtualization in its name and turn it ON.
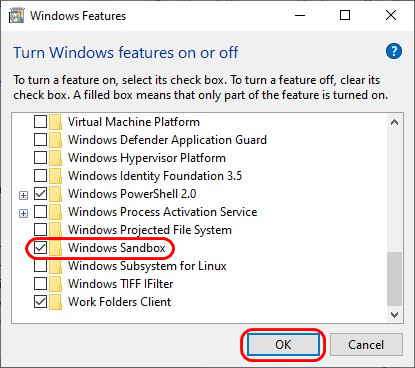
Turn On Windows Sandbox
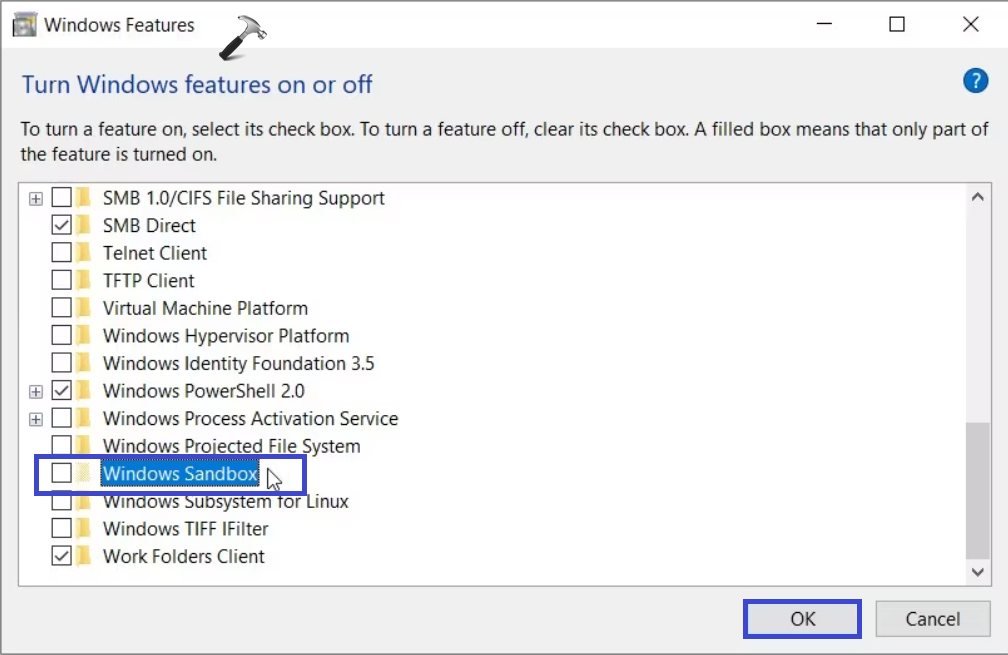
- Open the Start Menu and type Windows Features.
- Select “Turn Windows features on or off” from the list of results.
- On the dialog box that pops up, look for the Windows Sandbox feature.
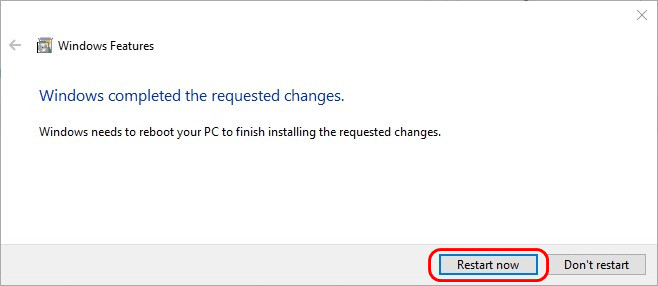
- Check on the box beside the name Windows Sandbox to enable it. Click OK.
- Your system will now activate the feature, hence, wait for the process to end.
- Restart your system and try to open Windows 10 Sandbox.
Once you successfully activate the Windows 10 Sandbox on your PC, use it as per your need. If at all anything goes wrong, try to update your system and it will fix the issues.
2] Windows Sandbox item is grayed out
Yet another issue that we would discuss is that under the Windows Features box, the list with the name Windows Sandbox is grayed out and does not allow to make any changes whatsoever. You can open the Windows Features by following the below sequence of steps. There are certain things that you can give an attempt to overcome this problem.
- Type Windows Features on the taskbar search and go ahead with the option “Turn Windows features on or off“.
- Windows Features dialog will become visible.
- The item Windows Sandbox is dimmed out as you can see in the given snapshot. As it is grayed out, you cannot use it to test programs.
- To bypass this weird problem, open the BIOS of your computer system. To do so, you need to press the DEL or ESC key constantly while the system is booting. (However, every machine has a different key to get into BIOS, please verify with the manufacturer before you proceed).
- Make sure all these options are configured as below –
-
- Hyper-V: Enabled
- Data Execution Prevention: Enabled
- Virtualization Technology (VTX): Enabled
- VM Monitor Mode Extensions: Yes
- Second Level Address Translation (VT-d or RVI): Enabled.
- 6. Save all the changes and Restart Windows 10 PC.
- 7. Open Windows Features to check the Windows Sandbox option again.
After mitigating the issue, you can easily check or uncheck the box to enable or disable the feature.
3] Error 0x80070015 – Windows Sandbox failed to start
Check Services
This issue occurs when the supporting devices to run the Windows Sandbox is not enabled and also when the OS is not up-to-date. Thus you will have to enable it manually from the Windows Service Manager. Here are the steps to open the Windows Service Manager and enable the services –
- Press “Win logo + R” on the keyboard to open Run dialog box on your system.
- Type services.msc and hit Enter.
- Search for the options in the list as given below and make the necessary changes.
Network Virtualization Service: (Startup type: Manual)
Virtual Disk: (Startup type: Manual)
Hyper – V Virtual Machine: (Startup type: Manual)
Hyper – V Host Compute Service: (Startup type: Manual)
Container Manager Services: (Startup type: Automatic)
- Apply all the settings, close the Services window and try running the Windows 10 Sandbox again.
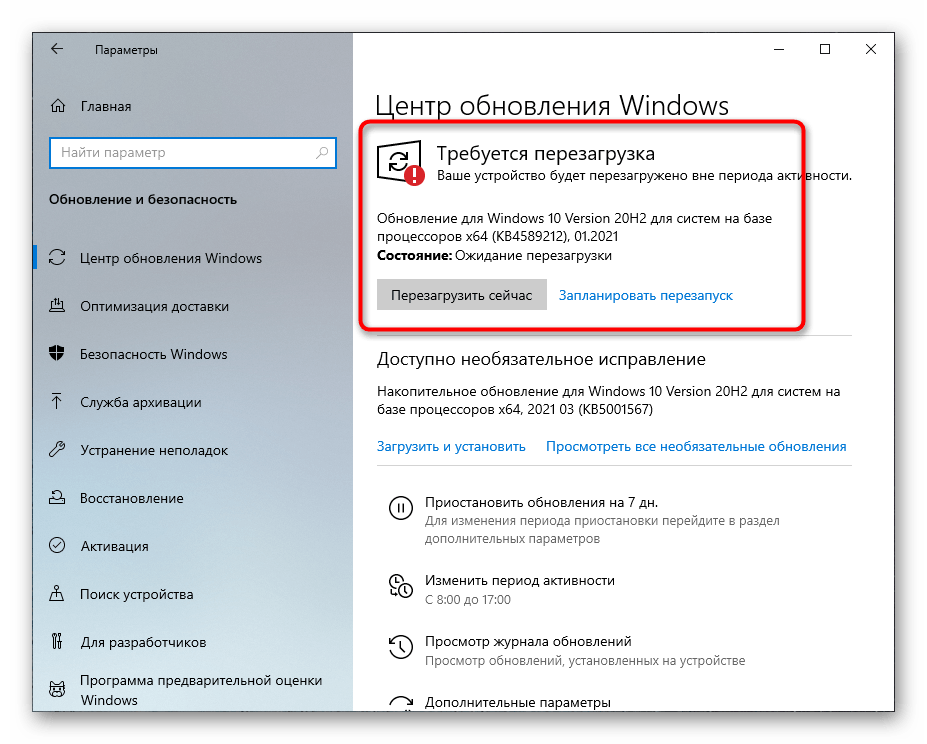
Perform Windows Update
- Another method that you can try is by updating your system. So go to Start Menu and click the cog icon.
- Select Update & Security.
- Go to Windows Update subsection on the left pane. Click on ‘Check for Updates‘.
- If updates are available, click on the Download to update the system.
- Finally, reboot the device.
Hopefully, this will fix the error and now you can try starting the Windows Sandbox once again.
4] Error 0x80070057 – The parameter is incorrect
For this issue or error, you can follow the same procedure as an above set of errors.
Check for Updates
- Get access to Start menu and click gear icon to launch Settings.
- Click Update & Security.
- Perform a hit on Check for updates. Wait for the system to scan and list down all the updates.
- Click Download to grab and if they require a reboot, carry it out to install the updates.
Make Sure Windows Sandbox Supports your System
Here are some of the criteria that your device should fulfill in order to prevent any Sandbox errors –
- Virtualization is enabled.
- Turn ON Hyper-V.
- Your CPU supports SLAT.
You can check out the above configurations by navigating to the BIOS settings of your device.
Simply reboot the system after making all these changes and the problem will not occur anymore the next time you start Windows Sandbox.
5] Fix Error 0xc030106
This error is caused due to the supporting virtualization components encountering some issues. Well, as we discussed the Windows Sandbox will only work on certain components that are enabled. Any changes made to it can be the reason that it is failing to start. Here are some of the methods that you can give a go to fix Windows 10 Sandbox problem.
Run Windows Sandbox with Admin Authorities
- Open Start Menu and scroll down to Windows Sandbox.
- Once you see it, do a right-click on it and choose “Run as Administrator”.
- Select YES, if prompted by User Account Control.
- This will certainly open the Windows Sandbox without any error.
Restart Certain Services
The post-installation of Hyper-V and turn-on of virtual hard disk requires you to restart some of the services. Please do them in the following given order to avoid any further complications –
- Go to the taskbar search box and insert the command services.msc.
- Hit Enter and on the Services window, restart the below list of services in the same sequence.
- Do a right-click on the service name and select Restart and wait for it to complete.
Network Virtualization Service
Virtual Disk
Hyper-V Virtual Machine Manager
Hyper-V Host Compute Service
Container Manager Services
This was pretty easy to run the tool on the system. Some of the other issues that you can check by making sure all the properties are enabled in the BIOS of your system as mentioned above. Also, download all the Windows updates on the computer and then restart it. It is most likely to fix any issue related to Windows Sandbox.
Conclusion
The major factors that need to be taken into consideration to fix Windows 10 Sandbox Problems are by making sure all the system components are up-to-date. Moreover, some of the options available on the BIOS of the system especially Virtualization and Hyper-V must be enabled to run the tool.
If at all any other error messages appear on the screen, these are the basic methods that you can always try to fix any issue in the future.
Some more posts on Windows Sandbox –
1] How to Manage Sandbox in Windows 10
2] How to Turn on Windows Defender Sandbox in Windows 10
Methods:
1] Windows Sandbox Mode Missing
2] In Windows Features, Sandbox item is greyed out
3] Windows Sandbox failed to start, Error 0x80070015
4] Error 0x80070057 – Windows Sandbox failed to start, The parameter is incorrect
5] Error 0xc030106 – Windows Sandbox failed to start
That’s all!!
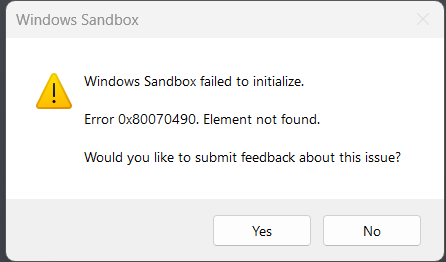
The “Windows Sandbox Failed to Initialize” error is a message that users may encounter when attempting to launch the Windows Sandbox feature on their Windows operating system. Windows Sandbox allows users to run applications in an isolated and secure environment. When users see the “Windows Sandbox Failed to Initialize” error, it means that there is an issue preventing the proper startup of the Windows Sandbox environment. In this guide, we’ll fix the Windows Sandbox Failed to Initialize error on Windows 11/10, the causes behind this error, and straightforward solutions to get your Windows Sandbox back on track.
Page Contents
Here are common reasons for the Windows Sandbox failed to initialize error:
- Virtualization not enabled: Virtualization needs to be enabled in the BIOS/UEFI settings.
- Hyper-V conflicts: Hyper-V may conflict with Windows Sandbox. Ensure only one is enabled at a time.
- Windows Sandbox feature not installed: The Windows Sandbox feature must be installed through the Windows Features menu.
- Windows Update: Ensure the Windows operating system is up to date with the latest updates.
- Third-party software conflicts: Some third-party antivirus or security software may interfere with Windows Sandbox.
- Hardware requirements: Check if the system meets the hardware requirements for Windows Sandbox.
- Graphics driver issues: Outdated or incompatible graphics drivers can cause problems with Windows Sandbox.
Below are several effective solutions to fix the “Windows Sandbox Failed to initialize” error:
Solution 1: Run the Windows Services Required by Sandbox
1. Press the Windows key + R. Type “services.msc” and click OK.
2. Right-click on the “Hyper-V Remote Desktop Virtualization Service” option and select “Properties”.
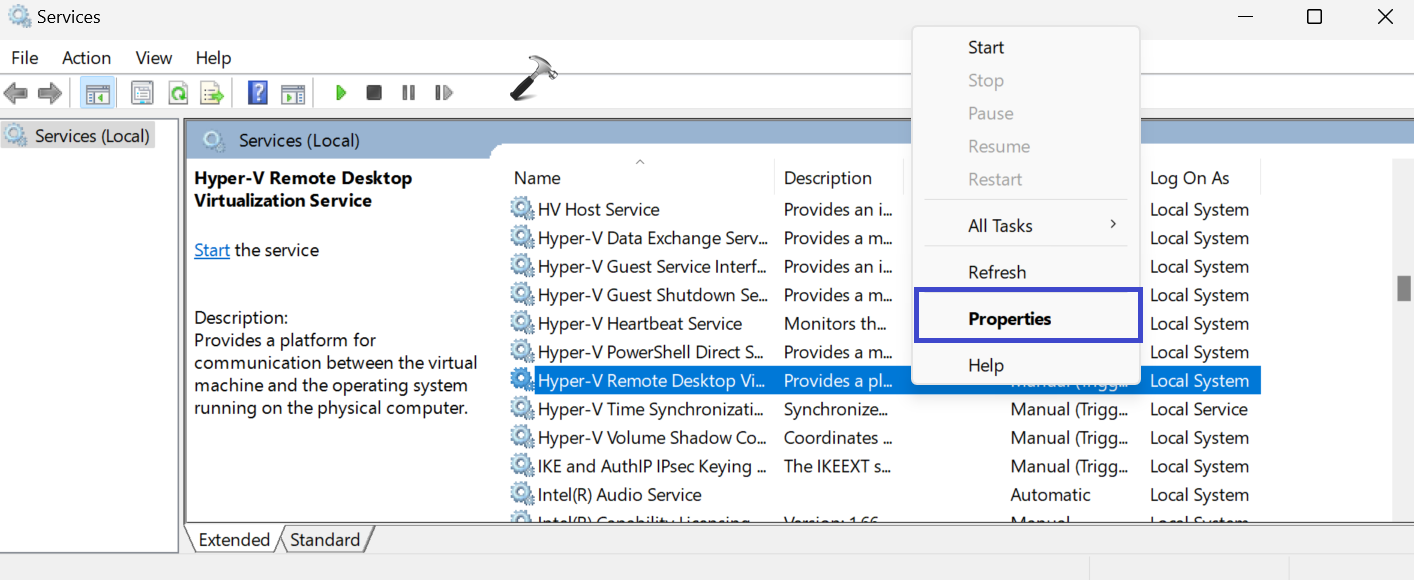
3. Make the startup type “Automatic” and then click on the “Start” button.

4. Click OK followed by Apply.
Solution 2: Use Built-in Troubleshooting Tools
1. Open the Command Prompt and run as administrator.
2. Type the following command and press Enter:
msdt.exe -id DeviceDiagnostic

Press Enter.
3. This will open the Device Diagnostic troubleshooter. (See the below image)
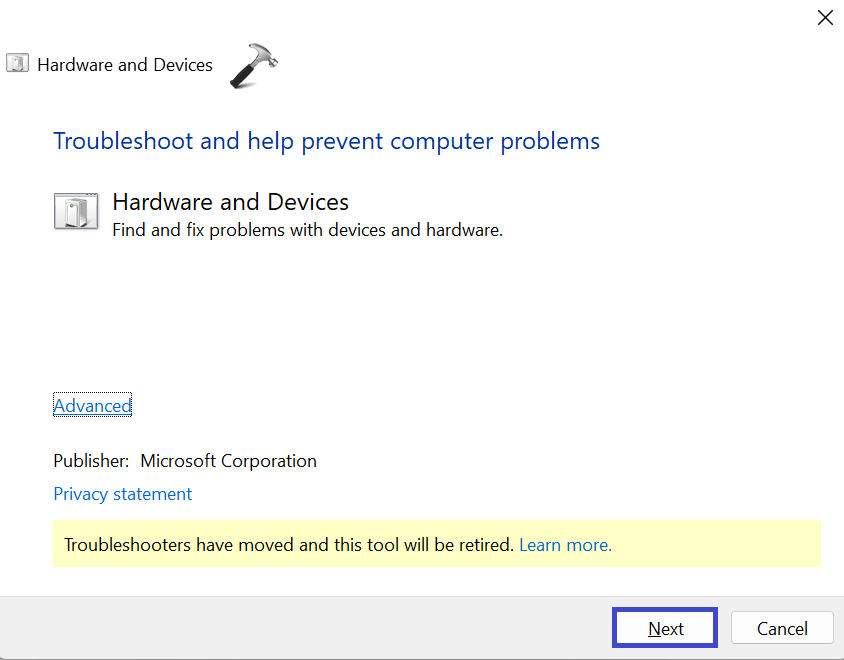
Click Next.
Follow the on-screen instructions to troubleshoot the problem.
Solution 3: Restore Windows
1. Open the search bar and type “Create a Restore Point” and select “Best match“.
2. Under the System Protection tab, click on the “System Restore” option. Press Next.
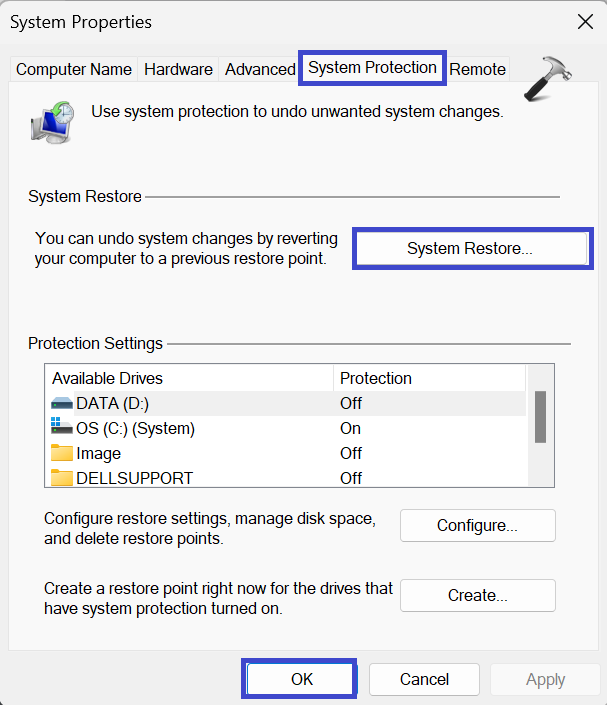
3. Now, select “Show more restore points“.
4. Select the preferred restore point and then click Next.
5. Finally, click the “Finish” option.
Solution 4: Update Your Device
1. Open the Settings App and go to Windows Update.
2. Now, click on “Check for Updates“.

3. If there is any update available, then update your device.
Solution 5: Restart Hyper-V on Windows Features
1. Press the Windows key + R. Type “optionalfeatures” and press Enter.
2. Expand the Hyper-V option.
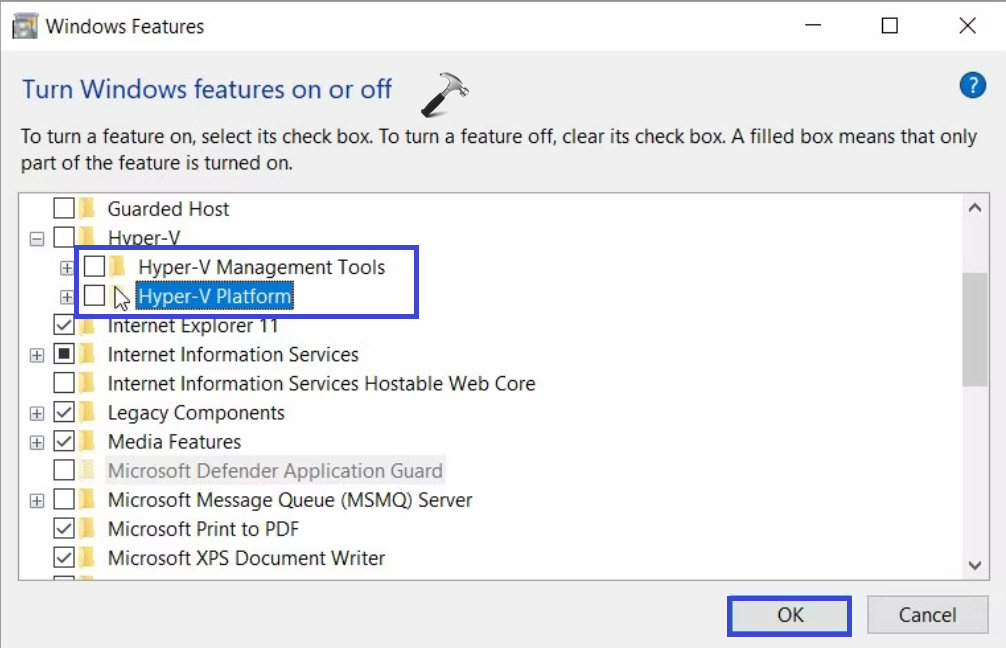
3. Uncheck the “Hyper-V Management Tools” and “Hyper-V Platform” options.
4. Click OK.
Solution 6: Repair Corrupted or Missing System Files
1. Open the command prompt and run as administrator.
2. Copy and paste the below command:
DISM /Online /Cleanup-Image /ScanHealth
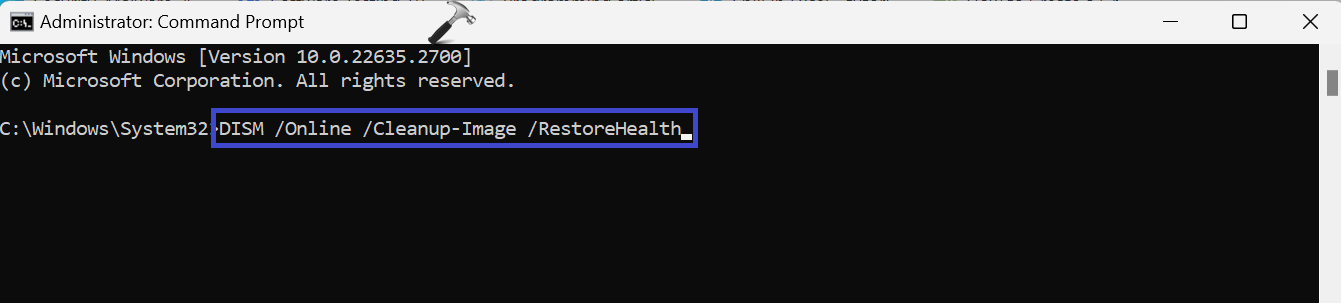
Press Enter.
Wait for the command to execute.
3. Now, copy and paste the below command:
sfc /scannow
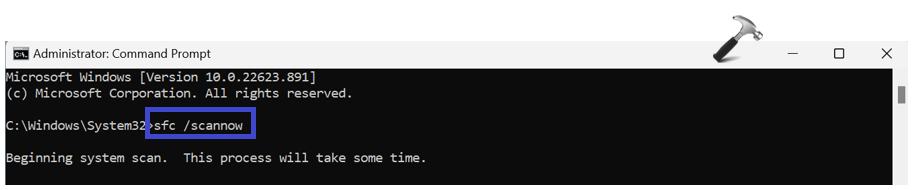
Press Enter.
4. Restart the PC after executing the above commands.
Solution 7: Disable/Re-Enable Windows Sandbox Tool
1. Press the Windows key + R. Type “optionalfeatures” and press Enter.
2. Uncheck the “Windows Sandbox” option. Click OK.
3. A dialog box will appear. Select the “Restart now” option.
4. When the device boots up, check the “Windows Sandbox” box.
5. Again, a dialog box will appear. Select the “Restart now” option.
That’s It!
RELATED ARTICLES
Several users complained that “Windows Sandbox failed to start” when they were trying to launch this tool on their PCs. If you are also experiencing this issue with an error code 0x80070015 and are looking for answers, this article presents three working solutions.
Windows Sandbox fails to start normally when either it is disabled under “Windows Features”, or when the supported services are not running in the background. Though there is less possibility, pending updates may also trigger a similar error code. So, check for pending updates and install them on your computer.

If you are not able to launch or start Windows Sandbox on your Windows PC, attempt the below fixes one by one. I hope these solutions help to recover Sandbox to its working state. The fixes are as follows –
- Disable and Re-enable Windows Sandbox
- Restart the required services
- Check for pending updates
1. Disable and Re-enable Windows Sandbox
The first solution to fix “Windows Sandbox failed to start” is of course to check its running status. If this feature has already been stopped, you can’t really start it. Sometimes this may also fail to start due to some internal glitches. So, we advise you to disable the Sandbox for once and then re-enable it. Here’s how to perform this task –
Disabling Windows Sandbox
- Press Win + R to launch the Run dialog.
- Type the following inside the text field and hit OK.
optionalfeatures
- Doing so will invoke the Windows Features page.
- Scroll down and locate Windows Sandbox on this page.
- When found, uncheck the box available left of it and hit OK.

A pop-up window will appear next prompting you to reboot your PC. Restart your PC next so that Windows Sandbox and all its features stop completely.
Note: If this feature was not pre-running on your PC, you need not require disabling it.
Re-enabling Windows Sandbox
When Windows 11/10 reloads, follow the below guidelines to activate Windows Sandbox.
- Press Win + S and start typing – “Windows Features”.
- Click the first option i.e. “Turn Windows features on or off”.
- Scroll down to Windows Sandbox, tick its checkbox, and hit OK.
- A pop-up will prompt again asking to reboot your device.
Restart your computer and when it does, check if Windows Sandbox starts opening normally.
2. Enable the essential services
Windows Sandbox requires certain services to run in the background continuously. If they are stopped somehow, you won’t be able to use Sandbox on your PC. The dependent services and how to enable them are elaborated below –
- Press Win + X and select Run.
- In the pop-up window, type “
services.msc“, and hit OK. - When the Services window launches, scroll down to the “Network Virtualization Service”.
- Right-click on it and select Properties.
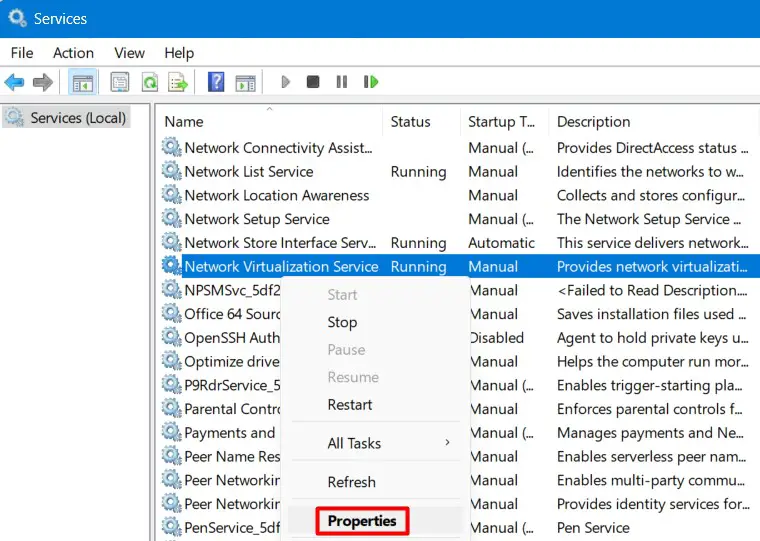
- On its properties window, check its running status and what’s there under “Startup type”.
- Using the drop-down menu next to the Startup type, select Manual.
- Now, click the stop button, wait for a few seconds, and then hit the Start button.
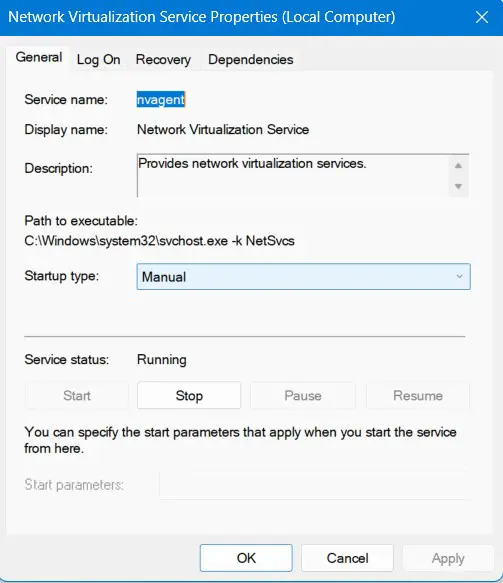
Note: If this service has already been set to Manual and is displaying “Running” under Service status, do restart it. To do so, stop this service first and then hit the Start button.
- Click Apply and then OK to confirm this setting.
- Now look for the service – “Container Manager Services” in the Services window.
- When found, double-click on it to open its Properties window.
- Change its startup type to “Automatic”, and click Stop followed by Start.
- Apply the below changes to the following services next –
Hyper-V Virtual Machine (Startup type - Manual)
Hyper-V Host Compute Service (Startup type - Manual)
Virtual Disk (Startup type - Manual)
- Make sure to stop and then restart these services by clicking on Stop and Start respectively.
- Assuming you have already changed the startup type of the above services and restarted them all, click Apply and then OK to confirm the recent changes.
- You may close the Services window now and restart your computer.
Sign back into your device again and check if Windows Sandbox is opening perfectly on your PC.
3. Check and Install Pending updates
Windows Sandbox should start working after applying the above two fixes alone. However, if it is not, you may check for pending updates on your computer and install them (if available).
- Press Win + I to launch Windows Settings.
- Go to Windows Update on the left navigation and hit Check for updates on the right pane.
- Wait for a few seconds while the system connects to Microsoft servers online and check for available updates.
- If this does find any pending updates, those will be downloaded and installed automatically.
Your PC should restart after installing the recent cumulative updates. If it isn’t force reboot your PC. Sign back in and you will find Windows Sandbox working perfectly on your device.
Read Next:
- How to Fix Sandbox Issues in Windows 11/10
- How to enable Windows Sandbox on Windows 11/10
Привет, друзья. Эта статья для энтузиастов, желающих опробовать новинки майского накопительного обновления — May 2019 Update — Windows 10. Как уже упоминалось на сайте, официальный релиз этого обновления состоялся 22 мая этого, 2019 года. Значимым новшеством накопительного обновления является новый компонент операционной системы — Windows Sandbox (Песочница Windows). Однако он недоступен в русскоязычном дистрибутиве, точнее он доступен для активации, поскольку это изначально не предустановленный компонент, но он при запуске слетает с ошибкой. Возможно, Microsoft вскоре решит эту проблему. А, возможно, она и вовсе возникает далеко не на каждом компьютерном устройстве. Но у меня эта проблема есть, и я нашёл ей своё решение, достаточно простое – установить англоязычный дистрибутив Windows 10 1903 и русифицировать его. Собственно, об этом и материал далее.
Windows Sandbox не запускается: устанавливаем англоязычную Windows 10 1903 и русифицируем её
Windows Sandbox – встроенное в операционную систему решение для тестирования подозрительных EXE-файлов и установки сомнительных программ, «недогипервизор», виртуальная среда, ограничено эмулирующая реальную среду Windows 10 1903. В этой статье не будем обозревать новую системную функцию и рассказывать, как с ней работать. Всё это вместе с моими субъективными оценками будет представлено позднее, по итогу опробования всех новшеств May 2019 Update. В этой статье будем лишь преодолевать препятствия на пути к возможности исследования Windows Sandbox.
{banner_google1}
Итак, Windows Sandbox на данный момент не работает в русскоязычном дистрибутиве Windows 10 1903. Но работает в англоязычном. Скачать таковой можно на официальном сайте Microsoft, но я выберу самый простой способ без возни с утилитой MediaCreationTool — скачаю установочный ISO на сайте:
https://tb.rg-adguard.net/public.php
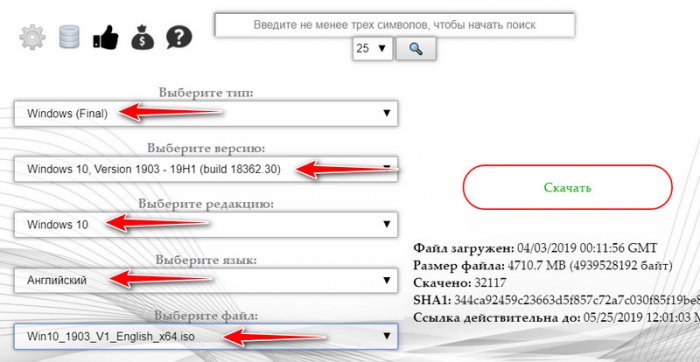
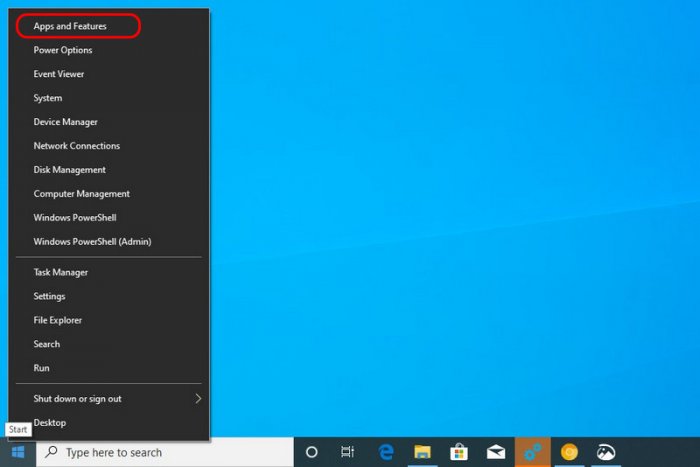
Устанавливаем Windows 10 1903. Активируем компонент песочницы. Для этого вызываем контекстное меню на меню «Пуск». Выбираем «Apps and Features».
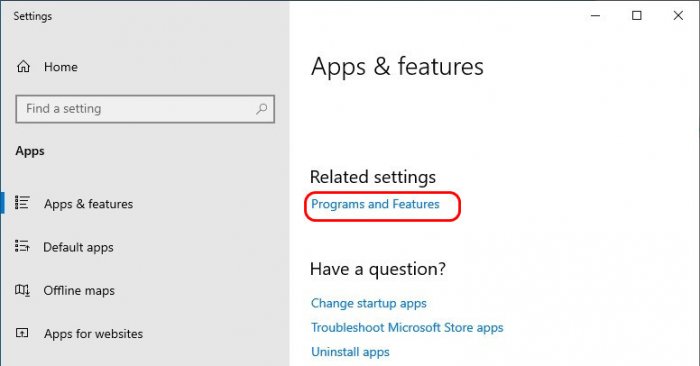
В открывшемся разделе системных настроек приложений кликаем «Programs and Features».
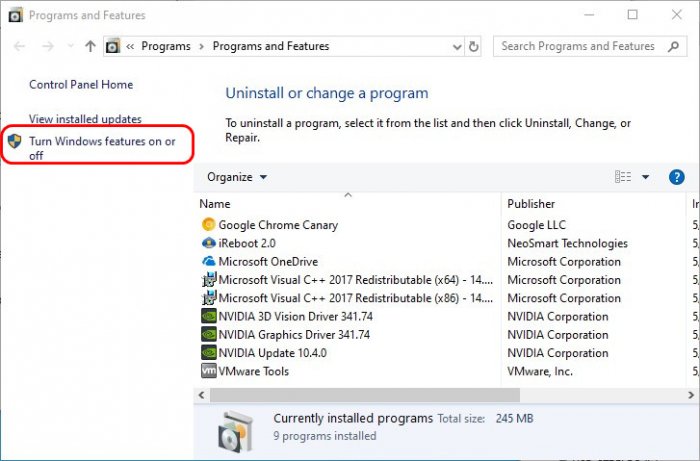
Попадём в среду установки программ и компонентов панели управления. Здесь жмём «Turn Windows features on or off».
{banner_google1}
И активируем пункт «Windows Sandbox».
После применения изменений перезагружаем систему.
И можем запускать и тестировать песочницу. Запускается она как обычное штатное приложение: в меню «Пуск» ищем ярлык «Windows Sandbox». Теперь осталось только русифицировать операционную систему. Мои тесты показали, что после установки русского пакета локализации песочница продолжает работать и не слетает с ошибкой.
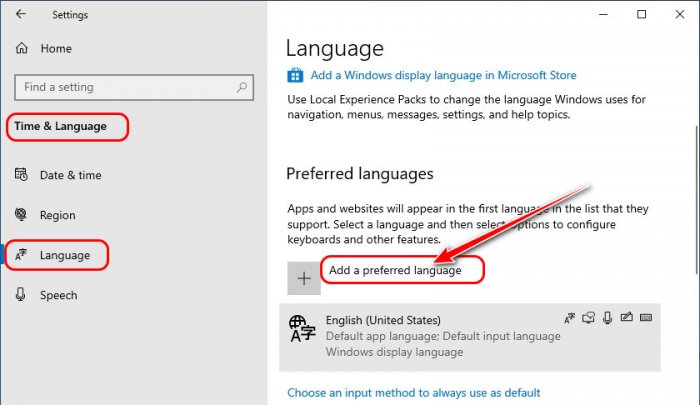
Как русифицировать Windows 10? Идём в системные настройки, в раздел «Time & Language», в подраздел «Language». Кликаем «Add a preferred language».
Ищем русский пакет локализации, кликаем его, жмём «Next».
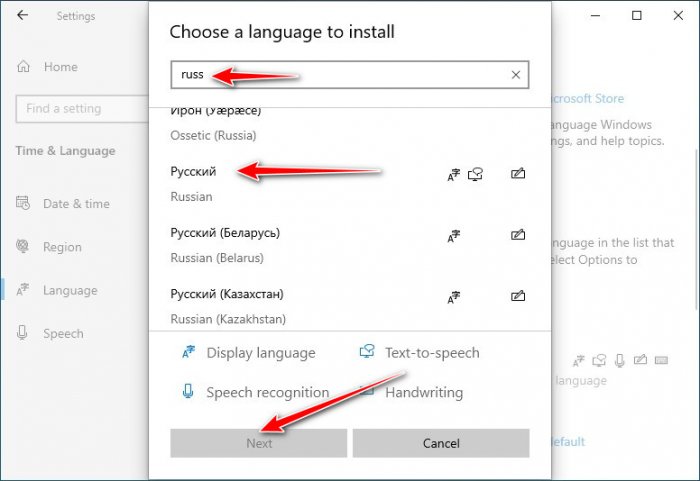
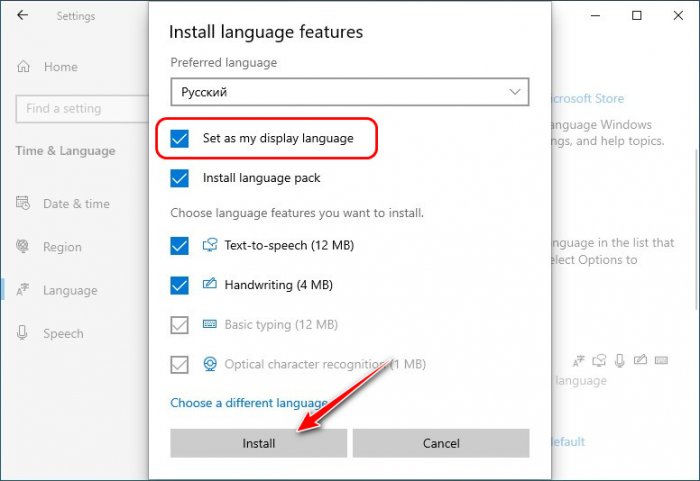
Ставим галочку «Set as my display language», чтобы он сразу же после установки был назначен в системе основным. И жмём «Install».
По итогу выполняем выход из системы.
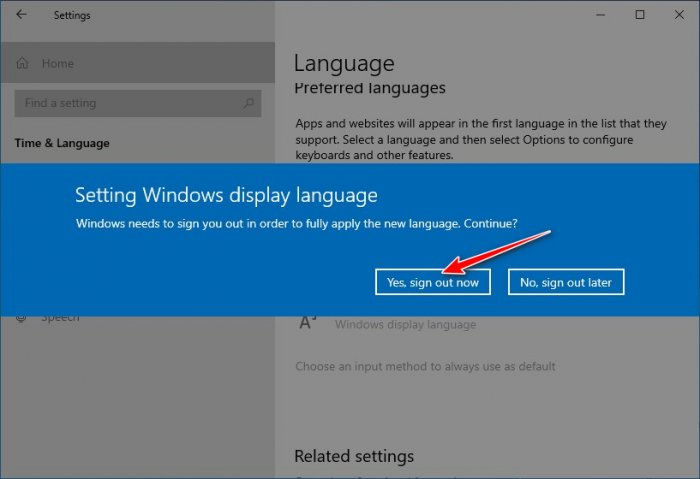
И снова заходим в неё.
***
Друзья, в статье показан процесс русификации не полностью, мы не переводили на русский административные параметры, отвечающие за область системы на экране блокировки и штатные UWP-приложения. Если мы русифицируем и административные параметры, то попросту превратим систему в русскоязычную сборку. И, соответственно, столкнёмся с ошибкой запуска Windows Sandbox. Так что придётся временно, пока Майкрософт не исправит проблему, побыть с недорусифицированной системой. Увы, имеем то, что имеем.