
Способы включения
Их шесть, они различаются по степени сложности. Рассмотрим их, начиная с самого простого и заканчивая самым сложным. Каждый из методов будет полезен для разных сценариев, а выбор зависит от того, на каком этапе загрузки возникает ошибка и есть ли у вас в целом доступ к Windows.
Способ первый: через параметры Windows
Когда полезен: этот метод требует, чтобы Windows запускалась хотя бы до рабочего стола. Подходит для диагностики, если система работает, но есть сбои.
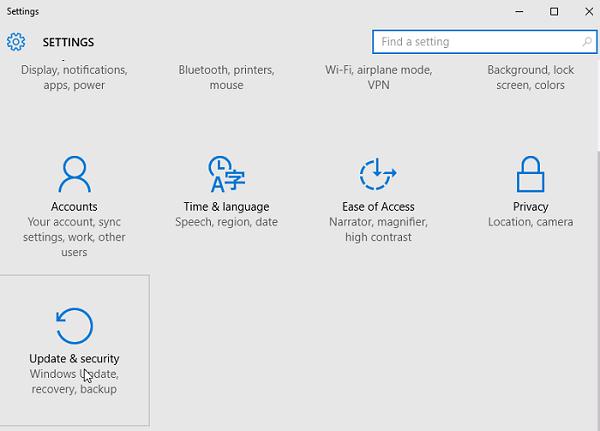
Откройте меню «Пуск», перейдите в «Параметры», затем выберите раздел «Обновление и безопасность» (для Windows 10) или «Система» и затем «Восстановление» (для Windows 11).
Так это будет выглядеть в в Windows 10
В боковом меню найдите пункт «Восстановление» и в разделе «Особые варианты загрузки» нажмите «Перезагрузить сейчас»:
А так — Windows 11
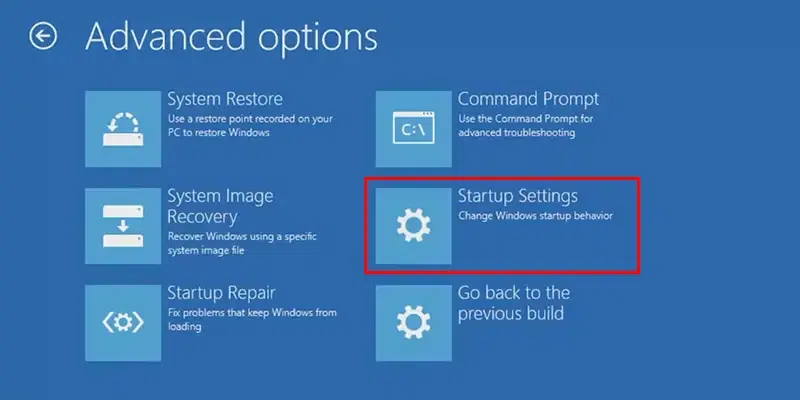
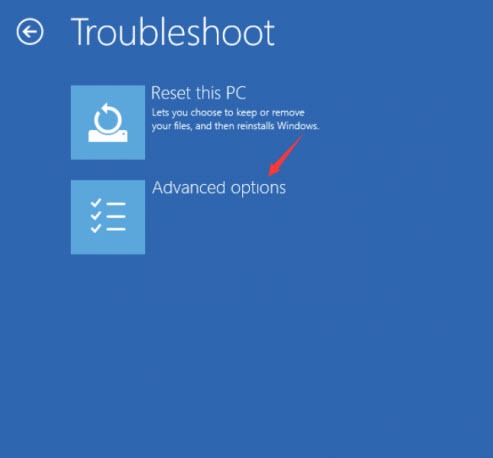
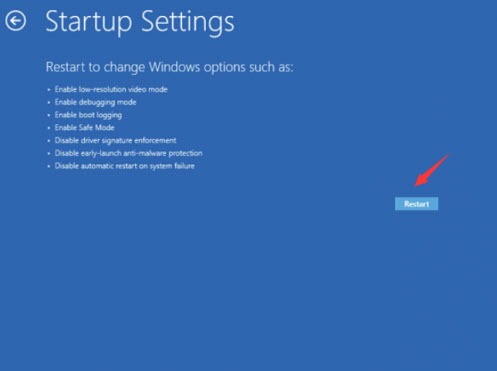
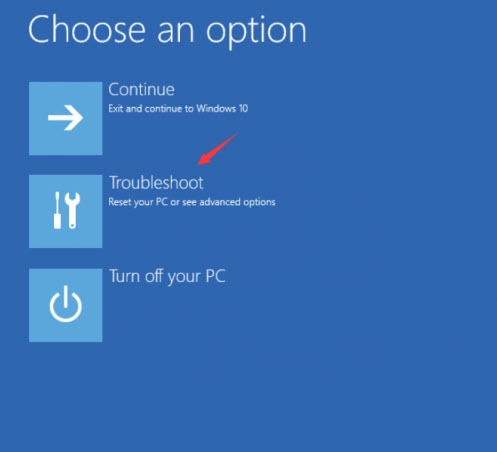
После перезагрузки компьютер предложит выбор действия. Пройдите по пути: «Диагностика» → «Дополнительные параметры» → «Параметры загрузки» и нажмите «Перезагрузить»:
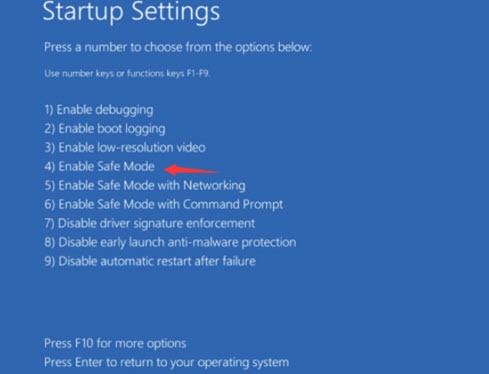
Когда система перезапустится, нажмите клавишу 4 или F4 для входа в безопасный режим.
Safe Mode is a simpler version of Windows that helps you sort out computer problems. It starts your computer with just the basics needed to run, which is great for fixing issues with software, drivers, viruses, or other glitches. Imagine it like stripping down a car to its frame to figure out what’s wrong. In this guide, we’ll show you how to jump into Safe Mode using just command lines through the Command Prompt in Windows 11 or 10.
Also see: Enter Safe Mode in Windows 11/10 when PC isn’t booting

What is Safe Mode in Windows?
Safe Mode is the bare-bones version of Windows, running only the must-have drivers and services. It’s perfect for diagnosing and fixing problems from software clashes, driver mishaps, to malware mess-ups. It’s your go-to tool for when your computer is acting up or when you need to get rid of troublesome software.
Windows has three Safe Mode flavors:
- Safe Mode: The standard mode with just the essential drivers and services.
- Safe Mode with Networking: Just like regular Safe Mode, but you can still get online. Handy for downloading updates or drivers.
- Safe Mode with Command Prompt: This is Safe Mode, but instead of the usual Windows look, you get a Command Prompt. Great for those who love typing commands to fix problems.
We’ll cover how to get into each of these Safe Modes using the Command Prompt in Windows 11/10.
Recommended resource: How to Startup Repair Windows 10/11 using Command Prompt
Steps to enter Safe Mode using Command Prompt
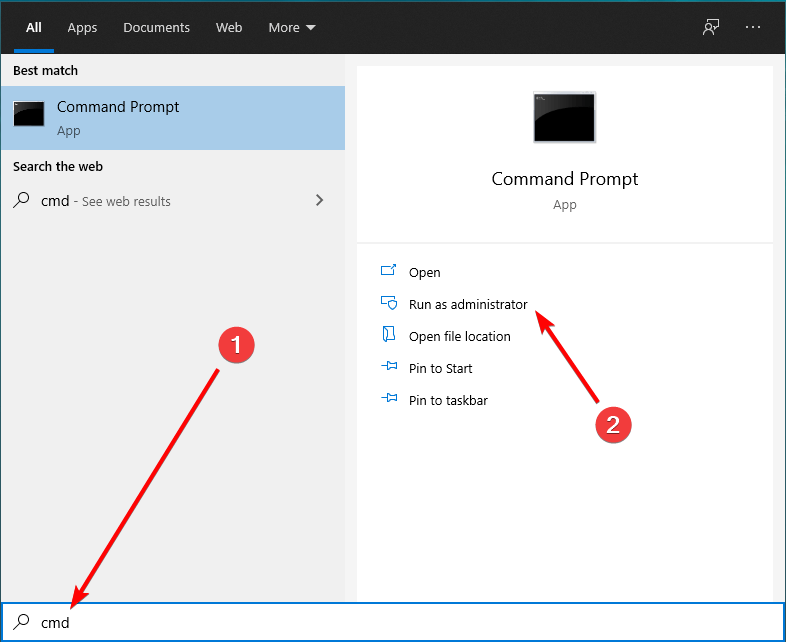
Step 1: Open Command Prompt as administrator
- Hit the Start button or press the Win key to bring up the Start menu.
- Search for “cmd” or “command prompt”.
- Right-click on Command Prompt in the search results and pick Run as administrator. If asked, click Yes to give it the thumbs up.

Step 2: Configure Windows to start in Safe Mode
To get into the Safe Mode you want, follow these steps:
Safe Mode (Basic)
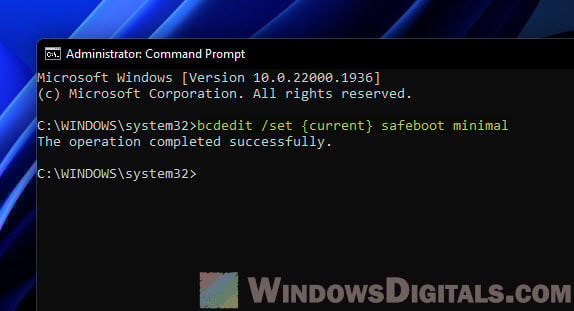
In the Command Prompt window, type this command and hit Enter to kick off Windows in basic Safe Mode:
bcdedit /set {current} safeboot minimal
Safe Mode with Networking
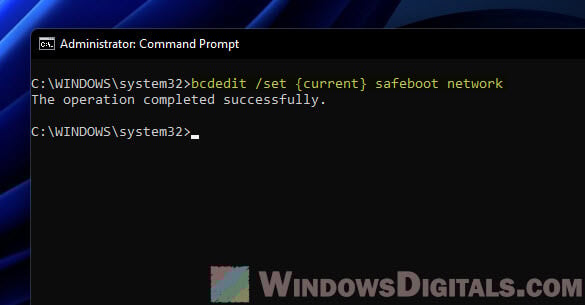
Or, type this command and hit Enter for Safe Mode with network smarts, letting you go online:
bcdedit /set {current} safeboot network
Safe Mode with Command Prompt
For Safe Mode with Command Prompt, do this:
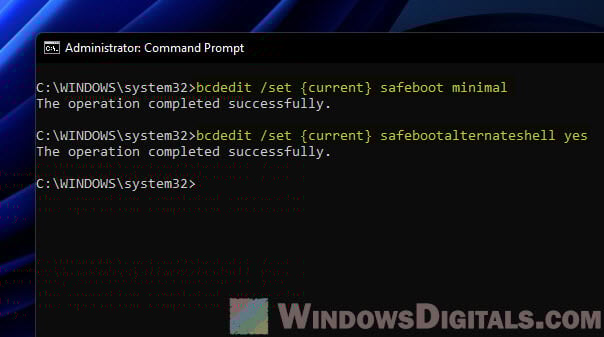
First, turn on basic Safe Mode with this command and pressing Enter:
bcdedit /set {current} safeboot minimal
Then, switch to command mode with this command and Enter:
bcdedit /set {current} safebootalternateshell yes
After these commands, you should get a message that you’re all set. Your computer is now ready to start in your chosen Safe Mode next time you restart it.
Linked issue: Windows 11 Keeps Booting in Safe Mode (Fix)
Step 3: Restart your computer
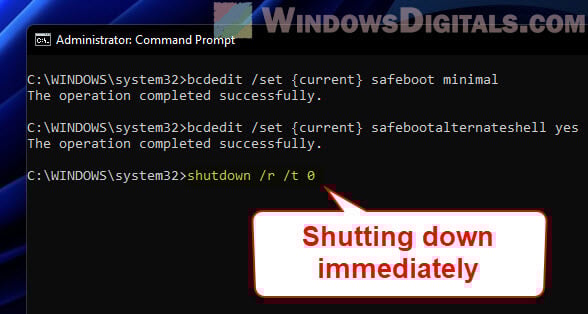
- Restart your computer with this command:
shutdown /r /t 0
- Now, your computer will restart and head straight into the Safe Mode you picked.
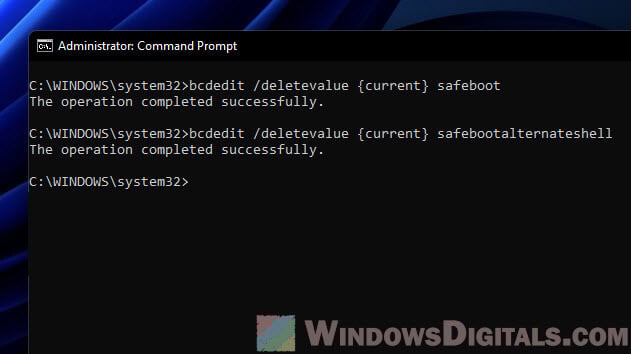
Exiting Safe Mode and returning to normal mode
If you’re done in Safe Mode and want to get back to regular Windows, follow these steps:
- Open Command Prompt in safe mode.
- Run this command and press Enter:
bcdedit /deletevalue {current} safeboot - If you were in Safe Mode with Command Prompt, turn off the command-only mode with this command:
bcdedit /deletevalue {current} safebootalternateshell - You’ll see a message that everything went smoothly. Your computer is now set to start normally next time you boot up.

- To restart and go back to normal Windows, type this and press Enter:
shutdown /r /t 0
- And that’s it, you’ll boot up as usual.
What we’ve learned
Using the Command Prompt to start Safe Mode gives you more power and options if you like using command-line tools. Here’s why you might want to use this approach to get into Safe Mode:
- It lets you easily choose between different Safe Mode options (like the basic one, one with networking, or one with Command Prompt). This is super useful when you need to figure out tricky problems that need checking in different settings.
- If you’re someone who knows their way around computers really well or if you’re an IT pro who often needs to start Safe Mode on lots of computers, or as part of fixing bigger issues, using Command Prompt can save you a lot of time. You can make scripts or set things up to happen automatically.
- Sometimes, you can’t use the usual way of doing things because of computer bugs, nasty viruses, or problems with drivers. In these situations, Command Prompt is a lifesaver because it doesn’t need the normal graphical stuff to work.
To wrap it up, although there are other ways to get into Safe Mode, going through the Command Prompt is a great choice for those who need that extra level of control and precision for solving complicated Windows problems.
Last Updated :
06 Feb, 2025
Safe Mode is a diagnostic mode in Windows 10 that helps enable system diagnostic and troubleshooting. Safe Mode has been designed to use minimal drivers and services and spot the issues caused by any software, virus or hardware. In addition to this, you must know how to turn on safe boot mode in Windows 10 when you encounter any issue with your Windows computer.
In this guide, we’ll explore various methods to easily boot your Windows 10 in Safe Mode, ensuring you can get back to a fully functioning state as quickly as possible.
Table of Content
- Method 1: Using System Configuration (msconfig)
- Method 2: Using Shift + Restart
- Method 3: Using the Sign-in Screen
- Method 4: Advanced Startup (WinRE)
- Method 5: Using Windows 10 Installation USB/DVD
Boot Into Safe Mode in Windows 10 — 5 Methods
Windows 10 grants you multiple pathways to reach Safe Mode. Familiarise yourself with these techniques to select the one that aligns with your specific situation:
Method 1: Using System Configuration (msconfig)
You can use the default method to boot your Windows PC safely in just a few steps. Here’s how you can boot Windows 10 in Safe Mode using msconfig:
Step 1: Open System Configuration
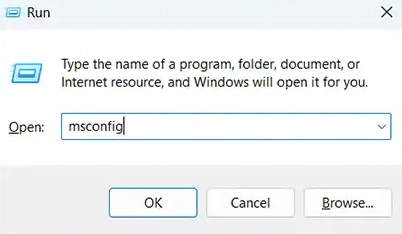
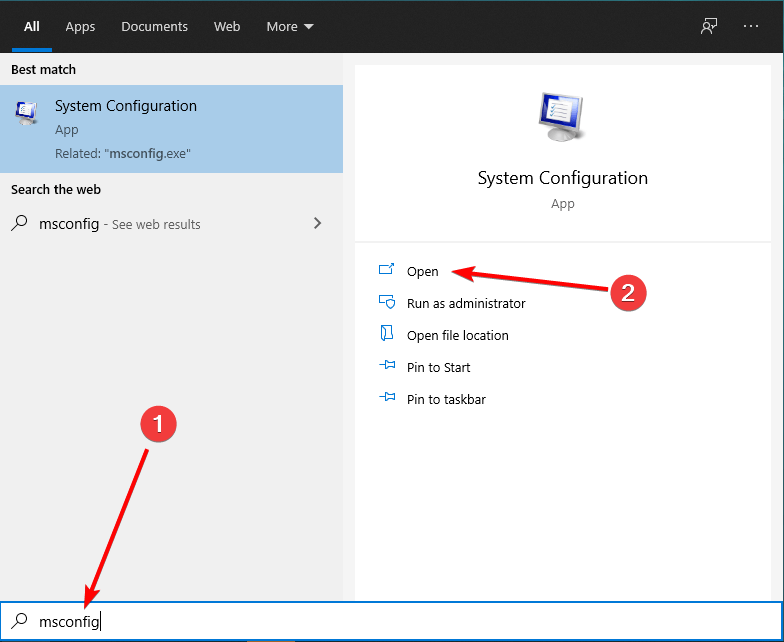
Open the Run dialog by pressing Win + R and type msconfig and hit Enter.
Step 2: Enable Safe Mode
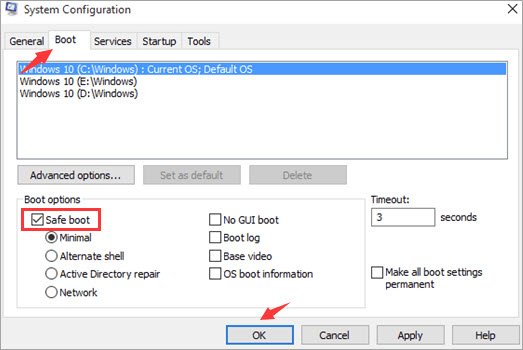
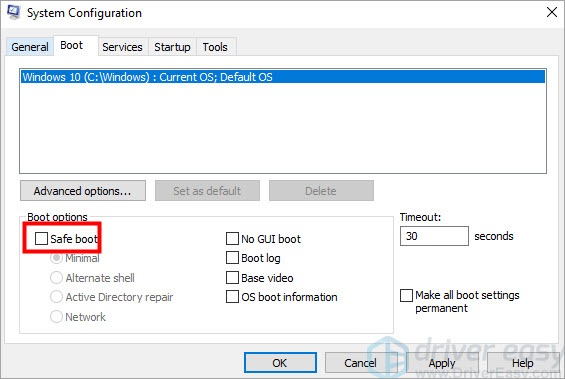
Go to the Boot tab and check the Safe boot option.
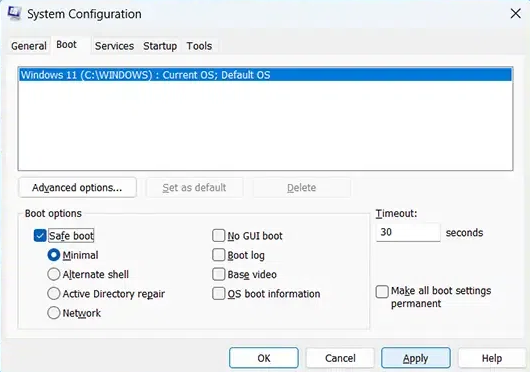
Step 3: Apply Changes & Restart
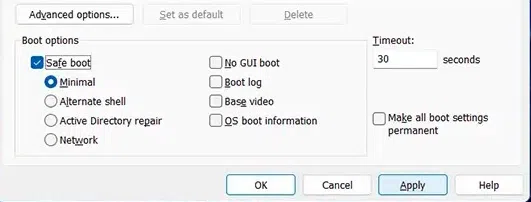
Check the «Safe boot» option in the Boot options section. Pick your preferred Safe Mode variant (Minimal, Network, etc.)
Method 2: Using Shift + Restart
You can use the Windows Settings to boot your Windows PC during startup. Here’s how you can boot Windows 10 in Safe Mode using Windows Settings option:
Step 1: Open Settings
Tap the Start button and select Power.
Step 2: Restart Your Computer
Press and keep the Shift key down as you click on Restart.

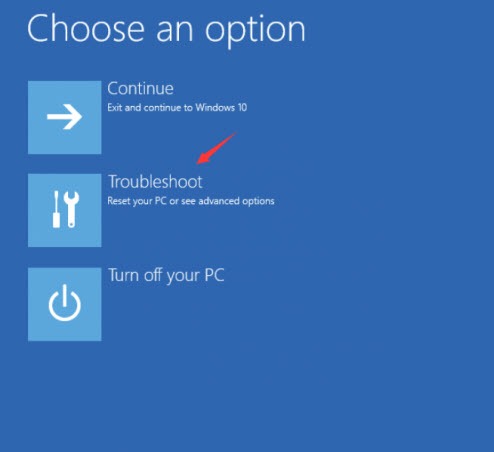
Step 3: Navigate to Recovery
Your PC will reboot, under the Advanced Startup Options.

Step 4: Select Startup Settings
Navigate to Troubleshoot > Advanced options > Startup Settings > Restart
After the reboot, press 4 or F4 to Enable Safe Mode.
Method 3: Using the Sign-in Screen
Windows Sign-in Screen can be the best method to perform a Safe boot for Windows 10 users as it does not require any additional technicality. Here’s what you need to do to for Windows 10 Safe Mode booting:
Step 1: Access the Power Options
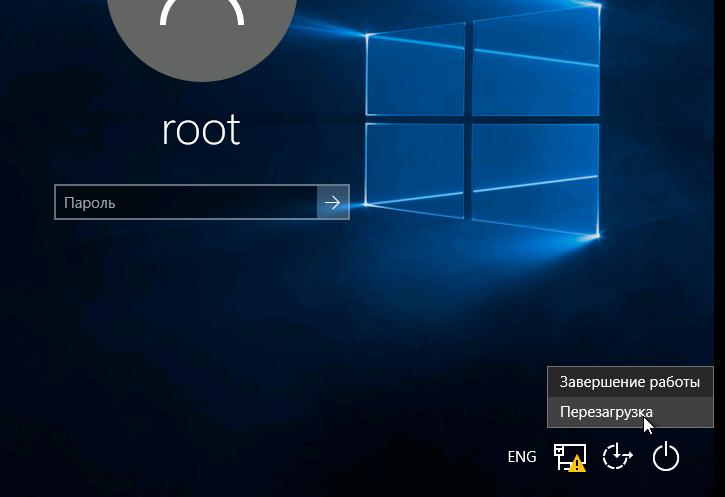
Click the Power button from the sign-in screen of Windows 10 PC.
Step 2: Restart with Shift
Keep the «Shift» key pressed while you click on «Restart.»
Step 3: Access the Startup Settings
Navigate to Troubleshoot > Advanced options > Startup Settings > Restart
After the reboot, press 4 or F4 to Enable Safe Mode.
Method 4: Advanced Startup (WinRE)
This is an uncommon method to slide your Windows 10 PC into the Safe mode option. Here’s what you can do in this method:
Step 1: Interrupt Boot Process
Make a force interrupt during Windows Startup (up to 3 times) & this will automatically land your Windows System into the Safe Mode option.

Step 2: Access Advanced Startup
Navigate to Troubleshoot > Advanced options > Startup Settings > Restart
Step 3: Choose Safe Mode
After the reboot, press 4 or F4 to Enable Safe Mode.
Method 5: Using Windows 10 Installation USB/DVD
If none of these methods works, then you might consider to use Windows 10 Installation media to fix this error. Here’s what you need to do:
Step 1: Create Installation Media
Use the Windows 10 Media Creation Tool to create a bootable USB.
Step 2: Boot from USB/DVD
Insert the USB drive and restart the computer and boot from the USB.

Step 3: Access Repair Options
Navigate to Troubleshoot > Advanced options > Startup Settings > Restart
Step 4: Choose Safe Mode
After the reboot, press 4 or F4 to Enable Safe Mode.
How to Exit Safe Mode
Exiting the Safe Mode is as important as entering it & that’s why once you’re done with the troubleshooting, you can get follow the below outlined steps to exit from the Safe Mode.
- Press Win + R & type msconfig & hit the enter button.
- In the System Configuration, go to the Boot tab.
- Uncheck the box for Safe Boot.
- Click Apply and Restart your computer will initiate a reboot into the Normal Mode.
Following these simple steps will take your computer out of Safe Mode and bring it back to normal mode, allowing you to resume your regular tasks.
Conclusion
Booting Windows 10 into the Safe Mode is a powerful and the most effective method of resolving and troubleshooting system related issues. Whether your system encounters any malware issue, or having any conflicts with software or driver, choosing the Safe Mode option is always the best method to encounter such issues. By following the above-mentioned 5 steps, you can easily boot into the Safe Mode and make your system smooth and secure.
Also Read
- How to Start Your Mac in Safe Mode?
- How to Fix System Errors in Windows Safe Mode?
- How to Boot Into Safe Mode on Windows 11?

Safe Mode is a way to run Windows in its most basic form. It uses only absolutely essential files and drivers.
For example, in Safe Mode, your screen will display only 16 colors and a very low resolution, and you won’t be able to print documents or hear audio. It also won’t load many programs in the background.
Safe Mode is designed to help you troubleshoot computer problems.
Sometimes Windows 10 will automatically start in Safe Mode (e.g. if it has a problem loading normally). But sometimes you’ll need to start it in Safe Mode manually (e.g. if you get a blue screen error every time you start Windows).
This article explains how to manually start Windows 10 in safe mode.
4 ways to start Windows 10 in Safe Mode
- Start Safe Mode by pressing F8 at startup
- Start Safe Mode by turning off your PC 3 times
- Start Safe Mode using the System Configuration tool
- Start Safe Mode from the login screen
- Can’t solve the problem? Try this fix…
Method 1: Start Safe Mode by pressing F8 at startup
IMPORTANT: This method must be manually enabled from within Windows. If you haven't already enabled it, and you can't access Windows to do so, skip to method 2 below.
First, you have to enable the F8 key method
On Windows 7, you could press the F8 key as your computer was booting to access the Advanced Boot Options menu. From there, you could access Safe Mode.
But on Windows 10, the F8 key method doesn’t work by default. You have to manually enable it.
Here’s how to get the F8 key to start Safe Mode in Windows 10:
1) Click the Windows start menu and type cmd, then click Run as administrator:
2) Copy this command:
bcdedit /set {default} bootmenupolicy legacy
3) Paste the copied command into the Command Prompt (right-click in the Command Prompt to paste), then press the Enter key on your keyboard.

4) Reboot your PC.
Now you can start Safe Mode using the F8 key
Now that you’ve enabled the F8 method, you can use it to start Safe Mode:
1) Ensure your computer is turned off.
2) Turn your computer on.
3) Before anything appears on your screen, press F8 repeatedly until the Boot Options menu below displays. Then select Safe Mode.
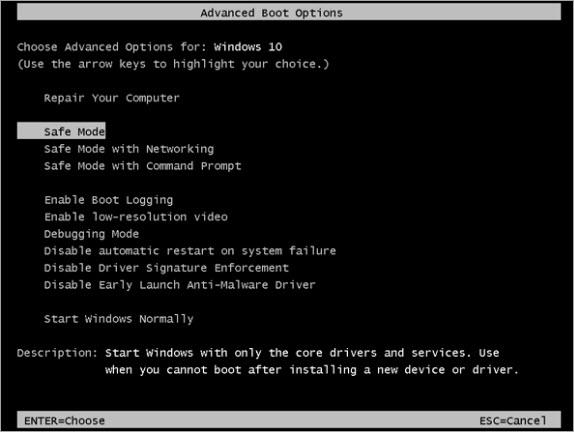
If the Boot Options menu above doesn’t display, and instead Windows just launches normally, it’s likely that you didn’t press F8 early enough.
Method 2: Start Safe Mode by turning off your PC 3 times
If you’re unable to launch Windows, and you haven’t enabled the F8 method above, this is how to start Safe Mode:
1) Ensure your computer is off.
2) Press the power button to turn on your PC, and when you see the small spinning circle of dots that indicates Windows is starting, press and hold the power button until your PC shuts down. You’ll have to hold it for 4-5 seconds.
Do this again, and then again. After you’ve done it 3 times, start your computer again and let it run. It should now go into Automatic Repair mode:

3) Wait for Windows to diagnose your PC:

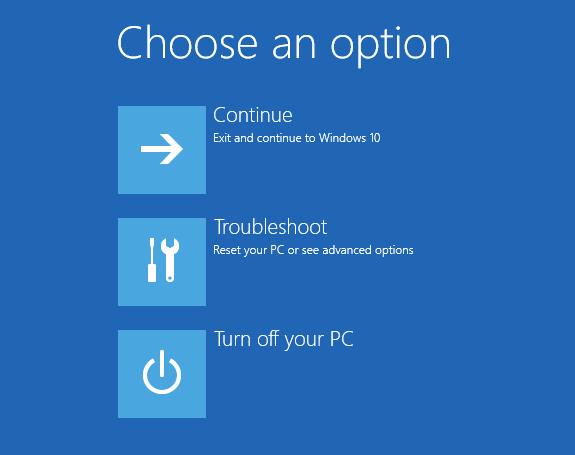
4) Click Advanced Options:

5) Click Troubleshoot:
6) Click Advanced options:
7) Click Startup Settings:

 Click Restart.
Your computer will restart and present a list of different startup options.
9) On your keyboard, press the number 4 key to enter Safe Mode without internet access or the number 5 key to enter Safe Mode with internet access:

IMPORTANT: If you follow these instructions, Windows will start in Safe Mode every time it restarts, until you undo your changes.
If you’re able to launch Windows normally, you can boot into Safe Mode using the System Configuration tool:
1) Click the Windows start menu and type msconfig, then click Open:
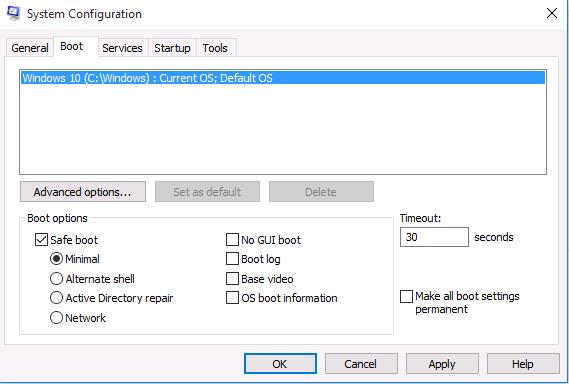
2) Select the Boot tab, then check Safe boot and click OK.
3) When you’re prompted to restart your computer to apply these changes, click Restart and you’ll boot into Safe Mode.
To turn off Safe Mode and go back to normal mode
When you want to return Windows to normal mode, you just have to undo your changes:
1) Click the Windows start menu and type msconfig, then click Open:
2) Select the Boot tab, then UNcheck Safe boot and click OK.
3) When you’re prompted to restart your computer to apply these changes, click Restart and you’ll boot into normal mode.
Method 4: Start Safe Mode from the login screen
If you can boot to the login screen, you can enter Safe Mode from there:
1) On your keyboard, hold down the Shift key.
2) While holding down the Shift key, click the power button at the bottom right of the screen, then select Restart.

The Windows RE (Recovery environment) screen will then display.
3) Click Troubleshoot:
4) Click Advanced options:

5) Click Startup Settings:

6) Click Restart.

Your computer will then restart and another screen opens showing a lot of different startup options.
7) On your keyboard, press the number 4 key to enter Safe Mode without internet access or the number 5 key to enter Safe Mode with internet access:
Can’t solve the problem? Try Driver Easy.
If you couldn’t solve your computer problem in Safe Mode but you can still run Windows normally, give Driver Easy a try.
Many computer problems are caused by outdated device drivers. So updating your drivers should always be one of the first fixes you try.
Driver Easy will automatically update all your device drivers to the latest correct version with just a couple of clicks. It will automatically recognize your system and find the correct drivers for it. You don’t need to know exactly what system your computer is running, you don’t need to risk downloading and installing the wrong driver, and you don’t need to worry about making a mistake when installing.
You can update your drivers automatically with either the FREE or the Pro version of Driver Easy. But with the Pro version it takes just 2 clicks (and you get full support and a 30-day money back guarantee):
1) Download and install Driver Easy.
2) Run Driver Easy and click Scan Now button. Driver Easy will then scan your computer and detect any problem drivers.

3) Click the Update button next to any flagged device to automatically download and install the correct version of that driver (you can do this with the FREE version).
Or click Update All to automatically download and install the correct version of all the drivers that are missing or out of date on your system (this requires the Pro version – you’ll be prompted to upgrade when you click Update All).

Windows 10 унаследовала все особенности системы загрузки у Windows 8, предоставляя такую же графическую среду для выполнения задач восстановления системы. Предполагается, что операции восстановления системы после сбоев будут преимущественно выполняться системой автоматического восстановления. В том случае, если Windows 10 не загружается корректно, запускается система автоматического восстановления, которая без участия пользователя пытается найти и исправить проблемы, мешающие нормальной загрузке системы. Однако это не означает, что в Windows 10 отсутствует безопасный режим (Safe mode), просто по умолчанию этот режим загрузки скрыт от пользователей.
В некоторых случаях необходимо запустить систему в безопасном режиме, например чтобы отладить или удалить службу, драйвер или приложение. Посмотрим как включить безопасный режим в Windows 10.
Windows 10 можно загрузить в безопасном режиме несколькими разными способами.
Содержание:
- Утилита MSConfig (Конфигурация системы)
- Сочетание Shift + Restart
- Запуск режим диагностики из интерфейса новой Панели управления
- Запуск безопасного режима из командой строки
- Возвращаем старое текстовое меню загрузки
- Запуск Safe Mode из режима восстановления
Утилита MSConfig (Конфигурация системы)
Самый простой способ загрузить Windows 10 в безопасном режиме, как и в предыдущих версиях Windows, воспользоваться утилитой msconfig.exe. Для этого:
- Нажмите сочетание клавиш Win+R и наберите msconfig
- В открывшемся окне перейдите на вкладку Boot
- В разделе Boot options поставьте флажок у пункта Safe boot

- Сохраните изменения (OK), согласитесь с предложением перезагрузить систему (Restart)
- После перезагрузки системы, Windows 10 загрузится в безопасном режиме (о чем свидетельствует надпись Safe Mode во всех углах экрана)

Совет. Отключить загрузку в безопасном режиме нужно также с помощью msconfig, сняв флажок у пункта Safe boot.
Сочетание Shift + Restart
В стартовом меню нажмите кнопку Power и, зажав Shift на клавиатуре, выберите пункт перезагрузки системы (Restart)
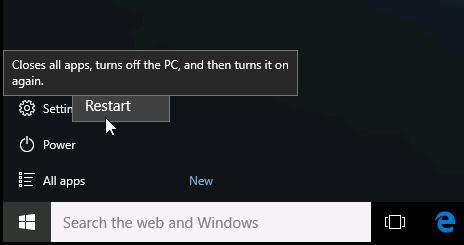
Примечание. Эту же комбинацию Shift+Перезагрузка можно использовать на экране входа в систему.
В появившемся диалоге последовательно выберите пункты Troubleshoot (Диагностика) -> Advanced options (Дополнительные параметры)-> Startup Settings (Параметры загрузки).
Перезагружаем компьютер, нажав кнопку Restart.
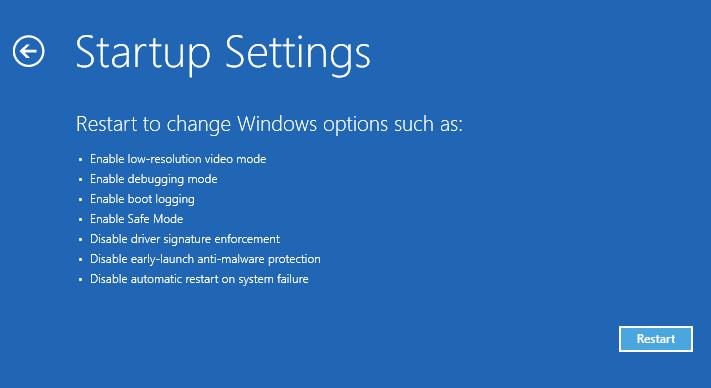
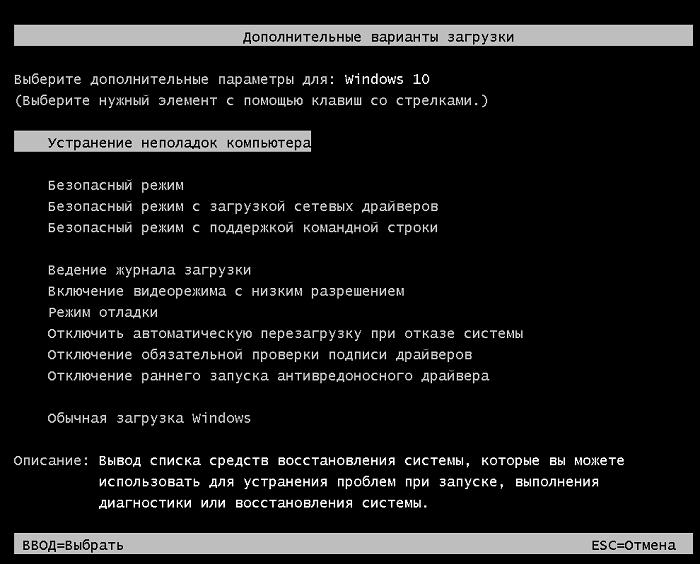
После перезагрузки появится окно с доступными опциями загрузки системы ( 9 вариантов, включая три вида безопасного режима). Для загрузки в безопасном режиме, нажмите клавишу F4 или 4 (или F5/F6 для загрузки в безопасном режиме с поддержкой сети или командной строки соответственно).
Запуск режим диагностики из интерфейса новой Панели управления
Для запуска новой современной Панели управления Windows 10, нажмите кнопку Start и выберите меню Settings. Затем перейдите в раздел Update & security.
Перейдите в раздел Recovery и в секции Advanced Startup нажмите Restart now.

Далее все аналогично предыдущему способу.
Запуск безопасного режима из командой строки
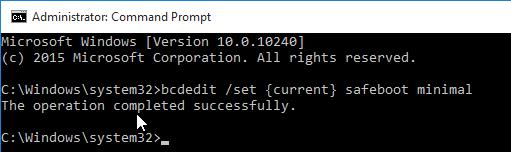
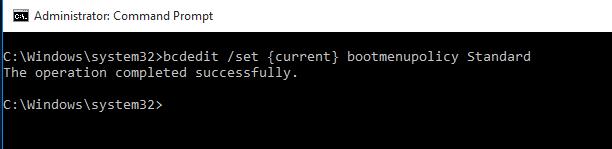
Возможно также настроить запуск Windows 10 в безопасном режиме и из командной строки. Для этого откройте командную строку (cmd) с правами администратора и выполните команду:
bcdedit /set {current} safeboot minimal
Затем перезагрузите компьютер командой:
Shutdown –f –r –t 0
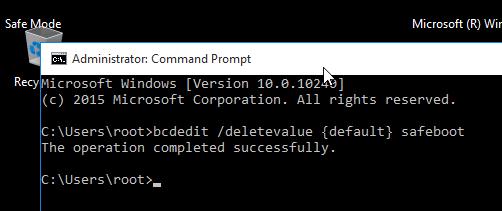
Теперь Windows 10 всегда будет загружаться в безопасном режиме. Чтобы вернуть обычный режим загрузки:
bcdedit /deletevalue {default} safeboot
Возвращаем старое текстовое меню загрузки
В Windows 10/8 возможно вернуться к старому текстовому загрузчику Windows, поддерживающего клавишу F8 (Shift+F8) и возможность выбора параметров запуска системы.
Примечание. Скорость загрузки системы с таким загрузчиком будет ниже.
Чтобы вернуть тестовый загрузчик, выполните в командной строке с правами администратора:
bcdedit /set {default} bootmenupolicy legacy
Теперь при загрузке компьютера после стадии самотестирования (POST) , нужно несколько раз нажать клавишу F8. Должно появится старое-доброе текстовое меню с параметрами загрузки системы.
Чтобы отключить текстовый режим загрузчика, и вернуться к быстрой загрузке, выполните:
bcdedit /set {default} bootmenupolicy standard
Запуск Safe Mode из режима восстановления
Мало кто знает, что, чтобы включить безопасный режим и прочие параметры восстановления в Windows 10, достаточно 3 раза подряд прервать загрузку системы кнопкой отключения питания.
На 4 раз запустится среда восстановления системы (Recovery mode), из которой можно выбрать загрузку в безопасном режиме или другие варианты загрузки системы.
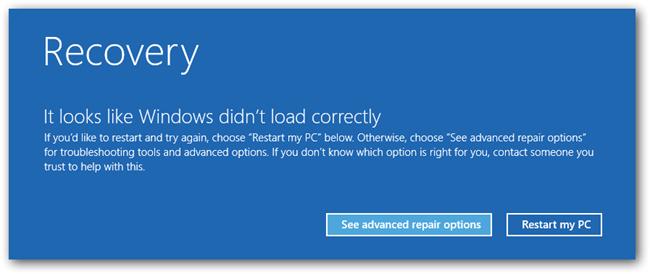
Выберите пункт See advanced repair options и следуйте инструкциям из второго пункта нашей статьи.