
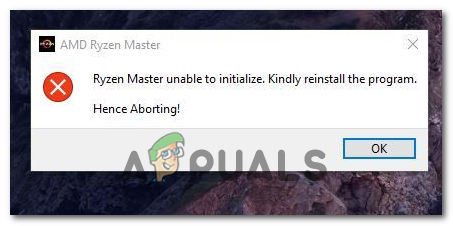
If the Ryzen Master application installed on your AMD computers is unable to launch, then this post will help you. When launching the application, since it cannot process the request, it gets aborted and asks to reinstall the app. However, more often than not, reinstalling will have no effect. Ryzen Master failed to initialize because of some security programs. In this post, we will see what you can do if Ryzen Master is unable to initialize.
Ryzen Master unable to initialize. Kindly reinstall the program.
Hence Aborting!

If Ryzen Master Failed to initialize on your computer, the very first thing you should do is to update your operating system. To do the same, just go to Windows Settings > Windows Update and then check if there is an update available. In case, there are available updates, just install them and you will be good to go. If the issue still persists, follow the solutions mentioned below to resolve it.
- Disable Microsoft Vulnerable Driver Blocklist
- Disable Core Isolation temporarily
- Reinstall Graphics Drivers
- Reinstall Ryzen Master
Let us talk about them in detail.
1] Disable Microsoft Vulnerable Driver Blocklist
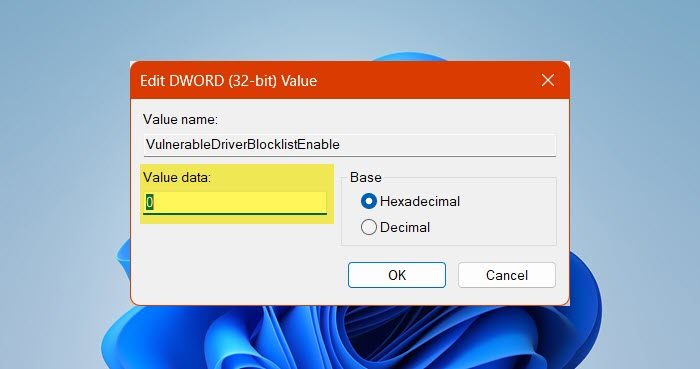
Microsoft’s Driver tends to block apps that it thinks can harm your system. In this case, Ryzen Master is getting blocked because of the Windows Security system. We need to disable Microsoft Vulnerable Driver Blocklist to get the security down. Follow the steps given below to do the same.
- Open Registry Editor from the Start Menu.
- Now, go to the following location.
HKEY_LOCAL_MACHINE\System\CurrentControlSet\Control\CI\Config\
- Then right-click on Config and select New > DWORD (32-bit value).
- Name the newly created key VulnerableDriverBlocklistEnable.
- Double-click on it and set the Value data to 0.
- Click on OK.
Finally, restart the computer and see if the issue is resolved.
2] Disable Core Isolation temporarily
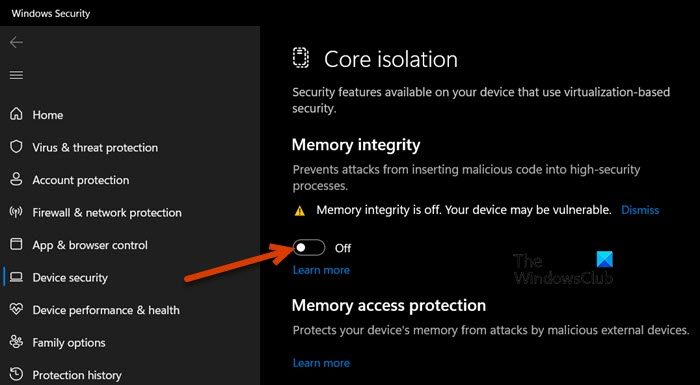
If you are not willing to make changes in the registry, we can disable Core Isolation from Windows Settings. When you enable Core Isolation, a VBS Environment is created, it conflicts with Ryzen Master and causes issues for the user. Remember that disabling the security feature will make the system vulnerable. Follow the steps mentioned below to disable Core Isolation.
- Hit Win + S, search “Core Isolation” and open the app.
- Go to Device Security.
- Turn off Memory Integrity.
You will have to restart to confirm your actions. Finally, check if the issue is resolved.
3] Reinstall Graphics Drivers
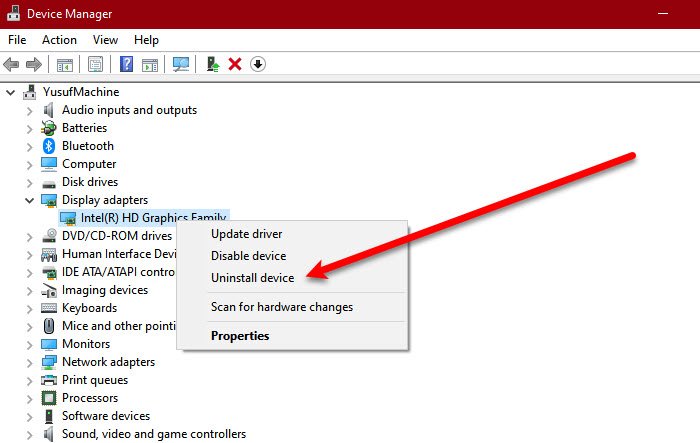
Ryzen Master will fail to initialize resources if the display driver is corrupted. We won’t get into why the driver is corrupted, but we sure will look for appropriate measures. So, in order to repair the corrupted driver, we need to reinstall it. To do the same, follow the steps mentioned below.
- Open Device Manager by Win + X > Device Manager.
- Expand the Display adapter, right-click on the display driver, and select Uninstall device.
- Now, click on Uninstall again to confirm your actions.
Note: Do keep in mind that after clicking on the Uninstall button, your screen will go black. That is a normal procedure and there is nothing to worry about. - Once the screen goes back to normal, restart your computer.
- Now that your computer started, open the Device Manager and check if the correct driver is installed.
- If the correct driver is not installed, right-click on the Display adapter and click on Scan for hardware changes.
In case Windows fails to install the right driver, download it from the manufacturer’s website and then install it.
4] Reinstall Ryzen Master
If nothing worked, your last resort is to reinstall Ryzen Master as is mentioned in the error message. Remember, Ryzen Master is an overclocking utility and is not necessary to have on your system. In order to uninstall Ryzen Master follow the steps mentioned below.
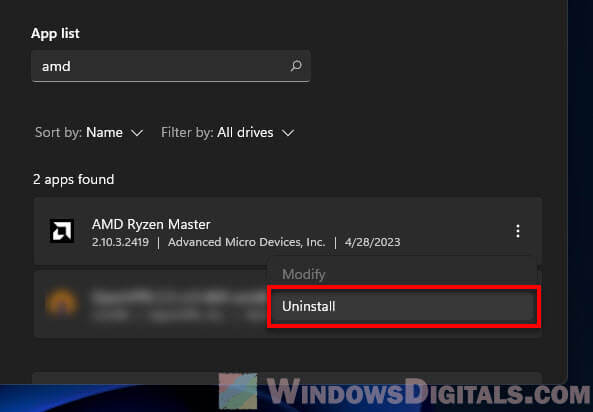
- Open Settings.
- Go to Apps > Installed apps or Apps & features.
- Look for “Ryzen Master”.
- Windows 11: Click on the three vertical dots and select Uninstall.
- Windows 10: Select the app and then click on Uninstall.
- Finally, click on the Uninstall button again to confirm your action.
After uninstalling the app, go to amd.com to install the app. Hopefully, this will do the job for you.
We hope that you will be able to resolve the issue using the solutions mentioned in this article.
Does Ryzen Master not work with Windows 11?
If Ryzen Master is not working on your computer, do check if you are using the latest version of Graphics Drivers. So, first of all, update your GPU drivers and then check if the issue is resolved. In case the issue persists, execute the solutions mentioned in this post to resolve the issue.
Raed: Ryzen Master Driver is not installed properly
Does Windows 11 have issues with AMD processors?
When Windows 11 first came out, there were notable heating issues with AMD processors. However, over time, the issue got resolved as the new operating system is completely optimized for AMD chipsets. So, if you are in the market looking to get a new computer, exclude AMD processors from the list due to these rumored issues.
Read: Fix AmdRyzenMasterDriver.sys Blue Screen error on Windows.
There is a quite widely known issue regarding AMD Ryzen Master unable to start itself up and ended up showing the “Ryzen Master unable to initialize. Kindly reinstall the program. Hence Aborting” error message. This specific issue may pop up right after a BIOS update, a CPU (hardware) upgrade on an AM4 motherboard, or, in some rare cases, after updating your GPU drivers. In this post, we’ll explain the issue and show you what you can do to fix it.
Also see: Why is my CPU Overheating and How to Fix it
What is actually the issue?
Ryzen Master is one of AMD’s popular tools for tweaking and keeping an eye on Ryzen processors. You can overclock, adjust memory settings, and much more. But some users get stuck with an error message that stops them from starting and using the utility. This could be due to a messy installation or conflicts with chipset or GPU drivers.

How to fix the “Ryzen Master unable to initialize, hence aborting” error
Before we get into the complicated steps, it’s important to know that we’ll be uninstalling some software and make changes to the Windows Registry. Make sure to follow each step carefully to avoid any further problems. If you’re feeling unsure, it might be a good idea to get help from someone who knows their way around these things or reach out to AMD support.
Related resource: How to Clear CMOS without Removing Battery or Jumper Cap
Step 1: Uninstall Ryzen Master and chipset drivers
Start by getting rid of both the Ryzen Master utility and your chipset drivers. Head over to the Control Panel and select Uninstall a program, or find them in the Apps & features in the Settings app in Windows 11. Look for Ryzen Master and the chipset drivers, and hit Uninstall. This will uninstall the software.
Learn more: How to Uninstall Drivers in Windows 11
Step 2: Delete the relevant registry entries
Editing the Windows Registry can be very risky and if not done right, it can mess up your computer badly to a point where you can’t even get into Windows. So, make sure to create a System Restore Point first before you start editing anything. This way, if things don’t go as planned, you can go back to how things were.
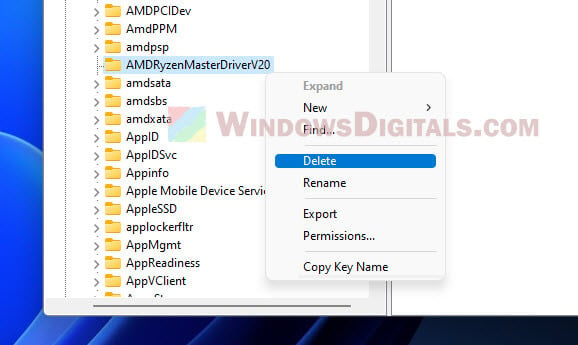
Open the Registry Editor by typing regedit in the Windows search bar and hitting Enter.
Go to the following path:
Computer\HKEY_LOCAL_MACHINE\SYSTEM\ControlSet001\Services
Look for folders named AMDRyzenMasterDriverV## (the “##” is your version number, like V13, V19, or V20). Right-click these folders and choose Delete. This clears out any old settings that might be causing problems.
Step 3: Reinstall chipset drivers and reboot
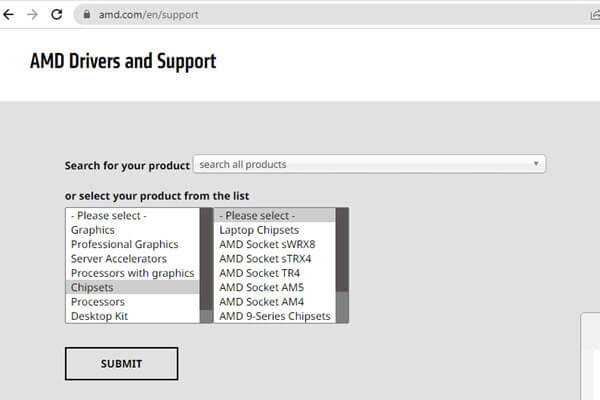
Next, reinstall the chipset drivers on your PC. These drivers are key for your hardware to work correctly. Download the latest drivers from AMD’s website:
https://www.amd.com/en/support
Find the drivers that match your motherboard or processor, download and install them, then restart your computer. This makes sure all changes take effect properly.
Step 4: Reinstall Ryzen Master
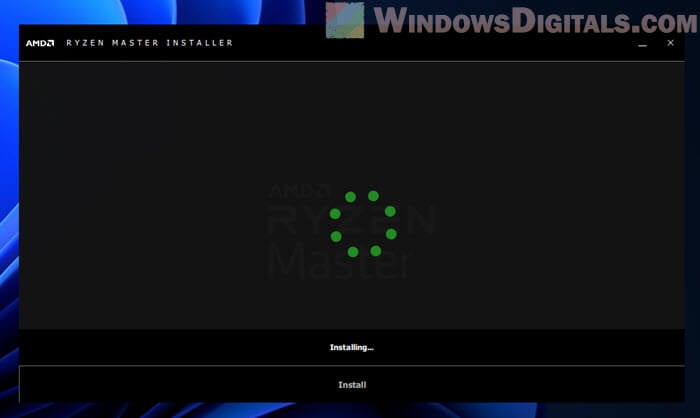
Now, get the latest Ryzen Master from AMD’s site:
https://www.amd.com/en/technologies/ryzen-master
Find the download link at the bottom of the page, install Ryzen Master, and restart your computer again.
Useful tip: How to Force App or Game to Use Dedicated GPU or Integrated Graphics
Other things to consider
Following this guide should sort out the “Ryzen Master unable to initialize” error in most cases. Yet, there are a few more things to think about that can help keep Ryzen Master running smoothly on Windows 11 or 10.
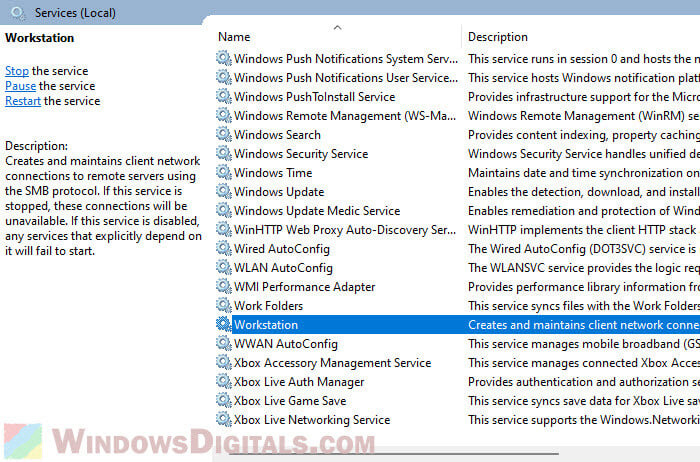
Workstation service
If you’ve tweaked any Windows services before, make sure the Workstation service is on Automatic. This service helps your computer communicate with other computers on the network. If it’s off, you might run into problems with Ryzen Master.
Driver installation order and handling future updates
Always install chipset and GPU drivers before you reinstall Ryzen Master. If you update these drivers and don’t reinstall Ryzen Master, you might get the same error again. Whether we like it or not, for some users, getting the driver order right is important to get things work correctly.
To prevent this issue from happening again, do this whenever you update your chipset or GPU drivers:
- Uninstall Ryzen Master.
- Update your chipset and GPU drivers.
- Reinstall Ryzen Master again.
This helps avoid any mix-ups between drivers and Ryzen Master.
Handy hint: How to See What Drivers Are Installed in Windows 11
Using DDU for a clean driver installation
If you’re still running into problems, consider using DDU (Display Driver Uninstaller) for a fresh install of your GPU drivers. DDU gets rid of all traces of your old GPU drivers to avoid any leftover issues.
- Download DDU from its official site:
https://www.wagnardsoft.com/ - Start your computer in Safe Mode.
- Open DDU, pick your GPU from the list, and hit Clean and restart.

- Reinstall your chipset and Radeon drivers.
- Then, reinstall Ryzen Master as described earlier.
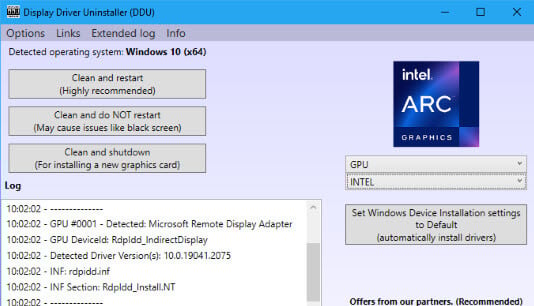
DDU makes sure there’s nothing left that could mess up your setup.
Just one last advice
The error message “Ryzen Master unable to initialize” doesn’t usually show up a lot when nothing has changed. But when you see it, it’s often because there’s a clash with the drivers on your Windows system or a change of hardware.
Therefore, a good practice is to reinstall Ryzen Master every time you update your chipset or GPU drivers, or replace your CPU or graphics card. This is a common workaround to let the software recognize your new drivers or hardware changes.
The error, “Unable to initialize; kindly reinstall. Hence, aborting,” is a common issue encountered when using Ryzen Master. This error occurs when there are problems with the initialization process of the Ryzen Master software. The error message indicates that the program failed to start correctly and advises reinstalling it as a potential solution. This error is typically caused by an outdated or corrupted installation of the application.
There are several other factors that may play a key part in users facing this error, such as conflicting software or services and incorrect system configuration.
We have curated a detailed troubleshooting guide that will enable users to rectify the error, “Unable to initialize; kindly reinstall. Hence, aborting.
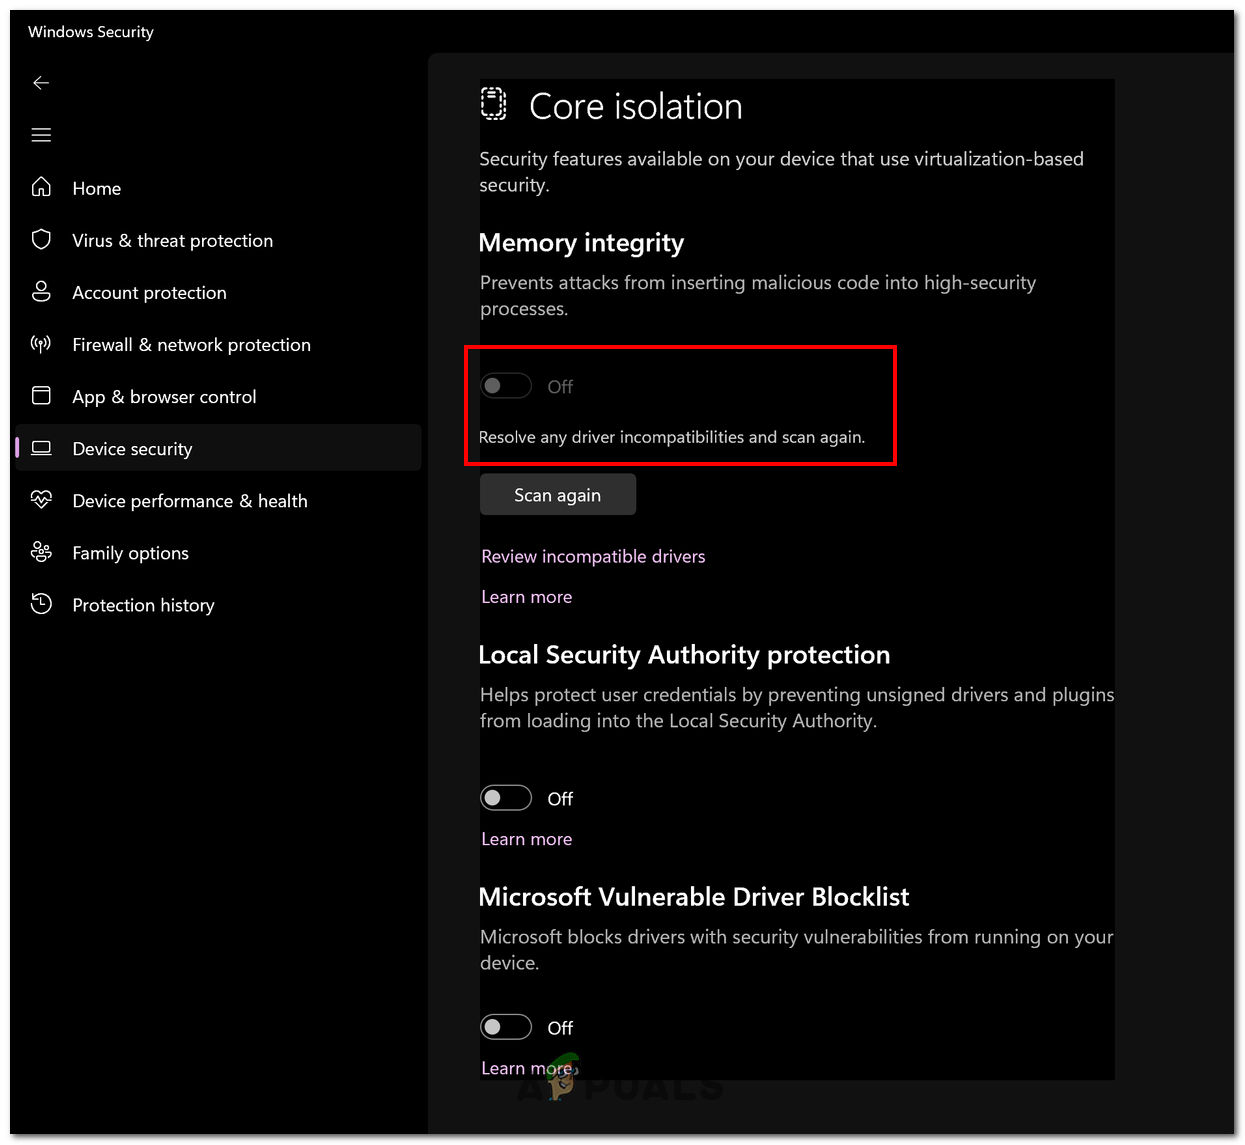
1. Bypass Windows Core Isolation
Windows Core Isolation, specifically the Memory Integrity component, can potentially impact the functionality of certain AMD applications or drivers. Windows Core Isolation’s Memory Integrity feature works by enforcing strict memory access policies, which can sometimes interfere with software that relies on direct access to system memory or makes low-level modifications.
Simply put, the Windows operating system tends to automatically crash programs created by other vendors if compatibility issues arise. However, you can take steps to bypass this security feature. Please follow the instructions below:
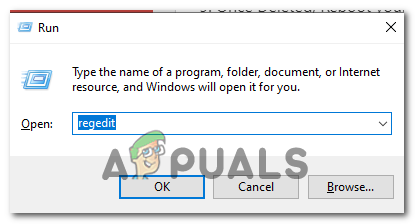
1.1 Create a DWORD value to disable the blocklist in the registry.
- Press the Windows + R keys simultaneously to open the run dialogue box.
- Type “regedit” in the run dialogue box search box.
- Now, Navigate to the path given below.
HKEY_LOCAL_MACHINE\System\CurrentControlSet\Control\CI\Config\
- In the config directory, Right-Click to open the context menu.
- Navigate to New > DWORD (32-bit value) and Name this entity as “VulnerableDriverBlocklistEnable”
- Set the value to 0
- Now, reboot your computer.
After the reboot, try launching the application in question, i.e., Ryzen Master, and check whether the issue has been resolved or not.
1.2 Disable Core Isolation from settings
Disabling core isolation can help resolve the Ryzen Master initialization error. This is achieved by eliminating potential conflicts between the VBS environment created by core isolation and the functioning of Ryzen Master. When core isolation is disabled, the VBS environment becomes inactive. This can potentially resolve compatibility issues between Ryzen Master and the isolated environment. Here’s how to do so:
- Press the Windows Key to open up the start menu.
- In the Start menu search bar, type “Core Isolation” and press the Enter key. If you do not see the Core Isolation feature, it means that CPU virtualization is disabled. Therefore, before continuing, make sure to turn it on.
- Toggle the switch under ‘memory integrity’ to ‘off,’ as shown in the image below.

- Reboot your computer.
After the reboot, Run the program and check if the issue’s been resolved or not.
2. Clear the CMOS
Clearing the CMOS can often resolve the error message, ‘Ryzen Master unable to initialize; kindly reinstall, hence aborting.’ This process fixes any corrupted BIOS settings that interfere with the initialization of Ryzen Master. By clearing the CMOS, these corrupted settings are removed, restoring the BIOS to a clean state. Here’s how to clear the CMOS:
- Shut down your computer completely and disconnect the power cord from the back of the computer or switch off the power supply.
- Open your computer case to access the motherboard. Refer to your computer or motherboard’s manual for specific instructions on how to open the case.
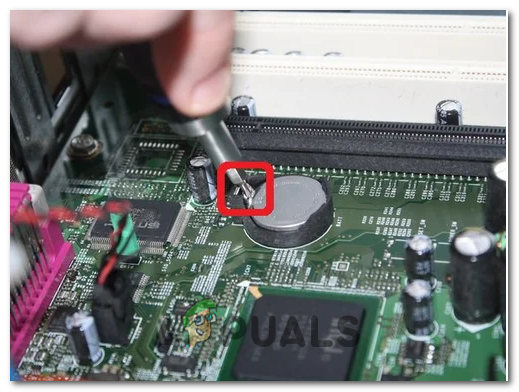
- Locate the CMOS battery on the motherboard. It resembles a round, silver coin-like battery and is often easily visible.

- Carefully remove the CMOS battery from its slot. You can use your fingers or a small flat-head screwdriver to gently lift it out.
- Wait for a few minutes to allow any residual charge in the system to dissipate. This helps to ensure that the CMOS settings are completely cleared.
- After waiting, reinsert the CMOS battery into its slot, ensuring it is properly aligned.
- Close the computer case and reconnect the power cord or switch on the power supply.
- Power on your computer and access the BIOS settings by pressing the appropriate key during the startup process (often displayed on the screen during boot-up). The commonly used keys include Del, F2, F10, or Esc. Refer to our BIOS key guide.
- Once your computer boots up successfully, Try checking it if the error has been resolved or not.
3. Reinstall the Chipset drivers
When it comes to ensuring your computer’s hardware components work smoothly, chipset drivers play a vital role. These drivers act as a bridge between the operating system and the hardware, enabling effective communication and ensuring everything functions properly.
However, over time, these drivers can become outdated or corrupted due to various factors, such as compatibility issues. This can lead to a range of issues. By reinstalling the chipset drivers, you can resolve these problems and optimize your system’s performance. As an example, we will be going through the steps to reinstall chipset drivers on an AMD device.
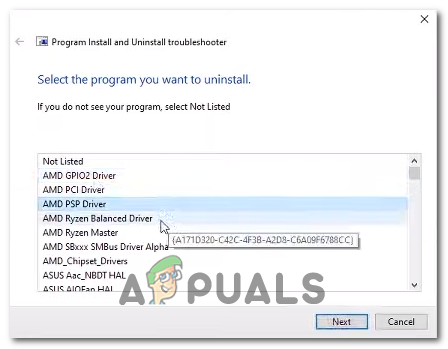
3.1 Uninstall existing chipset drivers
Follow these straightforward steps to uninstall the existing chipset drivers:
- Download the AMD cleanup utility by clicking here.
- Once downloaded, continue with the straightforward installation procedure.
- In the application select the PCI, GPIO2, etc one by one to individually uninstall them.

- Once installed, Reboot your computer.
3.1 Install AMD Chipset drivers.
Follow these steps to install the latest AMD chipset drivers:
- Click here to visit the download page for the AMD chipset drivers.
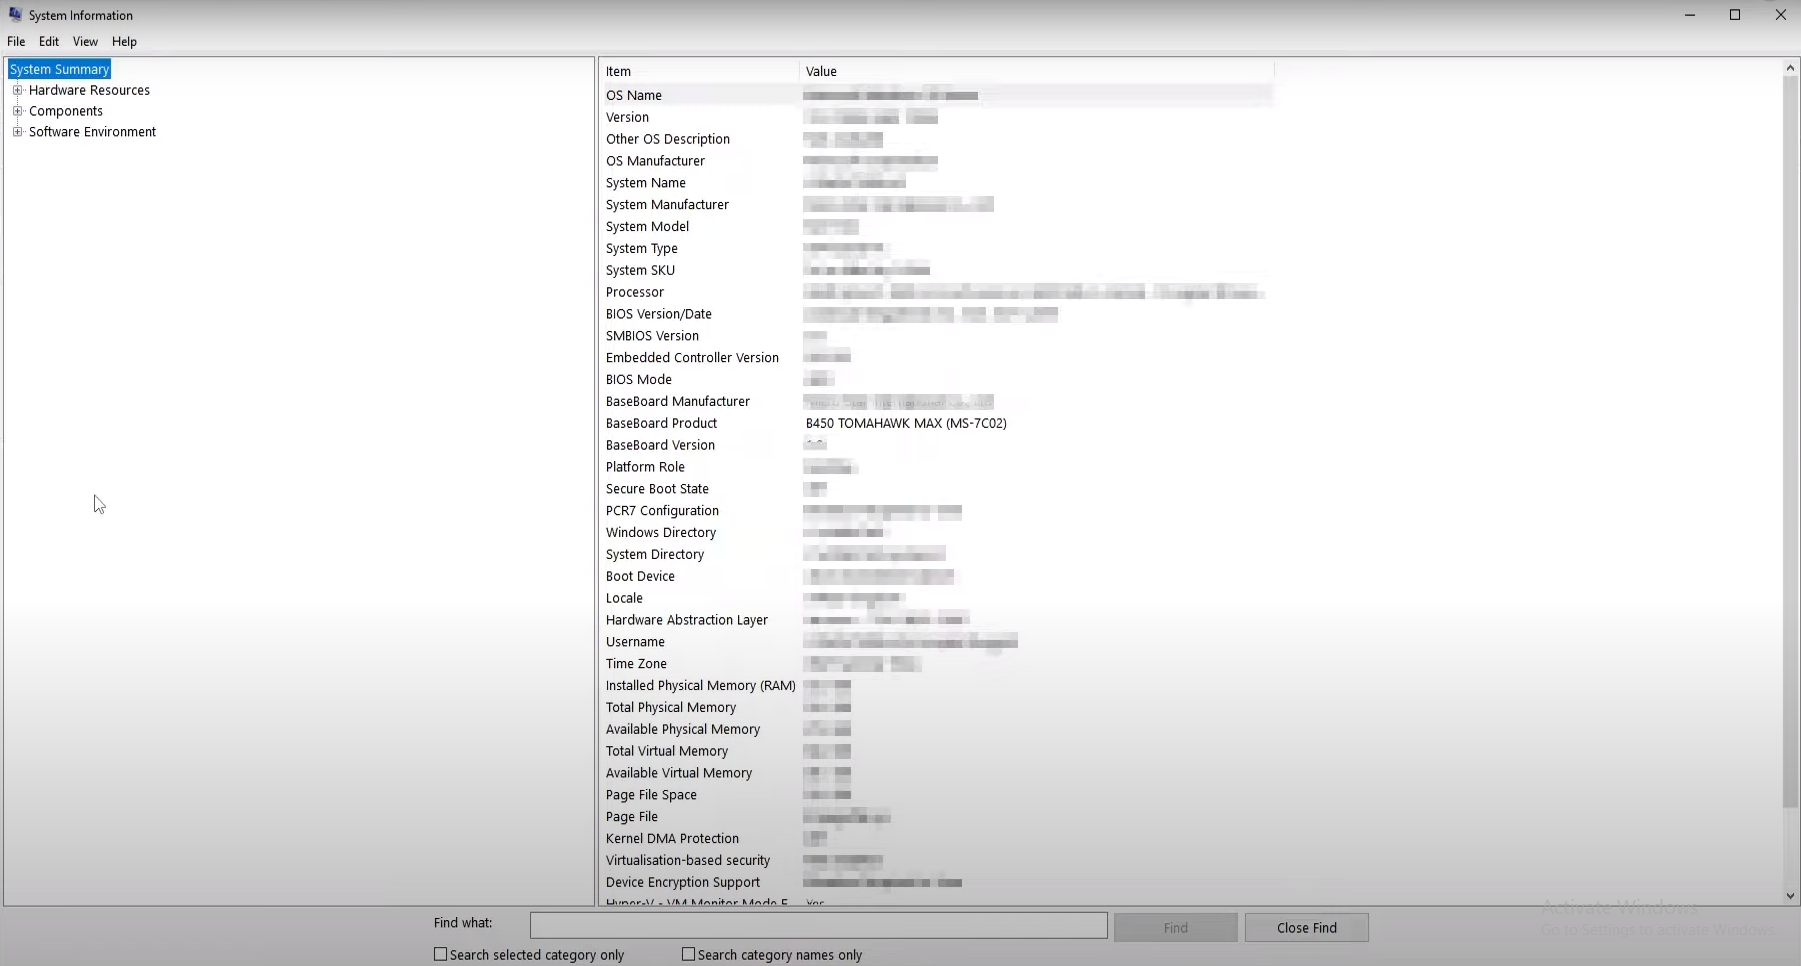
- If you’re unsure of the specification of your motherboard, Press the Windows key and in the search bar type “System Information”. Here you can check the information under Baseboard product.

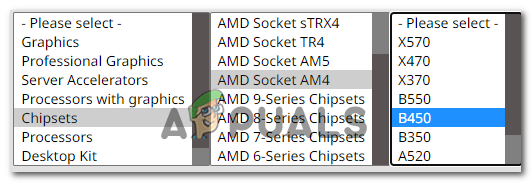
- Now, On the Download page specify your Device and download the drivers as shown in the image below.

- Download the driver file, and install it.
- Reboot your computer after installation.
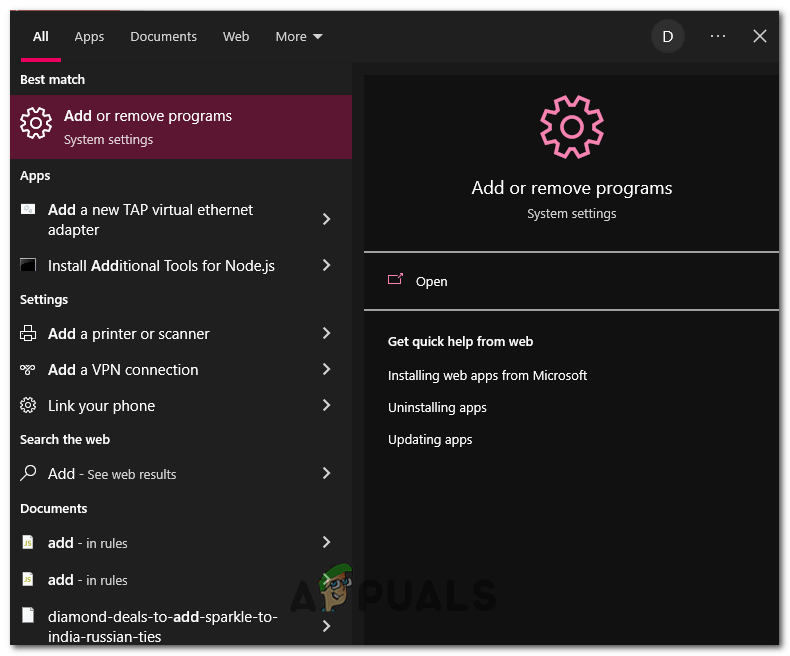
4. Reinstall Ryzen master
By addressing issues related to Ryzen Master’s installation files or configurations, reinstalling the program can potentially fix the error message ‘Ryzen Master unable to initialize; kindly reinstall the program, hence aborting.
Additionally, we will clear the registry entries to ensure the complete removal of the program from your computer before proceeding with the reinstallation. Follow these steps:
- Press the Windows key on your keyboard to open the start menu.
- In the start menu search bar, type Add or Remove program

- Now, in the list of applications locate Ryzen Master and Click on it.
- Click on the Uninstall button and wait for a while.
- Now, Press the Windows + R keys simultaneously to open the Run dialogue box.
- Type Regedit in the text box and hit the enter key.

- Navigate to the below-mentioned path:
Computer\HKEY_LOCAL_MACHINE\SYSTEM\ControlSet001\Services\AMDRyzenMasterDriverV13 (or v15, v20, the version number depends on the installed version._
- Delete the V13/V19 or the V20 folder. The version number totally depends on the version of ryzen master installed.
- Once Deleted, Reboot your computer for the changes to take effect.
Dawood Janjua
Dawood Janjua is a highly skilled technology enthusiast with a wealth of knowledge in Windows troubleshooting and gaming. He holds a CCNA certification and has a proven track record of providing exceptional support to customers. While currently working as an author, Dawood aspires to obtain the prestigious CCIE certification in the future to expand his technical expertise and provide regional-level support. With his passion for gaming and expertise in technology, Dawood is committed to sharing his knowledge with the community to help others improve their skills and knowledge in the field.
AMD’s Ryzen Master is a powerful tool designed for fine-tuning your Ryzen CPU settings. It allows users to monitor temperatures, adjust clock speeds, and overclock their processors, taking performance to new heights. However, some users encounter an issue where Ryzen Master fails to initialize, leaving them unable to utilize its features effectively. In this article, we will delve into common causes of the error, along with detailed solutions to rectify the problem, ensuring a seamless experience with Ryzen Master.
Understanding the Problem
When Ryzen Master displays the «Unable to Initialize» message, it indicates that the software is unable to launch or fully initialize the necessary components for performance management. This issue can arise due to a variety of reasons, including software conflicts, system configuration errors, outdated drivers, or system incompatibilities. By identifying these underlying causes, we can apply the appropriate solutions.
Common Causes of Initialization Errors
-
Outdated Software: An outdated version of Ryzen Master or Windows can lead to compatibility issues.
-
Driver Conflicts: Issues with chipset or graphics drivers may disrupt the proper functioning of Ryzen Master.
-
Background Processes: Certain background applications can interfere with Ryzen Master’s operation.
-
Overclocking Settings: Improperly configured BIOS overclocking settings can hinder Ryzen Master’s functionality.
-
Corrupted Installation Files: An incomplete or corrupted installation can prevent the application from initializing correctly.
-
Compatibility Issues: The version of Ryzen Master may not be compatible with specific hardware versions or system configurations.
Step-by-Step Solutions
1. Update Windows and Ryzen Master
The first step in troubleshooting the initialization issue is to ensure that both the Windows operating system and Ryzen Master are up-to-date.
-
Updating Windows:
- Open the Settings application (you can find it in the Start menu).
- Navigate to Update & Security > Windows Update.
- Click the Check for updates button. Download and install any available updates, then restart your system.
-
Updating Ryzen Master:
- Visit the official AMD website to get the latest version of Ryzen Master.
- Uninstall the current version of Ryzen Master through Control Panel > Programs and Features.
- Install the latest version that you downloaded.
2. Check for Driver Updates
Outdated drivers, especially for the chipset and graphics, can cause initialization issues with Ryzen Master.
-
Updating Chipset Drivers:
- Go to the AMD driver support page and download the latest chipset driver for your motherboard.
- Install the driver and restart your computer.
-
Updating Graphics Drivers:
- Visit the website of your graphics card manufacturer (NVIDIA or AMD) and download the latest drivers.
- Install the graphics driver and reboot your computer.
3. Disable Background Applications
Some background applications can interfere with Ryzen Master’s ability to initialize. These are often utilities related to overclocking, system monitoring, or even antivirus programs.
- Use Task Manager (Ctrl + Shift + Esc) to check for running applications.
- Right-click on unnecessary programs (such as hardware monitoring tools) and select End Task.
- If you have third-party applications that control fan speeds or overclocking settings, consider disabling them temporarily.
4. Reset BIOS Settings
If Ryzen Master was working previously, changes made in the BIOS might have affected its initialization.
- Restart your PC and press the appropriate key (usually Delete, F2, or Esc) to enter the BIOS.
- Once in BIOS, look for an option to Reset to Default settings, often found under Exit or an equivalent tab.
- Save changes and exit the BIOS. This will reset all overclocking settings and return your CPU to stock settings, allowing Ryzen Master to initialize properly.
5. Reinstall Ryzen Master
If the problem persists, a clean reinstallation of Ryzen Master may resolve the issue.
- Uninstall Ryzen Master via Control Panel > Programs and Features.
- Go to the Program Files folder on your drive (usually C:) and ensure that the Ryzen Master folder is completely deleted.
- Download and install the latest version from the AMD website, ensuring a clean installation without previous remnants.
6. Check Windows Services
Ryzen Master relies on specific Windows services to run correctly. If these services are disabled, the application might not initialize.
- Press Windows + R to open the Run dialog box.
- Type services.msc and hit Enter.
- In the Services window, look for the following services:
- Windows Management Instrumentation (WMI)
- Remote Procedure Call (RPC)
- Make sure they are set to Running. If they are disabled, right-click on them, select Start, and set their startup type to Automatic.
7. Perform a System File Check
Corrupted system files could also cause issues with initializing Ryzen Master. The System File Checker tool can repair these files.
- Open the Command Prompt with Administrator privileges (search for «cmd» in the Start menu, right-click, and select Run as administrator).
- Type the command:
sfc /scannowand hit Enter. - The system will scan for and attempt to repair any corrupted files. This process may take some time. Restart your computer once completed.
8. Check for Compatibility Issues
Ryzen Master may not support certain CPU architectures or motherboards.
- Verify the compatibility of your CPU and motherboard with the current version of Ryzen Master. Check the documentation available on the AMD website.
- Consider using earlier versions of Ryzen Master that may work better with your hardware configuration.
9. Try Running in Safe Mode
Booting your computer in Safe Mode can help to identify if any third-party software is causing the initialization issue.
- Restart your PC and hold Shift while clicking Restart from the Start menu.
- In the menu that appears, select Troubleshoot > Advanced options > Startup Settings > Restart.
- After your computer restarts, press 5 or F5 to enable Safe Mode with Networking.
- Try launching Ryzen Master in Safe Mode. If it works, this indicates that a third-party application is likely causing the conflict.
10. Consider Hardware Issues
If all software solutions fail, the problem could stem from hardware issues, such as faulty RAM or a malfunctioning motherboard. Run diagnostics to evaluate your components.
- Tools like MemTest86 can check for RAM issues.
- Use system monitoring tools to check for overheating issues or power supply concerns.
11. Contact AMD Support
If you have attempted all the solutions and Ryzen Master still fails to initialize, your final recourse may be to contact AMD support for further assistance. They can provide specific insight or advanced troubleshooting based on your hardware configuration.
Conclusion
Experiencing the «Unable to Initialize» error in Ryzen Master can be frustrating, especially for those keen on maximizing their CPU performance. However, by following the detailed solutions outlined above, most users should be able to resolve this issue effectively. Remember to keep software updated, check for driver conflicts, and maintain proper BIOS settings to prevent such issues in the future. With a functioning Ryzen Master, you can unlock the full potential of your AMD processor and enjoy enhanced performance for gaming, content creation, or any demanding applications.
AMD’s Ryzen Master software is an essential tool for many enthusiasts and gamers. It provides users with an intuitive interface to monitor and overclock their Ryzen processors. However, some users encounter issues with the software, particularly an error stating “Ryzen Master Unable to Initialize.” This message can be frustrating and may prevent users from accessing the full capabilities of their AMD hardware. In this article, we will delve into reasons behind this error and provide comprehensive solutions to help get Ryzen Master up and running smoothly.
Understanding Ryzen Master
Ryzen Master is AMD’s official utility designed for performance tuning and monitoring of Ryzen processors. The application allows users to tweak CPU settings, manage memory performance, monitor temperatures, and adjust other system parameters. For overclocking enthusiasts, it offers a simple point-and-click interface to adjust CPU clock speeds and voltages, enhancing the system’s performance without the need for complex BIOS settings.
Common Causes of Initialization Issues
The “unable to initialize” error can occur due to various factors, including:
- Compatibility Issues: The version of Ryzen Master may not be compatible with the installed version of Windows or the motherboard’s BIOS.
- Corrupt Installations: A corrupted installation of Ryzen Master can lead to this error, often caused by incomplete installations or previous versions lingering on the system.
- Outdated Drivers: Drivers for your chipset, graphics card, or other component may need updates to work seamlessly with Ryzen Master.
- Access Rights and Permissions: Sometimes, the software may not have the appropriate permissions for execution due to Windows User Account Control (UAC) settings.
- Other Software Conflicts: Background applications, especially other overclocking tools or system monitoring utilities, can conflict with Ryzen Master.
- System Configuration Settings: Incorrect BIOS settings or hardware configurations can also lead to initialization problems.
Step-by-Step Solutions for Initialization Issues
Here’s a detailed guide to resolving the “Ryzen Master Unable to Initialize” issue.
1. Update Your Windows
Before diving into further solutions, ensure that your Windows operating system is up to date. Microsoft frequently releases updates that address bugs and improve compatibility with hardware and software.
- Steps to Update Windows:
- Go to Settings > Update & Security > Windows Update.
- Click on Check for updates.
- Download and install any available updates, then restart your computer.
2. Reinstall Ryzen Master
If you’ve been using an older version of Ryzen Master, or if your installation might be corrupted, a complete reinstallation could fix the issue.
- Steps to Reinstall:
- Go to Control Panel > Programs > Uninstall a program.
- Locate Ryzen Master in the list and click Uninstall.
- Follow the prompts to remove the software completely.
- Visit the official AMD website to download the latest version of Ryzen Master.
- Install the software and restart your computer after installation.
3. Update Your Chipset Drivers
Outdated chipset drivers can cause communication errors between Ryzen Master and the CPU.
- Steps to Update Chipset Drivers:
- Go to the AMD Drivers and Support page.
- Select your motherboard’s chipset and download the latest drivers.
- Install the drivers and restart your computer.
4. Enable Administrator Rights
Running Ryzen Master with administrator privileges can sometimes resolve permission issues.
- Steps to Enable Administrator Rights:
- Right-click on the Ryzen Master shortcut on your desktop.
- Select Properties.
- Go to the Compatibility tab.
- Check the box that says Run this program as an administrator.
- Click OK and then try launching Ryzen Master again.
5. Check BIOS Settings
Sometimes, certain BIOS settings can cause issues. Ensure that your BIOS is updated to the latest version and check the following settings:
- Steps to Check BIOS Settings:
- Restart your computer and press the designated key (often Del, F1, or Esc) to enter BIOS.
- Ensure that Precision Boost and Core Performance Boost are enabled.
- Check if CSM (Compatibility Support Module) is disabled, as it can sometimes interfere with Ryzen Master.
- Save your changes and exit BIOS.
6. Disable Conflicting Software
Other overclocking tools, such as MSI Afterburner or similar applications, may interfere with Ryzen Master. Disable or uninstall them to see if it resolves the issue.
- Steps to Disable Conflicting Software:
- Go to Task Manager by right-clicking the taskbar and selecting it.
- Look for any running applications related to overclocking or system monitoring.
- Right-click and select End Task for these applications.
- Try launching Ryzen Master again.
7. Clean Boot of Windows
A clean boot can help eliminate background processes that may interfere with the operation of Ryzen Master.
- Steps for Clean Boot:
- Press Windows + R, type
msconfig, and press Enter. - In the System Configuration window, navigate to the Services tab.
- Check the box for Hide all Microsoft services and then click Disable all.
- Go to the Startup tab and click Open Task Manager. Disable all startup items.
- Close Task Manager and click OK in the System Configuration window.
- Restart your computer, and try starting Ryzen Master.
- Press Windows + R, type
8. Check for Malware
Malware or unwanted software can sometimes affect how other programs function:
- Steps to Scan for Malware:
- Use Windows Defender or another reputable antivirus software to perform a full system scan.
- Remove any threats or unwanted applications found during the scan.
9. Review Event Viewer Logs
Event Viewer can provide more insights into why Ryzen Master is unable to initialize:
- Steps to Open Event Viewer:
- Press Windows + R, type in
eventvwr, and press Enter. - Look under Windows Logs > Application for any critical errors related to Ryzen Master.
- Investigate these errors, which may give clues for troubleshooting.
- Press Windows + R, type in
10. Contact Support or Community Forums
If you’ve tried all of the above and still face issues, it’s time to reach out for help:
- Visit the AMD community forums or Ryzen Master support forums where users and AMD representatives discuss common problems and solutions.
- You can also contact AMD’s support team directly for assistance.
Preventative Measures
To avoid encountering the “Ryzen Master Unable to Initialize” error in the future, consider the following preventative measures:
- Regular Updates: Always keep Ryzen Master, Windows, and your hardware drivers updated to the latest versions.
- Minimize Conflicting Software: Be cautious about installing other overclocking or monitoring software alongside Ryzen Master.
- Routine System Maintenance: Regularly clean your system of unnecessary files and malware to keep it running smoothly.
- Backup Important Files: Before performing any major changes to your system, always back up important data.
Conclusion
The “Ryzen Master Unable to Initialize” error can be a significant hurdle for users keen on optimizing their AMD Ryzen processors. However, with a step-by-step approach, it can often be resolved through updates, reinstalls, and configuration tweaks. By following this comprehensive guide, users can hopefully get Ryzen Master working correctly and enjoy the performance enhancements that come with it. Always remember to stay informed and engaged with community discussions and AMD updates to prevent future issues. Happy tuning!