
An average PC comes with two graphics cards. The first, the default one, is called the ‘On-board’ graphics card and it’s usually an Intel chip. The second one is the ‘Dedicated’ graphics card and Nvidia and AMD are the best ones available.
A dedicated graphics card is normally found on gaming PCs but it’s not uncommon to find a lower-end GPU on a non-gaming rig.
Do I use my dedicated graphics card?
When an application’s requirements exceed the capabilities of the on-board graphics card, your system switches to the dedicated GPU. This happens mostly when you play games. You can however force an app to use the dedicated GPU. Here’s how.
As mentioned earlier, there are two major GPU manufacturers that dominate the market; Nvidia, and AMD. We’re going to show you how you can force an app to use the dedicated GPU from both manufacturers.
Windows 10 Settings
You must be running Windows 10 1809 or later for this to work. It doesn’t matter which GPU you have because this will work for both.
- Open the Settings app and go to the System group of settings.
- Select the Display tab and scroll down.
- Click the ‘Graphic Settings‘ option.
- On the Graphics Settings screen, open the ‘Choose an app to set preference‘ dropdown.
- Select the type of app you want to set the GPU use for; Classic app for desktop apps, and Universal app for UWP or Store apps.
Once selected, click the Browse button and select the app. Click the ‘Options‘ button under the app once it has been added.
In the window that opens, select ‘High Performance‘ and click ‘Save‘.
Force App To Use NVIDIA Graphics Card
It’s worth mentioning that NVIDIA uses Optimus Technology. Whenever it detects that an app needs additional, more powerful resources, the dedicated GPU kicks in. That said, you can still force an app to use the dedicated GPU.
With NVIDIA, it’s really easy
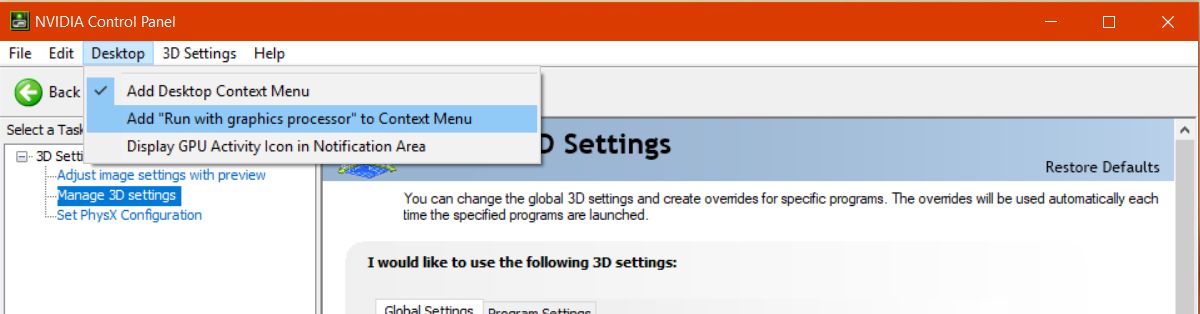
Open the NVIDIA control panel. Right-click on an empty area on your desktop and select the ‘NVIDIA Control Panel‘ option from the context menu.
Go to the Desktop menu and enable the ‘Add “Run with graphics processor” to Context Menu‘ option.
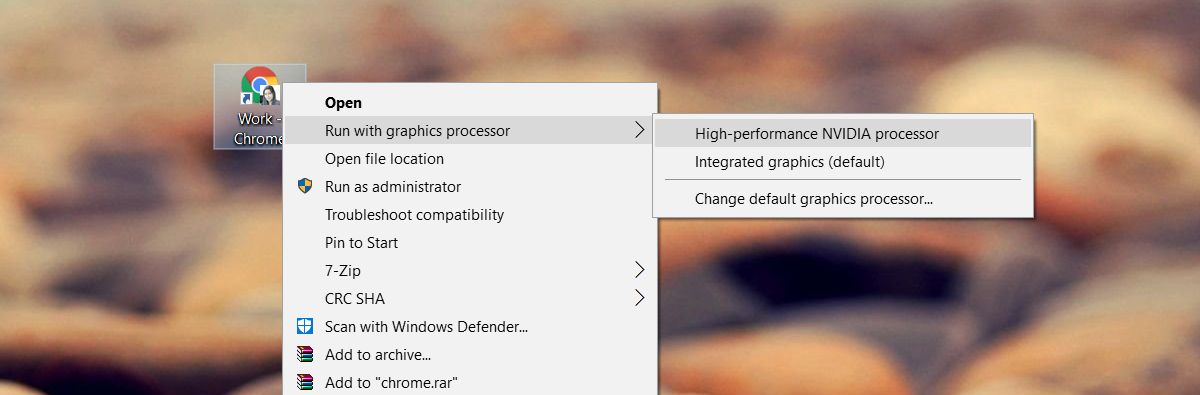
Return to your desktop. Right-click the app you want to force to use the dedicated GPU. The right-click context menu will have a ‘Run with graphics processor’ option. Select ‘High-performance NVIDIA processor’ from the sub-options and the app will run using your dedicated GPU.
Force App To Use AMD Graphics Card
You can force an app to use your AMD graphics card but it isn’t as easy, or as accessible as the NVIDIA option.
With AMD, you can select which apps will use the dedicated graphics card. You don’t have an option in the context menu. Instead, you add apps to the AMD Catalyst Control Center.
Open the AMD Catalyst Control Center app by right-clicking on an empty area on your desktop.
- Select ‘Catalyst Control Center‘ from the context menu.
- From the list of panels on the left, select ‘Power‘.
- Under ‘Power’, select ‘Switchable application graphics settings‘.
Here you will see a list of apps that AMD already recognizes as needing better GPU support. On this panel is an ‘Add Application’ button.
Click it and select the EXE of the app you want to force to use the AMD graphics card.
After you add the application, open the dropdown next to it for setting graphics options. Select ‘High performance’ and you’re done. The app will always use AMD graphics card.
We should mention that some options may differ depending on your driver version and the GPU model you have. These solutions will still work but the options may be found under a different menu.
Windows UWP Apps – NVIDA GPU
Unfortunately, this doesn’t work for Windows UWP apps. That doesn’t mean you can’t force them to use the dedicated GPU, just that the process is different for an NVIDIA GPU.
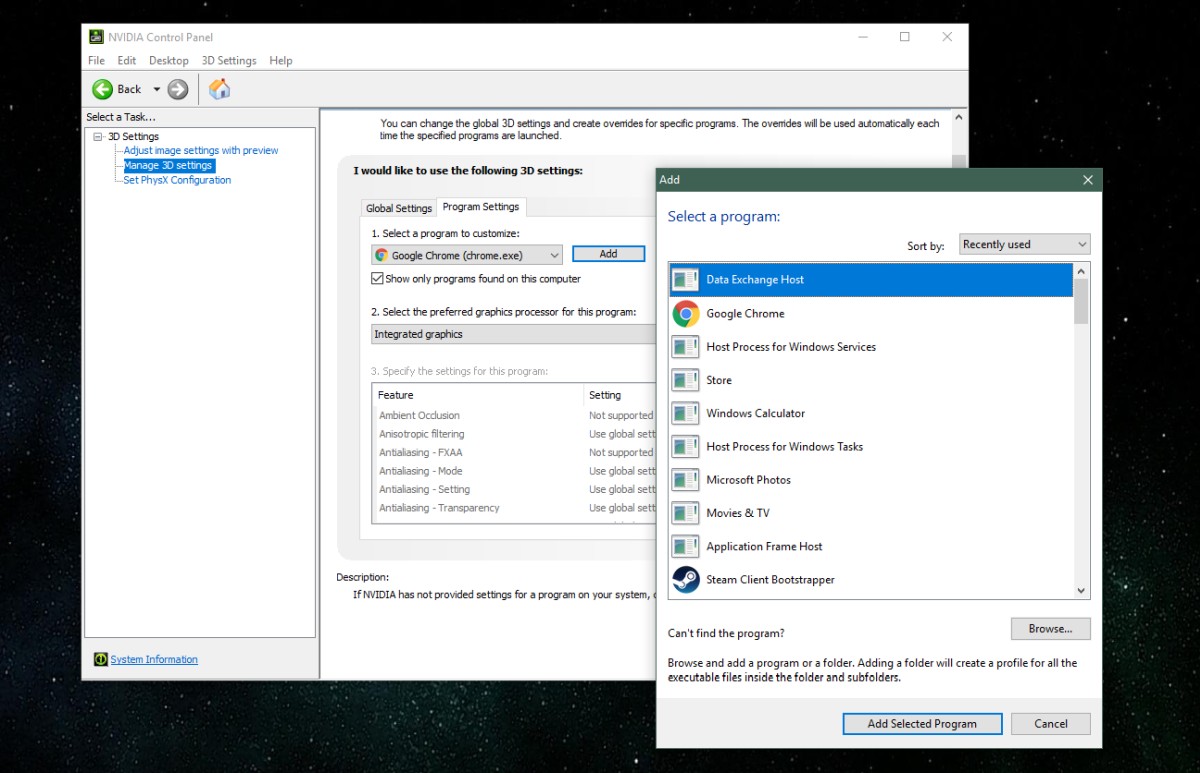
Open the NVIDIA control panel and go to 3D Settings>Manage 3D Settings.
Select the Program Settings tab and click the ‘Add’ button. Browse for the Windows UWP app you want to run with the dedicated GPU, and add it.
From the ‘Select the preferred graphics processor for this program’ dropdown, select your GPU.
Parting words
For those of you who’d like to see everything that’s been said above, but in a video, check out our tutorial below.

Fatima Wahab
Fatima has been writing for AddictiveTips for six years. She began as a junior writer and has been working as the Editor in Chief since 2014.
Fatima gets an adrenaline rush from figuring out how technology works, and how to manipulate it. A well-designed app, something that solves a common everyday problem and looks
«Run with graphics processor» missing from context menu: Change in process of assigning GPUs to use for applications
Updated 02/02/2023 04:39 PM
«Run with graphics processor» missing from context menu: Change in process of assigning GPUs to use for applications
Beginning with the Windows 10 May 2020 Update (20H1), the method for selecting which graphics processor to use for applications has changed. This has the following effects:
Live Chat
Chat online with one of our support agents
CHAT NOW
ASK US A QUESTION
Contact Support for assistance
800.797.6530
Ask a Question
Methods and steps to Remove Run with Graphic Processor From Context Menu Windows 10. – Are you a perfectionist regarding File Explorer? Then this article is pointing to you. Implementing a right-click on either a .exe file or application shortcut displays Run with Graphic Processor command on Context menu. This command comes due to NVIDIA Graphics card existing on Windows PC. The users who love to play high resolution games often use this choice. But the choice is useless for rest users. So they might want to delete this option in order to declutter the context menu.
A simple way is available to Run with Graphic Processor’ From Context Menu Windows 10 unlike with the other commands. Other commands couldn’t be deleted without experimenting with the registry editor.
Remove Run with Graphic Processor From Context Menu Windows 10
Step 1 – First of all, click on the Start icon on the extreme left of the taskbar to expand the start menu. Then Write NVIDIA Control into the search field of start menu and once the result appears at the top, hit on it.
Step 2 – Once NVIDIA Control Panel becomes available, click on the menu Desktop thereafter on Add “Run with graphic processor” to Context menu.
When you become eager to dislodge NVIDIA symbol from variant locations such as context menu, System tray, furthermore Notification area, the Desktop menu will assist.
If you untick the choice “Add Desktop context menu” eliminates NVIDIA Control Panel from the context menu on the desktop.
In a similar fashion, unchecking Show Notification tray icon eradicates Open NVIDIA GeForce Experience from System tray.
If you dislike GPU Activity simply uncheck the menu saying Display GPU Activity icon.
Conclusion
Therefore, NVIDIA Control panel helps to a great extent to keep context menu clean. Secondly, you can remove other commands only by tweaking registry editor which is not possible for an average techy guy. Whereas from this interface, they can remove unnecessary stuff quite easily and keep File Explorer clean.
A lot of modern laptops come with two graphics cards, one integrated with the motherboard and the other one with a dedicated GPU. Normally, Windows can automatically select the most appropriate GPU for all apps.
If you want to force a program to use a specific GPU, you can change Windows settings appropriately. This article will show you two ways you can force a program to use a specific GPU in Windows 10.
Table of Contents
What is a GPU?
A modern Graphical Processing Unit or GPU is similar to CPU but makes use of parallel processing and is able to handle many processes and threads at the same time. GPU has many processing cores while a CPU has only a few.
Due to its parallel processing, a GPU is normally used for graphics processing and rendering.
Why and when should a dedicated GPU be used?
GPU should be used for programs and apps that run several threads and processes and require parallel processing.
If an app only requires a single processing core to process its data, running it with a GPU will degrade its performance. This is because CPU cores are more powerful than the GPU cores.
Running apps with a dedicated GPU will also consume more power. If you are on battery life and want to prolong battery usage time, you should consider not using a dedicated GPU for any app.
How to identify the number of GPUs in your computer
Here is how you can check if you only have an integrated GPU in your computer, or a dedicated one as well, without opening up the hardware.
- Launch Run by pressing the Windows Key + R shortcut keys.
- Enter dxdiag and click ok.
In the DirectX Diagnostic Tool, the number of tabs starting with Display will tell you the number of the graphics cards in your system. You can switch between the tabs to view their details.

You can also check the no. of GPUs from the task manager performance tab.

Some of the most common and famous GPU manufacturers are:
- Nvidia
- Gigabyte
- AMD
- Asus
Every GPU from these manufacturers come with their own drivers and software-based control panels so that each user can run and customize how their GPU performs.
However, you can still forcefully run an application on a specific GPU on a Windows 10 platform, if it is compatible. Let us continue to see how this can be achieved.
Force the program to use a specific graphics card using Windows 10 settings
Regardless of the manufacturer of the GPU, or its model, every application can be customized to use a dedicated GPU when run by default.
- Open the Start Menu by pressing the Windows Key, and then click on the Settings (Gear) Icon
- Now click on System. In the left pane, select Display, then scroll to the bottom in the right pane. Click on Graphics Settings.

- Under the Choose an app to set preference drop-down menu, select Desktop App to select the third-party application you wish to configure to a specific GPU. Or select Microsoft Store App to select built-in Microsoft applications to run on a dedicated GPU.

- Once selected, browse for the application you want to configure and select it.
- You will now be able to see the application in the Graphics Settings. Click on Options.

- You will now see the Graphics Preference window, from where you can set which GPU to be used for the respective application. Select Power Saving if you wish to run the application on the built-in GPU, or select High Performance to run the application on the secondary GPU.

Click on Save to finalize the selection.


The application will now run using the selected GPU by default.
You can do this for as many apps as you want.
Force an application to use a dedicated GPU i.e., Nvidia, Radeon, etc. using the context menu
Each GPU manufacturer has their own control panel to customize the behavior of each individual GPU. This can also be used to run an application using a dedicated GPU through the Context Menu.
- Open up the GPU Control Panel by right-clicking on a blank space on the desktop.
- We now need to enable the Add Run with Graphics Processor to Context Menu somewhere in the GPU control panel. In the case of Nvidia, this can be found under the Desktop menu at the top.

- You may now close the control panel. Navigate to the application you wish to run with the secondary GPU and right-click on it. You can now find the Run with Graphics Processor option in the Context Menu. Expand it and select the GPU you wish to run it with.


The application will now run using the selected GPU. But note that this will not set the GPU to default, and only execute the selection this one time.
Please note that these configuration settings may differ for every manufacturer or graphics card model. If you can’t find this option, look for 3D program settings.
How do you know if a specific GPU is being used?
To make sure that a certain application is using a dedicated GPU while the others are using the integrated one, we can check for it using the secondary GPU’s Control Panel.
- Right-click on the blank space on the desktop and select GPU’s Control Panel.
- Enable the Display GPU activity icon in Notification Area. This will create a new icon in the bottom-right of the screen.
- Click on this icon to view all the applications using the dedicated GPU.
You can also check the GPU activity in the Windows Task Manager performance tab. This will give you an idea which GPU is being used.
How do we set the default GPU (system-wide)?
If you have a desktop computer, then you can manage your default GPU through the BIOS and set the default GPU to Integrated, PCI or PCI-E.
However, in the case of a laptop, the default GPU cannot be managed through BIOS as it does not have any PCI slots. However, it can be managed through the GPU’s control panel.
- If you have an Nvidia graphics card, open the Nvidia control panel.
- In the left pane, select Manage 3D settings.
- In the right pane, under Global Settings tab, click on the drop-down menu under Preferred Graphics Processor.
- Select the graphics card you wish to set as default, then click Apply to enforce the changes.


If done intelligently, this application specific graphics processor usage option can optimize system performance to the next level.
What applications do you run on your dedicated GPU?
Nvidia graphics cards or notebook GPUs that support the Nvidia’s Optimus Technology will let you switch the graphics processor to run any application on a Windows PC. With this Optimus technology, you can force any program, application to run using the dedicated Nvidia GPU chip. This technology automatically selects the best graphics processor for running the application taking into consideration the battery life and the performance.
Suppose if you are performing normal tasks on your PC like browsing then the integrated graphics processor will be used which is Intel HD graphics. But if you start playing a game or run a heavy 3D application then the dedicated Nvidia chip will be used automatically to deliver the best game and 3D performance without compromising the battery life.
This graphics switching only takes 5-10 seconds. However, you can manually switch graphics between Intel and Nvidia. For this, you just have to right-click on any application and look for ‘run with graphics processor’. From here you have to select the Nvidia processor to force it to run the application or program.
But sometimes the «run with graphics processor» is missing in the right context menu. There are only two reasons for this option for not being visible in the right click menu on a Windows 10 notebook PC. The first reason is that your Nvidia GPU doesn’t support the Optimus technology. If this is the case then the missing option will never come in the right-click menu. This case is only applicable to desktops which are still using older Nvidia cards in the x16 card slot with a newer Intel core CPU. In case of desktops, you don’t need to worry as your default display driver is already Nvidia if you have connected your monitor to the x16 card.
The second reason is that you have re-installed the Nvidia GPU drivers. This case applies to both the desktop and the notebooks but only on newer ones that support the Optimus technology. Now you have re-installed the driver then you only have to change one setting in the Nvidia control panel to bring the «run with graphics processor» option back in the right-click menu.
Open the Nvidia control panel in the Windows 10 control panel. Click the ‘Desktop‘ tab and put a check on ‘Add «Run with graphics processor» to Context Menu‘. That’s it you can now see that missing option in the right-click menu.

If your Nvidia graphics is older and doesn’t support Optimus technology then you can still force many games or other applications to use it instead of integrated graphics. To do this simply click the ‘Manage 3D settings’ in the control panel. Then click the ‘Program Settings‘ tab. Now click the ‘
Add
‘ button and chose your program/application. Now click the second option below it and select ‘High-performance NVIDIA processor‘. Finally, click ‘Apply‘.

You now have brought the missing «run with graphics processor» back in the right context menu. With this quick option, you can easily switch graphics between Intel and Nvidia. By default, the high-performance Nvidia processor will be automatically used for games.
If you liked the article then please share it.
Share This Post.
You May Also Read
Get Blog Updates Via Email Subscribe Now
Please check your email for the verification link. Click on the verification link to start your email newsletter subscription.