
As virtualization technology continues to evolve, using virtual machines for testing and development has become more prevalent. Among the various options available, QEMU (Quick Emulator) stands out as a versatile and powerful tool for running different operating systems on a host machine. With the recent release of Windows 11, many tech enthusiasts are eager to explore its features but may prefer not to install it directly on their physical hardware. This is where QEMU comes into play, allowing users to safely experiment with Windows 11 in a contained environment.
In this article, we’ll explore the process of installing and running Windows 11 on QEMU. We will cover topics from the prerequisites and installation steps through configuration tips to optimize performance. Whether you are a developer, a tech enthusiast, or simply someone who wants to try out Windows 11 without disturbing your existing operating system, this guide will help you navigate the setup.
Understanding QEMU
Before jumping into the installation process, let’s familiarize ourselves with QEMU. QEMU is an open-source machine emulator and virtualizer. It allows users to run multiple virtual machines on a single physical machine, utilizing either full system emulation or user-mode emulation. Its full system emulation mode is typically used for running complete operating systems, such as Windows 11.
One of the advantages of using QEMU is its flexibility. You can run virtual machines on various architectures (x86, ARM, PowerPC, etc.) and create a highly customizable environment. QEMU is particularly suited for developers needing to emulate different hardware great for testing.
Prerequisites
Before proceeding with the installation of Windows 11 on QEMU, you need to ensure that your system meets certain prerequisites:
-
Host Operating System: You can install QEMU on various operating systems, including Linux, macOS, and Windows. For this guide, we will focus on the installation on a Linux-based system, but the principles are similar on other platforms.
-
Hardware Requirements:
- A CPU that supports virtualization (Intel VT-x or AMD-V).
- At least 4 GB of RAM (8 GB is recommended for better performance).
- A minimum of 64 GB of storage is required for Windows 11 installation.
-
QEMU Installation: Ensure that you have QEMU installed on your host system. On Ubuntu or Debian-based distributions, you can install it using the following command:
sudo apt update
sudo apt install qemu qemu-kvm libvirt-daemon-system libvirt-clients bridge-utils
For Fedora, CentOS, or RHEL, use:
sudo dnf install qemu-kvm libvirt virt-install bridge-utils -
Windows 11 ISO: You need a legitimate Windows 11 ISO file. You can download it from the official Microsoft website.
-
VirtIO Drivers: For optimal performance, download the VirtIO drivers ISO, which provides optimized drivers for network and disk devices. You can usually find this on the Fedora project website or the RPM Fusion repositories.
-
QEMU Management Tools: You can also install
virt-managerfor a graphical interface, making it easier to manage your virtual machines.
Setting Up QEMU
Once you have all the prerequisites in place, you can proceed with the setup of QEMU for running Windows 11. Here are the detailed steps:
Step 1: Create a Disk Image
Before installing Windows 11, you need to create a virtual disk image where Windows 11 will be installed. You can use the qemu-img command to create a disk image:
qemu-img create -f qcow2 windows11.img 64GThis command creates a 64 GB QCOW2 disk image named windows11.img. The QCOW2 format is efficient for storage as it allows for snapshots and dynamic resizing.
Step 2: Launching the Installer
To run the Windows 11 installer, you will use the QEMU command-line tool with the necessary configurations. Here’s a basic command to start the installation:
qemu-system-x86_64 -m 8G -smp 4 -enable-kvm -cpu host -hda windows11.img -cdrom path/to/windows11.iso -boot d -net nic -net user -device virtio-balloon-pci -device virtio-serial-pci -device virtio-rng-pciIn this command:
-m 8G: Allocates 8 GB of RAM to the virtual machine.-smp 4: Allocates 4 CPU cores.-enable-kvm: Enables hardware acceleration (KVM) if supported by the host.-cpu host: Uses the host CPU model for better compatibility.-hda windows11.img: Specifies the disk image to use.-cdrom path/to/windows11.iso: Points to the Windows 11 ISO file to boot from.-boot d: Boots from the CD-ROM.-net nic: Adds a network interface card.-net user: Uses user mode networking.-device virtio-balloon-pci: Adds a balloon driver for memory management.-device virtio-serial-pci: Enables serial support for improved guest communication.-device virtio-rng-pci: Adds a random number generator for improved cryptographic strength.
This command will boot up the Windows 11 installer. Follow the on-screen instructions to proceed with the installation. Make sure to format the virtual hard disk during the installation process.
Step 3: Installing Windows 11
During the installation, you will be prompted to select your language, region, and keyboard layout. Once those settings are determined, proceed to the installation type. Select “Custom: Install Windows only (advanced)” and choose the virtual disk you previously created.
Please note:
- If you encounter an issue with installation, it might be because of TPM requirements. Windows 11 requires TPM 2.0, which is usually a challenge in virtual environments. To bypass this, you can create a virtual TPM using the
-smbiosoption in QEMU.
-smbios type=1,uuid=$(uuidgen) -machine pc-q35-6.2Continue following through the installation, entering your product key (if required), and setting up your Microsoft account.
Step 4: Installing VirtIO Drivers
After Windows 11 is installed, it’s crucial to install the VirtIO drivers for better performance. Here’s how to do it:
- Mount the VirtIO driver ISO as a secondary CD-ROM:
qemu-system-x86_64 -hda windows11.img -cdrom path/to/virtio-win.iso -boot d- From within your Windows 11 VM, navigate to the VirtIO CD drive.
- The needed drivers will usually be located in the
viostorfolder for storage and thenetkvmfolder for network drivers. Install each driver accordingly.
After the drivers are installed, you should notice improved I/O performance and better network connectivity.
Configuration and Optimization
Once Windows 11 is running on QEMU, a few configuration tweaks can significantly enhance performance and usability.
Graphics and Display
To optimize your graphics performance in the virtual machine, you could use the -vga option with QEMU:
-vga qxlUsing the QXL virtual GPU allows for better graphic performance, particularly if you plan to run graphics-intensive applications.
Adding Shared Folders
If you wish to share folders between the host and the Windows 11 VM, you can set this up using a combination of VirtIO and shared drives.
-
Create a directory on your host that you want to share:
mkdir -p ~/Shared -
Add the share to your QEMU command with the
-virtfsoption:-virtfs local,path=~/Shared,mount_tag=hostshare,security_model=none,id=hostshare -
Inside Windows, you can mount this shared folder using the following commands in PowerShell:
New-PSDrive -Name Z -PSProvider FileSystem -Root \10.0.2.4hostshare
Networking Options
For networking, QEMU provides several backend options. Using -netdev with user network mode is convenient for most users, but to set up a bridge for full network access, you’ll need additional configuration steps to ensure your virtual machine can appear as a device on the network.
Conclusion
Running Windows 11 on QEMU is an excellent way for developers and enthusiasts to try out the latest features without altering their primary operating system. By following the steps outlined in this article, you should be able to successfully install and optimize Windows 11 on a QEMU virtual machine.
QEMU offers flexibility through virtual hardware configuration, enabling you to tailor the virtual environment to fit your needs. Whether you are assessing compatibility, developing applications, or simply exploring Windows 11, QEMU will stand by as a reliable, robust tool in your virtualization toolkit.
This detailed guide should set you up for successful experiences with Windows 11 in a virtualized environment, paving the way for further exploration and development opportunities. Happy virtualizing!
Время на прочтение6 мин
Количество просмотров179K
Хотим мы того или нет, но программы, для которых необходима Windows, никуда из офисов не исчезли. В ситуации, когда их использование безальтернативно, лучше иметь виртуальную ОС, например для того, чтобы подключиться к аудио-конференции через Skype for Business.
В этой статье я расскажу, как можно с минимальными издержками установить гостевую ОС Windows на гипервизоре QEMU с помощью графического интерфейса virt-manager. Мы нанесем на карту все подводные камни и рифы, а жучков аккуратно посадим в банку.
Подготовка
Самый первый шаг — настройка параметров ядра. Обязательна поддержка KVM и vhost-net, желательна поддержка туннельных интерфейсов[1] и сетевого моста[2]. Полный список на Gentoo вики-странице QEMU.
Подготовьте дисковое пространство. Я выделил 70 GiB, и Windows 8.1 за пару месяцев использовала почти 50 GiB так, что для обновления до 10-й версии места на диске не хватило.
Далее, нам понадобится набор редхатовских драйверов virtio-win. Если у вас установлен RedHat, достаточно запустить
[root@server ~]# yum install virtio-winи образ iso будет записан в каталог /usr/share/virtio-win/. Также можно его скачать с репозитариев Fedora.
Убедитесь, что поддержка аппаратной виртуализация включена в BIOS/UEFI. Без этого KVM не будет активирован, а virt-manager выдаст вот такую ошибку.

В качестве проверки можно прочитать файл устройства.
(2:506)$ ll /dev/kvm
crw-rw----+ 1 root kvm 10, 232 ноя 9 02:29 /dev/kvm
Если файл не обнаружен, а опции ядра выставлены верно, значит дело в настройках BIOS/UEFI.
Устанавливаем нужные пакеты.
(5:519)$ sudo emerge -av qemu virt-managerДля RedHat 7 достаточно установить только virt-manager, так как QEMU устанавливается по умолчанию.
[root@server ~]# yum install virt-managerДебианщикам надо установить пакет qemu.
root# aptitute install qemuМожно теперь переходить к установке.
Запуск и инсталляция
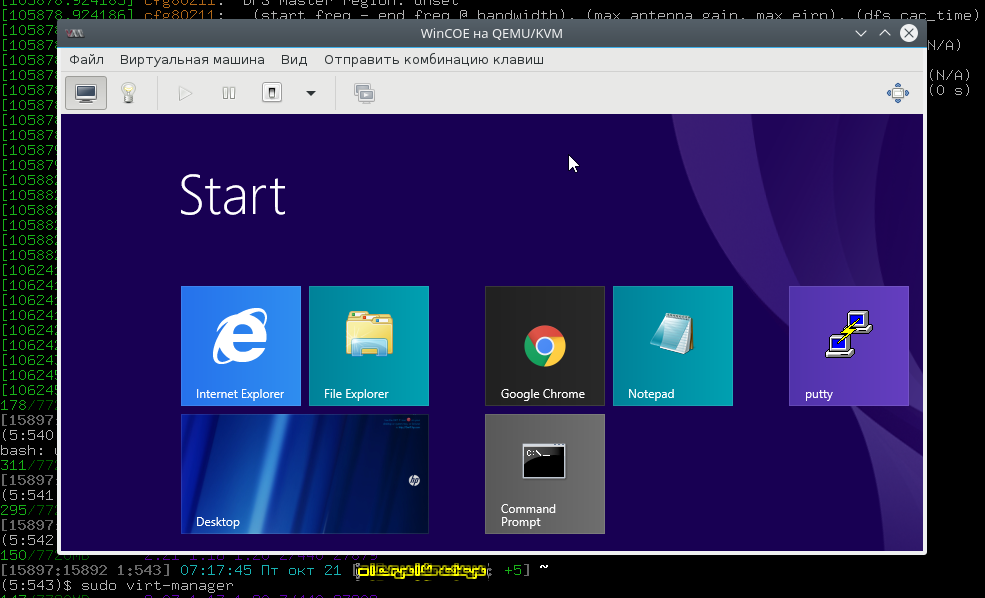
Запускаем virt-manager и создаем новую виртуальную машину из локального хранилища.

Указываем путь к установочному iso образу Windows.

Далее, на 3-м и 4-м шаге будет выбор количества CPU, объем RAM и размер дискового пространства, после чего на 5-м шаге следует выбрать дополнительные конфигурации перед настройкой.

Окно дополнительных настроек нужно для того, чтобы выполнить финт ушами. Его смысл в том, чтобы добавить виртуальный флопарь с драйверами из набора virtio-win. Это даст возможность изменить тип жесткого диска: удалить диск с шиной IDE и добавить его же, но с шиной VirtIO. Подробно, в доках RedHat.
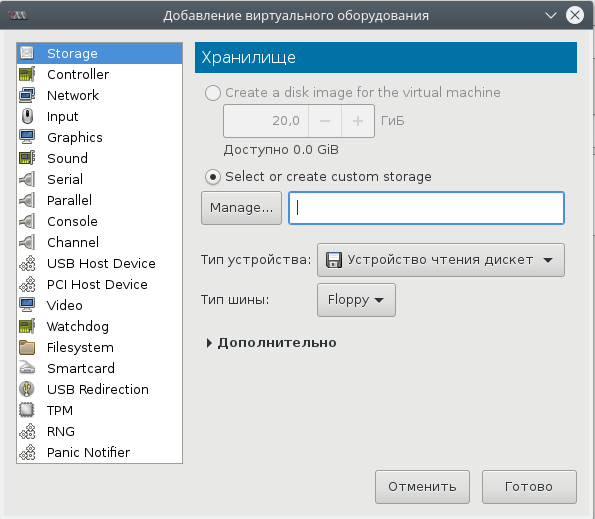
Прописываем драйвер /usr/share/virtio-win/virtio-win.vfd и добавляем виртуальный флоппи-диск. Затем переходим на вкладку [Шина] Диск № и проделываем финт с заменой шины диска: удаляем с IDE и добавляем с VirtIO.
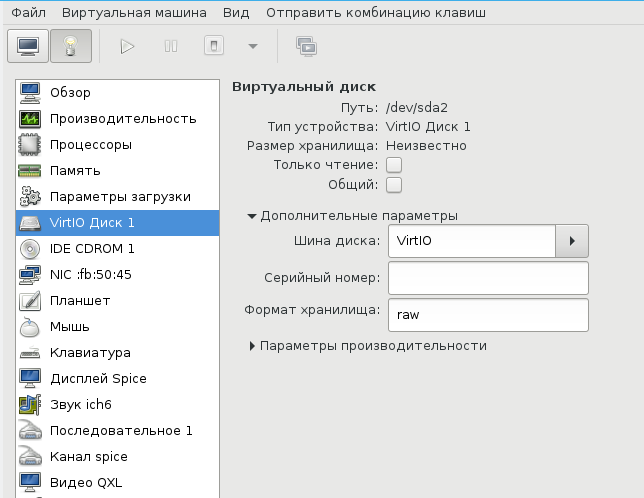
Чуть не забыл сказать, для чего нужен этот фокус. Специалисты утверждают, что с шиной VirtIO, производительность диска ощутимо выше.
В принципе, уже можно начинать инсталляцию, но мы забыли добавить CD-ROM с драйверами virtio-win, а они нам пригодятся, когда диспетчер устройств засверкает желтыми иконками вопросительного знака.
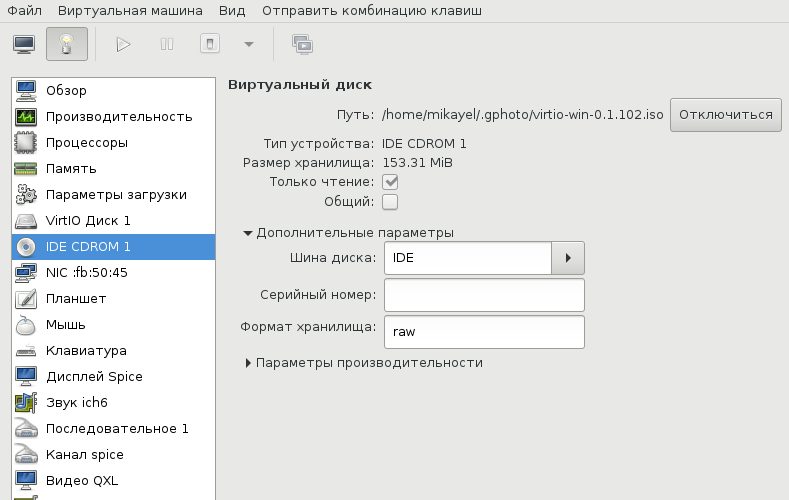
Ну вот теперь можно начать установку.
Ну хорошо, начали мы установку. А что, если установщик Windows попросит сменить диск? Мне из-за этого пришлось пару раз прервать и начать всю карусель заново, но с вами такого уже не случится.
(qemu) change ide1-cd0 /tmp/windows_8.1_x64_disk2.isoДрайвера и доводка
По окончанию процесса установки диспетчер устройств недосчитается некоторых драйверов. Предположительно, это могут быть:
Ethernet Controller
PCI Simple Communication Controller
SCSI Controller
Нужно скормить им драйвера из набора virtio-win, что подключены через IDE CD-ROM в предыдущем разделе.
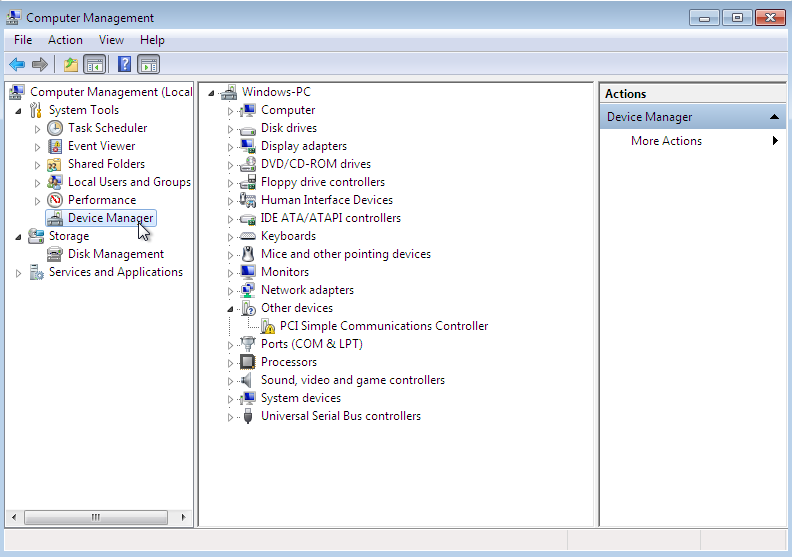
Делается это стандартно: правой кнопкой на желтый знак вопроса, обновить драйвера, путь к файлам.
Вот весь список, а это соседняя страница RedHat доков, где установка драйверов показана подробнее.
- Balloon, the balloon driver, affects the PCI standard RAM Controller in the System devices group.
- vioserial, the serial driver, affects the PCI Simple Communication Controller in the System devices group.
- NetKVM, the network driver, affects the Network adapters group. This driver is only available if a virtio NIC is configured. Configurable parameters for this driver are documented in Appendix E, NetKVM Driver Parameters.
- viostor, the block driver, affects the Disk drives group. This driver is only available if a virtio disk is configured.
Оборудование
Тут постепенно начинается область безграничных возможностей и 101 способов сделать по-своему, поэтому я покажу, как это работает у меня, а вы можете настроить более точно под свои нужды.
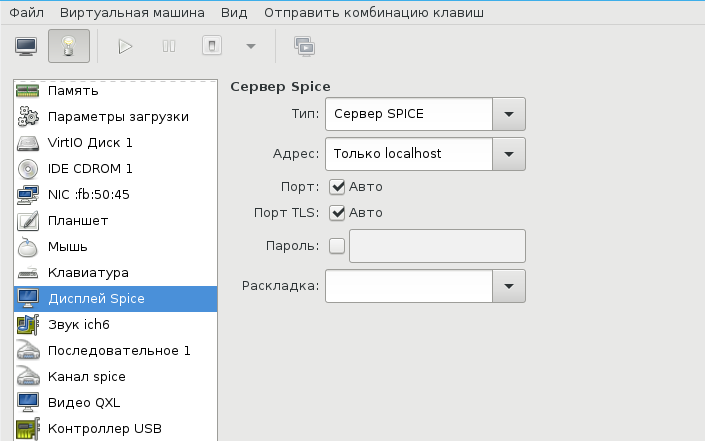
У меня выбран дисплей Сервер Spice и звуковое устройство ich6. Нет, конечно, если у вас уйма времени и желание во всем разобраться до самых тонкостей — дерзайте и пробуйте альтернативные подходы, но у меня звук взлетел, вернее завибрировал, только с такими настройками. Во второй части, посвященной прогулке по граблям и отлову багов, я расскажу об этом подробнее. В закладке видео я выставил QXL, ибо с этой опцией, благодаря волшебному драйверу, мне удалось добиться нормального разрешения экрана.
Подключаться к ВМ можно разнообразно.
- Через графический интерфейс virt-manager
- Выбрать дисплей VNC-сервер и подключаться через vnc-клиента
- Установить Spice-клиента и подключаться через него
- К Windows можно подключиться через rdp, если включен терминальный сервер
У меня вариант 3, для Gentoo это программа spice-gtk
$ eix spice-gtk
[I] net-misc/spice-gtk
     Доступные версии:      0.31 ~0.32-r1 ~0.32-r2 **9999 {dbus gstaudio gstreamer gstvideo gtk3 +introspection libressl lz4 mjpeg policykit pulseaudio python sasl smartcard static-libs usbredir vala webdav PYTHON_SINGLE_TARGET="python2_7 python3_4" PYTHON_TARGETS="python2_7 python3_4"}
     Установленные версии:  0.31(16:05:41 18.06.2016)(gtk3 introspection pulseaudio python usbredir -dbus -gstreamer -libressl -lz4 -policykit -sasl -smartcard -static-libs -vala -webdav PYTHON_SINGLE_TARGET="python2_7 -python3_4" PYTHON_TARGETS="python2_7 python3_4")
     Домашняя страница:     http://spice-space.org https://cgit.freedesktop.org/spice/spice-gtk/
     Описание:              Set of GObject and Gtk objects for connecting to Spice servers and a client GUI
Сеть
Сеть для ВМ можно настроить по-разному, на Хабре умельцы уже об этом писали. Я перепробовал несколько способов, и в конце простота опять взяла вверх. Сама ВМ запускается из под рута[3], но графический интерфейс spice-gtk — из под обычного непривилегированного пользователя. Это позволяет решить дилемму: для сетевых опций нужны права рута, а для звукового демона pulseaudio, рут запрещен. Я пробовал навешать все права на обычного пользователя, но ничего не получалось, то pulse не пульсирует, то сеть не создается, там много а тут мало. В итоге решил так и доволен. Буду рад, если в комментариях будет найден лучший способ.
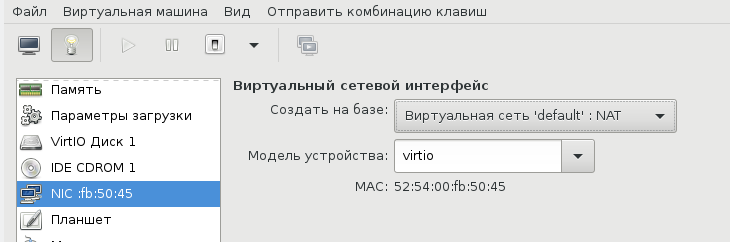
Такой простой выбор сетевых опций дает результат превосходящий ожидания. Создаются 3 дополнительных сетевых интерфейса: virbr0, virbr0-nic, vnet0.
$ ip addr
...
4: virbr0: <BROADCAST,MULTICAST,UP,LOWER_UP> mtu 1500 qdisc noqueue state UP group default qlen 1000
    link/ether 52:54:00:cc:2a:1e brd ff:ff:ff:ff:ff:ff
    inet 192.168.102.1/24 brd 192.168.102.255 scope global virbr0
       valid_lft forever preferred_lft forever
5: virbr0-nic: <BROADCAST,MULTICAST> mtu 1500 qdisc pfifo_fast master virbr0 state DOWN group default qlen 1000
    link/ether 52:54:00:cc:2a:1e brd ff:ff:ff:ff:ff:ff
11: vnet0: <BROADCAST,MULTICAST,UP,LOWER_UP> mtu 1500 qdisc pfifo_fast master virbr0 state UNKNOWN group default qlen 1000
    link/ether fe:54:00:fb:50:45 brd ff:ff:ff:ff:ff:ff
    inet6 fe80::fc54:ff:fefb:5045/64 scope link
       valid_lft forever preferred_lft forever
В iptables создается свод правил, вот основные:
$ sudo iptables -L
...
Chain FORWARD (policy ACCEPT)
target     prot opt source               destination
ACCEPT     all  --  anywhere             192.168.102.0/24     ctstate RELATED,ESTABLISHED
ACCEPT     all  --  192.168.102.0/24     anywhere
Windows ВМ:
C:\Users\user>ipconfig

Windows IP Configuration
Ethernet adapter Ethernet 2:

   Connection-specific DNS Suffix  . :
   Link-local IPv6 Address . . . . . : fe80::90c3:a458:6645:7b9a%7
   IPv4 Address. . . . . . . . . . . : 192.168.102.203
   Subnet Mask . . . . . . . . . . . : 255.255.255.0
   Default Gateway . . . . . . . . . : 192.168.102.1

Tunnel adapter isatap.{BD8F0DA4-92A8-42BD-A557-23AC89AED941}:

   Media State . . . . . . . . . . . : Media disconnected
   Connection-specific DNS Suffix  . :

Tunnel adapter IPHTTPSInterface:

   Connection-specific DNS Suffix  . :
   IPv6 Address. . . . . . . . . . . : 2620:0:a13:8a7:51af:79ae:92b8:828a
   Temporary IPv6 Address. . . . . . : 2620:0:a13:8a7:b49d:81fe:e509:16e7
   Link-local IPv6 Address . . . . . : fe80::51af:79ae:92b8:828a%15
   Default Gateway . . . . . . . . . :
Повторяю, все это libvirtd создает сам, ничего для этого делать не надо. В результате имеем нормальный роутинг между хостом и ВМ, можно обмениваться файлами по ssh / scp. Можно пойти дальше и создать шару на Windows, а на Linux хосте настроить samba, но мне это показалось избыточным.
В завершение
Трудно рассказать в одной статье обо всех аспектах Windows + QEMU/KVM, поэтому завершим в следующей. А там будет самый смак, командный интерфейс, разрешение экрана максимум 1024×768, Сцилла pulseaudio и Харибда сети, команда virsh и настройка ВМ из конфиг файла, фейл с tpm, двоичный синтаксис устройств и прочие тихие радости.
- ↑TUN/TAP interfaces
- ↑Ethernet bridging
- ↑От английского root
Если эта публикация вас вдохновила и вы хотите поддержать автора — не стесняйтесь нажать на кнопку

How to Install and Run Windows Within the QEMU Emulator
on an OpenBSD or Linux Desktop
Running Windows in a Virtual Machine
The following describes how to run Windows in a
virtual machine on any Linux distribution or on
OpenBSD.
This how-to includes all the details,
including setting up networking.
The method uses the QEMU virtual machine emulator.
QEMU running on a Linux platform can take advantage of the
KVM (or Kernel-based Virtual Machine) support within the
Linux kernel for better performance.
I was using OpenBSD
on my laptop at the time.
Now I have given up on OpenBSD, but these directions
should be useful on
FreeBSD
and Linux.
Once in a great while I need to do something with Windows.
Yes,
LibreOffice
and
Gnumeric
let me handle Microsoft Office documents just fine.
That would seem to leave games as the only thing that Windows
is really good for.
But once in a while I need to figure out
where Windows hides a certain piece of data,
or just how Windows (mis)behaves in a certain situation,
or I have to deal with a poorly written «web page» that isn’t
really a web page after all, it’s nothing more than
an Explorer page.
The solution would seem to be VMware,
but it isn’t available for the OpenBSD operating system.
And even on Linux, VMware is very sensitive to kernel version
and distribution.
You might have to keep your system running older kernels and
therefore older user-space packages to support VMware.
And forget about running VMware on other hardware platforms,
like the
Alpha
or UltraSPARC.
No problem — there is a much easier
way to run Windows!
The OpenBSD-specific parts of the following are based on
the web page found
here
and this file:
/usr/local/share/doc/qemu/README.OpenBSD
with some corrections and updates and improvements.
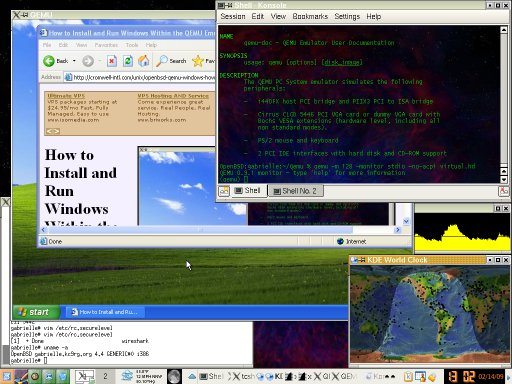
A KDE desktop on an OpenBSD laptop,
with Windows XP running within a QEMU virtual machine.
Within that XP VM, Explorer is viewing an early version
of this page (in which you did not see Explorer
viewing the page, and so on down to infinity).
Install QEMU and QEMU Kernel Support
Install the QEMU packages as needed.
They will probably have names
like qemu and qemu-img.
See my page on Unix package management
for more details on
how to add packages.
Find the package names with one of these:
Most RPM based Linux distributions:
   # yum list | grep qemu
Mageia Linux:
   # urpmq --list | grep qemu
Debian/Ubuntu Linux:
   # apt-get update
   # apt-cache dumpavail | grep -i 'package:.*qemu'
Install the packages with one of these, changing
the list of package names as needed:
Most RPM based Linux distributions:
   # yum install qemu qemu-img
Mageia Linux:
   # urpmi qemu qemu-img
Debian/Ubuntu Linux:
   # apt-get install qemu-kvm qemu-kvm-extras
OpenBSD:
   # pkg_add qemu
Notice that package collections for past versions of OpenBSD,
at least on the i386 platform, have included a
QEMU kernel accelerator package kqemu.
However, QEMU versions starting with 0.12.0 support large
memory, making them incompatible with kqemu,
and newer versions of QEMU have dropped all kqemu
support.
Quoting from the QEMU development mailing list
from August, 2009:
kqemu introduces a number of restrictions on the i386 target.
The worst is that it prevents large memory
from working in the default build.
Furthermore, kqemu is fundamentally flawed
in a number of ways.
It relies on the TSC as a time source which will not be
reliable on a multiple processor system in userspace.
Since most modern processors are multicore,
this severely limits the utility of kqemu.
If you are
building your own Linux kernel,
be sure to include support for KVM,
the Kernel-based Virtual Machine module of the Linux kernel.
Here you see a kernel build configuration underway,
with virtualization supported and loadable modules being
built for KVM for both Intel and AMD processors.
This builds three modules: kvm.ko,
kvm-amd.ko and kvm-intel.ko.
Convert an Existing VMware Image
Thanks to
Bodhi Zazan
for suggestions here!
Let’s say you are starting with an existing VMware based
virtual machine that you would like to keep.
If not,
skip to the next section.
The VMware products have probably led you to creating the
disk image as a collection of files allowed to grow up to
2 GB each instead of one large disk image file.
So, you see something like the following:
Linux:~/Qemu-Win7 % ls -sh
 1.9G Windows7-s001.vmdk   320K Windows7-s015.vmdk
 2.0G Windows7-s002.vmdk   320K Windows7-s016.vmdk
 2.0G Windows7-s003.vmdk   320K Windows7-s017.vmdk
 2.0G Windows7-s004.vmdk   320K Windows7-s018.vmdk
 2.0G Windows7-s005.vmdk   320K Windows7-s019.vmdk
 2.0G Windows7-s006.vmdk   320K Windows7-s020.vmdk
1018M Windows7-s007.vmdk   128K Windows7-s021.vmdk
 214M Windows7-s008.vmdk    11M Windows7.log
 283M Windows7-s009.vmdk   4.0K Windows7.vmdk
 320K Windows7-s010.vmdk      0 Windows7.vmsd
 1.1G Windows7-s011.vmdk   8.0K Windows7.vmx
  23M Windows7-s012.vmdk   4.0K Windows7.vmxf
 320K Windows7-s013.vmdk    12K nvram
 320K Windows7-s014.vmdk
First, convert the multi-file disk image into a single file.
You will need the vmware-vdiskmanager program
from VMware Workstation or Server.
Notice that the parameter is the relatively small file
describing the collection of large disk image files,
Windows7.vmdk
and not the 21
Windows7-s0??.vmdk files:
Linux:~/Qemu-Win7 % vmware-vdiskmanager -r Windows7.vmdk -t 0 Windows7-1file.vmdk
This will take a long time and involve a lot of disk I/O,
so be patient.
The result is one large VMware file, 15 GB in this case.
It’s the first file in this listing:
Linux:~/Qemu-Win7 % ls -sh
  15G Windows7-1file.vmdk   320K Windows7-s014.vmdk
 1.9G Windows7-s001.vmdk    320K Windows7-s015.vmdk
 2.0G Windows7-s002.vmdk    320K Windows7-s016.vmdk
 2.0G Windows7-s003.vmdk    320K Windows7-s017.vmdk
 2.0G Windows7-s004.vmdk    320K Windows7-s018.vmdk
 2.0G Windows7-s005.vmdk    320K Windows7-s019.vmdk
 2.0G Windows7-s006.vmdk    320K Windows7-s020.vmdk
1018M Windows7-s007.vmdk    128K Windows7-s021.vmdk
 214M Windows7-s008.vmdk     11M Windows7.log
 283M Windows7-s009.vmdk    4.0K Windows7.vmdk
 320K Windows7-s010.vmdk       0 Windows7.vmsd
 1.1G Windows7-s011.vmdk    8.0K Windows7.vmx
  23M Windows7-s012.vmdk    4.0K Windows7.vmxf
 320K Windows7-s013.vmdk     12K nvram
Now we can use a QEMU tool to convert the one large disk
image file to the qcow2 format.
The option is «dash-capital-O» and not «dash-zero»:
Linux:~/Qemu-Win7 % qemu-img convert -O qcow2 Windows7-1file.vmdk Windows7.qemu
Install Windows in a QEMU Emulator
If you successfully converted an existing Windows image
as described in the above section,
skip to the next section.
However, if you need to start with a fresh installation
of Windows, use this section.
This was easier for me than some web pages
suggested it would be.
But just in case, I’ll provide alternatives in case you
need to work around problems.
First, let’s put our Windows virtual machine somewhere
we can easily find it without cluttering things up.
The location ~/windows made sense to me:
% cd
% mkdir windows
% cd windows
Now create an empty disk image.
8 GB was going to be more than enough
for what I wanted to do.
It might be nice to have an image that would fit on one
single-layer DVD, so 4500M could have been a
better choice than 8G for the size specification
if I had been certain that what I needed to do would
have fit into that space.
% qemu-img create -f qcow2 virtual.hd 8G

    create     = What we're doing, creating a new disk image
    -f qcow2   = Most versatile format, supporting sparse file
                systems, AES encryption, zlib-based compression,
                and multiple VM snapshots
                  "cow" = "copy on write",
                  "q" = "qemu",
                  "2" = version 2, not the older and
                        less capable "qcow"
    virtual.hd = The name of the image file to create
    8G         = 8 gigabytes
Unlike some people, I had no trouble getting qemu
to boot from a physical drive.
I simply put a Windows XP install DVD in the drive and
used that.
However, if for some reason that didn’t work,
you could always use
k3b
or similar to create an ISO image of that DVD.
That could even be done on another system and shared over NFS.
I suspect that their problem might have been caused by
ownership and permissions on the CD/DVD device itself.
Compare the owner, group, and permissions reported by:
% ls -l /dev/cd0a
to your credentials reported by:
% id
and adjust as needed.
OK, let’s do the initial installation:
% qemu -m 512 -cdrom /dev/cd0a -boot d -monitor stdio -no-acpi virtual.hd

    -- or, if that doesn't work, something like this --

% mkdir /tmp/nfs
% su root -c 'mount server:/home/cromwell /tmp/nfs'
% qemu -m 512 -cdrom /tmp/nfs/xp.iso -boot d -monitor stdio -no-acpi virtual.hd

    -m 512               = Let the virtual machine have 512 MB of RAM.
                           This should be no more than half the
                           physical RAM in the system.
    -cdrom /path/to/dvd  = Specify the CD/DVD device or ISO image.
    -boot d              = Boot from device D, the CD/DVD.
    -no-acpi             = Disable the disfunctional ACPI.
    virtual.hd           = The file containing the virtual disk image.
Hey, look, it works!
It’s the Windows installation boot process running within
a window on your OpenBSD desktop.
Get it started and then go do something else for a while.
It will get to some point and want to reboot from the
partially installed hard drive.
Since we’re running on a virtual disk image, we will have
to use qemu to tell it how to do that.
In the terminal emulator where you started qemu
you should be looking at a qemu prompt.
Type q and <enter> to effectively
power off the virtual machine.
Now leave the DVD in the drive (or the ISO image mounted)
and start qemu a little differently.
Notice that we are not passing the -boot d
parameter specifying a boot from the DVD device.
This example is from my OpenBSD laptop where
/dev/cd0a is the CD/DVD device.
The default boot device is the file virtual.hd,
QEMU’s notion of the boot disk.
% qemu -m 128 -cdrom /dev/cd0a -monitor stdio -no-acpi virtual.hd

    -- or, if that doesn't work and the ISO image is still mounted --

% qemu -m 128 -cdrom /tmp/nfs/xp.iso -monitor stdio -no-acpi virtual.hd
Now get the secondary installation running, and go away
and do something that takes even longer….
Once it’s done installing, shut down Windows and quit
the emulator.
Then just start it the same way as shown above.
I created a one-line shell script to save typing.
Options: ACPI (or not), Networking and Graphics
ACPI
Some combinations of host OS, guest OS and QEMU version
have required me to use the
-no-acpi option.
Networking
Scenario #1:
Hardware: Intel Celeron 900 @ 2.2 GHz, 3 GB RAM
Host OS: OpenBSD 5.0 / amd64 with QEMU 0.14.1p4
Guest OS: Windows XP SP3 (IA32 version)
Add this line to the end of /etc/rc.local
to set up a bridge between the QEMU VLAN and
the physical Ethernet interface, changing
re0 as needed to the name of your Ethernet
device:
/etc/qemu-ifup re0
Put the people who will run QEMU in group wheel and
run these commands to allow them to access the network
tunnel devices:
# chgrp wheel /dev/tun?
# chmod g+rw /dev/tun?
# ls -l /dev/tun*
crw-rw----  1 root  wheel   40,   0 Apr  9 14:26 /dev/tun0
crw-rw----  1 root  wheel   40,   1 Mar 30 16:58 /dev/tun1
crw-rw----  1 root  wheel   40,   2 Mar 30 16:58 /dev/tun2
crw-rw----  1 root  wheel   40,   3 Mar 30 16:58 /dev/tun3
crw-r--r--  1 root  wheel   49,  16 Mar 30 16:58 /dev/tuner0
Now you are ready to start the virtual machine:
% qemu -m 512 -monitor stdio -net nic,model=pcnet -net tap,vlan=0 virtual.hd &

    -m 512               = Let the virtual machine have 512 MB of RAM.
                           This should be no more than half the
                           physical RAM in the system.
    -monitor stdio       = This terminal emulator is now dedicated to
                           monitoring QEMU.  Preface this command with
			   xterm -e
                           to start a new dedicated terminal emulator.
    -net nic,model=pcnet = The VM will see one PCNet Ethernet NIC
    -net tap,vlan=0      = The virtual NIC will be connected to the
                           QEMU VLAN, which the script /etc/qemu-ifup
                           has bridge to a physical Ethernet interface.
    virtual.hd           = The file containing the virtual disk image.
This allows ping and tracert to work
from the Windows virtual machine along with TCP
client applications.
It will be able to reach everything except
the host OS.
Scenario #2:
Hardware: AMD Phenom II X4 965 @ 3.4 GHz, 8 GB RAM
Host OS: Linux 3.3.1 with QEMU 0.15.0
Guest OS: Windows XP SP3 (IA32 version)
This machine is my gateway to the Internet and it has two
Ethernet interfaces.
The external interface is eth0, with an IP
address, netmask and default route set by the ISP.
The internal interface is eth1, 10.1.1.100/24.
The plan is to bridge the QEMU VLAN to the internal interface,
eth1, and have at least TCP connectivity to systems
on the internal 10.1.1/24 LAN and out on the Internet.
This means that a bridge interface br0 will appear,
and it will be used in place of eth1 as this
system’s internal interface.
The firewall rules used for
masquerading
or
NAT
must be modified.
First, I need to create two files,
/etc/qemu-ifup:
#!/bin/sh

# stop DHCP, bounce eth1
/etc/init.d/dhcpd stop
ifdown eth1
ifconfig eth1 0.0.0.0 promisc up

# bring up tap device tap1
openvpn --mktun --dev tap1 --user root
ifconfig tap1 0.0.0.0 promisc up

# create bridge eth1 - tap1
brctl addbr br0
brctl addif br0 eth1
brctl addif br0 tap1

# turn off spanning tree
brctl stp br0 off

# bring up br0 / eth1
# ifconfig eth1 10.1.1.100/24
ifconfig br0 10.1.1.100/24
/etc/init.d/dhcpd start

# forward from the bridge through masquerading to the outside.
# previous FORWARD chain and related rules were set at boot time thusly:
#    iptables -P FORWARD DROP
#    iptables -t nat -F
#    iptables -t nat -A POSTROUTING -o eth0 -j SNAT --to-source ${EXT_IPADDR}
#    iptables -A FORWARD -m state --state ESTABLISHED,RELATED -j ACCEPT
#    iptables -A FORWARD -i eth1 -j ACCEPT
#    iptables -A FORWARD -i eth2 -j ACCEPT
# and so on for other internal interfaces.  since br0 just appeared
# as a new internal interface, add the corresponding rule:
iptables -A FORWARD -i br0 -j ACCEPT
and /etc/qemu-ifdown:
#!/bin/sh

# shut down the bridge and tunnel
brctl delif br0 tap1
brctl delif br0 eth1
ifconfig br0 down
brctl delbr br0
openvpn --rmtun --dev tap1
# bring eth1 back up
ifconfig eth1 10.1.1.100/24
/etc/init.d/dhcpd stop
/etc/init.d/dhcpd start
Then, add this line to /etc/sudoers by running
visudo
%wheel ALL= NOPASSWD: /etc/qemu-if*
Finally, create a shell script qemu-xp containing:
#!/bin/sh

cd ~/Qemu-XP
sudo /etc/qemu-ifup
xterm -e qemu -m 1024 -monitor stdio virtual.hd
sudo /etc/qemu-ifdown
Now I can start the virtual machine very simply by
running that qemu-xp shell script.
Started this way, TCP client applications can reach
everything including the host OS.
However, ping and tracert will not work,
possibly causing some confusion and frustration.
Here is the network configuration before running the
/etc/qemu-ifup script.
The output has been edited down to just show the relevant
details:
% ifconfig
eth0	Link encap:Ethernet  HWaddr 00:11:95:1E:8E:B6
	inet addr:98.223.228.34  Bcast:255.255.255.255  Mask:255.255.252.0
	inet6 addr: fe80::211:95ff:fe1e:8eb6/64 Scope:Link
	UP BROADCAST RUNNING MULTICAST  MTU:1500  Metric:1

eth1	Link encap:Ethernet  HWaddr 6C:62:6D:B2:F8:41
	inet addr:10.1.1.100  Bcast:10.1.1.255  Mask:255.255.255.0
	inet6 addr: fe80::6e62:6dff:feb2:f841/64 Scope:Link
	UP BROADCAST RUNNING PROMISC MULTICAST  MTU:1500  Metric:1

lo	Link encap:Local Loopback
	inet addr:127.0.0.1  Mask:255.0.0.0
	inet6 addr: ::1/128 Scope:Host
	UP LOOPBACK RUNNING  MTU:16436  Metric:1

% route -n
Kernel IP routing table
Destination     Gateway         Genmask         Flags Metric Ref    Use Iface
0.0.0.0         98.223.228.1    0.0.0.0         UG    0      0        0 eth0
10.1.1.0        0.0.0.0         255.255.255.0   U     0      0        0 eth1
98.223.228.0    0.0.0.0         255.255.252.0   U     0      0        0 eth0
169.254.0.0     0.0.0.0         255.255.0.0     U     1002   0        0 eth0
And now, the network configuration after running the
/etc/qemu-ifup script, while the QEMU VM
is running:
br0	Link encap:Ethernet  HWaddr 6C:62:6D:B2:F8:41
	inet addr:10.1.1.100  Bcast:10.1.1.255  Mask:255.255.255.0
	inet6 addr: fe80::6e62:6dff:feb2:f841/64 Scope:Link
	UP BROADCAST RUNNING MULTICAST  MTU:1500  Metric:1

eth0	Link encap:Ethernet  HWaddr 00:11:95:1E:8E:B6
	inet addr:98.223.228.34  Bcast:255.255.255.255  Mask:255.255.252.0
	inet6 addr: fe80::211:95ff:fe1e:8eb6/64 Scope:Link
	UP BROADCAST RUNNING MULTICAST  MTU:1500  Metric:1

eth1	Link encap:Ethernet  HWaddr 6C:62:6D:B2:F8:41
	inet6 addr: fe80::6e62:6dff:feb2:f841/64 Scope:Link
	UP BROADCAST RUNNING PROMISC MULTICAST  MTU:1500  Metric:1

lo	Link encap:Local Loopback
	inet addr:127.0.0.1  Mask:255.0.0.0
	inet6 addr: ::1/128 Scope:Host
	UP LOOPBACK RUNNING  MTU:16436  Metric:1

tap1	Link encap:Ethernet  HWaddr 8E:5A:F4:C8:8C:E1
	UP BROADCAST PROMISC MULTICAST  MTU:1500  Metric:1

% route -n
Kernel IP routing table
Destination     Gateway         Genmask         Flags Metric Ref    Use Iface
0.0.0.0         98.223.228.1    0.0.0.0         UG    0      0        0 eth0
10.1.1.0        0.0.0.0         255.255.255.0   U     0      0        0 br0
98.223.228.0    0.0.0.0         255.255.252.0   U     0      0        0 eth0
169.254.0.0     0.0.0.0         255.255.0.0     U     1002   0        0 eth0
Scenario #3:
Hardware: AMD Phenom II X4 965 @ 3.4 GHz, 8 GB RAM
Host OS: Linux 3.3.1 with QEMU 0.15.0
Guest OS: Windows 7 (IA64 version)
As this is a 64-bit OS, I cannot use the qemu command.
If I try that, I get the ASCII-as-graphic «Windows is loading
files» error screen.
I also need to add the -vga std option.
A new slightly different script is needed.
Here is the qemu-win7 shell script.
#!/bin/sh

cd ~/Qemu-Win7
sudo /etc/qemu-ifup
xterm -e qemu-kvm -m 1024 -monitor stdio -vga std Win7.qemu
sudo /etc/qemu-ifdown
See the
QEMU Networking Documentation
page and also
this page
and
this page
for far more details on QEMU networking.
Networking on Windows within a QEMU Virtual Machine
I simply set up networking to use DHCP,
as QEMU includes a tiny DHCP server!
Go into the Control Panel, select Networking,
then LAN Connection, its Properties, and TCP/IP.
Then specify to get the IP address and the DNS server address
automatically.
That resulted in the following promising output:
c:\>ipconfig /all

Windows IP Configuration

        Host Name . . . . . . . . . . . . : qemuxp    (or whatever....)
        Primary Dns Suffix  . . . . . . . :           (need to fix this....)
        Node Type . . . . . . . . . . . . : Unknown
        IP Routing Enabled  . . . . . . . : No
        WINS Proxy Enabled  . . . . . . . : No

Ethernet adapter Local Area Connection:

        Connection-specific DNS Suffix  . :
        Description . . . . . . . . . . . : Realtek RTL8029(AS)-based ....
        Physical Address  . . . . . . . . : 52-54-00-12-34-56
        DHCP Enabled . .  . . . . . . . . : Yes
        Autoconfiguration Enabled . . . . : Yes
        IP Address  . . . . . . . . . . . : 10.0.2.15
        Subnet Mask . . . . . . . . . . . : 255.255.255.0
        Default Gateway . . . . . . . . . : 10.0.2.2
        DHCP Server . . . . . . . . . . . : 10.0.2.2
        DNS Servers . . . . . . . . . . . : 10.0.2.2
        Lease Obtained  . . . . . . . . . : (just a few minutes ago...)
        Lease Expires . . . . . . . . . . : (tomorrow...)
The Realtek RTL8029(AS) emulation and the MAC address are
defined by QEMU.
10.0.2.2 appears to the virtual machine to be its DNS server,
DHCP server, and default gateway.
Really that’s the QEMU software.
However, things aren’t quite working correctly yet.
DNS works, nslookup works just fine.
But the only thing you can contact via ping
or tracert or anything else is 10.0.2.2.
DNS works because QEMU is an application making calls
to the host operating system’s resolver library.
It’s QEMU that is generating and receiving the DNS queries
and replies out via the Ethernet interface.
But why are ping and tracert broken?
Sniffing packets with
Wireshark
reveals the mystery!
The ICMP packets used by ping and tracert
are being replaced by UDP port 7 (echo) packets by
Slirp,
used by QEMU and replacing the original network and
transport layer encapsulation.
My firewall isn’t masquerading and passing UDP/Echo packets,
and I wouldn’t expect other firewalls to do so, either.
TCP protocols like HTTP, FTP, and SSH work just fine.
I’ll just have to remember that ping and
tracert just don’t work from the virtual machine,
but that doesn’t mean that networking is broken.
Everything works just fine if you have multiple interfaces
on the host OS.
QEMU is a user process running on that OS, and the operating
system simply uses its routing table to decide which
interface to use, and how.
This seems to me like a huge improvement over VMware and
its obsession about the first Ethernet interface.
Click here
for details about VMware networking and
how to handle multiple physical interfaces in VMware.
See the
QEMU Networking Documentation
page and also
this page
and
this page
for far more details on QEMU networking.
Installing Office on that virtual Windows system
VMware Networking
How to install the QEMU emulator and Linux
on a USB device, so you can run Linux within
a window on a hosting machine running
Linux or BSD or Windows
Back to the Linux / Unix page
This article describes the setup of a Windows guest using QEMU.
Configuration
Host
To create a disk image for the virtual machine, run:
user $qemu-img create -f qcow2 WindowsVM.img 25G
Tip
Consider allocating more space if you are aiming for newer Windows versions as e.g. Win 10 Pro 22H2 after fresh install already occupies 20G. You may extend disk images easily by qemu-img resize later on, but as Windows rescue partition is located at the end of the disk this needs further steps.
Download a Windows driver image from this location.
Since QEMU requires a lot of options, it would be a good idea to put them into a shell script, e.g.:
FILE WindowsVM.sh
#!/bin/sh
exec qemu-system-x86_64 -enable-kvm \
        -cpu host \
        -drive file=WindowsVM.img,if=virtio \
        -net nic -net user,hostname=windowsvm \
        -m 1G \
        -monitor stdio \
        -name "Windows" \
        "$@"
Change the path to the disk image WindowsVM.img in the script. Additional options can be used when calling the script. To boot the disk image, run:
user $./WindowsVM.sh -boot d -drive file=WINDOWS.iso,media=cdrom -drive file=DRIVER.iso,media=cdrom
Install the Windows guest. See the guest section for optimum support. After the installation start the script without the additional options.
Note
When upgrading to QEMU 1.3 the -enable-kvm must be added to keep the guest responsive. Also change -net nic to -net nic,model=rtl8139 to have a network interface in the guest.
Note
When upgrading to QEMU 1.5.3, add -display sdl,frame=off,window_close=off" to keep a full screen session full screen. Without this option there may be a (new) menu bar at the top of the screen, pushing the Windows bottom menu off screen.
Note
When upgrading to QEMU 2.0.0 replace qemu-kvm with qemu-system-<CPUTYPE> (e.g. qemu-system-x86_64) (-enable-kvm switch may need to be added); the qemu-kvm wrapper has been removed — see bug #506566
Note
German (and perhaps other) localized Windows versions likely are not able to setup any virtual network card properly on QEMU >=6.0 due to a problem in Windows — see QEMU issue #774
Guest
- During installation at the partition step Windows doesn’t detect the VirtIO hard drive. Windows will require the viostor driver from the driver image listed above.
- After installation the VirtIO Ethernet adapter will appear without a driver. Windows will require the netkvm driver from the driver image listed above.
- For 32-bit Windows 7 a sound driver for the Intel 82801AA AC97 exists.
- For 64-bit Windows 7 Intel HDA is available as an option (QEMU option:
-soundhw hda) - Windows 10 guest audio emulation is tricky for ALSA users. Pass these options to QEMU:
-audiodev alsa,id=snd0,out.try-poll=off -device ich9-intel-hda -device hda-output,audiodev=snd0- This assumes use of the default ALSA device for playback.
- we cannot use AC97 for Windows 10 because there is no driver for it.
out.try-poll=offis an odd option, but without it I got nothing but clicks and pops during playback.- there may be more options required for line-in and line-out (
-device hda-duplex) or microphone and line-out (-device hda-micro). - For PulseAudio, see ArchWiki
- USB 2.0 pass through can be configured from host to guest with variations of:
-usb -device usb-ehci,id=ehci -device usb-host,bus=ehci.0,vendorid=1452
- For Windows 8.1 USB tablet is available only with USB 2.0 pass through (QEMU option:
-device usb-ehci,id=ehci -device usb-tablet,bus=ehci.0- The USB tablet device helps the Windows guest to accurately track mouse movements. Without it mouse movements will be jerky.
- Another device that can be presented to the Windows guest is the random number generator. Add QEMU option:
-device virtio-rng-pci. Now install the viorng driver from the driver image. - For Windows 10, to boot using UEFI the sys-firmware/edk2-ovmf is required on the host, then add QEMU option:
-bios /usr/share/edk2-ovmf/OVMF_CODE.fd.to the qemu call. This option is essential for running Hyper-V guest images.
SPICE
QEMU with SPICE support enables (among other things) the more powerful QXL display device and makes clipboard sharing possible (copy/paste between clients and the virtual machine).
To use SPICE with QEMU enable the following USE flag in package.use:
FILE /etc/portage/package.useSetting USE variable
Build QEMU:
root #emerge app-emulation/qemu
To connect spice server, a client like net-misc/spice-gtk is required.
Guest
On Windows guests, install Windows guest tools.
On Windows 8.1 guest, to set screen resolution more than 1024×768, install drivers from https://fedoraproject.org/wiki/Windows_Virtio_Drivers#Direct_download and QXL WDDM DOD driver. If trying to install Windows guest tool, QXL WDDM DOD driver won’t work well because of Windows SPICE agent .
To try the new qlx-dod driver linked above, in order to use the driver, update’ the basic windows display adapter driver and point it to the unzipped folder for the new driver. This can be found by: Right click the Start button -> Device Manager. Expand ‘Display adapters’ and right click on the sub entry and hit update driver.
Initialization script
To run QEMU from a script (the spicy viewer requires net-misc/spice-gtk):
FILE WindowsVM.sh
#!/bin/sh
SPICE_PORT=5924
qemu-system-x86_64 -enable-kvm -daemonize \
    -cpu host \
    -drive file=WindowsVM.img,if=virtio \
    -net nic -net user,hostname=windowsvm \
    -m 1G \
    -vga qxl \
    -spice port=${SPICE_PORT},disable-ticketing=on \
    -usbdevice tablet \
    -device virtio-serial \
    -chardev spicevmc,id=vdagent,name=vdagent \
    -device virtserialport,chardev=vdagent,name=com.redhat.spice.0 \
    "$@"
exec spicy --title Windows 127.0.0.1 -p ${SPICE_PORT}
Or remote-viewer (app-emulation/virt-viewer):
FILE WindowsVM.sh
#!/bin/sh
SPICE_PORT=5924
qemu-system-x86_64 -enable-kvm -daemonize \
    -cpu host \
    -drive file=WindowsVM.img,if=virtio \
    -net nic -net user,hostname=windowsvm \
    -m 1G \
    -vga qxl \
    -spice port=${SPICE_PORT},disable-ticketing=on \
    -usbdevice tablet \
    -device virtio-serial \
    -chardev spicevmc,id=vdagent,name=vdagent \
    -device virtserialport,chardev=vdagent,name=com.redhat.spice.0 \
    "$@"
exec remote-viewer --title Windows spice://127.0.0.1:${SPICE_PORT}
Readers help support Windows Report. We may get a commission if you buy through our links.
Read our disclosure page to find out how can you help Windows Report sustain the editorial team. Read more
When compared to previous iterations, Windows 11 has more stringent security standards. The use of a TPM 2.0 chip (TPM 2.0 can be enabled in your BIOS if you have current hardware) and Secure Boot are the two primary requirements for it to run in QEMU.
If you wish to take advantage of Windows 11, you can do so by installing it in a virtual machine using virtualization tools such as QEMU on a Linux or Mac computer. This article assumes you’ve already installed QEMU and are familiar with the process of configuring a virtual machine using it.
However, if you haven’t installed it yet, you can head to QEMU’s download page and install the version you desire after selecting your OP.
Follow along as we will first see what the QEMU requirements are then proceed with the Windows 11 installation process.
What are QEMU’s requirements?
Qemu is a hypervisor that conducts hardware virtualization and is available for free and open-source use. QEMU v2.6.0 added the virtual NVDIMM (vNVDIMM) capability, which allows users to emulate a virtual NVDIMM.

The memory type (pmem) is the only one that has been implemented. In terms of feature enhancements, the block window type (blk) is one that should be deployed in the near future. If there are any changes, please refer to the QEMU release notes.
To get TPM 2.0 emulation, you’ll need to have QEMU 4.0 or higher installed on your computer. Other hardware requirements for Windows 11 include 4GB of RAM and a hard drive with a capacity of 64GB.
Unless you match the basic requirements, which include TPM and Secure boot, you will see an error message stating that your PC is unable to run Windows 11.
How can I easily install Windows 11 in QEMU?
1. Use the QTEMU GUI
- You’ll need to download the Windows 11 ISO and mount it and go through the setup process. If you are already familiar with the process, head to Microsoft’s website to download the Disk Image ISO.

- Install the Qtemu graphical user interface. If you are using Windows 10 to run QEMU, click on the Windows x86_64 installer to download the needed GUI.

- After the installation of Qtemu run it from the Windows Start menu.
- In the first column QEMU binaries path copy-paste the following command or enter the path where you have installed the QEMU:
C:\Program Files\qemu\
- For the second column enter the path of the Qemu-img file that is:
C:\Program Files\qemu\qemu-img.exe
- Now create a folder anywhere on your computer where you want to save the virtual machines created by QEMU. Click on the folder icon given in the front of the third column to select that particular folder.

- Now, from Qemu GUI manager Qtemu, simply click on Machine and select New Machine.

- Configure the Virtual Machine hardware, then select the CPU.
- By Default, the HAXM- Hardware Accelerated Execution will be selected in the Qtemu but in case the HAXM is not supported by your system or not available, thus uncheck it and check TCG- Tiny Code Generator.
- Set the amount of RAM you want to assign to your VM.
- Right-click on the created VM on the QTEMU interface and select Machine Settings.

- There select the Boot options from the right-side panel and after that check the Enable boot menu and then the CD ROM option following the Save button.

- Under the Machine settings, go to the Media menu and click on the CD icon. This will open the Windows file explorer, navigate to the ISO file of the OS with which you want to boot in QEMU, and click on the Save button.

- Now, on the main interface of the Qtemu GUI, select the created VM and click on the Start button. This will open the boot screen.


As we know, the QEMU uses the command line to create virtual machines by default. But it would be not feasible for standard computer users using CLI to manage virtual machines, thus we install another open-source application to provide a Graphical user interface (GUI) to QEMU.
How can I make QEMU run faster?
If you are unfamiliar with the terms virtualization and emulation, you might think that they are interchangeable. However, this is as far from the truth as you could possibly go.
Virtualization is the process of emulating the operation of computer hardware, such as the CPU, CD-ROM, graphics controller, and other components.

In contrast, in an emulator, the virtual machine duplicates the entire hardware environment in software. In this way, an operating system designed for one computer architecture can be used to run on another computer architecture for which the emulator has been written.
In the case that you are running qemu-system-x64 on an x64-compatible processor, you can take advantage of the hardware virtualization capabilities provided by KVM (hardware virtualization). To make use of KVM, send the command enable-kvm to QEMU.
If you find that QEMU is slower than usual, examine your BIOS settings first, and make certain that VT-x (or Virtualization Technology, depending on your BIOS) is turned on.
Assuming there is also an option for the Execute Disable Bit, make certain that it is also enabled. In the vast majority of circumstances, both options are enabled by default.
Loredana Harsana
Windows Software Expert
Loredana is a passionate writer with a keen interest in PC software and technology. She started off writing about mobile phones back when Samsung Galaxy S II was on top of the world and she fell in love with tech of all sorts.
Whenever she’s not at her work desk, you’ll find her enjoying refreshing tea flavors, spilling stories on paper, and listening to the radio.