
Download Windows Speedup Tool to fix errors and make PC run faster
There may be some programs that you may want to always run on startup or boot. Let us say that the first thing you always do is fire up your browser and start browsing the web. Sure, when your Windows PC boots to desktop, you can always fire up your browser manually and enter the URL, but if you wish to make it auto-start, then you can easily make Programs, like say a Browser, run on startup automatically every time in Windows 11/10.
First, you want to check in the Program’s settings and see if there is a setting that allows you to make it run at every startup. If there is then it answers the question easily. If not, then there are three other ways you can do it. Let us take a look at them:
1] Place Program shortcut in Startup folder

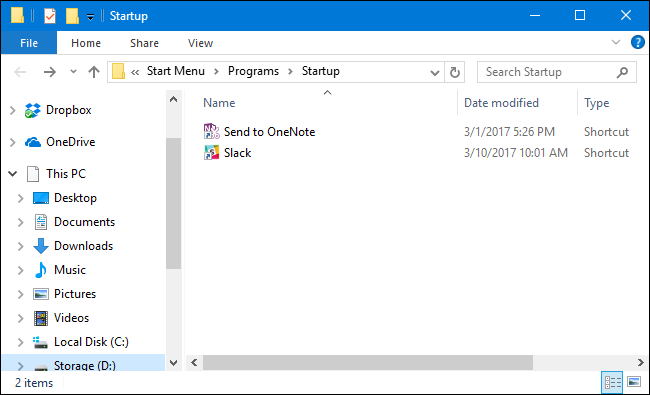
The simplest way would be to place a shortcut of the Program in the Windows Startup folder.
The Current Users Startup folder in Windows is located at:
C:\Users\Username\AppData\Roaming\Microsoft\Windows\Start Menu\Programs\Startup
These programs start up for the current logged in user only. To directly access this folder, open Run, type shell:startup and hit Enter.
The All Users Windows startup folder is located at:
C:\ProgramData\Microsoft\Windows\Start Menu\Programs\StartUp
To open this folder, bring up the Run box, type shell:common startup and hit Enter.
You can add shortcuts to the programs you want to start with your Windows in this folder.
Read: Program in Startup folder not starting on startup.
2] Add Programs to startup using freeware
While the built-in MSCONFIG or System Configuration Utility allows you to disable or delete startup entries, it does not allow you to add startup programs.
There are many free tools that let you manage startup programs.
To add startup programs easily, you can make use of freeware like Chameleon Startup Manager or Quick Startup. Both are feature-rich startup managers that let you easily add startup programs along with their launch parameters.
3] Make Program run with Windows boot via Registry
You can make use of the Registry Startup Paths to add programs to start with every boot. You can use the Run and RunOnce registry keys to make programs to run each time that a user logs on or run just once.
The registry keys are located here. They are for Current User and for All Users – Run every time or run just once:
HKEY_LOCAL_MACHINE\Software\Microsoft\Windows\CurrentVersion\Run

HKEY_CURRENT_USER\Software\Microsoft\Windows\CurrentVersion\Run

HKEY_LOCAL_MACHINE\Software\Microsoft\Windows\CurrentVersion\RunOnce

HKEY_CURRENT_USER\Software\Microsoft\Windows\CurrentVersion\RunOnce
You can read more about this on MSDN.
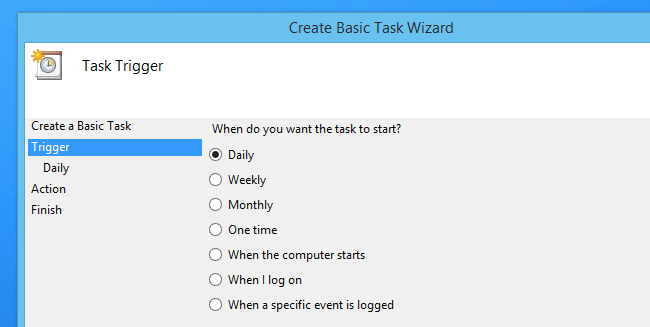
4] Use Task Scheduler to make programs run at startup
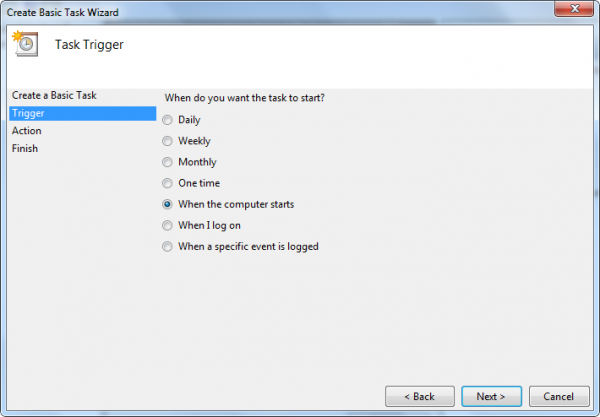
You can create a Basic Task Wizard using Windows Task Scheduler to make a program start at boot every time, by using the When the computer starts option as the Task Trigger.
Having done this, you might want to set a delay time for the Startup programs. If you wish, you can also autostart Programs as Administrator.
Read:
- How to open Files or Folders automatically when Windows starts
- This post will show you how to open Microsoft Store apps on startup
- Disable Startup programs in Windows using Task Manager, WMIC, GPEDIT, Task Scheduler, MSCONFIG, Settings.
Anand Khanse is the Admin of TheWindowsClub.com, a 10-year Microsoft MVP (2006-16) & a Windows Insider MVP (2016-2022). Please read the entire post & the comments first, create a System Restore Point before making any changes to your system & be careful about any 3rd-party offers while installing freeware.
Reader Interactions
Applies ToWindows 11 Windows 10
Support for Windows 10 will end in October 2025
After October 14, 2025, Microsoft will no longer provide free software updates from Windows Update, technical assistance, or security fixes for Windows 10. Your PC will still work, but we recommend moving to Windows 11.
Learn more
When it comes to optimizing your Windows device, one of the key optimization areas is the startup process. The applications that run automatically when your device boots up can impact both the speed of your startup and the overall performance of your system. By customizing which applications launch on startup, you can streamline your routine, ensuring that only the tools you need for your daily tasks are ready and waiting for you.
Depending on how the applications are installed and registered in Windows, there are different ways to configure their startup behavior:
-
Any applications that are registered in Windows with a startup task can be configured from Settings or from Task Manager
-
Other applications can be configured using File Explorer
Expand each section to learn more.
-
In the Settings app on your Windows device, Apps > Startup or use the following shortcut:
Startup
-
For any of the applications in the list
-
set the toggle to On to start the app automatically when you sign in
-
set the toggle to Off to prevent the app from starting automatically
-
-
If you want to change the advanced settings for that app, select the chevron and make changes as desired
If the app that you want to configure isn’t listed in the startup list, you can configure its startup from File Explorer.
The Task Manager provides the same list of startup applications offered by Settings. You can configure the applications that run at startup with both tools, but they present the information slightly differently.
The Task Manager provides a more detailed view, including the impact each app has on the startup process. This can be particularly useful for troubleshooting performance issues during system startup.
-
Right-click on Start and select Task Manager
-
Select the Startup apps tab
-
Select the app that you want to configure
-
Select Enable to start the app automatically when you sign in
-
Select Disable to prevent the app from starting automatically
-
Task Manager shows the impact of each of the apps have on your startup experience:
-
None : Startup app is disabled
-
Not Measured : No data available to measure the startup app, startup app is enabled
-
Low Impact : Total CPU usage takes less than 300 milliseconds and total disk usage is less than 292 kilobytes
-
Medium Impact : Total CPU usage takes less than 1 second but more than 300 milliseconds or total disk usage is less than 3 megabytes but more than 292 kilobytes
-
High Impact : Total CPU usage takes more than 1 second or total disk usage is more than 3 megabytes
If the app that you want to configure isn’t listed in the startup list, you can configure its startup from File Explorer.
For applications that aren’t registered in Windows with a startup task, you can use File Explorer. The process consists of copying or creating a shortcut to the app’s executable to either one of these folders:
-
shell:startup if you are configuring the startup behavior for the current user
Note: the path corresponds to %userprofile%\AppData\Roaming\Microsoft\Windows\Start Menu\Programs\Startup
-
shell:common startup if you are configuring the startup behavior for all users using the device
Note: the path corresponds to %ProgramData%\Microsoft\Windows\Start Menu\Programs\Startup
Here are the steps:
-
Right-click on Start and select Run
-
In the Run dialog box, type shell:appsfolder and select Enter
A File Explorer window opens, containing a list of all applications installed on the device. Keep this first window open
-
Right-click on Start and select Run
-
In the Run dialog box, type either shell:startup or shell:common startup and select Enter
A second File Explorer window opens, containing a list of applications that start automatically when a user signs in
-
Drag and drop the applications that you want to start automatically from the first window to the second one
If you want to remove applications from the startup folder, delete the links from the second window.
Fix the error: We couldn’t find this app
If you see the massage We couldn’t find this app as an app title in Settings, the app could be on a removable drive, a network drive, or the path to the app might not exist. This could also happen if an app was uninstalled, therefore you can try to reinstall the app to try to fix it.
To find more information about the missing app, select the icon next to the On / Off toggle of the app.
When there isn’t a valid path, a window lists the registry location or the file path that contains the broken path. If the path points to a registry location, you can use the Registry Editor and find the broken path.
Startup apps in the registry
The startup applications in Windows can be stored in specific registry locations.
-
For applications that run at startup for all users, the registry paths are:
-
HKLM\Software\Wow6432Node\Microsoft\Windows\CurrentVersion\Run
-
HKLM\Software\Microsoft\Windows\CurrentVersion\Run
-
-
For applications that run at startup for the current user, the registry path is:
-
HKCU\Software\Microsoft\Windows\CurrentVersion\Run
-
Caution: modifying the registry can have unintended consequences. It’s important to be careful and back up the registry before making changes.
Need more help?
Want more options?
Explore subscription benefits, browse training courses, learn how to secure your device, and more.
Функция автозагрузки ранее считалась вредной, поскольку старые компьютеры не обладали хорошей производительностью, а автозапуск целого набора программ заставлял и без того медленную систему запускаться очень долго. Но теперь автозагрузка программ в Windows 10 и 11 даже полезна.

Ультрабюджетные современные машины обладают приличной производительностью и имеют на борту как минимум 8 ГБ оперативной памяти, поэтому об экономии системных ресурсов речи не идет. В этой статье мы расскажем, что такое автозагрузка программ в Windows 10 и 11, и как правильно использовать эту функцию.
Что такое автозагрузка программ в Windows и зачем она нужна
Автозагрузка программ в Windows — это специальная функция, позволяющая некоторым программам запускаться одновременно со стартом Windows. Изначально она была призвана облегчить неопытным пользователям процесс работы с компьютером.
К тому же в автозагрузке часто находятся драйверы, которые необходимы для работы того или иного оборудования компьютера. Системные приложения часто ставят в автозагрузку, чтобы они запускались вместе с ОС Windows. Собрали в материале 15 лучших программ для обновления драйверов.
Однако автозагрузка также любимое место вирусов. Поэтому ее нужно уметь правильно настраивать, удаляя то, что не должно там находиться. Да и минимальное количество программ всегда положительно сказывается на общей работоспособности Windows. Читайте о лучших антивирусах в нашем материале.
Где находится автозагрузка в Windows 10 и 11
Теперь поговорим о том, где находится автозагрузка в Windows 10 и 11. В более старых версиях ОС, например, в Windows 7, папку автозагрузки можно было найти в меню «Пуск». Это было удобно, так как без проблем можно было посмотреть, что именно стартует вместе с системой.
В Windows 10 и 11 папка автозагрузки скрыта от глаз пользователей. Ее можно найти по пути «C:\Users\Имя_пользователя\AppData\Roaming\Microsoft\Windows\Start Menu\Programs\Startup». Но сначала потребуется включить возможность просматривать скрытые файлы в проводнике. Для включения отображения скрытых файлов нужно сделать следующее:
-
В верхней панели щелкните по пункту «Вид» и в панели ниже отметьте галочкой «Скрытые элементы».

-
В проводнике Windows 11 нужно раскрыть меню «Просмотреть» из верхней панели, перейти в раздел «Показать» и щелкнуть пункт «Скрытые элементы».

Как добавить программу или папку в автозагрузку на Windows
Если вы хотите добавить программу или какую-то определенную папку в автозагрузку, для этого есть сразу несколько способов. Мы рассмотрим наиболее эффективные — от простых до продвинутых.
1. С помощью диспетчера задач
Это самый простой способ добавления программ в автозагрузку. Нужно сделать следующее:
-
Запустите диспетчер задач при помощи сочетания клавиш «Ctrl+Shift+Esc» и переместитесь на вкладку «Автозагрузка». Также диспетчер можно вызвать при помощи сочетания «Ctrl+Alt+Del» и меню автозагрузки или щелкнуть правой кнопкой мыши по кнопке «Пуск» и в появившемся меню выбрать «Диспетчер задач».

-
В диспетчере на Windows 11 этот пункт называется «Автозагрузка приложений» и переехал он на боковую панель.

-
Появится список программ в автозагрузке, в том числе отключенных. Выберите нужную.
-
Щелкните по выбранной программе правой кнопкой мыши и в появившемся меню выберите «Включить».

-
Вот так включается автозагрузка программ в диспетчере из Windows 11.

Так можно включить те приложения, которые автоматически прописываются в автозагрузке, но по каким-то причинам деактивированы. Но не стоит активировать все программы без исключения. Особо требовательные к ресурсам компьютера можно оставить отключенными.
2. Через меню «Автозагрузка» в параметрах системы
В Windows 10 и 11 есть специальное меню параметров, которое существует отдельно от панели управления. Именно в нем можно настроить приложения, которые должны стартовать вместе с системой. Сделать это можно следующим образом:
-
Запустите «Параметры» с помощью сочетания клавиш «Win+I», переместитесь в раздел «Приложения».

-
В Windows 11 меню приложений находится в боковой панели.

-
Затем переключитесь на пункт «Автозагрузка».

-
Раздел «Автозагрузка» в Windows 11 располагается здесь.

-
При помощи переключателей напротив названия каждой программы в появившемся списке включите ее автозапуск.

-
В Windows 11 процесс включения автозагрузки конкретного приложения выглядит так.

Суть способа практически такая же, как и в варианте с диспетчером задач. Просто используется немного другой интерфейс — некоторым пользователям он подходит больше, чем список программ в диспетчере задач.
3. С помощью редактора реестра
Это сложный способ для продвинутых пользователей, но он позволяет добавить в автозагрузку даже те программы, которых нет в стандартном списке. Однако нужны хотя бы базовые навыки работы с редактором реестра. Алгоритм действий такой:
-
Запустите редактор реестра. Для этого нажмите сочетание клавиш «Win+R» для вызова диалога «Выполнить», введите в строке «regedit» и нажмите «ОК».

-
Далее в редакторе пройдите по пути «HKEY_LOCAL_MACHINE\SOFTWARE\Microsoft\Windows\CurrentVersion\Run».

-
Щелкните правой кнопкой мыши по пустому месту в папке и выберите «Создать» и далее «Строковый параметр». Имя параметру можно дать любое, например, «Autostart».

-
Дважды кликните по только что созданному параметру.

-
В поле «Значение» введите путь к исполняемому файлу программы и нажмите «ОК».

Осталось только продублировать параметр «Autostart» дополнительно в ветках «HKEY_CURRENT_USER\SOFTWARE\Microsoft\Windows\CurrentVersion\Run», «HKEY_CURRENT_USER\SOFTWARE\Wow6432Node\Microsoft\Windows\CurrentVersion\Run» и «HKEY_LOCAL_MACHINE\SOFTWARE\Wow6432Node\Microsoft\Windows\CurrentVersion\Run» для того, чтобы все работало нормально.
4. С помощью планировщика заданий
Планировщик заданий позволяет не только добавить программу в автозагрузку, но и настроить конкретное время их запуска для того, чтобы немного разгрузить систему во время старта. Перед тем, как добавлять программу с помощью планировщика, нужно убрать ее из списка автозагрузки в планировщике задач или в параметрах системы.
Далее сделать нужно следующее:
-
Нажмите на клавиатуре «Win+R», введите в строке «taskschd.msc» и щелкните «ОК».

-
Нажмите кнопку «Создать простую задачу».

-
Придумайте имя, кликните «Далее». Описание можно не добавлять.

-
В разделе «Триггер» отметьте «При запуске компьютера» и щелкните «Далее».

-
На следующем этапе выберите «Запустить программу», нажмите «Далее».

-
Затем впишите путь к исполняемому файлу и кликните «Далее».

-
Отметьте пункт «Открыть окно «Свойства» после нажатия кнопки «Готово»» и нажмите «Готово».

-
В следующем диалоговом окне перейдите на вкладку «Триггеры».

-
Выберите нужную задачу в списке и щелкните кнопку «Изменить».

-
Отметьте пункт «Отложить задачу на», выставьте необходимый временной промежуток и затем нажмите «ОК».

Теперь задача на автостарт определенного приложения успешно создана. Для проверки ее работоспособности можно перезагрузить компьютер. Таким образом можно добавить в автозагрузку любую программу.
5. С помощью стороннего ПО
Существует ряд полезных приложений, которые позволяют управлять системной автозагрузкой программ. Многие из них являются универсальными и позволяют дополнительно чистить накопители и оптимизировать систему. Вот наиболее полезные программы под Windows для управления автозагрузкой:
-
Starter. Это весьма неплохая и функциональная альтернатива стандартному диспетчеру задач Windows. Программа позволяет не только управлять автозагрузкой, но и умеет показывать программы, стартующие вместе с операционной системой для каждого пользователя компьютера отдельно.
-
Autoruns. Это софт от компании Microsoft. Главным преимуществом является то, что программа позволяет управлять автозагрузкой не только сторонних программ, но и встроенных приложений, а также системных служб и процессов. Правда, со службами нужно быть аккуратным, поскольку можно отключить что-либо жизненно важное для системы.
-
Auslogics BoostSpeed. Настоящий комбайн, предназначенный для всесторонней оптимизации операционной системы Windows. Программа платная, но она стоит своих денег. В числе прочего есть возможность всесторонне управлять автозагрузкой программ и системных компонентов. Но для слабых ПК она может быть тяжеловатой.
Какие программы стоит удалить из списка автозапуска
Нужно определить, какие именно программы сильнее нагружают систему во время автозапуска. В том же диспетчере задач отображается степень влияния на ОС. Если у вас установлены какие-то продукты от Adobe, то в автозагрузке может поселиться большое количество сопроводительного софта, который к тому же очень требователен к системным ресурсам — поэтому продукты Adobe рекомендуется отключать в первую очередь.
Вообще, можно отключить все, без чего система и оборудование могут нормально работать. Например, панель управления Realtek, мессенджеры, торрент-клиенты, игровые лаунчеры и тому подобное.
Но если у вас игровая мышка, под которую предусмотрен сопроводительный софт, то вот его убирать из автозагрузки не рекомендуется, поскольку настройки мыши могут сбиться, и она будет работать не так, как было задумано.
Как удалить приложения из автозагрузки
Процесс удаления во многом зависит от того, как именно приложение было добавлено в автозагрузку. Например, в диспетчере задач нужно перейти на вкладку «Автозагрузка», щелкнуть правой кнопкой мыши по нужной программе и в появившемся меню выбрать «Отключить».


Если же использовались системные параметры, то нужно пройти по тому же пути, который использовался для включения, и переключить тумблер напротив нужной программы в положение «Откл».


Если использовался реестр, то здесь придется посетить каждую ветку, в которой создавался ключ автозагрузки, и удалить его вручную. После этого необходимо перезагрузить компьютер для того, чтобы все изменения были учтены.

В случае с планировщиком заданий также придется удалить созданную задачу, чтобы выбранная программа была удалена из автозагрузки. После этого также рекомендуется перезагрузить компьютер.

Распространенные проблемы с автозагрузкой и их решение
Иногда с функцией автозагрузки в Windows могут возникать проблемы, и поэтому она может не работать. Рассмотрим наиболее популярные и очевидные из них, а также предложим их решение:
- Сбой программы во время установки. Если вы уверены, что конкретное приложение точно должно быть в автозагрузке, но его там нет, то даже ручное добавление мало что даст. Вероятно, во время установки программы произошел сбой. Помочь здесь может только полное удаление программы и последующая ее переустановка.
- Повреждение системных файлов. Иногда автозагрузка может не работать из-за повреждения системных файлов. Их можно попытаться восстановить. Для этого запустите командную строку от имени администратора, введите в окне «sfc /scannow» и нажмите «Enter». Запустится процесс проверки системных файлов на целостность и попытка их восстановления. После выполнения процедуры необходимо будет перезагрузить компьютер. Если это не поможет, то придется полностью переустанавливать Windows.
- Не хватает прав для автозапуска. Если вы создавали задание в планировщике, то вполне возможно, что поставленной задаче не хватает прав для выполнения. В этом случае потребуется отредактировать задачу, отметив в настройках пункт «Выполнить с наивысшими правами» на вкладке «Общие» в окне настройки задачи.
Главное об автозагрузке программ в Windows 10 и 11
Подведем итоги и выделим то, что нужно запомнить об автозагрузке программ в Windows 10 и 11.
- Функция автозапуска позволяет программам загружаться вместе с операционной системой, что может быть весьма удобно в некоторых ситуациях.
- Если вы замечаете, что автозагрузка слишком сильно нагружает компьютер, можно убрать некоторые программы из автозагрузки самыми разными способами.
- Для добавления и удаления программ из автозагрузки можно использовать диспетчер задач, параметры системы, редактор реестра или планировщик заданий.
- Процесс удаления программы из автозапуска зависит от того, какой именно способ использовался для ее добавления.
- Существуют специальные программы под Windows, которые позволяют полностью управлять системной автозагрузкой.
Learn how to add programs to startup in Windows 10 & 11.
Published
7 min read
How To Add Program To Startup In Windows 10 & 11 [Jump Start Apps]
In today’s fast-paced environment, efficiency is key. One way to boost your productivity is by automating tasks that you regularly perform when you start your computer. If you’re a Windows 10 or Windows 11 user, one effective method to enhance your workflow is by adding specific programs to your startup. This article will guide you through the process of adding programs to startup in Windows 10 and 11, ensuring you can jump-start your favorite applications as soon as your computer boots up.
What is Startup in Windows?
Before diving into the «how-to,» it’s important to understand what is meant by «Startup» in Windows. The Startup folder in Windows is a special folder that holds shortcuts to programs that should automatically run when the computer boots up. By placing a program’s shortcut in this folder, you instruct Windows to launch that application automatically, saving you the hassle of searching for and manually opening it each time.
Why Add Programs to Startup?
Adding programs to startup can benefit you in several ways:
-
Convenience: Automatically opening frequently used applications streamlines your tasks.
-
Time-Saving: Reduces the amount of time spent searching for applications during each session.
-
Efficiency: Ensures that essential applications, like antivirus programs or cloud storage, are always running and ready when you need them.
-
Customization: Allows you to tailor your computer to your specific needs, making it more personal and productive.
Precautions Before Adding Programs to Startup
While it can be advantageous to add programs to your startup list, it’s crucial to approach this wisely. Here are some precautions to consider:
-
Avoid Bloating: Too many programs running at startup can slow down your system. Only add the programs you truly need to start instantly.
-
Check Performance: Regularly review your startup list to ensure that unnecessary applications don’t hinder your system’s performance.
-
Reliability and Security: Only add trusted applications to avoid potential security risks.
How to Add Programs to Startup in Windows 10
Adding programs to startup in Windows 10 can be accomplished through a few different methods. Below, we’ll explore the most common, user-friendly methods:
Method 1: Using the Startup Folder
-
Open the Run Dialog: Press
Windows + Ron your keyboard. This will open the Run dialog box. -
Access the Startup Folder: Type
shell:startupinto the Run dialog and pressEnter. This action opens the Startup folder. -
Add a Program: There are a couple of ways to add a program here:
- Creating a Shortcut:
- Open the location of the program you want to add to startup.
- Right-click the program’s executable file (the
.exefile). - Select
Create Shortcut. - Drag the newly created shortcut into the Startup folder.
- Copying an Existing Shortcut:
- If there’s already a shortcut on your Desktop or elsewhere, right-click it and select
Copy. - Navigate to the Startup folder, right-click in the folder, and select
Paste.
- If there’s already a shortcut on your Desktop or elsewhere, right-click it and select
- Creating a Shortcut:
-
Confirm: The program is now set to run at startup. You can close the Startup folder.
Method 2: Using Task Manager
Sometimes, you may want to add applications to startup that do not have shortcuts or those that require specific startup conditions. Using Task Manager can help.
-
Open Task Manager: Right-click on the taskbar and select
Task Manager, or pressCtrl + Shift + Esc. -
Navigate to the Startup tab: In Task Manager, click on the
Startuptab. -
Add a Program: If the program you want isn’t listed, you can’t add it through Task Manager directly, but you can disable other programs to clear space for it. For adding a program, it’s best to revert to the Startup folder method.
-
Managing Startup Programs: Once you identify the programs you want running, ensure they are set to
Enabled. If they’re set toDisabled, right-click and selectEnable.
Method 3: System Configuration (msconfig)
Another way of accessing startup options is through the System Configuration tool.
-
Open Run dialog: Press
Windows + R. -
Type msconfig: In the Run dialog box, type
msconfigand pressEnter. -
Select the Startup tab: In the System Configuration window that pops up, navigate to the
Startuptab. -
Open Task Manager: Note that Windows 10 has redirected startup management to Task Manager. For changes, go back to Task Manager, use the process mentioned previously.
Method 4: Using Settings
For some applications, particularly Windows Store apps, you can add them through Settings.
-
Open Settings: Click the
Startmenu and selectSettings(the gear icon). -
Navigate to Apps: Click on
Apps. -
Startup: In the left navigation pane, select
Startup. -
Turn On Apps: Here you’ll see a list of apps. Toggle the switch to
Onfor apps you wish to start during boot.
How to Add Programs to Startup in Windows 11
Adding programs to startup in Windows 11 is quite similar to the process in Windows 10 but comes with a modernized interface. Let’s break down the options available:
Method 1: Using Startup Folder
-
Access the Run Dialog: Press
Windows + Rto open the Run dialog. -
Go to Startup Folder: Type
shell:startupand pressEnterto access the Startup folder. -
Add a Program: Following the same process as in Windows 10:
- Create a shortcut to the desired executable and move it to this Startup directory.
Method 2: Using Task Manager
-
Open Task Manager: Right-click the taskbar and select
Task Manager, or usingCtrl + Shift + Esc. -
Go to Startup tab: Locate the
Startuptab. Here, you can see applications set to launch at startup. -
Manage Startup Items: You can enable or disable applications by right-clicking on them and selecting your desired action.
Method 3: Settings App
Adding applications through the Settings app is also a straightforward process in Windows 11.
-
Open Settings: Click the
Startmenu and selectSettings. -
Click on Apps: Select
Appsfrom the sidebar. -
Access Startup: Click on
Startupand toggle the applications you want to start automatically.
Method 4: Using Group Policy Editor
For users looking for more advanced options, the Group Policy Editor (available only in Windows 11 Pro, Enterprise, and Education editions) can be utilized.
-
Open Run Dialog: Press
Windows + R. -
Access Group Policy Editor: Type
gpedit.mscand hitEnter. -
Navigate to Startup Options: Browse through
Computer Configuration > Windows Settings > Scripts (Startup/Shutdown). -
Add a Startup Script: Here, you can control scripts that run on startup. Right-click and add a new script pointing to the executable.
Monitoring Startup Performance
Once you’ve configured your startup applications, it’s wise to monitor your system’s performance. Windows 10 and 11 both come with built-in Performance Monitor tools, which allow you to track startup time and application performance. You can also utilize Task Manager to get a quick overview of how much CPU and memory each program is consuming at startup.
Managing Startup Applications
Over time, you may find that your interests change, or that certain applications don’t need to run at startup any longer. Periodically revisiting your startup list helps ensure your system runs smoothly. Here’s how you can manage these applications:
-
Review the Startup Folder: Check the Startup folder regularly and remove unnecessary shortcuts.
-
Task Manager: Use the Startup tab in Task Manager to disable any applications that are no longer needed.
-
Uninstall Unused Applications: If certain applications feature heavily in your startup but are rarely used, consider uninstalling them properly from your PC via Settings > Apps.
Troubleshooting Startup Issues
Encountering issues with applications not starting correctly? Here are some common troubleshooting steps:
-
Check Shortcut Paths: Ensure that the shortcut in the Startup folder points to the correct executable file.
-
Application Permissions: Some applications might require administrative privileges to run successfully. Right-click the shortcut, go to Properties, and then make sure the “Run as administrator” box is checked if necessary.
-
Compatibility Issues: Some older programs may not function properly with the latest Windows versions. Check for any updates or settings that might enhance compatibility.
-
Corrupted User Profiles: Sometimes, a corrupted user profile may prevent startup items from working. Creating a new user profile can often help bypass such glitches.
-
Malware Check: If unwanted programs are showing up in your startup or causing havoc, consider running a full malware check.
Conclusion
Adding programs to startup in Windows 10 and 11 is a practical way to streamline your daily operations. Using methods such as the Startup folder, Task Manager, and the Settings app, you can easily configure which applications start with your system. This enhancement not only improves convenience but also encourages a productive computing environment.
As you explore these options, remember the key to effective use lies in moderation—choose wisely the applications that you genuinely need at startup to keep your computer running smoothly. With the right approach, you can easily jump-start your favorite applications as soon as you log on, making your work or leisure time much more efficient. Happy computing!
Quick Links
-
Check the App’s Settings to Change Startup Options
-
Step One: Open the Windows Startup Folder
-
Step Two: Create a Shortcut in the «Startup» Folder to Add a Program to Startup
-
How to Make Startup Programs Load Faster
-
Alternative Method for Power Users: Use Task Scheduler for More Control
Summary
- Easily add any app, file, or folder to start with Windows by adding it to the Windows «Startup» folder. It works in all versions of Windows.
- Open the «Startup» folder by using the «shell:startup» command in the «Run» box or by navigating to %APPDATA%\Microsoft\Windows\Start Menu\Programs\Startup.
- You can also use Task Scheduler to automatically open a program based on specific conditions,
Some Windows apps configure themselves to automatically start whenever Windows boots. But you can make any app, file, or folder start with Windows by adding it to the Windows «Startup» folder.
Check the App’s Settings to Change Startup Options
Many apps have an option built in to their settings that let you determine whether or not they’ll automatically launch when you boot up your PC. Unfortunately, we can’t tell you «look here!» because the location varies wildly between apps. However, if the setting exists, that is typically the quickest way to control an app’s startup behavior.
Very often you’ll be prompted to set an app’s startup behavior during setup.
Keep in mind that the more programs you start on boot, the longer the startup process will appear to take. If there are any apps you don’t want to start on boot, you can disable certain startup programs too.
Step One: Open the Windows Startup Folder
«Startup» is a hidden system folder that you can navigate to in File Explorer (provided you’re showing hidden files). Technically, it’s located in "%APPDATA%\Microsoft\Windows\Start Menu\Programs\Startup", but you don’t need to open up File Explorer and start browsing—there’s a much easier way to get there.
You can open many of Windows’ hidden and special folders directly using the «shell» command if you know the folders’ names. And you can launch the «shell» command right from the «Run» dialog box.
To open the «Startup» folder the easy way, just hit Windows+R to open the «Run» box, type «shell:startup,» and then press Enter.
This will open a File Explorer window right to the «Startup» folder.
Go ahead and leave that window open, because we’re going to be working with it in the next section.
Step Two: Create a Shortcut in the «Startup» Folder to Add a Program to Startup
To make an app, file, or folder start with Windows, all you have to do is create a shortcut to the item inside the «Startup» folder. We’re going to be working with a handy little app named Sizer as our example, but this technique applies no matter what you’re creating a shortcut to.
First, locate the item to which you want create your shortcut. Just open a second File Explorer window and find the executable, file, or folder you want to start at boot. There are different ways to create shortcuts in Windows, but we’re fans of the super quick right-drag method: hold your right mouse button down and drag the item you want to create the shortcut for to the «Startup»folder. When you release the button, a popup menu with a few options appears. Click «Create shortcut here.»
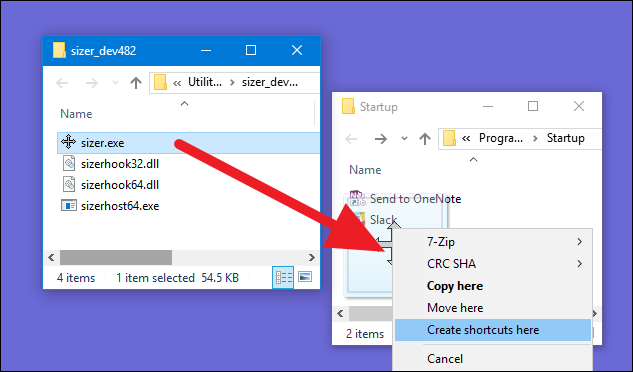
That’s all you have to do. You’ll now see a shortcut to your item in the «Startup» folder.
The next time you start Windows, your app, file, or folder will launch right along with it. This method even works for launching Windows Store Apps at startup.
How to Make Startup Programs Load Faster
When you’re using Windows 10 or 11, there’s a delay before your startup programs actually start to launch, which is probably there to help everything feel like it’s functional earlier in the startup process and allow for all of the internal Windows features to fully start running. But if you’ve got a really fast PC, you might not need to bother with that delay.
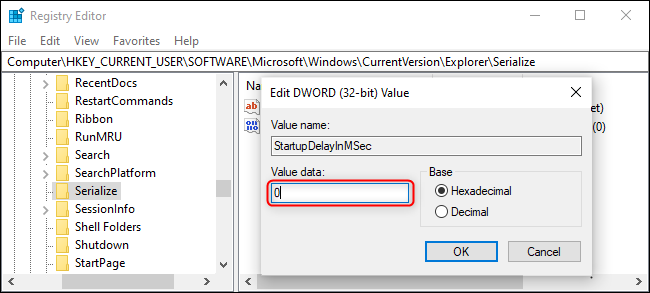
You can remove the delay by opening up Registry Editor and browsing down to the following key:
HKEY_CURRENT_USER\SOFTWARE\Microsoft\Windows\CurrentVersion\Explorer\
Once there, create a key named Serialize, and then a new 32-bit DWORD called «StartupDelayInMSec" underneath it with the value set to 0.
Or you could just head over to our article on removing the Windows 10 startup delay and grab the registry hack files that automate it for you. Up to you!
Alternative Method for Power Users: Use Task Scheduler for More Control
While we certainly would recommend simply using the shell:startup trick, you can also use Task Scheduler to run processes at system startup, when you log on, during idle times, or even when you lock or unlock your screen. It’s an incredibly powerful tool for more advanced users who want to automate their computer to do things like creating System Restore Points at startup or automatically waking up at a certain time.
To launch a program at Startup using Task Scheduler, you can open up Task Scheduler using the Start menu search box, go to Action and then Create Basic Task, and follow the prompts. You should actually use the «Log on» option if you’re trying to run a regular program.
Task Scheduler is a pretty useful tool if you want to fine-tune startup behaviors, and using it isn’t really that difficult.