
Skip to content
Navigation Menu
Provide feedback
Saved searches
Use saved searches to filter your results more quickly
Sign up
Appearance settings
English | 简体中文
Run nginx as a service on windows
Requirements
- Executing scripts requires administrator privileges.
- nssm:https://nssm.cc/
- nginx for windows: http://nginx.org/en/download.html
Preparation before use
- Download nssm to the current directory (filename must be nssm.exe)
- Download nginx to the current directory (folder name must be nginx-bin)
How to use
- clone or download:
git clone https://github.com/youuycom/nginx-service.gitor nginx-service.zip - install service:
install-nginx-service.bat - uninstall service:
uninstall-nginx-service.bat - restart service:
restart-nginx-service.bat - stop service:
stop-nginx-service.bat
Example: the full directory tree
~/nginx-service
│   install-nginx-service.bat
│   nssm.exe
│   README.md
│   README_CN.md
│   restart-nginx-service.bat
│   stop-nginx-service.bat
│   uninstall-nginx-service.bat
│
└───nginx-bin
    │   nginx.exe
    │
    ├───conf
    ├───contrib
    ├───docs
    ├───html
    ├───logs
    └───temp
Table of Contents
Download Nginx and NSSM
Nginx is an free, open-source HTTP server characterized by its small footprint, exceptional performance and efficient use of resources. It hosts over 7% of all domains worldwide!
Non-Sucking Service Manager (NSSM) is a service helper program that assists in installing an application as a service, monitoring the application’s state and handling failures as it runs.
1. To run Nginx as a Windows Service you need download:
- Nginx for Windows: http://nginx.org/en/download.html
- Download NSSM: https://nssm.cc/download
2. Extract downloaded files then copy nssm.exe in win64 folder and src folder to extracted nginx folder.
3. Now, in the nginx folder, we have nginx source and nssm source.
4. Copy all files and folders in nginx folder to C:/nginx ( create nginx folder in C drive if it not exists).
5. Right click on the Start icon then open Windows PowerShell as administrator.
6. Navigate to nginx folder then run this command .\nssm.exe install to open NSSM service installer.
PS C:\Users\mpnadmin> cd /
PS C:\> cd .\nginx\
PS C:\nginx> .\nssm.exe install
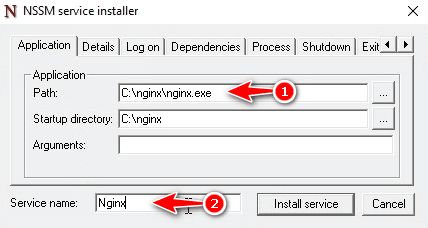
Service "Nginx" installed successfully!7. In the NSSM service installer window:
- Application Path: Browse to nginx.exe in C:\nginx.
- Service name: Enter service name as you need.
- Click button.
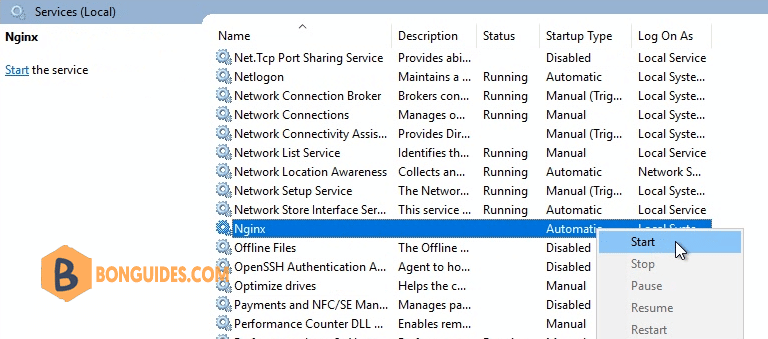
8. Now, open Windows Services (services.msc) then start the Nginx service. As you can see, Startup Type is Automatic, it means nginx service will load on boot.
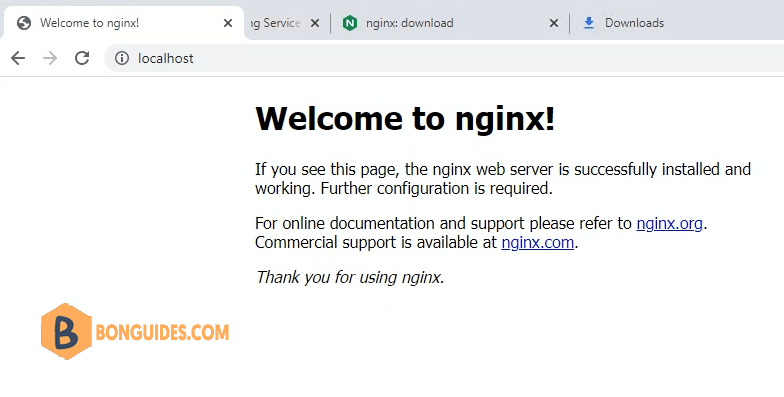
Finally, open any web browser then visit localhost to verify it works.
- IT
- Cancel
Есть вопрос: Каким образом можно установить Nginx службой Windows?
Nginx — веб-сервер являющийся альтернативой таким монстрам как Apache или IIS, он больше похож на Lighthttpd, создан для скорости и обработки большой нагрузки. Изначально родом nginx из Linux, но также работает и под Windows имея нативную сборку. Единственная проблема в том, что nginx не поддерживает Windows Services.
Есть способ работать с nginx как со службой используя сторонние средства, больше всего для этого подходит Windows Service Wrapper, посколько nginx создает несколько экземпляров процессов, и для закрытия требует выполнения особой команды, не отрабатывая сигналы остановки. Windows Service Wrapper поддерживает указание команд для запуска и остановки службы.
Скачать бинарник можно тут.
Кратко опишу процесс запуска.
1. Качаем бинарник Windows Service Wrapper, помещаем его в корень папки nginx, переименуем exe файл, например в ngsrvc.exe
2. Там же создадим xml файл, называя его, так же как и exe файл Windows Service Wrapper. В нашем случае назовём его ngsrvc.xml.
3. В ngsrvc.xml пишем такое
<service>
<id>nginx</id>
<name>nginx</name>
<description>nginx</description>
<executable>C:\nginx\nginx.exe</executa
<logpath>C:\nginx\srvc_log</logpath>
<logmode>roll</logmode>
<depend></depend>
<startargument>-p C:\nginx</startargument>
<stopargument>-p C:\nginx -s stop</stopargument>
</service>
ключевые атрибуты:
executable — путь до nginx.exe
logpath — путь куда будут писаться логи Windows Service Wrapper
Файл .xml желательно сохранить в кодировке UTF8, а если используются кириллические символы, то обязательно.
4. Теперь пришло время инсталлировать службу.
ngsrvc.exe install
Еще можно такое:
Запустить — ngsrvc.exe start
Остановить — ngsrvc.exe stop
Рестартовать — ngsrvc.exe restart
Деинсталляция службы — ngsrvc.exe uninstall
Do you need any of your third-party applications or software to run automatically when your system boots? The best way to do that is by deploying them as Windows Service.
Running your apps as Windows service ensures permanent availability unless you want to stop the service yourself. You can start or stop any Windows service through the Services console that you can access by running services.msc.
The problem is, there is no easy way within Windows OS to do that. Sure you can deploy a native Windows app as a service using New-Service.
But if you want other 3rd party applications to run as Windows service then you will need to leverage the help of a specific Tool or a Utility.
The easiest way to do that is with NSSM.
What is NSSM (Non-Sucking Service Manager)?
NSSM is basically a service helper that allows you to convert any executable file into a Windows service. The difference between NSSM and other utilities of this sort is that NSSM monitors the services. So if a particular service fails, it will detect the failure and re-start it at once.
In my opinion, the biggest advantage of using NSSM is the ease-of-use and simple deployment.
Now I am going to demonstrate on how to use it.
For the sake of this tutorial, we are going to deploy Nginx as a service. Nginx is a Web server just like apache and it’s available for Windows as well.
The problem that most Windows users face is Nginx does not register itself as a Windows service. You always have to start it manually to run your Localhost web applications.
What could be a better candidate than this one right?
Now I will show you step-by-step on how to run Nginx as a Windows service using NSSM.
Step-1: Download Nginx
The first step is of course to download Nginx for Windows. You can download it from HERE.
Once it’s downloaded, you will need to extract it to a folder. For this exercise you need to extract it and rename the folder as “nginx”. Then place the folder in the C: drive on this path:
C:/nginx/Inside the nginx folder, you should be able to see the nginx.exe file. This is the main file that we will need later to be run as a service.
Step-2: Download NSSM
Now we need to download NSSM. You can download it from HERE.
If you are running Windows 10, be sure to download the new version as shown in the screenshot.

Once it’s downloaded, extract it to a folder. For this exercise, I have downloaded and extracted it to folder with the same name as the download.
Step-3: Running NSSM
Now it’s time to run the Non-sucking Service manager. To that that we need to open the command prompt and traverse to the path where NSSM exe file is located.

When you open the command prompt, the correct path should look like this:

Now we are ready to create the new service. Move on to the next step.
Step-4: Install Nginx service with NSSM
This is the most important step. If this goes well, we will have a new nginx service in the services manager.
On the command prompt, run this command:
nssm install nginxserviceWhere nginxservice is the service name we have chosen for our new service. You can type any name you want.

As soon as you type and enter the above command, a dialog box will appear as shown in the screenshot. Here you will need to browse and add the path of the nginx.exe file in the C:/nginx/ path.

And that’s it. All you need to do now is to click the Install Service button. When it’s done you should get a success message like this one:

And your new service has been installed.
Step-5: Verify the service in Services manager
This step is just for verifying if your services has actually been deployed in the Windows services manager. To do that you need to type the following command in Run dialog box.
services.mscThis should open the Windows services console. Now browse through the services and find the one that you created.

The new service won’t probably be running the first time you see it. To start the service, simply right-click on the service and click Start.
This should start your new service and if you have configured any web page in your localhost on nginx, you should be able to browse the localhost in the browser.
Pretty simple right? This small utility is quite amazing in its functionality. You can configure other options in it as well like Automatic start, Manual start, Delayed start etc.
Additional Resources
- How to Run a NodeJS app as a Windows Service
Run Nginx as a service in Windows platform
NSSM is the best tool to run Nginx as a service. You can follow this SO answer for more details. If due to software restrictions or any other trouble, you do not want to use any external 3rd party software then you can deploy any of these two methods.
-
Windows Task Scheduler
-
Windows startup shortcut
Windows Task Scheduler
- As mentioned in this answer prepare one start.bat file.
start.bat
@ECHO OFF
REM Start Nginx
tasklist /FI "IMAGENAME eq nginx.exe" 2>NUL | find /I /N "nginx.exe">NUL
IF NOT "%ERRORLEVEL%"=="0" (
   REM Nginx is NOT running, so start it
   c:
   cd \nginx
   start nginx.exe
   ECHO Nginx started.
) else (
   ECHO Nginx is already running.
)
stop.bat
@ECHO OFF
REM Stop Nginx
tasklist /FI "IMAGENAME eq nginx.exe" 2>NUL | find /I /N "nginx.exe">NUL
IF "%ERRORLEVEL%"=="0" (
   REM Nginx is currently running, so quit it
   c:
   cd \nginx
   nginx.exe -s quit
   ECHO Nginx quit issued.
) else (
   ECHO Nginx is not currently running.
)
-
Put this file where nginx.exe is present.
-
Open windows task scheduler and set up the task as described in this answer to run it indefinitely.
1. Add a trigger:

Make sure to set the current date and 00:00:00 as the start time
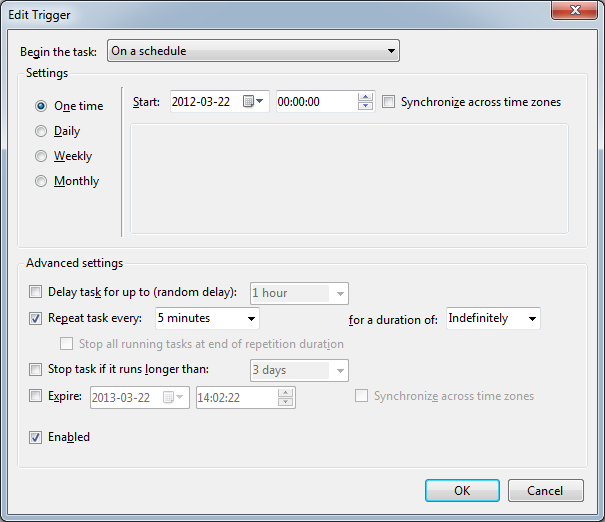
2. Make sure the task is run as soon as possible if the start was missed:
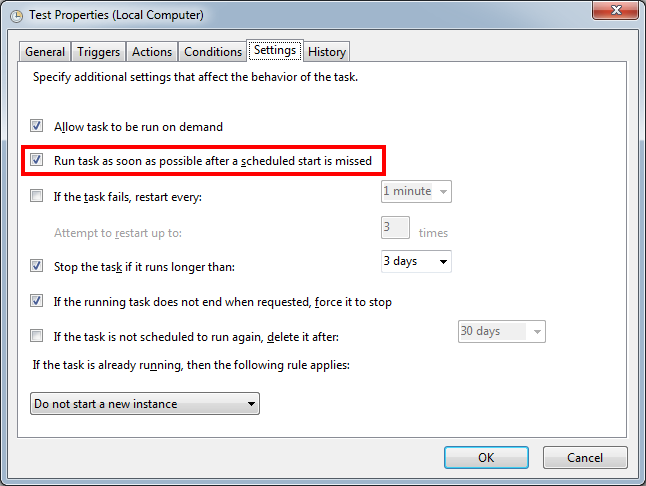
- Do not forget to run this task as the highest privilege with the system account, as described here.
- Open Task Scheduler
- Create a new task
- In the “General” tab — ensure the following settings are entered:
- “Run whether the user is logged on or not”
- “Run with highest privileges”
- “Configure For” (your operating system)
- In the “Triggers” tab, when adding a trigger (schedule) — ensure that the “Enabled” checkbox is checked
The other tabs need to be looked at as well (actions etc) — but these are the options you should specify when trying to ensure a task runs regardless of which user is logged in, and without the UAC prompts.
When saving the task, you will be prompted to enter a username and password — this username and password is the user that will be used to execute the task. If you are running the task with “highest privileges” you will need to make sure this is an admin account.
-
Make the task to start daily at a certain time, through the bat file it will check whether the service is already running to avoid creating multiple nginx.exe instances.
-
If due to some reason Nginx shuts down, within 5 minutes it will start.
Windows Startup shortcut
-
Create one shortcut of nginx.exe and put it in the startup folder of Windows.
-
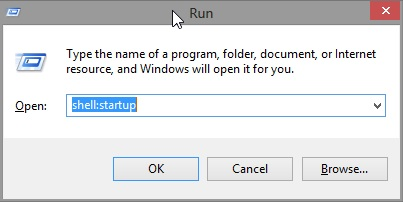
Follow this answer to find your startup location.
It can be found here:
C:\Users\%USERNAME%\AppData\Roaming\Microsoft\Windows\Start Menu\Programs\Startup`or easier to access with this command in the Run Win+R prompt:
shell:startupHere is even more explanations of how accessing/viewing the startup folder.
-
Nginx will run automatically whenever you log in to the system.
-
This one is the easiest. However, it is dependent on the user profile i.e. if you are running Nginx on a server, it will run only for your user account, when you log off it stops.
-
This is ideal for the dev environment.