
UPDATE: I’ve recorded a 30 min video with developers from the project as well as Dustin from Ubuntu about HOW this works if you want more technical details.
As a web developer who uses Windows 10, sometimes I’ll end up browsing the web and stumble on some cool new open source command-line utility and see something like this:
In that past, that $ prompt meant «not for me» as a Windows user.
I’d look for prompts like
or
Of course, I didn’t always find the prompts that worked like I did. But today at BUILD in the Day One keynote Kevin Gallo announced that you can now run «Bash on Ubuntu on Windows.» This is a new developer feature included in a Windows 10 «Anniversary» update (coming soon). It lets you run native user-mode Linux shells and command-line tools unchanged, on Windows.
After turning on Developer Mode in Windows Settings and adding the Feature, run you bash and are prompted to get Ubuntu on Windows from Canonical via the Windows Store, like this:

This isn’t Bash or Ubuntu running in a VM. This is a real native Bash Linux binary running on Windows itself. It’s fast and lightweight and it’s the real binaries. This is an genuine Ubuntu image on top of Windows with all the Linux tools I use like awk, sed, grep, vi, etc. It’s fast and it’s lightweight. The binaries are downloaded by you — using apt-get — just as on Linux, because it is Linux. You can apt-get and download other tools like Ruby, Redis, emacs, and on and on. This is brilliant for developers that use a diverse set of tools like me.
This runs on 64-bit Windows and doesn’t use virtual machines. Where does bash on Windows fit in to your life as a developer?
If you want to run Bash on Windows, you’ve historically had a few choices.
- Cygwin — GNU command line utilities compiled for Win32 with great native Windows integration. But it’s not Linux.
- HyperV and Ubuntu — Run an entire Linux VM (dedicating x gigs of RAM, and x gigs of disk) and then remote into it (RDP, VNC, ssh)
- Docker is also an option to run a Linux container, under a HyperV VM
Running bash on Windows hits in the sweet spot. It behaves like Linux because it executes real Linux binaries. Just hit the Windows Key and type bash.
After you’re setup, run apt-get update and get a few developer packages. I wanted Redis and Emacs. I did an apt-get install emacs23 to get emacs. Note this is the actual emacs retrieved from Ubuntu’s feed.

Of course, I have no idea how to CLOSE emacs, so I’ll close the window. 
Note that this isn’t about Linux Servers or Server workloads. This is a developer-focused release that removes a major barrier for developers who want or need to use Linux tools as part of their workflow. Here I got Redis via apt-get and now I can run it in standalone mode.

I’m using bash to run Redis while writing ASP.NET apps in Visual Studio that use the Redis cache. I can then later deploy to Azure using the Azure Redis Cache, so it’s a very natural workflow for me.
Look how happy my Start Menu is now!
Keep an eye out at http://blogs.msdn.microsoft.com/commandline for technical details in the coming weeks. There’s also some great updates to the underlying console with better support for control codes, ANSI, VT100, and lots more. This is an early developer experience and the team will be collection feedback and comments. You’ll find Ubuntu on Windows available to developers as a feature in a build Windows 10 coming soon. Expect some things to not work early on, but have fun exploring and seeing how bash on Ubuntu on Windows fits into your developer workflow!
Sponsor: BUILD — it’s what being a developer is all about so do it the best you can. That’s why Stackify built Prefix. No .NET profiler is easier or more powerful. You’re 2 clicks and $0 away, so build on! prefix.io
About Scott
Scott Hanselman is a former professor, former Chief Architect in finance, now speaker, consultant, father, diabetic, and Microsoft employee. He is a failed stand-up comic, a cornrower, and a book author.
About Newsletter
Hosting By
Accessing Linux tools and environments on a Windows system can be challenging. Managing dual OS systems, ensuring compatibility, and avoiding data loss during setup are common hurdles.
Finding a seamless way to run Linux alongside Windows is crucial for enhancing productivity.
Many users need Linux-specific tools and applications without replacing their existing OS. Running Linux on Windows lets you explore and utilize Linux environments while keeping the familiarity and functionality of your Windows system.
In this blog, we’ll provide a detailed, step-by-step guide on how to run Linux on a Windows system. We’ll cover various methods, including using virtual machines, Windows Subsystem for Linux (WSL), and dual-boot setups.
By understanding these methods, you can successfully run Linux on Windows, leverage Linux tools, and improve your development workflows.
Benefits of Running Linux on a Windows System
Running Linux on a Windows system offers several advantages, particularly for IT professionals and developers. Here are some key benefits:
Access to Linux Tools
Linux provides a range of powerful tools and applications that are essential for development and system administration tasks.
Running Linux on Windows allows you to leverage these tools without needing a separate Linux machine.
Enhanced Development Workflows
Many developers prefer Linux for its robust development environment.
Running Linux alongside Windows enables you to optimize your development workflows, using the best features of both operating systems.
System Compatibility
Running Linux on Windows ensures compatibility with software and hardware that may only support one OS. This dual setup allows for greater flexibility and reduces the need for additional hardware.
Cost Savings
By running Linux on a Windows system, you can avoid the expense of purchasing additional hardware. This setup allows you to maximize the use of your existing resources without incurring extra costs.
Convenience and Flexibility
Running both operating systems on the same machine provides the convenience of switching between environments without rebooting or setting up another physical device.
This flexibility is beneficial for multitasking and managing different projects efficiently. For IT professionals and developers, a dual-OS setup also opens the door to integrating specialized business tools. For instance, using SMS call center software within the Linux environment can streamline customer communications without disrupting workflows on the Windows side. This approach enhances support operations and allows teams to consolidate tasks across platforms—all without the need for additional hardware.
Methods to Run and Install Linux on Windows
There are several methods available to run Linux on a Windows system, each offering different levels of integration and performance. Here are the most popular options:
Using a Virtual Machine
Virtual machines (VMs) allow you to run Linux within a window on your Windows desktop. This method provides a full Linux environment with isolation from the host OS.
VMs are perfect for users who want to test different Linux distributions or run Linux applications without affecting their main system.
Steps to Set Up a VM:
- Download and Install Virtualization Software: Popular options include VMware Workstation, Oracle VM VirtualBox, and Hyper-V. These platforms offer user-friendly interfaces and robust features to help you create and manage your virtual machines.
- Download a Linux Distribution: Obtain an ISO file of your preferred Linux distribution (e.g., Ubuntu, Fedora, Debian). Make sure to download from the official websites to ensure you get a genuine and secure copy.
- Create a New VM: Open your virtualization software and create a new virtual machine. Allocate resources such as CPU, memory, and storage based on the requirements of your Linux distribution. Most virtualization software provides easy-to-follow wizards to guide you through the setup process.
- Install Linux: Use the ISO file to install Linux on the VM. Follow the installation instructions provided by the Linux distribution. Once the installation is complete, you can start using Linux within the VM environment.
Windows Subsystem for Linux (WSL)
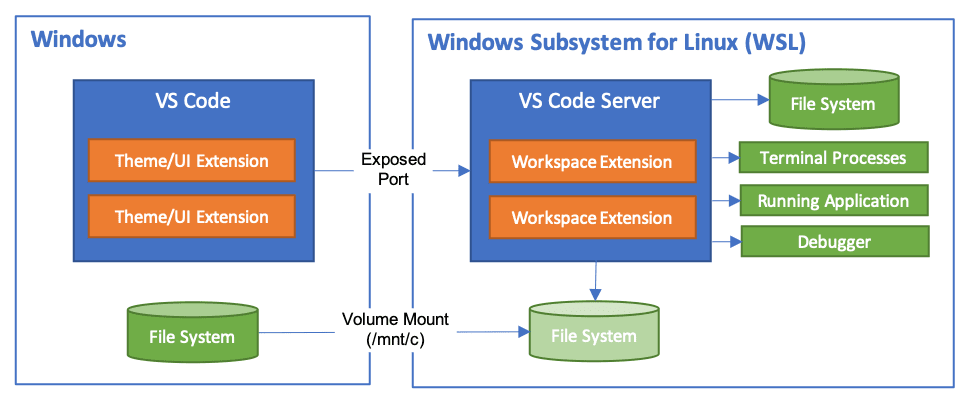
WSL is a compatibility layer for running Linux binary executables natively on Windows.
It integrates with the Windows file system and allows you to run Linux command-line tools directly. WSL is ideal for users who need to use Linux tools without the overhead of a full VM or dual-boot setup.
Steps to Set Up WSL:
- Enable WSL: Go to Settings > Update & Security > For Developers and enable “Developer Mode.» This step prepares your Windows system to support WSL.
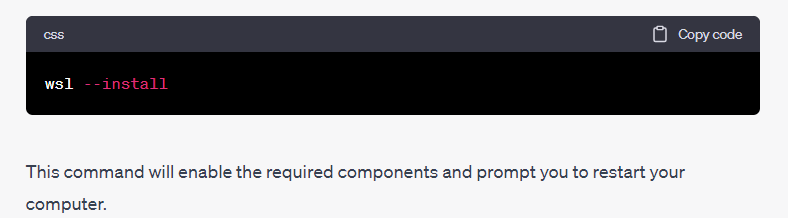
- Install WSL: Open PowerShell as an administrator and run wsl –install to install WSL and the default Linux distribution (usually Ubuntu). This command will download and set up the necessary components for WSL.
- Choose a Linux Distribution: You can install additional distributions from the Microsoft Store. Simply search for the Linux distribution you want and install it like any other app.
- Launch Linux: Open a terminal and start using Linux commands. You can access the Linux file system directly from Windows and use your preferred Linux tools seamlessly.
Dual-Boot Setup
Dual-booting allows you to install Linux alongside Windows on your machine, giving you the option to boot into either operating system.
This method is suitable for users who want to use both operating systems without the limitations of a VM.
Steps to Set Up Dual-Boot:
- Create a Backup: Ensure you have a backup of your important data. This step is crucial to prevent data loss during the partitioning process.
- Partition Your Drive: Use disk management tools to create a separate partition for Linux. You can use built-in tools like Disk Management in Windows or third-party tools to resize existing partitions and create space for Linux.
- Download a Linux Distribution: Obtain an ISO file of your preferred Linux distribution. Ensure you download it from the official website to avoid any security issues.
- Create a Bootable USB Drive: Use tools like Rufus to create a bootable USB drive with the Linux ISO. This drive will be used to install Linux on your system.
- Install Linux: Boot from the USB drive and follow the installation instructions. Choose the partition you created earlier for the Linux installation. During the setup, you can configure the bootloader to allow you to choose between Windows and Linux at startup.
Using a Live USB
Live USB allows you to run Linux directly from a USB drive without installing it on your hard drive. This is useful for testing or temporary use, providing a risk-free way to explore Linux.
Steps to Set Up a Live USB:
- Download a Linux Distribution: Obtain an ISO file of your preferred Linux distribution. Make sure to download it from the official website to ensure authenticity and security.
- Create a Bootable USB Drive: Use tools like Rufus to create a bootable USB drive with the Linux ISO. This drive will allow you to run Linux without affecting your current system setup.
- Boot from the USB Drive: Restart your computer and boot from the USB drive. You might need to change the boot order in your BIOS settings to prioritize the USB drive. Once booted, you can run Linux directly from the USB drive, allowing you to test and use Linux without any permanent changes to your system.
Conclusion
Running Linux on a Windows system provides access to powerful tools and applications, enhancing development workflows and system compatibility.
By understanding and implementing methods like virtual machines, Windows Subsystem for Linux, dual-boot setups, and live USBs, you can seamlessly integrate Linux into your Windows environment.
Choosing the right method depends on your specific needs and technical expertise. Whether you need a full Linux environment or just access to Linux command-line tools, these methods offer flexibility and functionality.
Explore these options to find the best solution for running Linux on your Windows system.
Why Choose V2 Cloud
While V2 Cloud does not currently offer Linux virtual machines or VDI solutions, we are actively working on expanding our services to include them in the near future. Here’s why V2 Cloud will be the top choice for your virtualization needs:
- Robust Solutions: Our Virtual Desktop Infrastructure (VDI) solutions enhance IT operations with secure remote access, daily backups, and seamless scalability.
- User-Friendly Interface: Designed to be intuitive and easy to use, our platform caters to both beginners and experienced users.
- Outstanding Support: V2 Cloud is known for its excellent customer support, ready to assist you with any issues or questions you may have.
- Cost-Effective: Our pricing plans are competitive and transparent, helping you reduce operational costs while maximizing the value of your investment.
- Security and Compliance: We prioritize data security and compliance with industry standards, ensuring your information is protected at all times.
Keep an eye out for V2 Cloud’s upcoming Linux VM and VDI offerings. In the meantime, sign up for our current VDI services to experience our secure, scalable, and efficient virtual environments.
Get Started with V2 Cloud
Ready to take your IT infrastructure to the next level? Sign up today to experience V2 Cloud’s secure, scalable, and efficient VDI solutions, perfectly tailored to meet your business needs. Talk to a Cloud Expert Now and transform your IT operations.
FAQs about Running Linux on Windows
Here are our most commonly asked questions on how to run Linux on Windows:
What is the easiest way to run Linux on Windows?
The easiest way to run Linux on Windows is using the Windows Subsystem for Linux (WSL). It allows you to run Linux command-line tools directly on Windows without needing a VM or dual-boot setup.
Can I run Linux on Windows without installing it?
Yes, you can run Linux on Windows without installing it by using a Live USB. This method allows you to boot and run Linux directly from a USB drive.
What are the system requirements for running Linux on a Windows machine?
System requirements vary depending on the method. Generally, you’ll need at least 4GB of RAM, sufficient storage space, and hardware virtualization support for VMs.
How do I switch between Linux and Windows in a dual-boot setup?
To switch between Linux and Windows in a dual-boot setup, restart your computer and select the desired operating system from the boot menu.
Is it possible to run graphical Linux applications on Windows using WSL?
Yes, with WSL 2 and the appropriate configuration, you can run graphical Linux applications on Windows. This requires an X server to display the graphical interface.
What should I do if I encounter issues during the installation?
If you encounter issues during the installation, refer to the documentation of the method you are using, check online forums, or contact support for assistance.
Are there any performance differences between running Linux natively and through a VM or WSL?
Yes, there can be performance differences. Running Linux natively offers the best performance, followed by WSL, which is close to native performance. VMs may have slightly lower performance due to resource overhead.
How do I choose the best Linux distribution for my Windows computer?
Choosing the best Linux distribution (Linux distro) for your Windows computer depends on your specific needs and preferences. Popular options include Ubuntu, Fedora, and Debian. These distros are user-friendly and compatible with most hardware, making the installation process straightforward.
Can I run multiple operating systems on my Windows computer?
Yes, you can run multiple operating systems on your Windows computer by using a virtual machine or a dual-boot setup. This allows you to install a Linux OS alongside Windows, giving you the flexibility to switch between the two as needed.
What should I know before installing Linux on my Windows computer?
Before installing Linux on your Windows computer, ensure you have a backup of your important data. You’ll also need to create a separate partition for the Linux file system. Once installed, you can access the Linux OS and run Linux-specific applications seamlessly.
How does the Linux file system integrate with a Windows computer?
When installing Linux on a Windows computer, the Linux file system is typically set up on a separate partition. This allows both operating systems to coexist without interfering with each other. Tools like WSL (Windows Subsystem for Linux) also enable integration, allowing you to access Linux files from Windows.
As a developer, you might need to run both Linux and Windows side by side. Luckily, there are a number of ways you can get the best of both worlds without getting different computers for each operating system.
In this article, we’ll explore a few ways to use Linux on a Windows machine. Some of them are browser-based or cloud-based that do not need any installation prior to using them.
Here are the methods we’ll be discussing:
- Dual boot
- Windows Subsystem for Linux (WSL)
- Virtual Machines (VM)
- Browser-based solutions
- Cloud-based solutions
Option 1: «Dual-boot» Linux + Windows
With dual boot, you can install Linux alongside Windows on your computer, allowing you to choose which operating system to use at startup.
This requires partitioning your hard drive and installing Linux on a separate partition. With this approach, you can only use one operating system at a time.
If this sounds like the way you want to go, here is a useful tutorial on setting up dual boot on Windows 10.
Option 2: Use Windows Subsystem for Linux (WSL)
Windows Subsystem for Linux provides a compatibility layer that lets you run Linux binary executables natively on Windows.
Using WSL has some advantages:
- The setup for WSL is simple and not time consuming.
- It is lightweight compared to VMs where you have to allocate resources from the host machine.
- You don’t need to install any ISO or virtual disc image for Linux machines which tend to be heavy files.
- You can use Windows and Linux side by side.
If this sounds like the right option for you, here is a detailed guide on how to install and use WSL.
Option 3: Use a Virtual Machine (VM)
A virtual machine (VM) is a software emulation of a physical computer system. It allows you to run multiple operating systems and applications on a single physical machine simultaneously. Here’s a detailed explanation of VMs:
You can use virtualization software such as Oracle VirtualBox or VMware to create a virtual machine running Linux within your Windows environment. This allows you to run Linux as a guest operating system alongside Windows.
VM software provides options to allocate and manage hardware resources for each VM, including CPU cores, memory, disk space, and network bandwidth. You can adjust these allocations based on the requirements of the guest operating systems and applications.
Here are some of the options available for virtualization:
- Oracle virtual box
- Multipass
- VMware workstation player
Option 4: Use a Browser-based Solution
Browser based solutions are particularly useful for quick testing, learning, or accessing Linux environments from devices that don’t have Linux installed.
You can either use online code editors or web based terminals to access Linux. Note that you usually don’t have full administration privileges in these cases.
Online code editors
Online code editors offer editors with built-in Linux terminals. While their primary purpose is coding, you can also utilize the Linux terminal to execute commands and perform tasks.
Replit is an example of an online code editor, where you can write your code and access the Linux shell at the same time.
Replit provides a code editor and a Linux shell.
Web-based Linux terminals
Online Linux terminals allow you to access a Linux command-line interface directly from your browser. These terminals provide a web-based interface to a Linux shell, enabling you to execute commands and work with Linux utilities.
One such example is JSLinux. The screenshot below shows a ready to use Linux environment:
Accessing Linux via JSLinux
Option 5: Use a Cloud-based Solution
Instead of running Linux directly on your Windows machine, you can consider using cloud-based Linux environments or virtual private servers (VPS) to access and work with Linux remotely.
Services like Amazon EC2, Microsoft Azure, or DigitalOcean provide Linux instances that you can connect to from your Windows computer. Note that some of these services offer free tiers, but they are not usually free in the long run.
How to Choose the Correct Method
The choice is totally dependent on your use case. But there are some factors that may help you decide which option works the best for you. Let’s discuss them:
- Access level/elevated privilege: If you require full administrative privileges, it is better to skip the browser-based solutions. WSL, dual booting, VMs, and cloud-based solutions provide you with full administrative control.
- Cost: Cloud-based solutions offer services against a subscription fee. This cost varies depending on the choice of operating system, hardware specs of the machine, traffic, and so on. If you are on a tight budget, cloud-based solutions might not be the best.
- Scalability: If you are just starting, but plan to do resource exhaustive development in the future, you can always scale up the physical specs of your machine. Some options that support upgrading are cloud-based solutions and VMs. You can add more processors or increase the RAM as per your needs.
- Current system’s hardware specs: If your current system has lower RAM and storage, running VMs can make the system heavy. It would be better to opt for cloud-based or browser based solutions.
- Switching: If you don’t plan to use Windows and Linux side by side, dual-boot can be a really good option. It offers a complete and focused Linux experience.
My Setup
I am using Ubuntu VM installed through VMWare workstation player. It is doing a great job as I can frequently switch between two operating systems. It was also simple to setup and I can enjoy the admin privileges as well!
Wrapping Up
I hope you found this article helpful. What’s your favorite thing you learned from this tutorial? I would love to connect with you on any of these platforms. 📧
See you in the next tutorial, happy coding 😁
Learn to code for free. freeCodeCamp’s open source curriculum has helped more than 40,000 people get jobs as developers. Get started
Although Windows users could also wish to run Linux software, Linux users frequently desire to run Windows applications on Linux. You can use Linux applications without leaving Windows, whether you’re searching for an improved development environment or strong command-line tools. There are several alternatives to purchasing a new laptop to run the OS for running Linux applications on Windows. Since anybody can set up a virtual machine with a free Linux distribution without the requirement for software licenses, it is simpler than running Windows software on Linux.
There are two popular methods for running Linux software on Windows, they are
- WSL (Windows Subsystem for Linux)
- Virtual Machine
In this article, we’ll discuss how to implement both of these methods briefly.
Note: If you’re using Windows 11, the below steps can be omitted since Windows 11 can run Linux GUI apps out of the box.
Method 1: Windows Subsystem for Linux (WSL)
The WSL is a feature available in Windows that’ll enable one to run the Linux file system, along with Linux command-line tools and GUI applications, directly on Windows. And they can be completely integrated with Windows tools. But the only drawback of WSL is that they are mainly targeted for command-line tools and cannot be used for graphics-intensive programs.
Step 1: Enable the Windows Subsystem for Linux optional feature
Start PowerShell or Command-Prompt with administrator privileges and enter the following command to enable the WSL services on windows, this may be enabled by default in some systems.
Enable-WindowsOptionalFeature -Online -FeatureName -Microsoft-Windows-Subsystem-Linux

Alternatively, you can enable it using the ‘programs and features’ settings.

Step 2: Enable the Virtual Machine platform and Install WSL2
The virtual machine has to be enabled before installing WSL, this can be done using the following command.
dism.exe /online /enable-feature /featurename:Microsoft-Windows-Subsystem-Linux /all /norestart

Once it has been enabled, install WSL by entering the following command in PowerShell or Command-Prompt.
wsl --install
Set the default version of WSL to 2
wsl --set-default-version 2

Step 3: Download and Install a Linux distribution
You can download and install any distro of your choice, for the sake of convenience we’ll be installing ubuntu. Navigate to Microsoft Store and search for ‘ubuntu’ then install the application. Once downloaded open the app and follow through with the installation wizard. Once the installation process is complete you’ll be left with the following terminal. Linux Command-line tools can be executed using this terminal.

Step 4: Download and Install VcXsrv Windows X Server
The X server is a third-party display manager which is a provider of graphics resources and keyboard/mouse events. Download VcXsrv Windows X Server from the link provided — VcXsrv Windows X Server
Once the setup is complete, make sure to disable the access control option to avoid running into errors while running the GUI applications.

Step 5: Setting up the DISPLAY environment variable
Starting the bash terminal, we have to set the DISPLAY environment variable so it uses the windows host IP address since WSL2 and Windows host doesn’t share the network device. Use any of the following commands to set the DISPLAY variable.
export DISPLAY=$(ip route|awk ‘/^default/{print $3}’):0.0
export DISPLAY=»`grep nameserver /etc/resolv.conf | sed ‘s/nameserver //’`:0″

Run the below command to check whether the variable is properly set or not.
echo $DISPLAY

The variable is reset every time a session is restarted so as to avoid running the command each and every time we open the terminal. We can add the command at the end of the /etc/bash.bashrc file. Open the bashrc file using nano or vim and then add the command at the end.
sudo nano /etc/bash.bashrc

Step 6: Create a .xsession file in the user’s home directory
The following command can be used to create a .xsession file in the user’s home directory /home/<user>/.xsession with the content xfce4-session.
echo xfce4-session > ~/.xsession
Now Windows desktop can run Linux GUI apps.

Method 2: Using a Virtual Machine
Using a Virtual Machine is the most efficient and easy way to run Linux apps on Windows, we’ll briefly discuss the installation and setting up a virtual machine with a Linux OS.
Step 1: Download and Install a Virtual Machine
Download a virtual machine of your choice (Oracle or VMware), here we’ll be using a VMware workstation. Download the software from the below link and follow the installation process. Refer to this How to Install VirtualBox on Windows GeeksforGeeks article for setting up a virtual machine using oracle.
Download VMware Workstation.

Step 2: Download a Linux distribution of your choice
You can download any Linux distribution, below are some of the most popular choices along with their links.
- Ubuntu
- Pop! OS
- Linux Mint
- Fedora
Step 3: Installing the OS
Open VMware Workstation, and click on the ‘Create new Virtual Machine’. And then select the installer disc image option and choose the downloaded Linux operating system’s ISO file.

Specify the disk capacity and click on next.

Name the virtual machine and move on to the next step.

Start the virtual machine to boot up the OS and follow the installation steps. Once the installation is complete you can run any Linux GUI apps using the virtual machine.

Step 4: Starting and Running the applications
You can now run any Linux application while within the virtual machines environment, here are some examples.
$ gedit

$ sudo apt install x11-apps -y
$ xcalc

$ xclock

$ xeyes

Upgrade & Secure Your Future with DevOps, SRE, DevSecOps, MLOps!
We spend hours on Instagram and YouTube and waste money on coffee and fast food, but won’t spend 30 minutes a day learning skills to boost our careers.
Master in DevOps, SRE, DevSecOps & MLOps!
Learn from Guru Rajesh Kumar and double your salary in just one year.
Get Started Now!
Windows Subsystem for Linux (WSL)
WSL, or Windows Subsystem for Linux, is a compatibility layer provided by Microsoft for Windows 10 and Windows Server that allows running Linux distributions natively on Windows without the need for virtual machines or dual-boot setups. It provides a way to run Linux command-line tools, utilities, and applications directly on a Windows system.
WSL consists of two distinct versions: WSL 1 and WSL 2.
This version uses a translation layer to convert Linux system calls into Windows system calls, allowing Linux binaries to run on Windows. It provides good compatibility and allows you to run many Linux tools. However, it has limitations in terms of performance and full compatibility with Linux kernel features.
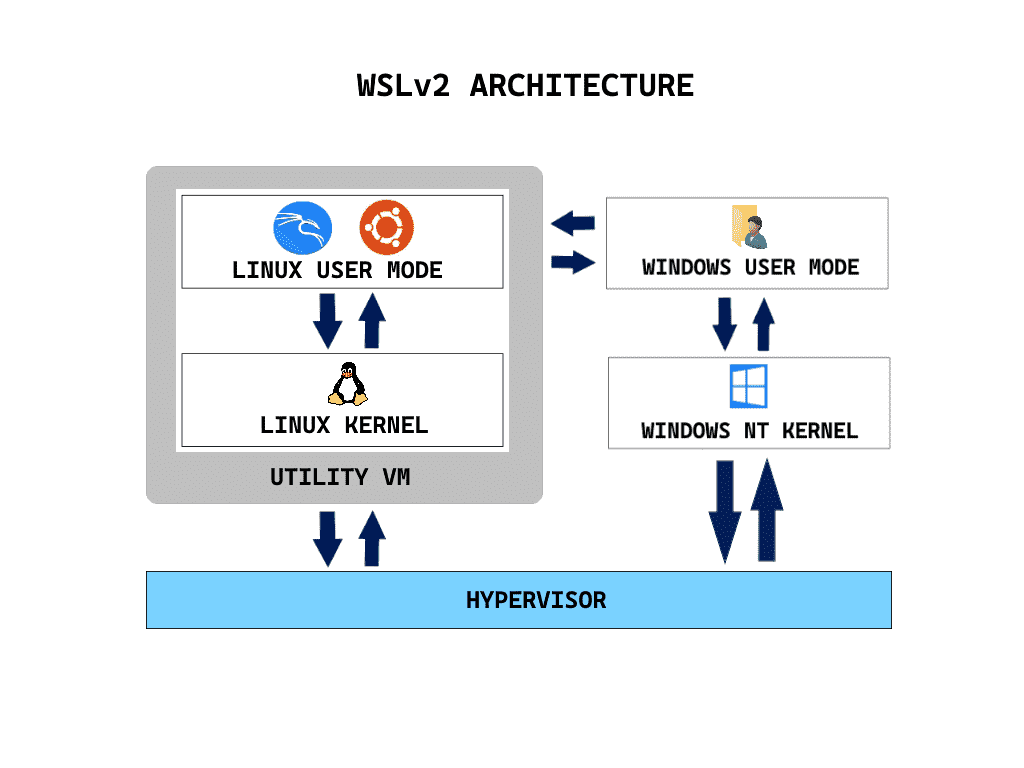
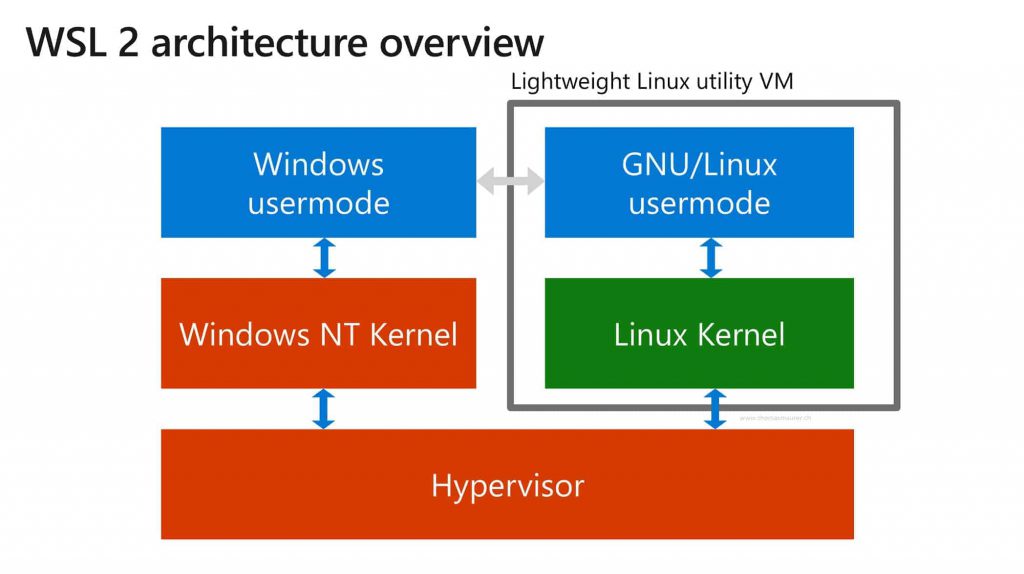
WSL 2:
This version introduced a more advanced architecture. It includes a lightweight virtual machine running a full Linux kernel. This allows for better performance, improved compatibility with Linux system calls, and support for features like Docker containers. WSL 2 provides a more complete Linux experience within Windows.
With WSL installed, you can choose and install Linux distributions directly from the Microsoft Store, including popular options like Ubuntu, Debian, Fedora, and more. Once a Linux distribution is installed, you can launch it from the Start menu or command line and access a Linux shell environment, where you can use Linux tools, run scripts, and even install and use development frameworks and applications.
WSL has been well-received by developers, as it allows them to work seamlessly across different platforms and leverage the power of both Windows and Linux environments simultaneously.
How to install WSL in windows?
To install Windows Subsystem for Linux (WSL) on Windows 10, you can follow these steps:
- Open the Start menu and search for “PowerShell.”
- Right-click on “Windows PowerShell” and select “Run as administrator.” This will open an elevated PowerShell window.
Note: If you’re using Windows 11, you can search for “Windows Terminal” instead and launch it as an administrator.
- In the PowerShell window, run the following command to enable the Windows Subsystem for Linux feature:
- After restarting, open the Microsoft Store by searching for it in the Start menu.
- In the Microsoft Store, search for the Linux distribution you want to install, such as Ubuntu, Debian, or Fedora.
- Select the desired Linux distribution and click on the “Install” button.
- Wait for the installation to complete. It may take some time depending on your internet connection speed.
- Once the installation is finished, launch the installed Linux distribution from the Start menu or by searching for its name.
- The first time you launch the Linux distribution, it will initialize and ask you to create a new user account and password. Follow the prompts to set up the user account.
To use WSL, you need to enable it on your Windows system. Here’s a general outline of the steps to set up WSL:
- Open the Start menu, search for “Turn Windows features on or off,” and open it.
- Scroll down and locate “Windows Subsystem for Linux.”
- Check the box next to “Windows Subsystem for Linux” and click “OK.”
- Windows will apply the changes and may ask you to restart your computer.
Once you have enabled WSL, you can install a Linux distribution from the Microsoft Store or by using the command line. Here’s how you can install Ubuntu from the Microsoft Store:
- Open the Microsoft Store.
- Search for “Ubuntu” and select the desired Ubuntu distribution.
- Click the “Install” button to download and install Ubuntu.
How to Configure WSL for SSH use?
Enabled SSHD for login from remote
$ sudo systemctl enable ssh
$ sudo service ssh restart
Enabled Password based authentication
$ vi /etc/ssh/sshd_config
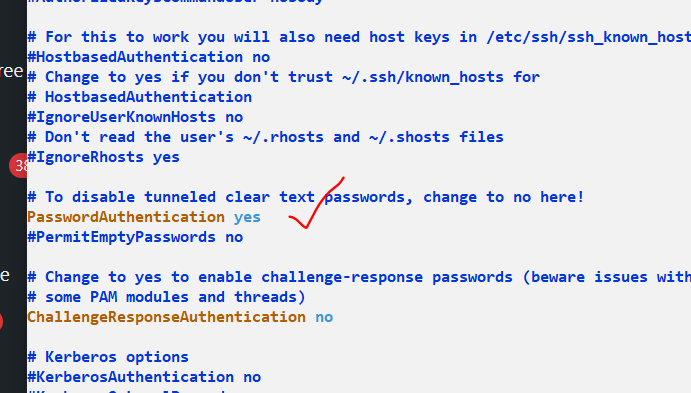
$ sudo service ssh restartWhat are the things you can do in Linux created with a help of WSL
When using Ubuntu through Windows Subsystem for Linux (WSL), you can perform various tasks and utilize a wide range of tools and applications available in the Ubuntu ecosystem. Here are some common things you can do in Ubuntu on WSL:
- Run Linux Commands: You can execute Linux commands and utilities directly from the Ubuntu terminal on WSL, just like you would on a regular Linux system.
- Install Packages: Ubuntu on WSL allows you to use the APT package manager to install, update, and manage software packages. You can install development tools, programming languages, web servers, databases, and other applications using APT.
- Develop and Program: WSL provides a convenient environment for software development. You can write and compile code in programming languages like Python, Java, C++, or JavaScript. Integrated development environments (IDEs) like Visual Studio Code and command-line text editors like Vim or Emacs are available for use.
- Access File System: Ubuntu on WSL provides access to the Windows file system, allowing you to work with files and directories seamlessly. You can navigate, create, edit, and delete files using the Ubuntu terminal or graphical file managers like Nautilus.
- Network Tools: Ubuntu on WSL includes various network utilities and tools. You can use commands like
ping,wget,curl, andsshto test connectivity, download files, and establish secure shell connections. - Web Development: With Ubuntu on WSL, you can set up a local web development environment. Install web servers like Apache or Nginx, configure databases like MySQL or PostgreSQL, and develop web applications using frameworks like Node.js or Django.
- Version Control: Git, a popular version control system, is available in Ubuntu on WSL. You can use Git to track changes in your projects, create branches, and collaborate with other developers using platforms like GitHub or GitLab.
- Run Linux Applications: Ubuntu on WSL supports running Linux graphical applications. You can install and launch applications that have a graphical user interface (GUI) using an X server like X410 or VcXsrv.
Certification Courses
DevOpsSchool has introduced a series of professional certification courses designed to enhance your skills and expertise in cutting-edge technologies and methodologies. Whether you are aiming to excel in development, security, or operations, these certifications provide a comprehensive learning experience. Explore the following programs:
- DevOps Certification — Learn the fundamentals and advanced concepts of DevOps practices and tools.
- DevSecOps Certification — Master the integration of security within the DevOps workflow.
- SRE Certification — Gain expertise in Site Reliability Engineering and ensure reliability at scale.
- MLOps Certification — Dive into Machine Learning Operations and streamline ML workflows.
- AiOps Certification — Discover AI-driven operations management for next-gen IT environments.

Explore our DevOps Certification, SRE Certification, and DevSecOps Certification programs at DevOpsSchool. Gain the expertise needed to excel in your career with hands-on training and globally recognized certifications.