
USB devices have solidly replaced optical media across the board for various uses. This includes installation media. USB devices are superior to optical media in many ways since they are easily reusable for installing operating systems. They are convenient and extremely inexpensive these days. Additionally, there are many tools available to interact with USB drives and use this for installation purposes. Installing Windows Server 2019 from a USB disk is extremely easy. This post will examine several ways to create a USB drive to install Windows Server 2019 locally and across the network that allows getting Windows Server 2019 installed on a physical device.
Can’t you mount an ISO image to a virtual machine and install the Windows Server OS from there? Yes, you can. However, this is in a virtual world. You need to have some physical media if you want to install the OS on a physical device. Creating a Windows Server 2019 USB disk is the easiest way to get Windows Server installed on a physical server. This process also works equally well on Windows Server 2016.
Create a USB Drive for Windows Server 2019 Installation
In this walkthrough, we will take a look at three different methods to create a Windows Server bootable USB drive. These progress from arguably the easiest method to the most involved. These include the following:
- Use Rufus
- Manually preparing a USB disk and copying the contents of an ISO
- Use OSDBuilder for custom Windows Server 2019
Before you are able to select which method you want to use, you must first download the Windows Server 2019 ISO file. If you have access to a Visual Studio subscription, you can easily download the files from there. Also, you can download Windows Server 2019 ISO file from the Microsoft Evaluation Center.
1. Use Rufus
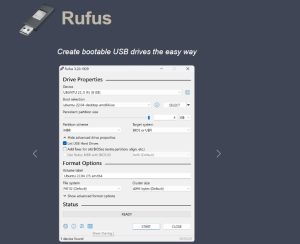
Most everyone has heard of Rufus if you have performed any installation of operating systems in the past few years. Back in the day, we had to use some sort of utility to “burn” an ISO image to optical media (CD or DVD). However, now, Rufus provides essentially the same functionality to allow “burning” your ISO image to a USB drive.
You can download Rufus from here:
- Rufus – The Official Website (Download, New Releases)
Rufus even provides a portable version of the software which allows simply running it without any installation. Rufus provides, “hands down” the easiest way to quickly get an ISO image loaded on a USB flash drive.
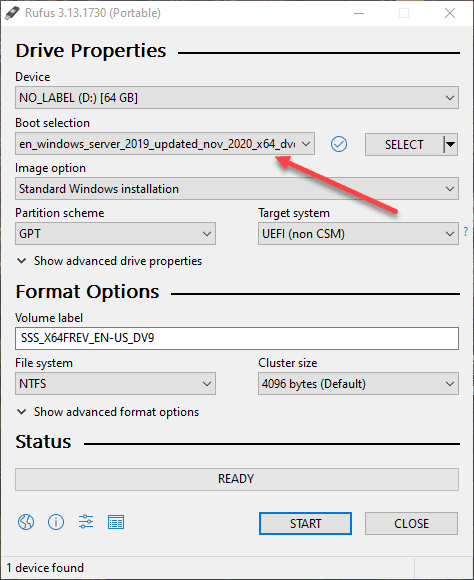
Once you launch Rufus, you simply select the ISO image from your local hard drive. It will populate the options for creating the USB disk that you will want to choose by default. Simply hit Start and
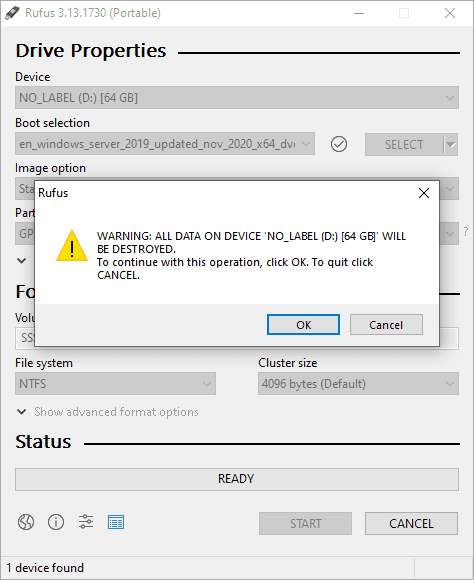
Click OK to allow Rufus to format the destination USB disk.
2. Manually preparing a USB disk and copying the contents of an ISO
If you don’t have access to Rufus or you want to manually create the USB disk for Windows Server 2019 installation, you can do this with a few steps. You will want to have your destination USB disk mounted to your workstation/laptop. We will use diskpart to prepare the USB disk as needed.
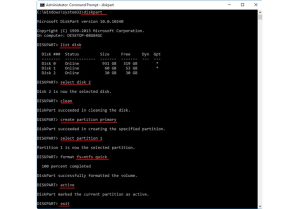
Mount your USB disk. Use the following diskpart commands to prepare the disk. ***Note*** make sure this is a USB disk you are ok to format (meaning you will loose all data contained on the USB drive). Below is the output of my running through the commands needed. You will “clean” the disk, create a primary partition, and format it with FAT32.
PS C:WINDOWSSystem32> diskpart

Microsoft DiskPart version 10.0.18362.1171

Copyright (C) Microsoft Corporation.
On computer: SPRO6

DISKPART> list disk

  Disk ###  Status         Size     Free     Dyn  Gpt
  --------  -------------  -------  -------  ---  ---
  Disk 0    Online          476 GB      0 B        *
  Disk 1    Online           58 GB    48 GB

DISKPART> select disk 1

Disk 1 is now the selected disk.

DISKPART> clean

DiskPart succeeded in cleaning the disk.

DISKPART> convert gpt

DiskPart successfully converted the selected disk to GPT format.

DISKPART> create partition primary size=10240

DiskPart succeeded in creating the specified partition.

DISKPART> list partition

  Partition ###  Type              Size     Offset
  -------------  ----------------  -------  -------
* Partition 1    Primary             10 GB  1024 KB

DISKPART> select partition 1

Partition 1 is now the selected partition.

DISKPART> format fs=fat32 quick

  100 percent completed

DiskPart successfully formatted the volume.

DISKPART>

Mount the Windows Server 2019 ISO image in Windows. You can do this by simply right-clicking and choosing Mount. After that select all the files in your mounted ISO and copy these to the destination USB drive.

You will most likely run into the error “The file install.wim is too large for the destination file system. You can click Skip to allow it to skip the install.wim file but copy everything else. We will solve the install.wim issue below.
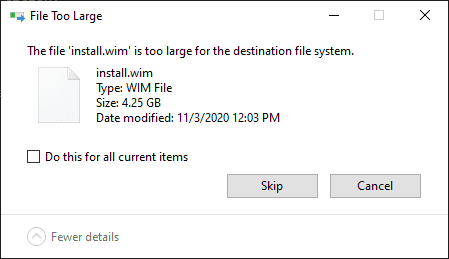
To get around this error due to FAT32, you will need to split up the install.wim file on your destination USB disk. To do that, you use the following command. The first source is the mounted ISO image. The second source is the target USB disk.
dism /Split-Image /ImageFile:E:sourcesinstall.wim /SWMFile:D:sourcesinstall.swm /FileSize:4096

Once you have the files copied to the USB drive, including the install.wim file split apart, you will have a bootable USB drive for Windows Server 2019 installation.
3. Use OSDBuilder for custom Windows Server 2019 installation disk
If you are looking to create a customized ISO image of your Windows Server 2019 build or you would like to have features, updates, and other configurations installed right from the ISO, OSDBuilder is a really powerful PowerShell module that allows you to do just that. Additionally, it includes a New-MediaUSB cmdlet that allows you to create bootable USB media from any OSMedia, OSBuild, or PEBuild.
OSDBuilder is a PowerShell module that allows you to perform offline servicing of your Windows operating system, including Windows Server 2019. You can then import the image into MDT or another OS deployment tool of your choosing. A compelling feature of OSDBuilder is that it creates an answer file called a Task that allows automating your offline image’s servicing. The Task has the information needed to service the image, so no interaction is needed.
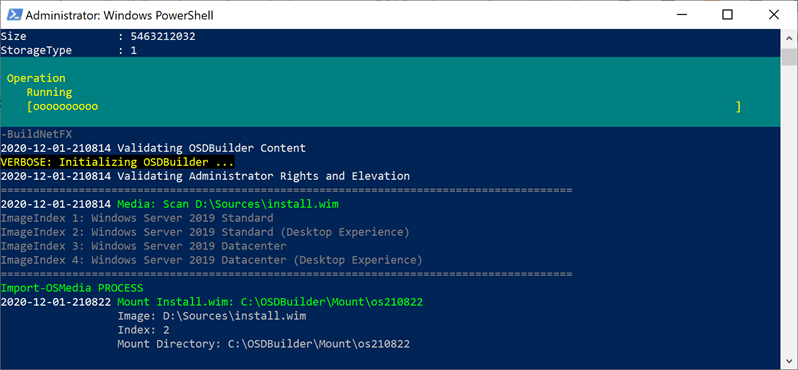
install-module OSDBuilder
import-module OSDBuilder
Mount-DiskImage -ImagePath C:windowstoolsISOen_windows_server_2019_updated_nov_2020_x64_dvd_8600b05f.iso
Import-OSMedia -ImageName 'Windows Server 2019 Standard (Desktop Experience)' -SkipGrid -Update -BuildNetFX
Using the New-MediaUSB as part of the OSDBuilder- You can create bootable USB of any OSMedia, OSBuild, or PEBuild. Once you customize your ISO image, this cmdlet allows easily “burning” the image to USB from the OSDBuilder process.
Learn more about how to use OSDBuilder to create a USB drive for Windows Server 2019 installation:
- Overview – OSDBuilder (osdeploy.com)
Concluding Thoughts
As you can tell, there are multiple ways to approach the process of creating a USB drive for Windows Server 2019 installation. Using the three approaches to creating a USB disk for installing Windows Server 2019, you can easily create a USB disk to work with the installation of Windows Server 2019. Rufus is arguably the easiest way to create a USB installation disk for Windows Server 2019 quickly. You can also manually create the disk by preparing a USB disk appropriately and then copying the Windows Server 2019 ISO contents to the USB disk. Finally, using OSDBuilder, you can create a custom ISO that can create a USB installation disk. It can install features, apply updates, all from the customized ISO file.
Windows Server 2019 is a powerful operating system designed for server environments. It offers a wide range of features and capabilities that make it an excellent choice for businesses and organizations. One of the common tasks when working with Windows Server 2019 is installing or reinstalling the operating system on a server. While there are several methods available for installing Windows Server 2019, using a bootable USB drive is one of the most convenient and efficient options.
Creating a bootable USB drive allows you to easily install Windows Server 2019 on a new server or reinstall the operating system on an existing server. It eliminates the need for physical installation media, such as DVDs, and simplifies the installation process. In this blog post, we will explore the different methods to create a bootable USB drive for Windows Server 2019 and provide step-by-step instructions for each method. Whether you are a beginner or an experienced IT professional, this guide will help you create a bootable USB drive for Windows Server 2019 with ease.
Video Tutorial:
What’s Needed
Before we dive into the methods of creating a bootable USB drive for Windows Server 2019, let’s discuss the prerequisites and the things you will need for the process:
1. Windows Server 2019 ISO file: You will need to download the Windows Server 2019 ISO file from the official Microsoft website or obtain it from a trusted source.
2. USB flash drive: You will need a USB flash drive with sufficient capacity to hold the Windows Server 2019 installation files. It is recommended to use a USB drive with at least 8 GB of storage space.
3. A computer running Windows: You will need a computer running a Windows operating system to perform the necessary steps for creating a bootable USB drive. The computer should have administrative privileges.
4. Rufus utility: Rufus is a popular and reliable utility for creating bootable USB drives. You will need to download Rufus from the official website or obtain it from a trusted source.
What Requires Your Focus?
Creating a bootable USB drive for Windows Server 2019 involves several steps and methods. Here are the key areas that you should focus on during the process:
1. Choosing the right method: There are multiple methods available for creating a bootable USB drive for Windows Server 2019. Each method has its advantages and requirements. It is important to understand the different methods and choose the one that best fits your situation and requirements.
2. Following the instructions carefully: Each method has its own set of instructions and steps. It is crucial to follow the instructions carefully and perform each step accurately to ensure success. Skipping or incorrectly executing a step can lead to errors or unsuccessful creation of the bootable USB drive.
3. Verifying the bootable USB drive: Once you have created the bootable USB drive, it is important to verify its functionality before using it for installation. You can do this by booting your server from the USB drive and ensuring that the Windows Server 2019 installation process starts without any issues. This step will help you avoid any potential installation problems.
Now that we understand the background and requirements, let’s explore the different methods to create a bootable USB drive for Windows Server 2019.
Method 1. How to Create a Bootable USB Drive Using Rufus
Rufus is a widely used utility for creating bootable USB drives. It is easy to use and offers a straightforward process for creating bootable media. Here’s how you can create a bootable USB drive for Windows Server 2019 using Rufus:
Step 1: Download Rufus
Visit the official Rufus website and download the latest version of the utility. Save the Rufus executable file to your computer.
Step 2: Insert the USB Flash Drive
Insert the USB flash drive into an available USB port on your computer. Make sure there is no important data on the USB drive as the process of creating a bootable USB drive will erase all existing data.
Step 3: Run Rufus
Locate the Rufus executable file that you downloaded in Step 1 and run it. Rufus does not require installation and can be executed directly from the downloaded file.
Step 4: Select the USB Drive
In the Rufus utility, ensure that the correct USB drive is selected from the “Device” dropdown menu. If you have multiple USB drives connected to your computer, make sure to choose the correct one.
Step 5: Select the Windows Server 2019 ISO File
Click on the “Select” button next to the “Boot selection” field and browse to the location where you have saved the Windows Server 2019 ISO file. Once you have selected the ISO file, Rufus will automatically populate the remaining fields with the appropriate settings.
Step 6: Choose the Partition Scheme and File System
Under the “Partition scheme” section, select “MBR” if your server’s firmware uses the legacy BIOS mode. If your server uses the UEFI firmware mode, select “GPT”. Choose the “FAT32” file system as it is compatible with most computers and servers.
Step 7: Start the Creation Process
Click on the “Start” button to begin the process of creating the bootable USB drive. Rufus will display a warning message stating that all data on the USB drive will be destroyed. Double-check that you have selected the correct USB drive and click “OK” to proceed.
Step 8: Wait for the Process to Complete
Rufus will now format the USB drive and copy the Windows Server 2019 installation files onto it. The process may take several minutes, depending on the speed of your computer and USB drive. Do not remove the USB drive or interrupt the process until it is completed.
Step 9: Verify the Bootable USB Drive
Once the process is complete, Rufus will display a “READY” message. You can now close Rufus and safely eject the USB drive from your computer. To verify the bootable USB drive, insert it into the server where you want to install Windows Server 2019 and boot from the USB drive. If the installation process starts, it indicates that the USB drive has been successfully created.
Pros & Cons:
| Pros | Cons |
|---|---|
| 1. Rufus is a reliable utility for creating bootable USB drives. | 1. Requires downloading and installing additional software. |
| 2. Offers a user-friendly interface with step-by-step instructions. | 2. May not be compatible with all USB flash drives. |
| 3. Allows customization of various settings, such as partition scheme and file system. | 3. Formatting the USB drive will erase all existing data. |
Now that we have covered one method, let’s explore another method to create a bootable USB drive for Windows Server 2019.
Method 2. How to Create a Bootable USB Drive Using Windows USB/DVD Tool
The Windows USB/DVD Tool is an official utility provided by Microsoft for creating bootable USB drives. It offers a simple and straightforward process for creating bootable media. Here’s how you can use the Windows USB/DVD Tool to create a bootable USB drive for Windows Server 2019:
Step 1: Download the Windows USB/DVD Tool
Visit the official Microsoft website and download the Windows USB/DVD Tool. Save the executable file to your computer.
Step 2: Insert the USB Flash Drive
Insert the USB flash drive into an available USB port on your computer. Make sure to back up any important data on the USB drive as the process of creating a bootable USB drive will erase all existing data.
Step 3: Run the Windows USB/DVD Tool
Locate the executable file that you downloaded in Step 1 and run it. The Windows USB/DVD Tool does not require installation and can be executed directly from the downloaded file.
Step 4: Choose the Windows Server 2019 ISO File
In the Windows USB/DVD Tool, click on the “Browse” button and navigate to the location where you have saved the Windows Server 2019 ISO file. Select the ISO file and click “Open” to proceed.
Step 5: Select USB Device
Select the “USB device” option in the Windows USB/DVD Tool. Ensure that the correct USB drive is selected from the dropdown menu. If you have multiple USB drives connected to your computer, make sure to choose the correct one.
Step 6: Begin the Creation Process
Click on the “Begin copying” button to start creating the bootable USB drive. The Windows USB/DVD Tool will display a warning message stating that all data on the USB drive will be destroyed. Double-check that you have selected the correct USB drive and click “Erase USB Device” to proceed.
Step 7: Wait for the Process to Complete
The Windows USB/DVD Tool will now format the USB drive and copy the Windows Server 2019 installation files onto it. The process may take several minutes, depending on the speed of your computer and USB drive. Do not remove the USB drive or interrupt the process until it is completed.
Step 8: Verify the Bootable USB Drive
Once the process is complete, the Windows USB/DVD Tool will display a notification indicating that the bootable USB drive has been created successfully. You can now close the Windows USB/DVD Tool and safely eject the USB drive from your computer. To verify the bootable USB drive, insert it into the server where you want to install Windows Server 2019 and boot from the USB drive. If the installation process starts, it indicates that the USB drive has been successfully created.
Pros & Cons:
| Pros | Cons |
|---|---|
| 1. Official utility provided by Microsoft for creating bootable USB drives. | 1. Requires downloading and installing additional software. |
| 2. Offers a simple and straightforward process with a user-friendly interface. | 2. May not be compatible with all USB flash drives. |
| 3. Allows customization of various settings, such as partition scheme and file system. | 3. Formatting the USB drive will erase all existing data. |
Now that we have covered two methods, let’s explore another method to create a bootable USB drive for Windows Server 2019.
Method 3. How to Create a Bootable USB Drive Using Diskpart Command
Diskpart is a command-line utility in Windows that allows you to manage disks, partitions, and volumes. It can also be used to create a bootable USB drive for Windows Server 2019. Here’s how you can use the Diskpart command to create a bootable USB drive:
Step 1: Open Command Prompt
Open the Command Prompt with administrative privileges on your computer. This can be done by searching for “Command Prompt” in the Start menu, right-clicking on it, and selecting “Run as administrator”.
Step 2: Run Diskpart
In the Command Prompt window, type “diskpart” and press Enter to start the Diskpart utility. You may need to provide administrator permissions if prompted.
Step 3: List Available Disks
Type “list disk” and press Enter to view a list of all available disks on your computer. Identify the disk number of the USB drive that you want to use for creating a bootable USB drive. Make sure to choose the correct disk as selecting the wrong disk can result in data loss.
Step 4: Select the USB Disk
Type “select disk ” and press Enter. Replace “” with the actual disk number of the USB drive. For example, if the USB drive is listed as Disk 1, you would enter “select disk 1”.
Step 5: Clean the Disk
Type “clean” and press Enter to erase all data on the USB drive. This will remove any existing partitions and prepare the USB drive for the bootable media.
Step 6: Create a Bootable Partition
Type “create partition primary” and press Enter to create a primary partition on the USB drive.
Step 7: Select the Partition
Type “select partition 1” and press Enter to select the partition you just created.
Step 8: Set the Partition as Active
Type “active” and press Enter to set the selected partition as active. This will make the USB drive bootable.
Step 9: Format the Partition
Type “format fs=ntfs quick” and press Enter to format the partition with the NTFS file system. The “quick” parameter enables quick formatting.
Step 10: Assign a Drive Letter
Type “assign” and press Enter to assign a drive letter to the USB drive. This will make the USB drive accessible in Windows.
Step 11: Copy Windows Server 2019 files
Open File Explorer and navigate to the location where you have saved the Windows Server 2019 ISO file. Right-click on the ISO file, select “Mount” from the context menu, and note the drive letter assigned to the mounted ISO file.
In the Command Prompt window, type “xcopy :* : /s /e /f” and press Enter. Replace “” with the drive letter assigned to the mounted ISO file and “” with the drive letter assigned to the USB drive. For example, if the mounted ISO file is assigned drive letter D and the USB drive is assigned drive letter E, you would enter “xcopy D:* E: /s /e /f”.
Step 12: Verify the Bootable USB Drive
Once the copy process is complete, you can close the Command Prompt and safely eject the USB drive from your computer. To verify the bootable USB drive, insert it into the server where you want to install Windows Server 2019 and boot from the USB drive. If the installation process starts, it indicates that the USB drive has been successfully created.
Pros & Cons:
| Pros | Cons |
|---|---|
| 1. Built-in command-line utility in Windows for creating bootable USB drives. | 1. Requires manual execution of command-line commands. |
| 2. Does not require downloading or installing additional software. | 2. May not be as user-friendly for beginners without command-line experience. |
| 3. Provides complete control over the partitioning and formatting process. | 3. Formatting the USB drive will erase all existing data. |
Now that we have covered three methods, let’s explore one more method to create a bootable USB drive for Windows Server 2019.
Method 4. How to Create a Bootable USB Drive Using PowerShell
PowerShell is a powerful scripting language and automation framework in Windows. It can also be used to create a bootable{“@context”:”https://schema.org”,”@type”:”FAQPage”,”mainEntity”:null}
Typically, specialists administering servers use bootable flash drives to simplify and speed up their work, because not all machines may have a virtual environment for installing an ISO distribution. Another method you can use is network installation. This method requires the preparation and configuration of a PXE server, but is more labor intensive than installation using an SCCM server. Installing from a USB drive is a simple and convenient way to always have up-to-date system images at hand for installation and install them on the desired machine in a short time. In this material, we will take a detailed look at the process of creating a bootable USB with Windows Server 2019.
Prepare a USB drive or external hard drive with a capacity of at least 8 GB – the optimal memory capacity is 16 GB. So, the most proven ways in which we can create a bootable flash device are using the Rufus program and using Diskpart from the console administrator. We will look at each method in detail and step by step.
Creating a Bootable USB Using Rufus Utility
Rufus is software that allows you to quickly and efficiently turn a USB drive into a full bootable device. This utility offers a simple and intuitive interface, thanks to which even without deep technical knowledge you can prepare a flash drive for installing operating systems, including Windows Server 2019.
The obvious advantage of Rufus is its ability to work with various file systems, including FAT, FAT32, NTFS and UEFI or BIOS for old and new computers. The program supports creating bootable media from ISO images and can even check USB drives for bad sectors, which ensures high reliability and quality of the bootable flash drive.
Read more about the capabilities of the Rufus program in our material at this link
So, you need to download the latest version of Rufus from the official website
While the program and iso file are downloading, check your USB drive. You may need to save any data you have on it, which may be important because it will be formatted during the installation process.
Once Rufus downloads, launch it.
The current settings of your USB device will appear in the main window of the utility. In the “Device” column, you need to carefully select the desired USB drive and not confuse it with other drives.
After that, click on the “Select” button next to the “Disk image” column and specify the path to the previously downloaded ISO image of Windows Server 2019.
Pay attention to the “Partition scheme” option to “MBR” or “GPT”. This depends on the BIOS type of the machine on which the installation will be performed: the MBR parameter is selected for a machine that has a BIOS, and GPT for a machine that supports the UEFI standard.
For the file system, “NTFS” is usually selected. This is because files larger than 4 GB cannot be stored on a FAT32 volume.
You need to check again that the selected parameters are correct, and if everything is in order, click on the “Start” button. The program will warn you that all data on the USB drive will be destroyed. Confirm the action and wait for the recording process to complete.
Once the process is complete, Rufus will notify you that your device is ready. You can now remove the USB drive from the port using the Safe Disconnect option.
Great! Your boot drive is ready, now you can connect the bootable USB flash drive to the server. To initiate, do not forget to go to the BIOS or UEFI settings and set the boot priority from the USB device.
Save your changes and reboot the server to begin installing Windows Server 2019. Follow the installer instructions carefully to ensure that you are prompted to install Windows Server 2019 on a specific hard drive or partition.

Making a bootable USB using Diskpart
Diskpart is a built-in console tool in Windows operating systems that provides users with advanced storage management capabilities. Diskpart allows you to perform many disk space-related tasks, such as initializing new disks, creating, formatting or deleting partitions, and changing drive letters and paths.
To create a bootable USB flash drive with Windows Server 2019 using the Diskpart tool, follow these steps:
Insert the USB drive into your computer and open Command Prompt as an administrator. To do this, press Win + X and select “Command Prompt (Admin)” or “Windows PowerShell (Admin)”.
• Type diskpart and press Enter to launch the utility.
• Use list disk command to display a list of all disks. Based on the size, identify the drive that matches your flash drive
• Enter the command select disk X, where X is the number of your USB drive.
• Clean the drive with clean command.
• To create a new primary partition, enter create partition primary.
• To select the created partition, use the select partition 1 command.
• Format the partition in NTFS format using the command format fs=ntfs quick (If the flash drive is larger than 32GB and you want to make it bootable under UEFI, use formatting in FAT32).
• Enable the partition using active command (this command is not needed for UEFI).
• Once formatting is complete, exit Diskpart by typing exit.
Now copy the Windows Server 2019 installation files to the flash drive. Open the ISO file from Windows Server and transfer all the files to the root directory of the USB drive.
This can also be done with the command X:cd\boot\ bootsect.exe /nt60 Y: – where X:\ is the letter of the mounted Windows ISO and Y:\ is the letter of the target USB drive
After copying the files, the bootable flash drive is ready, and you can begin installing Windows Server 2019 on the desired machine. Connect the finished bootable USB flash drive to the server, go to the BIOS or UEFI settings and set the boot priority from the USB device. I hope that the article was useful and helped you in creating a bootable USB drive.
Post Views: 457
After downloading the Windows Server 2019 .iso file, you need to create a bootable USB drive to install the server.
Note: Ensure your USB drive has at least 16 GB of storage.
You can use the following application for this task:
Rufus
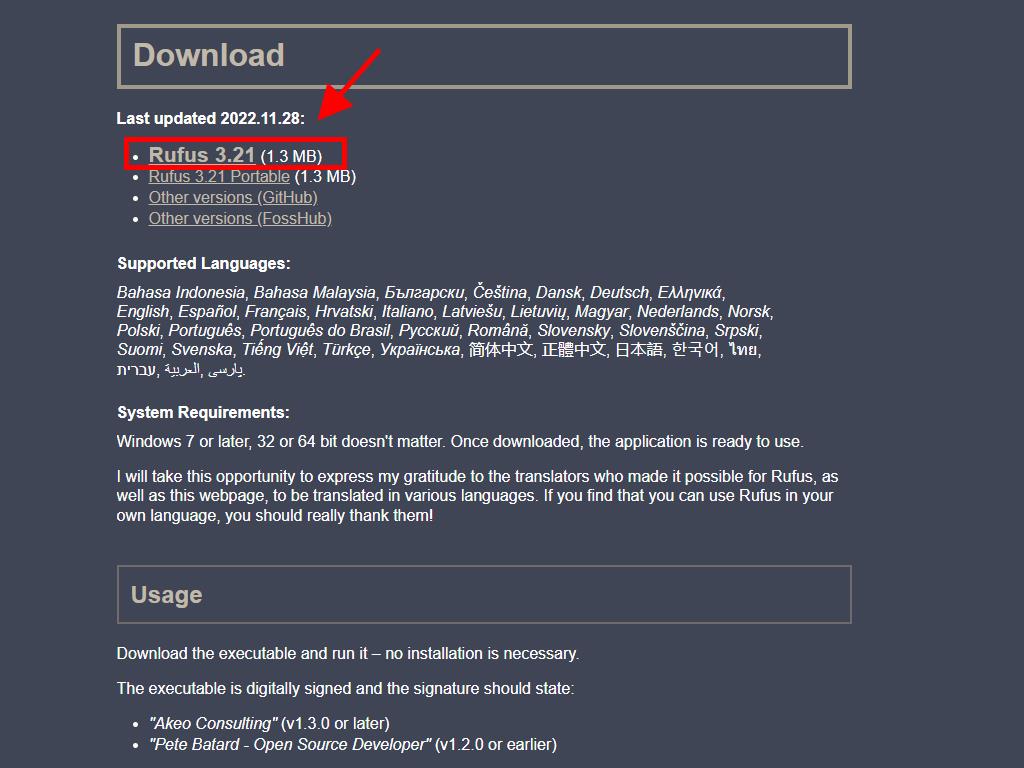
- Download it for free here.
- Scroll down and download the latest version of Rufus in the Download section.
- Plug in your USB drive and open the Rufus application.
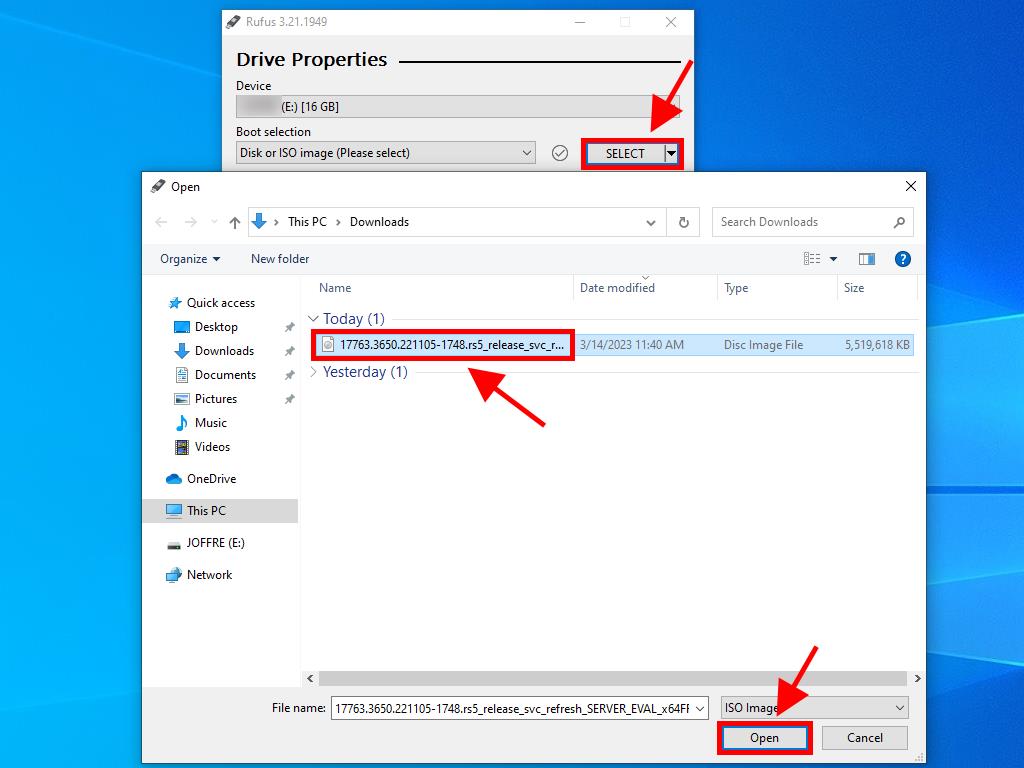
- Click Select and locate the Windows Server 2019 .iso file you downloaded.
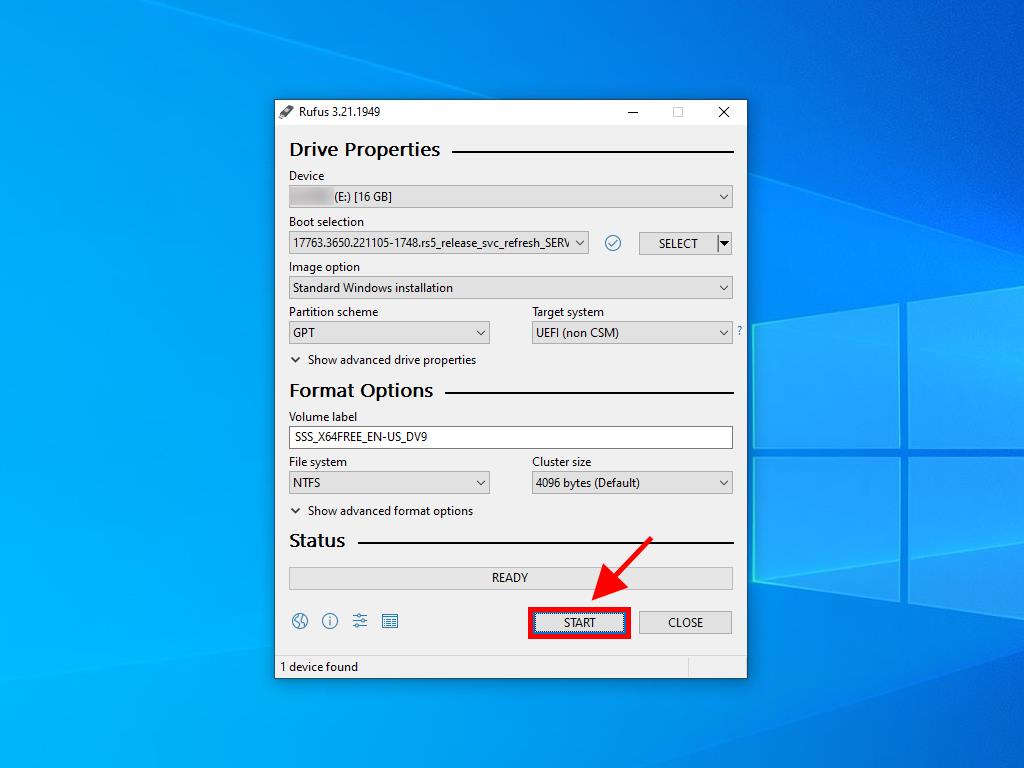
- Finally, click Start and wait for the application to create the bootable USB drive.
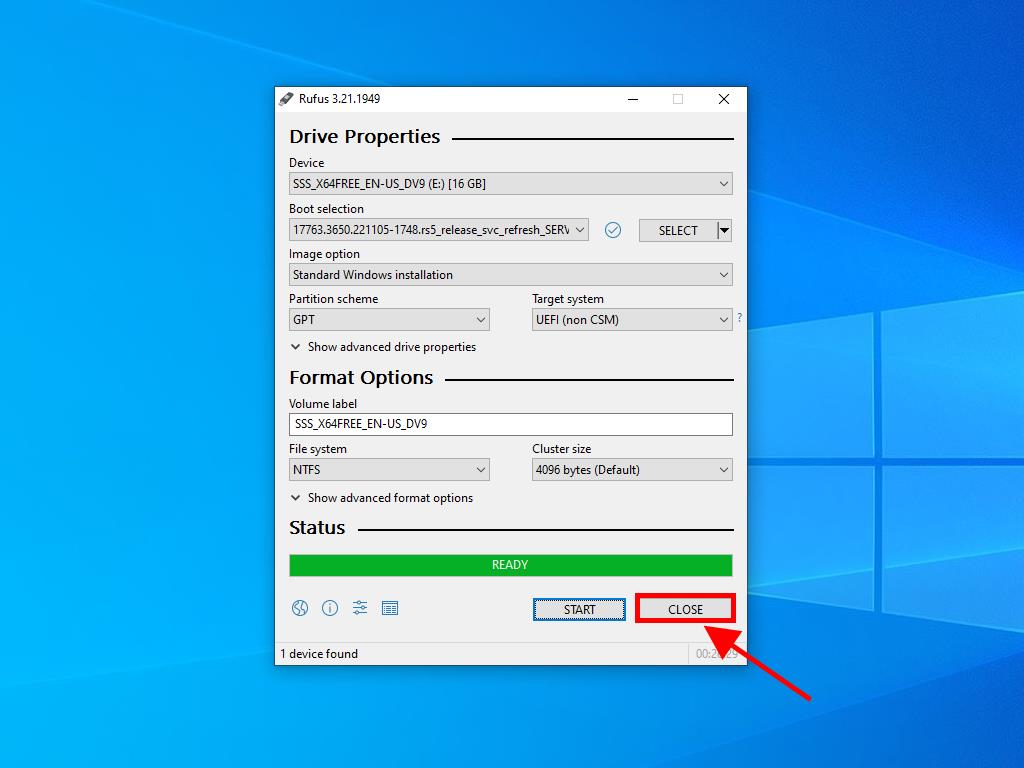
- Once the process is complete (progress bar shows Ready), click Close and you are ready to install Windows Server 2019.
Note: When the Customize Windows Installation window appears, select Disable Data Collection and wait for the process to complete.

This is how to Create a Bootable Windows 2019 Essentials USB Media Fash Drive Stick Using Rufus.
👉For Rufus:
https://rufus.ie/
👉For Windows 2019 Essentials (Trial) ISO:
https://www.microsoft.com/en-us/evalcenter/evaluate-windows-server-2019-essentials
👉Buy Windows Server 2019 Essentials Full:
https://amzn.to/38NyTmJ
OR
https://amzn.to/38Nc42E
👉Buy Windows Server 2019 64 BIT OEM English Standard License
https://amzn.to/3pBqUPV
******************************************************************************
⚠️ All Amazon Links Are Affiliated Paid Links
My Gear:
👉My Panasonic 4K Camera Go To:
https://amzn.to/3f6pkk6
👉Buy Audio Interface For Crisp Mic Sound Device Go To:
https://amzn.to/392OBdr
👉My Mic 1 (I Use This For PC On Screen Recording )
https://amzn.to/36mzmZi
👉My Sony Clip Mic 2 (I use this to connect to my cam to record videos)
https://amzn.to/36BCMK0
👉You, Will Need This XLR Cable To Connect That Mic To The Interface For The PC Recording .
https://amzn.to/35ZBMPh
🙏Thank You For Watching!
😇If This Video Helped You Please Consider Subscribing, Give Us A Thumbs Up👍, Comment & Share.
👉FOR MORE INFORMATION PLEASE VISIT OUR WEBSITE
https://csa4u.com/tech-tutorials/
👍Follow US
https://www.facebook.com/uscstutorials
source
windows server