
Guide
When you purchase through links on our site, we may earn an affiliate commission. Here’s how it works.
— Updated
· Hot!
Rufus is a small and free utility for creating bootable USB drives for installing various operating systems. Unlike Microsoft’s Media Creation Tool (MCT) app, which supports only Windows 10 and 11, Rufus also works with Windows 7, 8.1, 10, 11, Linux, and other operating systems.
Besides better OS support, Rufus provides several quality-of-life improvements, especially for those wanting to install Windows 11. For starters, Rufus can bypass TPM 2.0 and Secure Boot requirements to create an install media compatible with older and officially unsupported hardware. Other neat features include the following:
- Automatic offline profile creation.
- Skipping the requirement for a Microsoft Account.
- Disabling «data-harvesting» options during the initial setup.
- Settings migration to speed up the initial setup process.
- Turning off default BitLocker disk encryption.
Users can combine Rufus and the Media Creation Tool when creating a Windows 11 bootable USB. For example, download an official ISO using MCT and then flash it using Rufus. Alternatively, you can download the original Windows ISO files directly in Rufus (supported versions include Windows 11, 10, and 8.1). It is worth noting that Microsoft has yet to update its official Media Creation Tool app with the recently launched Windows 11 version 23H2 images, so Rufus and similar third-party apps are your only option to make a Windows 11 23H2 install media.
Note: Although Rufus allows creating a bootable USB with old and unsupported Windows versions, the app only works on Windows 8, 8.1, 10, and 11. Sadly, Windows 7 is no longer supported.
Create Windows 11 installation USB using Rufus
- Begin with downloading Rufus from the app’s official website. Rufus is free, and it is available in installable and portable variants.
- Connect your USB drive (8 GB is the minimum requirement) and launch Rufus. If you need to change the app’s language, click the button with a globe icon.

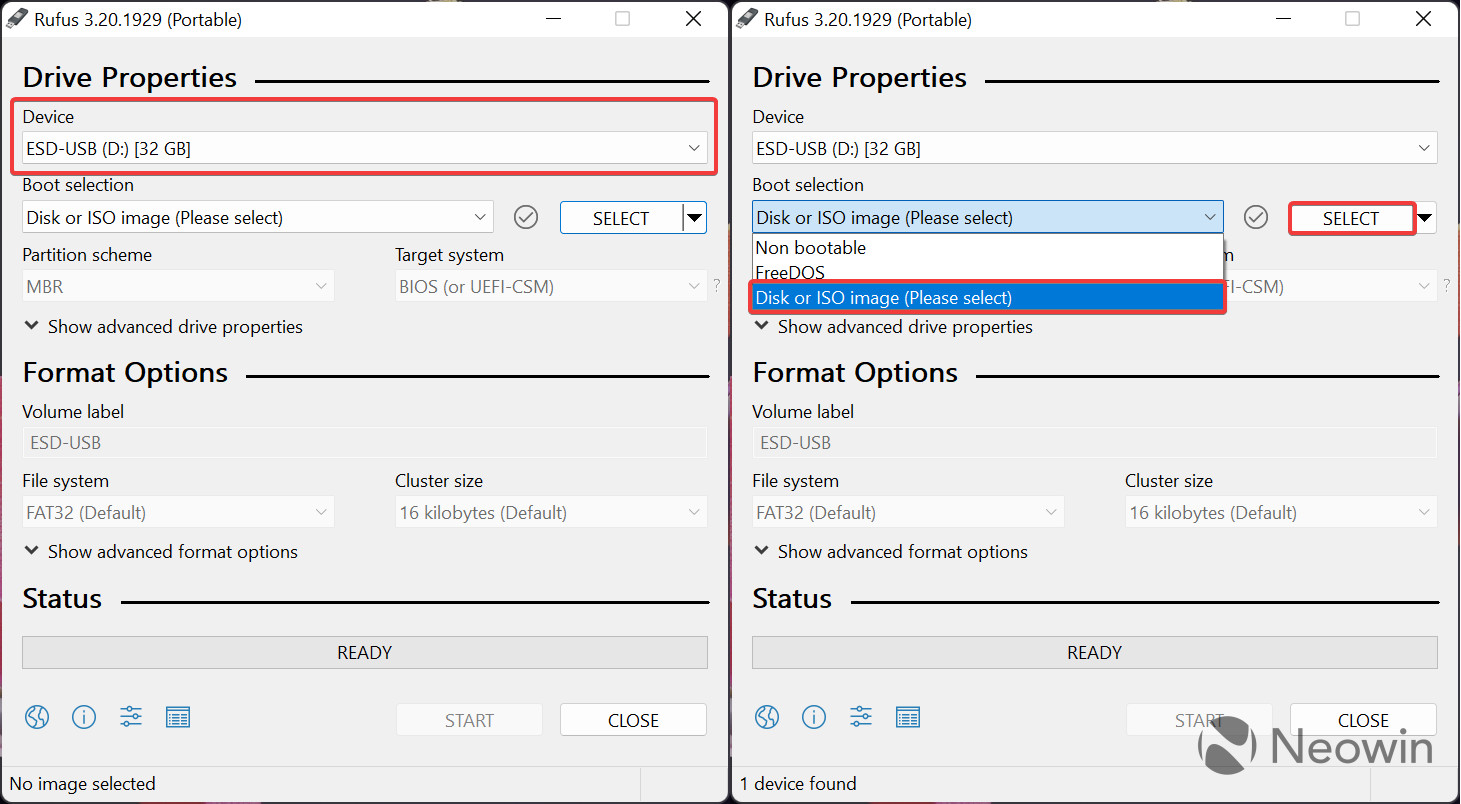
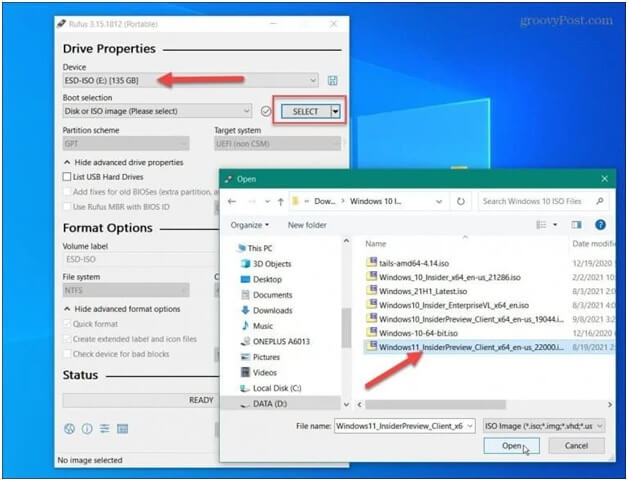
- Select the USB drive from the Device drop-down.
- If you already have a Windows 11 ISO, select Disk or ISO Image and click Select, then skip to Step 9.

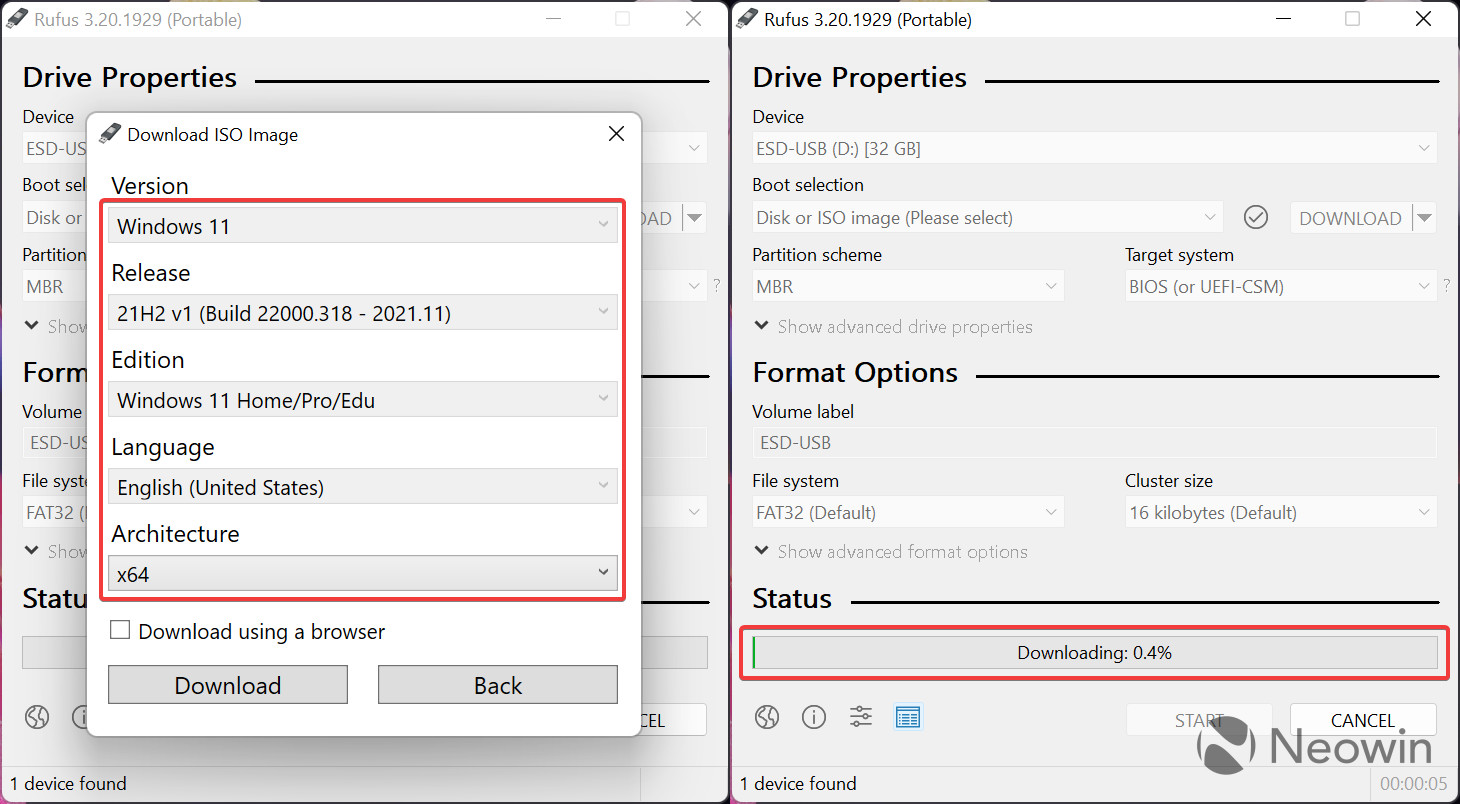
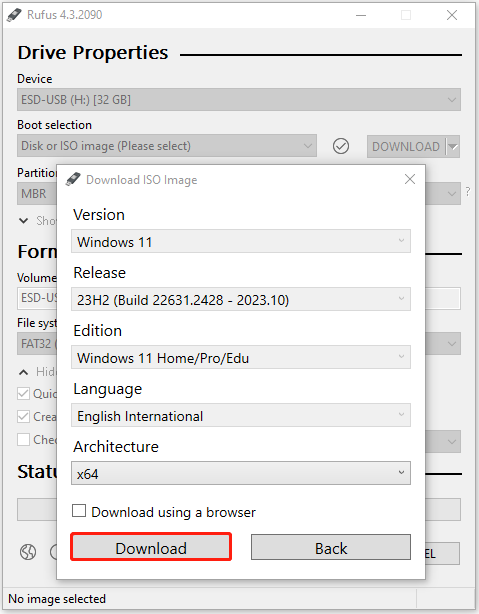
- You can download the original Windows 11 ISO file using Rufus if you do not have it. To do so, click the arrow-down button next to the Select button and press Download. Note that you must let the app check for updates; otherwise, the download option will not appear.
- Click the Download button again and wait a few seconds for Rufus to run the needed script. Note: Rufus uses a third-party script to connect to Microsoft servers and download original ISOs.
- Select the Windows version you need, and click Continue. The app will prompt you to pick release, SKU (Edition), Language, and architecture.
- Once everything is set, click Download, specify where Rufus should save the ISO, and wait for the app to complete its job.

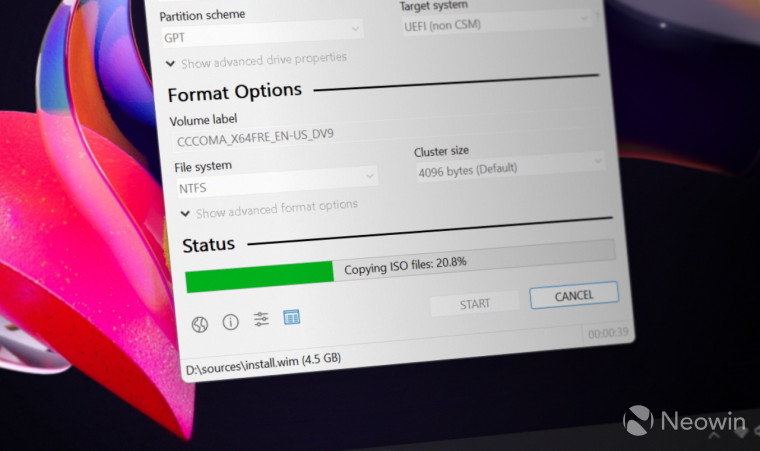
- Now you are ready to write the ISO to the USB drive. You can leave the Volume Label as is or rename it to something more palatable, for example, Windows11_Install.
- Click Start.
- After clicking the Start button, Rufus will offer you to customize the installation with the following options (place checkmarks next to the ones you need):
- Remove Requirement for 4GB+ RAM – tick this option if you want to install Windows 11 on a computer with unsupported hardware.
- Remove requirement for an online Microsoft account—select this option to skip the Microsoft Account requirement. Windows 11 will not ask you to sign in with a Microsoft Account during the initial setup.
- Create a local account—you can specify your account name, for example, Neowin.
- Set regional options using the same values as this user – Rufus will copy the current regional settings to the new installation.
- Disable data collection – Windows 11 will not ask you to send diagnostic data, enable location, advertisement ID, and other things some users consider privacy-invading.
-
Disable BitLocker automatic device encryption—this will ensure BitLocker is not turned on by default.
- Click OK and wait for Rufus to create a Windows 11 installation USB. You can check the progress in the Status section.


Now you can use your USB drive to install Windows 11 from scratch. Restart your computer and boot from the newly made Windows 11 install USB.
Tags
- Guide
- Windows 11
- Windows 10
- Windows 8.1
- Windows 7
- Install windows
- Rufus
- Microsoft
- Windows iso
- Windows 11 isos
What is Rufus?
If you are looking for a clean install of the Windows 11 operating system on your PC and wondering how to use Rufus to install Windows 11, then the best way to do so is by creating a bootable USB drive. Rufus utility will help you create a bootable USB drive on your PC.
Rufus is a utility software that helps users to create or format bootable USB flash drives. Rufus is used when you need a USB installation media from bootable ISO, which includes Linux, UEFI, and Windows, to install on a PC without any operating system.
* Do you know how to create a Windows bootable USB with Rufus?
How to use Rufus to install Windows 11
To reduce the chance of getting stuck in the process of the bootable USB creation with Rufus, get to know the four basic requirements and prepare for them in advance.
1. An empty USB stick, flash drive
Once the installation process of the Rufus utility is complete, users will now need an empty flash drive to burn the ISO image. Make sure the USB device you are using is empty. Format the drive before going on to the next step.
2. Download Windows 11 ISO image
There are multiple Windows 11 files available on the internet, so downloading it is quite simple. All you have to do is open the internet and look for Windows 11 ISO images. Make sure to download the file from a renowned website to be sure that the file is not corrupt.
*This guide tells you how to download Windows 11 automatically without searching iso around.
3. Download and install Rufus on your PC
If you want to download and install Windows 11 with the help of Rufus, then you have to download and install the Rufus utility on your PC. When you are downloading Rufus if you are asked to download the update, make sure to do that as well.
4. Burn ISO image to the USB drive in Rufus
Launch the Rufus application and select the USB flash drive you want to use under devices. Click on the Select button on the right-hand side of the application. This will open up a new window where you need to select the Windows 11 ISO file you have downloaded from the internet.
Full guide for how to create and install Windows 11 with Rufus
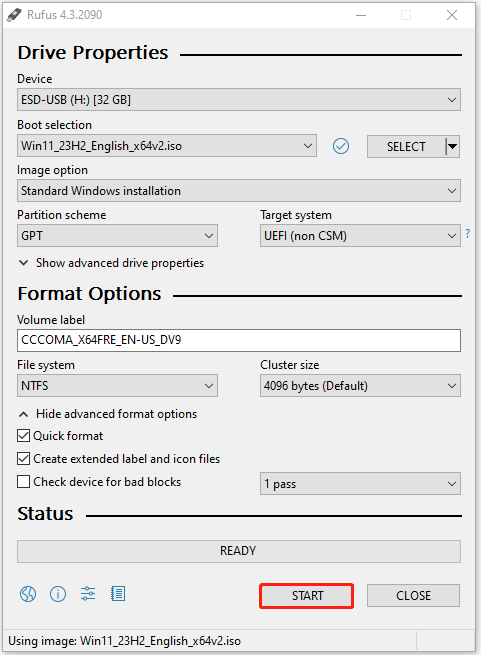
Step 1. Now go to the third option available on the Rufus utility called «Image Option». Select on the dropdown to Standard Windows Installation. Go to the partition option and select GPT. Click on the Volume Label and type the name of the USB drive as you like.
Step 2. Keep all the rest options as it is and click on the Start button. You will see a warning come up on the screen which says all data on the flash drive will be wiped, so make sure you click on the OK button.
Step 3. Wait for the USB drive to get created. You can check on the Status section to stay updated on how much the installation has been completed.
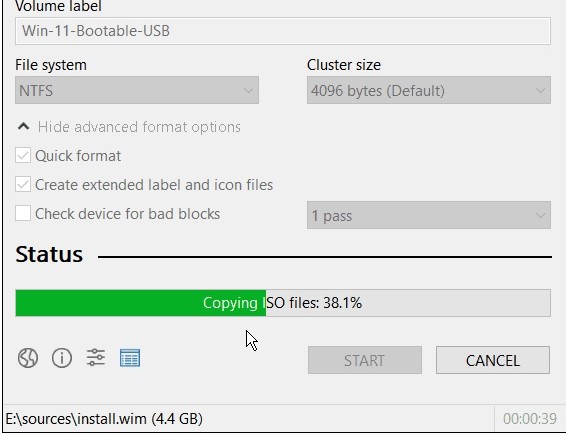
Once the process is complete, you would get to see the following media bar.
Step 4. Once the USB drive is completed, insert the USB drive on the computer you are looking to install the OS and reboot the system. This will start up the installation process. Proceed ahead, and your OS will be installed in a very short time.
How to run Windows 11 from a bootable USB drive
The other case is that you need a bootable Windows 11 USB drive from other computers. Rufus can help you clean install a Windows 11 operating system on a computer, but with EaseUS OS2Go, you can try to copy a Windows 11 operating system to a USB drive and then make it bootable on any device, including another PC and Mac.
What’s EaseUS OS2Go?
EaseUS OS2GO is a popular Windows bootable USB creation tool that helps in creating a portable USB drive from an Already installed Microsoft Windows operating system. It helps in cloning an already installed OS into a USB drive.
A simple comparison between OS2Go and Rufus
EaseUS OS2GO and Rufus are utility software that helps in creating bootable USB drives, but both of them are quite different from each other. Rufus is used when you already have an ISO file of the operating system, and all you have to do is creating the bootable USB drive. Whereas EaseUS OS2Go is used to directly clone and make a USB bootable drive from a previously installed operating system. Both of the utility software have their uses.
Guide for how to create a bootable Windows 11 bootable drive with OS2Go
Step 1. Install EaseUS OS2Go on your Windows computer, it will display your system drive’s used space. Plug in a USB drive that is larger than the system drive used space. Choose the target USB drive and click Next to continue.

Step 2. EaseUS OS2Go will notify you that the following operation would delete all data on your drive. Make sure that you have backed up all the important data. Click the Continue button to proceed.

Step 3. Adjust disk layout. The default disk layout on the target drive will be exactly the same as the resource drive. You could also edit the layout according to your needs. Tick the option there if you’re using a Solid State Drive as the Windows bootable drive. Next, click Proceed.

Step 4. Then EaseUS OS2Go will start to create the portable USB drive. It usually takes a while depending on your OS and Network condition. When the progress reaches 100%, the USB drive should be bootable now.

Step 5. Insert the portable Windows USB and start your computer. Press the required key (F2, DEL, F10…) to access BIOS. Choose to boot from the USB disk.
Note: Please make sure that the boot mode (UEFI or Legacy) of the portable USB and your target computer are the same, otherwise you may not be able to boot.
Both Rufus and EaseUS OS2GO are popular in the market when creating a bootable USB drive. They are just used in different scenarios. You can choose the process you want depending on how and where you are creating a bootable drive.
Через короткое время после выхода Windows 11, известная программа для создания загрузочных установочных флешек Rufus была первой, которая встроила возможность установки без доверенного платформенного модуля TPM 2.0. К сегодняшнему дню количество доступных в утилите опций для образов Windows 11 стало ещё более широким.
В этой инструкции подробно о том, как отключить проверку на наличие модуля TPM 2.0 и включенной безопасной загрузки (Secure Boot), минимальных требований к объему оперативной памяти и места на диске, а также экран настройки сбора персональных данных, создав загрузочную флешку в Rufus последней версии. Дополнительная возможность — установка Windows 11 с локальной учётной записью. Также может быть полезным: способы создания загрузочной флешки Windows 11, Создание мультизагрузочной флешки в Ventoy (также отключает требования к системе для Windows 11).
Опции при создании загрузочной флешки Windows 11, доступные в Rufus
Сам процесс записи установочного накопителя в Rufus не изменился по сравнению с тем, что было описано в статье про одну из предыдущих версий программы: Создание загрузочной флешки Windows в Rufus.

Однако в новой версии (скачать можно на официальном сайте — https://rufus.ie/ru/), при использовании образа ISO Windows 11 (Как скачать Windows 11 оригинальные ISO образы), возможно включение дополнительных опций в программе.
Ранее обход требований Windows 11 включался в поле «Параметры образа», теперь в главном окне программы такие настройки отсутствуют. Вместо этого, после того как заданы все параметры создания загрузочной флешки, достаточно нажать кнопку «Старт», чтобы появилось следующее окно с дополнительными параметрами:

В текущей версии текст в окне представлен на английском языке, а потому поясню каждый из пунктов:
- Remove requirement for 4Gb RAM, Secure Boot and TPM 2.0 — отключить требование наличия модуля TPM 2.0 и включенной безопасной загрузки Secure Boot, а также наличия нужного объема оперативной памяти.
- Remove requirement for an online Microsoft account — отменить требования обязательного создания учетной записи Майкрософт. Также вы можете создать локальную учетную запись при установке Windows 11 другими способами или удалить учетную запись Майкрософт уже после установки.
- Create a local account with username — автоматическое создание локальной учётной записи с указанным именем при установке Windows 11 с созданного USB-накопителя.
- Set regional options to the same values as this user’s — установить региональные параметры такими же, как у текущего пользователя. Пропускает настройку языков и клавиатур при установке системы.
- Disable data collection (Skip privacy questions) — опция для отключения экрана настройки параметров конфиденциальности при установке (отключает сбор данных во всех пунктах).
Используя эти опции при создании загрузочной флешки Windows 11, вы можете не только отключить нежелательные вам требования к установке, но и сильно сократить время, необходимое для первоначальной настройки после копирования файлов.
Частый вопрос пользователей касается также требований новой ОС к поколению процессора. Здесь всё просто: эти требования не учитываются при чистой установке Windows 11 с флешки, то есть установка возможна даже при использовании очень старых CPU (при условии, что они в принципе с этим могут справиться).
UPDATED 1/27/2025: Rufus is a free tool for quickly creating a bootable USB flash drive to upgrade or clean install Windows 11. The utility works similarly to the Media Creation Tool. However, you can also provide an existing ISO file or download the files directly from Microsoft servers.
Unlike the Microsoft solution, Rufus not only allows you to create a USB installation media, but it completes the process faster. You can also use it to create a bootable USB media for older versions, such as Windows 10. If you want to create an installer for an older version of Windows 11, you will have to provide the ISO file of the version you want to install.
Also, the tool can create a bootable USB that bypasses the security and memory requirements to install the operating system on unsupported hardware.
In this guide, I’ll teach you the steps to use Rufus to download the ISO file and create a bootable media to install Windows 11 from scratch.
- Create Windows 11 bootable USB using Rufus with ISO download
- Create Windows 11 bootable USB using Rufus with existing ISO file
- Create Windows 11 bootable USB for unsupported hardware using Rufus
Create Windows 11 bootable USB using Rufus with ISO download
To use Rufus to download the Windows 11 ISO file and create a bootable media, connect a USB flash drive with 8GB of space, and then use these steps:
-
Open Rufus website.
-
Click the link to download the latest version under the “Download” section.
-
Double-click the Rufus executable file to launch the tool.
-
Click the Settings button (third button from the left) at the bottom of the page.

-
Choose the Daily option in the “Check for updates” setting and under the “Settings” section.
-
Click the Close button.
-
Click the Close button again.
-
Open Rufus again.
-
(Optional) Choose the USB flash drive under the “Device” section.
-
Select the “Disk or ISO image” option under the “Boot selection” section.
-
Click the down-arrow button (on the right side) and select the Download option.
-
Click the Download button.
-
Select the Windows 11 option.
-
Click the Continue button.
-
Select the latest release of the operating system.
-
Click the Continue button.
-
Select the Windows 11 Home/Pro/Edu option.
-
Click the Continue button.
-
Select the language for Windows 11 installation.
-
Click the Continue button.
-
Select the x64 architecture option.
-
Click the Download button.
-
Select the location to save the Windows 11 ISO file automatically.
-
Choose the “Standard Windows 11 Installation” option under the “Image option” setting.
-
(Optional) Continue with the default settings after the download.
-
(Optional) Under the “Volume label” setting, specify a name for the drive (for example, Windows 11 Setup).
-
Click the Start button.
-
Clear all the options from the “Windows User Experience” page to create an installation media without modifications.

-
Click the OK button.


Once you complete the steps, you can use the bootable USB flash drive to install Windows 11 using a clean or in-place upgrade installation.
Create Windows 11 bootable USB using Rufus with existing ISO file
To create a bootable USB with Rufus using an existing ISO file, connect a USB flash drive with 8GB of space and use these steps:
-
Open Rufus website.
-
Click the link to download the latest version under the “Download” section.
-
Double-click the rufus.4.xx.exe file to launch the tool.
-
Select the USB flash drive to create the Windows 11 bootable media under the “Device” section.
-
Select the “Disk or ISO image” option under the “Boot selection” section.
-
Click the Select button.

-
Select the Windows 11 ISO file.
-
Click the Open button.
-
Select the “Standard Windows 11 Installation” option under the “Image option” setting.
-
Select the GPT option under the “Partition scheme” section.
-
Select the UEFI (non-CSM) option under the “Target system” section.
-
Specify a descriptive name for the bootable USB drive under the “Volume label” section. For example, Windows 11 Setup.
-
Use the default settings for the File system and Cluster size options.
-
Check the Quick format option.
-
Check the “Create extended label and icon files” option.
-
(Optional) Clear the “Remove requirement for 4GB+ RAM, Secure Boot and TPM 2.0” option.
-
(Optional) Check the “Remove requirement for an online Microsoft account” option to be able to create a local account during the out-of-box experience (OOBE).
-
(Optional) Check the “Create a local account with username” option and specify the account name if you want an installation with a local account instead of a Microsoft account (not recommended).
-
(Optional) Clear the “Set regional options to the same values as this user’s” option.
-
(Optional) Clear the “Disable data collection” option.
-
Click the Start button.
-
Click the OK button to confirm the USB’s deletion and the bootable drive’s creation.


After you complete the steps, the tool will begin creating a USB media with the Windows 11 installation media.
Create Windows 11 bootable USB for unsupported hardware using Rufus
Alternatively, Rufus has the option to create a bootable USB that bypasses the Microsoft account, TPM 2.0, Secure Boot, and memory requirements to install Windows 11 on unsupported hardware.
To create a Windows 11 bootable USB for unsupported hardware, use these steps:
-
Open Rufus website.
-
Click the link to download the latest version under the “Download” section.
-
Double-click the Rufus executable file to launch the tool.
-
Choose the flash drive to create the Windows 11 bootable USB media under the “Device” section.
-
Select the “Disk or ISO image” option under the “Boot selection” section.
-
Click the Select button.
-
Select the Windows 11 ISO file.
-
Click the Open button.
-
Select the “Standard Windows 11 Installation” option under the “Image option” section.
-
Select the GPT option under the “Partition scheme” section.
-
Choose the UEFI (non-CSM) option under the “Target system” section.
-
(Optional) Specify a descriptive name for the bootable USB flash drive under the “Volume label” section.
-
Use the default settings for the File system and Cluster size options.
-
Check the Quick format option.
-
Check the “Create extended label and icon files” option.
-
Click the Start button.
-
Check the “Remove requirement for 4GB+ RAM, Secure Boot and TPM 2.0” option to install version 24H2 on unsupported hardware.
-
Check the “Remove requirement for an online Microsoft account” option to set up Windows 11 without a Microsoft account using a local account.
-
(Optional) Check the “Create a local account with username” option and specify the account name to install the operating system with a local account.
-
(Optional) Clear the “Set regional options to the same values as this user’s” option to use the current language as the default for new installations.
-
(Optional) Clear the “Disable data collection” option to prevent Microsoft from collecting some of your data.
-
(Optional) Check the “Disable BitLocker automatic device encryption” option.
Quick note: Starting on version 24H2, Microsoft will force encryption on new installations. Although it’s recommended to use encryption to improve the security of the data, if you don’t want to use this feature, you can turn off this option.
-
Click the OK button.


Once you complete the steps, Rufus will create a bootable USB media that will bypass the security and memory requirements as well as the Microsoft account requirement to install a fresh copy of Windows 11 on virtually any supported or unsupported hardware.
Update January 27, 2025: This guide has been updated to ensure accuracy and reflect changes to the process.
-
Home
-
News
- How to Create Bootable Windows 11 23H2 USB via Rufus?
By Daisy | Follow |
Last Updated
If you plan to install Windows 11 23H2 from a USB bootable media, you can choose Rufus to do that. This post from MiniTool introduces how to create bootable Windows 11 23H2 USB via Rufus. Now, keep on your reading.
Users can combine Rufus and media creation tools when creating a Windows 11 23H2 bootable USB. For example, use MCT to download the official ISO, then use Rufus to flash it. Alternatively, you can download the original Windows ISO file directly in Rufus.
Additionally, Rufus can help you create USB installation media for older versions, including 22H2, Windows 10, and 8.1 (Windows 7 is no longer supported). Rufus can bypass TPM 2.0 and Secure Boot requirements to create installation media compatible with older and officially unsupported hardware.
Let’s dive into how to create bootable Windows 11 23H2 USB via Rufus, regardless of whether your hardware is supported or not. Before starting the following steps, you need to do the following preparation.
- Download Rufus from its official website and install it.
- Connect your USB drive that has at least 8 GB.
How to Create Bootable Windows 11 23H2 USB via Rufus
How to use Rufus to create bootable Windows 11 23H2 USB? Launch Rufus. If you already have a Windows 11 23H2 ISO, select Disk or ISO Image and click Select, then click STRAT.
If you don’t have a Windows 11 23H2 ISO, you can download the original Windows 11 23H2 ISO file using Rufus.
1. Click the arrow-down button next to the Select button and press Download.
2. Click the Download button again and wait a few seconds for Rufus to run the needed script.
Tips:
Rufus uses a third-party script to connect to Microsoft servers and download original ISOs.
3. Select the Windows version you need, and click Continue. The app will prompt you to pick release, SKU (Edition), Language, and architecture. Once everything is set, click Download, and specify where Rufus should save the ISO.
4. Once the download completes, the boot selection will be automatically the ISO file that just downloaded and you can click START to continue.
How to Create Bootable Windows 11 23H2 USB via Rufus for Unsupported Hardware
How to create Windows 11 23H2 custom bootable USB using Rufus? After clicking the STRAT button, Rufus will offer you to customize the installation with the following options. You can check the boxes based on your needs.
- Remove Requirement for 4GB+ RAM – if you want to install Windows 11 on a computer with unsupported hardware.
- Remove requirement for an online Microsoft account – skip the Microsoft Account requirement. Windows 11 will not ask you to sign in with a Microsoft Account during the initial setup.
- Create a local account – you can specify your account name.
- Set regional options using the same values as this user – Rufus will copy the current regional settings to the new installation.
- Disable data collection – Windows 11 will not ask you to send diagnostic data, enable location, advertisement ID, and other things some users consider privacy-invading.
- Disable BitLocker automatic device encryption – BitLocker is not turned on by default.
After creating a Windows 11 23H2 bootable USB via Rufus, you can start to install Windows 11 23H2. Before installing it, you had better back up important data in your current system since a clean installation will remove everything on your disk. Try the PC backup software – MiniTool ShadowMaker to back up files.
MiniTool ShadowMaker TrialClick to Download100%Clean & Safe
About The Author
Position: Columnist
Having been an editor at MiniTool since graduating college as an English major, Daisy specializes in writing about data backups, disk cloning, and file syncing as well as general computer knowledge and issues. In her free time, Daisy enjoys running and going with friends to the amusement park.