
— 13 min read

Table of Content
Streaming media has become an integral part of our digital infrastructure, powering everything from security cameras to virtual events. At the heart of many streaming solutions lies RTSP (Real-Time Streaming Protocol) media servers, and today, we’re diving deep into the world of open-source options that won’t break the bank.
Before we jump into our carefully curated list of open-source solutions, let’s break down what makes RTSP servers special. Think of an RTSP server as your personal broadcast control center – it’s the technology that lets you stream live video and audio with minimal delay.
Whether you’re setting up a home security system or broadcasting a live event, RTSP servers handle all the heavy lifting of media transmission.
Why Go Open Source?
After years of working with various streaming solutions, we’ve found that open-source RTSP servers offer compelling advantages:
- Zero License Fees: Keep your budget for other critical aspects of your project
- Ultimate Flexibility: Modify the code to create your perfect streaming setup
- Security Through Transparency: Sleep better knowing you can audit every line of code
- Active Community Support: Tap into a network of developers who continuously improve the software
- Future-Proof Solution: No vendor lock-in means you’re free to evolve your system as needed
Real-World Applications
We’ve seen these open-source RTSP servers powering some impressive projects:
- Smart City Surveillance: Many municipalities around the world can use the open-source minimal V4L2RTSPServer for traffic monitoring
- Virtual Classrooms: Universities leveraging Ant Media Server for remote learning
- IoT Camera Networks: Industrial facilities deploying snx_rtsp_server for process monitoring
- Live Event Broadcasting
If you are looking for other open-source live streaming apps, CCTV solutions, RTSP clients, we recommend checking our compiled evergreen lists:
- Free open-source Media Servers
- Live Streaming Media Servers
- Free and Open-source CCTV /NVR Camera Solutions
- Free RTSP Clients, Viewers and Players
Our Curated Collection of Top Open-Source RTSP Servers
After extensive testing and community feedback, we’ve compiled what we believe are the most promising open-source RTSP servers available today:
1- MediaMTX
MediaMTX is a ready-to-use and zero-dependency free real-time media server and media proxy that allows to publish, read, proxy, record and playback video and audio streams. It has been conceived as a «media router» that routes media streams from one end to the other.
It supports several media protocols, video and audio codecs out of the box.
Beyond its support for RTS, RTSP, RTMP, it also supports WebRTC and HLS.
Features
- Publish live streams to the server
- Read live streams from the server
- Streams are automatically converted from a protocol to another
- Serve multiple streams at once in separate paths
- Record streams to disk
- Playback recorded streams
- Authenticate users
- Redirect readers to other RTSP servers (load balancing)
- Control the server through the Control API
- Reload the configuration without disconnecting existing clients (hot reloading)
- Read Prometheus-compatible metrics
- Run hooks (external commands) when clients connect, disconnect, read or publish streams
- Compatible with Linux, Windows and macOS, does not require any dependency or interpreter, it’s a single executable
- Easy to setup, configure and use
MediaMTX: Free Open-Source Media Server for Real-Time Video Streaming and RTSP Cameras — Take your Surveillance to Next Level
MediaMTX is a free, open-source media server supporting real-time video streaming, RTSP, RTMP, HLS, and WebRTC. It enables the management and streaming of video from various sources, including RTSP cameras, with low-latency performance. It is a lightweight solution that is written using Go language. Features * Publish live streams to the

MEDevel.com: Open-source for Healthcare, and EducationHazem Abbas

2- rtsp-simple-server
rtsp-simple-server has been rebranded as MediaMTX. The reason is pretty obvious: this project started as a RTSP server but has evolved into a much more versatile product that is not tied to the RTSP protocol anymore.
Nothing will change regarding license, features and backward compatibility.
GitHub — bhaney/rtsp-simple-server: ready-to-use RTSP / RTMP / LL-HLS server and proxy that allows to read, publish and proxy video and audio streams
ready-to-use RTSP / RTMP / LL-HLS server and proxy that allows to read, publish and proxy video and audio streams — bhaney/rtsp-simple-server
GitHubbhaney

3- PHP-RTSP-IP-Camera-Streaming
This open-source project enables you to stream IP cameras using RTSP over websites as HLS, MPEG DASH or RTMP (Flash).
Features
- Re-Stream Live Video in Browser
- Input Existing Streams (RTSP, UDP, RTMP)
- Output RTMP & HTML5: HLS, MPEG-DASH
- Serve hundreds/thousands of users with a streaming server
- Share Channels Link
- Limit Stream Life (Automated Deletion)
- Limit Watch Time by Channel, User
- Simple Setup
- Easy to Install, Configure
- Full PHP Source Code
- Easy to Integrate
- Transcoding for iOS HLS / Android MPEG DASH playback
GitHub — videowhisper/PHP-RTSP-IP-Camera-Streaming: Publish a RTSP IP cam live stream on websites as HLS, MPEG DASH or RTMP (Flash).
Publish a RTSP IP cam live stream on websites as HLS, MPEG DASH or RTMP (Flash). — videowhisper/PHP-RTSP-IP-Camera-Streaming
GitHubvideowhisper
4- SRS (Simple Realtime Server)
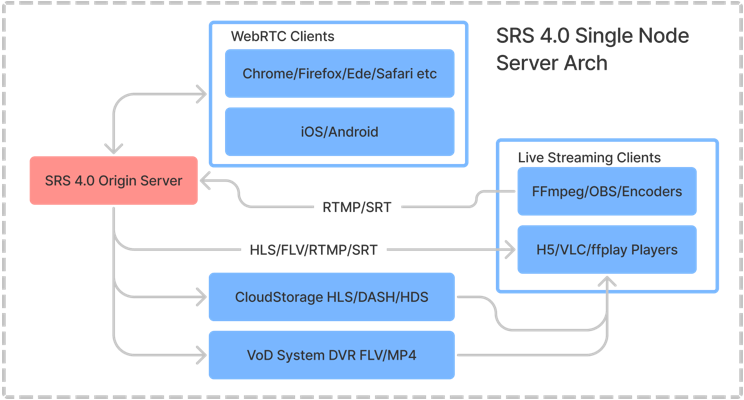
SRS is a simple, high-efficiency, real-time media server supporting RTMP, WebRTC, HLS, HTTP-FLV, HTTP-TS, SRT, MPEG-DASH, and GB28181.
SRS is written in C++ and can be easily installed on Windows, Linux and macOS.
GitHub — ossrs/srs: SRS is a simple, high-efficiency, real-time media server supporting RTMP, WebRTC, HLS, HTTP-FLV, HTTP-TS, SRT, MPEG-DASH, and GB28181.
SRS is a simple, high-efficiency, real-time media server supporting RTMP, WebRTC, HLS, HTTP-FLV, HTTP-TS, SRT, MPEG-DASH, and GB28181. — ossrs/srs
GitHubossrs
Ant Media Server is a real-time streaming engine that delivers ultra-low latency streaming (sub-0.5 seconds) using WebRTC technology. It’s designed to be auto-scalable and can be deployed on-premises or in the cloud, offering adaptive bitrate streaming to ensure smooth playback across various devices and internet speeds.
It supports a wide range of protocols, it’s ideal for reaching large audiences with high interactivity.
Features
- Ultra-Low Latency: ~0.5 seconds latency with WebRTC technology.
- Protocol Support: WebRTC, CMAF, DASH, HLS, RTMP, RTSP, SRT, Zixi, and more.
- Adaptive Bitrate Streaming: Enables real-time streaming across all screens and internet speeds.
- Scalability: Auto-scalable clustering for thousands of publishers and viewers.
- Flexible Deployment: Deploy on-premises or in the cloud.
- Enhanced Audience Reach: Adaptive streaming for a broader audience.
- Scalable Real-time Streaming: Experience sub-0.5 seconds latency and enjoy seamless live video streaming with Ant Media Server.
- Extensive Protocol Support: Whether you need WebRTC, CMAF, HLS, RTMP, RTSP, SRT, Zixi, or more, Ant Media Server has got you covered.
- Easy Integration: Our platform offers rich SDKs for iOS, Android, React Native, Flutter, Unity, and JavaScript, ensuring smooth integration with your existing infrastructure.
- Secure and Robust: Rest assured that your streams are protected with advanced security features like SSL/TLS encryption, token authentication, IP filtering, and watermarking.
- Community and Enterprise Editions: Choose the edition that suits your needs. Our Community Edition provides essential streaming functionality, while the Enterprise Edition offers advanced features and dedicated technical support.
Ant Media Server: Open-source Free Live-streaming Video Engine
Ant Media Server is a powerful and scalable ultra-low latency media server that enables users to stream live and on-demand video in real-time. It is an open-source media server that comes equipped with all the necessary features to provide a seamless streaming experience. Use-cases 1. Security 2. Gaming and e-sport
MEDevel.com: Open-source for Healthcare, and EducationHazem Abbas

6- RTSPtoWeb
RTSPtoWeb converts your RTSP streams to formats consumable in a web browser like MSE (Media Source Extensions), WebRTC, or HLS. It’s fully written with Go language without the use of FFmpeg or GStreamer!
GitHub — deepch/RTSPtoWeb: RTSP Stream to WebBrowser
RTSP Stream to WebBrowser. Contribute to deepch/RTSPtoWeb development by creating an account on GitHub.
GitHubdeepch
7- Rtsp Streaming Server
RTSPtoWeb is a free self-hosted app that converts your RTSP streams to formats consumable in a web browser like MSE (Media Source Extensions), WebRTC, or HLS. It’s fully native Golang without the use of FFmpeg or GStreamer!
GitHub — chriswiggins/rtsp-streaming-server: Lightweight RTSP/RTP streaming media server written in Javascript
Lightweight RTSP/RTP streaming media server written in Javascript — chriswiggins/rtsp-streaming-server
GitHubchriswiggins
8- Xiu
Xiu is a high-performance, secure media server written in Rust, designed to support multiple live streaming protocols with flexibility across platforms. It enables protocol conversions, supports advanced configurations, and ensures robust authentication and notifications.
The app offers flexibility, security, and high performance for diverse live streaming needs.
Key Features
- Multi-Platform Support: Compatible with Linux, macOS, and Windows.
- Protocol Support: RTMP, RTSP, WebRTC (WHIP/WHEP), HTTP-FLV, HLS.
- Stream Encoding: H.264, H.265, AAC support.
- GOP Cache: Configurable in settings.
- Protocol Conversion: RTMP to HTTP-FLV/HLS, RTSP to RTMP/HLS/HTTP-FLV, WHIP to RTMP/HLS/HTTP-FLV.
- Cluster Support: Scalable clustering setup.
- HTTP API & Notifications: For querying stream info and status updates.
- Token Authentication: Secures stream access.
- Recording: Save live streams as HLS files (m3u8+ts).
- Configurable Setup: Command line or configuration file options.
GitHub — harlanc/xiu: A simple,high performance and secure live media server in pure Rust (RTMP[cluster]/RTSP/WebRTC[whip/whep]/HTTP-FLV/HLS).🦀
A simple,high performance and secure live media server in pure Rust (RTMP[cluster]/RTSP/WebRTC[whip/whep]/HTTP-FLV/HLS).🦀 — harlanc/xiu
GitHubharlanc
9- v4l2rtspserver — RTSP Server for V4L2 device
v4l2rtspserver is a lightweight RTSP server designed to stream video from V4L2 capture devices, supporting a variety of options and protocols for flexible setup.
This makes v4l2rtspserver suitable for real-time streaming from embedded devices or cameras in resource-constrained environments.
Features
- RTSP Streaming: Streams video from V4L2 capture devices via RTSP.
- Multi-Codec Support: Supports H.264, VP8, VP9, and JPEG formats.
- Audio Streaming: Streams audio from ALSA devices.
- Adaptive Framerate: Dynamically adjusts framerate based on network conditions.
- Multiple Stream Formats: Streams H.264, MJPEG, and other formats via RTSP.
- ONVIF Compatibility: Provides ONVIF support for device discovery and control.
- Configuration Options: Supports a variety of configurable parameters (e.g., bitrate, framerate).
- Low Latency Streaming: Ensures minimal latency during video streaming.
- Static or Dynamic Frame Sizes: Configurable frame size adjustments.
- Container Support: Available in Docker for easy deployment.
- Web Interface: Basic web interface for controlling stream settings.
- Low Resource Usage: Optimized for low CPU and memory usage.
- Access Control: Supports basic access control features.
GitHub — mpromonet/v4l2rtspserver: RTSP Server for V4L2 device capture supporting HEVC/H264/JPEG/VP8/VP9
RTSP Server for V4L2 device capture supporting HEVC/H264/JPEG/VP8/VP9 — mpromonet/v4l2rtspserver
GitHubmpromonet
10- Python Rtsp Server
Python-rtsp-server is a lightweight, zero-dependency proxy and storage server for several IP-cameras and multiple clients.
Features
- Reliable connection of clients in the local network. One connection to each camera, regardless of the number of clients.
- Minimum client connection latency.
- Low CPU load.
- Proxying streams from IP cameras to an unlimited number of clients in the local network, the ability to limit the number of web clients.
- Ability to save to hard disk, with fragmentation and daily rotation.
- Restoring of connection with cameras and recording to disk after a possible disconnection of cameras.
GitHub — vladpen/python-rtsp-server: Lightweight, zero-dependency proxy and storage RTSP server
Lightweight, zero-dependency proxy and storage RTSP server — vladpen/python-rtsp-server
GitHubvladpen
11- RtspServer
This is a simple yet robust RTSP server and pusher based on C++.
Features
- Support Linux and Windows platforms.
- Support H.264/H.265/G711A/AAC
- Support unicast(rtp over udp, rtp over rtsp), multicast
- Support digest authentication
12- OBS-RTSPServer
The OBS RTSPServer is a plugin for OBS Studio, a popular open-source software for video recording and live streaming, which adds the ability to stream directly over the RTSP protocol. OBS Studio itself is known for its flexibility and advanced features, supporting multiple inputs, scene transitions, and encoding options.
With the OBS RTSPServer plugin, users can stream live video from OBS to compatible RTSP clients without additional software. This plugin is particularly useful for those needing low-latency, network-friendly streaming, such as in security or surveillance systems.
The plugin’s key features include the ability to create multiple RTSP streams from OBS, low-latency transmission, and compatibility with various RTSP-capable clients and devices.
This integration extends OBS’s capabilities, making it a powerful tool for real-time media distribution over local networks or the internet.
GitHub — iamscottxu/obs-rtspserver: RTSP server plugin for obs-studio
RTSP server plugin for obs-studio. Contribute to iamscottxu/obs-rtspserver development by creating an account on GitHub.
GitHubiamscottxu
13- snx_rtsp_server
snx_rtsp_server is a small rtsp streaming server developed base on live555 library.
Features
- Video Stream Support: Streams H.264 and MJPEG video formats.
- Audio Stream Support: Streams G.711 Alaw audio format.
- RTP/RTSP Support: Uses UDP and TCP for RTP/RTSP streaming.
- RTP/RTSP over HTTP: Supports TCP streaming over HTTP for additional compatibility.
- Unicast and Multicast: Offers both unicast and multicast streaming modes.
- Single Stream Capability: Streams one video and one audio stream simultaneously.
- Frame Buffer Tuning: Configurable frame buffering, with a default of 10 frames (audio/video).
- Customizable Ports: Allows custom configuration of RTSP and HTTP ports.
- Low Resource Consumption: Optimized for minimal DDR and CPU usage.
This combination of features makes snx_rtsp_server suitable for low-power and embedded devices where efficiency is essential.
GitHub — haoweilo/RTSP_stream_server: Small rtsp server base-on Live555
Small rtsp server base-on Live555 . Contribute to haoweilo/RTSP_stream_server development by creating an account on GitHub.
GitHubhaoweilo
14- rtsp-simple-server
rtsp-simple-server is a simple, ready-to-use and zero-dependency RTSP server and RTSP proxy, a software that allows multiple users to publish and read live video and audio streams over time.
RTSP, RTP and RTCP are standardized protocol that describe how to perform these operations with the help of a server, that is contacted by both readers and publishers in order to negotiate a streaming protocol. The server is then responsible of relaying the publisher streams to the readers.
Features:
- Read and publish live streams via UDP and TCP
- Each stream can have multiple video and audio tracks, encoded in any format
- Publish multiple streams at once, each in a separate path, that can be read by multiple users
- Pull and serve streams from other RTSP servers, always or on-demand (RTSP proxy)
- Make streams secure with usernames and passwords (authentication)
- Run custom commands when clients connect, disconnect, read or publish streams (linux only)
- Compatible with Linux, Windows and Mac, does not require any dependency or interpreter, it’s a single executable
Getting Started
Ready to dive in? Here’s our recommended approach:
- Assess Your Needs: Consider factors like expected viewer count, required latency, and available resources
- Test Drive: Most of these solutions offer quick Docker deployments for easy testing
- Community Check: Browse through GitHub issues and community forums to gauge support quality
- Start Small: Begin with a proof of concept before scaling up
Final Thoughts
The world of open-source RTSP servers is vibrant and constantly evolving. While commercial solutions have their place, the open-source alternatives we’ve highlighted offer compelling features that rival their paid counterparts. Whether you’re building a home security system or deploying an enterprise-grade streaming solution, there’s likely an open-source RTSP server that fits your needs.
Remember, the best choice depends on your specific requirements – consider factors like scalability needs, resource constraints, and required features when making your decision. And don’t forget to contribute back to the community if you can – that’s what keeps the open-source ecosystem thriving!
Have you implemented any of these RTSP servers in your projects? We’d love to hear about your experiences in the comments below.
Further Readings
16 Open-source Free Web Live-Streaming Solutions
What is a Live Streaming Media Server? A self-hosted live streaming media server refers to a software application or platform that allows users to host and stream live video content on their own infrastructure or server. Unlike relying on third-party streaming services, a self-hosted solution gives users full control over
MEDevel.com: Open-source for Healthcare, and EducationHazem Abbas
24 Open-source Free RTSP Viewers and Media Servers for IP-Camera Streams
RTMP (Real-Time Messaging Protocol) and RTSP (Real-Time Streaming Protocol) viewers and servers are software tools that facilitate the viewing, streaming, and recording of media content, particularly IP-camera streams. RTMP is a protocol commonly used for streaming audio, video, and data over the internet. It is widely supported by various media
MEDevel.com: Open-source for Healthcare, and EducationHazem Abbas

18 Best Open-source Free UPnP and DLNA Media Servers for building Home Entertainment Systems
If you want to view certain media files, such as photos and videos from your computer, or mobile on your TV, then you need to have enabled UPnP and DLNA-compliant devices, as well as, to set up a media server. In this article we will give brief explanations about DLNA,
MEDevel.com: Open-source for Healthcare, and EducationHazem Abbas
rtsp-simple-server is a ready-to-use and zero-dependency server and proxy that allows users to publish, read and proxy live video and audio streams through various protocols:
| protocol | description | variants | publish | read | proxy |
|---|---|---|---|---|---|
| RTSP | fastest way to publish and read streams | RTSP, RTSPS | ✔️ | ✔️ | ✔️ |
| RTMP | allows to interact with legacy software | RTMP, RTMPS | ✔️ | ✔️ | ✔️ |
| HLS | allows to embed streams into a web page | Low-Latency HLS, standard HLS | ❌ | ✔️ | ✔️ |
Features:
- Publish live streams to the server
- Read live streams from the server
- Proxy streams from other servers or cameras, always or on-demand
- Each stream can have multiple video and audio tracks, encoded with any RTP-compatible codec, including H264, H265, VP8, VP9, MPEG2, MP3, AAC, Opus, PCM, JPEG
- Streams are automatically converted from a protocol to another. For instance, it’s possible to publish a stream with RTSP and read it with HLS
- Serve multiple streams at once in separate paths
- Authenticate users; use internal or external authentication
- Redirect readers to other RTSP servers (load balancing)
- Query and control the server through an HTTP API
- Reload the configuration without disconnecting existing clients (hot reloading)
- Read Prometheus-compatible metrics
- Run external commands when clients connect, disconnect, read or publish streams
- Natively compatible with the Raspberry Pi Camera
- Compatible with Linux, Windows and macOS, does not require any dependency or interpreter, it’s a single executable
Table of contents
- Installation
- Standard
- Docker
- Basic usage
- General
- Configuration
- Authentication
- Encrypt the configuration
- Proxy mode
- Remuxing, re-encoding, compression
- Save streams to disk
- On-demand publishing
- Start on boot
- Linux
- Windows
- HTTP API
- Metrics
- pprof
- Compile and run from source
- Publish to the server
- From a webcam
- From a Raspberry Pi Camera
- From OBS Studio
- From OpenCV
- Read from the server
- From VLC and Ubuntu
- RTSP protocol
- General usage
- TCP transport
- UDP-multicast transport
- Encryption
- Redirect to another server
- Fallback stream
- Corrupted frames
- RTMP protocol
- General usage
- Encryption
- HLS protocol
- General usage
- Embedding
- Low-Latency variant
- Decreasing latency
- Links
Installation
Standard
-
Download and extract a precompiled binary from the release page.
-
Start the server:
Docker
Download and launch the image:
docker run --rm -it --network=host aler9/rtsp-simple-server
The --network=host flag is mandatory since Docker can change the source port of UDP packets for routing reasons, and this doesn’t allow the server to find out the author of the packets. This issue can be avoided by disabling the UDP transport protocol:
docker run --rm -it -e RTSP_PROTOCOLS=tcp -p 8554:8554 -p 1935:1935 -p 8888:8888 aler9/rtsp-simple-server
Please keep in mind that the Docker image doesn’t include FFmpeg. if you need to use FFmpeg for an external command or anything else, you need to build a Docker image that contains both rtsp-simple-server and FFmpeg, by following instructions here.
Basic usage
-
Publish a stream. For instance, you can publish a video/audio file with FFmpeg:
ffmpeg -re -stream_loop -1 -i file.ts -c copy -f rtsp rtsp://localhost:8554/mystreamor GStreamer:
gst-launch-1.0 rtspclientsink name=s location=rtsp://localhost:8554/mystream filesrc location=file.mp4 ! qtdemux name=d d.video_0 ! queue ! s.sink_0 d.audio_0 ! queue ! s.sink_1To publish from other hardware / software, take a look at the Publish to the server section.
-
Open the stream. For instance, you can open the stream with VLC:
vlc rtsp://localhost:8554/mystreamor GStreamer:
gst-play-1.0 rtsp://localhost:8554/mystreamor FFmpeg:
ffmpeg -i rtsp://localhost:8554/mystream -c copy output.mp4
General
Configuration
All the configuration parameters are listed and commented in the configuration file.
There are 3 ways to change the configuration:
-
By editing the
rtsp-simple-server.ymlfile, that is-
included into the release bundle
-
available in the root folder of the Docker image (
/rtsp-simple-server.yml); it can be overridden in this way:docker run --rm -it --network=host -v $PWD/rtsp-simple-server.yml:/rtsp-simple-server.yml aler9/rtsp-simple-server
The configuration can be changed dynamically when the server is running (hot reloading) by writing to the configuration file. Changes are detected and applied without disconnecting existing clients, whenever it’s possible.
-
-
By overriding configuration parameters with environment variables, in the format
RTSP_PARAMNAME, wherePARAMNAMEis the uppercase name of a parameter. For instance, thertspAddressparameter can be overridden in the following way:RTSP_RTSPADDRESS="127.0.0.1:8554" ./rtsp-simple-serverParameters that have array as value can be overriden by setting a comma-separated list. For example:
Parameters in maps can be overridden by using underscores, in the following way:
RTSP_PATHS_TEST_SOURCE=rtsp://myurl ./rtsp-simple-serverThis method is particularly useful when using Docker; any configuration parameter can be changed by passing environment variables with the
-eflag:docker run --rm -it --network=host -e RTSP_PATHS_TEST_SOURCE=rtsp://myurl aler9/rtsp-simple-server -
By using the HTTP API.
Authentication
Edit rtsp-simple-server.yml and replace everything inside section paths with the following content:
paths:
  all:
    publishUser: myuser
    publishPass: mypass
Only publishers that provide both username and password will be able to proceed:
ffmpeg -re -stream_loop -1 -i file.ts -c copy -f rtsp rtsp://myuser:mypass@localhost:8554/mystream
It’s possible to setup authentication for readers too:
paths:
  all:
    publishUser: myuser
    publishPass: mypass

    readUser: user
    readPass: userpass
If storing plain credentials in the configuration file is a security problem, username and passwords can be stored as sha256-hashed strings; a string must be hashed with sha256 and encoded with base64:
echo -n "userpass" | openssl dgst -binary -sha256 | openssl base64
Then stored with the sha256: prefix:
paths:
  all:
    readUser: sha256:j1tsRqDEw9xvq/D7/9tMx6Jh/jMhk3UfjwIB2f1zgMo=
    readPass: sha256:BdSWkrdV+ZxFBLUQQY7+7uv9RmiSVA8nrPmjGjJtZQQ=
WARNING: enable encryption or use a VPN to ensure that no one is intercepting the credentials.
Authentication can be delegated to an external HTTP server:
externalAuthenticationURL: http://myauthserver/auth
Each time a user needs to be authenticated, the specified URL will be requested with the POST method and this payload:
{
  "ip": "ip",
  "user": "user",
  "password": "password",
  "path": "path",
  "action": "read|publish"
}
If the URL returns a status code that begins with 20 (i.e. 200), authentication is successful, otherwise it fails.
Please be aware that it’s perfectly normal for the authentication server to receive requests with empty users and passwords, i.e.:
{
  "user": "",
  "password": "",
}
This happens because a RTSP client doesn’t provide credentials until it is asked to. In order to receive the credentials, the authentication server must reply with status code 401 — the client will then send credentials.
Encrypt the configuration
The configuration file can be entirely encrypted for security purposes.
An online encryption tool is available here.
The encryption procedure is the following:
-
NaCL’s
crypto_secretboxfunction is applied to the content of the configuration. NaCL is a cryptographic library available for C/C++, Go, C# and many other languages; -
The string is prefixed with the nonce;
-
The string is encoded with base64.
After performing the encryption, put the base64-encoded result into the configuration file, and launch the server with the RTSP_CONFKEY variable:
RTSP_CONFKEY=mykey ./rtsp-simple-server
Proxy mode
rtsp-simple-server is also a proxy, that is usually deployed in one of these scenarios:
- when there are multiple users that are reading a stream and the bandwidth is limited; the proxy is used to receive the stream once. Users can then connect to the proxy instead of the original source.
- when there’s a NAT / firewall between a stream and the users; the proxy is installed on the NAT and makes the stream available to the outside world.
Edit rtsp-simple-server.yml and replace everything inside section paths with the following content:
paths:
  proxied:
    # url of the source stream, in the format rtsp://user:pass@host:port/path
    source: rtsp://original-url
After starting the server, users can connect to rtsp://localhost:8554/proxied, instead of connecting to the original url. The server supports any number of source streams, it’s enough to add additional entries to the paths section:
paths:
  proxied1:
    source: rtsp://url1

  proxied2:
    source: rtsp://url1
It’s possible to save bandwidth by enabling the on-demand mode: the stream will be pulled only when at least a client is connected:
paths:
  proxied:
    source: rtsp://original-url
    sourceOnDemand: yes
Remuxing, re-encoding, compression
To change the format, codec or compression of a stream, use FFmpeg or GStreamer together with rtsp-simple-server. For instance, to re-encode an existing stream, that is available in the /original path, and publish the resulting stream in the /compressed path, edit rtsp-simple-server.yml and replace everything inside section paths with the following content:
paths:
  all:
  original:
    runOnReady: ffmpeg -i rtsp://localhost:$RTSP_PORT/$RTSP_PATH -pix_fmt yuv420p -c:v libx264 -preset ultrafast -b:v 600k -max_muxing_queue_size 1024 -f rtsp rtsp://localhost:$RTSP_PORT/compressed
    runOnReadyRestart: yes
Save streams to disk
To save available streams to disk, you can use the runOnReady parameter and FFmpeg:
paths:
  all:
  original:
    runOnReady: ffmpeg -i rtsp://localhost:$RTSP_PORT/$RTSP_PATH -c copy -f segment -strftime 1 -segment_time 60 -segment_format mpegts saved_%Y-%m-%d_%H-%M-%S.ts
    runOnReadyRestart: yes
In the example configuration, streams are saved into TS files, that can be read even if the system crashes, while MP4 files can’t.
On-demand publishing
Edit rtsp-simple-server.yml and replace everything inside section paths with the following content:
paths:
  ondemand:
    runOnDemand: ffmpeg -re -stream_loop -1 -i file.ts -c copy -f rtsp rtsp://localhost:$RTSP_PORT/$RTSP_PATH
    runOnDemandRestart: yes
The command inserted into runOnDemand will start only when a client requests the path ondemand, therefore the file will start streaming only when requested.
Start on boot
Linux
Systemd is the service manager used by Ubuntu, Debian and many other Linux distributions, and allows to launch rtsp-simple-server on boot.
Download a release bundle from the release page, unzip it, and move the executable and configuration in the system:
sudo mv rtsp-simple-server /usr/local/bin/
sudo mv rtsp-simple-server.yml /usr/local/etc/
Create the service:
sudo tee /etc/systemd/system/rtsp-simple-server.service >/dev/null << EOF
[Unit]
Wants=network.target
[Service]
ExecStart=/usr/local/bin/rtsp-simple-server /usr/local/etc/rtsp-simple-server.yml
[Install]
WantedBy=multi-user.target
EOF
Enable and start the service:
sudo systemctl enable rtsp-simple-server
sudo systemctl start rtsp-simple-server
Windows
Download the WinSW v2 executable and place it into the same folder of rtsp-simple-server.exe.
In the same folder, create a file named WinSW-x64.xml with this content:
<service>
  <id>rtsp-simple-server</id>
  <name>rtsp-simple-server</name>
  <description></description>
  <executable>%BASE%/rtsp-simple-server.exe</executable>
</service>
Open a terminal, navigate to the folder and run:
The server is now installed as a system service and will start at boot time.
HTTP API
The server can be queried and controlled with an HTTP API, that must be enabled by setting the api parameter in the configuration:
The API listens on apiAddress, that by default is 127.0.0.1:9997; for instance, to obtain a list of active paths, run:
curl http://127.0.0.1:9997/v1/paths/list
Full documentation of the API is available on the dedicated site.
Metrics
A metrics exporter, compatible with Prometheus, can be enabled with the parameter metrics: yes; then the server can be queried for metrics with Prometheus or with a simple HTTP request:
wget -qO- localhost:9998/metrics
Obtaining:
paths{name="<path_name>",state="ready"} 1
rtsp_sessions{state="idle"} 0
rtsp_sessions{state="read"} 0
rtsp_sessions{state="publish"} 1
rtsps_sessions{state="idle"} 0
rtsps_sessions{state="read"} 0
rtsps_sessions{state="publish"} 0
rtmp_conns{state="idle"} 0
rtmp_conns{state="read"} 0
rtmp_conns{state="publish"} 1
hls_muxers{name="<name>"} 1
where:
paths{name="<path_name>",state="ready"} 1is replicated for every path and shows the name and state of every pathrtsp_sessions{state="idle"}is the count of RTSP sessions that are idlertsp_sessions{state="read"}is the count of RTSP sessions that are readingrtsp_sessions{state="publish"}is the counf ot RTSP sessions that are publishingrtsps_sessions{state="idle"}is the count of RTSPS sessions that are idlertsps_sessions{state="read"}is the count of RTSPS sessions that are readingrtsps_sessions{state="publish"}is the counf ot RTSPS sessions that are publishingrtmp_conns{state="idle"}is the count of RTMP connections that are idlertmp_conns{state="read"}is the count of RTMP connections that are readingrtmp_conns{state="publish"}is the count of RTMP connections that are publishinghls_muxers{name="<name>"}is replicated for every HLS muxer and shows the name and state of every HLS muxer
pprof
A performance monitor, compatible with pprof, can be enabled with the parameter pprof: yes; then the server can be queried for metrics with pprof-compatible tools, like:
go tool pprof -text http://localhost:9999/debug/pprof/goroutine
go tool pprof -text http://localhost:9999/debug/pprof/heap
go tool pprof -text http://localhost:9999/debug/pprof/profile?seconds=30
Compile and run from source
Install Go 1.18, download the repository, open a terminal in it and run:
You can perform the entire operation inside Docker:
Publish to the server
From a webcam
To publish the video stream of a generic webcam to the server, edit rtsp-simple-server.yml and replace everything inside section paths with the following content:
paths:
  cam:
    runOnInit: ffmpeg -f v4l2 -i /dev/video0 -pix_fmt yuv420p -preset ultrafast -b:v 600k -f rtsp rtsp://localhost:$RTSP_PORT/$RTSP_PATH
    runOnInitRestart: yes
If the platform is Windows:
paths:
  cam:
    runOnInit: ffmpeg -f dshow -i video="USB2.0 HD UVC WebCam" -pix_fmt yuv420p -c:v libx264 -preset ultrafast -b:v 600k -f rtsp rtsp://localhost:$RTSP_PORT/$RTSP_PATH
    runOnInitRestart: yes
Where USB2.0 HD UVC WebCam is the name of your webcam, that can be obtained with:
ffmpeg -list_devices true -f dshow -i dummy
After starting the server, the webcam can be reached on rtsp://localhost:8554/cam.
From a Raspberry Pi Camera
rtsp-simple-server natively support the Raspberry Pi Camera, enabling high-quality and low-latency video streaming from the camera to any user. To make the video stream of a Raspberry Pi Camera available on the server:
-
The server must be installed on a Raspberry Pi, with Raspberry Pi OS bullseye or newer as operative system, and must be installed by using the standard method (Docker is not actually supported). If you’re using the 64-bit version of the operative system, you need to pick the
arm64variant of the server. -
Make sure that the legacy camera stack is disabled. Type:
Then go to
Interfacing options,enable/disable legacy camera support, chooseno. Reboot the system. -
edit
rtsp-simple-server.ymland replace everything inside sectionpathswith the following content:paths: cam: source: rpiCamera
After starting the server, the camera can be reached on rtsp://raspberry-pi:8554/cam or http://raspberry-pi:8888/cam.
Camera settings can be changed by using the rpiCamera* parameters:
paths: cam: source: rpiCamera rpiCameraWidth: 1920 rpiCameraHeight: 1080
All available parameters are listed in the sample configuration file.
From OBS Studio
OBS Studio can publish to the server by using the RTMP protocol. In Settings -> Stream (or in the Auto-configuration Wizard), use the following parameters:
- Service:
Custom... - Server:
rtmp://localhost - Stream key:
mystream
If credentials are in use, use the following parameters:
- Service:
Custom... - Server:
rtmp://localhost - Stream key:
mystream?user=myuser&pass=mypass
From OpenCV
To publish a video stream from OpenCV to the server, OpenCV must be compiled with GStreamer support, by following this procedure:
sudo apt install -y libgstreamer1.0-dev libgstreamer-plugins-base1.0-dev gstreamer1.0-plugins-ugly gstreamer1.0-rtsp python3-dev python3-numpy
git clone --depth=1 -b 4.5.4 https://github.com/opencv/opencv
cd opencv
mkdir build && cd build
cmake -D CMAKE_INSTALL_PREFIX=/usr -D WITH_GSTREAMER=ON ..
make -j$(nproc)
sudo make install
Videos can be published with VideoWriter:
import cv2
import numpy as np
from time import sleep

fps = 20
width = 800
height = 600

out = cv2.VideoWriter('appsrc ! videoconvert' + \
    ' ! x264enc speed-preset=ultrafast bitrate=600 key-int-max=40' + \
    ' ! rtspclientsink location=rtsp://localhost:8554/mystream',
    cv2.CAP_GSTREAMER, 0, fps, (width, height), True)
if not out.isOpened():
    raise Exception("can't open video writer")

while True:
    frame = np.zeros((height, width, 3), np.uint8)

    # create a red rectangle
    for y in range(0, int(frame.shape[0] / 2)):
        for x in range(0, int(frame.shape[1] / 2)):
            frame[y][x] = (0, 0, 255)

    out.write(frame)
    print("frame written to the server")

    sleep(1 / fps)
Read from the server
From VLC and Ubuntu
The VLC shipped with Ubuntu 21.10 doesn’t support playing RTSP due to a license issue (see here and here).
To overcome the issue, remove the default VLC instance and install the snap version:
sudo apt purge -y vlc
snap install vlc
Then use it to read the stream:
vlc rtsp://localhost:8554/mystream
RTSP protocol
General usage
RTSP is a standardized protocol that allows to publish and read streams; in particular, it supports different underlying transport protocols, that are chosen by clients during the handshake with the server:
- UDP: the most performant, but doesn’t work when there’s a NAT/firewall between server and clients. It doesn’t support encryption.
- UDP-multicast: allows to save bandwidth when clients are all in the same LAN, by sending packets once to a fixed multicast IP. It doesn’t support encryption.
- TCP: the most versatile, does support encryption.
The default transport protocol is UDP. To change the transport protocol, you have to tune the configuration of your client of choice.
TCP transport
The RTSP protocol supports the TCP transport protocol, that allows to receive packets even when there’s a NAT/firewall between server and clients, and supports encryption (see Encryption).
You can use FFmpeg to publish a stream with the TCP transport protocol:
ffmpeg -re -stream_loop -1 -i file.ts -c copy -f rtsp -rtsp_transport tcp rtsp://localhost:8554/mystream
You can use FFmpeg to read that stream with the TCP transport protocol:
ffmpeg -rtsp_transport tcp -i rtsp://localhost:8554/mystream -c copy output.mp4
You can use GStreamer to read that stream with the TCP transport protocol:
gst-launch-1.0 rtspsrc protocols=tcp location=rtsp://localhost:8554/mystream ! fakesink
You can use VLC to read that stream with the TCP transport protocol:
vlc --rtsp-tcp rtsp://localhost:8554/mystream
UDP-multicast transport
The RTSP protocol supports the UDP-multicast transport protocol, that allows a server to send packets once, regardless of the number of connected readers, saving bandwidth.
This mode must be requested by readers when handshaking with the server; once a reader has completed a handshake, the server will start sending multicast packets. Other readers will be instructed to read existing multicast packets. When all multicast readers have disconnected from the server, the latter will stop sending multicast packets.
If you want to use the UDP-multicast protocol in a Wireless LAN, please be aware that the maximum bitrate supported by multicast is the one that corresponds to the lowest enabled WiFi data rate. For instance, if the 1 Mbps data rate is enabled on your router (and it is on most routers), the maximum bitrate will be 1 Mbps. To increase the maximum bitrate, use a cabled LAN or change your router settings.
To request and read a stream with UDP-multicast, you can use FFmpeg:
ffmpeg -rtsp_transport udp_multicast -i rtsp://localhost:8554/mystream -c copy output.mp4
or GStreamer:
gst-launch-1.0 rtspsrc protocols=udp-mcast location=rtsps://ip:8554/...
or VLC (append ?vlcmulticast to the URL):
vlc rtsp://localhost:8554/mystream?vlcmulticast
Encryption
Incoming and outgoing RTSP streams can be encrypted with TLS (obtaining the RTSPS protocol). A TLS certificate is needed and can be generated with OpenSSL:
openssl genrsa -out server.key 2048
openssl req -new -x509 -sha256 -key server.key -out server.crt -days 3650
Edit rtsp-simple-server.yml, and set the protocols, encryption, serverKey and serverCert parameters:
protocols: [tcp]
encryption: optional
serverKey: server.key
serverCert: server.crt
Streams can be published and read with the rtsps scheme and the 8322 port:
ffmpeg -i rtsps://ip:8322/...
If the client is GStreamer, disable the certificate validation:
gst-launch-1.0 rtspsrc tls-validation-flags=0 location=rtsps://ip:8322/...
At the moment VLC doesn’t support reading encrypted RTSP streams. A workaround consists in launching an instance of rtsp-simple-server on the same machine in which VLC is running, using it for reading the encrypted stream with the proxy mode, and reading the proxied stream with VLC.
Redirect to another server
To redirect to another server, use the redirect source:
paths:
  redirected:
    source: redirect
    sourceRedirect: rtsp://otherurl/otherpath
Fallback stream
If no one is publishing to the server, readers can be redirected to a fallback path or URL that is serving a fallback stream:
paths:
  withfallback:
    fallback: /otherpath
Corrupted frames
In some scenarios, when reading RTSP from the server, decoded frames can be corrupted or incomplete. This can be caused by multiple reasons:
-
the packet buffer of the server is too small and can’t keep up with the stream throughput. A solution consists in increasing its size:
-
The stream throughput is too big and the stream can’t be sent correctly with the UDP transport. UDP is more performant, faster and more efficient than TCP, but doesn’t have a retransmission mechanism, that is needed in case of streams that need a large bandwidth. A solution consists in switching to TCP:
In case the source is a camera:
paths:
  test:
    source: rtsp://..
    sourceProtocol: tcp
RTMP protocol
General usage
RTMP is a protocol that allows to read and publish streams, but is less versatile and less efficient than RTSP (doesn’t support UDP, encryption, doesn’t support most RTSP codecs, doesn’t support feedback mechanism). It is used when there’s need of publishing or reading streams from a software that supports only RTMP (for instance, OBS Studio and DJI drones).
At the moment, only the H264 and AAC codecs can be used with the RTMP protocol.
Streams can be published or read with the RTMP protocol, for instance with FFmpeg:
ffmpeg -re -stream_loop -1 -i file.ts -c copy -f flv rtmp://localhost/mystream
or GStreamer:
gst-launch-1.0 -v flvmux name=s ! rtmpsink location=rtmp://localhost/mystream filesrc location=file.mp4 ! qtdemux name=d d.video_0 ! queue ! s.video d.audio_0 ! queue ! s.audio
Credentials can be provided by appending to the URL the user and pass parameters:
ffmpeg -re -stream_loop -1 -i file.ts -c copy -f flv rtmp://localhost:8554/mystream?user=myuser&pass=mypass
Encryption
RTMP connections can be encrypted with TLS, obtaining the RTMPS protocol. A TLS certificate is needed and can be generated with OpenSSL:
openssl genrsa -out server.key 2048
openssl req -new -x509 -sha256 -key server.key -out server.crt -days 3650
Edit rtsp-simple-server.yml, and set the rtmpEncryption, rtmpServerKey and rtmpServerCert parameters:
rtmpEncryption: optional
rtmpServerKey: server.key
rtmpServerCert: server.crt
Streams can be published and read with the rtmps scheme and the 1937 port:
rtmps://localhost:1937/...
Please be aware that RTMPS is currently unsupported by VLC, FFmpeg and GStreamer. However, you can use a proxy like stunnel or nginx to allow RTMP clients to access RTMPS resources.
HLS protocol
General usage
HLS is a protocol that allows to embed live streams into web pages. It works by splitting streams into segments, and by serving these segments with the HTTP protocol. Every stream published to the server can be accessed by visiting:
http://localhost:8888/mystream
where mystream is the name of a stream that is being published.
Please be aware that HLS only supports a single H264 video track and a single AAC audio track due to limitations of most browsers. If you want to use HLS with streams that use other codecs, you have to re-encode them, for instance by using FFmpeg:
ffmpeg -i rtsp://original-source -pix_fmt yuv420p -c:v libx264 -preset ultrafast -b:v 600k -c:a aac -b:a 160k -f rtsp rtsp://localhost:8554/mystream
Embedding
The simples way to embed a live stream into a web page consists in using an iframe tag:
<iframe src="http://rtsp-simple-server-ip:8888/mystream" scrolling="no"></iframe>
Alternatively you can create a video tag that points directly to the stream playlist:
<video src="http://localhost:8888/mystream/index.m3u8"></video>
Please note that most browsers don’t support HLS directly (except Safari); a Javascript library, like hls.js, must be used to load the stream. You can find a working example by looking at the source code of the HLS muxer.
Low-Latency variant
Low-Latency HLS is a recently standardized variant of the protocol that allows to greatly reduce playback latency. It works by splitting segments into parts, that are served before the segment is complete.
LL-HLS is disabled by default. To enable it, a TLS certificate is needed and can be generated with OpenSSL:
openssl genrsa -out server.key 2048
openssl req -new -x509 -sha256 -key server.key -out server.crt -days 3650
Set the hlsVariant, hlsEncryption, hlsServerKey and hlsServerCert parameters in the configuration file:
hlsVariant: lowLatency
hlsEncryption: yes
hlsServerKey: server.key
hlsServerCert: server.crt
Every stream published to the server can be read with LL-HLS by visiting:
https://localhost:8888/mystream
If the stream is not shown correctly, try tuning the hlsPartDuration parameter, for instance:
Decreasing latency
in HLS, latency is introduced since a client must wait for the server to generate segments before downloading them. This latency amounts to 1-15secs depending on the duration of each segment, and to 500ms-3s if the Low-Latency variant is enabled.
To decrease the latency, you can:
-
enable the Low-Latency variant of the HLS protocol, as explained in the previous section;
-
if Low-latency is enabled, try decreasing the
hlsPartDurationparameter; -
try decreasing the
hlsSegmentDurationparameter; -
The segment duration is influenced by the interval between the IDR frames of the video track. An IDR frame is a frame that can be decoded independently from the others. The server changes the segment duration in order to include at least one IDR frame into each segment. Therefore, you need to decrease the interval between the IDR frames. This can be done in two ways:
-
if the stream is being hardware-generated (i.e. by a camera), there’s usually a setting called Key-Frame Interval in the camera configuration page
-
otherwise, the stream must be re-encoded. It’s possible to tune the IDR frame interval by using ffmpeg’s
-goption:ffmpeg -i rtsp://original-stream -pix_fmt yuv420p -c:v libx264 -preset ultrafast -b:v 600k -max_muxing_queue_size 1024 -g 30 -f rtsp rtsp://localhost:$RTSP_PORT/compressed
-
Links
Related projects
- gortsplib (RTSP library used internally) https://github.com/aler9/gortsplib
- pion/sdp (SDP library used internally) https://github.com/pion/sdp
- pion/rtp (RTP library used internally) https://github.com/pion/rtp
- pion/rtcp (RTCP library used internally) https://github.com/pion/rtcp
- notedit/rtmp (RTMP library used internally) https://github.com/notedit/rtmp
- go-astits (MPEG-TS library used internally) https://github.com/asticode/go-astits
- go-mp4 (MP4 library used internally) https://github.com/abema/go-mp4
- https://github.com/flaviostutz/rtsp-relay
Standards
- RTSP 1.0 https://datatracker.ietf.org/doc/html/rfc2326
- RTSP 2.0 https://datatracker.ietf.org/doc/html/rfc7826
- HTTP 1.1 https://datatracker.ietf.org/doc/html/rfc2616
- HLS https://datatracker.ietf.org/doc/html/rfc8216
- HLS v2 https://datatracker.ietf.org/doc/html/draft-pantos-hls-rfc8216bis
- Golang project layout https://github.com/golang-standards/project-layout
Назначение
Программа позволяет создать сервер на компьютере, чтобы транслировать различные мультимедийные потоки. Она не требует установки и не создаёт дополнительных файлов или папок на ПК.
Основные функции
Happytime RTSP Server работает без графического интерфейса, что может смутить некоторых пользователей. Однако её основная функция проста, и отсутствие интерактивных элементов управления облегчает использование программы даже новичкам.
Файлы, к которым вы хотите получить доступ через потоковую передачу, должны находиться в том же каталоге, что и исполняемый файл сервера. Если вам нужно получить доступ сразу к нескольким файлам из разных мест, вы можете легко это сделать, поскольку программа поддерживает одновременную трансляцию нескольких потоков.
Плюсы программы:
- Лёгкая установка и запуск.
- Поддержка трансляции нескольких мультимедийных потоков одновременно.
- Совместимость с различными аудио- и видеофайлами.
- Отсутствие необходимости в установке дополнительных компонентов.
Минусов программы в исходном тексте не указано.
Скачать с официальной страницы
Happytime RTSP Server
Похожие программы
По устройству
Обычная веб-камера
Если ОС основана на Linux, отредактируйте файл mediamtx.yml и замените все внутри секции paths на следующее содержимое:
Код: Выделить всё
paths:
  cam:
    runOnInit: ffmpeg -f v4l2 -i /dev/video0 -pix_fmt yuv420p -preset ultrafast -b:v 600k -f rtsp rtsp://localhost:$RTSP_PORT/$MTX_PATH
    runOnInitRestart: yes
Если ОС — Windows:
Код: Выделить всё
paths:
  cam:
    runOnInit: ffmpeg -f dshow -i video="USB2.0 HD UVC WebCam" -pix_fmt yuv420p -c:v libx264 -preset ultrafast -b:v 600k -f rtsp rtsp://localhost:$RTSP_PORT/$MTX_PATH
    runOnInitRestart: yes
Где USB2.0 HD UVC WebCam — это имя веб-камеры, которое можно получить с помощью:
Код: Выделить всё
ffmpeg -list_devices true -f dshow -i dummyПолученный поток будет доступен по пути /cam.
Камеры Raspberry Pi
MediaMTX поддерживает камеру Raspberry Pi, позволяя передавать высококачественное видео с низкой задержкой любому пользователю и для любых целей. Есть несколько требований:
Сервер должен работать на Raspberry Pi с операционной системой Raspberry Pi OS bullseye или новее. Поддерживаются как 32-битные, так и 64-битные операционные системы.
Убедитесь, что стек устаревших камер отключен. Введите sudo raspi-config, затем перейдите в раздел Interfacing options, включите/выключите поддержку устаревших камер, выберите no. Перезагрузите систему.
Если вы хотите запустить стандартную (не-Docker) версию сервера:
Убедитесь, что установлены следующие пакеты:
libcamera0 (≥ 0.0.5)
libfreetype6
загрузите исполняемый файл сервера. Если вы используете 64-битную версию операционной системы, обязательно выберите вариант arm64.
Отредактируйте файл mediamtx.yml и замените все внутри секции paths на следующее содержимое:
Полученный поток будет доступен по пути /cam.
Если вы хотите запустить сервер внутри Docker, вам нужно использовать образ latest-rpi (который уже содержит необходимые библиотеки) и запустить контейнер с некоторыми дополнительными флагами:
Код: Выделить всё
docker run --rm -it \
--network=host \
--privileged \
--tmpfs /dev/shm:exec \
-v /run/udev:/run/udev:ro \
-e MTX_PATHS_CAM_SOURCE=rpiCamera \
bluenviron/mediamtx:latest-rpi
Имейте в виду, что образ Docker не совместим с камерами, для которых требуется пользовательская libcamera (например, некоторые продукты ArduCam), поскольку он поставляется со стандартной libcamera в комплекте.
Настройки камеры можно изменить с помощью параметров rpiCamera*:
Код: Выделить всё
paths:
  cam:
    источник: rpiCamera
    rpiCameraWidth: 1920
    rpiCameraHeight: 1080
Все доступные параметры перечислены в файле конфигурации примера.
Чтобы добавить звук с USB-микрофона, установите GStreamer и alsa-utils:
Код: Выделить всё
sudo apt install -y gstreamer1.0-tools gstreamer1.0-rtsp gstreamer1.0-alsa alsa-utilsсоставить список доступных аудиокарт с помощью:
Образец вывода:
Код: Выделить всё
surround51:CARD=ICH5,DEV=0
    Intel ICH5, Intel ICH5
    Выход 5.1 Surround на фронтальные, центральные, тыловые колонки и сабвуфер
default:CARD=U0x46d0x809
    USB-устройство 0x46d:0x809, USB Audio
    Аудиоустройство по умолчанию
Полученный поток будет доступен по пути /cam_with_audio.