
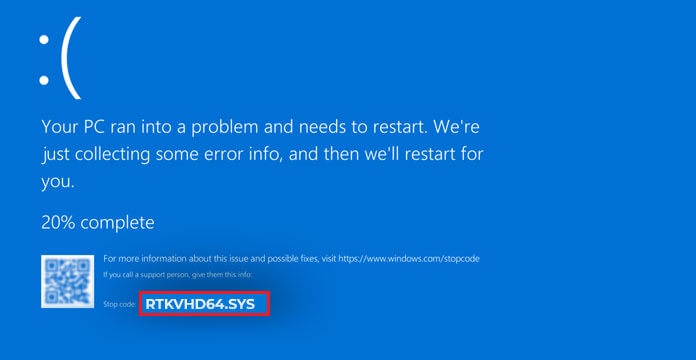
RTKVHD64.sys is a blue screen of death (BSOD) error that appears with SYSTEM_SERVICE_EXCEPTION stop code and a bug check value of 0×0000003B. This error usually occurs while playing video games or albums and when Realtek audio drivers stop working.
What Causes the RTKVHD64.sys Error?
The primary causes of the RTKVHD64.sys error include the following:
- Outdated graphic drivers
- Faulty Realtek audio driver
- Corrupt system files
- Invalid registry entries
- Malware or virus attack
Important: This error may even crash your entire system. You need to check if you can boot your Windows 10 in safe mode. If it is possible, take a backup of your important data. If not, use a data recovery software, such as Stellar Data Recovery Professional , to recover the data.
Stellar Data Recovery Professional is an easy-to-use yet powerful data recovery software tailored to retrieve all types of files and folders from all kinds of storage devices. It even lets you create a bootable media drive to restore data from an unbootable or crashed Windows system.
Methods to Fix the RTKVHD64.sys Error
You can follow the below methods to fix the RTKVHD64.sys error. But see first if you can boot the system in the safe mode. Follow the steps given below:
Steps to Boot the System in Safe Mode
- Turn off your Windows system forcefully using the power key.
- Now, reboot your system. When the Windows logo starts showing up on the screen, turn off your system.
- Repeat the above steps thrice and you will reach the Automatic Repair environment.
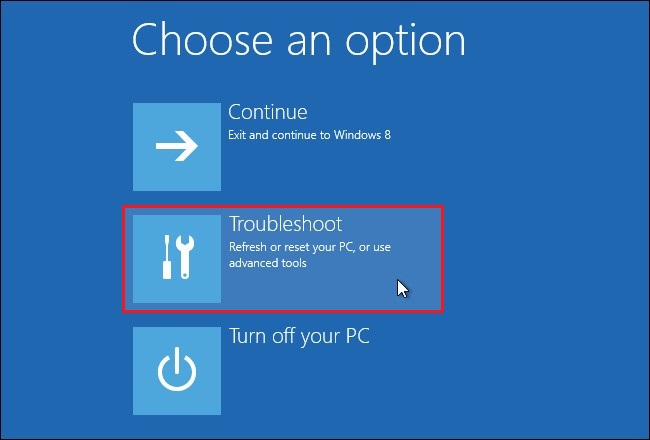
- In the Automatic Repair environment, select Advanced options > Troubleshoot.
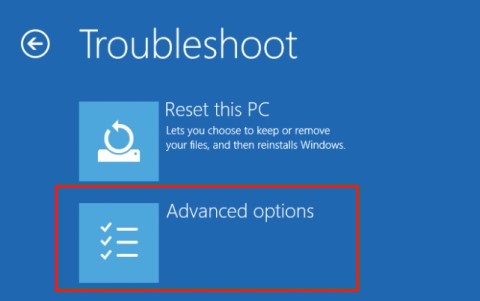
- On the Troubleshoot window, select Advanced Options.
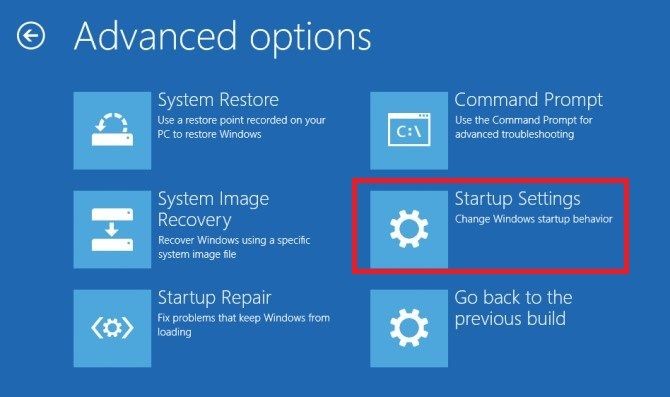
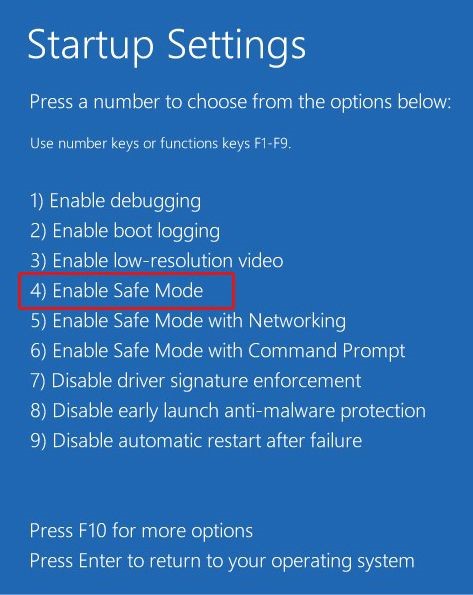
- Next, select Startup Settings from the available options.
- Click Restart and the system will reboot.
- Now, press F4 to enable the safe mode.
Now that you’re in safe mode, perform the following.
Scenario A: If you can boot into safe mode
Method 1: Update Realtek Device Driver
Outdated, incompatible, or corrupted Realtek device driver may cause RTKVHD64.sys blue screen error. You can try updating the driver. Follow these steps:
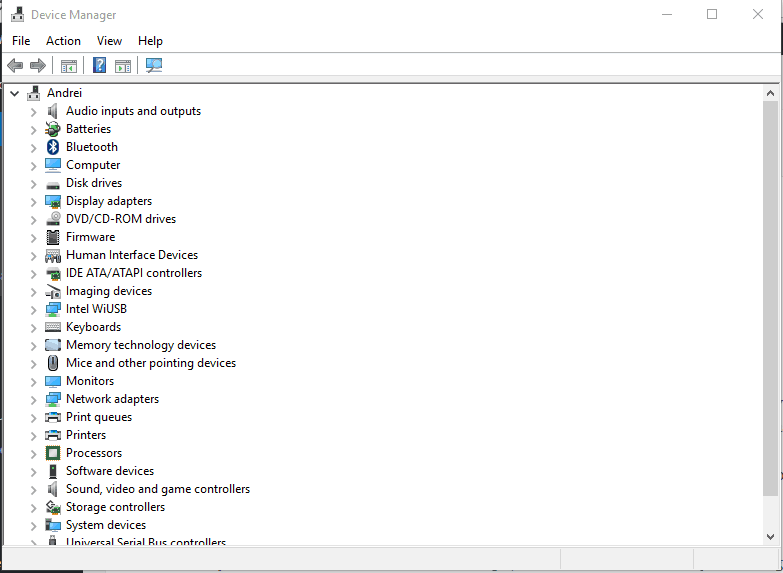
- Open Device Manager by pressing Windows + X and then open the Realtek device category.
- Expand the device category, right-click on the Realtek driver, and select Update driver.
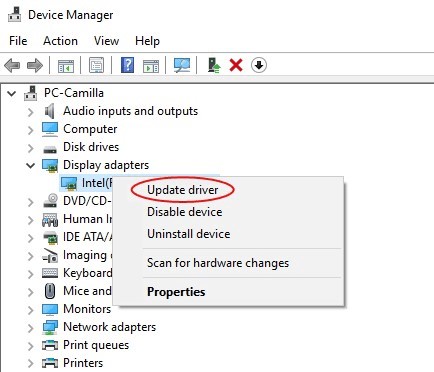
- On the next prompt, select Search automatically for drivers.
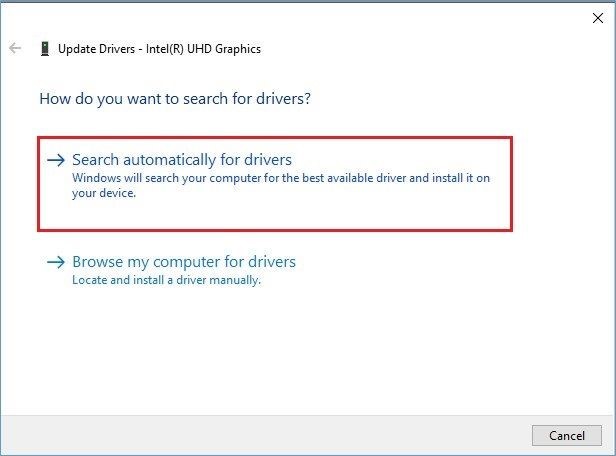
- Windows will search for the latest driver software.
- If you can’t find one, visit the official site and follow the instructions to download the compatible and latest driver software.
Method 2: Repair Files with SFC Scan
Corrupt, damaged, or missing system files may cause RTKVHD64.sys error on Windows 10. You can try to fix it by using the System File Checker utility. Here are the steps:
- Open the Command Prompt and run it as administrator.
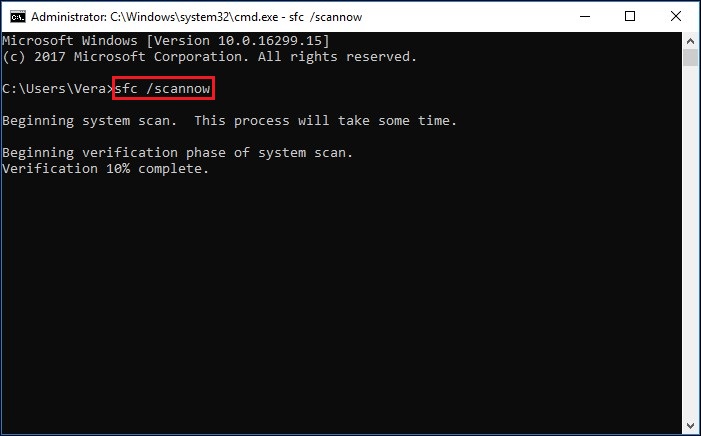
- In the command prompt window, type SFC/scannow and hit Enter.
- The process may take some time to complete.
- Once completed, reboot your system to check if the error is resolved.
Method 3: Fix Hard Drive Corruption with CHKDSK Command
Sometimes, a corrupted hard drive may also be the cause of this blue screen error. You can fix the issue by running the CHKDSK command.
Note: CHKDSK command with /f /r attributes may fix the corruption on a hard drive. However, it also scans and marks down the bad sectors on the hard drive, preventing Windows from reading and storing data on these bad sectors, eventually causing data loss. So either take backup or restore your data using a reliable data recovery software.
Steps to run the CHKDSK command:
- Run Command Prompt as administrator and type CHKDSK /f/r D: and hit Enter. (Replace the D: with your hard drive letter.)
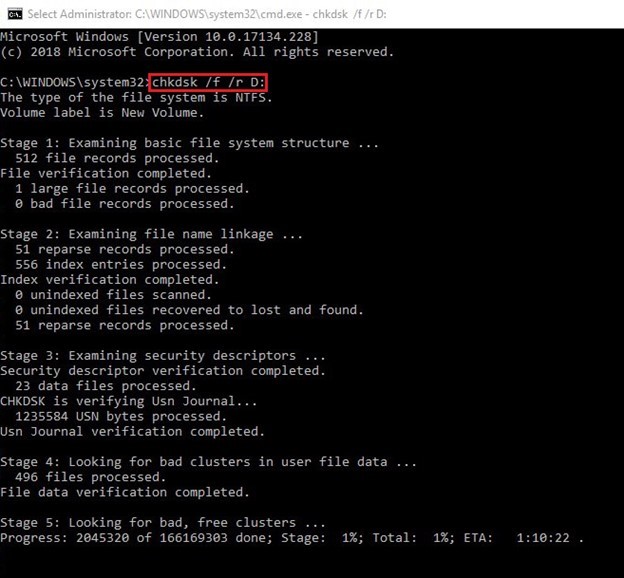
- Wait until the process is complete. Then, close the command prompt window.
- Reboot your system and see if the error is resolved.
Method 4: Run Antivirus Program
Sometimes, due to malware or virus attack, you may encounter the blue screen error. You can run the Windows Defender Antivirus program to scan the PC if there’s any malware on your system.
- Press Windows + I to open System Settings.
- Next, go to Update & Security > Windows Security.
- Locate and click Virus & threat protection.
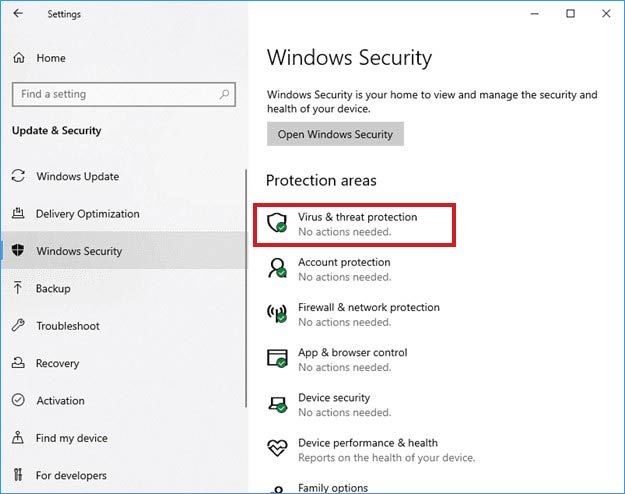
- The tool will detect any virus on the system and show it in the results.
- Follow the instructions given on the screen to get rid of the malware. Once done, reboot your system.
Method 5: Perform System Restore
You may also try performing a system restore to fix the BSOD error. This will remove any problematic program, applications, corrupt system files, invalid registry settings, etc. However, it may cause data loss. Follow these steps:
- Type Create a restore point in Windows Search box, and then on the System Properties window, navigate to the System Protection tab.
- Click System Restore.
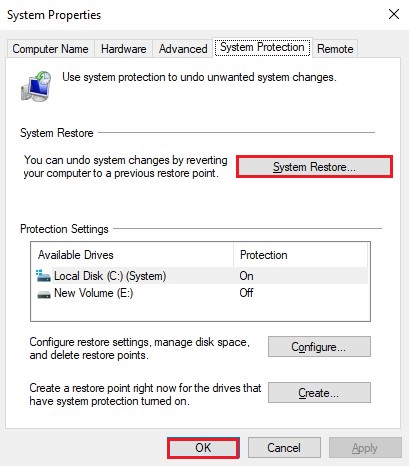
- Click Next on the System Restore window.
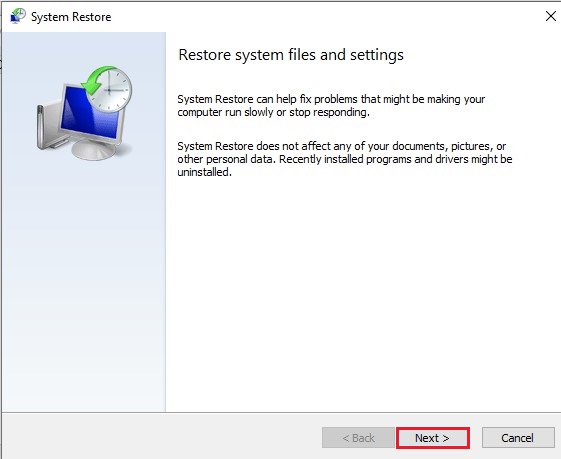
- Select the restore point and click Scan for affected programs.
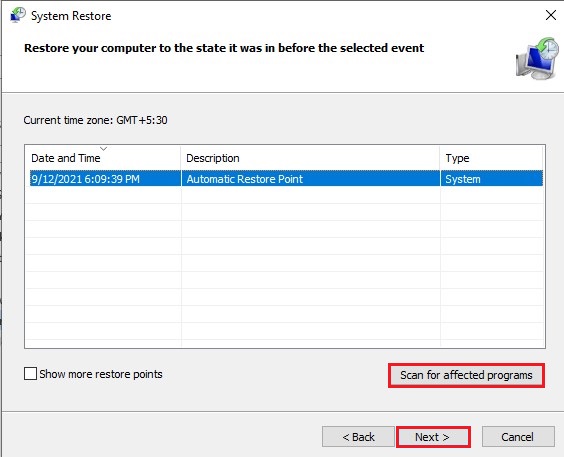
- After that, click Close > Next > Finish.
- Now, close the window and reboot your Windows system.
Scenario B: If you can’t boot into safe mode
Method 6: Reinstall Windows 10
If you can’t boot your system in safe mode or the above methods fail to fix the error, you’ll be left with only one option, i.e., reinstalling Windows 10. You can reinstall Windows 10 using the Windows media creation tool. Remember, reinstalling Windows 10 will clean the drive partition data on which it will be installed. You can restore the data before reinstalling Windows by using a professional data recovery software. Once you’ve got your data, you may proceed with Windows reinstallation.
Conclusion
Above, we’ve mentioned the troubleshooting methods to resolve the RTKVHD64.sys error on Windows 10 system. But before applying the methods, take the backup of your system. In case the system is not booting, you can use a powerful data recovery solution, such as Stellar Data Recovery Professional, to retrieve the data.
You may also read about: How to Fix FAULTY HARDWARE CORRUPTED PAGE Error on Windows 10
Was this article helpful?
YES1
NO
Blue screens of death (BSODs) are caused by critical errors in the Windows operating system, leading to system failure. These errors can be triggered by software crashes or hardware issues, causing frustration for users.
Here are some of the most common BSOD errors:
- WHEA_UNCORRECTABLE_ERROR
- VIDEO_DXGKNL_FATAL_ERROR
- IRQL_NOT_LESS_OR_EQUAL BSOD
What Causes BSODs?
There are many possible causes of BSODs. However, most of the time, they are caused by issues with the driver or hardware components. But then again, we must not forget the fact that they may also be triggered by problems with low-level software programs that are running in the Windows kernel level.
Now, regular apps that you download online won’t be able to cause BSODs. In the event that they crash, they won’t bring the operating system along.
When Windows encounters a BSOD, it comes across a STOP error. This is a critical failure that results in a crash. And in case this happens, all that is left for Windows to do is restart. This situation can then lead to data loss because apps and programs did not have a chance to save any active data.
It is worth noting that BSODs look different from one Windows version to another. But in general, they appear like a blue screen with a terminal screen displaying information about the crash.
In this article, we will tackle one specific blue screen problem: the RTKVHD64.sys BSOD in Windows 10/11.
What Is the RTKVHD64.sys Blue Screen Error In Windows 10/11?
The RTKVHD64.sys is a BSOD stop error that results in a system crash. When it happens, your system turns blue and forces a restart right away. This problem can be very frustrating as it can negatively impact one’s productivity.
Even with all the inconveniences that this issue brings, know that a BSOD error like this plays a vital role within the Windows platform. This is because it prevents any serious damage that may otherwise cause the whole system to malfunction. Because a BSOD often forces a system restart, then a problem can be resolved immediately and the user can continue working productively.
Now, in the case of a RTKVHD64.sys error, it’s a completely different story. This error indicates that something is wrong with your system causing it not to function optimally.
So, what causes the RTKVHD64.sys error to appear? This particular problem is triggered by a problematic device driver, which is most of the time, associated with the Realtek High Definition Audio driver. When this BSOD occurs, your audio may stop working. Worse, there could be other technical issues with the sound.
Other possible triggers are:
- An insufficient disk space
- Faulty device drivers
- Misconfiguration of the BIOS
- Corrupted hard disk
- Unidentified Windows 10/11 bug
- Outdated Windows OS
- Incorrect system registry entries
To fix this problem, there are a couple of basic troubleshooting steps you can perform.
Basic BSOD Troubleshooting Steps
If you are running Windows 10/11, then you are in luck. Most of the time, your system will automatically perform troubleshooting methods after restarting or recovering from a crash. But still, it is still worth checking the Action Center to find out other details of the crash or see other helpful troubleshooting methods.
After that, if you find that Windows was unable to resolve the problem on its own, your best option is to search the web. Better yet, do the following:
Use System Restore
If it is your first time seeing a BSOD, then System Restore might just help. This will allow you to revert your system to a previously working state. If this troubleshooting method works, then it means that a certain software program has triggered the error.

To use System Restore, do the following:
- Go to the Start menu and select Control Panel.
- Click Control Panel from the search results.
- Navigate to Recovery -> Open System Restore.
- Hit Next.
- Select a restore point and hit Next.
- Finally, click Finish.
Scan for Virus or Malware
There are malware entities and viruses that dig deep into the system and gets hooked into the kernel level, resulting in system instability. So, if you suspect that a malware or virus has triggered the BSOD, then scan your computer for any signs of malware and get rid of them once and for all.
Make Sure Your Drivers Are Up to Date
An outdated device driver can lead to a blue screen on death error. Make sure you install any available driver update to prevent any driver-related issues.
Boot Your System into Safe Mode
If you see the BSOD error every time you turn on your device, then try booting into safe mode. In this mode, only the essential drivers and processes are loaded upon startup. If a recently installed driver is causing the BSOD, it shouldn’t appear in this mode.
To boot Windows 10/11 into Safe Mode, do the following:
- Hold the Shift key while pressing the Power button.
- Select Restart.
- When your PC restarts to the Choose an Option screen, choose Troubleshoot.
- Click Advanced Options and go to Startup Settings.
- Press Restart.
- Once your PC restarts, a list of options will appear. Press F4 to boot your device into Safe Mode.
Check for Hardware Issues
Blue screens can also show if you have a faulty hardware component in your device. Try checking the temperature of your hardware components to make sure they’re not overheating. Also, test your device’s memory for any errors. If that fails, then you may have a more serious hardware problem. Hire a professional to resolve the problem for you.
To check if your PC is having a hardware issue, follow these steps:
- Press the Windows + R keys to open the Run dialog box.
- Input mdsched.exe and hit Enter to launch it.
- Choose whether you want to restart your computer or check for problems the next time you restart your computer.
Alternatively, you can use a third-party hardware diagnostic app. If you do a quick search on Google, you can find a lot of powerful diagnostic apps that can identify potential or existing hardware problems.
Reinstall Windows
This should be the last resort. Doing this will remove anything you have saved on your system. If your device still throws a BSOD error after this, then this is a hardware problem that needs to be checked.
To reinstall Windows, do the following:
- Tap Settings and select Change PC settings.
- Click Update and Recovery and press Recovery.
- Navigate to the Remove everything and reinstall Windows section. Click Get Started.
- Follow the onscreen instructions.
Ways to Fix the RTKVHD64.sys Blue Screen Error In Windows 10/11
If none of the above troubleshooting methods worked, then these methods should fix it:
Solution #1: Run the Windows Startup Repair Tool.
Windows 10/11 is created by compiling hundreds of different elements and configuration files. If an issue occurs between these elements and files, there is a chance that an error will surface.
But with so many files out there, it would be difficult to pinpoint which one is the culprit. For that, you need a quicker and more effective solution: the Windows Startup Repair Tool.
The Windows Startup Repair Tool is a handy tool in Windows 10/11. It is widely used in cases when Windows does not boot up properly or when you are experiencing issues that indicate a problem in your system.
To use it, follow these steps:
- Hold the Shift key while pressing the Power button.
- Continue holding the Shift key and select Restart from the list of options that appear.
- Once your device restarts, you will be presented with several options. Select Troubleshoot.
- Navigate to the Advanced Options section.
- Select Startup Repair.
- In the screen that shows, select an account with administrator privileges.
- Enter your password to continue.
- Hit Continue.
- Wait as the tool scans your system and fixes any issues.
- After the scan, restart your PC and check if the error persists.
Solution #2: Check for Any Corrupt System File.
As mentioned, a corrupt system file can cause BSOD errors to surface. Therefore, you should make sure that no corrupt system file exists in your system. To check this, refer to the instructions below:
- Input cmd into the search field.
- Right-click on the most relevant search result and select Run as Administrator.
- Enter the sfc /scannow command into the command line.
- Hit the Enter button and wait for the results.
- Restart your device.
Solution #3: Uninstall Your Audio Drivers.
We’ve specifically mentioned above that the RTKVHD64.sys BSOD is usually caused by an issue with the Realtek Audio Driver. So, it might be helpful to update it.
Here’s how to update and uninstall your audio driver:
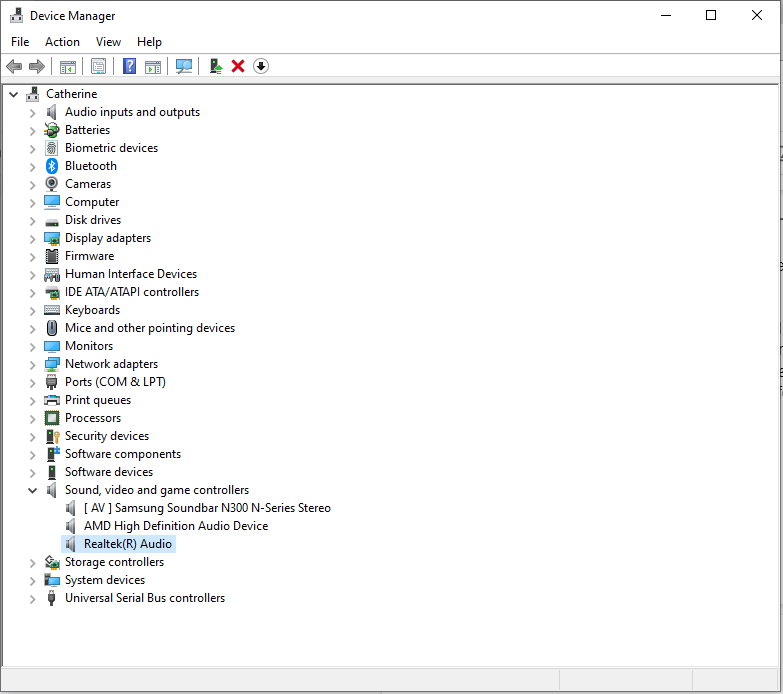
- Press the Windows + X keys and select Device Manager.
- Double-click on the Sound, video, and game controllers section to expand it.
- Right-click on the Realtek Audio Device and choose Update Driver.
- Select the Search automatically for updated driver software option and follow the onscreen prompts to complete the update process.
- Once done, restart your device and the BSOD error should be fixed.
Solution #4: Install a New Realtek Driver.
Without an audio driver, you cannot hear any sound from your computer. So, try installing the latest version of your Realtek audio driver.
Although this can be done via the Device Manager, we highly discourage doing so to avoid compatibility issues. Your other alternatives would be to visit the official Realtek website to download the most recent audio driver for your device or use a third-party device driver updater tool.
Install a New Driver via Device Manager
- Into the search field, input device manager and select the most relevant result.
- Locate your audio driver and right-click on it.
- Select the Search automatically for updated driver software option.
- Hit the Update Driver button to proceed.
Install a New Driver via the Realtek Website
For this method, you simply need to visit Realtek’s official website and download the audio driver version that is compatible with your device. Once you have the driver, run it and follow the onscreen instructions.
Install a New Driver Using a Third-Party Driver Updater
Among all methods, this is what we recommend. Not only is it quick and easy, but it is also safe. All you have to do is download and install a third-party driver updater tool, run it, and let it find the driver that is compatible with your Windows version. Once it finds the driver, then let the tool do its job. It’s that fast and easy!
Solution #5: Disable Your Antivirus Suite.
Are you using an antivirus software program? If yes, then it could also be causing the RTKVHD4.sys BSOD error. To verify this, try disabling or uninstalling your current antivirus.
To turn off your antivirus, do the following:
- Go to the Start menu and select Settings.
- Navigate to the Update and Security section and click Windows Security.
- Select Virus and Threat Protection and click Manage Settings.
- Switch off the Real-Time Protection option.
To uninstall your current antivirus software, here’s what you should do:
- Go to the Start menu and click Control Panel.
- Select Uninstall a Program.
- Choose the antivirus program that you want to uninstall.
- Hit the Uninstall button.
- When prompted, restart your device.
If this solution helped you, it only suggests that your security software is causing the BSOD error. Thus, you might want to consider using another antivirus program.
Solution #7: Update Your BIOS.
Before you proceed with this step, take note that this is a bit complex and can trigger more serious problems if not done properly. If you don’t trust your technical skills, then we suggest skipping this solution entirely. But if you wish to give it a try, follow these steps:
- Into the search field, input system information and hit Enter.
- Check the BIOS Version/Date and the BaseBoard Product sections. Jot down any important information.
- Next, launch your favorite web browser and visit the official website of your motherboard’s manufacturer.
- Navigate to the Downloads section and locate the appropriate update for your BIOS.
- Launch the installer you have downloaded and wait for the process to complete.
- Once done, your device will automatically reboot.
Solution #8: Check for Any Hard Drive Problems.
If you suspect that hard drive problems are causing the BSOD error, then try this solution. Here’s how to begin:
- Click the Start button and input command into the search field.
- Press and hold the CTRL + Shift keys and hit Enter.
- Hit Yes if prompted by the dialog box.
- Input chkdsk /f into the command line and hit Enter.
- The program will then start scanning.
- Follow the on-screen instructions.
Solution #9: Roll Back Windows to a Previously Working State.
This is another solution that we don’t recommend, especially if you are not tech-savvy. However, should you wish to give this solution a try, just follow the steps below:
- Press the Win + X keys and select Run.
- Input rstrui into the text field and hit OK.
- Click Next to see a list of restore points.
- Next, choose the Show More Restore Points option.
- Select a restore point prior to the appearance of the error.
- Click Next and hit Finish to restore Windows to your desired restore point.
Solution #10: Run a Malware Scan.
The error could also be triggered by a malware entity. So, get rid of any threats on your device to rule out the possibility of a malware infection. To run a malware scan, do the following:
- Into the Cortana search field, and type windows defender.
- Hit Enter.
- Select the most relevant search result to launch Windows Defender.
- Click the shield icon and select Advanced Scan.
- Choose the Full Scan option to perform an extensive scan.
- Press Scan Now to begin the scan.
Solution #11: Check If a Newly Installed Device Is Causing the BSOD.
If you have just installed a new device prior to the occurrence of the BSOD error, try to unplug the device first. After that, check if your screen turns blue. If not, check if your device is properly installed and securely connected to the motherboard.
Solution #12: Install Any Pending Windows Update.
It is important to keep your operating system updated, too. If any patch or update is available from Microsoft, install it right away. These updates and patches are rolled out for a reason. So, if you leave them uninstalled, then you may be putting your device at risk of threats.
To update Windows, here’s what you should do:
- Go to the Start menu and navigate to the Microsoft System Center.
- Select Software Center.
- Navigate to the Updates section and hit the Install All button.
- Once all updates have been installed, restart your computer.
Solution #13: Run the BSOD Troubleshooter.
To fix BSOD errors, you can use the BSOD troubleshooter. This tool interprets various bug check codes and lets you know whether the crash was caused by a faulty hardware component, problematic device driver, or whatsoever.
There are two ways to use this troubleshooter. First, use it via Microsoft’s website. Second, use it directly from your device.
Via Microsoft
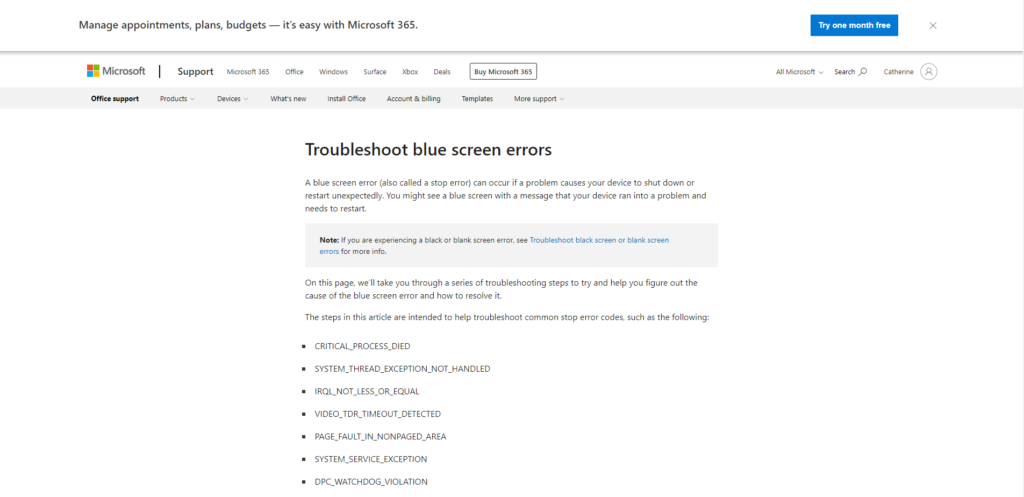
- Go to the Troubleshoot blue screen errors section on Microsoft’s website.
- Follow the instructions and provide answers to the question to be able to troubleshoot the blue screen error.
- If you still require more help, then you can post a new thread on the forum section and a member of Microsoft’s support team will get in touch.
Via Windows 10/11
- Go to Control Panel and click the Troubleshooting icon.
- Tap the View All link.
- Right-click on the Blue Screen Troubleshooter option and select Run as Administrator.
- Click the Advanced link.
- Tick the Apply Repairs Automatically option and click Next.
- The troubleshooter will now proceed with identifying problems on your device. If problems were found, then follow the instructions shown on your screen. Otherwise, click the View Detailed Information option.
Solution #14: Disconnect Any Incompatible Peripheral.
This BSOD can also occur if a connected hardware component is incompatible with Windows 10/11. Make sure that you are using a hardware peripheral that is compatible with Windows 10/11. To do so, visit the website of your hardware manufacturer.
Solution #15: Uninstall Incompatible Third-Party Apps.
Incompatible third-party apps can cause the BSOD error to appear. To uninstall these apps, do the following:
- Click the Start menu and select Settings.
- Go to the Apps section and find the conflicting app in the list. Click on it.
- Hit the Uninstall button and follow the onscreen instructions.
Solution #16: Free Up Disk Space.
If you no longer have sufficient disk space on your Windows 10/11 device, then you may likely encounter the RTKVHD64.sys BSOD. So, try freeing up your hard disk space to rule out the possibility of an insufficient hard disk drive space.
To free up disk space on your Windows 10/11 device, do the following:
- Go to the Start menu and select Settings.
- Navigate to System and click Storage.
- Select Storage Settings.
- Delete any unnecessary files on your hard disk.
- Under the Free Up Space Now section, click Clean Now.
Now, manually deleting files on your hard drive is not recommended as you may end up deleting important system files, which can then result in more serious problems. And we don’t want that to happen. As an option, try using a PC repair tool to get rid of unwanted files automatically.
Solution #17: Fix Problems with Registry Entries.
To fix a corrupt registry entry, you have three options: Run an Automatic Repair, Refresh, or Reset.
Which of the three should you choose? As the name suggests, the Run an Automatic Repair option automatically runs a repair session on your behalf. The Refresh option will reinstall applications you installed in Windows and create a copy of them on your desktop. The Reset option, on the other hand, will remove any personal files and delete system settings or configuration on your computer.
To run an automatic repair, follow these steps:
- Open the Settings utility.
- Go to the Update and Security option.
- Open the Recovery tab and click Advanced Startup.
- Select Restart Now.
- In the Choose an Option screen, select Troubleshoot.
- Choose Automated Repair.
- Select an account and log in.
- The repair process should now begin. Your computer will reboot many times during the process.
To perform a system refresh, do the following:
- Open the Settings utility.
- Navigate to Update and Security.
- Select Recovery and click Get Started.
- Next, hit the Get Started button to proceed.
- Click the Keep My Files option.
- Follow the instructions on your screen to complete the refresh process.
To reset Windows 10/11, here’s what you should do:
- Go to the Settings utility.
- Select Update and Security.
- Click Recovery and select Get Started.
- Hit the Get Started button.
- Choose the Remove Everything button.
- Follow the instructions to finish the reset process.
In Conclusion
A computer that is in perfect working condition should not show any blue screen issue at all. However, let’s admit it. No hardware or software is without a fault. Even the most expensive supercomputer out there may encounter a BSOD error like the RTKVHD64.sys blue screen.
If you have encountered this error, don’t worry. The solutions we have laid above should help you resolve it. You could begin by performing basic troubleshooting steps like using System Restore, scanning your device for malware, ensuring your drivers are updated or booting your system into safe mode. But none of them works, move on to the more complex solutions like uninstalling your audio drivers, updating your BIOS, or rolling back Windows to a previously working state.
Now, if you think you have done everything you can but to no avail, then your best option is to seek help from a professional Windows technician. You can take your device to an authorized service center and have it checked. And then, let them fix the problem on your behalf.
How did you resolve the RTKVHD64.sys error? Do you know other solutions that we forgot to include in this article? We’d love to hear from you. Comment below!
Give us some love and rate our post!
Issue: I’m getting BSOD rtkvhd64.sys for several days and feel frustrated about it.. Each time it shows up, I have to force the system to restart because it freezes the screen and I can’t continue doing what I did before. After the first time the BSOD came up, I upgraded nvidia drivers to 335.23, but that did not solve the problem. That was everything that came up to my mind and I don’t know what else I could do to fix this mess. By the way, I’ve noticed that this error usually happens when I’m playing FM2014 or Warcraft. Any help would be highly appreciated. Thanks!
Solved Answer

SYSTEM_SERVICE_EXCEPTION (rtkvhd64.sys) is a BSOD (Blue Screen of Death), which is related to the Realtek Audio Driver. Rtkvhd64.sys that is reported on the BSOD error is one of the Microsoft Windows files, which is installed by default and can’t be modified in any way. If, for some reasons, it starts malfunctioning, rtkvhd64.sys BSOD emerges and may lead to the disappearance of sounds.
In most of the cases, SYSTEM_SERVICE_EXCEPTION (rtkvhd64.sys) error shows up when the system is under heavy load, for example when playing games. However, it may happen when watching a video on Youtube or simply listening to music on music player. Just like other BSOD errors, rtkvhd64.sys error is triggered by some hardware and driver problems, which is why you have to take it seriously and take respective actions. In this post, we will provide several methods that appeared to be useful for SYSTEM_SERVICE_EXCEPTION (rtkvhd64.sys) fix.
A research on SYSTEM_SERVICE_EXCEPTION (rtkvhd64.sys) error revealed that, as usually, PCs running Windows 10 most frequently encounter this issue. Besides, it seems that this particular Blue Screen is caused by Realtek audio device, which due some reasons, has crashed. Down below are the solutions that can help you to fix SYSTEM_SERVICE_EXCEPTION (rtkvhd64.sys) error and issues related to it.
FIX 1. Ensure that all drivers are up-to-date
As we have noted above, this BSOD is triggered by a failure of your sound card driver. Therefore, checking and updating it would be reasonable solution. To do that, perform these steps:
- Press Windows icon and type Device Manager.
- Click on the Device Manager and you should be exposed to a list of devices that are running on your operating system.
- Here you have to find Sounds option, expand it and locate your sound card (probably Realtek Sound Card).
- Check if it’s not marked with a yellow exclamation mark. In fact, check all drivers and if you find any of them marked with an exclamation mark, right-click on each of them and select Properties.
- When a drop down menu occurs, go to Drivers and opt for Update Drivers.
- Finally, reboot the system and check if SYSTEM_SERVICE_EXCEPTION (rtkvhd64.sys) error occurs. In most of the cases this fix has helped.
FIX 2.Uninstall malfunctioning drivers
If the previous method did not help to fix rtkvhd64.sys error, it means that driver update is not sufficient. In this case, we would recommend uninstall the drivers that are problematic and let Windows system install generic ones automatically. How to do that? It’s quite easy.
- Click on Windows icon and type Device Manager.
- When a list of drivers that are currently installed on your device appears, go through that list and check which ones are marked with a yellow exclamation mark.
- As soon as you detect the ones that are malfunctioning, click on each of them and select Uninstall.
- After this is done, reboot your machine.
- Now you have to click on Windows icon one more time and type Check for Updates.
- Click on this option and let Windows system detect the missing drivers that you’ve just deleted.
- As soon as the system finished checking for updates, select Run the Update. By doing this, Windows system will automatically find and install generic drivers that are compatible with the system.
NOTE: Keep in mind that all errors that occur on your system appear due to inappropriate PC’s maintenance. In other words, if you do not take care of the updates, leave useless files/programs on your machine, don’t remove old/outdated registries, do not ensure a proper security of your PC, etc. etc., it’s not surprising that now you encounter SYSTEM_SERVICE_EXCEPTION (rtkvhd64.sys) Blue Screen. To prevent such and similar issues in the future, we would highly recommend installing a professional antivirus and use a reliable PC optimization tool, for example, FortectMac Washing Machine X9.
Repair your Errors automatically
ugetfix.com team is trying to do its best to help users find the best solutions for eliminating their errors. If you don’t want to struggle with manual repair techniques, please use the automatic software. All recommended products have been tested and approved by our professionals. Tools that you can use to fix your error are listed bellow:
do it now!
Download Fix
Happiness
Guarantee
Compatible with Microsoft Windows
Still having problems?
If you failed to fix your error using Fortect, reach our support team for help. Please, let us know all details that you think we should know about your problem.
Fortect will diagnose your damaged PC. It will scan all System Files that have been damaged by security threats. To repair damaged system, you will have a 24hr Free Trial and the ability to purchase the licensed version of the Fortect malware removal tool.
Access geo-restricted video content with a VPN
Private Internet Access is a VPN that can prevent your Internet Service Provider, the government, and third-parties from tracking your online and allow you to stay completely anonymous. The software provides dedicated servers for torrenting and streaming, ensuring optimal performance and not slowing you down. You can also bypass geo-restrictions and view such services as Netflix, BBC, Disney+, and other popular streaming services without limitations, regardless of where you are.
Don’t pay ransomware authors – use alternative data recovery options
Malware attacks, particularly ransomware, are by far the biggest danger to your pictures, videos, work, or school files. Since cybercriminals use a robust encryption algorithm to lock data, it can no longer be used until a ransom in bitcoin is paid. Instead of paying hackers, you should first try to use alternative recovery methods that could help you to retrieve at least some portion of the lost data. Otherwise, you could also lose your money, along with the files. One of the best tools that could restore at least some of the encrypted files – Data Recovery Pro.
Sep. 11, 2024 / Updated by
Seraphina to
Windows 10

RTKVHD64.SYS is part of the Realtek HD audio driver. When issues arise with this file, it may cause system crashes and blue screen errors. This article provides detailed solutions to resolve the issue and restore system stability.
Method 1: Update the Realtek Audio Driver
Outdated or corrupt audio drivers are a common cause of RTKVHD64.SYS errors. Updating the driver can effectively fix this issue. It is recommended to use Driver Talent to automatically detect and update drivers, saving time and avoiding the risk of downloading incorrect drivers.
Download Driver Talent
-
Click the download button to get the latest version of Driver Talent. After installation, open the software and click «Scan».
-
After the scan is complete, it will show which drivers need installation or updating. Find the Realtek audio driver in the list and click «Download».

-
After updating, restart your computer to ensure the new driver works correctly.
Method 2: Check System File Integrity
Press Windows + S, and type «Command Prompt» or «cmd».
Right-click «Command Prompt» and select «Run as Administrator».
In the Command Prompt, type the following command: sfc /scannow

Press Enter, and the system will start scanning for missing or corrupted system files. This may take a few minutes.
Once complete, the system will display the results of the repair.
If the System File Checker repairs the files, restart your computer to see if the issue is resolved.
If certain files couldn’t be repaired, enter the following command to run the DISM tool: DISM /Online /Cleanup-Image /RestoreHealth

After running this, execute sfc /scannow again and restart your computer.
Method 3: Uninstall and Reinstall the Audio Driver
Press Windows + X and select «Device Manager».
Expand the «Sound, video, and game controllers» section, right-click on Realtek or another audio device, and select «Uninstall Device».
Check the box for «Delete the driver software for this device» and click «Uninstall».

After the uninstallation is complete, restart your computer. The system will typically reinstall the default audio driver automatically.
If it doesn’t, you can manually download and install the latest driver.
-
Step 1: Visit the Realtek website or your PC manufacturer’s site and find the correct audio driver for your model.
-
Step 2: Download the latest Realtek HD audio driver compatible with your operating system.

-
Step 3: After downloading, run the installer and follow the prompts to complete the installation.
-
Step 4: Restart your computer and check if the audio is working normally.
Method 4: Roll Back Windows Updates
Press Windows + I to open «Settings» and go to «Update & Security».
In the «Update & Security» window, click «View update history».
Select «Uninstall updates», choose the most recent update, and click «Uninstall». Follow the prompts to complete the process.

After uninstalling, restart your computer to apply the changes.
Check if the system is functioning normally and if the RTKVHD64.SYS error is resolved.
Method 5: Perform a System Restore
Press Windows + S, type «Create a restore point», and open «System Properties».
In the «System Properties» window, select the «System Protection» tab and click «System Restore».

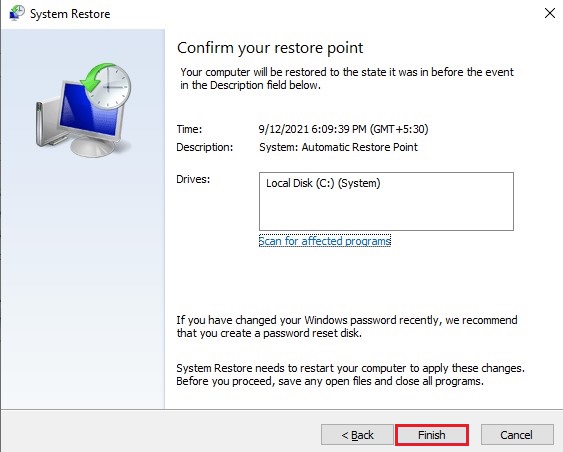
In the System Restore wizard, choose a restore point. Ensure that the selected point predates the issue caused by updates or software installations.
Click «Next», then «Finish», and follow the prompts to begin the restoration process.
The system will reboot and restore to the selected point. This may take some time, so please be patient.
Once complete, log in and check if the issue is resolved. If the problem persists, try other solutions or seek professional assistance.
Download Driver Talent
By following these steps, you can effectively resolve the RTKVHD64.SYS-related crashes on Windows 10. Keeping drivers updated, repairing system files, and rolling back problematic updates are common and effective solutions.
See also:
How to fix computer crashes when playing games
Steps to Download DirectX 12 for Windows 10
How to Fix Mouse Lagging and Stuttering on Windows 11
6 Ways to Fix the Ryzen Master Driver Not Installed Properly Issue
How to Fix Audio Device Disabled Issues on Windows 10
Recommended Download
|
ExplorerMax |
Driver Talent for Network Card | |||
| Smart and advanced file explorer tool for Windows platforms | Download & Install Network Drivers without Internet Connection | |||
|
30-day Free Trial |
Free Download |
In this article, we are going to discuss on How to fix rtkvhd64.sys blue screen error in Windows 10. You will be guided with easy steps/methods to resolve the issue. Let’s starts the discussion.
‘rtkvhd64.sys BSOD error’: It is common Windows Problem considered as Blue Screen of Death (BSOD) error. This BSOD error is appeared with message saying ‘Your PC ran into a problem and needs to restart. We’re just collecting some error info, and then we’ll restart for you’ along with some Windows Stop Codes like SYSTEM THREAD EXCEPTION, PAGE FAULT IN NONPAGED AREA, or DRIVER VERIFIER DETECTED VIOLATION, and 0×0000003B error code.
This BSOD error is also appeared message saying ‘SYSTEM_SERVICE_EXCEPTION STOP 0×0000003B RTKVHD64.sys’. rtkvhd64.sys blue screen of death (BSOD) error is appeared usually in the middle of your work on computer or when you start/restart your computer. There could be several reasons behind the issue including the corruption in system files or registry, or in system image, malware or viruses infections in computer, outdated/corrupted sound card drivers or other device drivers issues.
You should make sure sound card driver or other device driver is properly installed in your computer is up-to-date to latest & compatible version. If not, sound card driver update is necessary if you don’t want any sound relating issues in your computer. It is possible to fix the issue with our instructions. Let’s go for the solution.
How to fix rtkvhd64.sys blue screen error in Windows 10?
Method 1: Fix rtkvhd64.sys blue screen error with ‘PC Repair Tool’
‘PC Repair Tool’ is easy & quick way to find and fix BSOD errors, EXE errors, DLL errors, problems with programs/applications, malware or viruses issues, system files or registry issues, and other system issues with just few clicks.
Method 2: Run SFC scan, DISM scan, and CHKDSK scan
You can run SFC scan, DISM scan and CHKDSK scan in computer in order to repair corruption in system files, system image and in hard disk drives in order to fix the issue.
Step 1: Type ‘cmd’ in Windows Search Box and press ‘SHIFT + ENTER’ keys on keyboard to open ‘Command Prompt as Administrator’
Step 2: Type the following commands one-by-one and hit ‘Enter’ key after each to execute
sfc /scannow
DISM.exe /Online /Cleanup-image /Restorehealth
chkdsk /f
Step 3: Once executed, restart your computer and check if the issue is resolved.
Method 3: Uninstall and then reinstall sound card driver
One possible way to fix the issue is to uninstall sound card driver and then reinstall it in computer.
Step 1: Open ‘Device Manager’ in Windows PC via Windows Search Box and expand ‘sound, video and game controllers’ category
Step 2: Right-click on sound card driver and select ‘Uninstall Device’ and follow on-screen instructions to finish uninstall, and after that, restart your computer
Step 3: Restarting your computer will automatically reinstall the necessary drivers in computer.
Method 4: Download or reinstall sound card driver update manually
Step 1: Open your browser and visit your sound card manufacturer official site
Step 2: Search for your sound card model on the opened page and download the sound card driver according to your sound card manufacturer and operating system version in your computer
Step 3: Once downloaded, double-click on downloaded driver setup file and follow on-screen instructions to finish installation and once installed, restart your computer and check if the issue is resolved.
Method 5: Download or reinstall sound card driver update in Windows PC [Automatically]
You can also try to update all Windows drivers including sound card driver update using Automatic Driver Update Tool. You can get this tool through button/link below.
Method 6: Disable third-party antivirus/firewall
This issue can be occurred due to interference of third-party antivirus/firewall program installed in computer. You can disable or uninstall your third-party antivirus/firewall program in computer in order to fix the issue, and check if disabling/uninstalling third-party antivirus or firewall works for you.
Method 7: Update BIOS
If the issue is still persist, then you can perform BIOS update in your computer in order to fix.
Step 1: Type ‘System Information’ in Windows Search Box and hit ‘Enter’ key
Step 2: Check BIOS version/date and BaseBoard Product sections, write down the relevant information
Step 3: Now, open your browser and visit your PC’s motherboard manufacturer official site and go to ‘Downloads’ section
Step 4: Find the appropriate update for your BIOS and launch the Installer and wait till the process is complete.
Step 5: Once done, restart your computer and check if the issue is resolved.
Conclusion
I am sure this post helped you on How to fix rtkvhd64.sys blue screen error in Windows 10 with several easy steps/methods. You can read & follow our instructions to do so. That’s all. For any suggestions or queries, please write on comment box below.