
This guide will help you install rsync on Windows 10. It is assumed that you already have Git for Windows installed.
If you didn’t already know, Git for Windows and its Git Bash environment is built using msys2, but it doesn’t include all the binaries from that project. One of the binaries that exists, but that isn’t included, is rsync. So what we need to do is to download the msys2 rsync binary, and place it somewhere Git Bash can find it.
- Go to repo.msys2.org/msys/x86_64 and download the latest version of rsync (not rsync2). At the time of this writing that is rsync-3.1.3-1-x86_64.pkg.tar.xz
- Extract the downloaded archive. I’m using Total Commander with a .xz plugin, but 7-zip is also a great option. Download and install from 7-zip.org if you need to.
- Copy the contents of the extracted archive (sub-folders and all) to where you have Git for Windows installed. For me that’s
C:\Program Files\Git\. (The archive contains a\usrfolder, and so does the git installation directory. What you want is for everything inside of the\usrfolder in the archive to end up in the\usrfolder in the git installation directory, ultimately ending up with, among other files,C:\Program Files\Git\usr\bin\rsync.exe)
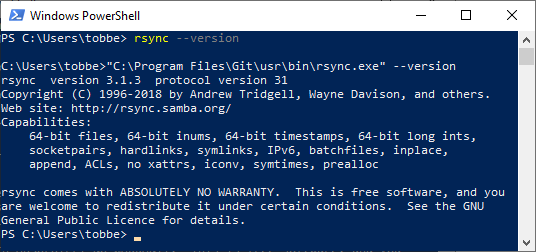
That’s it. You now have rsync installed. You can test your installation by opening up a Git Bash command line window and running rsync --version. You should see it print out version information.
Now, if you want to use rsync from the Windows Command Prompt, or from PowerShell, there is one more step.
Create a new .bat file with the following content (adjust the path to match your environment)
"C:\Program Files\Git\usr\bin\rsync.exe" %*
Name the file rsync.bat and place it somewhere in your %PATH%. I placed mine in C:\Windows\. Press Win + R and enter cmd. In the Command Prompt window that you just launched, enter rsync --version and it will find your .bat-file and run it, passing all arguments (that’s what %* does in the command above) off to your newly installed rsync.exe
The first three steps above are based on serverfault.com/questions/310337/using-rsyn.. where you can also find instructions for setting up Pageant for SSH, if that’s something you need.
I hope this short tutorial was useful to you. Happy rsyncing!
Rsync For Windows 10: A Comprehensive Guide
In the world of data synchronization and backup solutions, few tools are as powerful and flexible as Rsync. Originally designed for Unix systems, Rsync has become a prominent utility for file synchronization and transfer across various platforms. However, Windows users often find it challenging to utilize this remarkable tool directly due to compatibility issues. This article will detail how to effectively leverage Rsync on Windows 10, covering its functionality, installation methods, usage, and tips for maximizing its potential.
Understanding Rsync
Rsync, short for «remote sync», is a command-line utility that enables users to efficiently copy and synchronize files between two locations. Whether it’s backing up files locally or transferring them over a network, Rsync optimizes the transfer process by only copying the parts of files that have changed. This incremental backup strategy greatly reduces data transfer times and bandwidth usage, making it ideal for both local and remote operations.
Key Features of Rsync
- Delta Transfer Algorithm: Rsync minimizes data transfer by only sending the differences between the source and destination files.
- Support for Compression: It can compress files during transit, further reducing transfer times and bandwidth usage.
- Public/Private Key Authentication: Rsync supports secure connections using SSH, ensuring safe data transfers.
- File Permissions Management: It can preserve file permissions, ownerships, and timestamps.
- Exclude and Include Patterns: Users can specify which files or directories to include or exclude during synchronization.
- Versatility: Rsync can be used for local file transfers, remote synchronization, and as a backup solution.
Why Use Rsync on Windows 10?
Windows 10 offers a user-friendly environment but lacks native support for Rsync. However, the versatility and efficiency of Rsync make it a compelling choice for Windows users, especially for:
- Backup Solutions: Automate regular backups to an external drive or a network location.
- File Synchronization: Keep files synchronized between multiple devices or locations.
- Bandwidth Optimization: Reduce the amount of data transferred during subsequent syncs.
- Cross-Platform Collaboration: Facilitate file transfers in mixed OS environments.
Installing Rsync on Windows 10
There are several ways to install and use Rsync on Windows 10, including installing Windows Subsystem for Linux (WSL), using a third-party tool, or employing Cygwin. Let’s explore these methods in detail.
Method 1: Using Windows Subsystem for Linux (WSL)
The Windows Subsystem for Linux allows users to run a Linux distribution directly on Windows 10. This method grants you access to Rsync as well as other Linux tools.
Step-by-Step Installation:
-
Enable WSL:
- Right-click on the Start menu and select «Windows PowerShell (Admin)».
- Type the following command and press Enter:
wsl --install - This command installs WSL and the default Linux distribution.
-
Open Linux:
- Once installation is complete, restart your computer.
- From the Start menu, find and open your installed Linux distribution (e.g., Ubuntu).
-
Install Rsync:
- In the Linux terminal, update the package lists and install Rsync using the following commands:
sudo apt update
sudo apt install rsync
- In the Linux terminal, update the package lists and install Rsync using the following commands:
-
Verify Installation:
- Type
rsync --versionto verify that Rsync has been installed successfully.
- Type
Method 2: Using Cygwin
Cygwin is a large collection of GNU and Open Source tools that provide functionality similar to a Linux distribution on Windows. Rsync can be installed as part of Cygwin.
Step-by-Step Installation:
-
Download Cygwin:
- Visit the Cygwin website (https://www.cygwin.com/) and download the setup executable.
-
Run Cygwin Setup:
- Launch the Cygwin setup file.
- Choose your installation directory and select a mirror for downloading packages.
-
Select Packages:
- When prompted to select packages, search for
rsync. - Check the box next to
rsyncto include it in the installation.
- When prompted to select packages, search for
-
Complete Installation:
- Proceed with the installation process until it is complete.
-
Launch Cygwin:
- Open the Cygwin terminal and verify the installation by running:
rsync --version
- Open the Cygwin terminal and verify the installation by running:
Method 3: Using DeltaCopy
DeltaCopy is a Windows-friendly version of Rsync that runs as a service, providing an easy-to-use GUI.
Step-by-Step Installation:
-
Download DeltaCopy:
- Visit the DeltaCopy website (http://www.aboutmyip.com/DeltaCopy.html) and download the installer.
-
Run Installer:
- Launch the DeltaCopy installer and follow the instructions to complete the setup.
-
Configure DeltaCopy:
- Open DeltaCopy and define the server settings.
- Set up the source and target directories for synchronization.
-
Start Syncing:
- Use the DeltaCopy interface to initiate your Rsync operations.
Basic Usage of Rsync
With Rsync installed, you can begin using it to synchronize files. The basic syntax of the Rsync command is:
rsync [options] source destinationUnderstanding Common Options
- -a: Archive mode; preserves all file attributes.
- -v: Verbose output; displays the progress during transfer.
- -z: Compresses files during transfer.
- –delete: Deletes files in the destination that are not in the source.
- -r: Recursively syncs directories.
- –include and –exclude: Specify patterns for file inclusion or exclusion.
Basic Examples
-
Synchronizing Files Locally:
To sync files from one directory to another:rsync -av /path/to/source/ /path/to/destination/Note: The trailing slashes are important when specifying directories. They indicate that you want to copy the content rather than the directory itself.
-
Syncing with Remote Server:
If you want to synchronize files with a remote server:rsync -avz /path/to/local/ user@remote_host:/path/to/remote/Here, you will replace
userwith the username andremote_hostwith the remote server’s IP address or hostname. -
Using Exclusion Patterns:
To exclude certain file types, you can use the--excludeoption:rsync -av --exclude '*.tmp' /path/to/source/ /path/to/destination/
Advanced Rsync Usage
Synchronizing Over SSH
Rsync can use SSH for secure file transfers. This is especially valuable if you’re syncing data over the internet or an unsecured network.
Example:
rsync -avz -e "ssh -p 2222" /path/to/local/ user@remote_host:/path/to/remote/In this command, we specify a custom SSH port (2222).
Automating Backups with Rsync
To automate backups, you can create a batch file or a shell script that includes your Rsync command. Scheduling that script with Windows Task Scheduler can save you time and effort.
-
Create a Batch File:
Open Notepad and enter your Rsync command, then save the file with a.batextension, e.g.,backup.bat. -
Create a Scheduled Task:
- Open Task Scheduler and select «Create Basic Task.»
- Follow the prompts to set a schedule and specify the path to your batch file.
Incremental Backups
Rsync’s ability to perform incremental backups is one of its standout features. By default, Rsync only transfers files that have changed since the last synchronization, significantly reducing the amount of data that needs to be sent.
To enhance this feature, you can combine Rsync with snapshot management. Using a combination of Rsync and hard links, you can create a series of incremental backups while minimizing disk space usage.
Monitoring Rsync Operations
To monitor Rsync operations effectively, consider using logging features. Adding --log-file=rsync.log to your command will create a log of all transfers, which can be invaluable for debugging and record-keeping.
Example:
rsync -av --log-file=rsync.log /path/to/source/ /path/to/destination/Troubleshooting Rsync on Windows
While Rsync is a reliable tool, Windows users might encounter some issues during installation or operation. Here are common problems and solutions.
Common Issues
-
Command Not Found:
- Ensure that Rsync is installed correctly and that you’re running it from the appropriate terminal (WSL, Cygwin, etc.).
-
Permissions Errors:
- Check your file permissions. You might need to run your terminal with administrative privileges.
-
Connection Failures:
- Make sure the SSH service is running on the remote host and that you’re using the correct port and credentials.
-
Path Errors:
- Paths should be specified correctly, especially when using Windows paths in WSL or Cygwin. Use
/mnt/c/...for accessingC:drive from WSL.
- Paths should be specified correctly, especially when using Windows paths in WSL or Cygwin. Use
Best Practices for Rsync
-
Test Before You Sync:
Use the--dry-runoption to simulate your command without making changes. This helps to ensure you’re transferring the intended files.rsync -av --dry-run /path/to/source/ /path/to/destination/ -
Use the Latest Version:
Stay updated with the latest version of Rsync for security patches and new features. -
Maintain Backup Logs:
Regularly check your backup logs to ensure that your data is being backed up correctly. -
Schedule Regular Backups:
Automating your backup with Task Scheduler ensures that your data is consistently backed up without manual intervention.
Conclusion
Rsync is a robust tool for file synchronization and backup, providing Windows 10 users with powerful capabilities that enhance their file management efficiency. While the native support for Rsync is limited on Windows, methods such as WSL, Cygwin, and DeltaCopy allow users to tap into the full power of this utility.
With the capability to perform incremental backups, secure file transfers, and efficient synchronization, Rsync stands out as a preferred choice for individuals and organizations alike. Understanding how to install, configure, and effectively use Rsync on Windows 10 can significantly elevate your data management strategy, keeping your files safe and synchronized across devices and locations.
Whether you’re a casual user or a system administrator, mastering Rsync equips you with the tools to handle file synchronization tasks with ease and confidence. By following the guidelines and best practices outlined in this article, you can ensure a seamless experience with Rsync on Windows 10, ultimately enhancing your productivity and data security.
Rsync is one of the most commonly used backup/synchronization software for Linux users. Here, you can know what it is and how to use it on Windows 10. Besides, there is a piece of Rsync alternative software – Minitool software for you.
What Is Rsync
Rsync stands for remote synchronization. It is a Linux/Unix-based utility for local and remote data backup and synchronization. Using the Rsync command, you can synchronize files and directories across directories, disks, or networked computers.
Also see: How to Install Linux (Ubuntu) on Windows 10 [Ultimate Guide 2021]
Advantages of Rsync
- It can efficiently copy files to or synchronize files from remote systems.
- It supports copying links, devices, owners, groups, and permissions.
- It uses compression and decompression methods to send and receive data at both ends at the same time, so the occupied bandwidth utilization is low.
- It is faster than SCP (secure copy) because Rsync uses the remote update protocol, which only allows the difference between the two sets of files to be transferred.
How to Use Rsync
This part is about how to use Rsync for Windows. The details are as follows.
Step 1: Install Windows Subsystem for Linux (WSL)
There are many ways to run Linux commands in Windows 10. One is Linux and Windows dual boot, which allows you to choose which system to start at boot, but it may be troublesome, especially when you don’t try to use Linux often.
Therefore, it is more recommended to install Windows Subsystem for Linux (WSL) on your computer. It is used as a Windows utility that enables you to run Linux distributions in command line mode. This is a relatively simple way to use Rsync in Windows 10, and it is also applicable to other Linux utilities.
You can refer to this post – Guide to Install Windows Subsystem for Linux (WSL) in Win 10 to get the detailed steps of installing WSL.
Step 2: Install Rsync
You can use the following command in your Linux distribution to install the Rsync package. Different distributions have the corresponding command. You need to choose it based on your Linux distribution.
On Debian/Ubuntu & Mint – $ sudo apt-get install rsync
On Arch Linux – $ pacman -S rsync
On Gentoo – $ emerge sys-apps/rsync
On Fedora/CentOS/RHEL and Rocky Linux/AlmaLinux – $ sudo dnf install rsync
On openSUSE – $ sudo zypper install rsync
Step 3: Start to Use Rsync
Some common options are used with the Rsync command.
- -v: verbose mode
- -z: Compress file data.
- -r: Recursively copy data (but does not retain time stamps and permissions when transferring data.
- -a: Archive mode, allowing recursive copying of files, it also preserves symbolic links, file permissions, user and group ownership, and timestamps.
- -h: Human-readable, output numbers in a human-readable format.
Here we take backing up to an external drive using Rsync as an example. First, you need to connect the drive to your PC. You should be able to see the drive in Windows Explorer. In the Linux terminal, the mounted drive is located in /mnt.
Step 1: Input ls /mnt to list your drives. The letter Windows assigned to your drive partitions will be listed.
Step 2: Maybe you will not find your external drive partition here since it is mounted by Windows, not by a Linux machine. Thus, you need to input the following commands. (J can be replaced with any other partition number)
sudo mkdir /mnt/j
sudo mount -t drvfs J: /mnt/j
Step 3: Input the following command to see the contents of the partition.
ls /mnt/j
Step 4: Suppose you want to back up C:\data\ to J:\. You need to input the following command.
sudo rsync -avn /mnt/c/data/ /mnt/j/
If you want to back up data to the remote server (such as NAS drive) using Rsync. The instructions are as follows.
Here in this example, a directory /abc/djskah which is on a remote server is being copied in your local computer in /efg/klagd. You should type the following command.
rsync -avzh [email protected]/abc/djskah /efg/klagd
Tip: In the command, daisy can be replaced with your remote servers’ name and 192.168.1.213 can be replaced with your remote servers’ address.
Rsync Alternative for Windows 10
From the content above, you can find that as a command in Linux, Rsync can be used in Windows 10, but the process is complicated and time-consuming. Thus, to back up and synchronize files locally and remotely more conveniently, there is a Rsync alternative – MiniTool ShadowMaker for you.
MiniTool ShadowMaker is a professional file backup and sync software. It allows you to sync your files between two computers and it also allows you to back up and restore files & folders and the system you need.
Thus it can help you protect your important data and perform data recovery. Other functions are also available, such as cloning disk and creating bootable media to boot the computer.
This free backup software offers a Trial Edition that allows a 30-day free trial for all backup features.
Now, we will show you how to back up data step by step with pictures.
Step 1: Download and install MiniTool ShadowMaker and launch it, click Keep Trial to continue.
MiniTool ShadowMaker TrialClick to Download100%Clean & Safe
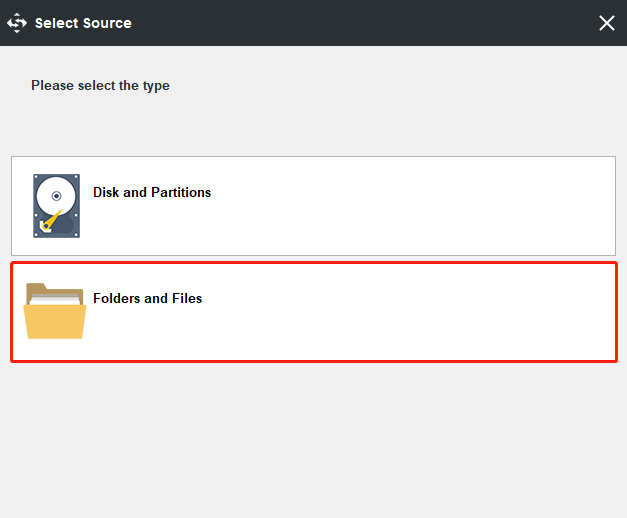
Step 2: After entering its main interface, go to the Backup page. Then click the Source module to choose the backup source. As for data backup, please choose Folders and Files to continue and choose the files you want to back up.
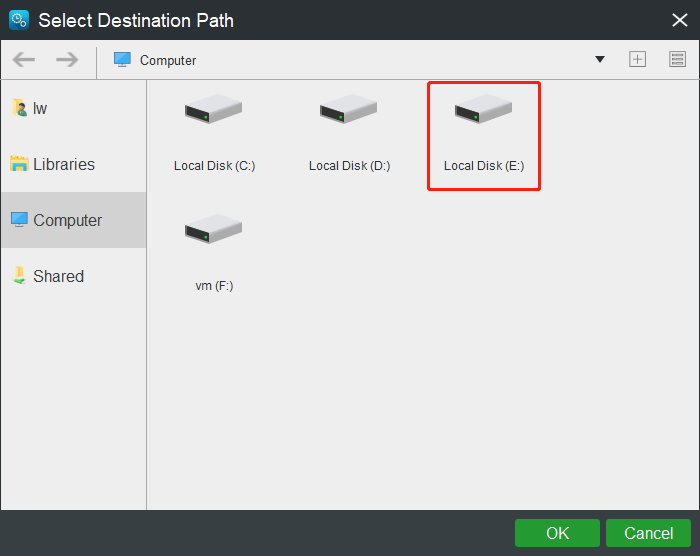
Step 3: Returning to the Backup page, click the Destination module to select the destination path to save the backup image. It is recommended to choose an external hard drive. Here, you can also choose NAS drive as your destination.
Tip: After you select Shared, you can directly sync files to the computer you select on the same LAN.
To get an extraordinary file backup experience, there are three important things you can do.
- MiniTool ShadowMaker is a user-friendly program that enables you to set an automatic file backup by clicking the Schedule button.
- MiniTool ShadowMaker also provides three different backup schemes so that it enables you to manage disk space by deleting some old backup images. The Incremental backup scheme is chosen by default and you can click the Scheme feature to change.
- You can set some advanced backup parameters such as changing image creation mode, compressing files size, and so on by clicking the Options button.
Step 4: After having successfully selected the backup source and destination, you can click Back up Now to perform the data backup action immediately. Or you can choose to click Back up Later to delay the process of files backup.
When the process is finished, you have successfully backed up files and have protected the data. From the above information, you can see MiniTool ShadowMaker is a great Rsync alternative, which is very easy and convenient to back up files.
You can also use the Sync feature of MiniTool ShadoaMaker to back up your data. Detailed operating steps are listed as follows:
Step 1: Enter Main Interface
Step 2: Specify Folders and Path to Sync
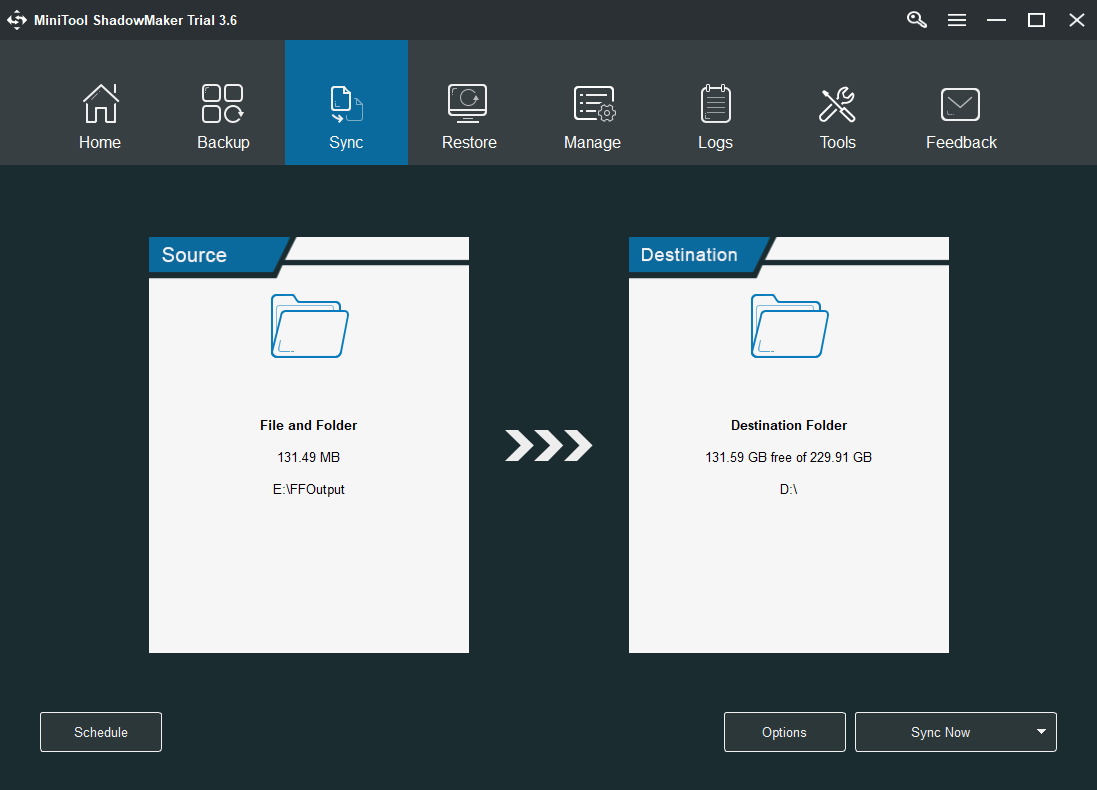
- Go to the Sync page and click it in the toolbar.
- Specify the source and destination for files sync.
What to Sync
- Go to the Source section.
- Under the Sourcetab, three paths are available: Administrator, Libraries, and Computer. You can choose a source to select files. Then click OKto continue.
Where to save synchronized folders
Under the Destination tab, there are four paths available: Administrator, Libraries, Computer, and Shared. To sync files to NAS, choose Shared, type Path, User name and Password in sequence, and click OK to finish.
Step 3: Start to Sync Files
- Please go to Sync.
- You can click Sync Now to perform file sync or click Sync Later to postpone it. Besides, you can continue this sync task on the Manage page.
If you want to sync files automatically, you can also click the Schedule button. Here are also four schedule settings available: Daily, Weekly, Monthly, and On Event. You can choose one to set up a time point and click the OK button to confirm the setting for automatic file sync.
If you want to set some advanced sync parameters, you can click the Options button. Here, you can compare and filter the files that you want to sync.
You can also try Windows snap-in tool – Backup and Restore (Windows 7) to back up data. Here is how to use it step by step. It is also a Rsync alernative.
Step 1: Type Control Panel in the search box of Windows 10 and choose it to continue.
Step 2: In the popup window, choose the Backup and Restore (Windows 7) link to continue.
Step 3: Next, click Set up backup under Back up or restore your files section to go on.
Step 4: Now, you are required to decide where you want to save the backup images and click Next to continue.
Step 5: In the next window, you will see two options. If you want to choose the backup source by yourself, you need to select the Let me choose option and click Next to continue.
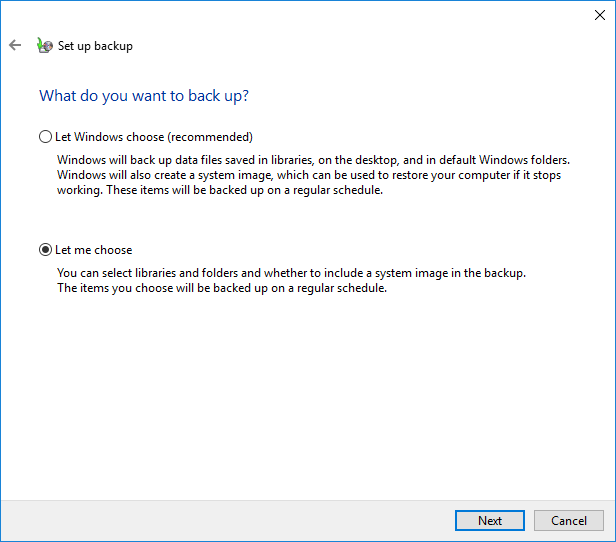
Step 6: Select the files you want to back up and click Next to continue.
Step 7: Then you need to review your backup settings. And if you want to set an automatic backup or change the backup schedule, you can click Change schedule to continue. Next, click Save settings and run backup to perform the data backup action.
Step 8: Then the file backup process will begin. After that, you have successfully backed up your files.
Bottom Line
Here is the information about Rsync Windows 10. You can know what it is and how to use it. However, it’s complicated and time-consuming. Thus, you can try the Backup feature and Sync feature of MiniTool ShadowMaker as the Rsync alternative for Windows 10.
If you have any questions about Rsync Windows 10, you can share them in the comment zone. Besides, if you have any problem with the MiniTool software, please don’t hesitate to contact us via the email [email protected].
Rsync — мощный инструмент для автоматизации резервного копирования и синхронизации файлов в Linux. Но как быть пользователям Windows? В этой статье мы подробно разберем, как установить и настроить Rsync в Windows 10/11 для эффективного резервного копирования и синхронизации локальных и удаленных данных.
1. Что такое Rsync и зачем его использовать в Windows?
Rsync — это утилита командной строки для Unix-подобных операционных систем, позволяющая выполнять быструю синхронизацию и резервное копирование файлов. Она использует алгоритм, который минимизирует объем передаваемых данных за счет сравнения контрольных сумм файлов.
Основные возможности Rsync:
- Синхронизация локальных и удаленных каталогов
- Инкрементальное и дифференциальное резервное копирование
- Передача данных по SSH для безопасности
- Возможность исключения и включения файлов при синхронизации
- Сохранение прав доступа и временных меток файлов
Почему Rsync актуален для пользователей Windows? Эта утилита позволяет автоматизировать задачи резервного копирования и синхронизации данных гораздо эффективнее, чем встроенные средства Windows. Плюс Rsync работает и в Windows, и в Linux, что удобно при необходимости синхронизации данных между этими ОС.
2. Установка Rsync в Windows
Существует несколько вариантов установки Rsync в Windows:
Вариант 1: Установка Windows Subsystem for Linux (WSL)
Это официальный способ запуска Linux-приложений в Windows 10 и 11. Необходимо включить поддержку WSL и установить выбранный дистрибутив Linux, например Ubuntu. После этого можно установить Rsync через менеджер пакетов, например apt-get.

Вариант 2: Использование Git Bash for Windows
Популярный инструментарий Git поставляется с окружением командной строки Git Bash, основанном на MSYS2. Можно дополнительно установить в него Rsync.
Вариант 3: Установка сторонних дистрибутивов Rsync для Windows
Существуют готовые порты Rsync для Windows, например cwRsync. Их можно просто загрузить и установить.
Лучший вариант зависит от ваших целей. Для простого использования Rsync в Windows достаточно Git Bash. Если требуется более тесная интеграция с Linux и WSL, то имеет смысл включить подсистему Linux.

3. Базовое использование Rsync в командной строке Windows
После установки Rsync доступны следующие основные команды в Windows:
rsync options source destination
Где options — различные ключи, source — источник файлов, destination — целевой каталог.
Например, чтобы скопировать каталог /src в /dst, используется:
rsync -r /src /dst
Ключ -r означает рекурсивное копирование вложенных каталогов.
Для синхронизации каталогов используется та же команда, но добавляется ключ -u:
rsync -r -u /src /dst
Это скопирует новые и обновленные файлы из src в dst.
Чтобы настроить резервное копирование в Rsync, нужно добавить ключи -a (archive — сохранение метаданных) и -z (сжатие для экономии места):
rsync -a -z /src /backup
Таким образом, используя базовый набор ключей, можно гибко настраивать Rsync для решения различных задач по работе с данными в Windows.
4. Дополнительные возможности Rsync в Windows
Помимо базового функционала, Rsync предоставляет множество дополнительных возможностей для тонкой настройки синхронизации и резервного копирования в Windows. Рассмотрим некоторые полезные опции.
Инкрементальное и дифференциальное резервное копирование
Чтобы делать не полные, а инкрементальные бэкапы, используется ключ --inplace:
rsync -a --inplace /src /backup
А для дифференциального резервного копирования применяется --link-dest:
rsync -a --link-dest=/last-full-backup /src /backup
Исключение и включение файлов и каталогов
Чтобы исключить файлы и папки из синхронизации, используется --exclude:
rsync -a --exclude='*.tmp' /src /dst
А для явного включения:
rsync -a --include='*.php' /src /dst
Ограничение скорости передачи данных
Чтобы не перегружать канал связи, можно ограничить скорость:
rsync --bwlimit=1000 /src server:/dst
Здесь скорость ограничена 1000 Кбит/с.
Таким образом, гибко настраивая параметры Rsync, можно тонко контролировать процесс синхронизации и резервного копирования данных в Windows с учетом конкретных требований и ограничений.
5. Настройка Rsync сервера в Windows
Чтобы настроить Rsync в режиме сервера в Windows, нужно выполнить следующие действия:
- Установить Rsync для Windows, например cwRsync
- Сконфигурировать Rsync как службу Windows
- Настроить доступ и права пользователей в конфиге Rsyncd.conf
- Протестировать подключение к серверу с клиента
Например, чтобы предоставить доступ к каталогу /data для пользователя backup с паролем secret, добавляем в конфиг:
[data] path = /data auth users = backup secrets file = /etc/rsync-secrets
А в файл паролей /etc/Rsync-secrets:
backup:secret
Таким образом можно гибко настраивать доступ к Rsync серверу в Windows.
6. Графические интерфейсы для управления Rsync в Windows
Хотя Rsync изначально работает в командной строке, существуют удобные графические оболочки для управления им в Windows. Рассмотрим популярные GUI-решения.
FreeFileSync
Популярная бесплатная программа с интуитивным интерфейсом для синхронизации файлов на базе Rsync. Поддерживает расписания и фильтры.
Deltacopy
Удобный инструмент для зеркалирования и синхронизации данных с помощью Rsync. Подходит для резервного копирования.
Интеграция в Total Commander
Популярный файловый менеджер можно дополнить плагином для синхронизации с Rsync.
GUI делают использование Rsync более доступным для неопытных пользователей. Однако в сложных случаях все же приходится обращаться к командной строке.
7. Альтернативы Rsync в Windows
Помимо Rsync, в Windows есть и другие решения для резервного копирования и синхронизации данных:
- Встроенная утилита Архивация данных в Windows 10
- Популярные сторонние утилиты: SyncBack, Cobian Backup
- Облачные сервисы: OneDrive, Dropbox, Google Диск
У каждого подхода есть свои плюсы и минусы по сравнению с Rsync. Например, облачные сервисы удобны для синхронизации файлов между разными устройствами, но требуют интернета и платных подписок. А локальные утилиты работают автономно, зато сложнее настраиваются для удаленного доступа.
Таким образом, в зависимости от конкретных задач и требований можно выбрать оптимальную альтернативу или дополнение к Rsync.

Personally, I love Rsync, a small command-line utility for data sync and backup. I have been using Rsync to handle my Linux server backup for the last few years. I was looking for similar software for Windows 10 but still cannot find it. So this article will discuss how to use Rsync to back up our data on Windows 10. We will utilize the Windows Subsystem for Linux.
Windows Subsystem for Linux allows us to seamlessly run the Linux operating system on top of Windows. We do not need third-party virtualization software such as VMware or Virtualbox. To set up the WSL on Windows 10, please follow my previous guide below
Install Windows Subsystem for Linux on Windows 10
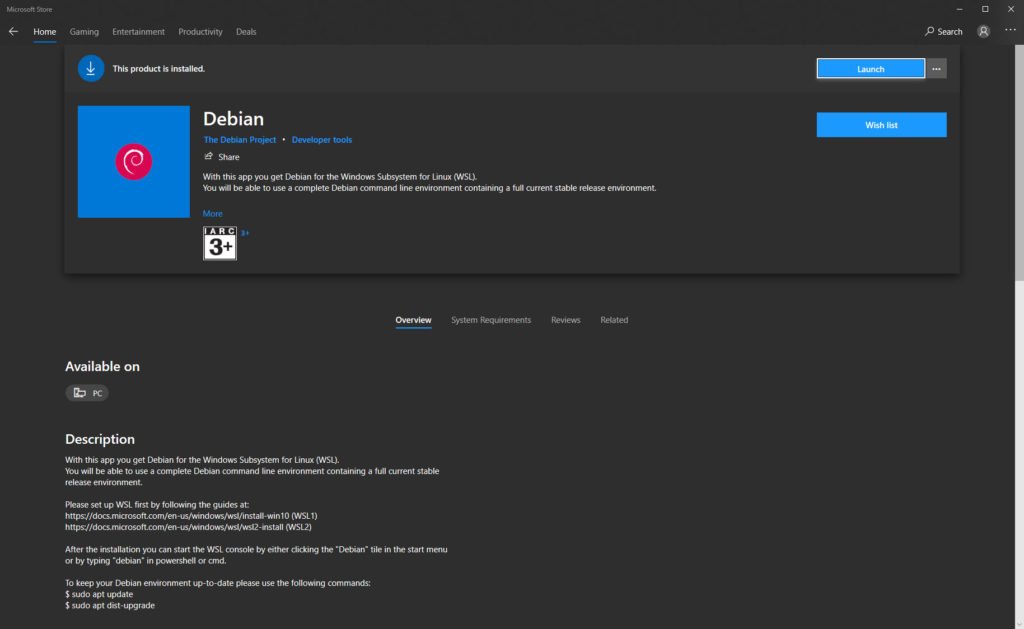
In this practice, I am using WSL Debian Linux. You can install Debian from Microsoft Store once you set up the WSL on Windows 10. I will show you how I backup my local folder to the remote NAS server.
Step 1. Install Windows Subsystem for Linux
As I mentioned above, first we need to install and configure WSL on Windows 10.
Step 2. Install Debian
Next, install Debian or Ubuntu, or any other Linux you feel comfortable using. Use Microsoft Store to download.
Step 3. Install Rsync
If you are using Ubuntu, rsync package is already installed. But if you are choosing Debian, you need to install this package manually. I also install ssh because I want to backup my local data to the remote server via ssh.
sudo apt install rsync ssh
Step 4. Perform the backup
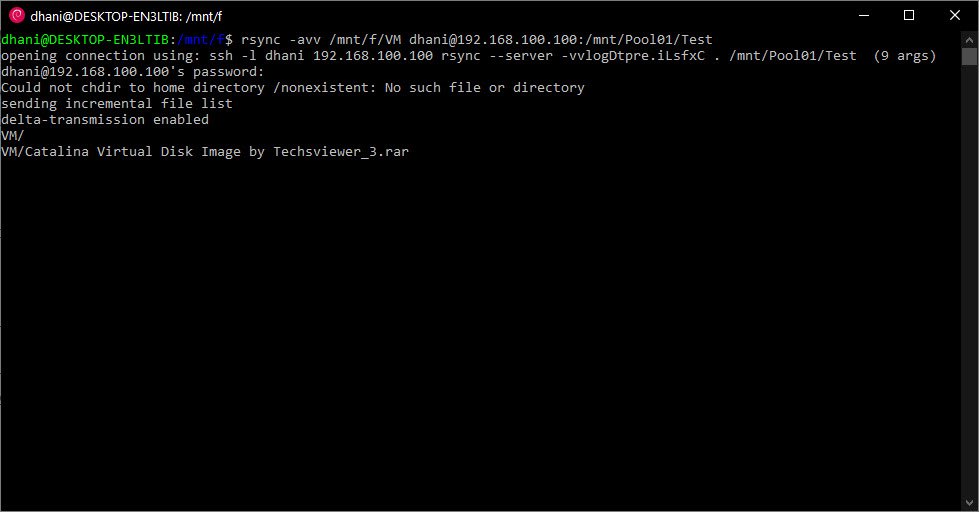
In this example, I am going to backup my VM folder to the remote server (192.168.100.100). This is the backup source.
f:\VM
The folder in the remote server would be:
/mnt/Pool01/Test
Now let’s execute the command
rsync -avv /mnt/f/VM dhani@192.168.100.100:/mnt/Pool01/Test
My F drive is mounted under /mnt directory in the Debian Linux.
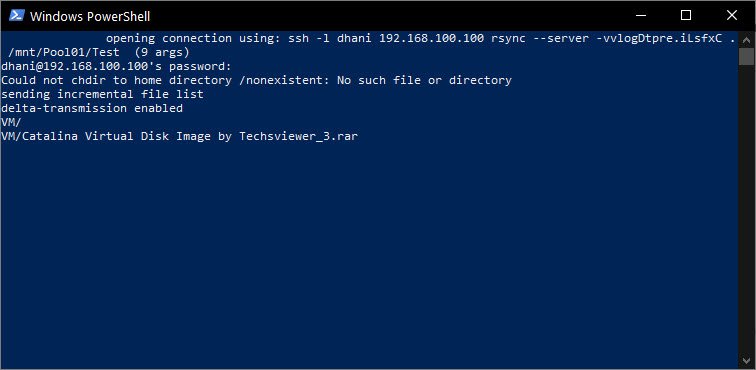
We can also start the rsync command directly from Windows PowerShell. For example:
wsl rsync -avv /mnt/f/VM dhani@192.168.100.100:/mnt/Pool01/Test
The command above will synchronize or backup the folder VM to the remote folder Test. We can do more with rsync. For more command or options, please visit the following page to learn more about rsync.
Common Rsync Options
Here are some of the common rsync options:
- – a : archive mode, archive mode allows copying files recursively and it also preserves symbolic links, file permissions, user & group ownerships and timestamps
- – v: verbose mode
- – h: human-readable, output numbers in a human-readable format
Backup/Sync Examples
A. Sync/Copy Folder A content to Folder B (Local folders)
rsync -avh --progress /mnt/f/folder_a/ /mnt/f/folder_b
The command will copy/sync all files inside folder_a to folder_b and show the progress.
Now, folder_b content is exactly the same as folder_a.
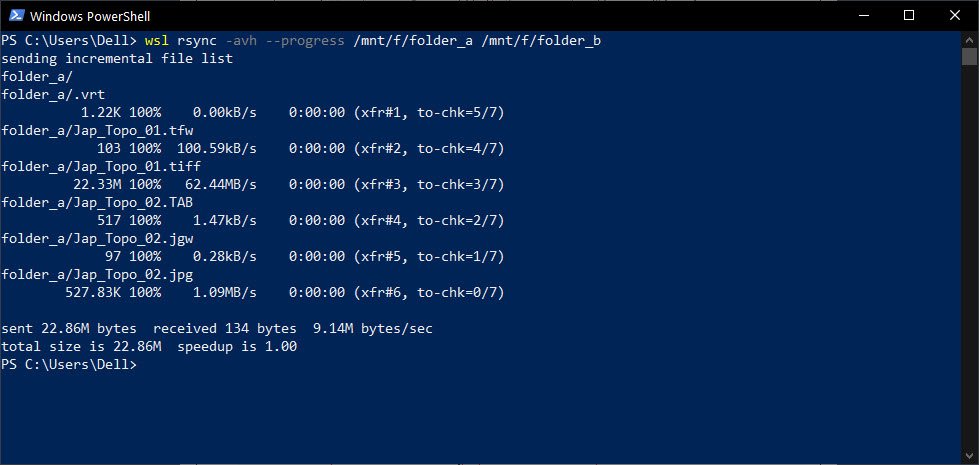
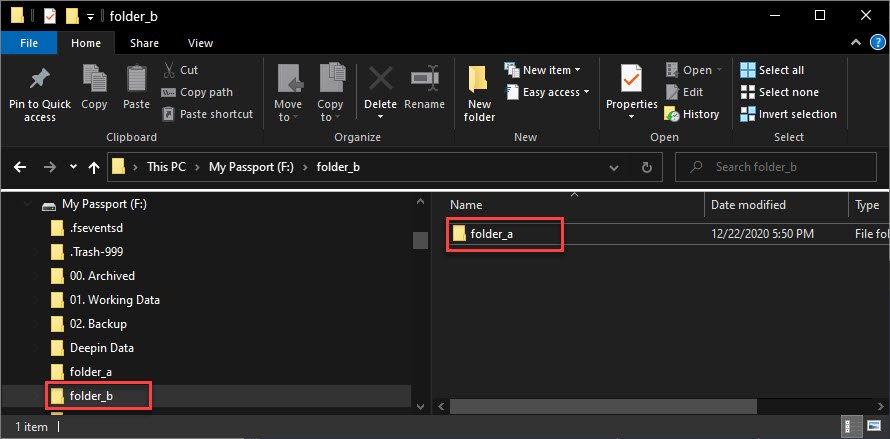
B. Sync/Copy folder_a to folder_b (Local folder)
Slightly it is similar to the scenario above. But, the following command will create folder_a inside folder_b.
rsync -avh --progress /mnt/f/folder_a /mnt/f/folder_b
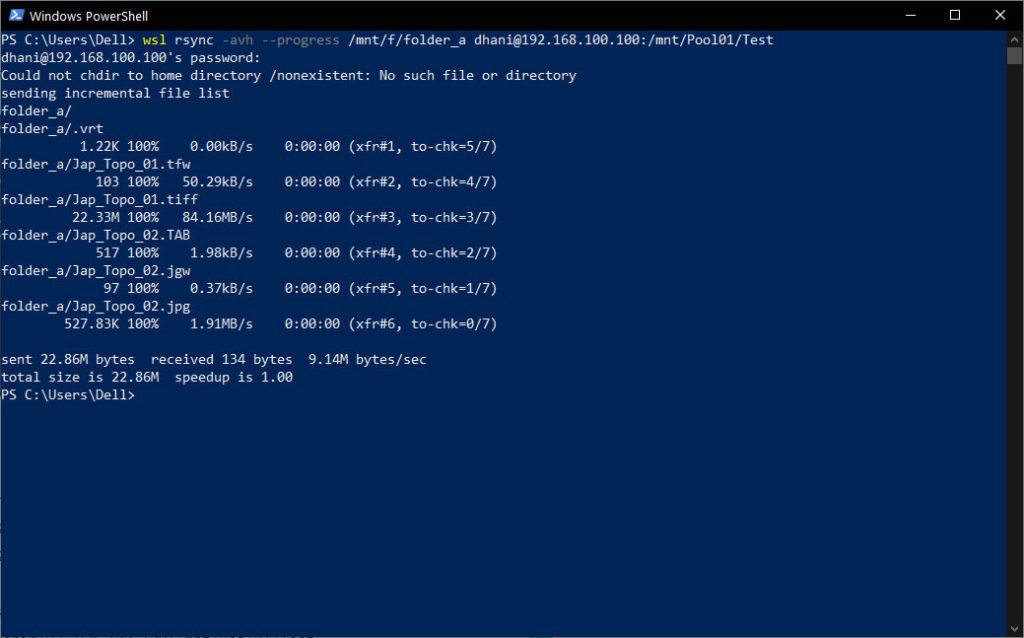
C. Sync/Copy local folder_a to remote server via SSH
The following scenario will copy/sync the local folder to remote server via SSH. For example: We will sync the folder_a (local) to a remote directory via SSH connection.
rsync -avh --progress /mnt/f/folder_a dhani@192.168.100.100:/mnt/Pool01/Test
D. Sync/Copy remote folder to local folder
The following example will sync the remote directory to the local directory via SSH. It’s pretty similar to the above scenario but with a different sync direction.
rsync -avh --progress dhani@192.168.100.00:/mnt/Pool01/Test /mnt/f/folder_a
Bottom Line
Rsync is one of the popular backup/sync software for Linux users. With the new WSL (Windows Subsystem for Linux) technology we can bring this rsync to Windows 10. With a little effort, we can bring the power of rsync to Windows 10.