
devops
2 Minutes
- Configuring sshd from Windows server
There’re few options available such as Cygwin, WSL, MSYS2(Git for Windows) and Win32-OpenSSH. Personally I ‘thought’:
- Cygwin: installing the Cygwin was relatively easy, but configuring the sshd wasn’t. Not providing uninstaller was also minus.
- WSL: Looked promising, but it didn’t support background daemon.
Quote: https://blogs.windows.com/buildingapps/2017/08/08/windows-subsystem-linux-windows-server/
What this isn’t — WSL is not a Linux server
Just as with WSL on Windows Client, you can run daemons and jobs like MySQL, PostgreSQL, sshd, etc., via an interactive shell, but you cannot currently use WSL to run persistent Linux services, daemons, jobs, etc. as background tasks.
- Win32-OpenSSH: It’s official way to use the sshd on Windows(It even recently started including OpenSSH from the OS additional features). Detailed instruction, (un)install Powershell scripts are also provided here https://github.com/PowerShell/Win32-OpenSSH/.
So I installed Win32-OpenSSH following by https://github.com/PowerShell/Win32-OpenSSH/wiki/Install-Win32-OpenSSH page.
The server already installed the ‘Git for Windows(MSYS2)’ so that I made the bash.exe as a default shell of the sshd.

Name: DefaultShell
Value: C:\Program Files\Git\bin\bash.exe
Few more tweaks required,
- I appended the client’s public key into the Windows Server(where rsync.exe server will be running)’s ~/.ssh/ authorized_keys
- The server’s sshd_config file is located at ‘C:\ProgramData\ssh’ (unless you changed). ‘PubkeyAuthentication yes’ option is commented out by default. Let’s enable it.
So far, you should be able to ssh login to the Windows Server and see the MSYS2’s bash.exe shell as the result.
2. Installing rsync on the Server
I was struggling with this part at first because when I googled ‘rsync over ssh windows’ the results were outdated or insufficient. However, I found this and if you’re using MSYS2(Git for Windows), it’s extremely simple. Just grab the compiled binary from msys2 repo and paste it to the bin folder(C:\Program Files\Git\usr\bin).
Refs: https://serverfault.com/a/872557 & https://blog.tiger-workshop.com/add-rsync-to-git-bash-for-windows/

Then I was able to successfully ‘rsync’ing by:
rsync …… -e ssh -vvv /c/somedir/folderA user@pcname.xxx.xxx:/c/detination_folder
Last bonus:
3. Working it through Jenkins
Additional chores remained if you want it to work through Jenkins because Jenkins service process is running under the SYSTEM account (if you didn’t modify). For example, if someone tried to launch a job does Jenkins rsync over SSH, then they’ll see the following error:
| [rsync test] $ C:\…\Git\bin\bash.exe -xe C:\Windows\TEMP\jenkins500000000000000003.sh
+ whoami SYSTEM + rsync … -e ‘ssh -vvv -i /c/Users/xxxxx/.ssh/id_rsa’ /c/…. OpenSSH_7.5p1, OpenSSL 1.0.2k 16 Jan 2017 debug1: Reading configuration data /etc/ssh/ssh_config : : : : : : debug3: hostkeys_foreach: reading file “/etc/ssh/ssh_known_hosts” debug3: hostkeys_foreach: reading file “/etc/ssh/ssh_known_hosts” debug1: read_passphrase: can’t open /dev/tty: No such device or address Host key verification failed. rsync: connection unexpectedly closed (0 bytes received so far) [sender] rsync error: error in rsync protocol data stream (code 12) at io.c(226) [sender=3.1.3] Build step ‘Execute shell’ marked build as failure Finished: FAILURE |
I believe this problem can be fixed by making the Jenkins to run under normal user account, but I approached bit differently by
- Launching cmd.exe as the SYSTEM privilege using Sysinternals’ PsExec.exe

- From that console, run bash.exe again and just login to the server once to create known_hosts for %SYSTEMPROFILE%.

Published by Heejune
Tweets by heejunek
View all posts by Heejune
Published
devops
2 Minutes
- Configuring sshd from Windows server
There’re few options available such as Cygwin, WSL, MSYS2(Git for Windows) and Win32-OpenSSH. Personally I ‘thought’:
- Cygwin: installing the Cygwin was relatively easy, but configuring the sshd wasn’t. Not providing uninstaller was also minus.
- WSL: Looked promising, but it didn’t support background daemon.
Quote: https://blogs.windows.com/buildingapps/2017/08/08/windows-subsystem-linux-windows-server/
What this isn’t — WSL is not a Linux server
Just as with WSL on Windows Client, you can run daemons and jobs like MySQL, PostgreSQL, sshd, etc., via an interactive shell, but you cannot currently use WSL to run persistent Linux services, daemons, jobs, etc. as background tasks.
- Win32-OpenSSH: It’s official way to use the sshd on Windows(It even recently started including OpenSSH from the OS additional features). Detailed instruction, (un)install Powershell scripts are also provided here https://github.com/PowerShell/Win32-OpenSSH/.
So I installed Win32-OpenSSH following by https://github.com/PowerShell/Win32-OpenSSH/wiki/Install-Win32-OpenSSH page.
The server already installed the ‘Git for Windows(MSYS2)’ so that I made the bash.exe as a default shell of the sshd.
Name: DefaultShell
Value: C:\Program Files\Git\bin\bash.exe
Few more tweaks required,
- I appended the client’s public key into the Windows Server(where rsync.exe server will be running)’s ~/.ssh/ authorized_keys
- The server’s sshd_config file is located at ‘C:\ProgramData\ssh’ (unless you changed). ‘PubkeyAuthentication yes’ option is commented out by default. Let’s enable it.
So far, you should be able to ssh login to the Windows Server and see the MSYS2’s bash.exe shell as the result.
2. Installing rsync on the Server
I was struggling with this part at first because when I googled ‘rsync over ssh windows’ the results were outdated or insufficient. However, I found this and if you’re using MSYS2(Git for Windows), it’s extremely simple. Just grab the compiled binary from msys2 repo and paste it to the bin folder(C:\Program Files\Git\usr\bin).
Refs: https://serverfault.com/a/872557 & https://blog.tiger-workshop.com/add-rsync-to-git-bash-for-windows/
Then I was able to successfully ‘rsync’ing by:
rsync …… -e ssh -vvv /c/somedir/folderA user@pcname.xxx.xxx:/c/detination_folder
Last bonus:
3. Working it through Jenkins
Additional chores remained if you want it to work through Jenkins because Jenkins service process is running under the SYSTEM account (if you didn’t modify). For example, if someone tried to launch a job does Jenkins rsync over SSH, then they’ll see the following error:
| [rsync test] $ C:\…\Git\bin\bash.exe -xe C:\Windows\TEMP\jenkins500000000000000003.sh
+ whoami SYSTEM + rsync … -e ‘ssh -vvv -i /c/Users/xxxxx/.ssh/id_rsa’ /c/…. OpenSSH_7.5p1, OpenSSL 1.0.2k 16 Jan 2017 debug1: Reading configuration data /etc/ssh/ssh_config : : : : : : debug3: hostkeys_foreach: reading file “/etc/ssh/ssh_known_hosts” debug3: hostkeys_foreach: reading file “/etc/ssh/ssh_known_hosts” debug1: read_passphrase: can’t open /dev/tty: No such device or address Host key verification failed. rsync: connection unexpectedly closed (0 bytes received so far) [sender] rsync error: error in rsync protocol data stream (code 12) at io.c(226) [sender=3.1.3] Build step ‘Execute shell’ marked build as failure Finished: FAILURE |
I believe this problem can be fixed by making the Jenkins to run under normal user account, but I approached bit differently by
- Launching cmd.exe as the SYSTEM privilege using Sysinternals’ PsExec.exe
- From that console, run bash.exe again and just login to the server once to create known_hosts for %SYSTEMPROFILE%.
На чтение2 мин
Опубликовано
Обновлено
Rsync — это удобный инструмент для синхронизации файлов между удаленными системами. Он позволяет эффективно передавать только измененные части файлов, что существенно уменьшает объем передаваемых данных и ускоряет процесс синхронизации.
Запустить Rsync сервер на операционной системе Windows Server 2012 можно с помощью Cygwin – набора утилит, позволяющих запускать ПО, разработанное для Unix-подобных систем, в среде Windows. Установка Cygwin и настройка Rsync требуют некоторых навыков работы с командной строкой, но этот подробный гайд поможет вам разобраться в процессе.
Важно: перед установкой Cygwin на сервер рекомендуется выполнить резервное копирование данных. Ошибки в процессе установки могут привести к непредвиденным последствиям и потере информации.
Шаг 1. Скачайте и запустите установщик Cygwin с официального сайта проекта. Установите Cygwin в каталог по умолчанию.
Для установки Rsync на Windows Server 2012 следуйте инструкции ниже:
1. Скачайте последнюю версию Rsync для Windows Server 2012 с официального сайта или из надежного источника.
2. Разархивируйте скачанный файл в удобную для вас директорию, например, «C:
sync».
3. Перейдите в директорию, в которую вы разархивировали Rsync, например, «C:
sync».
4. Скопируйте файлы «rsync.exe», «cygiconv-2.dll» и «cygwin1.dll» в директорию «C:\Windows\System32».
5. Создайте директорию для хранения Rsync-сервера, например, «C:\RsyncServer».
6. Создайте новый текстовый файл в редакторе кода и сохраните его с именем «rsyncd.conf».
7. Откройте файл «rsyncd.conf» и добавьте следующие строки:
uid = 0gid = 0use chroot = falsemax connections = 10timeout = 300[Открытый доступ]path = /path/to/your/foldercomment = Открытый доступ к файламread only = falselist = trueuid = 0gid = 0auth users = usernamesecrets file = /path/to/your/secrets.file
8. Замените «/path/to/your/folder» на реальный путь к вашей директории, в которой вы хотите хранить данные.
9. Замените «username» на имя пользователя, которому нужно предоставить доступ к Rsync-серверу.
10. Сохраните файл «rsyncd.conf» и закройте его.
11. Создайте новый текстовый файл и сохраните его с именем «secrets.file».
12. Откройте файл «secrets.file» и добавьте следующую строку:
username:password
13. Замените «username» на имя пользователя, которое вы указали в файле «rsyncd.conf», и «password» на пароль этого пользователя.
14. Сохраните файл «secrets.file» и закройте его.
Теперь у вас установлен Rsync на Windows Server 2012 и сконфигурирован Rsync-сервер для открытого доступа к файлам.
Подготовка сервера для Rsync
Перед установкой и настройкой Rsync сервера на Windows Server 2012, необходимо выполнить несколько шагов подготовки:
1. Установка Windows Server 2012
Убедитесь, что на сервере установлена операционная система Windows Server 2012. Если еще не установлена, установите ее в соответствии с инструкциями от Microsoft.
2. Установка Git Bash
Для работы с Rsync на Windows необходимо установить Git Bash — эмулятор терминала, который предоставляет командную оболочку Git вместе с утилитой Rsync. Получить инсталлятор Git Bash можно с официального сайта Git.
3. Загрузка Rsync
После установки Git Bash, пройдите на официальный сайт Rsync и загрузите подходящую версию Rsync для Windows. Рекомендуется выбрать Precompiled Binaries, соответствующие архитектуре вашего сервера.
4. Распаковка архива Rsync
После загрузки архива Rsync, распакуйте его в удобное для вас место на сервере.
5. Добавление пути Rsync в переменную среды PATH
Для того чтобы Rsync был доступен из любого места в системе, необходимо добавить путь к исполняемому файлу Rsync в переменную среды PATH. Откройте Панель управления -> Система -> Дополнительные параметры системы -> Переменные среды и измените переменную PATH, добавив путь к исполняемому файлу Rsync.
После завершения этих шагов, сервер будет готов к установке и настройке Rsync.
Windows, WHY ARE YOU ALWAYS SO DIFFICULT! Gosh. Damn you are. This time. i wanted to do schedule a backup from my windows server 2012r2 to my linux backup drive. Its as simple as that (while i though it was at least). Google doesn’t help with so many rubbish online. Hence, here is a guide that will help us out (me included)
Environment
Enterprise server (Windows 2012 R2)
This is a windows environment server 2012 R2 where our data is
Backup server (Debian Linux)
This is my backup server where i would like to rsync over.
Installation
On Windows server 2012 r2
On Linux
- Install openssh-server and rsync.
- Provide data to a partition (eg.: /backup/).
- Place the public key in /home/USER/.ssh/ and rename the file to authorized_keys. (assuming its root)
On Windows
- Test the connection without a password with the following command:
- Test Rsync:
rsync -v -rlt -z --delete "/myfiles/" "USER@BackupServerIP:/backups/"
- where cygdrive is the directory on C:\cygdrive so the above C:\cygdrive\myfiles
- To Test Other port
rsync -e "ssh -p 14000" -arv "--exclude=.svn/" /myfiles USER@BackupServerIP:/backups/
- Create a bat file with the rsync command and place it in C:\cwRsync\bin.
- Schedule execution every day at 0:30 (half past midnight).
Helpful Resources
- http://stackoverflow.com/questions/34147565/rsync-uid-gid-impossible-to-set-cases-cause-future-hard-link-failure-how-to
- http://www.smellems.com/tiki-read_article.php?articleId=14
Download CWRSYNCSERVER software installation (this is file synchronization software under Windows)
First, (1)File client serverInstall the software, find rsyncd.conf under the installation location, modify the configuration file (Note that the format is: / cygdrive / c / ztb indicate: / cygdrive / c / ztb represents the ztb directory under the C disc
use chroot = false

strict modes = false

hosts allow =*

log file = rsyncd.log

pid file = rsyncd.pid

port = 873

uid = 0

gid = 0

max connections = 10

lock file = rsyncd.lock


[backup]

path = /cygdrive/c/ztb/

transfer logging = yes

ignore errors

list = no

secrets file =/cygdrive/c/Rsync/rsyncd.secrets

hosts allow = 192.168.0.2/255.255.255.0

hosts deny = *
(2) Establish rsyncd.secrets
Enter directly:
Second, inBackup file server(Database Server) Install the software, create new password file rsyncd.secrets, input format is:
Third, inBackup file serverManual synchronous test (recommended to test first, if an error can be seen directly)
Enter the software installation directory C: \ Program Files (x86) \ ICW \ bin; enter the command
rsync.exe -avzPu--progress --delete rsync://192.168.0.2:873/backup /cygdrive/c/Appbackup--password-file=/cygdrive/c/Rsync/rsyncd.secrets
Fourth, automatic synchronization test
inBackup file server(Database Server) New file synchronization script rsync.cmd, the content is as follows:
@echo off

set rsynclog="C:\Rsync\rsync.log"

set nowtime=te:~0,10% %time%

echo %nowtime% >> %rsynclog%

cd /d

C:\Program Files (x86)\ICW\bin

rsync.exe  -avzPu  --progress  --delete  rsync://192.168.0.2:873/backup/cygdrive/c/Appbackup  --password-file=/cygdrive/c/Rsync/rsyncd.secrets

>> %rsynclog%

@echo -------------------------------------------------- >>%rsynclog%

@echo. >> %rsynclog%
V. Join the system mission plan
Click the task plan program, enter the right click [Create Task]
Creating timing tasks and databases can be found, you can see another blog post
https://www.cnblogs.com/marshu/p/9842697.html
Sixth, encounter problems and solutions(This step is referred to.https://www.cnblogs.com/janas/p/3321087.html)
Error 1: Rsync: Read error: Connection Reset by Peer (104)
rsync error: error in rsync protocol data stream (code 12) at io.c(794) [receive r=3.0.2]
 Solve: Very large might be to open the RSYNC service server. Open service.
Error 2: @ERROR: ChDIR FAILED
rsync error: error starting client-server protocol (code 5) at main.c(1495) [receiver=3.0.2]
 SOLUTION: The server-side synchronization directory has no permissions, and the CWRSync default user is SVCWRSYNC. Add user SVCWRSync permissions for synchronous directories.
Error 3: @error: failed to open lock file
rsync error: error starting client-server protocol (code 5) at main.c(1495) [receiver=3.0.2]
 Solve: The configuration file rsync.conf adds lock file = rsyncd.lock to resolve.
Error 4: rsync: could not open password file "/cygwin/e/setting/rsync/rsync_db.pwd": No Such File or Directory (2)
 Solve: The directory of the password file must exist, and use the POSIX style to write: /cygdrive/e/setting/rsync/rsync_db.pwd
Error 5: @ERROR: Auth failed on module data_backup rsync error: Error Starting Client-Server Protocol (Code 5) at main.c (1506) [receivediver = 3.0.7]
 Solve: The password is incorrect, enter the correct password. If the username and password are correct, it is possible to be 600 permissions for the account password file of the remote RSYNC server.
Error 6: Password File Must Not Be Other-Accessible
 Solve: This is because rsyncd.pwd rsyncd.sec is not right, should be set to 600. Such as: chmod 600 rsyncd.pwd, Windows should change the owner of the password file to the user running.
Error 7: @Error: Invalid Uid Nobody. Rsync Error: Error Starting Client-Server Protocol (CODE 5) at main.c (1506) [received = 3.0.7]
 Solve: Add the following two lines in the rsyncd.conf file.
uid = 0
gid = 0
Question 8: @error: chroot failed
rsync error: error starting client-server protocol (code 5) at main.c(1522) [receiver=3.0.3]
 Cause: The directory of the server does not exist or no permissions. Creating a directory and correcting permissions to solve the problem.
Question 9: @error: unknown module 'Tee_nonexists'
rsync error: error starting client-server protocol (code 5) at main.c(1522) [receiver=3.0.3]
 Cause: The server does not exist the specified module. Provide the correct module name or modify the module you want to solve the problem in the server.
Question 10: rsync: failed to connect to 218.107.243.2: no route to host (113)
rsync error: error in socket IO (code 10) at clientserver.c(104) [receiver=2.6.9]
 Cause: The other party does not boot, the firewall is blocked, and there is a firewall block on the network. Turn off the firewall, in fact, open the 873 or specified RSYNC port of the TCP UDP.
Question 11: rsync error: Error Starting Client-Server Protocol (Code 5) at main.c (1524) [receivediver = 3.0.7]
 Cause: /etc/rsyncd.conf configuration file content has an error. Please correctly check the configuration file.
Question 12: rsync: chown "" failed: invalid argument (22)
 Cause: Permissions cannot be copied. Remove the parameters of the synchronous permissions. (This situation is more than Linux time to Windows)
Question 13: @error: daemon security Issue - Contact Admin
rsync error: error starting client-server protocol (code 5) at main.c(1530) [sender=3.0.6]
 Cause: There is a soft connection file in the synchronized directory, which requires the server-side /etc/rsyncd.conf to open Use Chroot = YES. Brush soft connection file.
Question 14: Rsync: Read error: Connection Reset by Peer (104)
rsync error: error in rsync protocol data stream (code 12) at io.c(794) [receiver=3.0.2]
 Solve: Very large might be to open the RSYNC service on the server side, turn on the service.
I have a dream to run back, and it is natural to be lucky!
This articles is published 697 days ago and last updated 665 days ago, some information may be out of date.

img from unsplash
These are the basic steps to set up and use an
rsynctool for synchronization on Windows.
Setup RSYNC Server on Windows
i. Manual Setup
- Install RSYNC on the server machines.
InstallRsyncsoftware like a linux through Chocolatey
choco install rsync -y- On the server, create a folder to share
mkdir -p C:\rsync_share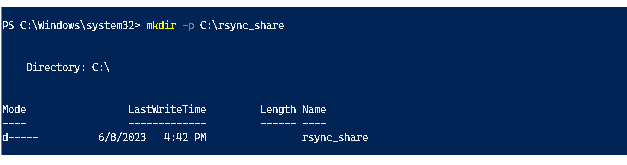
e.g. C:\rsync_share. as rsync share folder.
- On the server,Create the
C:\rsync\rsyncd.conffile with the following contents:
[rsync_share]
path = /cygdrive/c/rsync_share
use chroot = no
ignore errors
read only = no
list = yes
This configures the share name as «rsync_share» pointing to the C:\rsync_share folder.
Use cygdrive path prefix as /cygdrive/c/rsync_share
- On the server, open PowerShell and run the rsync daemon:
rsync --daemon --config=C:\rsync\rsyncd.confThis will run the rsync daemon using the config file C:\rsync\rsyncd.conf.
- You may need to configure firewall rules on the server to allow incoming
TCPconnections to port873
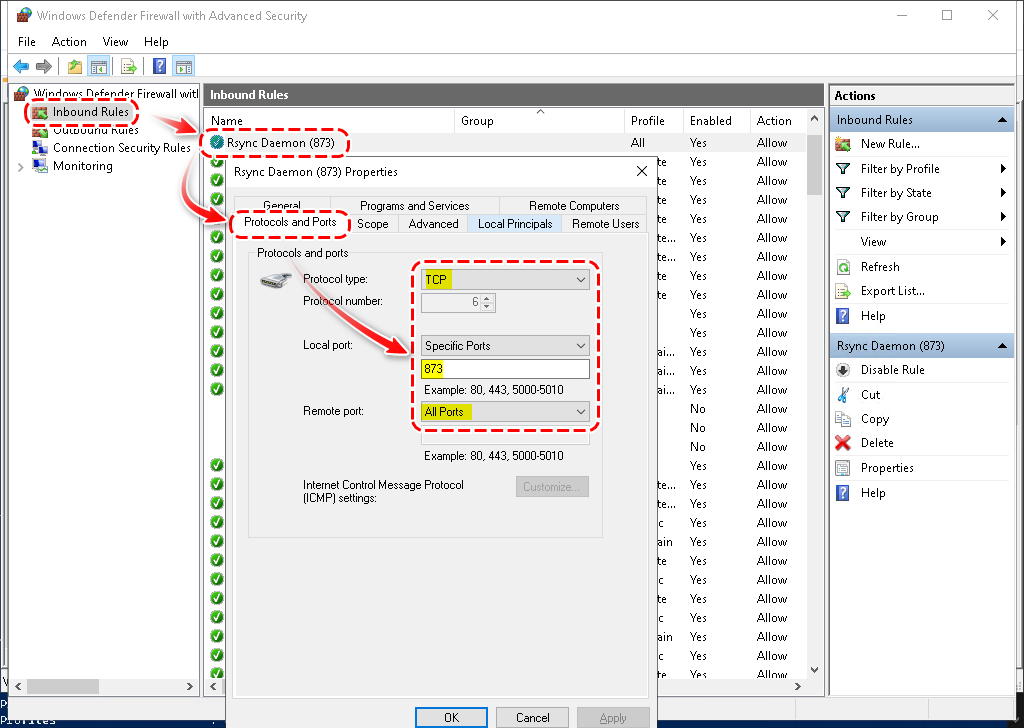
(The rsync daemon default port).
- Rsync service is set to run automatically on startup on the server via «Task Scheduler«.


ii. Automatic via Script
Here are Windows scripts to automatically install
rsync, configure it, and open the firewall port:
- Update Policy to allow execute self PowerShell script.
Set-ExecutionPolicy RemoteSignedExecution Policy Change
The execution policy helps protect you from scripts that you do not trust. Changing the execution policy might expose
you to the security risks described in the about_Execution_Policies help topic at
https:/go.microsoft.com/fwlink/?LinkID=135170. Do you want to change the execution policy?
[Y] Yes [A] Yes to All [N] No [L] No to All [S] Suspend [?] Help (default is «N»): y
- Create Windows PowerShell Script
Save all below content to a PowerShell script as names «rsync-config.ps1»
# Create rsync config and share folders
New-Item -Path C:\rsync -ItemType Directory
New-Item -Path C:\rsync_share -ItemType Directory

# Create rsync.conf file
@"
[rsync_share]
path = /cygdrive/c/rsync_share
ignore errors
read only = no
list = yes
auth users = rsync
secrets file = /cygdrive/c/rsync/rsync.passwd
"@ | Add-Content -Path C:\rsync\rsyncd.conf

# Open port 873 for rsync
New-NetFirewallRule `
    -Name "Rsync Daemon (873)" `
    -DisplayName "Rsync Daemon (873)" `
    -Protocol TCP `
    -LocalPort 873

# Create scheduled task to run rsync daemon
$Trigger = New-ScheduledTaskTrigger -AtStartup
$Action = New-ScheduledTaskAction `
    -Execute "Powershell.exe" `
    -Argument "rsync --daemon --config=C:\rsync\rsyncd.conf"
Register-ScheduledTask `
    -TaskName "Rsync Daemon" `
    -Trigger $Trigger `
    -Action $Action `
    -RunLevel Highest `
-User System| Parameter | Description | Path |
|---|---|---|
| rsync | Configuration folder for rsync | C:rsync\ |
| rsync_share | Shared folder for rsync | C:rsync_share\ |
| /cygdrive/c/rsync_share | Cygwin path prefix up to the shared folder location | C:rsync_share\ |
| auth users = rsync | Specifies that only the «rsync» user can connect |
|
| secrets file = /cygdrive/c/rsync/rsync.passwd | Specifies the location of the password file that will be used for authenticating rsync connections. | C:rsyncrsync.passwd |
The format of the rsync password file(C:rsyncrsync.passwd) is as follows:
username:passwordusername: This is the username for the rsync account.password: This is the password for the rsync account.
Each line in the file represents a single rsync account. Create multiple accounts by adding additional lines to the file.
- Execute the PowerShell Script
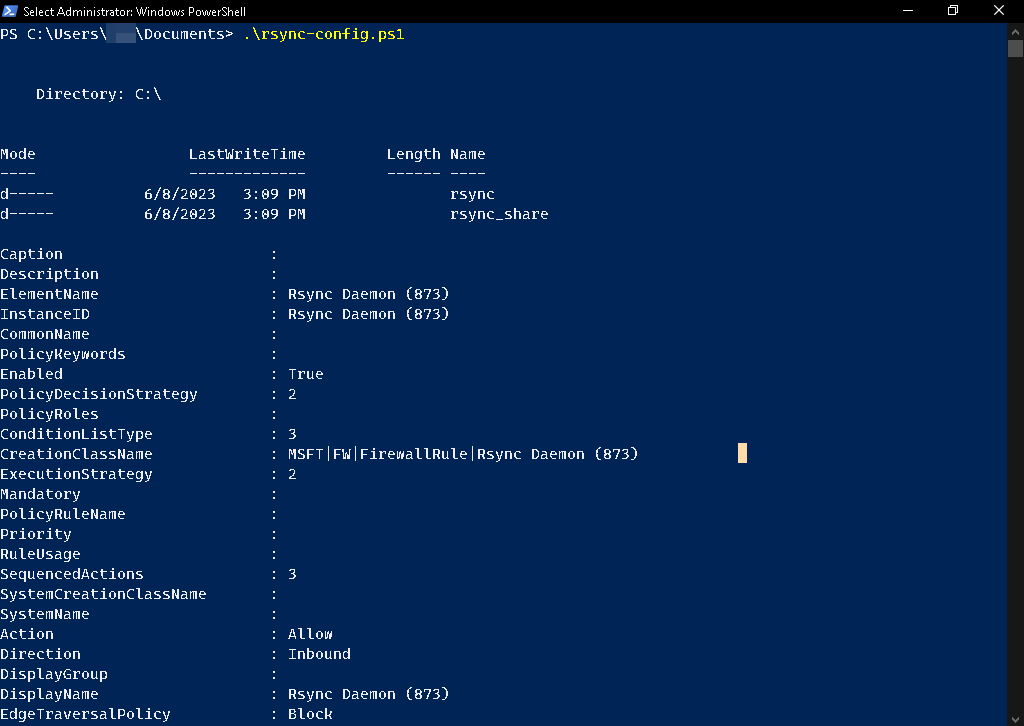
run on Windows server to automatically setup rsync daemon, create share folder names «rsync_share» and configure the firewall. moreover, the rsync service startup on reboot.
Setup RSYNC Client on Windows
Install RSYNC on the client machines.
Install Rsync software like a linux through Chocolatey
choco install rsync -yOperating
i. Manual
On the client PC, create a folder to store rsync data
mkdir -p C:\rsync_clientDirectory: C:\Mode LastWriteTime Length Name
—- ————- —— —-
d—— 7/11/2023 12:46 PM rsync_client
For example:
To sync files from client to server (PUSH):
rsync -avz /cygdrive/c/rsync_client rsync://server_ip_address/rsync_shareTo sync files from server to client (PULL):
rsync -avz rsync://server_ip_address/rsync_share /cygdrive/c/rsync_client To sync files from server to client with --progress flag on Linux
rsync -avz --progress --update --chmod=ugo=rwX --delete rsync://server_ip_address/rsync_share ./rsync_client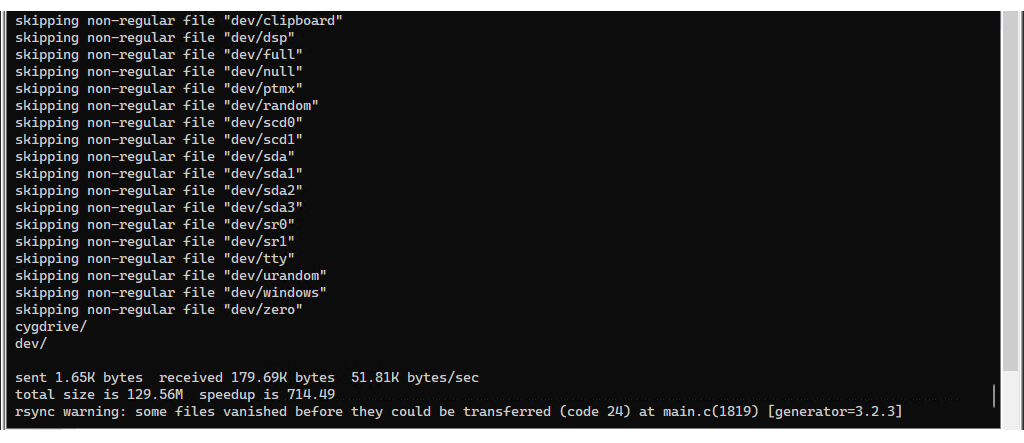
| Option | Description |
|---|---|
-a |
Enables archive mode |
-v |
Enables verbose output |
-z |
Enables compression |
--progress |
Displays progress during the transfer |
--update |
Skips files that are newer on the destination |
--chmod=ugo=rwX |
Sets permissions of synced files |
--delete |
Removes files on the destination that do not exist on the source |
rsync://server_ip_address/rsync_share |
Specifies the remote directory as rsync_share |
./ClientFolder |
Specifies the current directory on the local machine |
i. Automatic via Script
Update Policy to allow execute self PowerShell script.
Set-ExecutionPolicy RemoteSigned- Create Windows PowerShell Script
Save all below content to a PowerShell script as names «rsync-client.ps1»
# Set variables
$RsyncPullFolder = "C:\rsync_pull"
$RsyncConfigFolder = "C:\rsync"
$Source = "/cygdrive/c/rsync_pull"
$Destination = "rsync_server_ip::share"
$Username = "rsync"
$Password = "P@ssw0rd123!"
$TaskName = "Rsync Pull"
$TriggerTime = "08:00"


# Check if rsync_pull and rsync folders exist, and create them if they don't
if (!(Test-Path $RsyncPullFolder)) {
    New-Item -ItemType Directory -Path $RsyncPullFolder
}
if (!(Test-Path $RsyncConfigFolder)) {
    New-Item -ItemType Directory -Path $RsyncConfigFolder
}
New-Item -Path "$RsyncConfigFolder" -Name "rsync.passwd" -ItemType "File"
Add-Content -Path "$RsyncConfigFolder\rsync.passwd" -Value "$Password"


# Build rsync command
$RsyncCommand = "rsync -avz --progress --update --chmod=ugo=rwX --delete --password-file=/cygdrive/c/rsync/rsync.passwd $Username@$Destination $Source"

# Create scheduled task to run rsync command
$Trigger = New-ScheduledTaskTrigger -Daily -At $TriggerTime
$Action = New-ScheduledTaskAction -Execute "Powershell.exe" -Argument "$RsyncCommand"
Register-ScheduledTask -TaskName $TaskName -Trigger $Trigger -Action $Action -RunLevel Highest -User "SYSTEM"| Variable | Description |
|---|---|
$RsyncPullFolder |
Specifies the download directory on the local machine |
$RsyncConfigFolder |
Specifies the config file storage directory on the local machine |
$Source |
Specifies the source directory on the local machine |
$Destination |
Specifies the destination directory on the remote server |
$Username |
Specifies the username of the rsync user on the remote server |
$Password |
Specifies the password for the rsync user on the remote server |
$TaskName |
Specifies the name of the scheduled task |
$TriggerTime |
Specifies the time when the scheduled task will run |
This script runs on a Windows client and automatically sets up an rsync schedule, creates an rsync folder named ‘rsync_pull’, and configures the username and password for authorization.
Conclusion
rsynccan be a reliable and efficient solution for file synchronization on Windows, with its ability to preserve file attributes, compress data during transfer, and show verbose output.To use
rsyncon Windows, you can install a version of rsync compatible with Windows, configure your system’s firewall and network settings, and create a configuration file to specify the files and directories to be synced.
Reference
- How-to Run a PowerShell Script
- The cygdrive path prefix
Related
- RSYNC USAGE
На чтение2 мин
Опубликовано
Обновлено
Rsync — это удобный инструмент для синхронизации файлов между удаленными системами. Он позволяет эффективно передавать только измененные части файлов, что существенно уменьшает объем передаваемых данных и ускоряет процесс синхронизации.
Запустить Rsync сервер на операционной системе Windows Server 2012 можно с помощью Cygwin – набора утилит, позволяющих запускать ПО, разработанное для Unix-подобных систем, в среде Windows. Установка Cygwin и настройка Rsync требуют некоторых навыков работы с командной строкой, но этот подробный гайд поможет вам разобраться в процессе.
Важно: перед установкой Cygwin на сервер рекомендуется выполнить резервное копирование данных. Ошибки в процессе установки могут привести к непредвиденным последствиям и потере информации.
Шаг 1. Скачайте и запустите установщик Cygwin с официального сайта проекта. Установите Cygwin в каталог по умолчанию.
Установка Rsync на Windows Server 2012
Для установки Rsync на Windows Server 2012 следуйте инструкции ниже:
1. Скачайте последнюю версию Rsync для Windows Server 2012 с официального сайта или из надежного источника.
2. Разархивируйте скачанный файл в удобную для вас директорию, например, «C:
sync».
3. Перейдите в директорию, в которую вы разархивировали Rsync, например, «C:
sync».
4. Скопируйте файлы «rsync.exe», «cygiconv-2.dll» и «cygwin1.dll» в директорию «C:\Windows\System32».
5. Создайте директорию для хранения Rsync-сервера, например, «C:\RsyncServer».
6. Создайте новый текстовый файл в редакторе кода и сохраните его с именем «rsyncd.conf».
7. Откройте файл «rsyncd.conf» и добавьте следующие строки:
uid = 0gid = 0use chroot = falsemax connections = 10timeout = 300[Открытый доступ]path = /path/to/your/foldercomment = Открытый доступ к файламread only = falselist = trueuid = 0gid = 0auth users = usernamesecrets file = /path/to/your/secrets.file
8. Замените «/path/to/your/folder» на реальный путь к вашей директории, в которой вы хотите хранить данные.
9. Замените «username» на имя пользователя, которому нужно предоставить доступ к Rsync-серверу.
10. Сохраните файл «rsyncd.conf» и закройте его.
11. Создайте новый текстовый файл и сохраните его с именем «secrets.file».
12. Откройте файл «secrets.file» и добавьте следующую строку:
username:password
13. Замените «username» на имя пользователя, которое вы указали в файле «rsyncd.conf», и «password» на пароль этого пользователя.
14. Сохраните файл «secrets.file» и закройте его.
Теперь у вас установлен Rsync на Windows Server 2012 и сконфигурирован Rsync-сервер для открытого доступа к файлам.
Подготовка сервера для Rsync
Перед установкой и настройкой Rsync сервера на Windows Server 2012, необходимо выполнить несколько шагов подготовки:
1. Установка Windows Server 2012
Убедитесь, что на сервере установлена операционная система Windows Server 2012. Если еще не установлена, установите ее в соответствии с инструкциями от Microsoft.
2. Установка Git Bash
Для работы с Rsync на Windows необходимо установить Git Bash — эмулятор терминала, который предоставляет командную оболочку Git вместе с утилитой Rsync. Получить инсталлятор Git Bash можно с официального сайта Git.
3. Загрузка Rsync
После установки Git Bash, пройдите на официальный сайт Rsync и загрузите подходящую версию Rsync для Windows. Рекомендуется выбрать Precompiled Binaries, соответствующие архитектуре вашего сервера.
4. Распаковка архива Rsync
После загрузки архива Rsync, распакуйте его в удобное для вас место на сервере.
5. Добавление пути Rsync в переменную среды PATH
Для того чтобы Rsync был доступен из любого места в системе, необходимо добавить путь к исполняемому файлу Rsync в переменную среды PATH. Откройте Панель управления -> Система -> Дополнительные параметры системы -> Переменные среды и измените переменную PATH, добавив путь к исполняемому файлу Rsync.
После завершения этих шагов, сервер будет готов к установке и настройке Rsync.
Windows, WHY ARE YOU ALWAYS SO DIFFICULT! Gosh. Damn you are. This time. i wanted to do schedule a backup from my windows server 2012r2 to my linux backup drive. Its as simple as that (while i though it was at least). Google doesn’t help with so many rubbish online. Hence, here is a guide that will help us out (me included)
Environment
Enterprise server (Windows 2012 R2)
This is a windows environment server 2012 R2 where our data is
Backup server (Debian Linux)
This is my backup server where i would like to rsync over.
Installation
On Windows server 2012 r2
On Linux
- Install openssh-server and rsync.
- Provide data to a partition (eg.: /backup/).
- Place the public key in /home/USER/.ssh/ and rename the file to authorized_keys. (assuming its root)
On Windows
- Test the connection without a password with the following command:
- Test Rsync:
rsync -v -rlt -z --delete "/myfiles/" "USER@BackupServerIP:/backups/"
- where cygdrive is the directory on C:\cygdrive so the above C:\cygdrive\myfiles
- To Test Other port
rsync -e "ssh -p 14000" -arv "--exclude=.svn/" /myfiles USER@BackupServerIP:/backups/
- Create a bat file with the rsync command and place it in C:\cwRsync\bin.
- Schedule execution every day at 0:30 (half past midnight).
Helpful Resources
- http://stackoverflow.com/questions/34147565/rsync-uid-gid-impossible-to-set-cases-cause-future-hard-link-failure-how-to
- http://www.smellems.com/tiki-read_article.php?articleId=14
This articles is published 705 days ago and last updated 673 days ago, some information may be out of date.
img from unsplash
These are the basic steps to set up and use an
rsynctool for synchronization on Windows.
Setup RSYNC Server on Windows
i. Manual Setup
- Install RSYNC on the server machines.
InstallRsyncsoftware like a linux through Chocolatey
choco install rsync -y- On the server, create a folder to share
mkdir -p C:\rsync_sharee.g. C:\rsync_share. as rsync share folder.
- On the server,Create the
C:\rsync\rsyncd.conffile with the following contents:
[rsync_share]
path = /cygdrive/c/rsync_share
use chroot = no
ignore errors
read only = no
list = yes
This configures the share name as «rsync_share» pointing to the C:\rsync_share folder.
Use cygdrive path prefix as /cygdrive/c/rsync_share
- On the server, open PowerShell and run the rsync daemon:
rsync --daemon --config=C:\rsync\rsyncd.confThis will run the rsync daemon using the config file C:\rsync\rsyncd.conf.
- You may need to configure firewall rules on the server to allow incoming
TCPconnections to port873
(The rsync daemon default port).
- Rsync service is set to run automatically on startup on the server via «Task Scheduler«.
ii. Automatic via Script
Here are Windows scripts to automatically install
rsync, configure it, and open the firewall port:
- Update Policy to allow execute self PowerShell script.
Set-ExecutionPolicy RemoteSignedExecution Policy Change
The execution policy helps protect you from scripts that you do not trust. Changing the execution policy might expose
you to the security risks described in the about_Execution_Policies help topic at
https:/go.microsoft.com/fwlink/?LinkID=135170. Do you want to change the execution policy?
[Y] Yes [A] Yes to All [N] No [L] No to All [S] Suspend [?] Help (default is «N»): y
- Create Windows PowerShell Script
Save all below content to a PowerShell script as names «rsync-config.ps1»
# Create rsync config and share folders
New-Item -Path C:\rsync -ItemType Directory
New-Item -Path C:\rsync_share -ItemType Directory

# Create rsync.conf file
@"
[rsync_share]
path = /cygdrive/c/rsync_share
ignore errors
read only = no
list = yes
auth users = rsync
secrets file = /cygdrive/c/rsync/rsync.passwd
"@ | Add-Content -Path C:\rsync\rsyncd.conf

# Open port 873 for rsync
New-NetFirewallRule `
    -Name "Rsync Daemon (873)" `
    -DisplayName "Rsync Daemon (873)" `
    -Protocol TCP `
    -LocalPort 873

# Create scheduled task to run rsync daemon
$Trigger = New-ScheduledTaskTrigger -AtStartup
$Action = New-ScheduledTaskAction `
    -Execute "Powershell.exe" `
    -Argument "rsync --daemon --config=C:\rsync\rsyncd.conf"
Register-ScheduledTask `
    -TaskName "Rsync Daemon" `
    -Trigger $Trigger `
    -Action $Action `
    -RunLevel Highest `
-User System| Parameter | Description | Path |
|---|---|---|
| rsync | Configuration folder for rsync | C:rsync\ |
| rsync_share | Shared folder for rsync | C:rsync_share\ |
| /cygdrive/c/rsync_share | Cygwin path prefix up to the shared folder location | C:rsync_share\ |
| auth users = rsync | Specifies that only the «rsync» user can connect |
|
| secrets file = /cygdrive/c/rsync/rsync.passwd | Specifies the location of the password file that will be used for authenticating rsync connections. | C:rsyncrsync.passwd |
The format of the rsync password file(C:rsyncrsync.passwd) is as follows:
username:passwordusername: This is the username for the rsync account.password: This is the password for the rsync account.
Each line in the file represents a single rsync account. Create multiple accounts by adding additional lines to the file.
- Execute the PowerShell Script
run on Windows server to automatically setup rsync daemon, create share folder names «rsync_share» and configure the firewall. moreover, the rsync service startup on reboot.
Setup RSYNC Client on Windows
Install RSYNC on the client machines.
Install Rsync software like a linux through Chocolatey
choco install rsync -yOperating
i. Manual
On the client PC, create a folder to store rsync data
mkdir -p C:\rsync_clientDirectory: C:\Mode LastWriteTime Length Name
—- ————- —— —-
d—— 7/11/2023 12:46 PM rsync_client
For example:
To sync files from client to server (PUSH):
rsync -avz /cygdrive/c/rsync_client rsync://server_ip_address/rsync_shareTo sync files from server to client (PULL):
rsync -avz rsync://server_ip_address/rsync_share /cygdrive/c/rsync_client To sync files from server to client with --progress flag on Linux
rsync -avz --progress --update --chmod=ugo=rwX --delete rsync://server_ip_address/rsync_share ./rsync_client| Option | Description |
|---|---|
-a |
Enables archive mode |
-v |
Enables verbose output |
-z |
Enables compression |
--progress |
Displays progress during the transfer |
--update |
Skips files that are newer on the destination |
--chmod=ugo=rwX |
Sets permissions of synced files |
--delete |
Removes files on the destination that do not exist on the source |
rsync://server_ip_address/rsync_share |
Specifies the remote directory as rsync_share |
./ClientFolder |
Specifies the current directory on the local machine |
i. Automatic via Script
Update Policy to allow execute self PowerShell script.
Set-ExecutionPolicy RemoteSigned- Create Windows PowerShell Script
Save all below content to a PowerShell script as names «rsync-client.ps1»
# Set variables
$RsyncPullFolder = "C:\rsync_pull"
$RsyncConfigFolder = "C:\rsync"
$Source = "/cygdrive/c/rsync_pull"
$Destination = "rsync_server_ip::share"
$Username = "rsync"
$Password = "P@ssw0rd123!"
$TaskName = "Rsync Pull"
$TriggerTime = "08:00"


# Check if rsync_pull and rsync folders exist, and create them if they don't
if (!(Test-Path $RsyncPullFolder)) {
    New-Item -ItemType Directory -Path $RsyncPullFolder
}
if (!(Test-Path $RsyncConfigFolder)) {
    New-Item -ItemType Directory -Path $RsyncConfigFolder
}
New-Item -Path "$RsyncConfigFolder" -Name "rsync.passwd" -ItemType "File"
Add-Content -Path "$RsyncConfigFolder\rsync.passwd" -Value "$Password"


# Build rsync command
$RsyncCommand = "rsync -avz --progress --update --chmod=ugo=rwX --delete --password-file=/cygdrive/c/rsync/rsync.passwd $Username@$Destination $Source"

# Create scheduled task to run rsync command
$Trigger = New-ScheduledTaskTrigger -Daily -At $TriggerTime
$Action = New-ScheduledTaskAction -Execute "Powershell.exe" -Argument "$RsyncCommand"
Register-ScheduledTask -TaskName $TaskName -Trigger $Trigger -Action $Action -RunLevel Highest -User "SYSTEM"| Variable | Description |
|---|---|
$RsyncPullFolder |
Specifies the download directory on the local machine |
$RsyncConfigFolder |
Specifies the config file storage directory on the local machine |
$Source |
Specifies the source directory on the local machine |
$Destination |
Specifies the destination directory on the remote server |
$Username |
Specifies the username of the rsync user on the remote server |
$Password |
Specifies the password for the rsync user on the remote server |
$TaskName |
Specifies the name of the scheduled task |
$TriggerTime |
Specifies the time when the scheduled task will run |
This script runs on a Windows client and automatically sets up an rsync schedule, creates an rsync folder named ‘rsync_pull’, and configures the username and password for authorization.
Conclusion
rsynccan be a reliable and efficient solution for file synchronization on Windows, with its ability to preserve file attributes, compress data during transfer, and show verbose output.To use
rsyncon Windows, you can install a version of rsync compatible with Windows, configure your system’s firewall and network settings, and create a configuration file to specify the files and directories to be synced.
Reference
- How-to Run a PowerShell Script
- The cygdrive path prefix
Related
- RSYNC USAGE