
Хочу поделиться вариантом использования rsync для синхронизации файлов между внешней UNIX/Linux системой и локальной системой Windows.
Подобные задачи иногда возникают в работе администратора. Однако оказалось непросто быстро найти в сети работоспособный вариант версии rsync под win32 и сразу начать использовать для решения возникших задач автоматизации переноса файлов. Я не буду рассказывать о преимуществах rsync. На мой взгляд, это наиболее универсальный и гибкий инструмент синхронизации файлов между хостами.
Мною были найдены несколько вариантов реализации rsync под платформу win32:
- rsync-win — вполне работоспособная сборка версии 2.5.7, но достаточно старая — датируемая 2002 годом. Содержит в себе команду rsync, которая имеет те же ключи, что и оригинальный rsync. В работе себя показало очень медленным и нестабильным решением.
- RsyncShare — дружественная по интерфейсу реализация rsync сервера под Windows.
- winrsync — графический клиент написанный на PHP4 и использованием библиотеки GTK.
- cwRsync — сборка rsync версии 3.04.
Из рассмотренных вариантов, я выбрал cwRsync.
Инсталляция
Скачиваем дистрибутив с домашней страницы cwRsync
У меня это был файл cwRsync_2.1.5_Installer.zip
Устанавливаем в систему. Скорее всего путь будет «C:\Program Files\cwRsync\»
Поскольку это консольное приложение и вызов его может потребоваться в разных контекстах. Я рекомендую обеспечить возможность нахождения приложения с помощью переменной окружения %Path%, мне больше нравится копировать подобные утилиты в специальный каталог, предназначенный для множества консольных утилит и который давно прописан в переменной %Path%. Если такого каталога нет, можно положить в %Systemroot%, поскольку этот каталог перечислен в %Path% по умолчанию. Либо добавить путь C:\Program Files\cwRsync\ в %Path% (изменения вступают в силу после повторного входа в систему). Вообщем, выбирайте по вкусу. В любом случае при наборе rsync в коммандной строке — мы должны увидеть вывод встроенной справки.
Использование
Формат вызова:
rsync опции источник приемник
Пример вызова:
rsync -rut -v -e ssh username@192.168.0.1:/remotefolder localfolder/
Данный пример копирует файлы с внешней системы в локальный фолдер.
Итак, какие опции использованы в даном примере:
-rut — в одну «кучу» собраны ключи определяющие режим копирования файлов:
r — рекурсивный обход дерева каталогов
u — обновлять только измененные файлы
t — сохранять значения даты и времени изменения файла
-e ssh — Как известно, утилита rsync может работать, используя разные оболочки для связи хостов, по умолчанию используется ssh. Для однозначности, я всегда указываю используемую оболочку.
username@192.168.0.1:/remotefolder localfolder/ — авторизация под пользователем username на хосте с адресом 192.168.0.1, будут браться файлы из каталога /remotefolder, копируемые дерево каталогов и файлы будут помещены в папку localfolder/ относительно текущего пути в момент вызова rsync.
При каждом запуске rsync будет запрашивать пароль для username. Для пакетного режима, следует воспользоваться возможностью авторизации SSH по ключам.
Чтобы изменить направление копирования файлов, достаточно в качестве источника указать локальный ресурс, а в качестве приемника — внешний.
Авторизация по ключам
Запускаем ssh-keygen.exe под тем пользователем от имени которого будет запускаться rsync в пакетном режиме:
На все вопросы нажимаем Enter. Пароль для ключа тоже не указываем, иначе в пакетном режиме будет запрашиваться пароль, но уже для самого ключа. Ключ должен быть успешно создан — в домашнем каталоге windows пользователя (переменная %USERPROFILE%) будет создан каталог .ssh, в нем записаны файлы ключей: id_rsa и id_rsa.pub. Теперь содержимое файла id_rsa.pub нужно скопировать на сервер (в нашем случае хост 192.168.0.1), добавив эту строку в файл ~/.ssh/authorized_keys домашнего каталога пользователя, под которым мы хотим авторизоваться на внешней системе.

Rsync is a popular Linux application that allows us to transfer, synchronize and backup files over computers. This program will check the file’s time stamp and size. It’s an effective way to sync or backup your computer to other computer and even to cloud storage. While rsync is developed for Linux system, is there any way to install and run rsync on Windows? Well, there are several programs that has the similar functionality with rsync that run on Windows machine. Here we will review some rsync for Windows program you can use to backup your Windows computer.
List of Rsync for Windows Program
1. DeltaCopy
DeltaCopy is a free and open source, fast incremental backup program for Windows. It offers an effective way to backup your files without having to send the whole files every time. It will only copy the part of the file that has been modified. With this method, we can save a lot of bandwidth. It is a client server application which means you will need to install on both computers act as server and client.
DeltaCopy supports all Windows version including Windows 7 and Windows 10 as well. Even the official website does not mention Windows 10, we tested this program runs well on our Windows 10 Professional. It consist of client and server application. The server must be configured on the computer that we use to store the data from the client.
How to install DeltaCopy on Windows 10
- Download DeltaCopy
- Extract the zip file
- Double click setup file inside DeltaCopy directory
- Follow on screen installation
Once installed, run DeltaCopy and register it as service.

Click Register Windows Service button and then enter your username and password you use to login to Windows. Next click Start Server button to start the service. When the service is correctly started, it will turn into green.

Now we need to configure where we want to save the backup.

DeltaCopy client
The client application is pretty simple. We only need to create a backup profile which contains information about the server IP address,
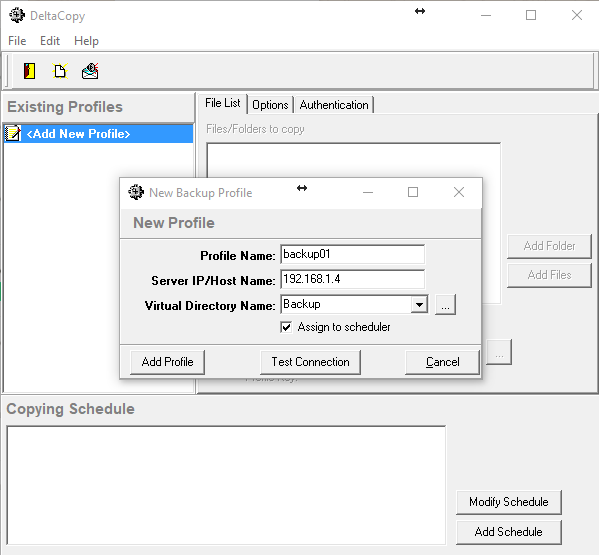
You can set the backup schedule, add folders to backup etc. There are some options such as set the email notification and change backup schedule.
2. Acrosync
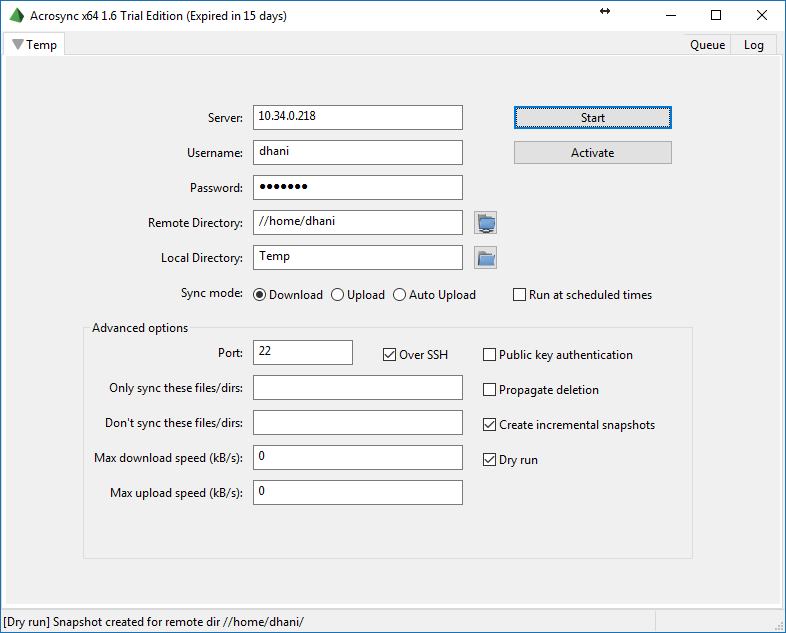
Acrosync is another simple Rsync Alternative for Windows. It can backup Windows machine to remote Linux/NAS server easily. Doesn’t like DeltaCopy, Acrosync does not require special rsync server software. Acrosync uses the native rsync technology on Windows OS. We can easily backup our data to Linux using ssh protocol. So if you have Linux server on your network or maybe NAS server such as Asustor NAS, you can use Acrosync to backup the data to those servers.
Acrosync comes with a simple and very easy user interface. We only need to enter the IP address of the remote server, username and password. Then, add the backup source and destination. Its very simple. It uses the ssh protocol (default port is 22).
Acrosync Main Features:
- Support public key authentication
- Multi profiles (multi backup jobs)
- Create Incremental Snapshot
- Dry run mode
- Schedule options
- Built in bandwidth limiter
Acrosync is the best rsync client for Windows but this software is not free. You can try it for 15 days and after that you must purchase it if you want to continue using it. For download and purchase the Acrosync Full Version, please visit this download link.
How to backup using Acrosync
It is very simple to use Acrsync.
- Open Acrosync from the application menu.
- And then, type the server IP address or hostname. Please note that you can connect to a cloud computer, public/private cloud computing as well.
- Type the username and password to connect to the remote server. Once you enter the username and password of the remote ssh server, click browse button to select the destination folder.

- Select the local directory.
- Scheduling. Click Run at scheduled time to configure regular backup.

Advanced Options
If your server uses different port than 22, you can specify here. There are also some advanced options such as:
- Public key authentication. This will enable public key to connect to your ssh server.
- Propagate deletion. This feature will enable file deletions on the destination if they do not exist in the source. Its good for syncing two directories.
- Create Incremental Snapshot. This is the feature that we love. Acrosync will only copy of the modified files only. Not the full backup everytime
- Dry run. Enable this to simulate the backup job.
Download Acrosync Now
3. GRsync
GRsync is a graphical rsync for Windows. It comes with a simple interface and yet easy to use. It mainly used for sync and backup files. Grsync makes use of the GTK libraries and is released under the GPL license. We don’t have to install Gnome libraries on Windows in order to use GRsync. Grsync is a bit outdated but still supports Windows 10. The latest version of GRsync is 0.6.3 and last update was in July 2016.
Download GRsync
How to install GRsync on Windows
Follow these steps to install GRsync on Windows 10
- Download GRsync
- Install it by double clicking the setup file. Next, provide the location where GRsync will be installed.

- Click Extract to start the installation
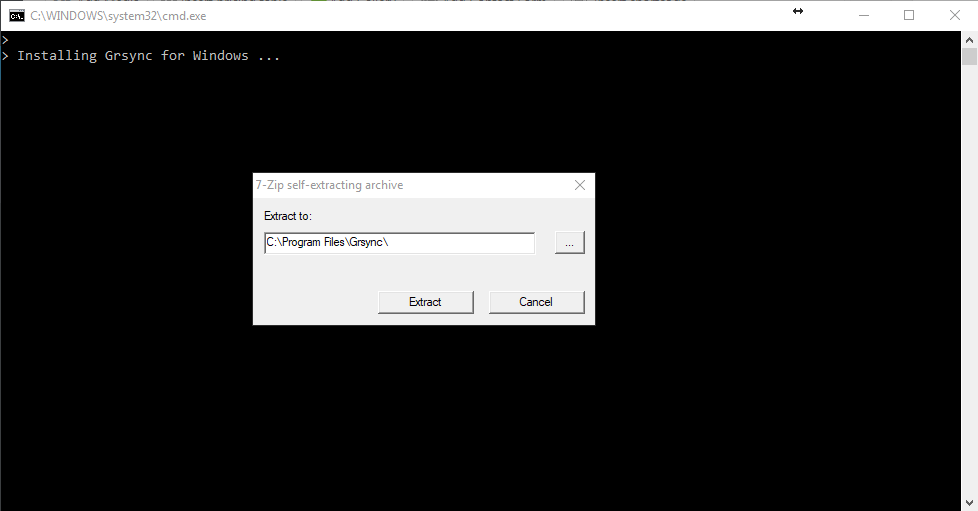
Please note that it will not create a program shortcut on your Windows start menu. So, we need to open the following directory to access the GRsync executable file.
C:\Program Files\Grsync\bin
You may change the C:\Program Files\Grsync\ with your actual installation directory. Double click grsync file inside bin directory above.
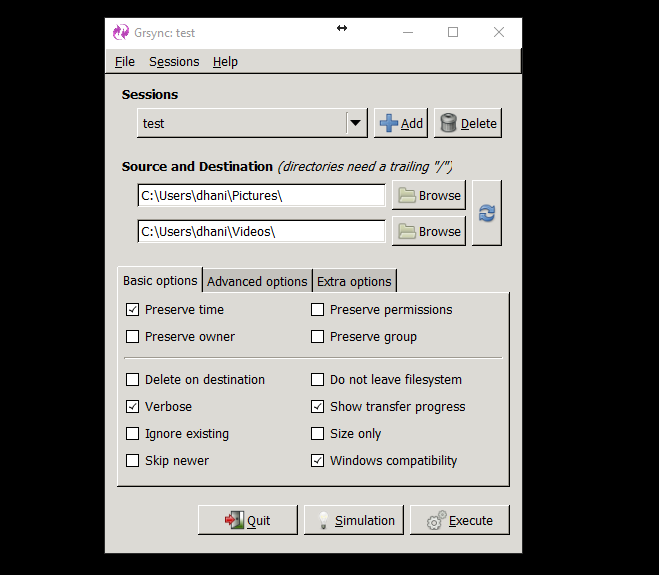
GRsync does not support direct ssh connection to the server. You have to mount the remote directory to your Windows.
Final Thought
Rsync for Windows is a great tool to backup and sync our files to remote computer or server. Acrosync offers a great experience when using their Rsync software. DeltaCopy also great but it needs a server software to work. Here are the summary of these Rsync Windows software we review on this post.
| Features | DeltaCopy | Acrosync | GRsync |
|---|---|---|---|
| Support Linux SSH Server | No | Yes | No |
| Needs Server Software | Yes | No | No |
| Incremental Backup | Yes | Yes | Yes |
| Schedule Backup | Yes | Yes | Yes |
| License | Free — Open Source | Paid | Free — Open Source |
Thanks for reading this Rsync for Windows review and see you on the next post.
rsync for Windows.
Most of the options are the same as the original rsync.

Usage: rsync-win.exe [OPTIONS] --src <SRC> --dest <DEST>

Options:
  -i, --identity <IDENTITY>  SSH identity file [default: "C:/Users/<YOUR USER NAME>/.ssh/id_rsa"]
  -v, --verbose
  -q, --quiet
  -c, --checksum
  -a, --archive
  -r, --recursive
      --delete
      --exclude <EXCLUDE>
      --progress
      --bwlimit <BWLIMIT>
  -4, --ipv4
  -6, --ipv6
  -s, --src <SRC>
  -d, --dest <DEST>
  -h, --help                 Print help
Rsync is one of the most commonly used backup/synchronization software for Linux users. Here, you can know what it is and how to use it on Windows 10. Besides, there is a piece of Rsync alternative software – Minitool software for you.
What Is Rsync
Rsync stands for remote synchronization. It is a Linux/Unix-based utility for local and remote data backup and synchronization. Using the Rsync command, you can synchronize files and directories across directories, disks, or networked computers.
Also see: How to Install Linux (Ubuntu) on Windows 10 [Ultimate Guide 2021]
Advantages of Rsync
- It can efficiently copy files to or synchronize files from remote systems.
- It supports copying links, devices, owners, groups, and permissions.
- It uses compression and decompression methods to send and receive data at both ends at the same time, so the occupied bandwidth utilization is low.
- It is faster than SCP (secure copy) because Rsync uses the remote update protocol, which only allows the difference between the two sets of files to be transferred.
How to Use Rsync
This part is about how to use Rsync for Windows. The details are as follows.
Step 1: Install Windows Subsystem for Linux (WSL)
There are many ways to run Linux commands in Windows 10. One is Linux and Windows dual boot, which allows you to choose which system to start at boot, but it may be troublesome, especially when you don’t try to use Linux often.
Therefore, it is more recommended to install Windows Subsystem for Linux (WSL) on your computer. It is used as a Windows utility that enables you to run Linux distributions in command line mode. This is a relatively simple way to use Rsync in Windows 10, and it is also applicable to other Linux utilities.
You can refer to this post – Guide to Install Windows Subsystem for Linux (WSL) in Win 10 to get the detailed steps of installing WSL.
Step 2: Install Rsync
You can use the following command in your Linux distribution to install the Rsync package. Different distributions have the corresponding command. You need to choose it based on your Linux distribution.
On Debian/Ubuntu & Mint – $ sudo apt-get install rsync
On Arch Linux – $ pacman -S rsync
On Gentoo – $ emerge sys-apps/rsync
On Fedora/CentOS/RHEL and Rocky Linux/AlmaLinux – $ sudo dnf install rsync
On openSUSE – $ sudo zypper install rsync
Step 3: Start to Use Rsync
Some common options are used with the Rsync command.
- -v: verbose mode
- -z: Compress file data.
- -r: Recursively copy data (but does not retain time stamps and permissions when transferring data.
- -a: Archive mode, allowing recursive copying of files, it also preserves symbolic links, file permissions, user and group ownership, and timestamps.
- -h: Human-readable, output numbers in a human-readable format.
Here we take backing up to an external drive using Rsync as an example. First, you need to connect the drive to your PC. You should be able to see the drive in Windows Explorer. In the Linux terminal, the mounted drive is located in /mnt.
Step 1: Input ls /mnt to list your drives. The letter Windows assigned to your drive partitions will be listed.
Step 2: Maybe you will not find your external drive partition here since it is mounted by Windows, not by a Linux machine. Thus, you need to input the following commands. (J can be replaced with any other partition number)
sudo mkdir /mnt/j
sudo mount -t drvfs J: /mnt/j
Step 3: Input the following command to see the contents of the partition.
ls /mnt/j
Step 4: Suppose you want to back up C:\data\ to J:\. You need to input the following command.
sudo rsync -avn /mnt/c/data/ /mnt/j/
If you want to back up data to the remote server (such as NAS drive) using Rsync. The instructions are as follows.
Here in this example, a directory /abc/djskah which is on a remote server is being copied in your local computer in /efg/klagd. You should type the following command.
rsync -avzh [email protected]/abc/djskah /efg/klagd
Tip: In the command, daisy can be replaced with your remote servers’ name and 192.168.1.213 can be replaced with your remote servers’ address.
Rsync Alternative for Windows 10
From the content above, you can find that as a command in Linux, Rsync can be used in Windows 10, but the process is complicated and time-consuming. Thus, to back up and synchronize files locally and remotely more conveniently, there is a Rsync alternative – MiniTool ShadowMaker for you.
MiniTool ShadowMaker is a professional file backup and sync software. It allows you to sync your files between two computers and it also allows you to back up and restore files & folders and the system you need.
Thus it can help you protect your important data and perform data recovery. Other functions are also available, such as cloning disk and creating bootable media to boot the computer.
This free backup software offers a Trial Edition that allows a 30-day free trial for all backup features.
Now, we will show you how to back up data step by step with pictures.
Step 1: Download and install MiniTool ShadowMaker and launch it, click Keep Trial to continue.
MiniTool ShadowMaker TrialClick to Download100%Clean & Safe
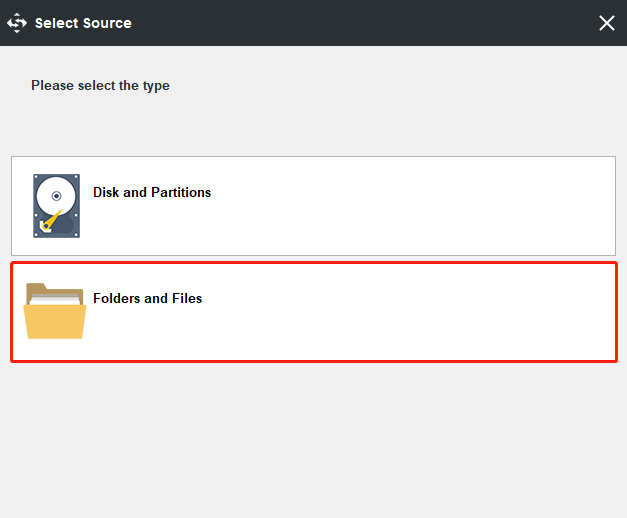
Step 2: After entering its main interface, go to the Backup page. Then click the Source module to choose the backup source. As for data backup, please choose Folders and Files to continue and choose the files you want to back up.
Step 3: Returning to the Backup page, click the Destination module to select the destination path to save the backup image. It is recommended to choose an external hard drive. Here, you can also choose NAS drive as your destination.
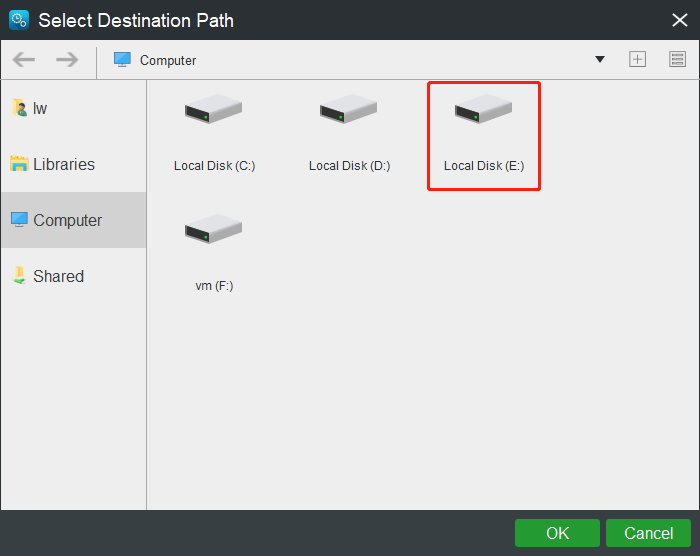
Tip: After you select Shared, you can directly sync files to the computer you select on the same LAN.
To get an extraordinary file backup experience, there are three important things you can do.
- MiniTool ShadowMaker is a user-friendly program that enables you to set an automatic file backup by clicking the Schedule button.
- MiniTool ShadowMaker also provides three different backup schemes so that it enables you to manage disk space by deleting some old backup images. The Incremental backup scheme is chosen by default and you can click the Scheme feature to change.
- You can set some advanced backup parameters such as changing image creation mode, compressing files size, and so on by clicking the Options button.
Step 4: After having successfully selected the backup source and destination, you can click Back up Now to perform the data backup action immediately. Or you can choose to click Back up Later to delay the process of files backup.
When the process is finished, you have successfully backed up files and have protected the data. From the above information, you can see MiniTool ShadowMaker is a great Rsync alternative, which is very easy and convenient to back up files.
You can also use the Sync feature of MiniTool ShadoaMaker to back up your data. Detailed operating steps are listed as follows:
Step 1: Enter Main Interface
Step 2: Specify Folders and Path to Sync
- Go to the Sync page and click it in the toolbar.
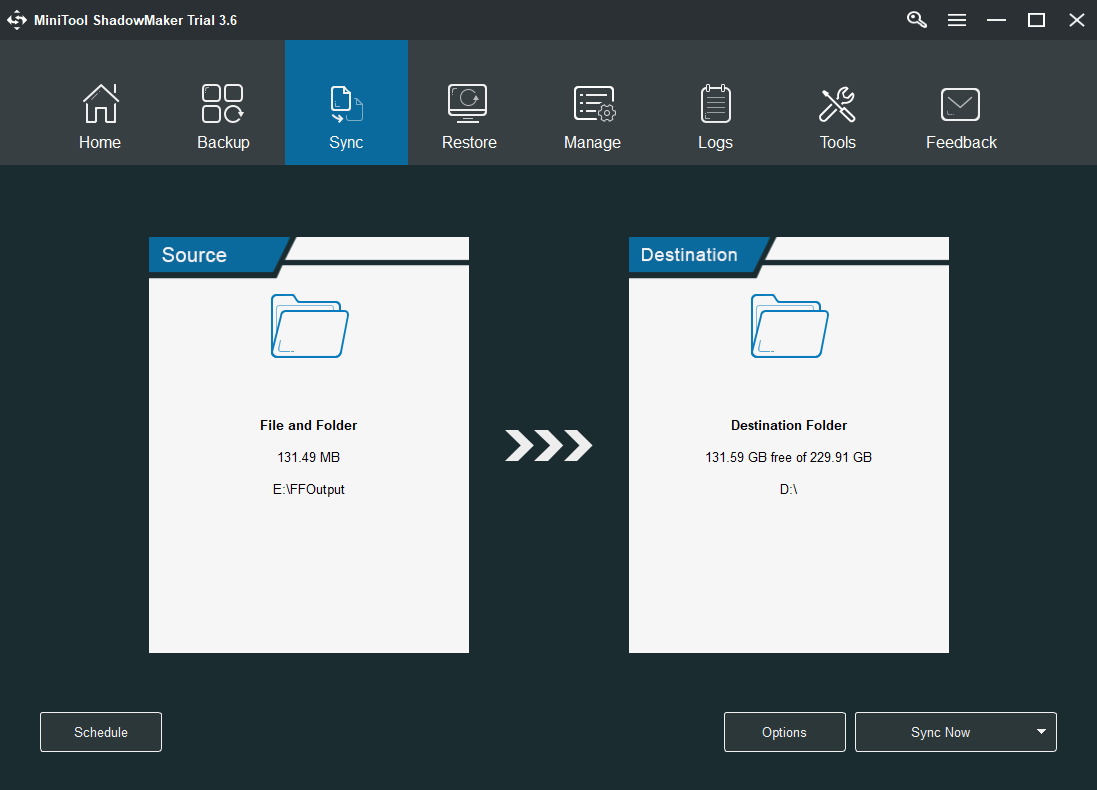
- Specify the source and destination for files sync.
What to Sync
- Go to the Source section.
- Under the Sourcetab, three paths are available: Administrator, Libraries, and Computer. You can choose a source to select files. Then click OKto continue.
Where to save synchronized folders
Under the Destination tab, there are four paths available: Administrator, Libraries, Computer, and Shared. To sync files to NAS, choose Shared, type Path, User name and Password in sequence, and click OK to finish.
Step 3: Start to Sync Files
- Please go to Sync.
- You can click Sync Now to perform file sync or click Sync Later to postpone it. Besides, you can continue this sync task on the Manage page.
If you want to sync files automatically, you can also click the Schedule button. Here are also four schedule settings available: Daily, Weekly, Monthly, and On Event. You can choose one to set up a time point and click the OK button to confirm the setting for automatic file sync.
If you want to set some advanced sync parameters, you can click the Options button. Here, you can compare and filter the files that you want to sync.
You can also try Windows snap-in tool – Backup and Restore (Windows 7) to back up data. Here is how to use it step by step. It is also a Rsync alernative.
Step 1: Type Control Panel in the search box of Windows 10 and choose it to continue.
Step 2: In the popup window, choose the Backup and Restore (Windows 7) link to continue.
Step 3: Next, click Set up backup under Back up or restore your files section to go on.
Step 4: Now, you are required to decide where you want to save the backup images and click Next to continue.
Step 5: In the next window, you will see two options. If you want to choose the backup source by yourself, you need to select the Let me choose option and click Next to continue.
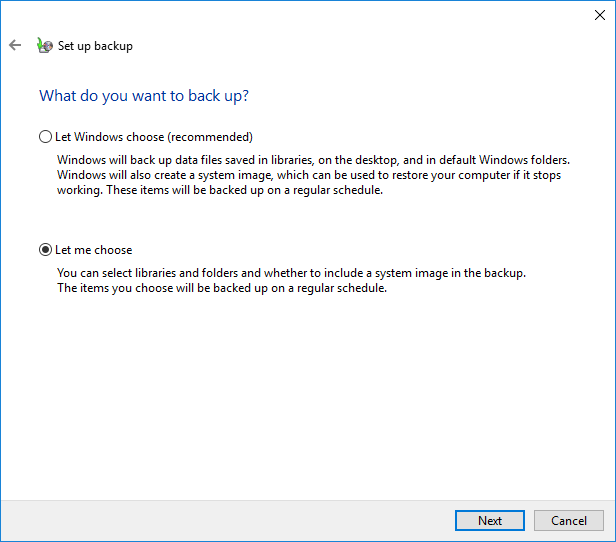
Step 6: Select the files you want to back up and click Next to continue.
Step 7: Then you need to review your backup settings. And if you want to set an automatic backup or change the backup schedule, you can click Change schedule to continue. Next, click Save settings and run backup to perform the data backup action.
Step 8: Then the file backup process will begin. After that, you have successfully backed up your files.
Bottom Line
Here is the information about Rsync Windows 10. You can know what it is and how to use it. However, it’s complicated and time-consuming. Thus, you can try the Backup feature and Sync feature of MiniTool ShadowMaker as the Rsync alternative for Windows 10.
If you have any questions about Rsync Windows 10, you can share them in the comment zone. Besides, if you have any problem with the MiniTool software, please don’t hesitate to contact us via the email [email protected].
This guide will help you install rsync on Windows 10. It is assumed that you already have Git for Windows installed.
If you didn’t already know, Git for Windows and its Git Bash environment is built using msys2, but it doesn’t include all the binaries from that project. One of the binaries that exists, but that isn’t included, is rsync. So what we need to do is to download the msys2 rsync binary, and place it somewhere Git Bash can find it.
- Go to repo.msys2.org/msys/x86_64 and download the latest version of rsync (not rsync2). At the time of this writing that is rsync-3.1.3-1-x86_64.pkg.tar.xz
- Extract the downloaded archive. I’m using Total Commander with a .xz plugin, but 7-zip is also a great option. Download and install from 7-zip.org if you need to.
- Copy the contents of the extracted archive (sub-folders and all) to where you have Git for Windows installed. For me that’s
C:\Program Files\Git\. (The archive contains a\usrfolder, and so does the git installation directory. What you want is for everything inside of the\usrfolder in the archive to end up in the\usrfolder in the git installation directory, ultimately ending up with, among other files,C:\Program Files\Git\usr\bin\rsync.exe)
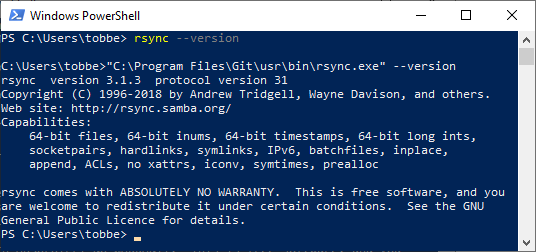
That’s it. You now have rsync installed. You can test your installation by opening up a Git Bash command line window and running rsync --version. You should see it print out version information.
Now, if you want to use rsync from the Windows Command Prompt, or from PowerShell, there is one more step.
Create a new .bat file with the following content (adjust the path to match your environment)
"C:\Program Files\Git\usr\bin\rsync.exe" %*
Name the file rsync.bat and place it somewhere in your %PATH%. I placed mine in C:\Windows\. Press Win + R and enter cmd. In the Command Prompt window that you just launched, enter rsync --version and it will find your .bat-file and run it, passing all arguments (that’s what %* does in the command above) off to your newly installed rsync.exe
The first three steps above are based on serverfault.com/questions/310337/using-rsyn.. where you can also find instructions for setting up Pageant for SSH, if that’s something you need.
I hope this short tutorial was useful to you. Happy rsyncing!