
Copilot is your AI companion
Always by your side, ready to support you whenever and wherever you need it.

IMPORTANT: Starting with Windows 10 October 2018 Update, RSAT is included as a set of «Features on Demand» in Windows 10 itself. See «Install Instructions» below for details, and «Additional Information» for recommendations and troubleshooting. RSAT lets IT admins manage Windows Server roles and features from a Windows 10 PC.
Important! Selecting a language below will dynamically change the complete page content to that language.
-
File Name:
WindowsTH-KB2693643-x86.msu
WindowsTH-KB2693643-x64.msu
Remote Server Administration Tools for Windows 10 includes Server Manager, Microsoft Management Console (MMC) snap-ins, consoles, Windows PowerShell cmdlets and providers, and command-line tools for managing roles and features that run on Windows Server.
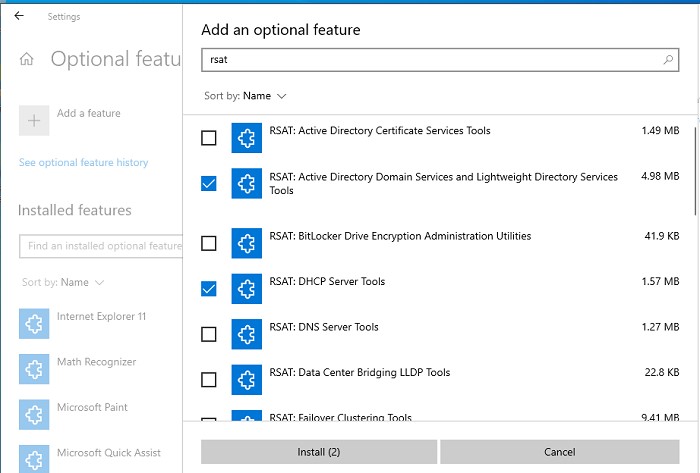
IMPORTANT: Starting with Windows 10 October 2018 Update, add RSAT tools right from Windows 10. Just go to «Manage optional features» in Settings and click «Add a feature» to see the list of available RSAT tools.
The downloadable packages above can still be used to install RSAT on Windows 10 version 1607.
-
Supported Operating Systems
Windows 10
**Remote Server Administration Tools for Windows 10 can be installed ONLY on computers that are running the full release of Windows 10 Professional, Windows 10 Enterprise, or Windows 10 Education.** Remote Server Administration Tools cannot be installed on Windows RT, computers with an Advanced RISC Machine (ARM) architecture, or other system-on-chip devices.
Remote Server Administration Tools for Windows 10 runs on both x86- and x64-based editions of the full release of Windows 10, Professional, Enterprise or Education editions. Download and install the version that matches the architecture of the computer on which you plan to install the administration tools. If you are not sure whether your computer is x86- or x64-based, see How to determine whether a computer is running a 32-bit version or 64-bit version of the Windows operating system.
Remote Server Administration Tools for Windows 10 is available in the following languages: cs-CZ, de-DE, en-US, es-ES, fr-FR, hu-HU, it-IT, ja-JP, ko-KR, nl-NL, pl-PL, pt-BR, pt-PT, ru-RU, sv-SE, tr-TR, zh-CN, and zh-TW. If the system UI language of your Windows 10 operating system does not match any of the available RSAT languages, you must first install a Windows 10 Language Pack for a language that is supported by RSAT, and then try installing Remote Server Administration Tools for Windows 10 again.
IMPORTANT: Remove all older versions of Administration Tools Pack or Remote Server Administration Tools—including older prerelease versions, and releases of the tools for different languages or locales—from the computer before you install Remote Server Administration Tools for Windows 10. Only one copy at a time of Remote Server Administration Tools can be installed on a computer. If you have upgraded to Windows 10 from an older release of Windows, you will need to install Remote Server Administration Tools for Windows 10 on the computer; no earlier releases of Remote Server Administration Tools are still installed on a computer that you have upgraded to Windows 10.
Remote Server Administration Tools for Windows 10 includes support for remote management of computers that are running Windows Server. It can be installed on Windows 10, but it cannot be installed on Windows Server.
Earlier releases of Remote Server Administration Tools (such as those for Windows 8.1) are not available—nor do they run—on Windows 10.
Server Manager is included with Remote Server Administration Tools for Windows 10; GUI-based tools that are part of this release of Remote Server Administration Tools can be opened by using commands on the Tools menu of the Server Manager console. To use Server Manager to access and manage remote servers that are running Windows Server 2008, Windows Server 2008 R2, Windows Server 2012, or Windows Server 2012 R2, you must install several updates on the older operating systems. For more information about requirements for using Server Manager to manage remote servers, see Manage multiple, remote servers with Server Manager.
-
NOTE: Please refer to the «Additional Information» section below for troubleshooting and known issue.
———-
To install specific RSAT tools on Windows 10 October 2018 Update or later
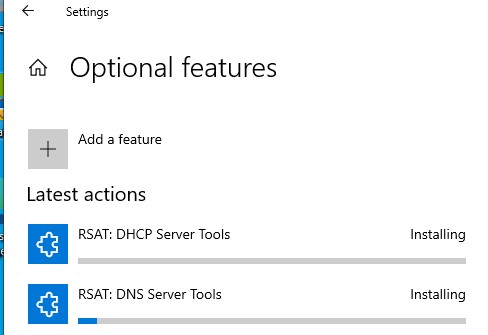
Starting with Windows 10 October 2018 Update, RSAT is included as a set of «Features on Demand» right from Windows 10. Do not download an RSAT package from this page. Instead, just go to «Manage optional features» in Settings and click «Add a feature» to see the list of available RSAT tools. Select and install the specific RSAT tools you need. To see installation progress, click the Back button to view status on the «Manage optional features» page.
See the list of RSAT tools available via Features on Demand. In addition to installing via the graphical Settings app, you can also install specific RSAT tools via command line or automation using DISM /Add-Capability.
One benefit of Features on Demand is that installed features persist across Windows 10 version upgrades!
To uninstall specific RSAT tools on Windows 10 October 2018 Update or later
On Windows 10, open the Settings app, go to «Manage optional features», select and uninstall the specific RSAT tools you wish to remove. Note that in some cases, you will need to manually uninstall dependencies. Specifically, if RSAT tool A is needed by RSAT tool B, then choosing to uninstall RSAT tool A will fail if RSAT tool B is still installed. In this case, uninstall RSAT tool B first, and then uninstall RSAT tool A. Also note that in some cases, uninstalling an RSAT tool may appear to succeed even though the tool is still installed. In this case, restarting the PC will complete the removal of the tool.
See the list of RSAT tools including dependencies. In addition to uninstalling via the graphical Settings app, you can also uninstall specific RSAT tools via command line or automation using DISM /Remove-Capability.
———-
To install RSAT for Windows 10 (prior to the October 2018 Update)
IMPORTANT: You can install Remote Server Administration Tools for Windows 10 only on the full release of Windows 10 Professional or Windows 10 Enterprise.
- Download the Remote Server Administration Tools for Windows 10 package that is appropriate for your computer’s architecture. You can either run the installer from the Download Center website, or save the download package to a local computer or share. If you save the download package to a local computer or share, double-click the installer program, WindowsTH-RSAT_WS_1803-x64.msu or WindowsTH-RSAT_WS_1803-x86.msu, depending on the architecture of the computer on which you want to install the tools.
- When you are prompted by the Windows Update Standalone Installer dialog box to install the update, click Yes.
- Read and accept the license terms. Click I accept. Installation requires a few minutes to finish.
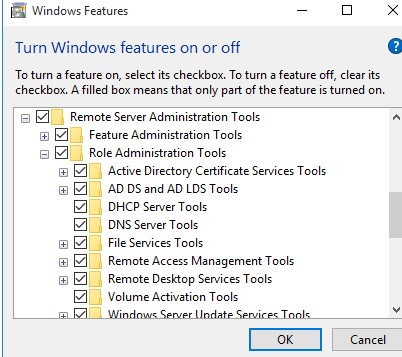
NOTE: All tools are enabled by default. You do not need to open Turn Windows features on or off in Windows 10 to enable tools that you want to use.
To turn off specific tools (prior to the October 2018 Update) (not available on RSAT versions 1709 or 1803)
- On the desktop, click Start, click All Apps, click Windows System, and then click Control Panel.
- Click Programs, and then in Programs and Features, click Turn Windows features on or off.
- In the Windows Features dialog box, expand Remote Server Administration Tools, and then expand either Role Administration Tools or Feature Administration Tools.
- Clear the check boxes for any tools that you want to turn off. Note that if you turn off Server Manager, the computer must be restarted, and tools that were accessible from the Tools menu of Server Manager must be opened from the Administrative Tools folder.
- When you are finished turning off tools that you do not want to use, click OK.
To uninstall RSAT for Windows 10 (prior to the October 2018 Update)
- On the desktop, click Start, click All Apps, click Windows System, and then click Control Panel.
- Under Programs, click Uninstall a program.
- Click View installed updates.
- Right-click Update for Microsoft Windows (KB2693643), and then click Uninstall.
- When you are asked if you are sure you want to uninstall the update, click Yes.
-
Recommendations for when to use which RSAT version:
Install RSAT FODs directly from Windows 10:
When installing on Windows 10 October 2018 Update (1809) or later, for managing Windows Server 2019 or previous versions.
See «Install Instructions» section above for details on how to install RSAT Features on Demand (FODs) right from Windows 10.Download and install WS_1803 RSAT package:
When installing on Windows 10 April 2018 Update (1803) or earlier, for managing Windows Server, version 1803 or Windows Server, version 1709.Download and install WS2016 RSAT package:
When installing on Windows 10 April 2018 Update (1803) or earlier, for managing Windows Server 2016 or previous versions.———-
Known issues affecting various RSAT versions:Issue: RSAT FOD installation fails with error code 0x800f0954
Impact: RSAT FODs on Windows 10 1809 (October 2018 Update) in WSUS/SCCM environments
Resolution: To install FODs on a domain-joined PC which receives updates through WSUS or SCCM, you will need to change a Group Policy setting to enable downloading FODs directly from Windows Update or a local share. For more details and instructions on how to change that setting, see this topic.Issue: RSAT FOD installation via Settings app does not show status/progress
Impact: RSAT FODs on Windows 10 1809 (October 2018 Update)
Resolution: To see installation progress, click the Back button to view status on the «Manage optional features» page.Issue: RSAT FOD uninstallation via Settings app may fail
Impact: RSAT FODs on Windows 10 1809 (October 2018 Update)
Resolution: In some cases, uninstallation failures are due to the need to manually uninstall dependencies. Specifically, if RSAT tool A is needed by RSAT tool B, then choosing to uninstall RSAT tool A will fail if RSAT tool B is still installed. In this case, uninstall RSAT tool B first, and then uninstall RSAT tool A. See the list of RSAT FODs including dependencies.Issue: RSAT FOD uninstallation appears to succeed, but the tool is still installed
Impact: RSAT FODs on Windows 10 1809 (October 2018 Update)
Resolution: Restarting the PC will complete the removal of the tool.Issue: RSAT missing after Windows 10 upgrade
Impact: Any RSAT .MSU package installation (prior to RSAT FODs) not automatically reinstalled
Resolution: An RSAT installation cannot be persisted across OS upgrades due to the RSAT .MSU being delivered as a Windows Update package. Please install RSAT again after upgrading Windows 10. Note that this limitation is one of the reasons why we’ve moved to FODs starting with Windows 10 1809. RSAT FODs which are installed will persist across future Windows 10 version upgrades.Issue: DNS Tools missing
Impact: WS_1709 RSAT package users
Resolution: Use the RSAT FODs, or use the WS_1803 or WS2016 RSAT package or apply this workaroundIssue: Cannot turn off individual RSAT components
Impact: WS_1803 and WS_1709 RSAT package users on Windows 10 1803/1709 (April 2018 Update/Fall Creators Update)
Resolution: Use the RSAT FODs, or use the WS2016 RSAT package on Windows 10 1607 (Anniversary Update)Issue: Tabs missing from MMC Properties
Impact: Windows 10 clients before 1607 (Anniversary Update)
Resolution: Update to the latest version of Windows 10 client and reinstall RSATIssue: Shielding Data File Wizard cannot create shielding data files
Impact: WS_1709 RSAT package users on Windows 10 1709 (Fall Creators Update)
Resolution: Use the RSAT FODs, or use the WS_1803 RSAT package on Windows 10 1803 (April 2018 Update), or use the WS2016 RSAT package on Windows 10 1607 (Anniversary Update) to create shielding data files for Windows shielded VMs, or the built-in RSAT tools in Windows Server, version 1709 to create shielding data files for both Windows and Linux shielded VMs.Issue: Template disks created from the Template Disk Wizard do not boot
Impact: WS_1709 RSAT package users on Windows 10 1709 (Fall Creators Update)
Resolution: Use the RSAT FODs, or use the WS_1803 RSAT package on Windows 10 1803 (April 2018 Update), or use the WS2016 RSAT package on Windows 10 1607 (Anniversary Update) to create template disks for Windows shielded VMs, or the built-in RSAT tools in Windows Server, version 1709 to create shielding data files for both Windows and Linux shielded VMs.Issue: IPAM in Server Manager prompts to install even though IPAM is already installed
Impact: IPAM users on Windows 10 1803/1709 (April 2018 Update/Fall Creators Update)
Resolution: Use the RSAT FODs, or use IPAM from an RSAT package installed on Windows 10 1607 (Anniversary Update) or 1703 (Creators Update)
Reading Time: 2 minutes

Microsoft has released a new version of Windows 10, dubbed version 21H1. This version brings new functionality that many organizations are eager to utilize. In many organizations, Windows-based devices are joined to Active Directory Domain Services (AD DS), so devices can be managed centrally and end-users can sign-in on any domain-joined device of their liking.
A new Windows version means that Active Directory needs to be properly prepared. In this blogpost, I’ll show you how to prepare Active Directory for Windows 10, version 21H1:
Group Policy
Windows 10, version 21H1 comes with ten new Group Policy settings. To centrally manage Group Policy, you can update the Group Policy Central Store with the new Group Policy template (*.admx) and Group Policy language (*.adml) files. This way, you can centrally manage the versioning of Group Policy templates.
Note:
If your organization doesn’t use the Group Policy Central Store feature, yet, now is a good time to implement it.
You can download the Download Administrative Templates (.admx) for Windows 10 May 2021 Update (21H1) from the Microsoft Download Center. This download includes *.adml files for the Czech, Danish, German, Greek, English, Spanish, Finnish, French, Hungarian, Italian, Japanese, Korean, Norwegian, Dutch, Polish, Portuguese, Russian, Swedish, Turkish and Chinese languages.
Copy the new PolicyDefinitions folder over the existing PolicyDefinitions folder in the Active Directory System Volume (SYSVOL) share to update the Group Policy Central Store.
When you’re a fan of Microsoft’s security baselines, you can download and implement the Security baseline (final) for Windows 10, version 21H1.
Windows Activation
Active Directory-based Activation (ADbA) is available since Windows Server 2012 as a replacement for Microsoft’s Key Management Services (KMS).
Note:
If your organization doesn’t use Active Directory-based Activation, yet, now is a good time to implement it.
You can download the product keys for your organization from the Volume Licensing Service Center (VLSC). Enter the product keys to automatically activate Windows 10 when it comes into scope of your Windows activation method.
Remote Server Administration Tools
In previous Windows 10 version, the Remote Server Administration Tools (RSAT) needed to be downloaded manually to allow admins to manage Windows Server features from these devices. However, since Windows 10, version 1809, the RSAT are included as Features on Demand in Windows 10 itself.
Do not download an RSAT package from this page. Instead, perform the following steps on a device running Windows 10, version 21H1:
- Press the Start button.
- Search for Manage optional features.
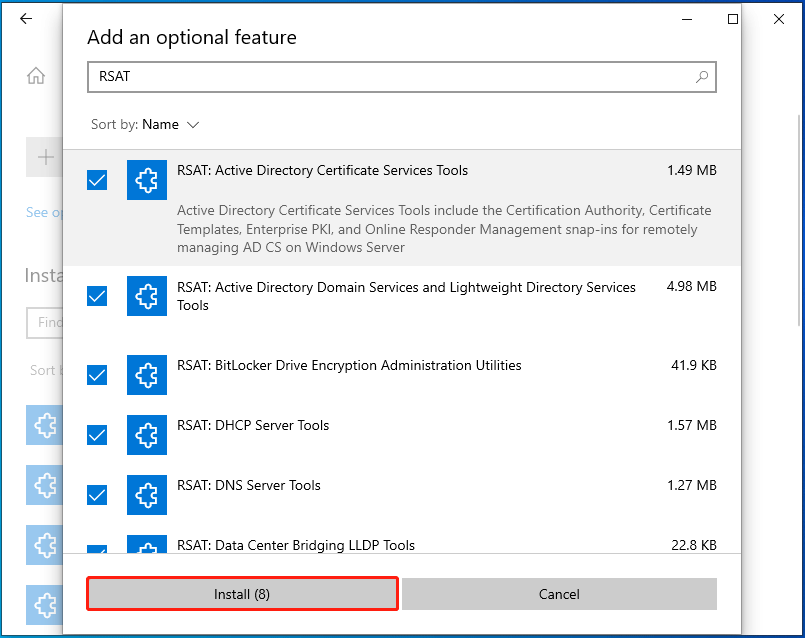
Click the search result with the same name - Click Add a feature.
You now see the list of available optional features. - Select and install the specific RSAT tools you need. All RSAT tools names are prefixed with RSAT: , so this makes for easy filtering.
Active Directory Users and Computers is a powerful tool for managing users, groups, and computers in a Windows domain environment. It allows administrators to easily create, modify, and delete user accounts, reset passwords, manage group memberships, and perform various administrative tasks. If you’re an IT professional or a system administrator, having this tool installed on your Windows 10 machine can greatly simplify your daily operations. In this tutorial, we will guide you through the process of installing Active Directory Users and Computers on Windows 10.
Step 1: Open the Run dialog box by pressing the Windows key + R on your keyboard.
Step 2: Type «control» in the Run dialog box and click OK or press Enter. This will open the Control Panel.
Step 3: In the Control Panel, click on «Programs» or «Programs and Features,» depending on your view settings.
Step 4: On the left side of the Programs window, click on «Turn Windows features on or off.» This will open the Windows Features dialog box.
Step 5: Scroll down the list of features and locate «Remote Server Administration Tools.» Expand it by clicking on the «+» sign next to it.
Step 6: Locate «Role Administration Tools» and expand it. Then, expand «AD DS and AD LDS Tools.«
Step 7: Check the box next to «AD DS Snap-Ins and Command-Line Tools» to enable Active Directory Users and Computers.
That’s it! You have successfully installed Active Directory Users and Computers on your Windows 10 machine. You can access it by searching for «Active Directory Users and Computers» in the Start menu or by running the «dsa.msc» command in the Run dialog box.
| Pros | Cons |
|---|---|
| 1. Simplifies user and group management in a Windows domain environment. | 1. Requires administrative privileges to install and use. |
| 2. Provides a user-friendly interface for managing user accounts and passwords. | 2. Only available in Windows 10 Professional, Enterprise, and Education editions. |
| 3. Saves time and effort by centralizing administration tasks. | 3. May be overwhelming for novice users or those unfamiliar with Active Directory concepts. |
Video Tutorial: How do I install Active Directory Users and Computers in Windows 10 Powershell?
How do I install RSAT tools on Windows 10 21h1?
To install RSAT (Remote Server Administration Tools) tools on Windows 10 version 21H1, you can follow these steps:
1. Open the Start Menu and go to «Settings.«
2. In Settings, click on «Apps» or «Apps & features.«
3. On the Apps page, click on «Optional features» or «Optional features and apps.«
4. Next, click on «Add a feature.«
5. A list of optional features will appear. Scroll down until you find «RSAT: Remote Server Administration Tools.«
6. Select the appropriate RSAT tools you want to install. You can choose from various options like Active Directory Domain Services, Group Policy Management Console, DNS Server Tools, etc.
7. Click on the «Install» button.
8. Windows will now download and install the selected RSAT tools. The installation process may take some time depending on your internet connection and the selected tools.
9. Once the installation is complete, you can close the Settings window.
After the installation, you should be able to access and use the RSAT tools from your Windows 10 version 21H1 system.
Note: Ensure that you have the appropriate administrative privileges on your Windows 10 machine to install new features and tools. Also, make sure you download and install RSAT tools specifically meant for Windows 10 version 21H1 to ensure compatibility.
Please note that the steps provided are based on general knowledge and may vary slightly depending on the specific Windows 10 version or updates. It’s always recommended to refer to official Microsoft documentation or support channels for the most accurate and up-to-date information.
How do I get all users in Active Directory?
To get all users in Active Directory, you can follow these steps:
1. Open the Active Directory Users and Computers tool: Go to the Start menu, search for «Active Directory Users and Computers,» and click on the appropriate result.
2. Connect to the Active Directory domain: In the tool, right-click on the «Active Directory Users and Computers» root node, select «Connect to Domain,» and enter the domain name or browse to select it.
3. Navigate to the user container: Expand the domain tree to locate the container where the users are stored, such as the «Users» container or a specific organizational unit (OU) that holds the user accounts.
4. View all users: Once you have selected the appropriate container or OU, the list of users will be displayed in the main panel of the tool. You can browse through the list to see all the users.
5. Export the user list (optional): If you want to export the user list for further analysis or documentation purposes, you can right-click on the user container or OU, select «Export List,» choose the desired file format, and save the exported file.
Note: The steps provided here assume that you have the necessary administrative permissions to access and manage user accounts in Active Directory. If you encounter any issues or don’t have the required privileges, contact your system administrator for assistance.
Additionally, it’s worth noting that the steps provided are based on a general understanding of Active Directory and may vary slightly depending on the version and configuration of your specific environment.
To install Active Directory Users and Computers on Windows 10 20H2, you can follow these steps:
1. Ensure you are signed in with administrative rights on your Windows 10 machine.
2. Open the Start menu and type «Control Panel» in the search bar. Click on the «Control Panel» app to open it.
3. In the Control Panel, select «Programs» and then click on «Programs and Features.«
4. On the left side of the window, select «Turn Windows features on or off.«
5. A new window labeled «Windows Features» will appear. Scroll down the list and find «Remote Server Administration Tools.» Expand it by clicking on the «+» icon next to it.
6. Now, look for «Role Administration Tools» and expand it as well.
7. Locate «AD DS and AD LDS Tools,» and enable the checkbox next to it. This will include Active Directory Users and Computers.
8. Click «OK» to close the «Windows Features» window.
9. Windows will now install the necessary components. This may take a few minutes, so be patient.
10. Once the installation is complete, you can access Active Directory Users and Computers by opening the Start menu, typing «Active Directory Users and Computers» in the search bar, and clicking on the corresponding app that appears.
By following these steps, you should be able to install and access Active Directory Users and Computers on Windows 10 20H2 successfully.
How to install Active Directory from command prompt?
Installing Active Directory from the command prompt involves several steps. Here’s a step-by-step guide on how to do it:
1. Open the command prompt with administrative privileges: Click on the Windows Start button, type «cmd» in the search bar, right-click on «Command Prompt,» and select «Run as administrator.«
2. Type the following command to install the Active Directory Domain Services (AD DS) role:
«`
ServerManagerCmd -i ADDS-Domain-Controller
«`
3. After executing the command, the Server Manager will open. Follow the instructions and click «Next» to begin the installation.
4. On the «Installation Type» step, select «Role-based or feature-based installation» and click «Next.«
5. Choose the appropriate server from the server pool and click «Next.«
6. On the «Roles» page, select «Active Directory Domain Services» and click «Next.«
7. Review the AD DS information and click «Next.«
8. On the «Features» page, leave the default selections unchanged and click «Next.«
9. The «AD DS» page will provide you with an overview of the role and its features. Click «Next» to proceed.
10. On the «Confirmation» page, review your selections and click «Install» to begin the installation process.
11. Once the installation is complete, you will see a notification. Click «Close» to exit the Server Manager.
12. Reboot your computer to finalize the installation.
After completing these steps, Active Directory will be installed on your machine. Remember to keep your system up to date with the latest patches and security measures to ensure the reliability and stability of your Active Directory environment.
How do I install Active Directory and users?
To install Active Directory and manage users, follow these steps:
1. Prepare the server:
– Ensure your server meets the system requirements for running Active Directory. Check the hardware specifications, operating system compatibility, and available storage.
– Install the Windows Server operating system, if not already installed.
2. Install Active Directory Domain Services (AD DS):
– Open the Server Manager and click on «Add roles and features.«
– Navigate through the installation wizard and select «Active Directory Domain Services» from the list of server roles.
– Continue through the wizard, accepting the default settings, unless you have specific requirements.
– After the installation completes, select the option to configure AD DS or manually configure it later.
3. Configure the Active Directory domain:
– Open the Active Directory Domain Services Configuration Wizard.
– Select «Add a new forest» if you are creating a new domain. Otherwise, select «Add a domain controller to an existing domain.«
– Specify the domain name and the domain controller options according to your needs.
– Set the domain and forest functional levels. For the latest version, set it to the highest level available (e.g., Windows Server 2022).
– Choose the appropriate locations for the AD DS database, log files, and SYSVOL folder.
– Provide a Directory Services Restore Mode Administrator password.
– Review the configuration summary and click «Install» to begin the domain configuration.
4. Manage users:
– Open the Active Directory Users and Computers management console.
– Locate the appropriate organizational unit (OU) or create a new one to manage users.
– Right-click on the OU and select «New» and then «User» to create a new user account.
– Fill in the required user details, such as name, username, password, etc.
– Customize additional settings if needed, such as group membership, account expiration, etc.
– Click «OK» to create the user account.
Remember to regularly manage and maintain your Active Directory environment by creating, modifying, and deleting user accounts as required. Additionally, ensure you implement appropriate security measures to protect sensitive user information and regularly back up your Active Directory database for disaster recovery purposes.
If you want to manage functions and roles in Windows Server on a PC that runs Windows 11 or 10, you can use Remote Server Administration Tools (RSAT). How to download and install RSAT on Windows 11/10? MiniTool will show you many details about this task in this post.
RAST, short for Remote Server Administration Tools, is a set of tools that can help you to remotely manage roles and features in Windows Server from a local computer running Windows 11, 10, 8, or 7. You won’t log into each Windows server individually. RSAT is not installed on computers by default. To use it, you need to install it manually on your PC.
Microsoft releases RAST for different Windows versions. On Windows 11 and Windows 10, the ways to install RSAT are different. Now, let’s go to see how to do the work.
How to Install RSAT on Windows 11
Install RSAT Components from Settings
Installing RSAT in Windows 11 via Settings is pretty straightforward and the following is what you should do.
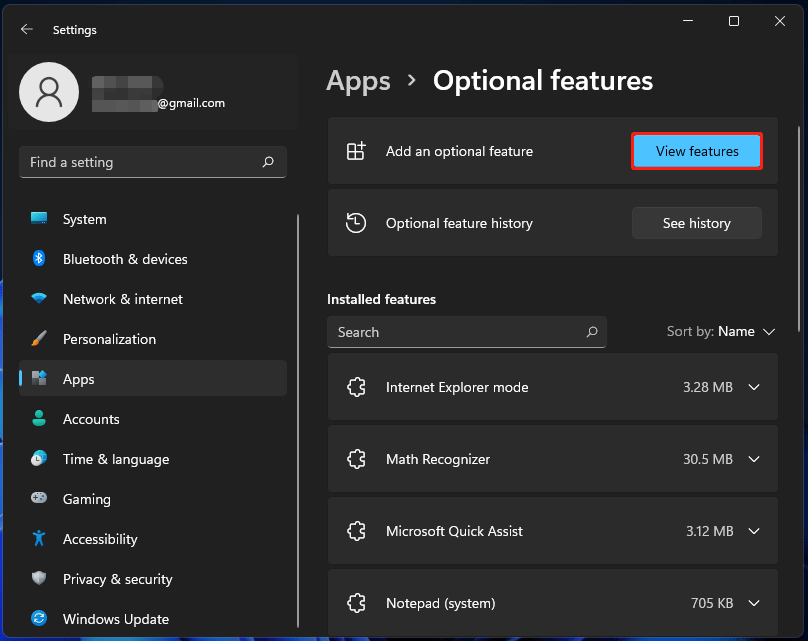
Step 1: Click Start > Settings to open Windows 11 Settings.
Step 2: Click Apps from the left side and choose Optional features.
Step 3: Click View features next to Add an optional feature.
Step 4: Type RSAT in the search bar, press Enter, and all the variants of RSAT are listed here. Choose one tool you want to install and click Next. Of course, you can choose all the listed tools to install.
Step 5: Click the Install button. Then, Windows 11 will start installing the RSAT tool you have selected.
Install RSAT on Windows 11 via PowerShell
To install RSAT, you can run Windows PowerShell. This allows you to install all the RSAT components at one time or choose individual tools to install according to your preference.
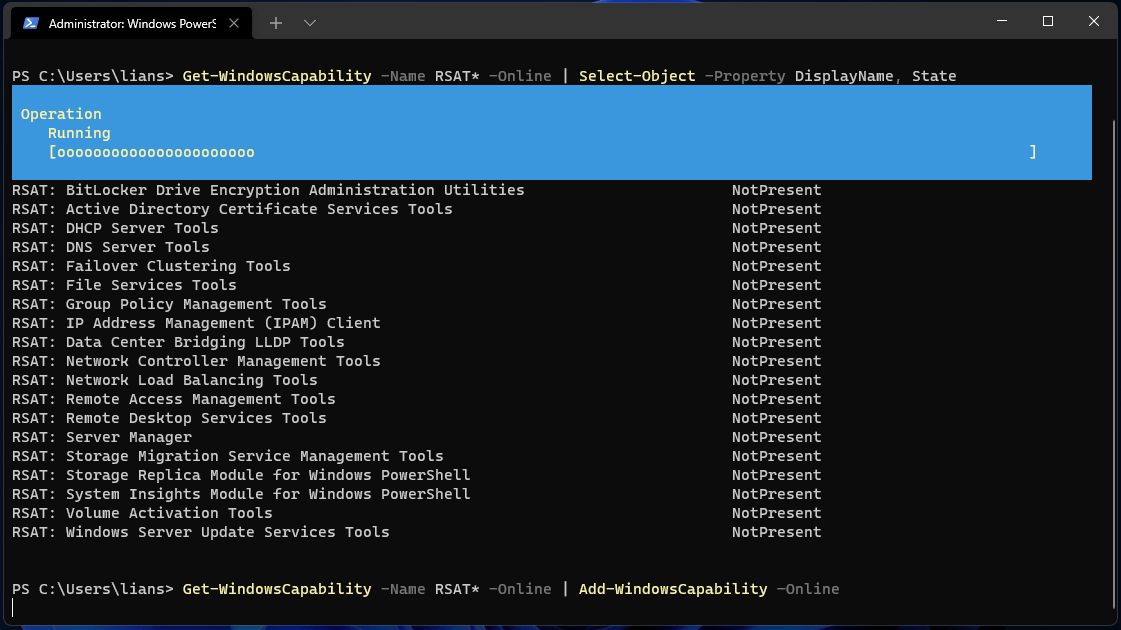
Step 1: Type in powershell to the search box of Windows 11 and right-click Windows PowerShell to choose Run as administrator.
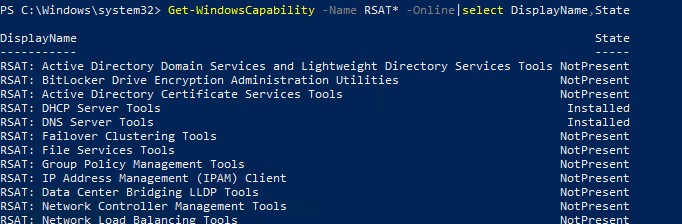
Step 2: Copy & paste the command – Get-WindowsCapability -Name RSAT* -Online | Select-Object -Property DisplayName, State, and press Enter. Then, all the RSAT tools available for your computer and their current status can be viewed. You can know exactly what to install.
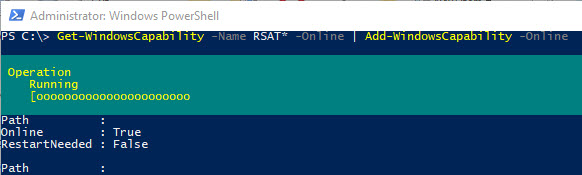
- To install all the RSAT tools at once, type the command – Get-WindowsCapability -Name RSAT* -Online | Add-WindowsCapability –Online and press Enter.
- To install RSAT components individually, execute the command Add-WindowsCapability -Online -Name “Rsat.<tool name>.Tools”. Replace <tool name> with the tool name you wish to install.
The tool name can be ActiveDirectory.DS-LDS, BitLocker.Recovery, FileServices, GroupPolicy.Management, CertificateServices, DHCP, Dns, Failover.Cluster.Management, IPAM.Client, LLDP, and NetworkController.
Related article: What Is Active Directory Users and Computers and How to Install
How to Install RSAT on Windows 10
Depending on different versions of Windows 10, the way to install RSAT varies.
RSAT Windows 10 Download (for V1803 or Earlier)
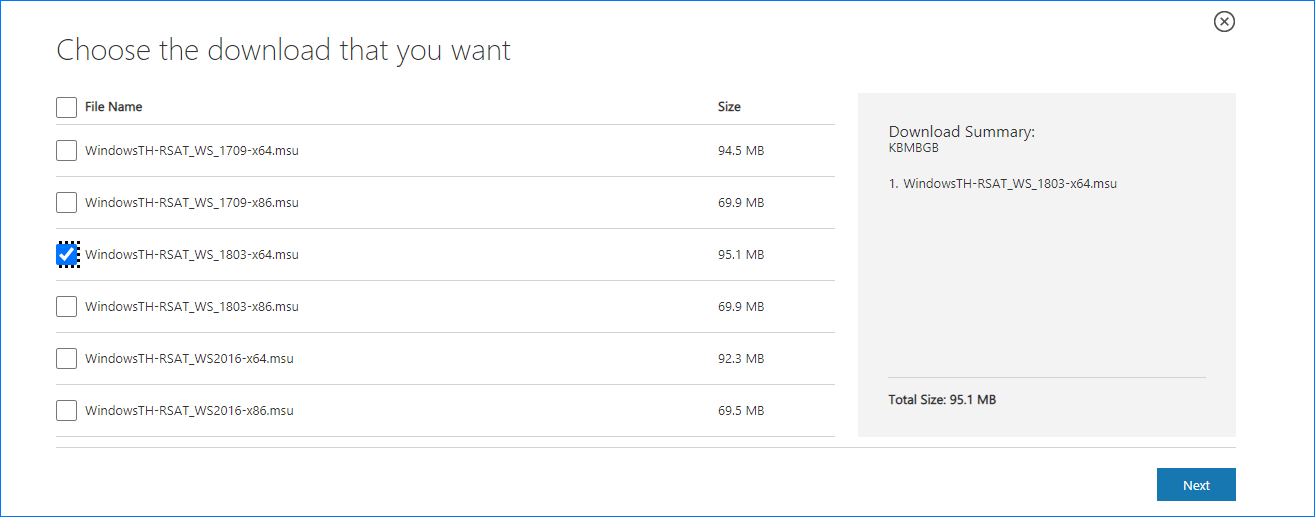
In Windows 10 V1803 or an earlier version, you need to manually download the RSAT tool and install it. Just go to the Download Remote Server Administrator Tools for Windows page, choose a language, and click the Download button. Then choose a proper version and click Next to download it on your PC. Then, double-click the file to start installing.
For Windows 10 Version 1809 or an advanced version, Microsoft simplifies the installation process of RSAT that is included as a set of “Features on Demand” in Windows 10 itself. And you can install RSAT via Windows Settings.
To install RSAT Windows 10 20H2/21H1/1909, etc., follow these steps below.
Step 1: Press Win + I to get Windows 10 Settings.
Step 2: Click Apps > Optional features > Add a feature.
Step 3: Type RSAT to the search box and press Enter.
Step 4: Choose all the RSAT components you want to install and click Install.
In addition, you can also install RSAT on Windows 10 via PowerShell. The commands are introduced in part Install RSAT on Windows 11 via PowerShell.
After finishing the installation of RSAT, you can run tools on your PC.
In Windows 11, click the Start button, click App apps > Windows Tools and you can see all the installed RSAT components. Double-click on any one to launch one tool you want to use.
In Windows 10, you can launch Control Panel, view all the items by large icons, click Administrative Tools, and then run any tool there.
Набор компонентов RSAT (Remote Server Administration Tools / Средства удаленного администрирования сервера) позволяет удаленно управлять ролями и компонентами на серверах Windows Server с обычной рабочей станции Windows. В RSAT входят графические MMC оснастки, утилиты командной строки, и модули PowerShell. Вы можете установить RSAT как на десктопных версиях Windows 10 или 11, так и в Windows Server 2022/2019/2016.
Содержание:
- Установка средств администрирования RSAT в Windows 10 и 11
- Установка RSAT в Windows с помощью PowerShell
- Как установить Remote Server Administration Tools в Windows Server 2022,2019,2016?
- Ошибка 0x800f0954 при установке RSAT в Windows
- Установка RSAT в Windows в офлайн режиме
Установка средств администрирования RSAT в Windows 10 и 11
В Windows 10 и 11 RSAT устанавливаются через графический интерфейс панели Settings -> Apps -> Optionla Features -> Add an optional feature (Параметры Windows -> Приложения -> Дополнительные возможности -> Добавить компонент).
Наберите в поисковой строке RSAT, чтобы вывести доступные компоненты. Вы можете установить в Windows 10/11 следующие инструменты администрирования RSAT:
- RSAT: Active Directory Domain Services and Lightweight Directory Services Tools
- RSAT: BitLocker Drive Encryption Administration Utilities
- RSAT: Active Directory Certificate Services Tools
- RSAT: DHCP Server Tools (настройка и управление DHCP сервером на Windows Server)
- RSAT: DNS Server Tools
- RSAT: Failover Clustering Tools
- RSAT: File Services Tools
- RSAT: Group Policy Management Tools – консоль управления GPO и PowerShell модуль GroupPolicy
- RSAT: IP Address Management (IPAM) Client
- RSAT: Data Center Bridging LLDP Tools
- RSAT: Network Controller Management Tools
- RSAT: Network Load Balancing Tools
- RSAT: Remote Access Management Tools
- RSAT: Remote Desktop Services Tools
- RSAT: Server Manager
- RSAT: Shielded VM Tools
- RSAT: Storage Migration Service Management Tools
- RSAT: Storage Replica Module for Windows PowerShell
- RSAT: System Insights Module for Windows PowerShell
- RSAT: Volume Activation Tools (консоль активации KMS сервера)
- RSAT: Windows Server Update Services Tools
Выберите нужные компоненты RSAT и нажмите Install.
Вы можете установить RSAT только Professional и Enterprise редакциях Windows 10/11, но не в Windows Home.
После установки некоторых компонентов RSAT может потребоваться перезагрузка.
Компоненты RSAT не включены в состав Windows, а поставляются в виде Функции по требованию (Features on Demand). Это значит, что для установки RSAT ваш компьютер должен быть подключен к интернету. Windows загрузит и установит необходимые файлы с серверов Microsoft Update.
В предыдущих версиях Windows (до билда Windows 10 1809) пакет удаленного администрирования серверов RSAT устанавливался в виде отдельного файла MSU обновления, которое нужно было вручную скачивать и установить с сайта Microsoft (https://www.microsoft.com/en-us/download/details.aspx?id=45520)
После установки пакета KB2693643 вы можете включить необходимые компоненты RSAT в разделе Control Panel -> Programs and Feature -> Turn Windows features on or off (
optionalfeatures.exe
). Разверните Remote Server Administration Tools и выберите необходимые компоненты для установки.
Если попытаться установить KB2693643 на более новых билдах Windows 10 или 11, появится ошибка:
Windows Update Standalone Installer encountered and error: 0x8024001d
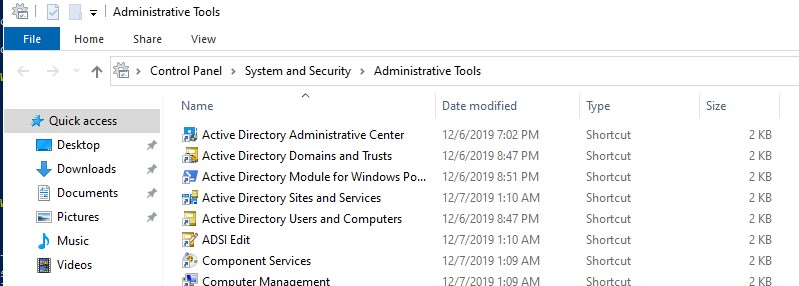
После установки, графические mmc оснастки RSAT будут доступны в панели управления в секции Administrative Tools (Control Panel\System and Security\Administrative Tools) или в папке:
%ProgramData%\Microsoft\Windows\Start Menu\Programs\Administrative Tools
.
Установка RSAT в Windows с помощью PowerShell
Вы можете установить компоненты администрирования RSAT в Windows 10 и 11 с помощью PowerShell.
С помощью следующей PowerShell команды можно вывести список компонентов RSAT, установленных на вашем компьютере:
Get-WindowsCapability -Name RSAT* -Online | Select-Object -Property DisplayName, State
В нашем примере инструменты управления DHCP и DNS установлены (
Installed
), а все остальные модуль RSAT отсутствуют (
NotPresent
).
Для установки RSAT в Windows используется PowerShell командлет Add-WindowsCapability.
Чтобы установить конкретный инструмент RSAT, например инструменты управления AD (в том числе консоль ADUC из модуля Active Directory для Windows Powershell), выполните команду:
Add-WindowsCapability –online –Name Rsat.ActiveDirectory.DS-LDS.Tools~~~~0.0.1.0
Для установки консоли управления DNS и модуля PowerShell DNSServer, выполните:
Add-WindowsCapability –online –Name Rsat.Dns.Tools~~~~0.0.1.0
И т.д.
Add-WindowsCapability -Online -Name Rsat.BitLocker.Recovery.Tools~~~~0.0.1.0
 Add-WindowsCapability -Online -Name Rsat.CertificateServices.Tools~~~~0.0.1.0
Add-WindowsCapability -Online -Name Rsat.DHCP.Tools~~~~0.0.1.0
Add-WindowsCapability -Online -Name Rsat.FailoverCluster.Management.Tools~~~~0.0.1.0
Add-WindowsCapability -Online -Name Rsat.FileServices.Tools~~~~0.0.1.0
Add-WindowsCapability -Online -Name Rsat.GroupPolicy.Management.Tools~~~~0.0.1.0
Add-WindowsCapability -Online -Name Rsat.IPAM.Client.Tools~~~~0.0.1.0
Add-WindowsCapability -Online -Name Rsat.LLDP.Tools~~~~0.0.1.0
Add-WindowsCapability -Online -Name Rsat.NetworkController.Tools~~~~0.0.1.0
Add-WindowsCapability -Online -Name Rsat.NetworkLoadBalancing.Tools~~~~0.0.1.0
Add-WindowsCapability -Online -Name Rsat.RemoteAccess.Management.Tools~~~~0.0.1.0
Add-WindowsCapability -Online -Name Rsat.RemoteDesktop.Services.Tools~~~~0.0.1.0
Add-WindowsCapability -Online -Name Rsat.ServerManager.Tools~~~~0.0.1.0
Add-WindowsCapability -Online -Name Rsat.Shielded.VM.Tools~~~~0.0.1.0
Add-WindowsCapability -Online -Name Rsat.StorageMigrationService.Management.Tools~~~~0.0.1.0
Add-WindowsCapability -Online -Name Rsat.StorageReplica.Tools~~~~0.0.1.0
Add-WindowsCapability -Online -Name Rsat.SystemInsights.Management.Tools~~~~0.0.1.0
Add-WindowsCapability -Online -Name Rsat.VolumeActivation.Tools~~~~0.0.1.0
Add-WindowsCapability -Online -Name Rsat.WSUS.Tools~~~~0.0.1.0
Чтобы установить сразу все доступные инструменты RSAT, выполните:
Get-WindowsCapability -Name RSAT* -Online | Add-WindowsCapability –Online
Также вы можете установить компоненты RSAT с помощью утилиты DISM:
DISM.exe /Online /add-capability /CapabilityName:Rsat.ActiveDirectory.DS-LDS.Tools~~~~0.0.1.0 /CapabilityName:Rsat.GroupPolicy.Management.Tools~~~~0.0.1.0 /CapabilityName:Rsat.WSUS.Tools~~~~0.0.1.0
Чтобы установить только отсутствующие компоненты RSAT, выполните:
Get-WindowsCapability -Name RSAT* -Online | where State -EQ NotPresent | Add-WindowsCapability –Online
Теперь убедитесь, что инструменты RSAT установлены (статус Installed);

Как установить Remote Server Administration Tools в Windows Server 2022,2019,2016?
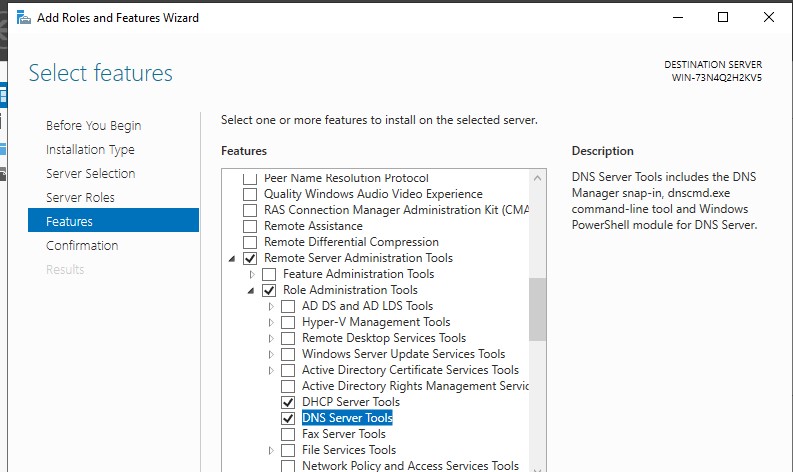
В Windows Server для установки RSAT не нужен доступ в интернет. Компоненты RSAT можно устанавливать при установке соответствующих ролей или фич Windows Server, либо можно установить их через Server Manager (Add roles and Features -> Features -> Remote Server Administration Tools). Все компоненты RSAT разбиты на две секции: Feature Administration Tools и Role Administration Tools. Выберите необходимые компоненты и нажмите Next -> Next.
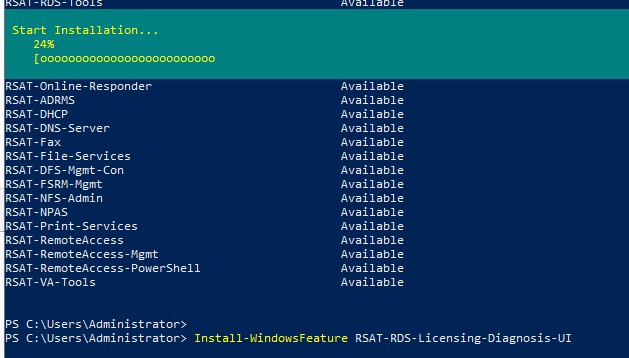
Для установки RSAT в Windows Server используется командлет установки компонентов и ролей — Install-WindowsFeature. Вывести список доступных компонентов RSAT в Windows Server 2022, 2019 и 2016:
Get-WindowsFeature| Where-Object {$_.name -like "*RSAT*"}| ft Name,Installstate
Для установки выбранного компонента RSAT, укажите его имя. Например, установим консоль диагностики лицензирования RDS:
Install-WindowsFeature RSAT-RDS-Licensing-Diagnosis-UI
Установить консоль удаленного управления Hyper-V Manager и PowerShell модуль Hyper-V:
Get-WindowsFeature | Where-Object {$_.Name -like "RSAT-Hyper-V-Tools"}| Install-WindowsFeature -IncludeAllSubFeature
Установленные графические консоли RSAT доступны из Server Manager или через панель управления.
Ошибка 0x800f0954 при установке RSAT в Windows
Если ваш компьютер Windows настроен на получение обновлений с локального сервера обновлений WSUS или SCCM (Configuration Manager) SUP, то при установке RSAT из графического интерфейса, Add-WindowsCapability или DISM вы получите ошибку.
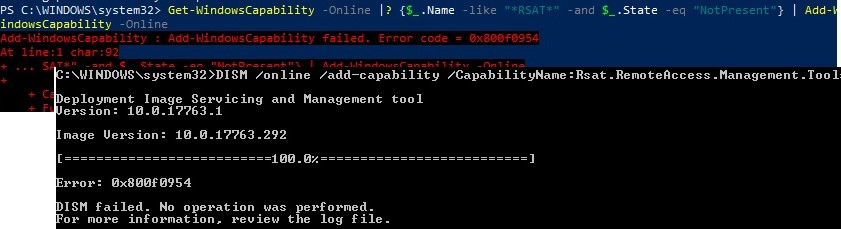
В этом случае Windows будет пытаться загрузить пакет RSAT с вашего локального сервера обновлений и вернет ошибку 0x800f0954:
Чтобы игнорировать локальный WSUS при установке дополнительных компонентов Windows и Features On Demand (в том числе RSAT) нужно настроить специальный параметр групповых политики:
- Откройте редактор локальной GPO –
gpedit.msc
или используйте доменную консоль управления GPO –
gpmc.msc
); - Перейдите в раздел Computer Configuration -> Administrative Templates -> System;
- Включите политику Specify settings for optional component installation and component repair, и включите опцию Download repair content and optional features directly from Windows Updates instead of Windows Server Updates Services (WSUS) (опция “Скачайте содержимое для восстановления и дополнительные компненты непосредственно из Центра обновления Windows вместо использования службы WSUS”);

- Сохраните изменения и обновите настройки групповых политик (
gpupdate /force
). - Перезапустите службу Windows Update:
net stop wuauserv
net start wuauserv
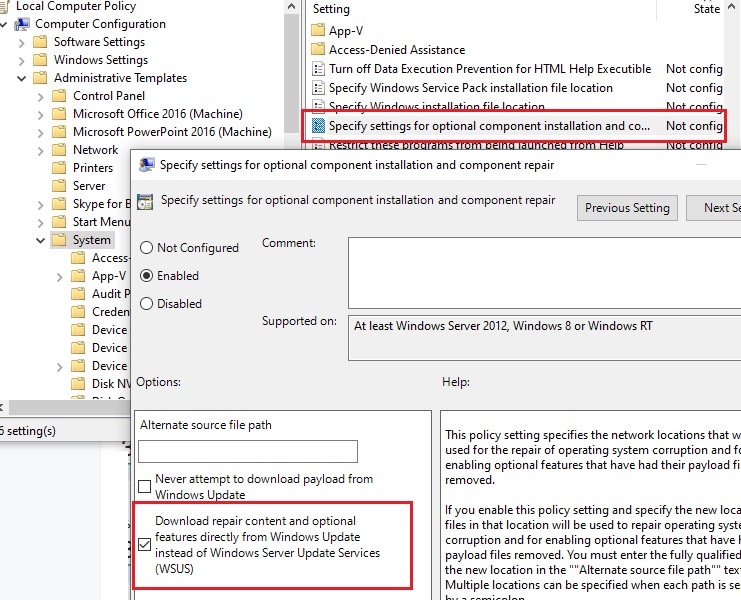
Теперь установка RSAT через PowerShell или DISM должна выполняться без ошибок.
Некоторые параметры реестра могут блокировать подключение к Microsoft Update при получении компонентов RSAT. Если при установке RSAT появляется ошибка 0x8024002e, измените значения следующий параметров реестра в ветке
HKLM\SOFTWARE\Policies\Microsoft\Windows\WindowsUpdate
:
- DoNotConnectToWindowsUpdateInternetLocations = 0
- DisableWindowsUpdateAccess = 0
Затем перезапустите службу wuauserv.
Установка RSAT в Windows в офлайн режиме
Если вы не можете открыть прямой доступ с рабочей станции к серверам Microsoft Update, вы можете воспользоваться офлайн установкой RSAT (рекомендуется для корпоративных сетей без прямого доступа в Интернет).
Для офлайн установки RSAT нужно скачать ISO образ диска с компонентами FoD для вашей версии Windows 10/11 с сайта Microsoft или из личного кабинета на сайте лицензирования Microsoft (Volume Licensing Service Center, VLSC):
- Для Windows 10 2004 — https://learn.microsoft.com/en-us/azure/virtual-desktop/language-packs (FOD Disk 1 ISO)
- Для Windows 11 21H2/22H2- https://learn.microsoft.com/en-us/azure/virtual-desktop/windows-11-language-packs (Language and Optional Features ISO)
Например, для Windows 10 2004 x64 нужно скачать образ 19041.1.191206-1406.vb_release_amd64fre_FOD-PACKAGES_OEM_PT1_amd64fre_MULTI.iso (около 5 Гб). Распакуйте образ в сетевую папку. У вас получится набор *.cab файлов, среди которых есть компоненты RSAT.
Теперь для установки компонентов RSAT на рабочей станции Windows нужно указывать путь к данному сетевому каталогу с FoD в параметре -Source:
Add-WindowsCapability -Online -Name Rsat.ActiveDirectory.DS-LDS.Tools~~~~0.0.1.0 -LimitAccess -Source \\msk-fs01\Distr\Windows-FOD\Win101903x64\

Также вы можете указать путь к каталогу с компонентами FoD с помощью указанной выше групповой политики. Для этого в параметре Alternative source file path нужно указать UNC путь к каталогу с файлами FoD.
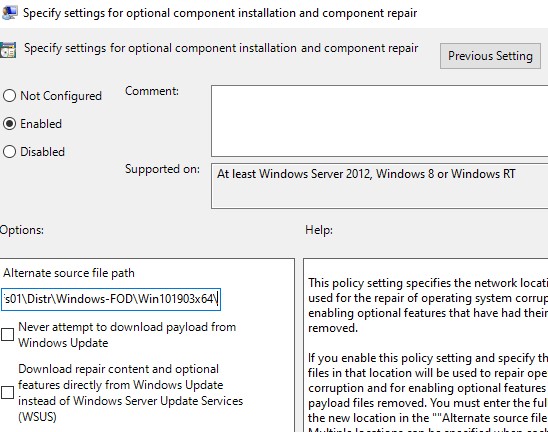
Или можете задать этот параметр через реестр отдельной политикой, указав путь к каталогу в параметр LocalSourcePath (тип REG_Expand_SZ) в ветке реестра HKLM\SOFTWARE\Microsoft\Windows\CurrentVersion\Policies\Servicing.
После этого, пользователи смогут самостоятельно устанавливать компоненты RSAT через графический интерфейс добавления компонент Windows 10.
Частые ошибки установки Remote Server Administration Tools в Windows
- 0x8024402c, 0x80072f8f – Windows не может поучить доступ к серверам обновления Windows для получения компонентов RSAT. Проверьте доступ в интернет или установите компоненты из локального образа FoD:
Add-WindowsCapability -Online -Name Rsat.Dns.Tools~~~~0.0.1.0 -LimitAccess -Source E:\RSAT\ - 0x800f081f – проверьте путь к каталогу с компонентами RSAT, указанному в параметре –Source;
- 0x800f0950 – ошибка аналогична 0x800f0954;
- 0x80070490 –проверьте целостность образа Windows с помощью DISM:
DISM /Online /Cleanup-Image /RestoreHealth