
Microsoft has stopped supporting this method of installation. It is not expected to work but is here for archival purposes.
There is more info at this answer on Robotics Stack Exchange
Show EOL distros:
ROS CTurtle is EOL, and these instructions for getting it to work on Windows are severely outdated. They are only kept here for historical reasons.
Please do not expect these steps to work, or try to follow them.
For future Windows support, see the relevant ROS2 resources.
Running ROS Software on Windows
ROS is currently not supported on Windows, but it is possible to run parts of ROS on Windows. In particular, you can:
-
run some of the Python code, including the ROS client library for Python (rospy). This is useful, for example, if you need to interface a process on Windows with a ROS graph running elsewhere.
- run C++ code under Cygwin
Each of these possibilities is discussed below.
Contents
-
Running ROS Software on Windows
-
Running Python code on Windows
- What you need
- Copying generated message and service files
- Disable calls to roslib.load_manifest
- Setup your environment
- Quick Check
- ROS windows port by Robotics Equipment Corporation
- Running with Cygwin
-
Running Python code on Windows
Running Python code on Windows
If you have Python code on Windows you wish to interface with ROS, you can use the rospy client library. This will enable you to run Python-based ROS nodes. Higher-level tools, like roslaunch, are not expected to work on Windows, though they can be ported.
There are some extra things you will have to do that, while cumbersome, will get you off the ground.
What you need
-
ROS: in particular, you will be using the rospy and roslib packages
-
Python
-
PyYAML
Copying generated message and service files
You will need the auto-generated Python files for the messages and services you plan to use. The easiest way to do this is to compile your packages on a non-Windows setup, then copy these files over.
In order to figure out which packages have messages, you can run:
$ rosmsg packages
You can then copy the src/package_name/msg from these packages onto your Windows machine.
In order to figure out which packages have services, you can run:
$ rossrv packages
You can then copy the src/package_name/srv from these packages onto your Windows machine.
Disable calls to roslib.load_manifest
rospy uses the rospack library to dynamically generate the appropriate PYTHONPATH. rospack doesn’t work on Windows (yet), so you will need to disable these calls and instead configure your Python path manually.
Here is an example of how to disable this call in roslib/src/roslib/launcher.py:
def load_manifest(package_name, bootstrap_version="0.7"):
    """
    Update the Python sys.path with package's dependencies
    @param package_name: name of the package that load_manifest() is being called from.
    @type  package_name: str
    @param bootstrap_version: (keyword argument) do not use. Soon to be deprecated
    @type  bootstrap_version: str
    """
    if 1 or package_name in _bootstrapped:
        return
Note the «1 or» on the second-to-last line.
Setup your environment
You will need to set your ROS_MASTER_URI and ROS_ROOT environment variables. Also set PYTHONPATH variable to the folder containing the copied packages
Quick Check
Ideally, you’ll have a folder containing the following python packages
- roslib — copied from $HOME/ros/ros/core/roslib/src/
- rospy — copied from $HOME/ros/ros_comm/clients/rospy/src/
- std_msgs — copied from $HOME/ros/ros_comm/messages/std_msgs/src/
- rosgraph_msgs — copied from $HOME/Users/tingfan/ros/ros_comm/messages/rosgraph_msgs/src/
-
other packages — copied from rospack find $package_name/src
These packages list above should be enough for running at least the «talker_listener» tutorial.
ROS windows port by Robotics Equipment Corporation
A native windows port is available here. The port currently includes
- roslib
- roscpp
- rosconsole
- message_filters
- tf
- actionlib
Its main purpose is to enable developers to create shiny windows GUIs connected to the ROS system running on the Linux driven robot.
System requirements:
- Windows 7 or Vista (32/64 bit)
- Microsoft Visual Studio 2008 or Microsoft Visual Studio 2008 Express Edition
- CMake (version 2.8 or later)
Running with Cygwin
Please see Tingfan Wu’s tutorial.
ROS Diamondback is EOL, and these instructions for getting it to work on Windows are severely outdated. They are only kept here for historical reasons.
Please do not expect these steps to work, or try to follow them.
For future Windows support, see the relevant ROS2 resources.
Overview
We are go! Well, not fully yet, but there is partial functionality and enough to be useful in some situations. To be practical, we are not targeting the windows environment as a full blown replacement for linux-ros as windows doesn’t have the mechanisms to handle the scaling of complexity (e.g. rosdeps), but it needs to be able to be useful in some simple use case scenarios. For example,
- Monitoring/debugging the robot from a remote windows pc.
- Users interfacing with a robot via simple controlling applications.
- Scenario apps (e.g. smach) that are more conveniently run on the network.
- Manager applications for controlling networked robots.
- Computationally heavy algorithms running on an idle pc away from the robot.
Status
-
Mingw Build Environment — cross compiling in linux with mingw.
-
Mingw Standalone Clients — running clients detached from ros trees.
-
Mingw Runtime Environment — roscore, roslaunch and others.
Current functionality has been enabled by compiling with the mingw cross-compiler in linux. The cross compiling is managed by eros and the windows specific utilities and tools are in win_ros. As ros moves to a purely cmake build environment, we hope to bring in the msvc compatibility.
Under Construction…
Contents
- Overview
-
Getting Started
- Windows C++ Development
- Linux C++ Development
- Where To Go From Here
ROS Electric is EOL, and these instructions for getting it to work on Windows are severely outdated. They are only kept here for historical reasons.
Please do not expect these steps to work, or try to follow them.
For future Windows support, see the relevant ROS2 resources.
Overview
We are go! Well, not fully yet, but there is partial functionality and enough to be useful in some situations. To be practical, we are not targeting the windows environment as a full blown replacement for linux-ros as windows doesn’t have the mechanisms to handle the scaling of complexity (e.g. rosdeps), but it needs to be useful in some simple use case scenarios. For example,
- Monitoring/debugging/interfacing with ros robots from a remote windows pc.
- Integrating with programs that only utilise windows drivers/libraries.
- Using ros comms to connect ros robots to a much larger networked environment.
- Computationally heavy algorithms running on an idle pc away from the robot.
The current status is still experimental. Various components are working and we hope to start realising some real usefulness with electric. You can check the roadmap to see what’s been done and what is on the immediate todo list (if you’re interested in helping, contact one of the devs!).
Getting Started
Windows C++ Development
This is for native windows development with the microsoft visual studio compiler (currently supporting visual studio/express 10+).
-
Msvc SDK — installing, configuring and verifying a pre-built sdk.
-
Msvc SDK Projects — developing projects with the msvc compiler and the sdk.
-
Msvc Runtime Environment — rosmaster, roslaunch’ers, rosparam and ros logging with the sdk.
For more advanced usage:
-
Msvc Build Environment — compiling the sdk/building your packages rosbuild2 style!
-
Msvc Debugging — debugging msvc and win_ros.
Linux C++ Development
This is for the control roboticists who love working in linux and get flustered when asked to build windows apps for the rest of the world (namely users/test engineers) there is the mingw cross-compiler. There is also qt support here — write the code once and compile your qt app for both windows and linux without any changes.
-
Mingw Build Environment — setting up the mingw-cross build environment.
-
Mingw Packages — how to create mingw packages in ros.
-
Mingw Qt-Ros Packages — how to create mingw qt packages in ros.
Where To Go From Here
-
Roadmap — if you’re interested in helping out, look here.
-
Frequently Asked Questions
-
Contact/Support
All guides and documentation for installing and using ros on windows can be found in the win_ros wiki pages.
Contents
- Overview
- Information
-
Getting Started
- WinRos on Windows
- WinRos on Linux
- Support
- Contributing
Overview
ROS Groovy is EOL, and these instructions for getting it to work on Windows are severely outdated. They are only kept here for historical reasons.
Please do not expect these steps to work, or try to follow them.
For future Windows support, see the relevant ROS2 resources.
Under development — ymmv.
Information
-
Subscribe to the ChangeList page to keep track of progress by email.
-
Roscon 2012 Presentation — Windows on Ros slides.
Getting Started
WinRos on Windows
This is for native windows development with the microsoft 2010 compiler. Currently supporting either windows sdk 7.1 (cl/nmake) or visual studio 10.0.
-
Msvc Status — what’s working and what’s not.
-
Msvc SDK — installing, configuring and verifying a pre-built sdk.
-
Msvc SDK Projects — developing projects with visual studio and the sdk.
-
Msvc SDK Messages — developing new ros msg types with the sdk.
-
Msvc Runtime Environment — rosmaster, roslaunch’ers, rosparam and ros logging with the sdk.
For more advanced users who are familiar with ros and catkin:
-
Msvc Compiled SDK — compiling the sdk manually.
-
Msvc Overlays — build catkin style with an overlay on top of an installed sdk.
WinRos on Linux
It is not likely we’ll have mingw re-enabled for groovy.
This is for the control roboticists who love working in linux and get flustered when asked to build windows apps for the rest of the world (namely users/test engineers) there is the mingw cross-compiler. There is also qt support here — write the code once and compile your qt app for both windows and linux without any changes.
-
Mingw Build Environment — setting up the mingw-cross build environment.
-
Mingw Packages — how to create mingw packages and stacks, ros style.
-
Mingw Qt-Ros Packages — how to create mingw qt packages in ros.
Support
-
Contact — where to go for help or to ask about contributing.
-
Troubleshooting — if you are having issues, consult this first.
-
Additional Help — general questions about working in win_ros.
Contributing
-
Roadmap/ChangeList — current status and plans.
-
Contributing — if you’re interested in helping, either with the infrastructure or porting stacks, start here.
All guides and documentation for installing and using ros on windows can be found in the win_ros wiki pages.
Contents
- Overview
- Information
-
Getting Started
- WinRos on Windows
- Support
- Contributing
Overview
ROS Hydro is EOL, and these instructions for getting it to work on Windows are outdated. They are only kept here for historical reasons.
Please do not expect these steps to work, or try to follow them.
For future Windows support, see the relevant ROS2 resources.
Information
-
Subscribe to the ChangeList page to keep track of progress by email.
-
Roscon 2012 Presentation — Windows on Ros slides.
Getting Started
WinRos on Windows
This is for native Windows development with the Microsoft Visual C++ Compilers 2010. Currently supporting either Windows SDK 7.1 (cl/nmake) or Visual Studio 10.0.
-
Msvc Status — what’s working and what’s not.
-
Msvc SDK — installing, configuring and verifying a pre-built sdk.
-
Msvc SDK Projects — developing projects with visual studio and the sdk.
-
Msvc SDK Messages — developing new ros msg types with the sdk.
- Msvc Runtime Environment — rosmaster, roslaunch’ers, rosparam and ros logging with the sdk.
For more advanced users who are familiar with ros and catkin:
-
Msvc Compiled SDK — compiling the sdk manually.
-
Msvc Overlays — build catkin style with an overlay on top of an installed sdk.
Support
-
Contact — where to go for help or to ask about contributing.
-
Troubleshooting — if you are having issues, consult this first.
-
Additional Help — general questions about working in win_ros.
Contributing
-
Roadmap/ChangeList — current status and plans.
-
Contributing — if you’re interested in helping, either with the infrastructure or porting stacks, start here.
Refer to hydro version for old installation instructions.
Refer to lunar if you are able to use a newer ROS version.
Windows Operating System
- ROS for Windows requires 64-bit Windows 10 Desktop or Windows 10 IoT Enterprise.
- Please ensure that you have Powershell installed and in the system path.
-
Exclude c:\opt (and later your workspace folder) from real-time virus Scanners, as they can interfere with install and development.
Reserve space for the installation
-
Clean and back up any existing data under c:\opt before proceeding.
-
c:\opt is the required install location. Relocation is not currently enabled.
- Please ensure you have 10 GB of free space on the C:\ drive for the installation and development.
Install Visual Studio 2019
Building a ROS project for Windows requires Visual Studio 2019 and the Microsoft Windows 10 SDK.
-
Download Visual Studio 2019
- Visual Studio 2019 is required to maintain toolchain compatibility with published binaries.
- Vcpkg is used for managing dependent libraries. It requires that the English language pack be installed.
- Include «Desktop development with C++» workload.
- In the Individual Components, select «Windows 10 SDK (10.0.19041.0)».
Install Windows Package Manager
Chocolatey is a package manager for Windows. It is used to make it easy to install tools and libraries needed for building and running ROS projects. The following instructions redirect the chocolatey install location into the c:\opt, so that you can clean or move a ROS environment from that one location.
- In the Start Menu, find the «x64 Native Tools Command Prompt for VS 2019» item.
- Right Click, select More then «Run as Administrator»
- Copy the following command line:
-
@"%SystemRoot%\System32\WindowsPowerShell\v1.0\powershell.exe" -NoProfile -InputFormat None -ExecutionPolicy Bypass -Command "iex ((New-Object System.Net.WebClient).DownloadString('https://chocolatey.org/install.ps1'))" && SET "PATH=%PATH%;%ALLUSERSPROFILE%\chocolatey\bin" - Paste it into the command window.
- Approve any prompts
- Once it has completed, close the command prompt to complete the install.
-
- Install Git:
- Reopen the Visual Studio Command Window as described above.
- Please install Git using the command here, even if you have it installed as an application.
choco upgrade git -y
- After Git installed, ensure Git is now available in the Visual Studio command window.
git --version
- Close and Reopen the Visual Studio Command Window as described above.
Binary Package Installation
To set up ROS for Windows follow these recommended steps:
ROS Last Known Good (LKG) Build Installation
To get things started, install the recommended desktop_full metapackage. A Metapackage is a collection of other packages. The Desktop-Full metapackage refers to a number of other packages needed to build, run, debug and visualize a robot.
Open the Visual Studio Command Prompt as Administrator as described above.
mkdir c:\opt\chocolatey
set ChocolateyInstall=c:\opt\chocolatey
choco source add -n=ros-win -s="https://aka.ms/ros/public" --priority=1
choco upgrade ros-noetic-desktop_full -y --execution-timeout=0
ROS 2 Build Installation
To get started with ROS 2, one can also follow the similar steps to install ROS 2 from the same Chocolatey feed.
For example, if you want to install ROS2 Foxy build, open the ROS Command Prompt created above and approve the administrative elevation if not already opened.
mkdir c:\opt\chocolatey
set ChocolateyInstall=c:\opt\chocolatey
choco source add -n=ros-win -s="https://aka.ms/ros/public" --priority=1
choco upgrade ros-foxy-desktop -y --execution-timeout=0
Create a ROS Command Window shortcut
In order to use ROS on Windows, the ROS setup script needs to be called in each command Window. In order to not forget in the future, it is helpful to have a ROS shortcut which does this automatically.
- Create an Administrative command line shortcut for Visual Studio:
-
Right click in a Windows Explorer folder, select New > Shortcut
- In the shortcut path, copy the highlighted command line from the following options, depending on the Visual Studio install above:
- If you are using Community:
C:\Windows\System32\cmd.exe /k "C:\Program Files (x86)\Microsoft Visual Studio\2019\Community\Common7\Tools\VsDevCmd.bat" -arch=amd64 -host_arch=amd64&& set ChocolateyInstall=c:\opt\chocolatey&& c:\opt\ros\noetic\x64\setup.bat
- If you are using Professional:
C:\Windows\System32\cmd.exe /k "C:\Program Files (x86)\Microsoft Visual Studio\2019\Professional\Common7\Tools\VsDevCmd.bat" -arch=amd64 -host_arch=amd64&& set ChocolateyInstall=c:\opt\chocolatey&& c:\opt\ros\noetic\x64\setup.bat
- If you are using Enterprise:
C:\Windows\System32\cmd.exe /k "C:\Program Files (x86)\Microsoft Visual Studio\2019\Enterprise\Common7\Tools\VsDevCmd.bat" -arch=amd64 -host_arch=amd64&& set ChocolateyInstall=c:\opt\chocolatey&& c:\opt\ros\noetic\x64\setup.bat
- Name the shortcut «ROS»
- Set that shortcut as Administrator
- Right Click on the shortcut and choose «Properties».
- Select the Shortcut Tab if not already selected.
- Press the Advanced button
- Check the button «Run as Administrator».
- Press OK on the Advanced properties dialog.
- Press OK on the «ROS Properties» shortcut dialog.
- If you are using Community:
Using the new Windows Terminal
Microsoft released a new open source terminal for Windows, which includes many improvements over the built in command line, including tabs and appearance customization. You can install it from the Microsoft Store.
To set up the terminal for ROS:
- Find the Windows Terminal from the start menu, right click and select ‘Run as Administrator’
- Select settings from the drop down arrow next to the Add Tab (+) Button.
- In the list array in the «profiles» object, add a new block for ROS.
    "profiles" :
    {
        list:
        [
            ...
            {
                "commandline" : "C:\\Windows\\System32\\cmd.exe /k \"C:\\Program Files (x86)\\Microsoft Visual Studio\\2019\\Community\\Common7\\Tools\\VsDevCmd.bat\" -arch=amd64 -host_arch=amd64 && set ChocolateyInstall=c:\\opt\\chocolatey&& c:\\opt\\ros\\noetic\\x64\\setup.bat",
                "guid" : "{xxxxxx-xxxx-xxxx-xxxx-xxxxxxxxxxxxxxx}",
                "icon" : "ms-appx:///ProfileIcons/{0caa0dad-35be-5f56-a8ff-afceeeaa6101}.png",
                "name" : "ROS Noetic",
                "startingDirectory" : "c:\\ws"
        },
-
from a Visual Studio command window, use the command uuidgen to generate a globally unique identifier (aka universally unique identifier).
- copy the guid (select the text, then right click to copy)
- Replace xxxxxx-xxxx-xxxx-xxxx-xxxxxxxxxxxxxxx with the text copied above.
- (Optionally) Set this guid as the «defaultProfile»
        "alwaysShowTabs" : true,
        "copyOnSelect" : false,
        "defaultProfile" : "{xxxxxx-xxxx-xxxx-xxxx-xxxxxxxxxxxxxxx}",
        ....
When launching the new Windows terminal, please remember to Run as Administrator, by right clicking on the Windows Terminal and Select *Run as Administrator*. There is a Always Run Terminal elevated feature request that needs to be implemented before this requirement is lifted.
Alternatively, Ctrl+Shift+clicking on the terminal icon in either the start menu or task bar is a handy shortcut to run as administrator.
Stay Up to Date
If you want to update your ROS install, use Chocolatey’s upgrade feature.
Open the ROS Command Prompt created above and approve the administrative elevation if not already opened.
Run the following command:
set ChocolateyInstall=c:\opt\chocolatey
choco upgrade all -y --execution-timeout=0
It is recommended to add —execution-timeout=0 to accommodate a chocolatey install failure due to slow network.
Uninstall
- Before the uninstallation, make sure no ROS system or program is running on your system.
- In a command prompt, run the following command:
rmdir /s /q c:\opt
Feedback
In case you run into any upgrade/install/uninstall issues, you are encouraged to ask a question on answers.ros.org and tag windows.
Windows Operating System
- ROS for Windows requires 64-bit Windows 10 Desktop or Windows 10 IoT Enterprise.
- Please ensure that you have Powershell installed and in the system path.
-
Exclude c:\opt (and later your workspace folder) from real-time virus Scanners, as they can interfere with install and development.
Reserve space for the installation
-
Clean and back up any existing data under c:\opt before proceeding.
-
c:\opt is the required install location. Relocation is not currently enabled.
- Please ensure you have 10 GB of free space on the C:\ drive for the installation and development.
Install Visual Studio 2019
Building a ROS project for Windows requires Visual Studio 2019 and the Microsoft Windows 10 SDK.
-
Download Visual Studio 2019
- Visual Studio 2019 is required to maintain toolchain compatibility with published binaries.
- Vcpkg is used for managing dependent libraries. It requires that the English language pack be installed.
- Include «Desktop development with C++» workload.
- In the Individual Components, select «Windows 10 SDK (10.0.19041.0)».
-
If you already have Visual Studio 2019 installed, you can Modify Installation
Install Windows Package Manager
Chocolatey is a package manager for Windows. It is used to make it easy to install tools and libraries needed for building and running ROS projects. The following instructions redirect the chocolatey install location into the c:\opt, so that you can clean or move a ROS environment from that one location.
- In the Start Menu, find the «x64 Native Tools Command Prompt for VS 2019» item.
- Right Click, select More then «Run as Administrator»
- Copy the following command line:
-
@"%SystemRoot%\System32\WindowsPowerShell\v1.0\powershell.exe" -NoProfile -InputFormat None -ExecutionPolicy Bypass -Command "iex ((New-Object System.Net.WebClient).DownloadString('https://chocolatey.org/install.ps1'))" && SET "PATH=%PATH%;%ALLUSERSPROFILE%\chocolatey\bin" - Paste it into the command window.
- Approve any prompts
- Once it has completed, close the command prompt to complete the install.
-
Binary Package Installation
To set up ROS for Windows follow these recommended steps:
ROS Last Known Good (LKG) Build Installation
To get things started, install the recommended desktop_full metapackage. A Metapackage is a collection of other packages. The Desktop-Full metapackage refers to a number of other packages needed to build, run, debug and visualize a robot.
Open the Visual Studio Command Prompt as Administrator as described above.
mkdir c:\opt\chocolatey
set ChocolateyInstall=c:\opt\chocolatey
choco source add -n=ros-win -s="https://aka.ms/ros/public" --priority=1
choco upgrade ros-melodic-desktop_full -y --execution-timeout=0
ROS 2 Foxy Installation
To get started with ROS 2, one can also follow the similar steps to install ROS 2 from the same Chocolatey feed.
For example, if you want to install ROS2 Foxy build, open the ROS Command Prompt created above and approve the administrative elevation if not already opened.
mkdir c:\opt\chocolatey
set ChocolateyInstall=c:\opt\chocolatey
choco source add -n=ros-win -s="https://aka.ms/ros/public" --priority=1
choco upgrade ros-foxy-desktop -y --execution-timeout=0
Create a ROS Command Window shortcut
In order to use ROS on Windows, the ROS setup script needs to be called in each command Window. In order to not forget in the future, it is helpful to have a ROS shortcut which does this automatically.
- Create an Administrative command line shortcut for Visual Studio:
-
Right click in a Windows Explorer folder, select New > Shortcut
- In the shortcut path, copy the highlighted command line from the following options, depending on the Visual Studio install above:
- If you are using Community:
C:\Windows\System32\cmd.exe /k "C:\Program Files (x86)\Microsoft Visual Studio\2019\Community\Common7\Tools\VsDevCmd.bat" -arch=amd64 -host_arch=amd64&& set ChocolateyInstall=c:\opt\chocolatey&& c:\opt\ros\melodic\x64\setup.bat
- If you are using Professional:
C:\Windows\System32\cmd.exe /k "C:\Program Files (x86)\Microsoft Visual Studio\2019\Professional\Common7\Tools\VsDevCmd.bat" -arch=amd64 -host_arch=amd64&& set ChocolateyInstall=c:\opt\chocolatey&& c:\opt\ros\melodic\x64\setup.bat
- If you are using Enterprise:
C:\Windows\System32\cmd.exe /k "C:\Program Files (x86)\Microsoft Visual Studio\2019\Enterprise\Common7\Tools\VsDevCmd.bat" -arch=amd64 -host_arch=amd64&& set ChocolateyInstall=c:\opt\chocolatey&& c:\opt\ros\melodic\x64\setup.bat
- Name the shortcut «ROS»
- Set that shortcut as Administrator
- Right Click on the shortcut and choose «Properties».
- Select the Shortcut Tab if not already selected.
- Press the Advanced button
- Check the button «Run as Administrator».
- Press OK on the Advanced properties dialog.
- Press OK on the «ROS Properties» shortcut dialog.
- If you are using Community:
(Optional) Using the new Windows Terminal
Microsoft is working on a new open source terminal for Windows, which includes many improvements over the built in command line, including tabs and appearance customization. You can install it from the Microsoft Store.
To set up the terminal for ROS:
- Find the Windows Terminal from the start menu, right click and select ‘Run as Administrator’
- Select settings from the drop down arrow next to the Add Tab (+) Button.
- In the list array in the «profiles» object, add a new block for ROS.
    "profiles" :
    {
        list:
        [
            ...
            {
                "commandline" : "C:\\Windows\\System32\\cmd.exe /k \"C:\\Program Files (x86)\\Microsoft Visual Studio\\2019\\Community\\Common7\\Tools\\VsDevCmd.bat\" -arch=amd64 -host_arch=amd64 && set ChocolateyInstall=c:\\opt\\chocolatey&& c:\\opt\\ros\\melodic\\x64\\setup.bat",
                "guid" : "{xxxxxx-xxxx-xxxx-xxxx-xxxxxxxxxxxxxxx}",
                "icon" : "ms-appx:///ProfileIcons/{0caa0dad-35be-5f56-a8ff-afceeeaa6101}.png",
                "name" : "ROS",
                "startingDirectory" : "c:\\ws"
        },
-
from a Visual Studio command window, use the command uuidgen to generate a globally unique identifier (aka universally unique identifier).
- copy the guid (select the text, then right click to copy)
- Replace xxxxxx-xxxx-xxxx-xxxx-xxxxxxxxxxxxxxx with the text copied above.
- (Optionally) Set this guid as the «defaultProfile»
        "alwaysShowTabs" : true,
        "copyOnSelect" : false,
        "defaultProfile" : "{xxxxxx-xxxx-xxxx-xxxx-xxxxxxxxxxxxxxx}",
        ....
When launching the new Windows terminal, please remember to Run as Administrator, by right clicking on the Windows Terminal and Select *Run as Administrator*. There is a Always Run Terminal elevated feature request that needs to be implemented before this requirement is lifted.
Alternatively, Ctrl+Shift+clicking on the terminal icon in either the start menu or task bar is a handy shortcut to run as administrator.
Stay Up to Date
If you want to update your ROS install, use Chocolatey’s upgrade feature.
Open the ROS Command Prompt created above and approve the administrative elevation if not already opened.
Run the following command:
set ChocolateyInstall=c:\opt\chocolatey
choco upgrade all -y --execution-timeout=0
It is recommended to add —execution-timeout=0 to accommodate a chocolatey install failure due to slow network.
Uninstall
- Before the uninstallation, make sure no ROS system or program is running on your system.
- In a command prompt, run the following command:
rmdir /s /q c:\opt
Feedback
In case you run into any upgrade/install/uninstall issues, you are encouraged to ask a question on answers.ros.org and tag windows. You can also leave a comment about your case on GitHub issue.
- What is rospy in Python?
- What is rospy rate?
- How do you install rospy on Windows?
- What is rospy and Roscpp?
- What does rospy spin do?
- What is rospy time now?
- Where is python installed on Ubuntu?
- How do I code python in Ubuntu?
What is rospy in Python?
rospy is a pure Python client library for ROS. The rospy client API enables Python programmers to quickly interface with ROS Topics, Services, and Parameters. … Many of the ROS tools, such as rostopic and rosservice, are built on top of rospy.
What is rospy rate?
rospy.Rate(hz) rospy provides a rospy.Rate convenience class which makes a best effort at maintaining a particular rate for a loop. For example: Toggle line numbers 1 r = rospy. Rate(10) # 10hz 2 while not rospy.
How do you install rospy on Windows?
ROS is currently not supported on Windows, but it is possible to run parts of ROS on Windows. In particular, you can: run some of the Python code, including the ROS client library for Python (rospy). This is useful, for example, if you need to interface a process on Windows with a ROS graph running elsewhere.
What is rospy and Roscpp?
roscpp is a C++ implementation of ROS. It provides a client library that enables C++ programmers to quickly interface with ROS Topics, Services, and Parameters.
What does rospy spin do?
rospy. spin() will effectively go into an infinite loop until it receives a shutdown signal (e.g. ctrl-c ). During that loop it will process any events that occur, such as data received on a topic or a timer triggering, when they occur but otherwise it will sleep.
What is rospy time now?
rospy. Time. now() just returns the current ‘wall clock time’ (or the simulated clock, depending on whether you have a Clock server running).
Where is python installed on Ubuntu?
You can type which python on the ubuntu terminal and it will give the Python installed location path. First, I hope you don’t really set PYTHONPATH=/etc , /etc is for configuration files, not python libraries. You can see what an environment variable is set to by using echo , e.g.: echo $PYTHONPATH .
How do I code python in Ubuntu?
Open a terminal window and type ‘python’ (without the quotes). This opens python in interactive mode. While this mode is good for initial learning, you may prefer to use a text editor (like Gedit, Vim or Emacs) to write your code. As long as you save it with the .
10 June 2017
Please find an updated version of this posting for WSL 2 here
The Windows Subsystem for Linux (WSL) is a compatibility layer which allows to run a whole bunch of linux binaries natively on Windows 10. With the advent of the Windows 10 Creators Update in March 2017, the WSL was heavily updated and now is able to run ROS lunar and melodic.
In this blogpost I will show you how to install WSL and setup ROS to get started.
Update Windows 10
A recent version of Windows 10 needs to be installed for ROS to work. If you are in doubt, which version is installed go to Settings -> System -> About and check that you have at least Version 1703
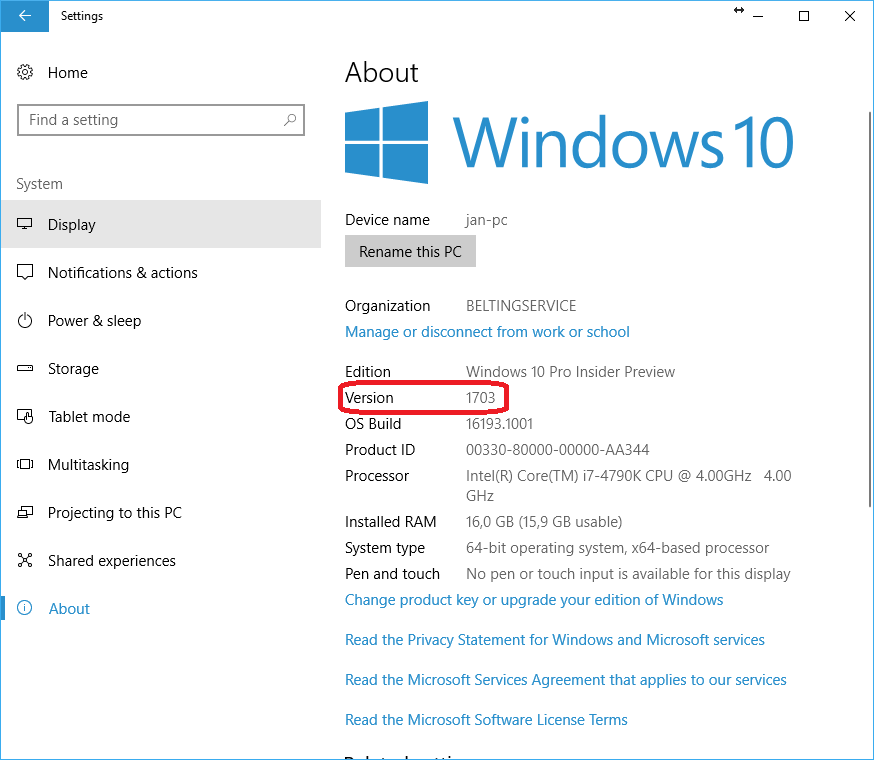
but Version 1809 is recommended for optimal performance.
If you need to update Windows, got to Windows Update and follow the instructions.
Install the WSL and Bash on Windows
To install the Windows Subsystem for Linux and Bash on Windows, follow this guide.
In case you have used the WSL before applying the creators update, you may still have the trusty version (14.04) or the xenial version (16.04). However, to install ros melodic, you need ubuntu bionic 18.04.
To check which version is actually installed, start an instance of bash and run lsb_release -a. The output should look like
$ lsb_release -a
No LSB modules are available.
Distributor ID: Ubuntu
Description:    Ubuntu 18.04.1 LTS
Release:        18.04
Codename:       bionic
If it shows an older version, you have to uninstall and then reinstall bash on windows from the windows command line as follows Warning: This will delete all of your existing data in WSL. Make a backup first
lxrun /uninstall /full /y
lxrun /install
Install ROS
Since WSL is based on ubuntu, you can follow the official ros installation guide for ubuntu by the word.
sudo sh -c 'echo "deb http://packages.ros.org/ros/ubuntu $(lsb_release -sc) main" > /etc/apt/sources.list.d/ros-latest.list'
curl -sSL 'http://keyserver.ubuntu.com/pks/lookup?op=get&search=0xC1CF6E31E6BADE8868B172B4F42ED6FBAB17C654' | sudo apt-key add -
sudo apt update
sudo apt install -y ros-melodic-desktop-full
sudo rosdep init
rosdep update
If you want to source ros melodic automatically for ever bash session, then
echo "source /opt/ros/melodic/setup.bash" >> ~/.bashrc
source ~/.bashrc
Run a simple test
-
Start a new bash prompt and run
roscore
- Start a second bash prompt
- Create a new file
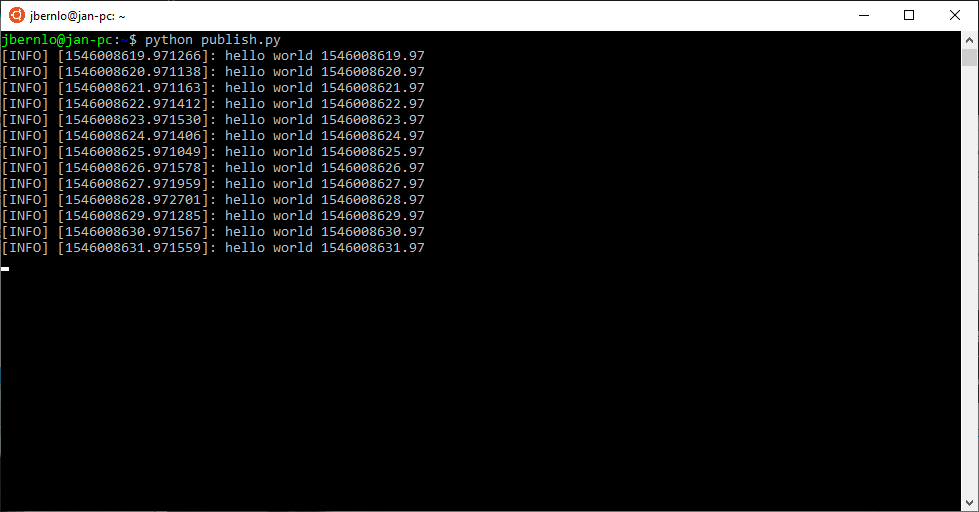
publish.pywith the contents#!/usr/bin/env python import rospy from std_msgs.msg import String pub = rospy.Publisher('chatter', String, queue_size=10) rospy.init_node('talker', anonymous=True) rate = rospy.Rate(10) # 10hz while not rospy.is_shutdown(): hello_str = "hello world %s" % rospy.get_time() rospy.loginfo(hello_str) pub.publish(hello_str) rate.sleep() -
Run the publisher
python publish.py
- Start a third bash prompt
- Create a new file
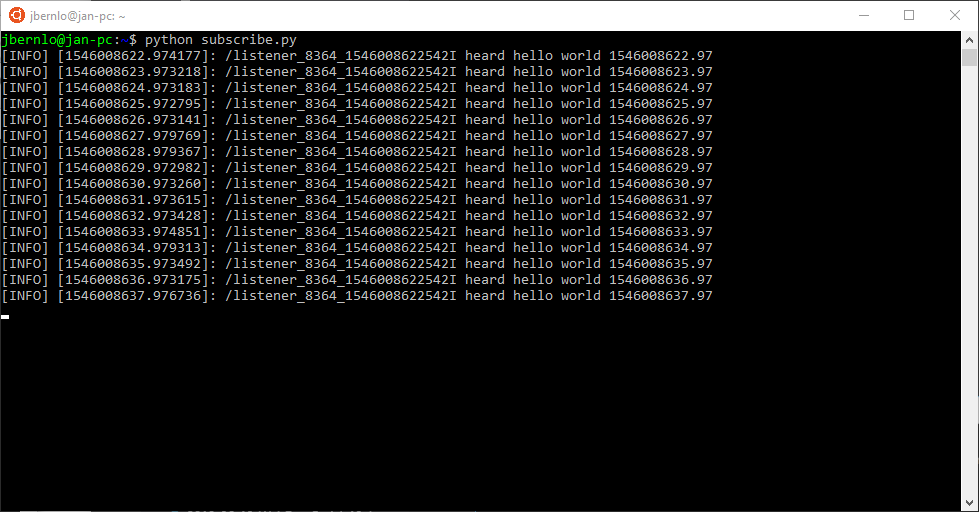
subscribe.pywith the contents#!/usr/bin/env python import rospy from std_msgs.msg import String def callback(data): rospy.loginfo(rospy.get_caller_id() + "I heard %s", data.data) def listener(): rospy.init_node('listener', anonymous=True) rospy.Subscriber("chatter", String, callback) # spin() simply keeps python from exiting until this node is stopped rospy.spin() if __name__ == '__main__': listener() -
Run the subscriber
python subscribe.py

Install VcXsrv
To run applications with graphical output, you need to install an X Server on Windows. To me, VcXsrv now works best.
After you have installed VcXsrv, you also need to configure WSL to use it. To do so modify you .bashrc as follows
echo "export DISPLAY=:0" >> ~/.bashrc
source ~/.bashrc
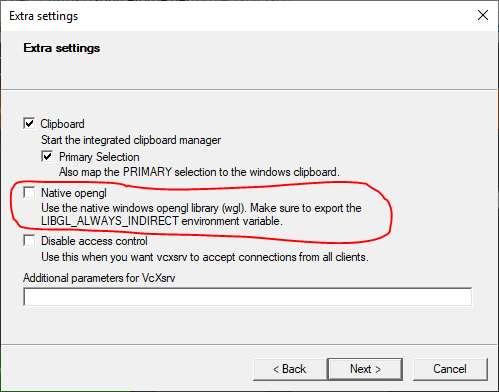
Finally, launch VcXsrv from the start menu. You can keep all default settings except Native opengl which needs to be unchecked. Otherwise applications such as rviz do not run as expected.
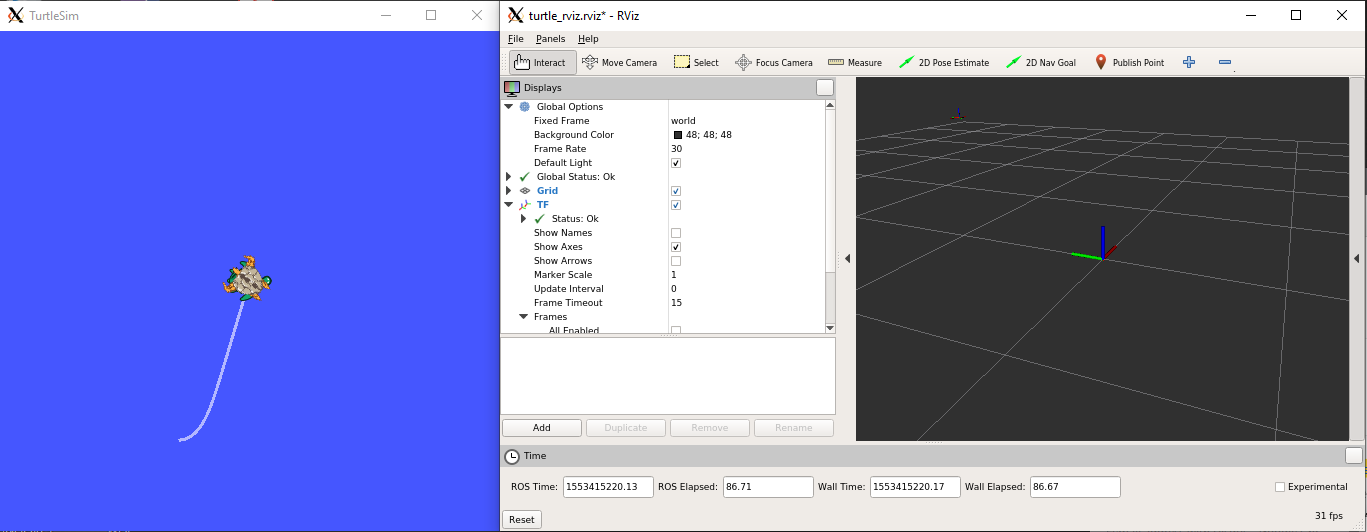
Run turtle_sim
The popular turtle_sim tutorial works fine WSL as well.
- Make sure you have an X Server installed, configured and running as described above.
- Start a new bash prompt and run
roslaunch turtle_tf turtle_tf_demo.launch
You can control the turtle by using the arrow keys by going back to the second prompt.

- Start a second bash prompt and run
rosrun rviz rviz -d `rospack find turtle_tf`/rviz/turtle_rviz.rviz
OpenGL indirection
Some places recommend to force indirect rendering using export LIBGL_ALWAYS_INDIRECT=1 for better OpenGL performance on WSL. However, with the versions of VcXsrv and Xming I tested, it is not possible to launch rviz when this indirection is active, thus my recommendation is to not use OpenGL indirection for the time being.
- wsl 2
- windows10 2
- ros 2
blog comments powered by
THIS IS NOT THE OFFICIAL ROSPY INDEX SERVER
rospy for pure Python
What is this for?
rospy packages without ROS installation.
It can be run in a pure python virtualenv.
It also supports tf2 and other binary packages.
Supported Python versions: 3.6, 3.7, 3.8
Support platforms: Linux, Windows, MacOSX
(Not all packages are tested.)
Note: If you’re using Conda environment, be sure to take a look at RoboStack, which provides more ROS pre-built packages including non-Python packages and tools such as Rviz.
Install
virtualenv -p python3 venv
. ./venv/bin/activate
pip install --extra-index-url https://rospypi.github.io/simple/ rospy
pip install --extra-index-url https://rospypi.github.io/simple/ tf2_ros
Sample
import rospy
import std_msgs.msg


def callback(msg):
    print(msg)


rospy.init_node("hoge")
rospy.loginfo('start')
sub = rospy.Subscriber("sub", std_msgs.msg.String, callback)
pub = rospy.Publisher('pub', std_msgs.msg.Int16, queue_size=10)
rate = rospy.Rate(1)
while not rospy.is_shutdown():
    pub.publish(3)
    rate.sleep()
Enjoy!
Start a local pypi server
docker build -t localpypi .
docker run --rm -p 8000:8000 localpypi
virtualenv -p python3 venv
. ./venv/bin/activate
pip install --extra-index-url http://localhost:8000/index/ rospy
Development
build.py downloads packages from github.com, builds wheel files and generates a Python package server directory.
git submodule update --init --recursive
# create virtualenv for build packages
virtualenv -p python3 dev
. ./dev/bin/activate
pip install --extra-index-url https://rospypi.github.io/simple/ -e rospy-builder/
# build pure python packages
rospy-build build -d any
# build platform depended packages if you need
rospy-build build -d linux --native
To build index html files, use rospypi/index_builder.
pip3 install git+git://github.com/rospypi/index_builder.git
python3 -m index_builder local index/ any/ linux/
python -m http.server
virtualenv -p python3 venv
. ./venv/bin/activate
pip install --extra-index-url http://localhost:8000/index/ rospy
Generate Message Python Package
git clone https://github.com/rospypi/simple.git
cd simple
virtualenv -p python3 venv
. ./venv/bin/activate
pip install --extra-index-url https://rospypi.github.io/simple/ -e rospy-builder/
mkdir msgs
(cd msgs; git clone https://github.com/ros/std_msgs.git)
(cd msgs; git clone https://github.com/ros/common_msgs.git)
# (cd msgs; any repository that is depended on your message)
rospy-build genmsg your_package_path -s msgs/
# ex.rospy-build genmsg ros_tutorials/rospy_tutorials/ -s msgs/
rospy is a pure Python client library for ROS.
-
Conda
- Files
- Labels
- Badges
-
License: BSD-3-Clause -
Home: http://ros.org/wiki/rospy -
32762 total downloads -
Last upload: 4 years and 6 months ago
Installers
Info: This package contains files in non-standard
labels.
-
linux-64
v1.14.3 -
osx-64
v1.14.3
conda install
To install this package run one of the following:
conda install conda-forge::ros-rospyconda install conda-forge/label/cf202003::ros-rospy
Description
rospy is a pure Python client library for ROS. The rospy client API enables
Python programmers to quickly interface with ROS Topics, Services, and
Parameters. The design of rospy favors implementation speed (i.e. developer
time) over runtime performance so that algorithms can be quickly prototyped
and tested within ROS. It is also ideal for non-critical-path code, such as
configuration and initialization code. Many of the ROS tools are written in
rospy to take advantage of the type introspection capabilities. Many of the
ROS tools, such as rostopic and rosservice, are built on top of rospy.