
Пользователи Windows 11/10 и других версий системы могут обратить внимание на одно или несколько неизвестных устройств в разделе «Другие устройства» на своем ПК или ноутбуке, где tap0901 фигурирует в качестве ИД устройства.
В этой статье о том, что представляет собой это устройство, как установить на него драйверы при необходимости и нужно ли это делать.
Tap0901 — виртуальный адаптер VPN
Устройство с ИД tap0901 в диспетчере устройств представляет собой виртуальный сетевой адаптер «TAP-Win32 Virtual Private Network Driver».
Если вы не устанавливали чего-то, имеющего отношение к OpenVPN, то с большой вероятностью устройство tap0901 появилось после использование активаторов Windows, которые создают его в ходе своей работы. При этом использование активатора несколько раз подряд может привести к появлению нескольких рассматриваемых устройств.
Если в вашем случае речь идёт именно о появлении устройства после использования активатора — устанавливать драйвер не обязательно: вы можете безопасно удалить это устройство в диспетчере, на работоспособность системы это никак не повлияет.
Как скачать и установить драйвер tap0901

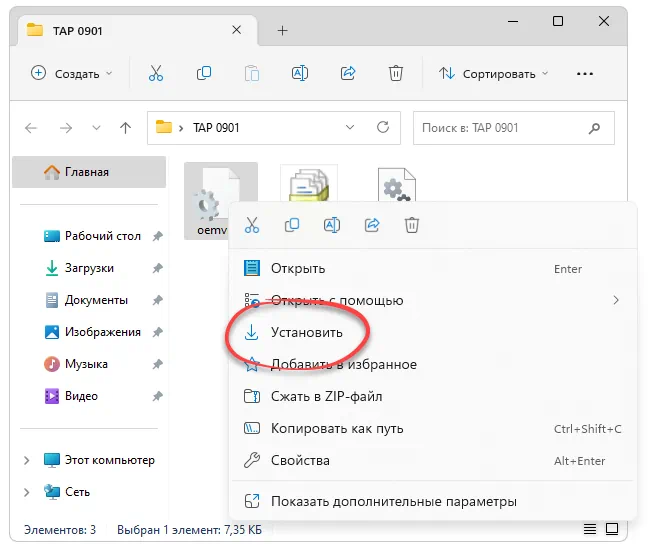
Возможны несколько подходов к установке драйвера tap0901. Первый подойдет в случае, если файл драйвера по факту присутствует на вашем компьютере — в случае активаторов это обычно так и есть.
- Нажмите правой кнопкой мыши по устройству, выберите «Обновить драйвер».
- Выберите пункт «Найти драйверы на этом компьютере».

- В поле «Искать драйверы в следующем месте» укажите C:\ и оставьте включенной отметку «Включая вложенные папки». Нажмите «Далее».

- С большой вероятностью нужный драйвер будет найден в папке
C:\Program Files\TAP-Windows\
или папке активатора в
C:\ProgramData\
и установлен.


Второй способ: загрузите архив dist.win7.zip с драйвером с этой страницы и распакуйте его в удобное расположение, после чего выполните установку драйвера tap0901 так же, как это было описано, но из папки с распакованным архивом: для x64 версий Windows требуется драйвер из папки amd64, для 32-бит — из папки i386.

Подробнее на тему установки драйверов из файлов: Как установить драйвер .inf в Windows.
И ещё одна возможность — скачать пакет установки OpenVPN, извлечь из него драйвер и установить его:
- Загрузите установщик OpenVPN с официального сайта (рекомендую загрузку версии 2.6 beta, где драйвер точно есть, в последней версии описанные далее шаги выполнить не получится).
- Распакуйте загруженный файл MSI как архив, в какую-либо папку. Это умеет, например, 7-Zip.

- Используйте установку драйвера, указав папку с распакованными файлами и шаги из первой части инструкции.

Надеюсь, один из предложенных вариантов подойдет в вашем случае и вопросов, касающихся tap0901 не останется.

Драйвер используется для устройств, реализованных в компьютерах и ноутбуках в виде сетевых адаптеров. Программное обеспечение может быть загружено и установлено для Microsoft Windows 7, 10 или 11.
Как установить
Итак, если на вашем ПК тоже отображается неизвестное устройство, давайте переходить непосредственно к решению проблемы:
- Сначала нужно скачать архив со всеми файлами. Затем распаковываем содержимое и посредством правого клика на tap0901.sys выбираем пункт начала установки.
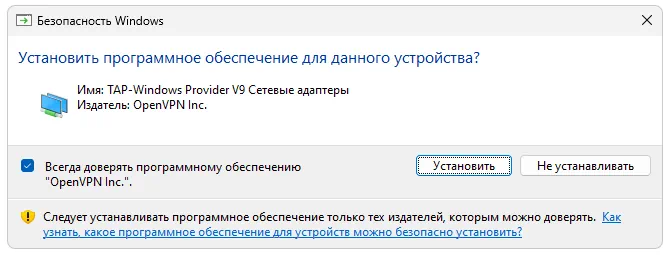
- Появится еще одно окно, в котором посредством соответствующей кнопки мы должны добавить драйвер в систему.
Драйвер, инсталляцию которого мы описали выше, подходит для любых операционных систем с разрядностью 32 или 64 Bit.
Скачать
Бесплатно скачать новейшую версию файла без угроз можно посредством прикрепленной ниже кнопки.
| Язык: | Русский |
| Активация: | Бесплатно |
| Разработчик: | Microsoft |
| Платформа: | Windows XP, 7, 8, 10, 11 |
TAP0901 Driver
TAP0901 — это виртуальный VPN-контроллер, использующийся в операционной системе Microsoft Windows.
Описание ПО
Итак, что же это за устройство и для чего оно нужно? Идентификатор оборудования TAP0901 пользователь видит в диспетчере устройств. Как уже было сказано, это виртуальный VPN-контроллер, который, в частности, используется для активации операционной системы.
Как установить
Задерживаться слишком долго на теории нет никакого смысла. Давайте лучше переходить непосредственно к обзору инструкции по правильной установке отсутствующего драйвера:
- Сначала нужно скачать архив с исполняемым файлом. Дальше извлекаем данные в любой понравившейся каталог. Делаем правый клик на отмеченном ниже исполняемом файле, затем из контекстного меню выбираем пункт запуска установки.

- Появится еще одно окно, в котором нам нужно просто подтвердить свое намерение посредством клика по «Установить». Обязательно перезагружаем компьютер.

Проверить корректность установки того или иного драйвера можно при помощи штатной утилиты Windows диспетчера устройств.
Скачать
Новейшая официальная версия драйвера может быть загружена прямо с сайта разработчика посредством прямой ссылки.
| Лицензия: | Бесплатно |
| Платформа: | Windows 7, 10, 11 x32/64 Bit |
| Язык: | Русский |
-
Main page -
Drivers
-
Network
-
Network Array Networks
- Array Networks TAP-Windows Adapter
-
Array Networks TAP-Windows Adapter
Driver type:
Network adapters
Vendor:
Array Networks TAP-Windows Adapter
Version:
9.24.4.601
*.inf file:
tap0901-ntx86.inf
Windows 8
32-bit ,
8.1
32-bit ,
10 / 11
32-bit
-
Array Networks TAP-Windows Adapter
Driver type:
Network adapters
Vendor:
TAP-Windows Provider V9
Version:
9.26.0.0
*.inf file:
oemvista.inf
Windows 8
64-bit ,
8.1
64-bit ,
10 / 11
64-bit
There are no drivers for Array Networks TAP-Windows Adapter for Windows.
Download DriverHub to find drivers automatically.
Array Networks TAP-Windows Adapter drivers were collected from official websites of manufacturers and other trusted sources.
Official driver packages will help you to restore your Array Networks TAP-Windows Adapter (Network).
Download latest drivers for Array Networks TAP-Windows Adapter on Windows.
Version: 1.3.15.3625 for Windows 8, 10 and 11
Free software
Optional software included
- Yandex Browser
- Opera Browser
- Avast Free Antivirus
- World of Tanks
- World of Warships
TAP-Windows driver (NDIS 6)
This is an NDIS 6.20/6.30 implementation of the TAP-Windows driver, used by
OpenVPN and other apps. NDIS 6.20 drivers can run on Windows 7 or higher except
on ARM64 desktop systems where, since the platform relies on next-gen power
management in its drivers, NDIS 6.30 is required.
Build
The prerequisites for building are:
- Python 2.7
-
- Microsoft Windows 10 EWDK (Enterprise Windows Driver Kit)
-
- Visual Studio+Windows Driver Kit works too. Make sure to work from a «Command Prompt for Visual Studio» and to call buildtap.py with «—sdk=wdk».
-
- The devcon source code directory (setup/devcon) from Windows-driver-samples (optional)
-
- If you use the repo from upstream remember to include our patch to devcon.vcxproj to ensure that devcon.exe is statically linked.
- Windows code signing certificate
- Git (not strictly required, but useful for running commands using bundled bash shell)
- MakeNSIS (optional)
- Prebuilt tapinstall.exe binaries (optional)
- Visual Studio 2019 and WiX Toolset for MSM packaging (optional)
Make sure you add Python’s install directory (usually c:\python27) to the PATH
environment variable.
Tap-windows6 has been successfully build on Windows 10 and Windows Server 2016 using
CMD.exe, Powershell and Git Bash.
View build script options:
$ python buildtap.py
Usage: buildtap.py [options]

Options:
  -h, --help           show this help message and exit
  -s SRC, --src=SRC    TAP-Windows top-level directory, default=<CWD>
  --ti=TAPINSTALL      tapinstall (i.e. devcon) directory (optional)
  -d, --debug          enable debug build
  --hlk                build for HLK tests (test sign, no debug)
  -c, --clean          do an nmake clean before build
  -b, --build          build TAP-Windows and possibly tapinstall (add -c to
                       clean before build)
  --sdk=SDK            SDK to use for building: ewdk or wdk, default=ewdk
  --sign               sign the driver files
  -p, --package        generate an NSIS installer from the compiled files
  -m, --package-msm    generate a MSM installer from the compiled files
  --cert=CERT          Common name of code signing certificate,
                       default=openvpn
  --certfile=CERTFILE  Path to the code signing certificate
  --certpw=CERTPW      Password for the code signing certificate/key
                       (optional)
  --crosscert=CERT     The cross-certificate file to use, default=MSCV-
                       VSClass3.cer
  --timestamp=URL      Timestamp URL to use, default=http://timestamp.verisign
                       .com/scripts/timstamp.dll
  --versionoverride=FILE
                       Path to the version override file
Edit version.m4 and paths.py as necessary then build:
$ python buildtap.py -b
On successful completion, all build products will be placed in the «dist»
directory as well as tap6.tar.gz. The NSIS installer package will be placed to
the build root directory.
Building tapinstall (optional)
The easiest way to build tapinstall is to clone the Microsoft driver samples
and copy the source for devcon.exe into the tap-windows6 tree. Using PowerShell:
$ git clone https://github.com/OpenVPN/Windows-driver-samples.git
$ Copy-Item -Recurse Windows-driver-samples/setup/devcon tap-windows6
$ cd tap-windows6
$ python.exe buildtap.py -b --ti=devcon
The build system also supports reuse of pre-built tapinstall.exe executables.
To make sure the buildsystem finds the executables, create the following
directory structure under tap-windows6 directory:
devcon
├── Release
│   └── devcon.exe
├── x64
│   └── Release
│       └── devcon.exe
└── ARM64
    └── Release
        └── devcon.exe
This structure is equal to what building tapinstall would create. Then call
buildtap.py with «—ti=devcon». Replace «Release» with your build configuration;
for example, when using —Hlk you’d use «Hlk».
Please note that the NSIS packaging (-p) step will fail if you don’t have
tapinstall.exe available. Also don’t use the «-c» flag or the above directories
will get wiped before MakeNSIS is able to find them.
Developer Mode: Installing, Removing and Replacing the Driver
The driver can be installed using a command-line tool, tapinstall.exe, which is
bundled with OpenVPN and tap-windows installers. Note that in some versions of
OpenVPN tapinstall.exe is called devcon.exe. To install, update or remove the
tap-windows NDIS 6 driver follow these steps:
- place tapinstall.exe/devcon.exe to your PATH
- open an Administrator shell
- cd to dist
- cd to amd64, i386, or arm64 depending on your system’s processor architecture.
If you are actively developing the driver (e.g.: Edit, Compile, Debug, Loop…), you may not be signing your driver each time, thus you need to be aware of the following additional items.
Disable Secure Boot:
Unsigned drivers require disabling secure boot.
- Secure Boot: Varies depending on PC Maker and/or the BIOS setting on your test machine.
- https://docs.microsoft.com/en-us/windows-hardware/manufacture/desktop/disabling-secure-boot
- VMWare (one example): https://docs.vmware.com/en/VMware-vSphere/7.0/com.vmware.vsphere.vm_admin.doc/GUID-898217D4-689D-4EB5-866C-888353FE241C.html
- Virtual Box: SecureBoot is not supported on Virtual Box
- Parallels (MacOS) https://kb.parallels.com/en/124242 [With Parallels 15, it is enabled by default, use 0 to disable]
Enable Windows Test Mode:
Test mode is also required.
- Enable Windows Test Mode via BCEDIT
- For details: https://docs.microsoft.com/en-us/windows-hardware/manufacture/desktop/bcdedit-command-line-options
- Specifically,
bcdedit /set testsigning offorbcdedit /set testsigning on - The result should be
Test Modein the bottom right corner of the windows screen.
Driver Installation:
Notes
- The command
tapinstall install OemVista.inf TAP0901installs the driver - Because your driver is not signed, the
tapinstall installstep will pop up the «Big Scary Unsigned Driver Warning», you’ll need to click OK. - As a result, the driver will be copied into the Windows Driver Store
Updating the Driver, and the Windows Driver Store:
At some point, you will build a shinny new driver and need to test it.
- The command
tapinstall remove TAP0901— removes the driver - However, the previously approved driver is still in the Windows Driver Store
- Typing
tapinstall install ...now, only re-installs the old driver that was copied into the driver store.
Key step: The driver needs to be removed from the driver store also.
- Details: https://docs.microsoft.com/en-us/previous-versions/windows/it-pro/windows-server-2008-R2-and-2008/cc730875(v=ws.11)
There is a script to do this, but it only works if you have not changed the text strings in your driver package
- Script Location: https://github.com/mattock/tap-windows-scripts
The manual steps are:
- Step 1 — Obtain a list of Installed drivers via the command:
pnputil -e, this will list all of theoemNUMBER.inffiles that are in the driver store. - Step 2 — Find your driver in that list, it will be some
oem<NUMBER>.inffile - Step 3 — To delete, use
pnputil.exe /d oemNUMBER.inf
Finally use tapinstall install OemVista.inf TAP0901 to install your driver
Important:
If you do not see the Big Scary Unsigned Driver Warning — Windows will use the old (not new) driver.
Troubleshooting:
Examining the SetupAPI log file helps, see C:\Windows\INF\setupapi.dev.log.
Build for HLK tests
A test-signed version of tap-windows6 driver should be used for the HLK tests.
The recommended procedure is to use pre-built, cross-signed devcon.exe and use
the WDK-generated key for signing the driver.
First setup the directory with prebuilt devcon as described above.
Then run the build with the —hlk option:
$ python.exe buildtap.py -c -b --ti=devcon-prebuilt --hlk
Release process and signing
Microsoft’s driver signing requirements have tightened considerably over the
last several years. Because of this this buildsystem no longer attempts to sign
files by default. If you want to sign the files at build time use the —sign
option. The «sign» directory contains several Powershell scripts that help
produce release-signed tap-windows6 packages:
- Cross-Sign: cross-sign tap-windows6 driver files and tapinstall.exe
- Create-DriverSubmission: create architecture-specific attestation signing submission cabinet files
- Extract-DriverSubmission: extract attestation-signed zip files
- Sign-File: sign files (e.g. tap-windows6 installer or driver submission cabinet files)
- Sign-tap6.conf.ps1: configuration file for all the scripts above
- Prepare-Msm.ps1: take Win7- and Win10-signed «dist» directories and produce a «dist» directory that MSM packaging can consume
Most of these scripts operate directly on the «dist» directory that
tap-windows6 build system produces. Below it is assumed that building and
signing is done on the same computer.
First produce cross-signed drivers for (Windows 7/8/8.1/Server 2012r2):
$ python.exe buildtap.py -c -b --ti=devcon
$ sign\Cross-Sign.ps1 -SourceDir dist -Force
Note that the «-Force» option for Cross-Sign.ps1 is required except in the
unlikely case that you’re appending a signature.
Next produce a driver submission cabinet files for attestation signing:
$ sign\Create-DriverSubmission.ps1
$ Get-ChildItem -Path disk1|sign\Sign-File.ps1
Three architecture-specific (i386, amd64, arm64) cabinet files are created.
Submit these to Windows Dev Center for attestation signing. Note that unsigned
cabinet files will be automatically rejected.
When submitting the drivers to Microsoft take care to only request signatures
applicable for each architecture.
At this point move the cross-signed «dist» directory away:
$ Move-Item dist dist.win7
Download the attestation-signed drivers as zip files put them into a temporary
directory (e.g. tap-windows6tempdir). Then run Extract-DriverSubmission.ps1:
$ Get-ChildItem -Path tempdir -Filter "*.zip"|sign\Extract-DriverSubmission.ps1
This extracts the drivers into the «dist» directory. Move that directory to dist.win10:
$ Move-Item dist dist.win10
After this you can start creating the installers and/or MSM packages.
If you’re creating NSIS packages do:
$ Move-Item dist.win7 dist
$ python.exe buildtap.py -p --ti=devcon
$ Move-Item dist dist.win7
Followed by:
$ Move-Item dist.win10 dist
$ python.exe buildtap.py -p --ti=devcon
$ Move-Item dist dist.win10
Finally sign both installers:
$ Get-Item tap-windows*.exe|sign\Sign-File.ps1
On the other hand if you’re creating MSM packages do:
$ sign\Prepare-Msm.ps1
$ python buildtap.py -m --sdk=wdk
$ Get-Item tap-windows*.msm|sign\Sign-File.ps1
For additional instructions and background information please refer to
this article on OpenVPN community wiki.
Overriding setting defined in version.m4
It is possible to override one or more of the settings in version.m4 file with
the —versionoverride <file> option. Any settings given in the override file
have precedence over those in version.m4.
This is useful when building several tap-windows6 drivers with different
component ids for example.
Notes on proxies
It is possible to build tap-windows6 without connectivity to the Internet but
any attempt to timestamp the driver will fail. For this reason configure your
outbound proxy server before starting the build. Note that the command prompt
also needs to be restarted to make use of new proxy settings.
MSM packaging
In order to build the MSM packages build and sign the driver first:
- Build the TAP driver with buildtap.py and «-b» flag.
- EV-sign the drivers
- WHQL/Attestation-sign the drivers
Place the signed drivers in a directory structure under tap-windows6
directory. Each platform directory should contain the EV-signed driver with a
«win10» subdirectory containing WHQL/Attestation signed driver for that
platform:
dist
├── amd64
│   ├── win10
│   │   ├── OemVista.inf
│   │   ├── tap0901.cat
│   │   └── tap0901.sys
│   ├── OemVista.inf
│   ├── tap0901.cat
│   └── tap0901.sys
├── arm64
│   ├── win10
│   │   ├── OemVista.inf
│   │   ├── tap0901.cat
│   │   └── tap0901.sys
│   └── (Note: EV-signed driver for arm64 is not used.)
├── include
│   └── tap-windows.h
└── i386
    ├── win10
    │   ├── OemVista.inf
    │   ├── tap0901.cat
    │   └── tap0901.sys
    ├── OemVista.inf
    ├── tap0901.cat
    └── tap0901.sys
Building MSM packages requires Visual Studio 2019 (EWDK is not sufficient) and
the WiX Toolset installed. In a Developer Command Prompt for Visual Studio
2019, run:
$ python buildtap.py -m --sdk=wdk
This will compile the installer.dll file with embedded drivers and package it
as a platform-dependent tap-windows-<version>-<platform>.msm files.
As the WiX Toolset does not support the arm64 platform yet, only amd64 and
i386 MSM files are built.
Optional: Consider EV-signing the MSM packages before deploying them. Thou,
MSM signature is ignored when merging MSM into MSI package, users get a choice
to validate the integrity of the downloaded MSM packages manually.
License
See the file COPYING.