
USB Video Class Driver by Microsoft Corporation.
The USB Video Device (WDM) service exists only in:
- Windows 10 Home 21H2
- Windows 10 Pro 21H2
- Windows 10 Education 21H2
- Windows 10 Enterprise 21H2
Default Settings
| Startup type: | Manual |
| Display name: | USB Video Device (WDM) |
| Service name: | usbvideo |
| Service type: | kernel |
| Error control: | normal |
| Path: | %SystemRoot%\System32\Drivers\usbvideo.sys |
| Registry key: | HKEY_LOCAL_MACHINE\SYSTEM\CurrentControlSet\Services\usbvideo |
Default Behavior
USB Video Device (WDM) is a kernel device driver. In Windows 10 it is starting only if the user, an application or another service starts it. If USB Video Device (WDM) fails to start, the failure details are being recorded into Event Log. Then Windows 10 will start up and notify the user that the usbvideo service has failed to start due to the error.
Restore Default Startup Configuration of USB Video Device (WDM)
1. Run the Command Prompt as an administrator.
2. Copy the command below, paste it into the command window and press ENTER:
sc config usbvideo start= demand
3. Close the command window and restart the computer.
The usbvideo service is using the usbvideo.sys file that is located in the C:\Windows\System32\Drivers directory. If the file is removed or corrupted, read this article to restore its original version from Windows 10 installation media.
Название драйвера
USB VIDEO DEVICE
Актуальная версия
61.2.8.160
Подраздел
Вебкамеры D-MAX USB VIDEO DEVICE
Драйвера USB VIDEO DEVICE для Windows x64
Драйвера USB VIDEO DEVICE для Windows x86
Список драйверов USB VIDEO DEVICE для Windows 10 x64
|
Устройства |
ОС |
ID |
Inf |
Ссылка |
|---|---|---|---|---|
|
USB VIDEO DEVICE 61.2.8.160
|
Windows 10 x64 Windows 8.1 x64 Windows 8 x64 Windows 7 x64 Windows Vista x64 Windows XP x64 |
USB\VID_04F2&PID_B008 |
snp2uvc.inf |
Скачать |
|
USB VIDEO DEVICE 61.2.8.140
|
Windows 10 x64 Windows 8.1 x64 Windows 8 x64 Windows 7 x64 Windows Vista x64 |
USB\VID_04F2&PID_B008 |
snp2uvc.inf |
Скачать |
|
USB VIDEO DEVICE 61.2.8.160
|
Windows 10 x64 Windows 8.1 x64 Windows 8 x64 Windows 7 x64 Windows Vista x64 Windows XP x64 |
USB\VID_04F2&PID_B013 |
snp2uvc.inf |
Скачать |
|
USB VIDEO DEVICE 61.2.8.140
|
Windows 10 x64 Windows 8.1 x64 Windows 8 x64 Windows 7 x64 Windows Vista x64 |
USB\VID_04F2&PID_B013 |
snp2uvc.inf |
Скачать |
|
USB VIDEO DEVICE 61.2.8.160
|
Windows 10 x64 Windows 8.1 x64 Windows 8 x64 Windows 7 x64 Windows Vista x64 Windows XP x64 |
USB\VID_0C45&PID_62C0 |
snp2uvc.inf |
Скачать |
|
USB VIDEO DEVICE 61.2.8.140
|
Windows 10 x64 Windows 8.1 x64 Windows 8 x64 Windows 7 x64 Windows Vista x64 |
USB\VID_0C45&PID_62C0 |
snp2uvc.inf |
Скачать |
|
USB VIDEO DEVICE 6.2.9200.10296
|
Windows 10 x64 Windows 8.1 x64 |
USB\VID_064E&PID_E263 |
RtSuyin.inf |
Скачать |
|
USB VIDEO DEVICE 61.2.8.160
|
Windows 10 x64 Windows 8.1 x64 Windows 8 x64 Windows 7 x64 Windows Vista x64 Windows XP x64 |
USB\VID_0C45&PID_62C0 |
snp2uvc.inf |
Скачать |
|
USB VIDEO DEVICE 61.2.8.140
|
Windows 10 x64 Windows 8.1 x64 Windows 8 x64 Windows 7 x64 Windows Vista x64 |
USB\VID_0C45&PID_62C0 |
snp2uvc.inf |
Скачать |
|
USB VIDEO DEVICE 6.2.9200.10296
|
Windows 10 x64 Windows 8.1 x64 |
USB\VID_064E&PID_E262 |
RtSuyin.inf |
Скачать |
|
USB VIDEO DEVICE 6.2.9200.10296
|
Windows 10 x64 Windows 8.1 x64 |
USB\VID_064E&PID_E21C |
RtSuyin.inf |
Скачать |
|
USB VIDEO DEVICE 6.2.9200.10296
|
Windows 10 x64 Windows 8.1 x64 |
USB\VID_064E&PID_E324 |
RtSuyin.inf |
Скачать |
|
USB VIDEO DEVICE 6.2.9200.10296
|
Windows 10 x64 Windows 8.1 x64 |
USB\VID_064E&PID_E325 |
RtSuyin.inf |
Скачать |
|
USB VIDEO DEVICE 61.2.8.160
|
Windows 10 x64 Windows 8.1 x64 Windows 8 x64 Windows 7 x64 Windows Vista x64 Windows XP x64 |
USB\VID_0C45&PID_62C0 |
snp2uvc.inf |
Скачать |
|
USB VIDEO DEVICE 61.2.8.140
|
Windows 10 x64 Windows 8.1 x64 Windows 8 x64 Windows 7 x64 Windows Vista x64 |
USB\VID_0C45&PID_62C0 |
snp2uvc.inf |
Скачать |
|
USB VIDEO DEVICE 61.2.8.160
|
Windows 10 x64 Windows 8.1 x64 Windows 8 x64 Windows 7 x64 Windows Vista x64 Windows XP x64 |
USB\VID_04F2&PID_B005 |
snp2uvc.inf |
Скачать |
|
USB VIDEO DEVICE 61.2.8.140
|
Windows 10 x64 Windows 8.1 x64 Windows 8 x64 Windows 7 x64 Windows Vista x64 |
USB\VID_04F2&PID_B005 |
snp2uvc.inf |
Скачать |
|
USB VIDEO DEVICE 61.2.8.160
|
Windows 10 x64 Windows 8.1 x64 Windows 8 x64 Windows 7 x64 Windows Vista x64 Windows XP x64 |
USB\VID_04F2&PID_B013 |
snp2uvc.inf |
Скачать |
|
USB VIDEO DEVICE 61.2.8.140
|
Windows 10 x64 Windows 8.1 x64 Windows 8 x64 Windows 7 x64 Windows Vista x64 |
USB\VID_04F2&PID_B013 |
snp2uvc.inf |
Скачать |
|
USB VIDEO DEVICE 6.2.9200.10296
|
Windows 10 x64 Windows 8.1 x64 |
USB\VID_064E&PID_E28B |
RtSuyin.inf |
Скачать |
Список DEVID для USB VIDEO DEVICE
Содержание
- USB Video Class driver overview
- Customizing the UVC Driver
- Additional Resources
- USB Video Device Drivers Download
- Find All USB Video Device Drivers
- Recent Help Articles
- Popular Driver Updates for USB Video Device
- How to Install Drivers
- Open Device Manager
- Install Drivers With Device Manager
- Install Drivers Automatically
- Benefits of Updated Drivers
- Windows 10 не распознает USB [FIX]
- Windows 10 не распознает USB, что делать?
- Исправлено – Windows 10 не распознает жесткий диск USB/USB-накопитель
- Исправлено – Windows 10 не распознает USB-клавиатуру
- Исправлено – Windows 10 не распознает USB-принтер
- Исправлено – Windows 10 не распознает порты USB
- USB Video Device
- Установщик драйверов:
- Список драйверов:
- Поддерживаемые модели ноутбуков
- USB device class drivers included in Windows
- USB Device classes
- Device setup classes
- Microsoft-provided USB device class drivers
USB Video Class driver overview
If you are providing a driver for a webcam or a digital camcorder, consider using the system-supplied universal serial bus (USB) Video Class driver, Usbvideo.sys. The USB Video Class (UVC) driver is a Microsoft-provided AVStream minidriver that provides driver support for USB Video Class devices. When your device uses UVC, you do not need to supply your own driver. Instead, the device works automatically with the system-supplied driver.
In the USB Video Class model, vendors do not write drivers; instead, vendors implement video streaming hardware according to the guidelines in the Universal Serial Bus Device Class Definition for Video Devices Specification document located on the USB Implementers Forum website. The UVC driver queries the hardware directly to obtain its capabilities and then drives the device, with no proprietary driver required.
You can optionally extend UVC driver functionality to add vendor-specific processing.
The following table shows support for UVC in different versions of Windows:
| UVC Version | Windows 7 | WindowsВ 8 |
|---|---|---|
| USB Video Class 1.5 (H.264 video codec) | Not supported | Supported |
| USB Video Class 1.1 | Supported | Supported |
| USB Video Class 1.0 | Supported | Supported |
Beginning with WindowsВ 8, the H.264 video codec (encoder/decoder) is supported. H.264 is an open standard that allows efficient video compression techniques for reducing the use of network bandwidth and storage space. This leads to a higher video quality for a given bit rate. For more information, see USB H.264 Video Cameras Support. Also refer to Microsoft Proposed Extensions to the USB Video Class for H.264.
The following list shows some advantages to using the Usbvideo.sys driver:
No CD required for installation
No driver writing cost
No maintenance cost
Opportunity for vendors to add functionality
Easier debugging with public symbols
Works with Driver Verifier
Works with checked OS builds
Compliant with ACPI power management
Compliant with Selective Suspend power management
Supports multimedia APIs in Media Foundation and DirectShow
The system-supplied Usbvideo.sys driver supports the following UVC features in different versions of Windows:
| UVC feature | Windows 7 | WindowsВ 8 |
|---|---|---|
| Single video control interface and one or more video streaming interfaces | Supported | Supported |
| Standard units and terminals, including Extension units | Supported | Supported |
| Still image capture support for all three methods defined in the UVC specification | Supported | Supported |
| Bulk and isochronous devices | Supported | Supported |
| Streaming parameter negotiation using probe commit controls | Supported | Supported |
| Compressed formats: MJPEG, DV | Supported | Supported |
| Uncompressed formats: YUY2, NV12 | Supported | Supported |
| Supports both capture and render devices | Supported | Supported |
| Compressed format: MPEG2TS | Not Supported | Not Supported |
| Stream-based and frame-based formats | Supported | Supported |
| H.264 video codec | Not Supported | Supported |
Customizing the UVC Driver
You can customize your support for UVC by supplying an Extension Unit plug-in. Extension units provide a private control channel between device and vendor-supplied application.
Additional Resources
To test your UVC implementation, you can use the following tools:
For more information about these tools, see AVStream Testing and Debugging.
You can find specifications for USB Video Class 1.1 on the USB Implementers Forum website.
Источник
USB Video Device Drivers Download
Download the latest version of the USB Video Device driver for your computer’s operating system. All downloads available on this website have been scanned by the latest anti-virus software and are guaranteed to be virus and malware-free.
Find All USB Video Device Drivers
Recent Help Articles
Popular Driver Updates for USB Video Device
If you have had recent power outages, viruses or other computer problems, it is likely that the drivers have become damaged. Browse the list above to find the driver that matches your hardware and operating system. To see more matches, use our custom driver search engine to find the exact driver.
DriverGuide maintains an extensive archive of Windows drivers available for free download. We employ a team from around the world which adds hundreds of new drivers to our site every day.
How to Install Drivers
Once you download your new driver, then you need to install it. To install a driver in Windows, you will need to use a built-in utility called Device Manager. It allows you to see all of the devices recognized by your system, and the drivers associated with them.
Open Device Manager
In Windows 10 & Windows 8.1, right-click the Start menu and select Device Manager
Install Drivers With Device Manager
Locate the device and model that is having the issue and double-click on it to open the Properties dialog box.
Select the Driver tab.
Click the Update Driver button and follow the instructions.
In most cases, you will need to reboot your computer in order for the driver update to take effect.
Visit our Driver Support Page for helpful step-by-step videos
Install Drivers Automatically
If you are having trouble finding the right driver, stop searching and fix driver problems faster with the Automatic Driver Update Utility. Automatic updates could save you hours of time.
The Driver Update Utility automatically finds, downloads and installs the right driver for your hardware and operating system. It will Update all of your drivers in just a few clicks, and even backup your drivers before making any changes.
Once you download and run the utility, it will scan for out-of-date or missing drivers:

When the scan is complete, the driver update utility will display a results page showing which drivers are missing or out-of-date:

Next, update individual drivers or all of the necessary drivers with one click.
Benefits of Updated Drivers
Many computer problems are caused by missing or outdated device drivers, especially in Windows 10. If your deskttop or laptop is running slow, or keeps crashing or hanging, there is a good chance that updating your drivers will fix the problem.
Ensures your hardware runs at peak performance.
Fixes bugs so your system will have fewer crashes.
Unlocks new features and configuration options in your devices, especially with video cards and gaming devices.
Источник
Windows 10 не распознает USB [FIX]
Мы используем USB-устройства ежедневно, но некоторые пользователи Windows 10 сообщают, что Windows 10 не распознает их USB-устройства. Это может создать всевозможные проблемы, но, к счастью, есть способ это исправить.
Windows 10 не распознает USB, что делать?
Проблемы с USB относительно распространены, и многие пользователи сообщили, что Windows 10 не распознает USB. Говоря о проблемах USB, пользователи также сообщили о следующих проблемах:
Ранее мы много писали о проблемах с USB. Добавьте эту страницу в закладки, если она понадобится вам позже.
Исправлено – Windows 10 не распознает жесткий диск USB/USB-накопитель
Иногда, из-за функции быстрого запуска, ваш жесткий диск USB может не распознаваться Windows 10. Это может создать всевозможные проблемы, особенно если вы используете USB-накопитель для хранения важных данных.
К счастью, вы можете легко исправить это, выполнив следующие действия:
После отключения быстрого запуска Windows 10 может начать работать немного медленнее, но все жесткие диски USB должны быть правильно распознаны.
Решение 2. Обновите драйверы/установите драйвер по умолчанию
Если это не сработает, вы можете удалить установленный драйвер и позволить Windows 10 установить драйвер по умолчанию. Для этого выполните следующие действия:
Узнайте все, что нужно знать об обновлении драйверов в Windows 10, с помощью нашего полного руководства!
Обновлять драйверы автоматически
Этот инструмент предназначен для Windows 10, одобрен Microsoft и Norton Antivirus для обновления вашего ПК с правильными драйверами Windows. Вот краткое руководство о том, как это сделать.
Примечание. Некоторые драйверы необходимо устанавливать в несколько этапов, поэтому вам придется нажимать кнопку «Обновить» несколько раз, пока не будут установлены все его компоненты.
Отказ от ответственности : некоторые функции этого инструмента не являются бесплатными.
Или попробуйте один из инструментов обновления драйверов из нашего нового списка. Все они великолепны!
Прежде чем Windows 10 сможет распознать ваш жесткий диск USB или USB-накопитель, ваш USB-накопитель должен быть разбит на разделы и ему должна быть назначена буква. Для этого выполните следующие действия:
Если ваш USB-накопитель разбит на разделы, но все еще не распознается в Windows 10, вы должны убедиться, что ему назначена буква. Для этого выполните следующие действия:
Следует отметить, что Windows 10 может работать только с файловыми системами NTFS и FAT32, поэтому при разбиении жесткого диска обязательно используйте файловую систему NTFS.
Если вы находите этот процесс слишком запутанным, вы можете легко разбить диск с помощью стороннего приложения, такого как Paragon Partition Manager .
Иногда устройства, которые не распознаются, могут быть скрыты в диспетчере устройств, поэтому давайте посмотрим, как их показывать и удалять. Для этого выполните следующие инструкции:
Решение 5. Удалите нераспознанное устройство из диспетчера устройств и назначьте другую букву жесткому диску USB
Если вы не можете найти нераспознанное устройство в диспетчере устройств, просто пропустите этот шаг и попробуйте изменить назначенную букву.
Используйте инструмент для удаления драйверов, чтобы облегчить свою жизнь и убедиться, что все удаляется!
Пользователи сообщали о некоторых проблемах с жестким диском Seagate, и, согласно им, жесткий диск USB не распознается, если он подключен к портам USB на передней панели компьютера.
Даже если вы не используете жесткий диск Seagate, попробуйте подключить жесткий диск USB к порту на задней панели вашего компьютера, чтобы проверить, работает ли он.
По словам пользователей, иногда порты на передней панели не вырабатывают достаточно энергии, поэтому лучше использовать порты USB на задней панели. Кроме того, если у вас есть USB-концентратор, не используйте его и подключите USB-накопитель напрямую к компьютеру.
Решение 8. Используйте инструмент USBOblivion
Если Windows 10 не распознает ваш USB-накопитель, вы можете использовать инструмент под названием USBOblivion. Этот инструмент удаляет все следы USB-накопителей с вашего компьютера путем очистки реестра.
Отключите жесткий диск USB, загрузите этот инструмент и запустите его. Теперь снова подключите жесткий диск USB и подождите, пока Windows 10 снова установит драйверы.
Исправлено – Windows 10 не распознает USB-клавиатуру
Решение 2. Удалите ненужные драйверы клавиатуры из диспетчера устройств.
Если Windows 10 не распознает клавиатуру USB, вам может потребоваться удалить ее драйверы из диспетчера устройств.
Пользователи сообщают, что у них установлено несколько драйверов клавиатуры, и если у вас возникла та же проблема, рекомендуется удалить ненужные драйверы клавиатуры. Для этого выполните следующие инструкции:
Решение 3 – установите Logitech SetPoint
Это решение может работать для владельцев клавиатуры Logitech, поэтому, если у вас есть устройство Logitech, загрузите и установите программное обеспечение Logitech SetPoint.
Некоторые пользователи сообщают, что Windows 10 успешно распознала их USB-клавиатуру после установки этого инструмента, поэтому обязательно попробуйте это.
Мы не знаем, будет ли это решение работать с клавиатурами других марок, но это не помешает, если вы попробуете его.
Пользователи сообщают, что иногда USB-контроллер может быть отключен, и это главная причина, почему Windows 10 не распознает USB-клавиатуру.
Пользователи сообщают, что иногда перезагрузка компьютера несколько раз устраняет проблемы с USB-клавиатурами. Кроме того, некоторые пользователи советуют отключить компьютер и вынуть его аккумулятор на несколько минут.
Мы должны предупредить вас, что вы нарушите свою гарантию, если вы извлечете батарею из своего компьютера, поэтому, возможно, лучше всего отнести ее в ремонтную мастерскую и попросить специалиста сделать это за вас.
Иногда, чтобы исправить проблемы с клавиатурой USB, вам необходимо отключить ее и подключить снова, когда ваш компьютер работает.
Некоторые пользователи предлагают выключить компьютер, отсоединить клавиатуру и снова подключить клавиатуру при запуске Windows 10.
Может быть, пришло время перемен! Выберите лучшую клавиатуру на рынке из нашего свежего списка!
Следует отметить, что эта проблема также может быть вызвана вашим антивирусом, поэтому, если вы используете антивирус Касперского, обязательно удалите его перед обновлением до Windows 10.
Если у вас все еще есть проблемы с антивирусом, вы можете переключиться на другое антивирусное решение для решения этой проблемы.
Решение 10. Обновите драйверы чипсета
Иногда Windows 10 не распознает USB-клавиатуру или USB-порты из-за драйверов чипсета, поэтому в этом случае перейдите на веб-сайт производителя материнской платы и загрузите последние версии драйверов для вашего чипсета.
После установки драйверов чипсета ваша USB-клавиатура должна начать работать.
Обновление драйверов вручную очень раздражает, поэтому мы рекомендуем вам загрузить этот инструмент обновления драйверов, чтобы сделать это автоматически. Таким образом, вы предотвратите потерю файлов и даже необратимое повреждение вашего компьютера.
Сообщалось, что быстрый запуск может иногда вызывать проблемы с USB-клавиатурами, и в этом случае рекомендуется отключить быстрый запуск.
В этой статье мы уже рассмотрели, как отключить быстрый запуск, поэтому обязательно проверьте его.
Не можете отключить быстрый запуск? Решите проблему как эксперт с нашим полным руководством!
Исправлено – Windows 10 не распознает USB-принтер
Microsoft выпустила официальное средство устранения неполадок с принтером, поэтому, если ваш принтер не распознается Windows 10, загрузите этот инструмент и запустите его на своем компьютере.
Решение 2. Добавьте принтер вручную
Если Windows 10 не распознает ваш USB-принтер, возможно, вам придется добавить его вручную. Для этого выполните следующие действия:
Мы много писали о проблемах с принтером. Ознакомьтесь с этим руководством для получения дополнительной информации.
Решение 3. Загрузите последние версии драйверов для вашего принтера
Ваш принтер может быть не распознан, если у вас нет последних версий драйверов для него, и для решения этой проблемы вам необходимо посетить веб-сайт производителя вашего принтера и загрузить последние версии драйверов для него.
После установки последних версий драйверов ваш принтер должен распознаваться Windows 10.
Исправлено – Windows 10 не распознает порты USB
Если Windows 10 не распознает USB-порты на вашем компьютере, вы можете проверить настройки управления питанием для USB Root Hub.
Некоторые пользователи также предлагают выполнить аналогичные шаги для всех контроллеров универсальной последовательной шины в диспетчере устройств, поэтому вы можете попробовать это сделать.
Windows не распознает ваш порт USB 3.0? Исправьте проблему, как настоящий эксперт, с помощью этого руководства!
Решение 3. Изменение настроек выборочной приостановки USB
Поскольку мы говорим о параметрах электропитания, отметим, что некоторые пользователи сообщали, что проблемы с портами устранены после отключения быстрого запуска, поэтому вы можете попробовать это сделать.
Если у вас возникли проблемы с USB-портами, возможно, вы захотите переподключить USB-устройства.
По словам пользователей, порты USB иногда необходимо перерегистрировать, и для этого просто отключите USB-устройство, подождите несколько секунд, а затем снова подключите USB-устройство к тому же USB-порту.
Как вы можете видеть, во многих случаях Windows 10 не распознает USB, и если у вас есть проблемы с USB-устройствами в Windows 10, мы надеемся, что наши решения могут быть вам полезны.
Примечание редактора . Этот пост был первоначально опубликован в марте 2016 года и с тех пор был полностью переработан и обновлен для обеспечения свежести, точности и полноты.
Источник
USB Video Device
Установщик драйверов:
В случае, когда вы не хотите тратить время на поиск нужного драйвера для вашего ПК, к вашим услугам представлен автоматический установщик, который самостоятельно подберет нужные и самые актуальные драйвера для всех устройств вашей системы. Скачать Outbyte Drivers Installer вы можете перейдя по этой ссылке Установить драйвера автоматически
| Устройство: | USB Video Device Drivers Installer |
| Версия драйвера: | 2.0.0.18 |
| Дата драйвера: | 2022-11-05 |
| Размер файла: | 1.12 Mb |
| Поддерживаемые ОС: | Windows 2000, Windows XP, Windows Vista, Windows 7, Windows 8 |
| Установить драйвера автоматически |
Список драйверов:
Найдено драйверов для устройства «USB Video Device»: 5. Для загрузки необходимого драйвера, выберите его из списка ниже и перейдите по ссылке «Скачать». Пожалуйста, убедитесь в соответствии выбранной версии драйвера вашей операционной системе для обеспечения корректности его работы.
Поддерживаемые модели ноутбуков
Мы собрали список популярных моделей ноутбуков на которых устанавливается оборудование «USB Video Device». Выбрав интересующую вас модель ноутбука вы можете посмотреть полный список совместимых устройств.
Источник
USB device class drivers included in Windows
This topic is for programmers. If you are a customer experiencing USB problems, see Troubleshoot common USB problems
This topic lists the Microsoft-provided drivers for the supported USB device classes.
If you are installing USB drivers: You do not need to download USB device class drivers. They are installed automatically. These drivers and their installation files are included in Windows. They are available in the WindowsSystem32DriverStoreFileRepository folder. The drivers are updated through Windows Update.
If you are writing a custom driver: Before writing a driver for your USB device, determine whether a Microsoft-provided driver meets the device requirements. If a Microsoft-provided driver is not available for the USB device class to which your device belongs, then consider using generic drivers, Winusb.sys or Usbccgp.sys. Write a driver only when necessary. More guidelines are included in Choosing a driver model for developing a USB client driver.
USB Device classes
USB Device classes are categories of devices with similar characteristics and that perform common functions. Those classes and their specifications are defined by the USB-IF. Each device class is identified by USB-IF approved class, subclass, and protocol codes, all of which are provided by the IHV in device descriptors in the firmware. Microsoft provides in-box drivers for several of those device classes, called USB device class drivers. If a device that belongs to a supported device class is connected to a system, Windows automatically loads the class driver, and the device functions with no additional driver required.
Hardware vendors should not write drivers for the supported device classes. Windows class drivers might not support all of the features that are described in a class specification. If some of the device’s capabilities are not implemented by the class driver, vendors should provide supplementary drivers that work in conjunction with the class driver to support the entire range of functionality provided by the device.
For general information about USB-IF approved device classes see the USB Common Class Specification
The current list of USB class specifications and class codes is documented in the USB-IF Defined Class Code List.
Device setup classes
Windows categorizes devices by device setup classes, which indicate the functionality of the device.
Microsoft defines setup classes for most devices. IHVs and OEMs can define new device setup classes, but only if none of the existing classes apply. For more information, see System-Defined Device Setup Classes.
Two important device setup classes for USB devices are as follows:
USBDevice <88bae032-5a81-49f0-bc3d-a4ff138216d6>: IHVs must use this class for custom devices that do not belong to another class. This class is not used for USB host controllers and hubs.
USB <36fc9e60-c465-11cf-8056-444553540000>: IHVs must not use this class for their custom devices. This is reserved for USB host controllers and USB hubs.
The device setup classes are different from USB device classes discussed earlier. For example, an audio device has a USB device class code of 01h in its descriptor. When connected to a system, Windows loads the Microsoft-provided class driver, Usbaudio.sys. In Device Manager, the device is shown under is Sound, video and game controllers, which indicates that the device setup class is Media.
Microsoft-provided USB device class drivers
| USB-IF class code | Device setup class | Microsoft-provided driver and INF | Windows support | Description |
|---|---|---|---|---|
| Audio (01h) | Media | Usbaudio.sys |
WindowsВ 10 for desktop editions (Home, Pro, Enterprise, and Education) WindowsВ 10 Mobile WindowsВ 8.1 WindowsВ 8 WindowsВ 7 Windows ServerВ 2008 WindowsВ Vista Microsoft provides support for the USB audio device class by means of the Usbaudio.sys driver. For more information, see «USBAudio Class System Driver» in Kernel-Mode WDM Audio Components. For more information about Windows audio support, see the Audio Device Technologies for Windows website. Communications and CDC Control (02h) Ports
Usbser.sys Usbser.inf WindowsВ 10 for desktop editions WindowsВ 10 Mobile In WindowsВ 10, a new INF, Usbser.inf, has been added that loads Usbser.sys automatically as the function driver.
Note Supports Subclass 02h (ACM) Usbser.sys Custom INF that references mdmcpq.inf WindowsВ 10 for desktop editions WindowsВ 8.1 WindowsВ 8 WindowsВ 7 Windows ServerВ 2008 WindowsВ Vista In WindowsВ 8.1 and earlier versions, Usbser.sys is not automatically loaded. To load the driver, you need to write an INF that references the modem INF (mdmcpq.inf) and includes [Install] and [Needs] sections.
Starting with Windows Vista, you can enable CDC and Wireless Mobile CDC (WMCDC) support by setting a registry value, as described in Support for the Wireless Mobile Communication Device Class.
NoteВ В Usbprint.sys enumerates printer devices under the device set up class: Printer
Usbhub.sys Usb.inf WindowsВ 10 for desktop editions WindowsВ 10 Mobile WindowsВ 8.1 WindowsВ 8 WindowsВ 7 Windows ServerВ 2008 WindowsВ Vista Microsoft provides the Usbhub.sys driver for managing USB hubs. For more information about the relationship between the hub class driver and the USB stack, see USB host-side drivers in Windows. Usbhub3.sys Usbhub3.inf WindowsВ 10 for desktop editions WindowsВ 8.1 WindowsВ 8 Microsoft provides the Usbhub3.sys driver for managing SuperSpeed (USB 3.0) USB hubs.
The driver is loaded when a SuperSpeed hub is attached to an xHCI controller. See USB host-side drivers in Windows. CDC-Data (0Ah) — — — Recommended driver: WinUSB (Winusb.sys) Smart Card (0Bh) SmartCardReader
Usbccid.sys (Obsolete) WindowsВ 10 for desktop editions WindowsВ 7 Windows ServerВ 2008 WindowsВ Vista Microsoft provides the Usbccid.sys mini-class driver to manage USB smart card readers. For more information about smart card drivers in Windows, see Smart Card Design Guide.
Note that for Windows Server 2003, Windows XP, and Windows 2000, special instructions are required for loading this driver because it might have been released later than the operating system.
Note Usbccid.sys driver has been replaced by UMDF driver, WUDFUsbccidDriver.dll. WUDFUsbccidDriver.dll WUDFUsbccidDriver.inf WindowsВ 8.1 WindowsВ 8 WUDFUsbccidDriver.dll is a user-mode driver for USB CCID Smart Card Reader devices. Content Security (0Dh) — — — Recommended driver: USB Generic Parent Driver (Usbccgp.sys). Some content security functionality is implemented in Usbccgp.sys. See Content Security Features in Usbccgp.sys. Video (0Eh) Image
Usbvideo.sys
Usbvideo.inf WindowsВ 10 for desktop editions
WindowsВ Vista Microsoft provides USB video class support by means of the Usbvideo.sys driver. For more information, see «USB Video Class Driver» under AVStream Minidrivers.
Note that for Windows XP, special instructions are required for loading this driver because it might have been released later than the operating system. Personal Healthcare (0Fh) — — — Recommended driver: WinUSB (Winusb.sys) Audio/Video Devices (10h) — — — — Diagnostic Device (DCh) — — — Recommended driver: WinUSB (Winusb.sys) Wireless Controller (E0h)
Note В В Supports Subclass 01h and Protocol 01h Bluetooth
Bth.inf WindowsВ 10 for desktop editions WindowsВ 10 Mobile WindowsВ 8.1 WindowsВ 8 WindowsВ 7 WindowsВ Vista Microsoft provides the Bthusb.sys miniport driver to manage USB Bluetooth radios. For more information, see Bluetooth Design Guide. Miscellaneous (EFh) Net
NoteВ В Supports SubClass 04h and Protocol 01h Rndismp.sys Rndismp.inf WindowsВ 10 for desktop editions WindowsВ 8.1 WindowsВ 8 WindowsВ 7 WindowsВ Vista
Note Microsoft recommends that hardware vendors build USB NCM compatible devices instead. USB NCM is a public USB-IF protocol that offers better throughput performance.
Источник
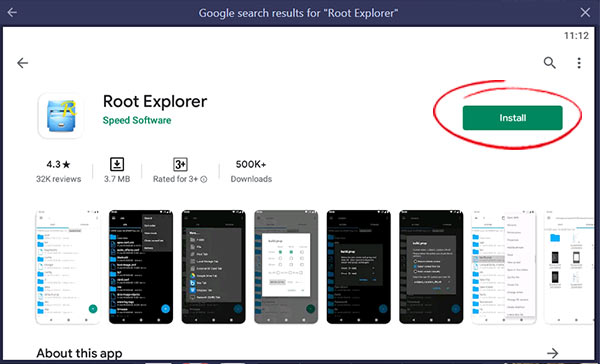
Do you want to download Root Explorer for PC? Then this tutorial provides an answer to your question. Root Explorer is a great app if you want to manage files and folders on your mobile device or computer. Most users are trying to find a computer version of Root Explorer PC, and there is no such version available to download. So, we have a method that helps download Root Explorer for Windows 10, 8, 7, and Mac computers. Follow the instruction below to start the installation.
What is Root Explorer App
Root Explorer is a free file manager to access the entire file system of any Android device. So you can access the root file, which is not available for standard users. For those who want to modify android system files, Root Explorer offers privilege for it. Speed Software has developed the app, and currently, there are more than 500,000+ install Root Explorer app worldwide. According to user reviews, Root Explorer has good ratings and feedbacks.
Root Explorer Features
If you need to do file moving or delete files and folders, file managers do excellent service. Root Explorer PC offers unlimited access to entire file systems of any android device. Some temporary files cannot delete from the standard file manager, but the Root Explorer app helps delete the temporary and unwanted files in your system. With open Root Explorer features, easy to search specific files and folder names by search features. Also, any documents can export to popular platforms like Dropbox, Box, and Google Drive.
Root Explorer PC interface is simple and easy to access files and folders. Users can manage files in more ways, such as move, delete, copy, paste, rename, extract zip, and more.
How to download Android Root Explorer for PC Windows 10, 8, 7, and Mac
Installing Root Explorer on the computer is a simple task. As we mentioned before, there is no Root Explorer official version available to download for Windows or Mac computers. It doesn’t mean that we cannot install Android Root Explorer Windows. To install, we need to use a virtual android device on our computer. You can get the virtual device from the Bluestacks emulator. With this method, you can do Bluestacks root explorer easily. Therefore, follow the instructions below to download Root Explorer for PC using Bluestacks android emulator.
- First of all, download and install the Bluestacks android emulator on your computer. Read our Bluestacks installation guide article to download setup files and installation instructions.
- Now open the Bluestacks emulator on your computer by click on the desktop shortcut. Open the Google PlayStore app on the home screen.
- In the Playstore, Type Root Explorer on the search area and click on the search icon to start the search.
- Once you found the Root Explorer app, click on the install button to start the installation.
- After it finishes, the installation Root Explorer app shortcut will be visible on the Bluestacks home screen. Click on it and start using Root Explorer for Windows 7, 8, 10, and Mac computers. Now you can access root folder android from PC
Download Root Explorer for Mac computers
To download Root Explorer app for Mac computers, you need to download Bluestacks Mac version on Mac. After that, follow the above guide and download Root Explorer for Mac computers.
FAQ (Frequently Ask Questions)
How do I download Root Explorer?
If you are using an android device, you can directly download Root Explorer from Google PlayStore. Also, if you are using a computer, install the Bluestacks emulator first. Then download Root Explorer from its Google PlayStore app.
Is rooting safe?
The rooting device, disable some built-in security features in your device. So, These security features are used to protect the operating system and prevent system corruption.
Root Explorer Alternative for PC
If you are looking for Root Explorer apps, you can use es file explorer for PC. It also offers similar features that you can get from the es file explorer app.
ROM Manager App
It is a simple ROM manager and allows the change of default font, boot animation, and even odex/deodex your firmware. Download ROM Manager For PC Windows and Mac computers.
MCBackup App
My Contacts Backup support backs up and restores your contacts from your phone. You can back up all your contacts with a single touch. Download MCBackup For PC Windows 10, 8, 7, and Mac.
CLONEit App
CLONEit app supports transferring your contacts, messages, call history, app data, images, videos, calendars, and more. You can CLONEit For PC Download Free.
Further, this is how we can download and install android Root Explorer for PC. There are few android emulators available to support Windows and Mac computers. But most of the emulators do not support good services and performance. Comparing to all of them, Bluestacks offers great services. If you cannot use the Bluestacks android emulator, we recommend the Nox Player android emulator. It also offers excellent service to users.
USB device on your computer is malfunctioned or not recognized in Windows 11/10? Don’t be panic. This article provides you with 7 solutions to troubleshoot the USB device not recognized issue, and you can try them one by one until your computer can recognize the USB drive and access data properly. If your USB drive is damaged and unreadable, you can follow steps in the last section to rescue lost data from corrupted USB drives.
Symptom of the USB Device Not Recognized issue
«Can anyone here help me with this troublesome error message which keeps popping up on my screen? It appears every time I insert my memory card which is connected via a card reader. This error had never appeared before I installed some system updates yesterday. The error message says the USB device not recognized and one of the USB device attached to this PC has malfunctioned and Windows does not recognize it. It is true that the memory card does not show up in This PC. I tried a different card reader and still get the error! Could you please tell me how to repair this crazy problem?»
Sometimes when you insert a USB device to your Windows PC, you may receive a «USB Device Not Recognized» error message which pops up in the right corner of taskbar. When the error appears, the USB drive does not show up in File Explorer, which means you cannot access files in the device if it is a storage device, for example USB flash drives. What’s more, this issue does not belong to a specific version of Windows operating systems, and it may happen to all current versions of Windows. This is one of the most common errors on USB devices and it usually drives users to frustration. Here is the exact content of the error message:
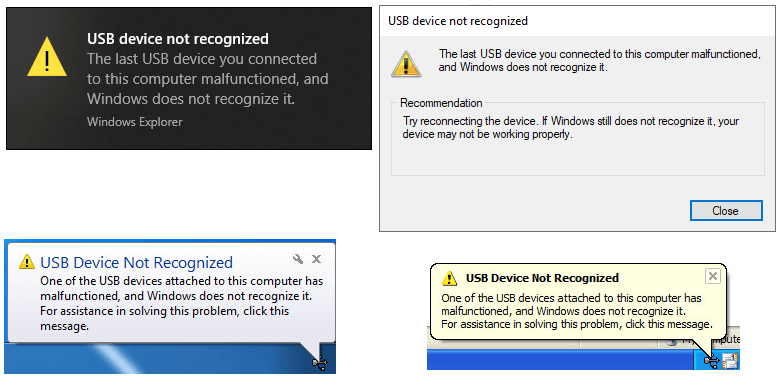
In Windows 7, Windows Vista or Windows XP, the error message says «USB Device Not Recognized. One of the USB devices attached to this computer has malfunctioned, and Windows does not recognize it. For assistance in solving this problem, click this message.» In Windows 11, Windows 10, or Windows 8, the error message will be «USB device not recognized. The last USB device you connected to this computer malfunctioned, and Windows does not recognize it. Recommendation. Try reconnecting the device. If Windows still does not recognizing it, your device may not be working properly.»
If you click the message box, you will get a window which gives a recommendation «Try reconnecting the device. If Windows still does not recognize it, your device may not be working properly.» If you check Windows Device Manager, you can see a yellow alert icon tagged the device; and the device is shown as Unknown USB Device (Device Descriptor Request Failed) under Universal Serial Bus Controllers.
Windows operating system is designed to be compatible with all kinds of PC accessories, especially USB-based add-ons such as USB flash drives, external hard drives, SD cards, microphones, webcams, game controllers, etc. Most such peripherals work out-of-the-box, but in some cases, the unrecognized error occurs. This error is quite common and has been talked about on various tech forums and communities. No matter what version of Windows you are using, you are like to get this error more than once in your lifetime.
Why does my USB device not recognized keep popping up?
In fact, there is not exact or specific causes that account for the issue, and we have to identify the problem and try sorts of approaches to solve it. Here are some common causes related to the error:
- Faulty USB ports or cables: There might be physical damages or wear and tear to USB ports on your computer and the cables of your external HDDs, preventing the connection and data transfer.
- Driver issues: Drivers are in charge of communications between USB devices and Windows operating systems, so corrupted or outdated drivers will lead to recognizing issues.
- Power supply issues: Some USB devices require more power than the USB port can supply, as sufficient power is needed to build the connection.
- Malfunctioned devices: The USB drive itself might be damaged due to hardware issues, which will prevent it from being detected and recognized by Windows.
- System errors: Operating system may include errors, and we need to install system updates to fix bugs, vulnerabilities, compatibility issues, etc.
- USB controller issues: Incorrect controller settings can lead to conflicts or glitches that prevent the proper functioning of USB drives and USB ports.
How can I fix USB device not recognized? The USB not recognizing problem can be a big headache. However, that does not mean it cannot be fixed. Each of these factors could potentially contribute to the USB device not recognized issue, and thus the troubleshooting involves more than one solutions. The following parts provide a couple of the most effective solutions that can help you get rid of it.
Solution 1: Try a different USB port
First and foremost, you should make sure there is no problem with the USB port. You can disconnect the USB device which cannot be recognized by Windows and then reconnect it via a different USB port. Do not connect the USB device via USB hubs. In many cases, the «the last USB device you connected to this computer malfunction» error is just temporary, and changing a USB port should get rid of the error.
If your computer is a desktop, then you can also try connecting the USB device to computer via the USB port on the back of the case. Those USB ports placed at the back of computer case usually have better power supply.
Besides, you can try the USB device on a different computer and check if the error still appears.
Solution 2: Rescan the device in Device Manager
There are some cases that the USB device not recognized is caused by operating system conflicts, which can be solved by rescanning the device in Device Manager.
Step 1. Log into Windows 10 or Windows 11 with your administrative account and open Run dialogue via pressing Windows and R keys.
Step 2. Type «devmgmt.msc» in Run box and press Enter key, which opens Device Manager. You can also launch Device Manager by right-clicking the Start button > choosing «Device Manager».
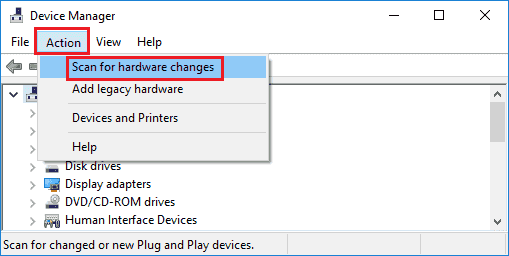
Step 3. In Device Manager, click «Action» menu and select «Scan for hardware changes» option. Then system will try to connect to any new devices connected to your PC. If your USB device still cannot be recognized after scanning, you should go on trying other solutions.
Solution 3: Remove computer power supply
This is a super easy solution! If this solution works, you’ll save a lot of time. Unplugging computer power supply does not mean simply turning off computer with the power button. That’s because most computers do not actually shut down completely, as the motherboard still gets power. Thus, you need to remove power battery from laptop or unplug power supply from the back of computer case.
Motherboard is the very place where all hardware is connected, including USB ports. Sometimes the motherboard should be rebooted when things go wrong. When power is removed, the microprocessor on the motherboard will reload drivers for USB ports, after which the USB device might be recognized again. Therefore, you can try shutting down computer and removing power supply for a while, and then plugging it back and restarting Windows.
Besides, the USB not recognized issue in Windows can also be caused by a dirty or loose RAM. Thus, after removing power supply you can manually remove the RAW and clean it. Cleaning RAM can also help a bit in improving speed.
Solution 4: Update USB device drivers
USB devices are connected to computers via USB ports, via which they become able to communicate with host controllers on motherboard. And the process is managed by driver software. Drivers are responsible for being an instruction which can be read by computer to interact with devices. Drivers contain various manuals which tell computer where it attempts to perform basic input/output actions with connected devices. When you get USB not recognized error, it is likely that there is something wrong with device drivers. Hence, this problem can be removed via fixing incorrect or outdated drivers. Here is how to update USB device drivers.
Step 1. Open Device Manager. Right-click on Start menu and select Device Manager option from Start menu; if you are using Windows 7, you need to right-click on Computer icon and select «Manage», after which you can select «Device Manager».
Step 2. Browse and expand Universal Serial Bus Controllers, and you can find the device is tagged as Unknown devices.
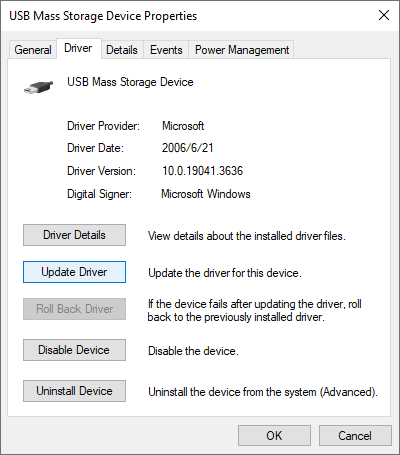
Step 3. Right-click on the Unknown Device and select Properties. Then select Driver tab from the Properties window.
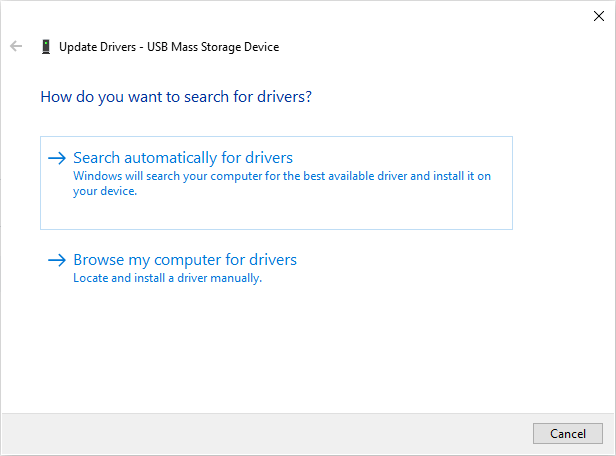
Step 4. Click Update Driver button and click «OK» button.
When you are asked how to do with drivers, choose «Search automatically for drivers» on the popped-up window. Then Windows will search your computer for the best available driver and install it on your device.
If this does not work, you can try updating drivers manually: go to the website of the device’s manufacturer and download the latest drivers. Then run the driver installer to get drivers installed, after which you need to restart computer.
Solution 5: Fix USB root hub
There are some cases that USB device does not work properly issue is caused by improper power management settings. So you can try following steps to fix it.
Step 1. Still open «Device Manager» and expand Universal Serial Bus Controllers to locate items like USB Root Hub.
Step 2. Right-click on USB Root Hub and select Properties.
Step 3. On the Properties window select Power Management tab and uncheck Allow the computer to turn off this device to save power. Then click «OK» button.
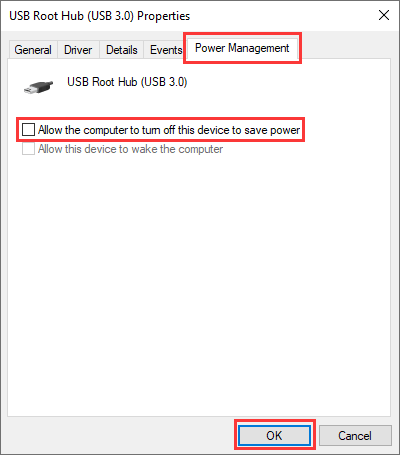
If there are multiple USB Root Hubs on your computer, you need to repeat this operation on all of them.
Solution 6: Uninstall hidden devices
By default, Windows Device Manager does not show all devices installed to computer, as it displays those that you are operating. Sometimes some hidden devices may conflict with connected devices and cause the problem. So we can view all hidden devices and uninstall useless devices to avoid any issues.
Step 1. Launch Command Prompt as administrator. For Windows 10 users, you can type cmd in searching box, and you will see «Command Prompt» app in searching result. Click Run as administrator.
Step 2. Type following commands in Command Prompt and press Enter after each command:
set DEVMGR_SHOW_DETAILS=1
set DEVMGR_SHOW_NONPRESENT_DEVICES=1
start devmgmt.msc
Step 3. Now Device Manager is launched and you should click View menu and choose «Show hidden devices» option.
Step 4. You can identify devices which are greyed out and unknown device. Right-click one and choose Uninstall. Repeat this action until all problematic devices are removed.
Solution 7: Disable USB selective suspend settings
The USB selective suspend setting is a feature provided to assign certain USB port to a power saving mode, which works like the computer’s sleep mode. Such feature is very useful when your laptop or tablet is only on battery. However, if you are using a desktop, this feature is not necessary, and sometimes causes USB device not recognized issue. Here is how to disable it:
Step 1. Type «power plan» in searching box next to the Start menu. Then click Choose a power plan from searching result.
Step 2. Select Change Plan Settings next to your currently selected plan. Then choose Change advanced power settings.
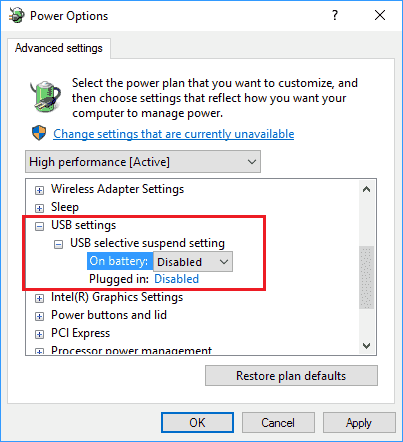
Step 3. On the «Power Options» window, you can select the power plan that you want to customize, and then choose settings that reflect how you want your computer to manage power. Then browse items in the box to expand «USB settings» and then expand» USB selective suspend settings«.
Step 4. Choose «Disabled» from the drop-down list. Then click Apply and OK button to save changes.
How to retrieve data from malfunctioned or not recognized USB drives?
These solutions introduced above are possible methods said to be effective to repair USB device not recognized issue. If none of them works on your USB drive, you can try USB drive recovery software to retrieve data from damaged and malfunctioned USB disks. DiskGenius Professional Edition can help you if the USB disk is not displayed in File Explorer and it is compatible with all versions of Windows operating systems.
With this recovery software, you can retrieve data from corrupted drives, for example, SD card not showing up in File Explorer but shows in Disk Management, uninitialized hard drive, RAW partition, unallocated external HDDs, etc.
Connect your USB drive to computer and launch the drive recovery software, and you can follow these steps to recover data.
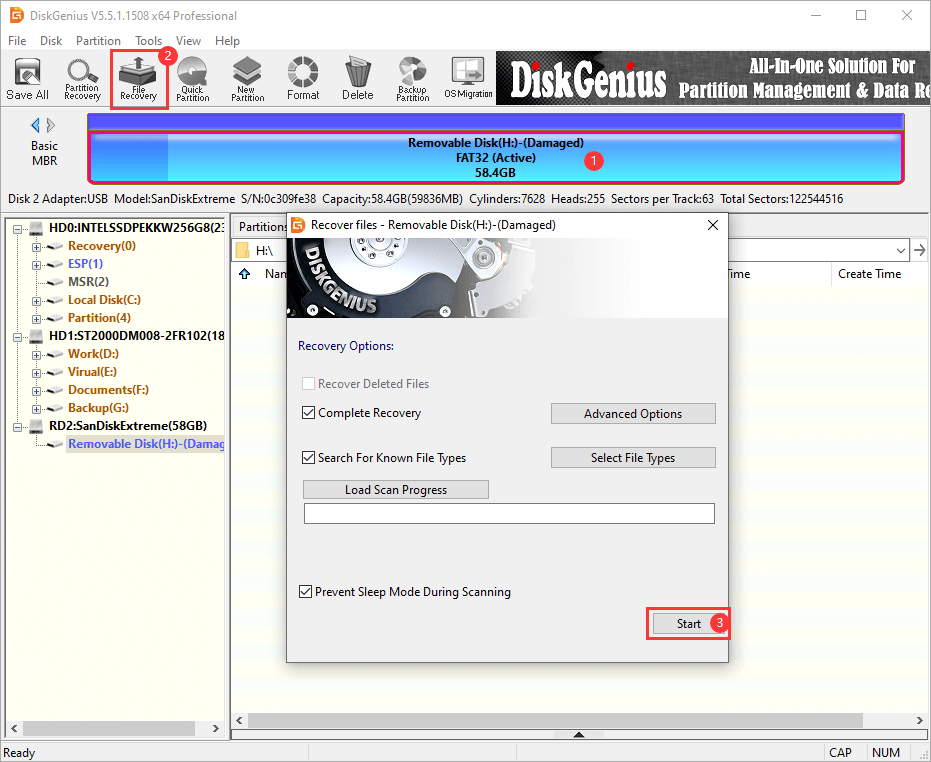
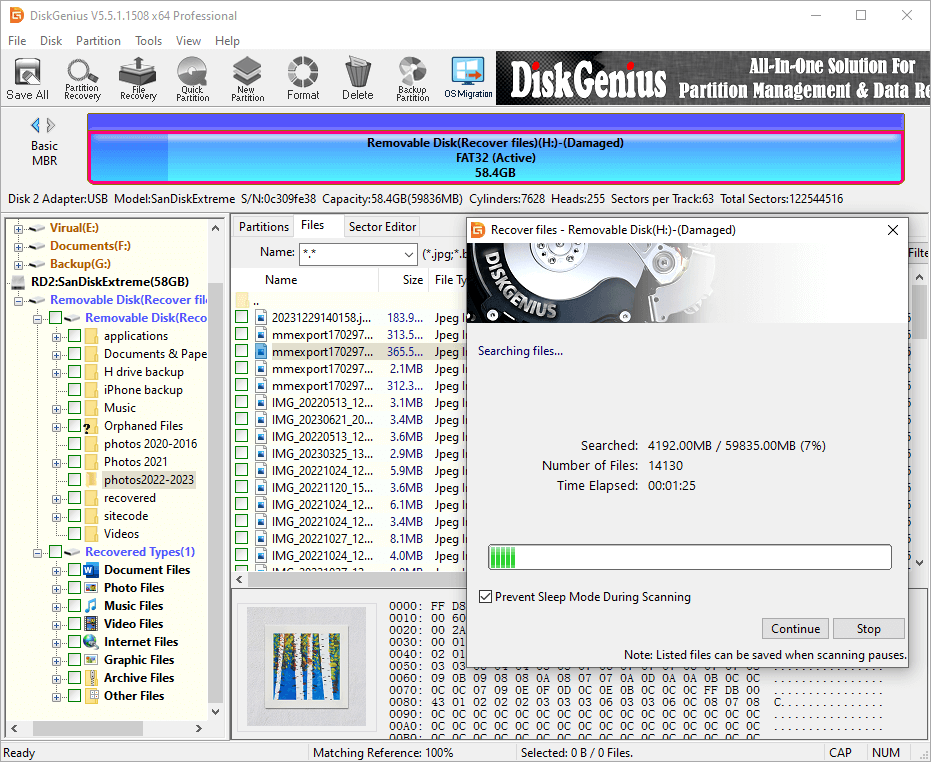
Step 1. Select the USB device where you want to recover data, click «File Recovery» button. Select «Complete Recovery» and «Search For Known File Types» option from the Recover Files window and click Start button.
In this example, the USB drive is tagged as Damaged in DiskGenius, as it is no longer readable in Windows File Explorer. If you try opening the USB drive in Windows, you receive an error message «You need to format the disk in drive before you can use it. Do you want to format it?»
Step 2. DiskGenius is running a quick and deep scan fo the USB drive, and many files have been found during the scanning.
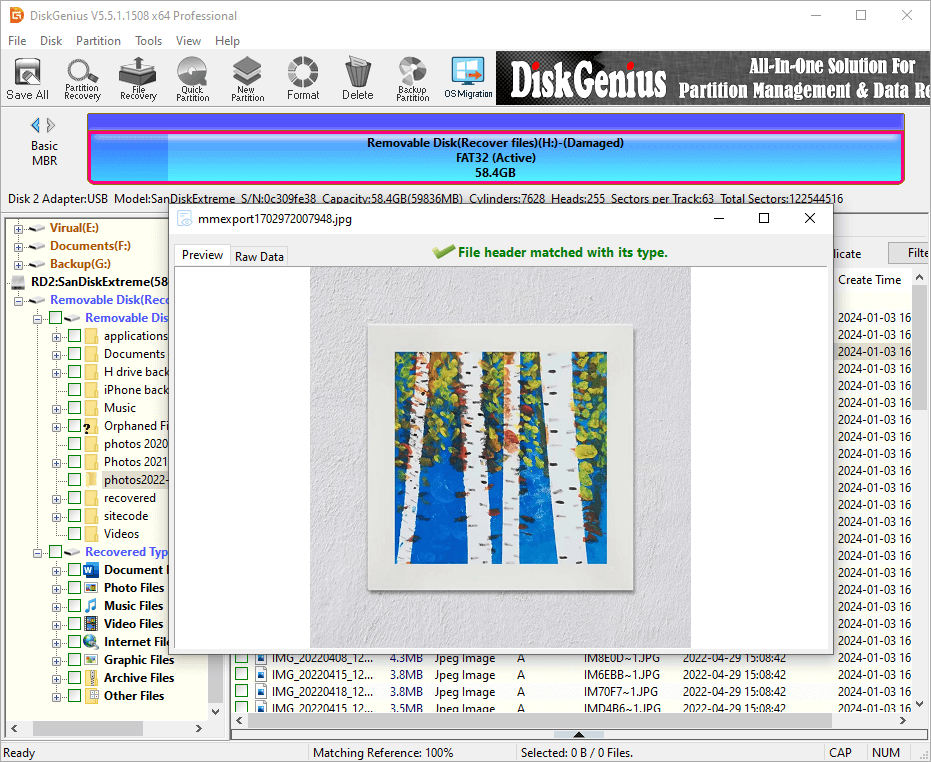
Step 3. Preview and filter recoverable files. You can preview files displayed during or after the scanning process to identify what you want to recover. Also, you can filter files by file type, name, size, modify time, etc. to locate files quickly.
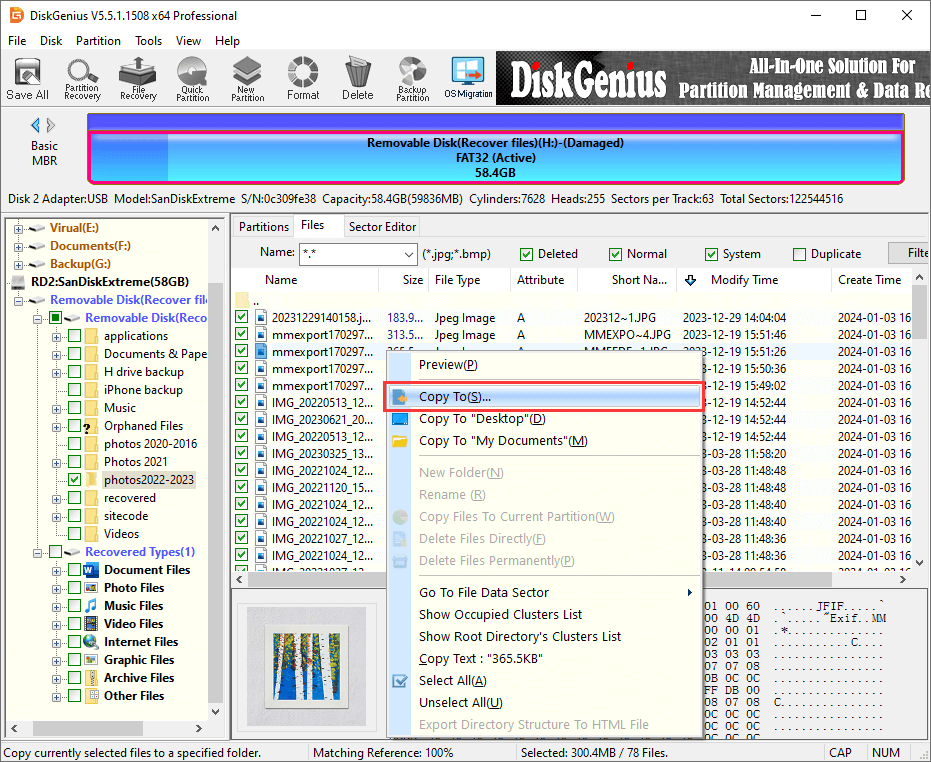
Step 4. Recover data from the damaged USB drive. Select all files and folders that are important to you and right-click on them to choose «Copy To«, after which you can save these files to a different drive.
Conclusion
This article explains a couple of solutions which have been proved to be effective by many users, and we hope these methods can help you fix the USB device not recognized issue. If you are facing issues like hard drive not showing up, RAW drives, crashed hard disks, computer not recognizing external hard drives, damaged SSDs, SD card not detecting, USB not working, etc., you can refer to our previous tutorials. If the USB drive not showing up issue is caused by physical damages, you may need to replace it with a new one. Should you have any suggestions or questions related on this issue, please feel free to comment or email our support team.