
Download Windows USB drivers (usb2.0)
Rockchip RK29, RK30, RK31
RK2918 / 32BIT (x86) [RK29]
- Windows 2000 – download
- Windows XP – download
- Windows Vista – download
- Windows 7 – download
RK2918 / 64BIT [RK29]
- Windows Vista – download
- Windows 7 – download
RK3066 / 32BIT (X86) [RK30]
- Windows 2000 – download
- Windows XP – download
- Windows Vista – download
- Windows 7 – download
RK3066 / 64BIT [RK30]
- Windows Vista – download
- Windows 7 – download
RK3188 / 32BIT (X86) [RK31]
- Windows 2000 – download
- Windows XP – download
- Windows Vista – download
- Windows 7 – download
- Windows 8 – download
RK3188 / 64BIT [RK31]
- Windows Vista – download
- Windows 7 – download
- Windows 8 – download
RK3066 / RK3188 / RK3288 32BIT (X86) / 64BIT
- Autoinstaller Windows 7 / 8 – download NEW
Firmware downloaden
RK3399 Firmware downloaden – LINK
RK3288 Firmware downloaden – LINK
Download RK Batchtool Firmware loader
Je Android device voorzien van nieuwe Firmware (*.img).
RK_Batchtool versie 1.5 – download
RK_Batchtool versie 1.7 – download
RK3066/RK3188 ROOT Software
Moborobo versie 2.1 – download
TPSarky Von Droid – download
Download SETCPU overclock app
Let op: De kloksnelheid aanpassen kan alleen als het Android systeem geroot is. Kloksnelheid verhogen kan leiden tot oververhitting.
SETCPU – download
Download RK2918/RK3066 Image Unpack/Repack tool
Om zelf Android Firmware bestanden te bewerken kan de Unpack/Repack tool gebruikt worden.
Unpack/Repack tool voor RK2918/RK3066 – download
Video tutorial over Unpacking – bekijk
Download RK3066 Android 4.1 Jelly Bean Source code
Zelf een ROM bouwen voor de RK3066? Begin dan met de Kernel Source code.
Android 4.1 Jelly Bean souce code – download
Download Android remote app voor Android smartfoon
Bestuur je Android apparaat gebaseerd op een Rockchip met je Android telefoon of tablet.
APK download (telefoon/tablet)- download
APK voor op je Android TV apparaat – download
Meer informatie over de remote app: Rockchip remote app
Windows on Arm device drivers for Rockchip
This repository contains drivers for RK35xx-based platforms, with a focus on RK3588(S).
Hardware support status
| Device | Driver | Status | Additional information |
|---|---|---|---|
| USB 3 ports 0/1 Host | usbxhci (Inbox) | 🟢 Working | The «full» USB3 port(s) work correctly, except USB3 only works in one orientation when used with a Type-C connector. Note that RK3588s devices (e.g. Opi5, Opi5B) have only 1 «full» USB3 port — only RK3588 devices (e.g. Opi5+) have 2 «full» USB3 ports. |
| USB 3 ports 0/1 Dual Role | usbxhci (Inbox) | 🔴 Not working | Host mode only, no dual role capability. Depends on USB/DP Alt Mode switching. |
| USB 3 port 2 Host | usbxhci (Inbox) | 🟡 Partially working | Won’t support USB1 devices without a hub. USB3 port 2 works by combining a USB3-only xHCI port with a USB2 EHCI+OHCI port. Since OHCI isn’t working (issue #5), this port will not work for USB1 devices. |
| USB 2.0 & 1.1 | usbehci (Inbox) | 🟡 Partially working | USBOHCI driver for USB 1.1 is missing in ARM64 builds (issue #5). |
| PCIe 3.0 & 2.1 | pci (Inbox) | 🟡 Partially working | Devices may work if drivers are available for them. Known issues include: — NVMe SSDs do not work with in-box storport.sys (issue #6, workaround available). — Devices that require cache-coherent bus or MSI do not work (e.g. Qualcomm Wi-Fi cards). — Devices that require a root PCIe port do not work (e.g. XHCI). |
| SATA | storahci (Inbox) | 🔴 Not working | SATA SSDs do not work with in-box storport.sys (issue #6, workaround available). |
| eMMC | dwcsdhc | 🟢 Working | |
| SD/SDIO | dwcmshc | 🟢 Working | |
| CPU frequency scaling | 🔴 Not working | Clocks limited at values set by UEFI. | |
| HDMI output | MSBDD (Inbox) | 🟡 Partially working | Single display with mode limited at 1080p 60 Hz, provided by UEFI GOP. |
| HDMI input | 🔴 Not working | ||
| DisplayPort output | MSBDD (Inbox) | 🟡 Partially working | Single display with mode limited at 1080p 60 Hz, provided by UEFI GOP. Only works in one orientation of the Type-C connector. |
| HDMI audio | 🔴 WIP | I2S audio driver enumerates, but requires VOP driver | |
| DisplayPort audio | 🔴 Not working | ||
| Analog audio | es8323 | 🟢 Working (Orange Pi 5) | |
| Digital audio | 🔴 Not working | ||
| USB/DP Alt Mode | 🔴 Not working | ||
| GPU | 🔴 Not working | Software-rendered | |
| NPU | 🔴 Not working | ||
| Multimedia codecs | 🔴 Not working | ||
| DSI | 🔴 Not working | ||
| CSI | 🔴 Not working | ||
| GMAC Ethernet | dwc_eqos | 🟢 Working | Requires latest UEFI (edk2-rk3588 master 2024/01/03 or later). |
| RTL8111/RTL8168/RTL8125 Ethernet | if_re | 🟢 Working | |
| UART | 🔴 Not working | No OS driver but debugging does work on UART2, being configured by UEFI. | |
| GPIO | rk3xgpio | 🟢 Working | |
| I2C | rk3xi2c | 🟢 Working | |
| I2S | csaudiork3x | 🟢 Working | |
| SPI | 🔴 Not working | ||
| CAN bus | 🔴 Not working | ||
| SPDIF | 🔴 Not working | ||
| SARADC | 🔴 Not working | ||
| PWM | 🔴 Not working |
Building
- Install a recent version of Visual Studio, Windows SDK and WDK.
- Clone this repo.
- Open the
Rockchip-Windows-Drivers\build\RockchipDrivers.slnsolution in Visual Studio. - Set the desired build configuraton (Release or Debug).
- Build -> Build Solution (or Ctrl+Shift+B).
The resulting driver binaries will be located in the Rockchip-Windows-Drivers\build\ARM64\Debug\Output (or Release) directory.
Firmware
The UEFI + ACPI implementation needed to run Windows and these drivers is available at https://github.com/edk2-porting/edk2-rk35xx.
Credits
Driver signing provided by Theo @ CHASE®
When you need to root or upgrade Rockchip RK3066 or RK3188 devices, you’ll usually have to connect your device to your computer via USB, and in Windows, installing specific drivers (ADB drivers) is usually needed. However, many people seem to have problems with installing the proper driver, and their device may not be recognized properly. To simplify the task for Windows users, Rockchip has written a tool called RK Driver Assistant to automatically install the correct drivers on different Windows versions.
Here’s how to install the drivers with this tools.There’s no need to connect your Rockchip device during this procedure.
- Download and extract RK_DriverAssitant.zip [Update: More recent versions of the tools can be found in Rockchip-Linux account in Github]
- Double click on DriverInstall.exe in Release_DriverAssitant directory to start the utility
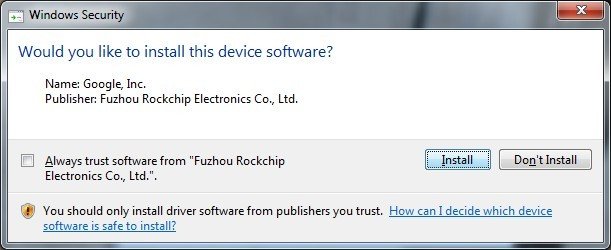
- If you’ve already tried to install USB drivers for Rockchip devices, make sure to click “Uninstall Driver” first
- Then click “Install Driver”, and depending on your version of Windows the Security below may show up twice during installation. Just click “Install”

- Done. The drivers should be installed, and you’re ready to root your device, or install or upgrade your firmware via USB.
Via MINIX and AndroidPC.es
Jean-Luc started CNX Software in 2010 as a part-time endeavor, before quitting his job as a software engineering manager, and starting to write daily news, and reviews full time later in 2011.
Support CNX Software! Donate via cryptocurrencies, become a Patron on Patreon, or purchase goods on Amazon or Aliexpress

Это общее руководсто по перепрошивке устройств на базе RockChip. Все RK сокеты поддерживают те же приложения и драйвера. Аппаратно устройства могут быть разными и вам понадобится определить где находится OTG порт и кнопка «recovery».
ПЕРЕД НАЧАЛОМ
Что вам понадобится:
Файл образа
Персональный компьютер с операционной системой: Windows XP (32/64bit) Windows 7 (32/64bit) Windows 8 (32/64bit) Windows 10 (32/64bit)
USB OTG кабель
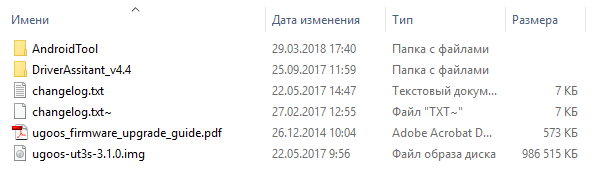
Первое что вам нужно сделать это скачать архив с прошивкой. Внутри архива вы найдете:
BatchTool или Android Tool — программа для обновления прошивки
DriverAssitant — программа для установки драйверов
Файл образа
УСТАНОВКА ДРАЙВЕРОВ
Запустите RK DriverAssitant и нажмите “Install Driver”
Примите все изменения и предупреждения во время установки пока не увидите сообщение об окончании
ПОДКЛЮЧЕНИЕ К ПК
Запустите Batch tool или Android tool на фашем ПК.
Для того чтобы соединить устройство с компьютером и запустить режим «bootloader» вам необходимо выполнить следующие действия:
1. Отключите адаптер питания от устройства
2. Подключите устройство к компьютеру через USB OTG порт, лучше использовать сертифицированный OTG USB кабель из комплекта устройства.
3. Запустите Batch tool или RK Android tool
4. Удерживайте кнопку восстановления (recovery).
5. Подключите адаптер питания и включите устройство если оно не включилось автоматически.
Подсказка: если вы не можете удерживать кнопку «recovery» или она сломана, вы можете перезагрузить устройство в режим «bootloader» (режим «загрузчика») из меню питания Ugoos.

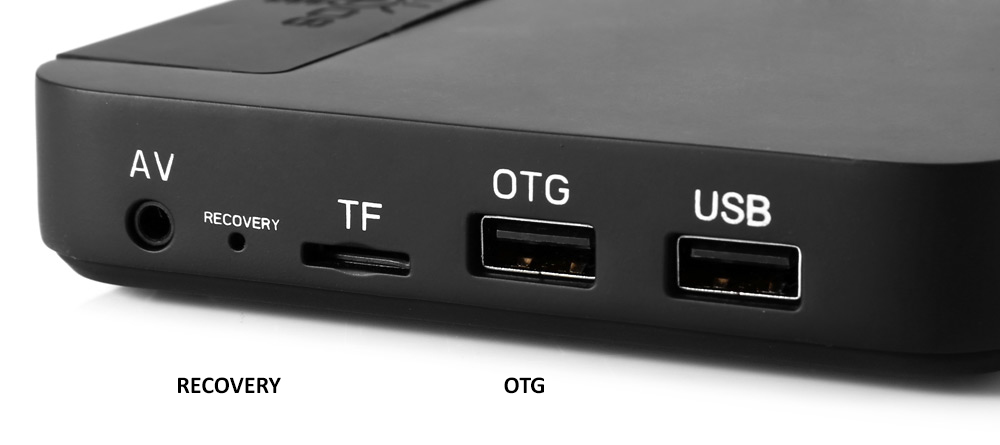
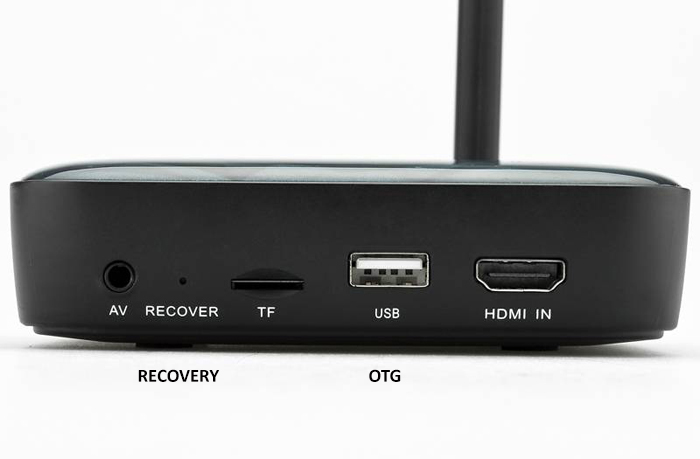
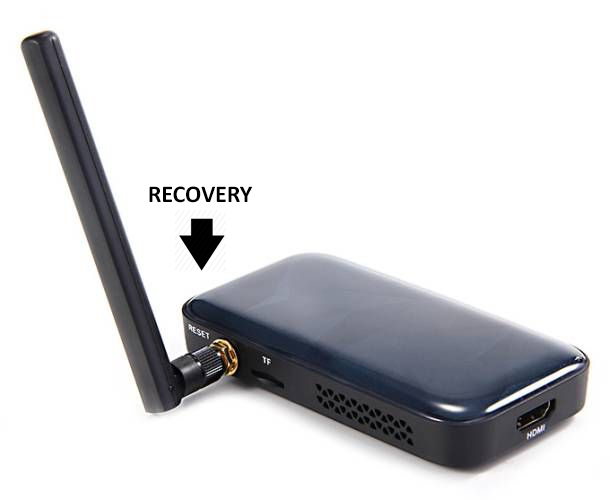
РАСПОЛОЖЕНИЕ КНОПКИ «RECOVERY» И OTG USB ПОРТА НА УСТРОЙСТВАХ UGOOS ВЫ МОЖЕТЕ УВИДЕТЬ В КОНЦЕ ЭТОЙ ИНСТРУКЦИИ.
ЕСЛИ ВЫ ИСПОЛЬЗУЕТЕ ANDROID TOOL:
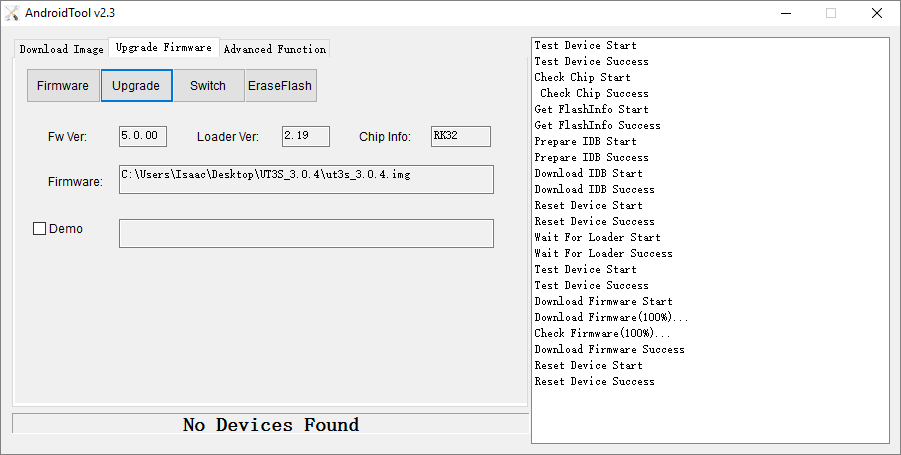
В Android Tool выберите вкладку “Upgrade Firmware”. Если вы сделали все правильно и драйвера RK установленны на вашем компьютере, ANDROID TOOL покажет вам сообщение “Found One Loader Device “.
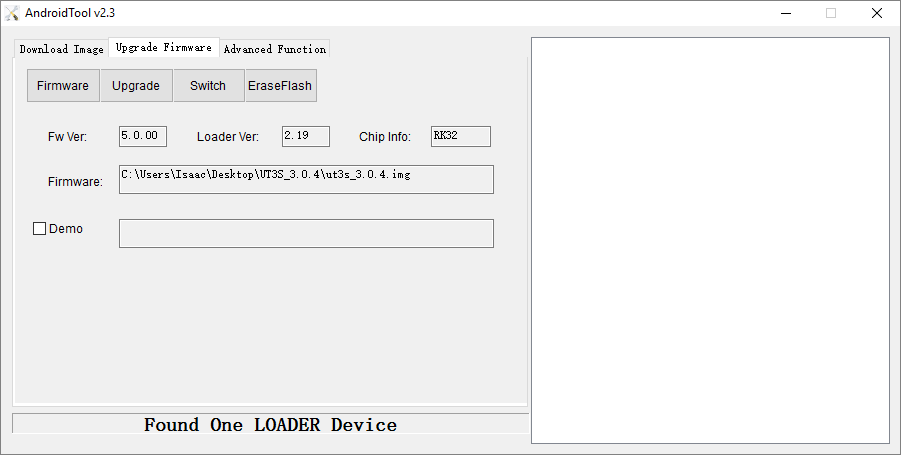
Нажмите кнопку “Firmware” и укажите путь к файлу прошивки. Вам нужно подождать пока программа скачает информацию о прошивке, на экране отобразится отчет. Теперь нажмите кнопку “Upgrade” для начала перепрошивки устройства. В конце процесса вы увидите сообщение об успешном окончании.
Прошивка «dualboot» или чистой linux прошивки (например «dualboot» прошивки для UT3/UT3S/UM3)
Запустите Android Tool. Если вы сделали все правильно и драйвера RK установленны на вашем компьютере, ANDROID TOOL покажет вам сообщение “Found One Loader Device “. В Android Tool выберите вкладку “Download Image”. По умолчанию программа настроена для утановки «чистого» android на ваше устройство. Если вы хотите установить “Dualboot” или “Чистый Linux” нажмите правой кнопкой мышки в окне программы и выберите “Load config”.
3. После выберите один конфигурационный файл:
config.cfg — если надо прошить только Android
config_dualboot.cfg — если надо прошить «dualboot»
config_linux.cfg — если надо прошить только linux
3. Теперь нажмите кнопку “Run” для начала перепрошивки устройства. В конце процесса вы увидите сообщение об успешном окончании.
ЕСЛИ ВЫ ИСПОЛЬЗУЕТЕ BATCH TOOL:
Запустите Rockchip Batch Tool и нажмите на “…” для выбора файла прошивки. Если вы сделали все правильно и драйвера RK установленны на вашем компьютере, вы увидите что один из индикаторов стал зеленым.
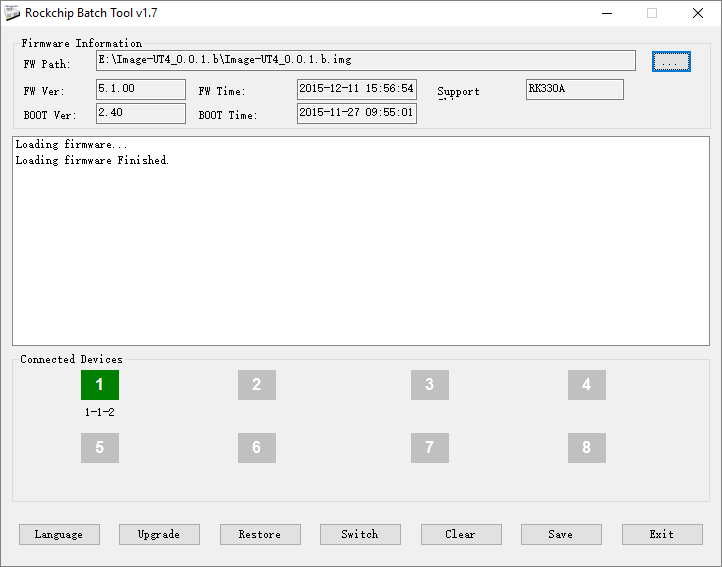
Теперь нажмите кнопку “Restore” для начала прошивки устройства. В конце процесса вы увидите сообщение об успешном окончании.
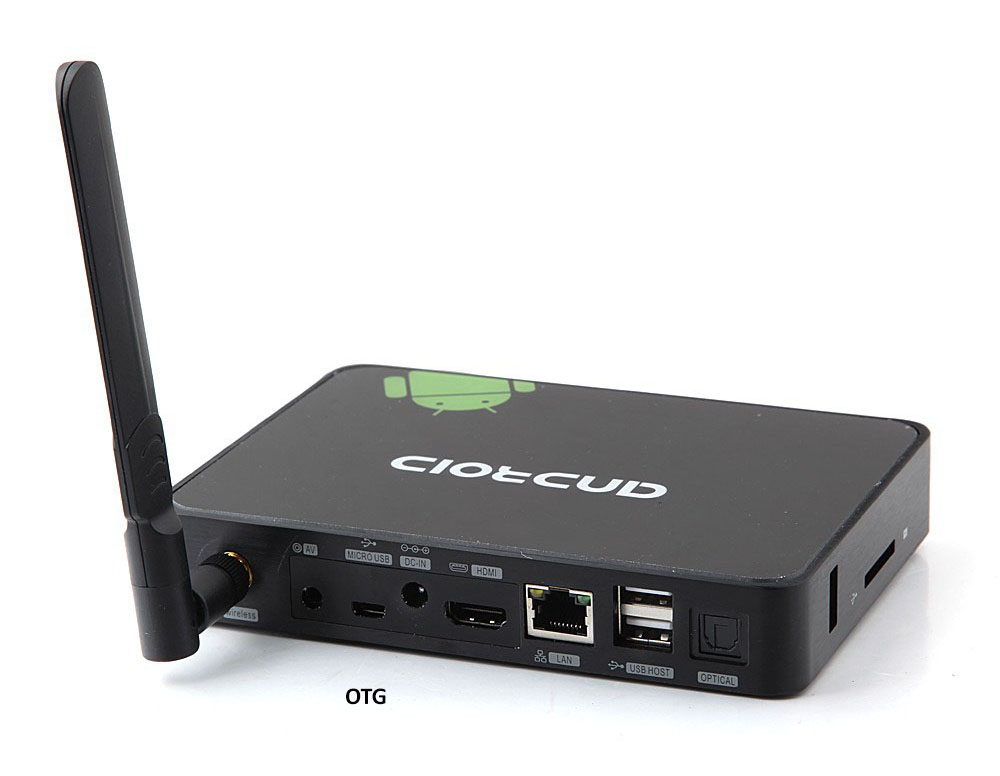
Расположение OTG usb портов и кнопок «recovery» на устройствах Ugoos:
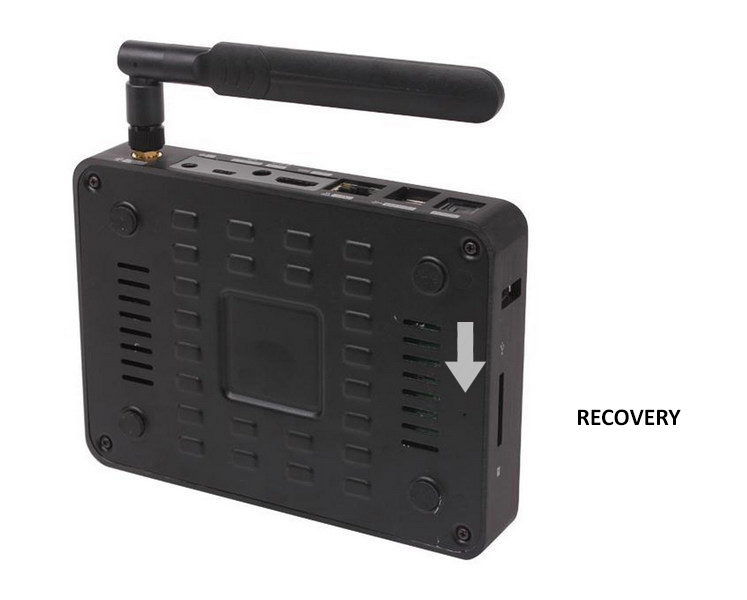
UT4/UT3S (в металлическом корпусе)/UT3+ (OTG порт находится возле порта HDM IN)
Кнопка «recovery» и USB OTG порт находятся на правой стороне
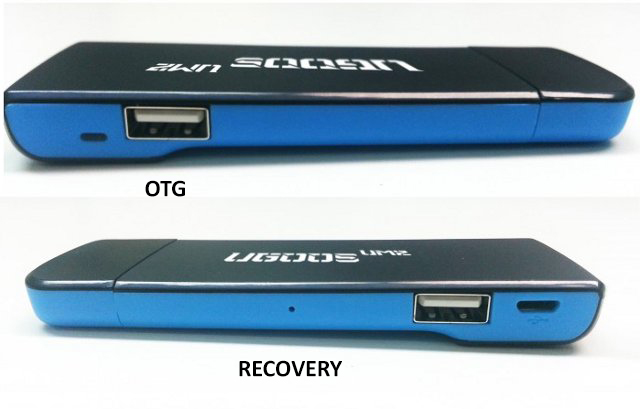
UT3/UT3S (в пластиковом корпусе)
Кнопка «recovery» и USB OTG порт находятся на правой стороне
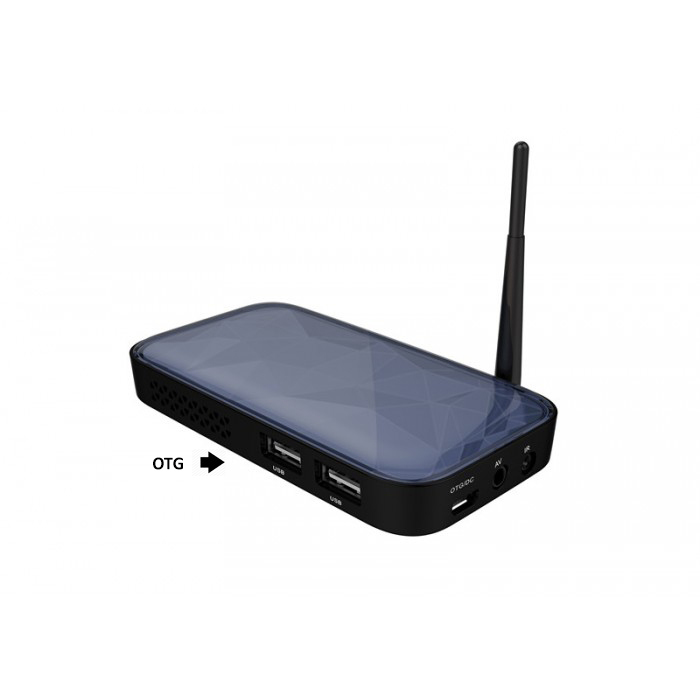
UM3/UM4
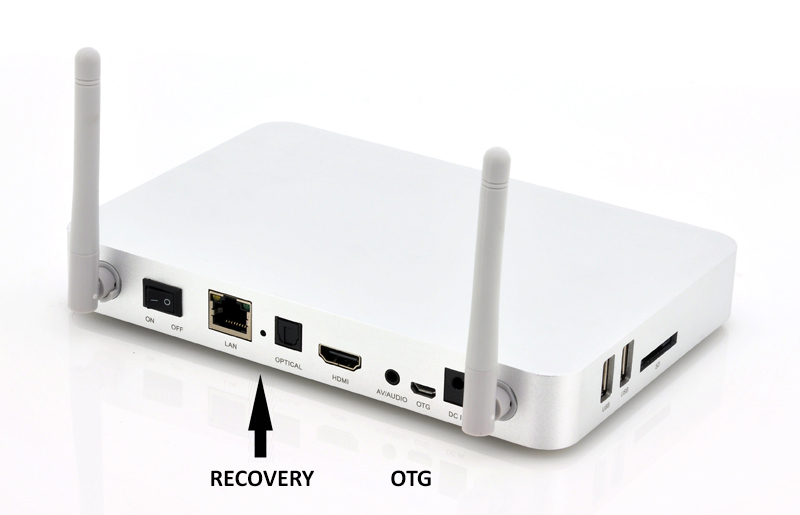
Кнопка «recovery» находится слева от коннектора антенны
OTG USB порт находится с левой стороны.
UM2
UT2
UT1
How to easily install Rockchip Rockusb Driver for Windows 8.1 & Windows 10 x64 bit
1:44 PM
danyrolux

Variant 1. Download & run ‘Rockchip Win10 Driver.reg’ file from here, here or here.
Variant 2. Download Rockchip driver USB fix archive from here, here or here. The archive contains two system files: usbhub.sys & usbport.sys (x64 & x86 versions). Go to your system folder C:\Windows\System32\drivers and back-up these 2 files (usbhub.sys & usbport.sys). Then run as admin the file ‘franken-usb.bat’ or copy over yourself the provided 2 files from the archive over the original existing ones in C:\Windows\System32\drivers.
Restart your PC. Install RockUSB driver with Rockchip Driver Assistant. Run Rockchip Batch Tool v1.7 and if the first block is pink then press ‘Switch’ button to turn it into green. The press ‘Restore’ button to flash the new firmware on your Rockchip CPU device (in my case a RK3188 tablet).
See the below video for details.