
В Windows Server 2008 R2 Microsoft значительно доработала и улучшила систему резервного копирования (как блочного, так и файлового). Появились следующие функции:
- Улучшена поддержка резервного копирования на уровне файлов: теперь можно выбрать конкретные папки и файлы, которые нужно включить/исключить из бекапа.
- Улучшена поддержка резервного копирования по сети: теперь появилась возможность выполнять резервное копирование на устройства NAS с запущенной службой доступа к файлам Samba (бекап на уровне файлов полностью не поддерживается). Также поддерживается инкрементальное копирование, но только в том случае, если на получателе работает служба VVS.
Однако в связи с наличием ряда ограничений во встроенной процедуре выполнения бэкапа в Windows Server 2008 R2 Microsoft, можно воспользоваться сторонними утилитами, специальными программами для резервного копирования, или утилитой robocopy.
Резервное копирование с помощью robocopy
Robocopy расшифровывается как “Robust File Copy”, это утилита командной строки для осуществления репликации каталогов, данная утилита во многом похожа на команду Unix – xcopy. Основное преимущество команды заключается в том, что она позволят выполнять копирование/перемещение только тех файлов, которые были изменены, что позволяет реализовать функцию инкрементального резервного копирования.
Синтаксис команды robocopy можно посмотреть, открыв командную строку и набрав:
robocopy
/?
Например, мы хотим выполнить копирование всех новых фотографий на сетевой накопитель NAS. В нашем примере мы должны указать папку-источник, папку назначения и опции команды:
robocopy "E:\Documents" "\\NAS\BACKUP\Documents" /MIR
Параметры “/MIR” означают, что нужно выполнить зеркальную копию, т.е. если я удалю фото в исходном каталоге, оно удалится и в моем бекапе.
Еще одной удобной функцией robocopy является возможность отложенного копирования, т.е. если папка источника или назначения не доступна, то копирование будет выполнено позднее. По-умолчанию, время ожидания 30 секунд, после которого будет еще 1000000 попуток скопировать файлы, в том случае, если мы хотим, например, выполнить повторное копирование через 15 секунд и повторить его только 5 раз, можно воспользоваться такой командой:
robocopy "E:\Documents" "\\NAS\BACKUP\Documents" /MIR /R:5 /W:15 Еще больше опция:
robocopy "E:\Documents" "\\NAS\BACKUP\Documents" /Z /MIR /R:5 /W:15 /V /TS /FP /NP /LOG+:"C:\NASSync.log"
Приведенные параметры robocopy говорят о том, что необходимо делать подробный вывод результатов исполнения (/V), выводить метку времен (/TS), полный путь (/FP), не показывать шкалу прогресса (/NP), и выводить результаты в файл лога (/LOG+). Для NAS, которые не поддерживают файловую систему NTFS, необходимо указывать параметр /FFT.
Планирование резервного копирования
Для того, чтобы выполнять регулярное резервное копирование, можно воспользоваться планировщиком Windows — Task Scheduler. Запускаем планировщик, создаем новое задание Create Basic Task, в мастере указываем имя задания (например, backup) и нажимаем Next. На экране Trigger, указываем как часто нужно выполнять резервное копирование. На вкладке Action указываем, что мы хотим запустить программу, нажимаем Next. Далее указываем имя программы, можно просто набрать robocopy, или указать полный путь к программе C:\Windows\System32\robocopy.exe. В окне с параметрами (Add arguments (optional)) мы должны указать аргументы команды robocopy.

Нажимаем Next и Finish.
Для того, чтобы проверить правильность работы задания, перейдем в планировщик, найдем в нем наше задание, правой кнопкой щелкнем по нему и выберем Run. После того, как задание будет выполнено, его статус можно найти в Last Run Result.
Примеры использования robocopy
Рассмотрим различные сценарии и параметры использования robocopy.
1. Скопировать файлы, измененные за последние 5 дней (исключая сегодня).
robocopy "E:\Documents" "\\NAS\BACKUP\Documents" /maxage:5 /minage:1
2. Переместить все файлы:
robocopy "E:\Documents" "\\NAS\BACKUP\Documents" /move /e3. Скопировать файлы за исключением скрытых (/xa:h):
robocopy "E:\Documents" "\\NAS\BACKUP\Documents" /e /xa:h
или за исключением read-only (/ia:rs):
robocopy "E:\Documents" "\\NAS\BACKUP\Documents" /ia:rs
При копировании также можно менять атрибуты файлов, при помощи опции A+ (добавить атрибут) or A- (удалить атрибут). Скопировать все файлы и задать им атрибут read-only:
robocopy "E:\Documents" "\\NAS\BACKUP\Documents" /e /A+:r
4. Скопировать все файлы по шаблону (расширению), пустые папки не копировать:
robocopy "E:\Documents" "\\NAS\BACKUP\Documents" *.doc *.ppt /s
5. Скопировать все файлы размером от 1000 до 60000 байт:
robocopy "E:\Documents" "\\NAS\BACKUP\Documents" /e /max:60000 /min:1000
6. Исключить из копирования папку AppData (/XD AppData):
Robocopy "C:\Users\Administrator" "\\NAS\BACKUP\Administrator" /MIR /XA:SH /XD AppData /XJD
7. Создать 32 потока (/MT:32) копирования файлов:
Robocopy "C:\Users\Administrator" \\NAS\BACKUP\Administrator /MIR /XA:SH /XD AppData /XJD /R:5 /W:15 /MT:32
В примере мы используем опцию /MT[:n], где n – это число от 1 до 128, которое определяет количество потоков. По умолчанию, если параметр /MT не указан, используется 8 потоков.
There are three primary commands that are useful for copying files.
| Command | Description |
|---|---|
| Copy | Basic file copy command. You can use this when you want to merge multiple files into one. |
| xcopy | Extended copy command. You can use this when you want to include subdirectories. |
| robocopy | Robust file copy command. You can use this to copy folder structures and include existing permissions. |
copy
You can use the copy command for basic file copying. The format is
copy source [destination]
It can also combine multiple files into a single file. The format when copying multiple files is
copy sourceFile1 + sourceFile2 [+ sourceFileN] destinationFile
Note
You can include as many source files as desired.
The following table shows some examples using the copy command.
| copy command | Comments |
|---|---|
c:\>copy test.txt test2.txt
|
Creates a new file named test2.txt from an existing source file named test.txt. |
c:\>copy test1.txt
+ test2.txt
combined.txt
|
Combines test1.text and test2.txt into a single file named combined.txt. The entire contents of test1.txt are at the beginning of the file and the entire contents of test2.txt are at the end. |
c:\>copy *.txt
combined.txt
|
Copies all the .txt files in the current directory into a single file named combined.txt. |
c:\data>copy *.*
c:\archive
|
Copies all files from the current folder (c:\data in the example) to the target folder (c:\archive in the example). The *.* wildcards indicate that all files should be copied. |
xcopy
xcopy extends the basic copy command and provides additional capabilities. The most notable capability with xcopy is the capability to copy subdirectories. The basic format of the command is
| xcopy Command | Comments |
|---|---|
/s
c:\>xcopy c:\data d:\data /s
c:\>xcopy c:\data d:\data\ /s
|
The /s switch copies all the files, directories, and subdirectories from the source to the destination. The example copies all the files on the c: drive to the d: drive. Use the trailing backslash (\) on the destination if the destination folder doesn’t exist. If the trailing backslash on the destination is omitted (d:\data instead of d:\data\) and the destination folder doesn’t exist, you are prompted to send the data to a file or a directory. If you select a file, all the data is combined into a single file. If you choose directory, the entire folder structure is re-created. |
/e
c:\>xcopy c:\data d:\data\ /s /e
|
The /e switch includes empty folders. This copies the entire contents of the c:\data folder, including all empty subfolders, to the d: drive. |
/t
c:\>xcopy c:\data d:\data\ /s /e /t
|
The /t switch is used to copy the directory structure only. Files are not copied. |
/y
c:\>xcopy c:\data d:\data\ /s /e /y
|
The /y switch suppresses prompting to overwrite files. This is useful in scripts when you want the process automated without prompting you to take action. If the destination folder exists and the /y switch is omitted, xcopy prompts the user to overwrite the folder. |
robocopy
robocopy is a robust file copy command. It can do everything that xcopy can do and more, including copy permissions. The basic syntax is
robocopy sourceDirectory destinationDirectory
One of the most valuable features of robocopy is the capability to copy metadata associated with a file. You identify the metadata you want to copy by using specific flags, as shown in the following table. Any of the flags can be used with the /copy switch to specify what metadata to copy.
| robocopy Metadata Flag | Description |
|---|---|
d
c:\>robocopy c:\data
d:\data\ /copy:d
|
Data flag. The d flag identifies the file itself. |
a
c:\>robocopy c:\data
d:\data\ /copy:da
|
Attributes flag. This includes attributes such as hidden or read-only. |
t
c:\>robocopy c:\data
d:\data\ /copy:dat
c:\>robocopy c:\data
d:\data\
|
Timestamps flag. Timestamps include when the file was created and when it was modified. The d, a, and t flags are used by default. In other words, the two example commands are the same. |
s
c:\>robocopy c:\data
d:\data\ /copy:dats
|
Security flag. This includes all of the NTFS access control lists (ACL). In other words, it includes all of the assigned permissions. |
o
c:\>robocopy c:\data
d:\data\ /copy:datso
|
Owner flag. This flag enables you to retain the original owner of the file. If this isn’t used, the owner of the copied file is the user who executes the command. |
u
c:\>robocopy c:\data
d:\data\ /copy:datsou
|
Auditing information flag. This includes all of the security access control lists (SACL) that identify auditing information for files and folders. |
The following table shows some common uses of the robocopy command.
| Common robocopy Commands | Description |
|---|---|
c:\>robocopy c:\data
d:\data\
c:\>robocopy c:\data
d:\data\ /copy:dat
|
Copies all the files in the c:\data folder to the d: drive. It does not include subfolders. Note that this includes the data, the attributes, and the timestamps and is the same as using the /copy:dat switch. |
/s
c:\>robocopy c:\data
d:\data\ /s
|
The /s switch includes nonempty subfolders. It copies the entire contents of the c:\data folder to the d: drive. It includes all nonempty subfolders. |
/e
c:\>robocopy c:\data
d:\data\ /e
|
If you want to include empty folders, use the /e switch. It copies the entire contents of the c:\data folder (including nonempty subfolders) to the d: drive. Note that /s is implied but does not need to be included. |
/purge
c:\>robocopy c:\data
d:\data\ /e /purge
|
The /purge switch deletes files at the destination that no longer exist at the destination. |
/mir
c:\>robocopy c:\data
d:\data\ /mir
|
Using the /mir switch mirrors the source contents at the destination. This is the same as using the /e and /purge switches. |
/mov
c:\>robocopy c:\data
d:\data\ /mov
|
The /mov switch specifies that the files should be copied to the destination and then deleted from the source. This is similar to a cut and paste operation. It does not include subdirectories. |
/move
c:\>robocopy c:\data
d:\data\ /move
|
You can add an e to the /mov switch (/move) to include all subdirectories, including empty subdirectories. This works like /mov but includes all subfolders. |
/copy:copyflag(s)
c:\>robocopy c:\data
d:\data\ /copy:datsou
c:\>robocopy c:\data
d:\data\ /copy:all
|
The /copy flag enables you to include additional metadata in the copy operation. The /copy:datsou command copies all the metadata and works the same as /copy:all. |
c:\>robocopy c:\data
d:\data\ /copy:dats
c:\>robocopy c:\data
d:\data\ /sec
|
If you want to copy the permissions without the owner and auditing information, you can use the /copy:dats switch. This works the same as the /sec switch. |
The output of the robocopy command provides useful information. It shows how many files and folders were copied, whether any files were skipped, whether any failures occurred, the speed of the copy, and more, as shown in the following partial output:
C:\>robocopy c:\scripts e:\scripts\ /copy:datsou
-----------------------------------------------------------------------
   ROBOCOPY     ::     Robust File Copy for Windows


-----------------------------------------------------------------------


  Started : Sun Nov 07 18:36:22 2010


   Source : c:\scripts\
     Dest : e:\scripts\


   Files : *.*


 Options : *.* /COPYALL /R:1000000 /W:30


-----------------------------------------------------------------------


          New Dir          8    c:\scripts\
100%        New File                 201        logon.vbs
100%        New File                  47        ipconfig.ps1
100%        New File                 482        shutdown.ps1
100%        New File                 321        createou.wsh
100%        New File                 182        createuser.wsh
100%        New File               11298        processes.txt


-----------------------------------------------------------------------


                Total    Copied   Skipped  Mismatch    FAILED     Extras
     Dirs :         1         1         0         0         0          0
    Files :         8         8         0         0         0          0
    Bytes :    12.2 k    12.2 k         0         0         0          0
    Times :   0:00:00   0:00:00                       0:00:00    0:00:00

    Speed :              156637 Bytes/sec.
    Speed :               8.962 MegaBytes/min.

    Ended : Sun Nov 07 18:36:23 2010
As a reminder, you can capture the output of any command using the > symbol to redirect the output to a text file like this:
c:\>robocopy c:\scripts e:\scripts\ /copy:datsou > robooutput.txt
Robocopy – это консольная утилита Windows для копирования файлов, которую можно использовать для синхронизации/репликации файлов и каталогов, и в сценариях резервного копирования. Robocopy (Robust File Copy) доступна начиная с Windows NT 4.0 Resource Kit, но по умолчанию эта функция появилась только в Windows Vista и Windows Server 2008. Robocopy заменяет Xcopy и copy, как более функциональная.
Применение:: ROBOCOPY источник назначение [файл [файл]…] [Параметры]
Источник:: Исходная папка (диск:путь или \серверобщий ресурспуть).
Назначение :: Конечная папка (диск:путь или \серверобщий ресурспуть).
Файл :: Копировать файлы (имена и подстановочные знаки: по умолчанию «*.*»).
Например:
robocopy C:\ Y:\ file.name /j /mt:32 — скопировать с помощью robocopy файл с диска C на Y с помощью 32 потоков
Параметры копирования:
/S :: Копировать вложенные папки, кроме пустых.
/E :: Копировать вложенные папки, включая пустые.
/LEV:n :: Копировать только верхние n уровней исходного дерева папок.
/Z :: Копирование файлов с возобновлением.
/B :: Копирование файлов в режиме архивирования.
/ZB :: используется режим с возобновлением; если доступ запрещен, используется режим архивации.
/EFSRAW :: Копирование всех зашифрованных файлов в режиме EFS RAW.
/COPY: флаги копирования :: что копируется для файлов (по умолчанию /COPY:DAT).
(флаги копирования: D=Данные, A=Атрибуты, T=Метки времени).
(S=Безопасность=NTFS ACLs, O=Сведения о владельце, U=Сведения аудита).
/DCOPY:T :: Копирование меток времени папки.
/SEC :: Копировать файлы с параметрами безопасности (эквивалентно /COPY:DATS).
/COPYALL :: Копировать все сведения о файле (эквивалентно /COPY:DATSOU).
/NOCOPY :: Не копировать никаких сведений о файле (удобно использовать с параметром /PURGE).
/SECFIX :: Исправлять параметры безопасности для всех файлов, даже пропущенных.
/TIMFIX :: Исправлять атрибуты времени для всех файлов, даже пропущенных.
/PURGE :: Удалять файлы и папки назначения, которых больше не существует в источнике.
/MIR :: Создать зеркало дерева папок (эквивалентно /E с /PURGE).
/MOV :: Перемещать файлы (удаление из источника после копирования).
/MOVE :: Перемещать файлы и папки (удаление из источника после копирования).
/A+:[RASHCNET] :: Добавлять заданные атрибуты скопированным файлам.
/A+:[RASHCNET] :: Удалять заданные атрибуты из скопированных файлов.
/CREATE :: Создать только дерево папок и файлы нулевой длины.
/FAT :: Создать файлы назначения только в формате 8.3 FAT.
/256 :: Отключить поддержку длинных путей ( > 256 знаков).
/MON:n :: Наблюдать за источником; перезапустить после n изменений.
/MOT:m :: Наблюдать за источником; перезапустить через m минут, если произошли изменения.
/RH:hhmm-hhmm :: Часы запуска — время, когда можно запускать новое копирование.
/PF :: Проверять часы запуска по файлам (не по проходам).
/IPG:n :: Интервал между пакетами (мс) для снижения нагрузки на сеть при низкоскоростных подключениях.
/SL:: копирование самих символических ссылок вместо копирования целевого объекта этих ссылок.
Параметры выбора файлов:
/A :: Копировать только файлы с установленным атрибутом «Архивный».
/M :: Копировать только файлы с атрибутом «Архивный» и сбросить его.
/IA:[RASHCNETO] :: Включить файлы, у которых установлен какой-либо из заданных атрибутов.
/XA:[RASHCNETO] :: Исключить файлы, у которых установлен какой-либо из заданных атрибутов.
/XF file [файл]… :: Исключить файлы, соответствующие заданным именам, путям и подстановочным знакам.
/XD dirs [папки]… :: Исключить папки, соответствующие заданным именам и путям.
/XC :: Исключить измененные файлы.
/XN :: Исключить более поздние файлы.
/XO :: Исключить более ранние файлы.
/XX :: Исключить дополнительные файлы и папки.
/XL :: исключить отдельно расположенные файлы и папки.
/IS :: Включить те же файлы.
/IT :: Включить оптимизированные файлы.
/MAX:n :: Максимальный размер файла — исключить файлы, размер которых более n байт.
/MIN:n :: Минимальный размер файла — исключить файлы, размер которых менее n байт.
/MAXAGE:n :: Максимальный возраст файла — исключить файлы, возраст которых превышает n дней.
/MINAGE:n :: Минимальный возраст файла — исключить файлы, возраст которых менее n дней.
/MAXLAD:n :: Наиболее поздняя дата последнего обращения — исключить файлы, которые не использовались с даты n.
/MINLAD:n :: Наиболее ранняя дата последнего обращения — исключить файлы, которые использовались после даты n.
(Если n < 1900, то n = n дней, в противном случае n — дата в формате ДДММГГГГ).
/XJ :: исключить точки соединения. (по умолчанию обычно включаются).
/FFT :: Использовать время файлов FAT (двухсекундная точность).
/DST :: Учитывать одночасовую разницу при переходе на летнее время.
/XJD :: Исключить точки соединения для папок.
/XJF :: Исключить точки соединения для файлов.
Параметры повторных попыток:
/R:n :: число повторных попыток для неудавшихся копий: по умолчанию — 1 миллион.
/W:n :: Время ожидания между повторными попытками: по умолчанию — 30 секунд.
/REG :: Сохранить /R:n и /W:n в реестре как параметры по умолчанию.
/TBD :: Ждать, пока будут определены имена общих ресурсов (ошибка повторной попытки 67).
Параметры ведения журнала:
/L :: Только список — файлы не копируются, не удаляются, не помечаются метками времени.
/X :: Сообщать обо всех дополнительных файлах, а не только о выбраных.
/V :: Подробный вывод с указанием пропущенных файлов.
/TS :: Включать в вывод метки времени исходных файлов.
/FP :: Включать в вывод полные пути файлов.
/BYTES :: Печатать размеры в байтах.
/NS :: Без размера — не заносить в журнал размер файлов.
/NC :: Без класса — не заносить в журнал классы файлов.
/NFL :: Без списка файлов — не заносить в журнал имена файлов.
/NDL :: Без списка папок — не заносить в журнал имена папок.
/NP :: Без хода процесса — не отображать число скопированных %.
/ETA :: Показывать оценку времени окончания копирования файлов.
/LOG: файл :: Записывать состояние в файл журнала (перезаписывать существующий журнал).
/LOG+: файл :: Записывать состояние в файл журнала (добавлять к существующему журналу).
/UNILOG: файл :: Записывать состояние в файл журнала в формате Юникод (перезаписывать существующий журнал).
/UNILOG+: файл :: Записывать состояние в файл журнала в формате Юникод (добавлять к существующему журналу).
/TEE :: Направлять выходные данные в окно консоли и в файл журнала.
/NJH :: Без заголовка задания.
/NJS :: Без сведений о задании.
/UNICODE :: Cостояние вывода в формате Юникод.
Параметры задания:
/JOB: имя_задания :: Взять параметры из указанного файла задания.
/SAVE: имя_задания :: Сохранить параметры в указанный файл задания
/QUIT :: Выйти после обработки командной строки (для просмотра параметров).
/NOSD :: Не указывается исходная папка.
/NODD :: Не указывается папка назначения.
/IF :: Включить следующие файлы
Примеры использования
Все это выполняется в командной строке (Пуск-Выполнить-CMD) или вы можете создать bat скрипт.
1. Скопировать файлы, измененные за последние 5 дней (исключая сегодня).
robocopy «E:\Documents» «\\NAS\BACKUP\Documents» /maxage:5 /minage:12. Переместить все файлы:
robocopy «E:\Documents» «\\NAS\BACKUP\Documents» /move /e3. Скопировать файлы за исключением скрытых (/xa:h):
robocopy «E:\Documents» «\\NAS\BACKUP\Documents» /e /xa:hили за исключением read-only (/ia:rs):
robocopy «E:\Documents» «\\NAS\BACKUP\Documents» /ia:rsПри копировании также можно менять атрибуты файлов, при помощи опции A+ (добавить атрибут) or A- (удалить атрибут). Скопировать все файлы и задать им атрибут read-only:
robocopy «E:\Documents» «\\NAS\BACKUP\Documents» /e /A+:r4. Скопировать все файлы по шаблону (расширению), пустые папки не копировать:
robocopy «E:\Documents» «\\NAS\BACKUP\Documents» *.doc *.ppt /s5. Скопировать все файлы размером от 1000 до 60000 байт:
robocopy «E:\Documents» «\\NAS\BACKUP\Documents» /e /max:60000 /min:10006. Исключить из копирования папку AppData (/XD AppData):
Robocopy «C:\Users\Administrator» «\\NAS\BACKUP\Administrator» /MIR /XA:SH /XD AppData /XJD7. Создать 32 потока (/MT:32) копирования файлов:
Robocopy «C:\Users\Administrator» \\NAS\BACKUP\Administrator /MIR /XA:SH /XD AppData /XJD /R:5 /W:15 /MT:328. Скопировать файлы из одной папки в другую со стандартными атрибутами исключив файл по расширению (допустим *.doc)
Robocopy » Robocopy «C:\Users\Administrator» «\\server\userbackup» /СOPY:DAT /XF *.docПример использования для бэкапа
1)
robocopy D:\исходная_папка \\192.168.0.1\целевая_папка /E /Z /COPY:TDASO /DCOPY:T /M /R:2 /W:5 /MT:64В данном примере:
Мы копируем папку «исходная папка», находящуюся на локальном диске D:
Мы копируем эту папку на компьютер \\192.168.0.1 в папку «целевая папка»
/E : Мы копируем все подпапки и файлы
/Z : Включаем поддержку докачки (на случай обрыва связи)
/COPY:TDASO : Копируем все атрибуты и ACL прав доступа NTFS (но не копируем атрибуты аудита)
/DCOPY:T : Копируем время создания папок
/M : Копируем только файлы с установленным атрибутом «A — Архивный» и сбрасываем этот атрибут, что позволяет нам копировать только измененные файлы.
/R : Количество повторных попыток копирования файла в случае, если копирование не удалось. Причем «не удалось» срабатывает и в том случае, если доступ к файлу закрыт. По-умолчанию = 1 миллионы, т.е. бесконечно, потому копирование благополучно встанет на первом же файле, к которому не будет доступа.
/W : Задержка в секундах между попытками копирования. По-умолчанию = 30 секундам.
/MT — кол-во потоков, увеличив которые можно ускорить копирование. Будет быстрее чем обычное копирование файла точно.
Заметка. Очень рекомендую задавать вручную параметры /R и /W, иначе при автоматической синхронизации она попросту зависнет, встретив на своем пути ошибку доступа.
2) Похожий пример , но обратите внимание — каждый раз бэкап копируется в папку с названием даты и времени. Очень удобно для создание добавочного бэкапа.
robocopy D:\исходная_папка \\192.168.0.1\целевая_папка\%date:~0,2%.%date:~3,2%.%date:~6,4%.%time:~0,2%-%time:~3,2% /E /Z /COPY:TDASO /DCOPY:T /M /R:2 /W:5%date:~0,2%.%date:~3,2%.%date:~6,4%.%time:~0,2%-%time:~3,2% — дата и время создание бэкапа в качестве названия папки. В итоге получается папка вида 16.01.2016-10.19
Или так — %date:~6,4%-%date:~3,2%-%date:~0,2%_%time:~0,2%-%time:~3,2% Результат — 2016-03-13_23-30
Много интересного вы также сможете узнать набрав команду set /?
Формат даты в командной строке:
@echo off
set day=%DATE:~0,2%
set month=%DATE:~3,2%
set year=%DATE:~6,4%
set hour=%TIME:~0,2%
set minute=%TIME:~3,2%
set second=%TIME:~6,2%
echo %day%
echo %month%
echo %year%
echo %hour%
echo %minute%
echo %second%
set YYYYMMDD=%year%%month%%day%
echo %YYYYMMDD%Microsoft has added better support for both block-level backup and file-level backup in Windows Server 2008 R2 comparing to its predecessor Windows Server 2008. The new features including:
-
Better support for file level backup: you can now choose folders and files to be included or excluded without backup the whole partition which makes the backup plan more flexible.
-
Better support for network backup: now it’s possible to backup to NAS running Samba file service for both block-level backup (file-level support is not directly supported due to the problem with sparse file, see article here). Incremental backup is also supported, but you won’t get versioning control due to the lack of VVS in destination.
The file-level backup of my documents, photos and videos to NAS is still problematic for me not only due to the problem of mounting VHD file when it’s created as sparse file by Samba, but also because I’d like to share the backup to other computers in the same folder structure, so my requirement is to synchronize/mirror backup files in local hard-drive to my NAS, and I use robocopy to achieve this.
Robocopy stands for “Robust File Copy”, and it is a command-line directory replication command similar to Unix xcopy command. The big advantage of this command is that it only copies/moves files that are modified which suites incremental backup perfectly.
To see the syntax and options of this command, open a prompt windows and type the following command:
A detailed description of syntax and options can be also found here. Essentially we need to specify the source folder, the destination folder and any specific options. In our backup scenario, we’d use the following command to backup all photos to NAS:
robocopy "E:\Documents" "\\NAS\BACKUP\Documents" /MIR
The option “/MIR” makes sure the backup mirrors the source, so if I delete a photo from my source later on, it will delete it from the backup.
Another thing robocopy does is wait and try again if it can’t do what it’s supposed to (why it’s called Robust File Copy). By default, it will wait a long time (30 seconds) and try a lot of times (1 million) if something’s up, to avoid waiting for 30 million seconds, let’s change these to retry 5 times and wait 15 seconds in between:
robocopy "E:\Documents" "\\NAS\BACKUP\Documents" /MIR /R:5 /W:15
We can even specify more options:
robocopy "E:\Documents" "\\NAS\BACKUP\Documents" /Z /MIR /R:5 /W:15 /V /TS /FP /NP /LOG+:"C:\NASSync.log"
Which tells the command to produce verbose (/V) output with timestamp (/TS), full pathname (/FP) and no progress (/NP) options as well as log file (/LOG+ for appending). For NAS which doesn’t run NTFS, we probably also need /FFT option, see more discussion here.
Schedule the backup
To schedule the backup task to run regularly, we open the Windows Task Scheduler. For our purpose, try looking on the right for an item called Create Basic Task which will launch the Create Basic Task Wizard, now give this task a name (for example: backup) and click Next. This goes to the Trigger screen, which dictates how often the backup will be done. Click next and now we’re at the Action screen and we want to start a program, so click Next. Here’s the important part, we need to select the program to run, which is robocopy, we can either just type robocopy or click browse and find C:\Windows\System32\robocopy.exe. Now we need to enter the parameters into the Add arguments (optional) textbox. These will be whatever we’ve decided based on the previous section:

Click Next and then Finish and it’s all setup.
Now if we want to see if it will all work, we should be able to find our backup task, right-click it and choose Run. After the task is completed, we can check the Last Run Result, which will be the exit code robocopy gives. The explanations of the exit code can be found here.
More examples
More advanced features of robocopy are illustrated as examples below:
1. Copy files that are modified within 5 days (except today) in source folder to destination folder:
robocopy "E:\Documents" "\\NAS\BACKUP\Documents" /maxage:5 /minage:1
2. Move files from source folder to destination folder:
robocopy "E:\Documents" "\\NAS\BACKUP\Documents" /move /e
3. Copy files except hidden files (/xa:h) from source folder to destination folder:
robocopy "E:\Documents" "\\NAS\BACKUP\Documents" /e /xa:h
Or copy only read-only system (/ia:rs) files from source folder to destination folder:
robocopy "E:\Documents" "\\NAS\BACKUP\Documents" /ia:rs
We can even modify file attributes when copying by using A+ (add attributes) or A- (remove attributes):
robocopy "E:\Documents" "\\NAS\BACKUP\Documents" /e /A+:r
The example above shows copy from source folder to destination folder and make sure all files are read-only afterwards.
4. Copy files with certain pattern from source folder to destination folder, empty folders won’t be copied (/s):
robocopy "E:\Documents" "\\NAS\BACKUP\Documents" *.doc *.ppt /s
5. Copy files with size between 1000 bytes and 60000 bytes from source folder to destination folder:
robocopy "E:\Documents" "\\NAS\BACKUP\Documents" /e /max:60000 /min:1000
6. Exclude the entire AppData folder(/XD AppData) and all the junction points (/XJD):
Robocopy "C:\Users\Administrator" "\\NAS\BACKUP\Administrator"
         /MIR /XA:SH /XD AppData /XJD
Windows uses junction points to link various operating system folders to the user profile folder. For example, the Cookies folder and the SendTo folder are linked to the user profile folder via junction points. We normally don’t want them in our backup.
7. Create 32 threads (/MT:32) to do the copy task:
Robocopy "C:\Users\Administrator" "\\NAS\BACKUP\Administrator"
         /MIR /XA:SH /XD AppData /XJD /R:5 /W:15 /MT:32
The above example uses the option /MT[:n], where n is a number from 1 to 128 which indicates the number of threads to be used. Keep in mind that n is optional and that by default, the /MT option will use 8 threads.
- Home
- »
- Operating System
- »
- Command line references
In this article I am going to explain about robocopy command in windows server 2008 operating system.
- 2498
Robocopy command in Windows Server 2008 The Robocopy command is used to copies file data.
Syntax of Robocopy command
robocopy <source> <destination> [<File>[….]] <options>[]
Parameters in Robocopy command
It contains following parameter, which is given below:
| Parameter | Description |
| <source> | It specifies the path of source directory. |
| <destination> | It specifies the path of the destination directory. |
| <file> | It specifies the file or files to be copied. |
| <options> | It specifies options to be used with the robocopy command. |
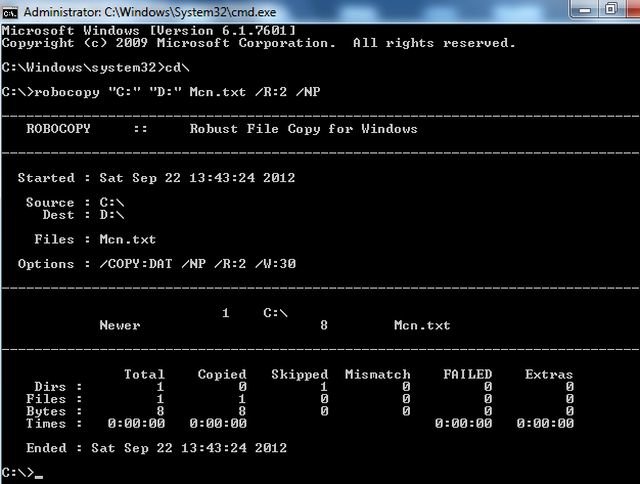
Example of Robocopy command
robocopy «C:» «D:» Mcn.txt /R:2 /NP
Output:
Ask Your Question
Got a programming related question? You may want to post your question here
Programming Answers here