
Robocopy – это консольная утилита Windows для копирования файлов, которую можно использовать для синхронизации/репликации файлов и каталогов, и в сценариях резервного копирования. Robocopy (Robust File Copy) доступна начиная с Windows NT 4.0 Resource Kit, но по умолчанию эта функция появилась только в Windows Vista и Windows Server 2008. Robocopy заменяет Xcopy и copy, как более функциональная.
Содержание:
- Основные возможности Robocopy
- Синтаксис и параметры robocopy
- Использование robocopy для зеркалирования каталогов
- Инкрементальное копирование с помощью robocopy
- Robocopy: перемещение файлов
- Пример использование robocopy в планировщике задач
- Отслеживание изменений в каталогах с помощью robocopy
- Коды возврата (ошибки) robocopy
Основные возможности Robocopy
Кроме обычного копирования файлов и папок из папки источника в каталог назначения, в Robocopy есть множество очень полезных функций:
- Устойчивость к обрывам сети (robocopy может продолжить копирования после восстановления сетевого доступа);
- Корректное копирование файлов с их атрибутами и NTFS правами доступа;
- Копирование с сохранением исходной временной метки;
- Возможность копирования файлов и директорий, запрещенных для доступа даже администратору, с помощью ключа /B (ключ позволяет игнорировать проверку прав доступа, ключ доступен только для участников группы Администраторы или Операторы архива);
- Возможность задать количество попыток копирования файла, если файл недоступен;
- Режим полного зеркалирования директорий;
- Пропуск уже существующих файлов (с одинаковым размером или временной меткой timestamp);
- Индикатор прогресса копирования;
- Корректная работа с длинными путями (более 260 символов);
- Эффективные алгоритмы и многопоточность позволяют выполнять копирование файлов намного быстрее, чем обычное копирование средствами Windows;
- Поддержка коды возврата (что позволяет использовать robocopy в различных внешних скриптах и утилитах).
Официальной графической версии robocopy (c GUI) от Microsoft нет. Существуют пользовательские версии, но их поддержка прекращена. Список неофициальных GUI для robocopy (это сторонние программы):
- EazyCopy
- RoboMirror
- RichCopy
Синтаксис и параметры robocopy
Robocopy имеет много параметров, которые на первый взгляд могут показаться сложными, но имея под рукой документацию, вы с легкостью разберетесь и сможете править скрипты под себя.
Официальная документация: https://docs.microsoft.com/en-us/windows-server/administration/windows-commands/robocopy
Синтаксис robocopy состоит из двух обязательных параметров (исходный и целевой каталог) и двух необязательных (фильтр файлов и параметры):
robocopy <source> <dest> [фильтр файлов] [параметры]
Поддерживаются как локальные пути, так и UNC, например, \\server\directory
Полный синтаксис утилиты robocopy (все параметры и их описания) доступны по команде:
robocopy /?
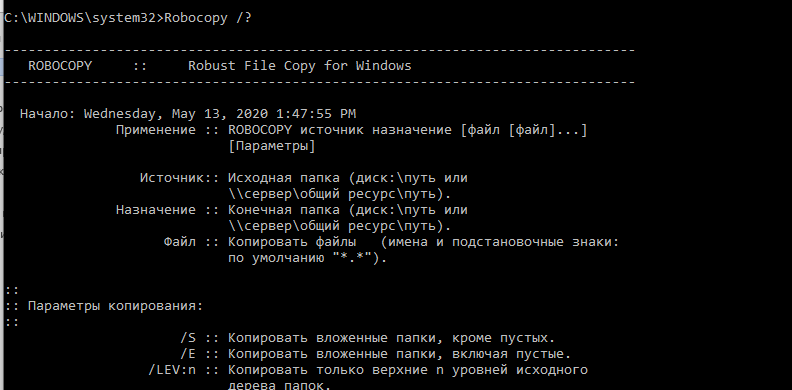
Исполняемы файл robocopy.exe находится в каталоге C:\Windows\System32.
Поскольку ключей в robocopy много, мы будем рассматривать их на практике, в готовых командах. Мы не будем рассматривать самые простые примеры использования robocopy, т.к. обычно они не вызывают вопросов. Ниже представлены готовые к применению более сложные команды robocopy, которые можно использовать в реальных сценариях.
Для тестирование различных команд robocopy без выполнения операций (копирования, перемещения или удаления) с файлами используется параметр
/L
. Данный параметр вернет список файлов и папок, которые будут скопированы вашей командой.
Использование robocopy для зеркалирования каталогов
Вы можете зеркалировать (синхронизировать) содержимое двух каталог с помощью следующей команды robocopy (под зеркалированием понимается копирование файлов из целевой папки с удалением файлов в целевом каталоге, если они удалены в источнике).
robocopy \\testnode1\C$\source\ \\testnode2\c$\dest\ *.txt /MIR /COPYALL /Z /B /J /R:3 /W:1 /REG /TEE /LOG+:%appdata%\robocopy.log
-
\\testnode1\C$\source\
— исходный каталог, откуда копируются файлы -
\\testnode2\C$\dest\
— каталог назначения, куда скопируются файлы -
*.txt
– фильтр файлов. Синхронизируются только .txt файл и директории. -
/MIR
– полное зеркалирование данных в source и dest директориях. Файлы, удаленные из source директории или не присутствующие в ней, также будут удалены из dest. Если вы хотите, чтобы удаленные из source файлы оставались в dest, то поменяйте параметр /MIR на /E -
/COPYALL
– копирует всю информацию о файле (Атрибуты, параметры безопасности и т.д.). Как альтернатива, можно применять флаг /COPY:DT для копирования timestamp, а не всей информации. /COPALL требует прав администратора -
/Z
– robocopy продолжит копирование файла при обрыве. Полезно при копировании больших файлов (неплохая альтернатива копированию файлов по BITS) -
/B
– позволяет robocopy избегать ошибки access denied error. В этом режиме robocopy игнорирует все права на файлы, которые могли бы помешать прочитать/записать файл. Этот режим требует прав администратора либо участие в группе Операторы архива -
/J
– Копирование без буфера (файлового кэша, оперативной памяти). Эффективно для больших файлов. -
/R:3
– количество попыток скопировать недоступный файл. Значение по умолчанию – миллион, поэтому необходимо его сменить. -
/W:1
– секунды между попытками скопировать недоступный файл. Значение по умолчанию – 30 секунд. -
/REG
– сохранить текущие значения ключей /R и /W в реестр как стандартные, для будущих вызовов robocopy. -
/TEE
– разделение вывода работы команды и в лог файл, и в консоль. При фоновом вызове robocopy (например, из планировщика задача) этот параметр можно убрать, оставив только /LOG -
/LOG
– путь к файлу лога
Обратите внимание на ключ /Z даже если вы копируете небольшие файлы по устойчивому каналу. Он не несёт дополнительных расходов при использовании, но в случае обрыва, вы сможете продолжить копирование просто повторно запустив скрипт.
При копировании больших файлов (более 2 Гб) с некоторых iSCSI/SAN томов, процесс robocopy может существенно использовать оперативную память сервера. Проблем обычно связано с тем, что для данного LUN в настройках RAID используется write-through кэширование вместо write-back.
Инкрементальное копирование с помощью robocopy
Сам по себе robocopy не может полностью обеспечить инкрементальное резервное копирование каталога (копирование новых и измененных файлов), для этого мы будем использовать небольшой bat скрипт:
@echo off
set date_=%date:/=-%
set source=C:\source
set dest=\\testnode2\C$\dest\%date_%
mkdir %dest%
robocopy "%source%" "%dest%" /maxage:1 /E /COPYALL /Z /B /J /R:3 /W:1 /REG /LOG+: /LOG+:%appdata%\robocopy.log
@echo on
-
set date_=%date:/=-%
— эта строчка присваивает значение переменной date_ в формате DD.MM.YYYY -
/maxage:1
— Максимальный возраст файла. Исключает файлы старше N дней или даты. Дата указывается в формате YYMMDD, например, /maxage:20200421 -
/E
– копирует подпапки, без ограничения уровня вложенности. Для контроля уровня вложенности директорий можно использовать параметр /lev, например, /lev:3
Инкрементальность осуществляется за счёт параметра /maxage:1 — файлы старше суток копироваться не будут. Для первого, “базового” копирования, можно выполнить этот скрипт без параметра /maxage.
Заметка. Если файловые системы source или dest не являются NTFS, используйте ключ
/FFT
, так как на других файловых системах (включая эмулированные NTFS) может возникнуть ошибка, из-за которой robocopy будет видеть старые файлы как измененные, из-за отличий в метке времени.
Robocopy: перемещение файлов
С помощью ключа
/mov
или
/move
вы можете переместить файлы (а точнее удалить успешно скопированные файлы из исходной директории):
robocopy C:\source\ F:\dest\ /MOVE /E /COPYALL /Z /B /J /R:3 /W:1 /REG /TEE /LOG+:%appdata%\robocopy.log
-
/MOVE
– удалить файлы и директории из исходной папки, после того как они были скопированы. Имейте в виду, что этот ключ нужно использовать вместе с /E или /S, в противном случае вы перенесете только файлы, но не директории. Если вы хотите перенести только файлы, используйте ключ /MOV
Примечание. Поведение robocopy при использовании ключей
/MOVE
и
/MOV
не интуитивно.
- Если вы используете ключ /MOVE с ключом /E, то вы перенесете все файлы, директории (включая файлы внутри них) и пустые директории. Файлы и директории удалятся из исходной папки. /MOVE с /S даст такой же результат, но пустые директории не перенесутся и будут удалены.
- Если вы используете ключ /MOV с ключом /E, то вы перенесете все файлы, включая те, которые находятся в директориях и поддиректориях, также скопируются все директории (включая пустые), но они не будут удалены из исходного каталога, в отличие от файлов. Используя /MOV с /S, вы получите такой же результат, но пустые директории не будут скопированы.
Пример использование robocopy в планировщике задач
Для примера возьмём задачу: нам необходимо с помощью robocopy регулярно синхронизировать содержимое сетевой папки между двумя серверами с ведением логов.
- Исходный путь — \\testnode1\C$\source
- Целевая директория- \\testnode2\C$\source
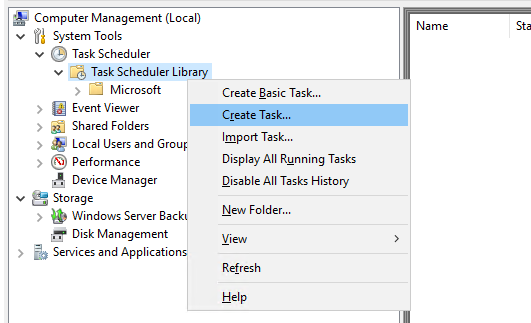
Запустите командную строку с правами администратора и введите: compmgmt.msc
Перейдите в System Tools -> Task Scheduler Library. Создайте новое задание планировщика (Create task).
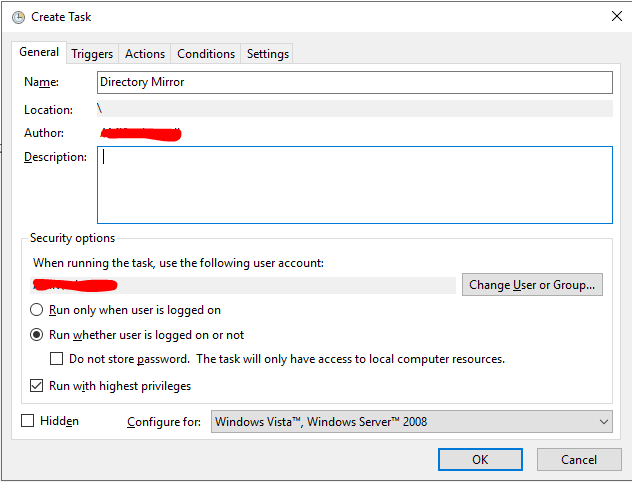
Укажите имя задания, и выберите пользователя из-под которого будет выполняться задание. Пользователь должен иметь доступ на чтению и запись в обоих каталогах (при копировании по сети между серверами домена можно использовать аккаунт System, в этом случае нужно предоставить на целевой каталог права RW для объекта computer сервера-источника) .
Выберите опцию Run whether user is logged on or not, для того чтобы задание выполнялось в фоновом режиме. Также отметьте Run with highest privileges. Эта опция сработает если аккаунт из-под которого выполняется задание, будет иметь права администратора.
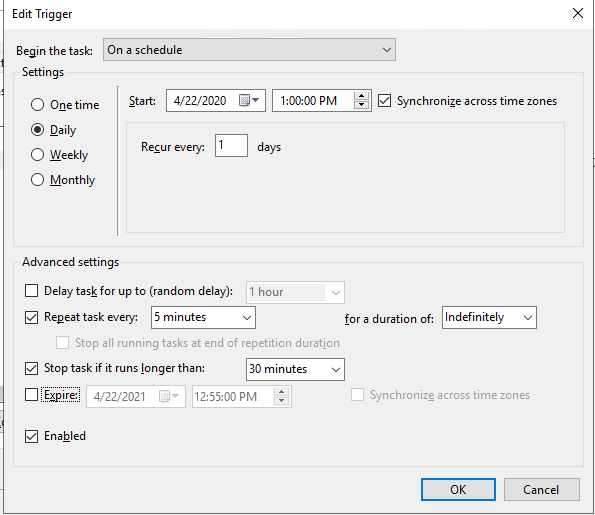
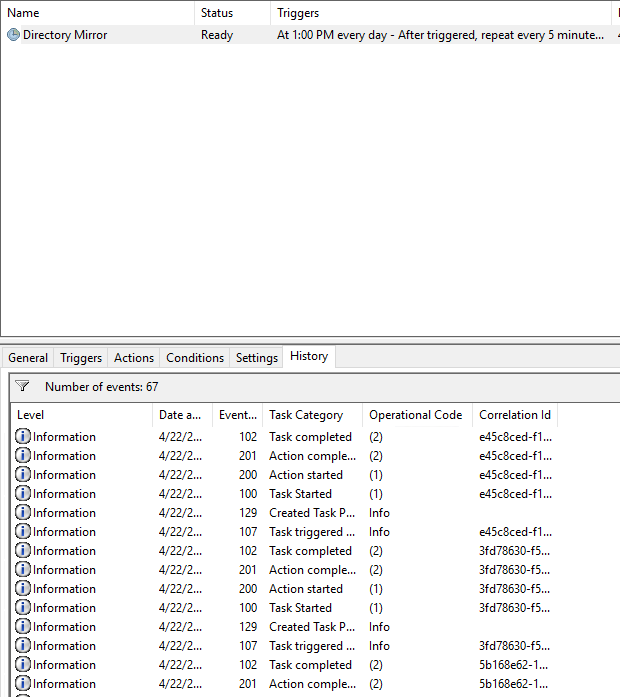
Перейдите на вкладку Triggers и создайте новый триггер.
Выберите параметр On a schedule (по расписанию), выберите время начала и отметьте Repeat task every, указав интервал выполнения. В моём случае это 5 минут – каждые 5 минут, начиная с часа дня 22 апреля (обязательно измените эту дату на ту, которая нужна вам), директории будут синхронизированы. В for a duration of поставьте Indefinitely (бесконечно)
Перейдите во вкладку Actions и нажмите New…
Выберите Start a program, и укажите путь к .bat скрипту.
Содержание robocopy-mirror.bat:
@echo off
robocopy \\testnode1\C$\source\ \\testnode2\c$\dest\ /MIR /COPYALL /Z /B /J /R:3 /W:1 /REG /LOG+:C:\robocopy.log
@echo on
Помимо журнала выполнения задания планировщика, robocopy будет писать собственный лог файл копирования в C:\robocopy.log. Если аккаунт из-под которого будет выполняться скрипт не имеет прав администратора, смените C:\robocopy.log на нужный вам путь.

Остальные настройки заполнять не надо. После нажатия на кнопку ОК, вас попросит ввести пароль от учетной записи, которую вы выбрали для запуска задания.
Если вы всё настроили правильно, директории должны начать синхронизироваться.

Если у вас возникли проблемы с выполнением скрипта, то обязательно проверьте вкладку History вашей задачи
Отслеживание изменений в каталогах с помощью robocopy
В robocopy есть встроенный механизм отслеживания изменений в исходном каталоге (и их последующего копирования) и встроенный планировщик – параметры
/mon
и
/mot
.
-
/mon:N
– проверяет исходную директорию на предмет изменений каждую 1 минуту, и если изменений в директории больше чем N, то будет произведено копирование в целевую директорию. Если задан параметр /mot:Y, то изменения будут проверяться каждые Y минут. -
/mot:N
– проверяет исходную директорию на предмет изменений каждые N минут. Минимальное значение N = 1, в минутах. Если параметр /mon не задан, то будет считаться что /mon:1
.bat скрипт для зеркалирования с отслеживанием изменений с интервалом в 1 минуту. Этот скрипт нужно запускать из-под аккаунта с правами администратора.
@echo off
robocopy \\testnode1\C$\source\ \\testnode2\c$\dest\ /MIR /COPYALL /Z /B /J /R:3 /W:1 /REG /LOG+:%appdata%\robocopy.log /mon:1 /mot:1
Плюсы:
- Не нужно создавать задание в планировщике задач
- Подходит для непостоянного выполнения. Например, в течение нескольких часов, в таком случае запустить скрипт руками через CMD проще, чем создавать задание в планировщике
Минусы:
- Чтобы запустить .bat скрипт в фоновом режиме, нужно либо использовать VBS скрипт, либо стороннее ПО, например, NirCmd.
- Минимальный интервал поиска изменений и копирования – 1 минута. Для меньшего интервала нужно использовать PowerShell или bat скрипт.
Коды возврата (ошибки) robocopy
Ниже приведены стандартные коды возврата robocopy, которые можно использовать для обработки различных ошибок, которые возвращает утилита после выполнения действия копирования (кот возврата эта битовая маска).
| Hex | Decimal | Meaning if set |
| 0x00 | 0 | No errors occurred, and no copying was done. The source and destination directory trees are completely synchronized. |
| 0x01 | 1 | One or more files were copied successfully (that is, new files have arrived). |
| 0x02 | 2 | Some Extra files or directories were detected. No files were copied Examine the output log for details. |
| 0x04 | 4 | Some Mismatched files or directories were detected. Examine the output log. Housekeeping might be required. |
| 0x08 | 8 | Some files or directories could not be copied (copy errors occurred and the retry limit was exceeded). Check these errors further. |
| 0x10 | 16 | Serious error. Robocopy did not copy any files. Either a usage error or an error due to insufficient access privileges on the source or destination directories. |
| Коды возврата могут комбинироваться: | ||
| 0x03 | 3 | (2+1) Some files were copied. Additional files were present. No failure was encountered. |
| 0x05 | 5 | (4+1) Some files were copied. Some files were mismatched. No failure was encountered. |
| 0x06 | 6 | (4+2) Additional files and mismatched files exist. No files were copied and no failures were encountered. This means that the files already exist in the destination directory |
| 0x07 | 7 | (4+1+2) Files were copied, a file mismatch was present, and additional files were present. |
Любое значение больше 7 говорит о том, что при копировании через robocopy возникла ошибка. Вы можете обрабатывать эти ошибки в bat файле:
if %ERRORLEVEL% EQU 16 echo ***FATAL ERROR*** & goto end
if %ERRORLEVEL% EQU 15 echo OKCOPY + FAIL + MISMATCHES + XTRA & goto end
if %ERRORLEVEL% EQU 14 echo FAIL + MISMATCHES + XTRA & goto end
if %ERRORLEVEL% EQU 13 echo OKCOPY + FAIL + MISMATCHES & goto end
if %ERRORLEVEL% EQU 12 echo FAIL + MISMATCHES& goto end
if %ERRORLEVEL% EQU 11 echo OKCOPY + FAIL + XTRA & goto end
if %ERRORLEVEL% EQU 10 echo FAIL + XTRA & goto end
if %ERRORLEVEL% EQU 9 echo OKCOPY + FAIL & goto end
if %ERRORLEVEL% EQU 8 echo FAIL & goto end
if %ERRORLEVEL% EQU 7 echo OKCOPY + MISMATCHES + XTRA & goto end
if %ERRORLEVEL% EQU 6 echo MISMATCHES + XTRA & goto end
if %ERRORLEVEL% EQU 5 echo OKCOPY + MISMATCHES & goto end
if %ERRORLEVEL% EQU 4 echo MISMATCHES & goto end
if %ERRORLEVEL% EQU 3 echo OKCOPY + XTRA & goto end
if %ERRORLEVEL% EQU 2 echo XTRA & goto end
if %ERRORLEVEL% EQU 1 echo OKCOPY & goto end
if %ERRORLEVEL% EQU 0 echo No Change & goto end
:end
Утилита robocopy имеет огромный функционал и позволяет гибко настроить операции копирования. Как альтернативу robocopy в PowerShell можно использовать командлет Copy-Item, который хоть и менее функционален, но работает с объектной моделью PowerShell, что может быть важно, если вы часто используете PowerShell или используете цепочки автоматизации с другими языками программирования.
Копирование заблокированных файлов с HoboCopy
Автор: windata.ru Оригинальная статья взята здесь.
Предположим, что вы хотите скопировать файл, который намертво заблокирован другой программой. В результате Windows нам радостно сообщит о том, что системный процесс не может получить доступа к файлу, поскольку последний заблокирован другим процессом. Как же тогда скопировать такой файл?
Что же мешает, собственно говоря, освободить файл, закрыв заблокировавшую его программу? Да ничего, но представьте, что вы настраиваете автоматическое резервное копирование файлов. Если файл заблокирован, то программа резервного копирования здесь не справится и нужный файл не будет скопирован. Вот тут-то и понадобится один рецепт, который представлен в этой статье.
Начиная с Windows XP операционная система от Microsoft поддерживает технологию теневого копирования (она же Volume Shadow Copy). Данная технология используется для резервного копирования данных и восстановления системы. В частности, теневая копия представляет собой временный “снимок” файла или раздела жесткого диска. При этом одна программа может получить доступ чтения именно к снимку, в то время как другие программы могут в это же время работать с файлом или изменять его.
Именно это нам и нужно – чтение занятого файла. И поможет нам в этом утилита для командной строки HoboCopy, предназначенная для резервного копирования файлов.
На следующей странице можно загрузить HoboCopy для Windows XP и Windows Vista/7 в версиях 32/64 бит:
Скачать HoboCopy для различных версий Windows (GitHub)
Для работы HoboCopy (да и многих других программ для резервного копирования) нам надобятся две следующих службы Windows:
- Теневое копирование тома
- MS Software Shadow Copy Provider
Если вы забыли, где просмотреть службы, то в Windows 7 перейдите по пути Панель управления > Система и безопасность > Администрирование > Службы (а в Windows XP – Панель управления > Администрирование > Службы).
Убедитесь в том, что службы не отключены. Если для них указан режим запуска Вручную, то программа HoboCopy самостоятельно запустит эти службы, когда понадобится и отключит их по завершению своей работы.
Резервное копирование одного файла с помощью HoboCopy
Как вы помните, HoboCopy – утилита командной строки. К слову сказать, в Windows 7 и Windows Vista ее нужно запускать в режиме администратора, для чего щелкните на файле программы правой кнопкой мыши, выберите команду Свойства > Дополнительно и установите флажок Запуск от имени администратора. Также будет не лишним ознакомиться со статьей Запуск программ Windows 7 в режиме администратора.
Синтаксис команды выглядит следующим образом:
| Bash | ||
|
К примеру, мы решили скопировать файл c:\users\windata\mail\outlook.pst прямо вот сюда: d:\backups\outlook.pst.
Команда будет выглядеть следующим образом:
| Bash | ||
|
Резервное копирование каталога с помощью HoboCopy
Чем копировать по одному файлу, разумеется, куда лучше настроить резервное копирование целыми папками. Для этого нам понадобятся такие ключи:
/full – копирование всех файлов
/skipdenied – игнорировать любые сообщения ошибках, связанных с разрешением доступа
/r – рекурсивное копирование
/y – никаких запросов, копировать абсолютно все
Синтаксис команды следующий:
| Bash | ||
|
Например, используя предыдущий пример, скопируем всю пользовательскую папку в папку d:\backups\. Для этого нам понадобится такая команда:
| Bash | ||
|
На копирование понадобится какое-то время, так что можно передохнуть, перекусить и потрещать вконтактике (шутка). Результатом станет полная копия всего каталога. Если при копировании были сообщения об ошибках, связанных с разрешением доступа, программа укажет на проблемные файлы.
Инкрементное копирование файлов с помощью HoboCopy
Утилита HoboCopy поддерживает и инкрементный тип копирования. Что это такое? Весьма полезная функция, она позволяет копировать только те файлы, что изменились с момента предыдущего резервного копирования. При этом последняя дата копирования хранится в файле, который вам нужно указать непосредственно в команде утилиты.
Для инкрементного копирования потребуются два ключа:
/statefile=имя_файла – это имя файла, в котором будут записаны данные о последнем копировании
/incremental – а это, как понятно из названия, ключ для инкрементного копирования
Синтаксис команды выглядит так:
| Bash | ||
|
Пример:
| Bash | ||
|
Важно. При первом запуске программы необходимо указать ключ /full вместо /incremental, иначе будет выдано сообщение об ошибке, так как файл с данными о предыдущем состоянии еще не будет создан. А вот уже все последующие команды нужно указывать с ключом /incremental.
Таким образом, утилита HoboCopy позволяет настроить автоматическое копирование папок, для чего нужно лишь запланировать процедуру копирования. В Windows 7/Vista для этого используйте системную программу Планировщик заданий (Панель управления > Система и безопасность > Администрирование > Расписание выполнения задач), а в Windows XP – окно Назначенные задания (Панель управления > Назначенные задания).
| Введение | |
| Пример | |
| Недостатки | |
| Мануал | |
| Похожие статьи |
Введение
Пример
Простое копирование поддиректории внутри родительской
robocopy .\sandbox\ .\sandbox2
——————————————————————————-
ROBOCOPY :: Robust File Copy for Windows
——————————————————————————-
Started : Tuesday, March 7, 2023 4:54:25 PM
Source : C:\Users\Andrei\sandbox\
Dest : C:\Users\Andrei\sandbox2\
Files : *.*
Options : *.* /DCOPY:DA /COPY:DAT /R:1000000 /W:30
——————————————————————————
New Dir 12 C:\Users\Andrei\sandbox\
100% New File 190.3 m 2023-02-27 AA.zip
100% New File 5605 DeveloperInstallation.vsconfig
100% New File 624.9 m Docker Desktop Installer.exe
100% New File 303.6 m Editor 2023.0.1.exe
100% New File 50.5 m Git-2.39.2-64-bit.exe
100% New File 206 github-recovery-codes.txt
100% New File 4.5 g ubuntu-22.04.2-desktop-amd64.iso
100% New File 1.8 g ubuntu-22.04.2-live-server-amd64.iso
100% New File 3.7 g ubuntu-22.10-desktop-amd64.iso
100% New File 1.5 g ubuntu-22.10-live-server-amd64.iso
100% New File 3.5 m VisualStudioSetup.exe
100% New File 16.3 m wsl_update_x64.msi
——————————————————————————
Total Copied Skipped Mismatch FAILED Extras
Dirs : 1 1 0 0 0 0
Files : 12 12 0 0 0 0
Bytes : 12.913 g 12.913 g 0 0 0 0
Times : 0:00:08 0:00:08 0:00:00 0:00:00
Speed : 1703557491 Bytes/sec.
Speed : 97478.341 MegaBytes/min.
Ended : Tuesday, March 7, 2023 4:54:33 PM
12.913 гига скопировано за 8 секунд

Multi Thread
Для ускорения копирования можно использовать опцию MT с указанием числа каналов.
Пример копирования той же директории с помощью 4 каналов.
robocopy .\sandbox\ .\sandbox2 /MT:32
robocopy .\sandbox\ .\sandbox2 /MT:4
——————————————————————————-
ROBOCOPY :: Robust File Copy for Windows
——————————————————————————-
Started : Wednesday, March 8, 2023 12:04:42 PM
Source : C:\Users\Andrei\sandbox\
Dest : C:\Users\Andrei\sandbox2\
Files : *.*
Options : *.* /DCOPY:DA /COPY:DAT /MT:4 /R:1000000 /W:30
——————————————————————————
100% New File 190.3 m C:\Users\Andrei\sandbox\2023-02-27 3PP.zip
New File 5605 C:\Users\Andrei\sandbox\DeveloperInstallation.100% ig
New File 624.9 m C:\Users\Andrei\sandbox\Docker Desktop Install100%
New File 303.6 m C:\Users\Andrei\sandbox\Editor Suite 2023.0.1.100%
100% New File 50.5 m C:\Users\Andrei\sandbox\Git-2.39.2-64-bit.exe
New File 206 C:\Users\Andrei\sandbox\github-recovery-codes.100%
New File 4.5 g C:\Users\Andrei\sandbox\ubuntu-22.04.2-desktop100% .iso
New File 1.8 g C:\Users\Andrei\sandbox\ubuntu-22.04.2-live-se100% md64.iso
New File 3.7 g C:\Users\Andrei\sandbox\ubuntu-22.10-desktop-a100% so
New File 1.5 g C:\Users\Andrei\sandbox\ubuntu-22.10-live-serv100% 64.iso
100% New File 3.5 m C:\Users\Andrei\sandbox\VisualStudioSetup.exe
100% New File 16.3 m C:\Users\Andrei\sandbox\wsl_update_x64.msi
——————————————————————————
Total Copied Skipped Mismatch FAILED Extras
Dirs : 1 1 0 0 0 0
Files : 12 12 0 0 0 0
Bytes : 12.913 g 12.913 g 0 0 0 0
Times : 0:00:28 0:00:05 0:00:00 0:00:01
Speed : 2733146938 Bytes/sec.
Speed : 156391.922 MegaBytes/min.
Ended : Wednesday, March 8, 2023 12:04:49 PM
Копирование на 1 секунду быстрее. Более очевидной разница будеть на большем количестве файлов.
Недостатки
robocopy не сможет повторить такую простую команду как копирование с wildcard
cp .\Downloads\ubuntu-* .\sandbox\
А теперь robocopy
robocopy .\Downloads\ubuntu-* .\sandbox\
——————————————————————————-
ROBOCOPY :: Robust File Copy for Windows
——————————————————————————-
Started : Tuesday, March 7, 2023 4:43:43 PM
Source —
Dest —
Files :
Options : /DCOPY:DA /COPY:DAT /R:1000000 /W:30
——————————————————————————
ERROR : Invalid Parameter #1 : «.\Downloads\ubuntu-*»
Simple Usage :: ROBOCOPY source destination /MIR
source :: Source Directory (drive:\path or \server\share\path).
destination :: Destination Dir (drive:\path or \server\share\path).
/MIR :: Mirror a complete directory tree.
For more usage information run ROBOCOPY /?
**** /MIR can DELETE files as well as copy them !
Мануал
——————————————————————————-
ROBOCOPY :: Robust File Copy for Windows
——————————————————————————-
Started : Tuesday, March 7, 2023 4:01:26 PM
Usage :: ROBOCOPY source destination [file [file]…] [options]
source :: Source Directory (drive:\path or \\server\share\path).
destination :: Destination Dir (drive:\path or \\server\share\path).
file :: File(s) to copy (names/wildcards: default is «*.*»).
::
:: Copy options :
::
/S :: copy Subdirectories, but not empty ones.
/E :: copy subdirectories, including Empty ones.
/LEV:n :: only copy the top n LEVels of the source directory tree.
/Z :: copy files in restartable mode.
/B :: copy files in Backup mode.
/ZB :: use restartable mode; if access denied use Backup mode.
/J :: copy using unbuffered I/O (recommended for large files).
/EFSRAW :: copy all encrypted files in EFS RAW mode.
/COPY:copyflag[s] :: what to COPY for files (default is /COPY:DAT).
(copyflags : D=Data, A=Attributes, T=Timestamps, X=Skip alt data streams).
(S=Security=NTFS ACLs, O=Owner info, U=aUditing info).
/SEC :: copy files with SECurity (equivalent to /COPY:DATS).
/COPYALL :: COPY ALL file info (equivalent to /COPY:DATSOU).
/NOCOPY :: COPY NO file info (useful with /PURGE).
/SECFIX :: FIX file SECurity on all files, even skipped files.
/TIMFIX :: FIX file TIMes on all files, even skipped files.
/PURGE :: delete dest files/dirs that no longer exist in source.
/MIR :: MIRror a directory tree (equivalent to /E plus /PURGE).
/MOV :: MOVe files (delete from source after copying).
/MOVE :: MOVE files AND dirs (delete from source after copying).
/A+:[RASHCNET] :: add the given Attributes to copied files.
/A-:[RASHCNET] :: remove the given Attributes from copied files.
/CREATE :: CREATE directory tree and zero-length files only.
/FAT :: create destination files using 8.3 FAT file names only.
/256 :: turn off very long path (> 256 characters) support.
/MON:n :: MONitor source; run again when more than n changes seen.
/MOT:m :: MOnitor source; run again in m minutes Time, if changed.
/RH:hhmm-hhmm :: Run Hours — times when new copies may be started.
/PF :: check run hours on a Per File (not per pass) basis.
/IPG:n :: Inter-Packet Gap (ms), to free bandwidth on slow lines.
/SJ :: copy Junctions as junctions instead of as the junction targets.
/SL :: copy Symbolic Links as links instead of as the link targets.
/MT[:n] :: Do multi-threaded copies with n threads (default 8).
n must be at least 1 and not greater than 128.
This option is incompatible with the /IPG and /EFSRAW options.
Redirect output using /LOG option for better performance.
/DCOPY:copyflag[s] :: what to COPY for directories (default is /DCOPY:DA).
(copyflags : D=Data, A=Attributes, T=Timestamps, E=EAs, X=Skip alt data streams).
/NODCOPY :: COPY NO directory info (by default /DCOPY:DA is done).
/NOOFFLOAD :: copy files without using the Windows Copy Offload mechanism.
/COMPRESS :: Request network compression during file transfer, if applicable.
::
:: File Selection Options :
::
/A :: copy only files with the Archive attribute set.
/M :: copy only files with the Archive attribute and reset it.
/IA:[RASHCNETO] :: Include only files with any of the given Attributes set.
/XA:[RASHCNETO] :: eXclude files with any of the given Attributes set.
/XF file [file]… :: eXclude Files matching given names/paths/wildcards.
/XD dirs [dirs]… :: eXclude Directories matching given names/paths.
/XC :: eXclude Changed files.
/XN :: eXclude Newer files.
/XO :: eXclude Older files.
/XX :: eXclude eXtra files and directories.
/XL :: eXclude Lonely files and directories.
/IS :: Include Same files.
/IT :: Include Tweaked files.
/MAX:n :: MAXimum file size — exclude files bigger than n bytes.
/MIN:n :: MINimum file size — exclude files smaller than n bytes.
/MAXAGE:n :: MAXimum file AGE — exclude files older than n days/date.
/MINAGE:n :: MINimum file AGE — exclude files newer than n days/date.
/MAXLAD:n :: MAXimum Last Access Date — exclude files unused since n.
/MINLAD:n :: MINimum Last Access Date — exclude files used since n.
(If n < 1900 then n = n days, else n = YYYYMMDD date).
/FFT :: assume FAT File Times (2-second granularity).
/DST :: compensate for one-hour DST time differences.
/XJ :: eXclude symbolic links (for both files and directories) and Junction points.
/XJD :: eXclude symbolic links for Directories and Junction points.
/XJF :: eXclude symbolic links for Files.
/IM :: Include Modified files (differing change times).
::
:: Retry Options :
::
/R:n :: number of Retries on failed copies: default 1 million.
/W:n :: Wait time between retries: default is 30 seconds.
/REG :: Save /R:n and /W:n in the Registry as default settings.
/TBD :: Wait for sharenames To Be Defined (retry error 67).
/LFSM :: Operate in low free space mode, enabling copy pause and resume (see Remarks).
/LFSM:n[KMG] :: /LFSM, specifying the floor size in n [K:kilo,M:mega,G:giga] bytes.
::
:: Logging Options :
::
/L :: List only — don’t copy, timestamp or delete any files.
/X :: report all eXtra files, not just those selected.
/V :: produce Verbose output, showing skipped files.
/TS :: include source file Time Stamps in the output.
/FP :: include Full Pathname of files in the output.
/BYTES :: Print sizes as bytes.
/NS :: No Size — don’t log file sizes.
/NC :: No Class — don’t log file classes.
/NFL :: No File List — don’t log file names.
/NDL :: No Directory List — don’t log directory names.
/NP :: No Progress — don’t display percentage copied.
/ETA :: show Estimated Time of Arrival of copied files.
/LOG:file :: output status to LOG file (overwrite existing log).
/LOG+:file :: output status to LOG file (append to existing log).
/UNILOG:file :: output status to LOG file as UNICODE (overwrite existing log).
/UNILOG+:file :: output status to LOG file as UNICODE (append to existing log).
/TEE :: output to console window, as well as the log file.
/NJH :: No Job Header.
/NJS :: No Job Summary.
/UNICODE :: output status as UNICODE.
::
:: Job Options :
::
/JOB:jobname :: take parameters from the named JOB file.
/SAVE:jobname :: SAVE parameters to the named job file
/QUIT :: QUIT after processing command line (to view parameters).
/NOSD :: NO Source Directory is specified.
/NODD :: NO Destination Directory is specified.
/IF :: Include the following Files.
::
:: Remarks :
::
Using /PURGE or /MIR on the root directory of the volume formerly caused
robocopy to apply the requested operation on files inside the System
Volume Information directory as well. This is no longer the case; if
either is specified, robocopy will skip any files or directories with that
name in the top-level source and destination directories of the copy session.
The modified files classification applies only when both source
and destination filesystems support change timestamps (e.g., NTFS)
and the source and destination files have different change times but are
otherwise the same. These files are not copied by default; specify /IM
to include them.
The /DCOPY:E flag requests that extended attribute copying should be
attempted for directories. Note that currently robocopy will continue
if a directory’s EAs could not be copied. This flag is also not included
in /COPYALL.
Using /LFSM requests robocopy to operate in ‘low free space mode’.
In that mode, robocopy will pause whenever a file copy would cause the
destination volume’s free space to go below a ‘floor’ value, which
can be explicitly specified by the LFSM:n[KMG] form of the flag.
If /LFSM is specified with no explicit floor value, the floor is set to
ten percent of the destination volume’s size.
Low free space mode is incompatible with /MT, /EFSRAW, /B, and /ZB.
Related Articles
| Windows | |
| Loudness Equalization | |
| PowerShell | |
| tail analog in PowerShell | |
| Firewall | |
| Drivers | |
| Developer Mode in Windows 10 | |
| BASH in Windows 10 | |
| Telnet in Windows 10 | |
| PATH system varialbe | |
| Windows Installation on gpt disk |
Robocopy: The Command-Line Utility for Robust File Copying
Robocopy (Robust File Copy) is a powerful command-line utility that is included with Windows operating systems starting from Windows Vista and Windows Server 2008. Designed for reliable and efficient file copying, Robocopy is particularly useful for administrators and advanced users who need a robust solution to manage file transfers, especially in network environments. Unlike its predecessor, the basic Copy command, Robocopy offers a wealth of features and capabilities that make it a go-to tool for data migrations, backups, and system recovery scenarios.
Introduction to Robocopy
Robocopy was developed to overcome the limitations of traditional file copying methods in Windows. It is optimized for copying large sets of files and directories while maintaining their file attributes and permissions. The utility is notable for its resilience in challenging situations, including network interruptions and errors that might derail simple file transfer.
One of Robocopy’s primary advantages is its ability to reclaim from failures. If a file transfer operation is interrupted, Robocopy can resume where it left off, which is a boon for network administrators managing file copies over potentially unreliable networks.
Robocopy operates through a command-line interface (CLI), meaning users must navigate through the Command Prompt. While this might seem intimidating to those used to graphical user interfaces (GUIs), the flexibility and power offered by Robocopy far outweigh the learning curve.
Key Features of Robocopy
Robocopy includes a wide range of features that cater to various aspects of file management:
-
Multi-threaded Copying:
Robocopy can copy files in parallel using multiple threads. This feature significantly reduces copy time, especially on large data sets, as it allows for simultaneous transfers. -
Directory and Subdirectory Support:
Unlike basic copy commands, Robocopy can mirror entire directory structures, including subdirectories. This capability is crucial for maintaining a complete view of data. -
File Filtering:
Users can filter files based on criteria like size, date, and specific file types. This flexibility allows for the selective copying of files that meet designated parameters. -
Robust Error Handling:
Robocopy can retry file transfers in case of failure, with customizable error-handling settings, which means transfers can resume without manual intervention. -
Logging Options:
Users can enable logging to track what files were copied, skipped, or failed during the copy process. This feature is essential for monitoring and auditing file transfers. -
Backup and Restore Attributes:
Robocopy preserves file attributes and permissions. It can also copy files that are in use or locked (subject to specific settings), making it useful for backup tasks. -
Network Resilience:
Robocopy is designed to withstand interruptions. Whether due to temporary network failures or brief system outages, Robocopy can pick up right where it left off. -
Compression:
Users have options for copying files more efficiently, which is particularly useful over slower networks.
Basic Usage of Robocopy
To begin using Robocopy, navigate to the Command Prompt in Windows and enter the executable name, followed by various parameters that define the copying process. The basic syntax for Robocopy is as follows:
robocopy [source] [destination] [options]Example Command
robocopy C:Source D:Destination /E /ZIn this example:
C:Sourceis the directory from which files will be copied.D:Destinationis the target directory where files will be copied./Eensures that all files and subdirectories (including empty ones) are copied./Zenables the «restartable mode» for interrupted copies.
Advanced Options and Parameters
The power of Robocopy lies in its advanced parameters. Below are some of the commonly used options, each accompanied by a brief explanation:
- /S: Copies directories and subdirectories except for empty ones.
- /E: Copies all subdirectories, including empty ones.
- /COPY:: Specifies the file properties to copy. For example,
/COPY:DATcopies Data, Attributes, and Timestamps. - /MOV: Moves files, copying and deleting them from the source.
- /MIR: Mirrors a directory tree; it deletes files at the destination that no longer exist at the source.
- /R:n: Specifies the number of retries on failed copies (the default is 1 million).
- /W:n: Specifies the wait time between retries in seconds (the default is 30 seconds).
- /LOG:: Enables logging to a specified file.
- /XD : Excludes specific directories from being copied.
- /XF : Excludes specific files from being copied.
- /MAXAGE:: Copies only files newer than N days.
- /MINAGE:: Copies only files older than N days.
- /SEC: Copies files with security info.
Practical Applications of Robocopy
1. Data Backup
A common scenario for using Robocopy is creating backups of important data. For instance, with the right arguments, you can set up a scheduled task that regularly backs up a set of files from one location to another.
robocopy C:ImportantData D:Backup /E /Z /COPY:DAT /MIR /LOG:C:backup_log.txtThis command would not only copy data but also produce a log file for review.
2. Migration of Data
Moving large datasets between servers or storage devices is another ideal use case. By utilizing Robocopy, you can ensure that all files are copied over efficiently while maintaining their original structure.
robocopy \SourceServerSharedFolder \DestinationServerSharedFolder /E /Z /COPY:DAT /XD tempHere, the command excludes the ‘temp’ directory to prevent unnecessary file transfers.
3. Synchronization of Directories
Robocopy is highly effective at keeping directories in sync, making it a preferred tool for entities that require updates in real-time.
robocopy C:Data D:Data /MIR /Z /LOG:C:sync_log.txtThis command mirrors the directories, ensuring both remain identical.
4. Network Performance
Robocopy can be particularly useful in network environments where file transfer speed is crucial. The multi-threading option allows simultaneous file transfers, enhancing performance significantly.
robocopy \SourceServerFiles D:Files /E /MT:16This command sets Robocopy to utilize 16 threads for the operation, vastly speeding up the process.
Common Pitfalls and Troubleshooting with Robocopy
While Robocopy is a robust tool, users may encounter various challenges. Understanding these issues can save time and effort.
-
Permissions Issues:
If Robocopy is unable to copy certain files, it may be due to insufficient permissions. Ensure that the command prompt is run as an administrator. -
Network Problems:
If copying over a network, intermittent connectivity issues can disrupt transfers. Ensure network stability and consider using/Rand/Woptions to automate retries. -
Mismatched Source and Destination:
If the path specified does not exist, Robocopy will return an error. Double-check paths and configurations before executing commands. -
Incorrect Use of Parameters:
Users should ensure that the parameters provided are correct. For example, mixing/MIRand/DELETEimproperly could result in unwanted deletions.
Best Practices for Using Robocopy
To get the most out of Robocopy, consider the following best practices:
-
Test Before Full Deployment:
Always run a test command with the/Loption (which lists what would be copied without actually performing the operation) before executing full copy operations.robocopy C:Source D:Destination /E /L -
Logging:
Enable logging to monitor processes, track errors, and maintain records for future reference. -
Avoid Depending Solely on Mirroring:
Mirroring is powerful for synchronization, but ensure that you understand its implications—especially with deletions—before relying on it entirely. -
Scheduled Backups:
Leverage Windows Task Scheduler to create automatic backups at preferred intervals while utilizing Robocopy. -
Continuous Learning:
Robocopy has a rich set of features, and continuous learning about its capabilities via documentation and community forums can help you optimize its use.
Conclusion
Robocopy remains one of the best tools for reliable file copying in a Windows environment. Its range of features—from multi-threaded copying to sophisticated error handling—makes it indispensable for IT professionals and advanced users alike. Understanding its capabilities and how to leverage them can significantly enhance productivity, particularly in data management scenarios.
While Robocopy may initially seem daunting due to its command-line interface, the investment in learning its nuances pays dividends through the efficiency and reliability it offers. Whether managing backups, synchronizing files, or transferring data across networks, Robocopy is a tool that stands the test of time, catering to the evolving needs of modern computing environments.
[Windows Vista or later (*)] Performs the copying of files/directories. It allows specifying more advanced options than traditional commands like Copy or Xcopy.
* Robocopy is installed by default in Windows Vista and later versions, but in earlier Windows versions, it may be included in the Resource Kit (included in the Resource Kit for NT 4.0/2000/XP and Windows Server 2003).
Usage
Robocopy is used by specifying the path and filename to be copied, followed by specifying options. For simple copy operations, the Copy command or Xcopy command may be more suitable. However, for backup tasks where conditions for the files to be copied need to be specified, Robocopy is a better choice.
The Robocopy syntax is as follows:
robocopy[.exe] <source-path> <dest-path> [<files>...] [options]
Specify the source directory name in <source-path>, the destination directory name in <dest-path>, and then specify the filename in the source directory that you want to copy (wildcards are allowed, see wildcards). For example, the command would be like the following:
robocopy C:\MyDocs D:\Backup\MyDocs *.** Note that if not specifying <files>, the default is to use ‘*.*’ so if you’re not narrowing it down by filename, you can omit ‘*.*’.
Commonly used options
An important aspect of using Robocopy is the ability to choose ‘which files to copy/not copy’ using its extensive options. It allows control over behaviors such as the information to be copied, copy speed, and more. For example, the following options are commonly used:
- /MIR — Fully synchronize the source and destination
- /E — Copy all, including empty directories
- /R:n — Specify the number of retries
- /LOG:<log-file> — Output the execution log
- /MT:n — Process using multithreading
Details are introduced in the later section ‘Options’, but if you’re not familiar, it’s recommended to assemble while trying with temporary directories or using /L option. (Please refer to samples as well.)
Options
* If multiple options of the same type are specified, the option specified later will be used. (Example: If ‘/COPYALL /COPY:AS’ is specified, ‘/COPY:AS’ will be used.)
Option list
Show header only
- <source-path>
- <dest-path>
- <files>
- /S
- /E
- /LEV:n
- /COPY:flags
- /SEC
- /COPYALL
- /NOCOPY
- /DCOPY:flags
- /NODCOPY
- /SECFIX
- /TIMFIX
- /PURGE
- /MIR
- /MOV
- /MOVE
- /A+:<attrs>
- /A-:<attrs>
- /CREATE
- /SL
- /SJ
- /Z
- /B
- /ZB
- /J
- /EFSRAW
- /FAT
- /256
- /MON:n
- /MOT:m
- /RH:hhmm—hhmm
- /PF
- /IPG:n
- /MT:n
- /NOOFFLOAD
- /COMPRESS
- /SPARSE
- /NOCLONE
- /IoMaxSize:size
- /IoRate:size
- /Threshold:size
- /A
- /M
- /IA:<attrs>
- /XA:<attrs>
- /XF <file>…
- /XD <directory>…
- /XC
- /XN
- /XO
- /XX
- /XL
- /IS
- /IT
- /IM
- /MAX:n
- /MIN:n
- /MAXAGE:n
- /MINAGE:n
- /MAXLAD:n
- /MINLAD:n
- /FFT
- /DST
- /XJ
- /XJD
- /XJF
- /R:n
- /W:n
- /REG
- /TBD
- /LFSM[:size]
- /L
- /X
- /V
- /TS
- /FP
- /BYTES
- /NS
- /NC
- /NFL
- /NDL
- /NJH
- /NJS
- /NP
- /ETA
- /LOG:<log-file>
- /LOG+:<log-file>
- /UNILOG:<log-file>
- /UNILOG+:<log-file>
- /UNICODE
- /TEE
- /JOB:<job-file>
- /SAVE:<job-file>
- /QUIT
- /SD <source-path>
- /NOSD
- /DD <dest-path>
- /NODD
- /IF <file>…
Base parameters
- <source-path>
- Specifies the directory name where the source files/directories are located.
-
* When describing in a job file, you can use the option ‘/SD’ to specify ‘/SD:<source-path>’.
* If <source-path> is specified in the job file (or specified with /SD), you cannot specify <source-path> on the command line. - <dest-path>
- Specifies the directory name where the files/directories will be copied to. Even if there are no files to copy or the number of files to copy is 0, a new directory will be created (and its parent directories), if they do not exist.
-
* When describing in a job file, you can use the option ‘/DD’ to specify ‘/DD:<dest-path>’.
* If <dest-path> is specified in the job file (or specified with /DD), you cannot specify <dest-path> on the command line. - <files>
- Specifies the names of files/directories existing in <source-path>. If specifying multiple, the names must be separated by spaces (if a file name contains spaces, enclose it in double quotes » «). You cannot use a specification like ‘dir\file’; you must always refer to names directly under <source-path>. Also, you cannot specify ‘.’ or ‘..’. Wildcards can be used here.
-
* If you want to copy the <source-path> directory itself, specify its parent directory in <source-path> and specify the relevant directory name in <files>. Copying the entire root directory (such as C:) or an entire shared folder (like \somepc1\share) as a directory is not possible, so to copy everything, you need to use wildcards or similar methods to copy all the files within.
- If omitting <files>, the process is performed as if ‘*.*’ is specified.
-
* You can also specify file names after each option (strings that do not begin with «/» and are the third and subsequent ones are all interpreted as file names).
* You can use ‘/IF’ option and specify it as ‘/IF <files>…’ when using it. This is used when describing in a job file.
Option details
-
- /S
- If <files> includes directories, Robocopy also copies subdirectories, but it does not copy empty directories. This is equivalent to the ‘/S’ option in Xcopy.
- /E
- If <files> includes directories, Robocopy also copies subdirectories, including empty directories. If both /S and /E are specified simultaneously, the option that appears later takes precedence (in the case of ‘/E /S’, empty directories will not be copied). This is nearly identical to the Xcopy ‘/E’ option, but please be cautious about the order of option specification.
-
* If both /S and /E are not specified, directories will not be copied even if <files> includes directories.
- /LEV:n
- Specifies the depth of subdirectory levels if /S or /E is specified. Specifies n with a numerical value indicating the hierarchy. ‘1’ is considered the hierarchy of the source directory itself. Specifying ‘1’ means no subdirectories, while specifying ‘2’ explores up to one level of subdirectories. If you omit ‘/LEV:n’ or specify ‘0’ for n, there will be no restrictions.
- /COPY:flags
- Selects information to copy. For flags, specify which information to copy by combining the following ‘characters’ in the list. For example, if you want to copy ‘Attributes’ and ‘Timestamp’, you can specify ‘AT’; if you only want to copy security information, you can specify ‘S’. If not specified, it is treated as if ‘DAT’ were specified.
-
Char Meaning Description D File data Copies the data written to the file. If not specified, the copy is skipped, and the file is not created if the file does not exist at the destination (however, if /CREATE is specified, it will be created with 0 bytes even without /COPY:D. In this case, if there are specifications in flags, attributes and other information will be copied). A Attribute Copies basic attribute information such as ‘Read-only’ and ‘Archive’ attribute, as well as encryption status. However, if /CREATE is specified, encryption status is not copied. T Timestamp Copies timestamp information such as ‘Creation time’ and ‘Last modified time’. If not specified or if the modification time matches, it is generally not copied. However, if ‘D’ is specified, it will be copied (it will not be copied if the content is the same and the modification time matches). S Security information Copies user-specific access control information and etc. Both the source and destination must support common security information for the file system (such as NTFS). O Ownership information Copies ownership information of files/directories. Both the source and destination must support common ownership information for the file system (such as NTFS). U Audit information Copies audit settings for files/directories. Both the source and destination must support audit settings for the file system (such as NTFS). Additionally, when using this option, administrator privileges (Security privilege; SeSecurityPrivilege) are required. X Skip alternate data stream [Windows 10 version ??? or later] Does not copy alternate data streams. If this option is not specified, alternate data streams are copied by default. (However, using only ‘/COPY:X’ would result in no information being copied, so it is necessary to combine it with other options such as ‘/COPY:DATX’.) -
* Regarding encryption status, even if ‘A’ is specified, it will not be copied if there are no changes in the data. Also, if the source is non-encrypted and the destination is encrypted, the encryption status of the destination will not be removed.
- /SEC
- Copies not only file data and basic information but also security information. This is equivalent to specifying ‘/COPY:DATS’.
- /COPYALL
- Copies all file data and all information related to the file. This is equivalent to specifying ‘/COPY:DATSOU’.
- /NOCOPY
- Does not perform the copy (Copy no file info). When combined with the ‘/PURGE’ option, it allows only the deletion of files that do not exist in the source.
- /DCOPY:flags
- Specifies the information to be copied along with the directory during the copy. In flags, combine the following ‘characters’ from the list to specify which information to copy.
-
Char Meaning Description T Timestamp Copies the creation time of the directory. D Data [Windows 8 or later] Copies data (default option). If the D option is specified, alternate data streams for directories are copied (they are not copied if not specified). A Attribute [Windows 8 or later] Copies attributes (default option). E Extended attribute [Windows 10 version ??? or later] Copies extended attributes (EA). (Extended attributes are not typically accessible through normal means, but they may be readable and writable via Linux commands over the network in some cases.) X Skip alternate data stream [Windows 10 version ??? or later] Does not copy data (cancels the effect of D). If specifying ‘T’ or ‘A’, it is not necessary to use ‘X’ if ‘D’ is not specified. However, if you do not want to specify other options, you can use ‘/DCOPY:X’. -
* It cannot be used with older versions of the Resource Kit Robocopy.
* Even without the ‘A’ specification, attributes such as read-only and hidden files are copied. It is unknown which attributes are specifically controlled by ‘A’.
* Even if the copy fails when specifying ‘E’, the copy process will continue without interruption.
* If ‘E’ is not explicitly specified, even when using ‘/COPYALL’, extended attributes will not be copied. - /NODCOPY
- [Windows 8 or later] Does not copy information such as directory attributes (Copy no directory info). If not specified, ‘/DCOPY:DA’ is used by default, so this option is used to override its effect. Also, when using this option, attributes such as ‘hidden files’ will not be copied.
- /SECFIX
- Fixes the security information (access rights, etc.) of the destination files with the source, including files that were skipped. The copy specification must include ‘S’ (include ‘S’ in options such as /COPY:S or /SEC).
-
* It cannot be used with older versions of the Resource Kit Robocopy.
- /TIMFIX
- Fixes the file time (mainly creation time) of the destination files with the source, including files that were skipped. If the file in the source and destination is not the ‘same content and same modification time’, no modification is made. Unlike /COPY:T, which does not copy creation time when the file content and modification time match, this option allows copying (fixing) the creation time in such cases.
-
* It cannot be used with older versions of the Resource Kit Robocopy.
- /PURGE
- Removes files and directories in the destination that do not exist in the source. If /E is not specified (if /MIR is not specified), only the directories directly under the destination are checked, and the files and subdirectories inside them are not checked.
- /MIR
- Performs mirroring, making the file count and data in the source and destination the same. This is equivalent to specifying ‘/E /PURGE’.
- /MOV
- Moves files (the source files are deleted after copying).
-
* Files for which no copy operation was performed (such as when the source and destination are identical) are not deleted. Even if there are specifications that prevent data copying, such as ‘/COPY:AT’, if the attributes do not match, the copy will be performed, and in that case, the source will be deleted.
- /MOVE
- Moves files and directories (the source files and directories are deleted after copying).
- /A+:<attrs>
- Adds attributes to the destination files after copying. <attrs> will be one or a combination of the following characters to represent the attributes.
-
Char Meaning R Read-only A Archive S System file H Hidden file C Compressed file (for NTFS etc.) N Non-indexed file (* In Attrib and etc. this attribute is represented as ‘I’. %~aX does not display this attribute.) E Encrypted file T Temporary file (* This attribute cannot be set with Attrib, but it can be verified with ‘T’ in the ‘Details’ tab of the file properties in Explorer or by using the value obtained with %~aX.) -
* The ‘Temporary file attribute’ (T) stores data in memory as much as possible during file operations, and writes the data when it can no longer be stored or when the file operation finishes without being deleted. Files with the temporary file attribute are expected to be deleted after use, so adding this attribute indiscriminately can result in data loss or impact performance.
* Robocopy tries to add attributes to the destination directory, so some attributes (such as T) may not be set, resulting in an error.
* C and E cannot be used with older versions of the Resource Kit Robocopy. - /A-:<attrs>
- Removes the attributes from the destination files after copying. <attrs> will be the characters from the above list, corresponding to the attributes you want to delete.
- [Windows 11 ???? or later] Specific for /A-, you can also specify ‘O’ (Offline attribute) in <attrs>
- /CREATE
- Creates only the files without copying the contents (does not copy data even if /COPY:D is present). If /S or /E is specified, the corresponding directories are also created. If the destination already exists, it does not overwrite the data with 0 bytes but only copies information such as date and attributes (if specified by options).
- /SL
- [Windows Vista SP1 or later] If there is a symbolic link in the source, it copies the symbolic link itself, not the target. This is effective for symbolic links to directories only when /S or /E is specified.
-
* Copying symbolic links requires administrator privileges (Symbolic Link Creation privilege; SeCreateSymbolicLinkPrivilege).
* The /SL option does not affect directories created as junction points instead of symbolic links, and if /E is present, they are created at the destination as directories, not as junction points. [Windows 10] To copy as a junction point, use /SJ option. - /SJ
- [Windows 10 2004 or 17763.1432? later] Copies the junction point itself, not the target, if there is a junction point in the source. This is effective only when /S or /E is specified.
- /Z
- Copies in restartable mode. If a communication failure or similar issue occurs and the copy fails, you can resume copying by using the same file names.
- /B
- Copies in backup mode. If the current user has backup and restore privileges (SeBackupPrivilege, SeRestorePrivilege), The copy operation can be performed regardless of ownership or security.
-
* Administrator privileges or a user with backup and restore privileges are required. For details, please see detail’s ‘About privileges’.
- /ZB
- Copies in restartable mode, and if an access denied error occurs, uses backup mode.
-
* Administrator privileges or a user with backup and restore privileges are required. For details, please see detail’s ‘About privileges’.
- /J
- [Windows 8 or later] Copies in unbuffered I/O mode. This mode does not use temporary buffers for file I/O, which can improve the copying speed for large files. However, if the copy is interrupted, it may result in unexpected states.
- /EFSRAW
- Copies encrypted files in EFS RAW mode. In EFS RAW mode, Robocopy copies encrypted files as they are, without decrypting or encrypting them. This allows copying operations to be performed even without the decryption key (even if the contents of the file are not known), as long as there are backup-like permissions.
-
* This option needs to be run by a user with access rights to the relevant files, administrator privileges, or backup privileges.
* It cannot be used with the Resource Kit Robocopy. - /FAT
- Creates destination files using only the ‘short file name’ (8.3 format FAT file name).
- /256
- Turns off support for path names longer than 256 characters. When this switch is specified, attempting to copy a file with a path that is too long results in a file not found error.
- /MON:n
- Starts monitoring after the copy operation (Monitor source). If Robocopy detects n changes in the source, it performs the copy again and continues monitoring. n will be a numerical value. ‘Changes’ include not only changes in file content but also changes in modification timestamps and attributes. Monitoring is done by checking files each time at intervals specified by /MOT:m (1-minute intervals by default). Even if there are changes and reversals within that interval, it counts as two changes (e.g. setting and then removing the read-only attribute counts as two changes). To end monitoring, enter Ctrl+C.
-
* Normally, changes in file content also result in a modification timestamp change, counting as two changes (unless intentionally keeping the modification timestamp the same).
- /MOT:m
- Starts monitoring after the copy operation, checks at intervals of m minutes, and if Robocopy detects any changes at least once, it performs the copy again and continues monitoring (Monnitor source; run again in a minute time). If /MON is specified, it performs the copy again when the specified number of accumulated changes is reached. Please refer to the description of /MON for details about monitoring content.
- /RH:hhmm—hhmm
- Restricts the time frame during which the copy operation is performed (Run hours). hhmm will be the time in 24-hour format based on the local system time (e.g. ‘1430’ for 2:30 PM). File copying occurs only during the specified time, and at other times, it waits for execution. If the time range is reversed (e.g., /RH:1234-1212), the smaller time is treated as the time of the next day.
- /PF
- Checks the restriction for each file instead of the path (parent directory) when restricting copying by time with /RH (Per file). This means that if there is a file that takes a long time to copy, the copying of the next file may be interrupted if it extends beyond the specified time frame.
- /IPG:n
- Specifies the Interpacket Gap (IPG). n will be the time in milliseconds. Robocopy performs data copying in approximately 64 KiB units, and when it reads and copies a unit of data, it waits for the specified time with this option. This option is used for purposes such as preventing network congestion during network-based copying.
- /MT:n
- [Windows 7 or later] Performs copying with multiple threads. n will be the number of threads to create. Increasing the number of threads allows parallel processing, and in some environments, it can significantly speed up the copying process. Additionally, using /LOG option to write log output to a file may further enhance performance.
- /MT option cannot be used in conjunction with /EFSRAW or /IPG. In other cases, if /MT is not specified, Robocopy performs parallel processing with 8 threads by default.
- /NOOFFLOAD
- [Windows 8 or later] Does not perform copying using Offloaded Data Transfer (ODX). If this option is not used, optimized copying may be done using Offloaded Data Transfer, so using /NOOFFLOAD may result in reduced performance.
- /COMPRESS
- [Windows 10 2004 or 17763.1432? later] Performs copying using SMB Compression if available. SMB Compression allows data compression during network-based copy operations, helping to conserve bandwidth and potentially improve transfer speeds.
-
* This feature requires the destination to support SMB Compression.
- /SPARSE
- [Windows 11 22H2? or later] Preserves the sparse status of sparse files during the copy operation. If not specifying this option, copying a sparse file will result in a non-sparse file at the destination.
-
* It seems that in some versions of Windows 11 that are not the latest, attempting to copy a file with sparse ranges using the /SPARSE option may result in the copy operation stopping prematurely. (However, in at least Windows 11 ver. 10.0.22621.2506, the copy operation works correctly.)
- /NOCLONE
- [Windows 11 24H2? or later] Disables ‘block cloning’ as an optimization method during file copying. By default, block cloning is performed, but this option forces Robocopy to copy files using traditional methods. This is useful in environments where block cloning is not supported or when block cloning needs to be avoided due to specific requirements. However, it may impact the speed of the copy process and the efficiency of disk space usage.
-
- /IoMaxSize:size
- [Windows 11 or later] Sets the size limit per cycle (read and write) during the copy operation. size can be specified in bytes or using units such as ‘K’ (kilobytes), ‘M’ (megabytes), or ‘G’ (gigabytes). For example, if you want to set a limit of 2 gigabytes, you can use ‘/iomaxsize:2G’. This ensures that each cycle of the copy operation does not exceed the specified size limit. (see also Details)
- /IoRate:size
- [Windows 11 or later] Sets the maximum copy speed, expressed as the size limit per second. size can be specified in bytes or using units such as ‘K’ (kilobytes), ‘M’ (megabytes), or ‘G’ (gigabytes). For example, if you want to set a limit of 1 MiB/s (1 megabyte per second), you can use ‘/iorate:1M’. This ensures that the copy operation does not exceed the specified speed limit. (see also Details)
- /Threshold:size
- [Windows 11 or later] Specifies a lower limit for the file size to which the restrictions of /IoMaxSize or /IoRate apply. By default, the restrictions apply to all files, but when /Threshold is specified, the limitations will not apply to files below the specified size. size can be specified in bytes or using units such as ‘K’ (kilobytes), ‘M’ (megabytes), or ‘G’ (gigabytes). For example, if you want to set a lower limit of 2 gigabytes, you can use ‘/threshold:2G’.
-
- /A
- Selects only files with the Archive attribute set. It is similar to /A option in Xcopy.
- /M
- Selects only files with the Archive attribute set and removes the Archive attribute after copying. It is similar to /M option in Xcopy.
- /IA:<attrs>
- Includes only files with the specified attributes. <attrs> can include the same characters as the ‘/A+’ option, which are ‘RASHCNET’, and it can also include ‘O’ (the offline file attribute).
-
* The offline file attribute is an attribute that cannot be set using Robocopy or Attrib, but you can check for the ‘O’ attribute in the file properties’ ‘Details’ tab in Windows Explorer or by using %~aX in the command line. Additionally, in Windows Explorer, files with the offline attribute may have an icon with an ‘X’ mark.
- /XA:<attrs>
- Excludes files with specified attributes. <attrs> can includes the same attribute letters ‘RASHCNETO’ as the /IA option.
- /XF <file>…
- Excludes specified files from the copy. <file> will be the file names to be excluded (absolute paths and wildcards are allowed, but wildcards and absolute paths cannot be combined). Multiple files can be specified, separated by spaces.
-
* After /XF option, any string not starting with ‘/’ until the /XD option is encountered will be treated as a string specified in <file> for /XF option.
- /XD <directory>…
- Excludes specified directories and their files. <directory> will be the directory name to be excluded (absolute paths and wildcards are allowed, but wildcards and absolute paths cannot be combined). Multiple directory names can be specified, separated by spaces.
-
* After /XD option, any string not starting with ‘/’ until the /XF option is encountered will be treated as a string specified in <directory> for /XD option.
- /XC
- Excludes files that have changes by comparing the source and destination for copying.
-
* ‘Files that have changes’ refer to files where the file timestamps (modification times) are the same between the source and destination, but the contents are different. Typically, when you edit a file, the file timestamp (modification date) also changes, so it is rare to have files excluded by this option (you can create such files using ‘/COPY:T’).
- /XN
- Excludes files where the source is newer when comparing the source and destination for copying.
- /XO
- Excludes files where the source is older when comparing the source and destination for copying.
- /XX
- Excludes files and directories that exist only in the destination (those are called extra files and directories). When specified with /PURGE, its effect is almost nullified.
- /XL
- Excludes files and directories that exist only in the source (those are called lonely files and directories). This is useful when you want to perform updates only on files that exist in both the source and destination.
- /IS
- Includes files that match between the source and destination (i.e. those are the same). Without specifying /IS, identical files will be skipped. This option does not exclude files that do not match.
-
* ‘Matching files’ refer to files with identical content and modification timestamps between the source and destination. Specifying /IS does not change the files targeted for fixing by /TIMFIX.
- /IT
- Includes files with minor changes (those are called tweaked files). ‘Minor changes’ refer to changes in file attributes, for example. Usually, changes in file attributes do not categorize a file as having changes. If the contents and modification timestamps of the files match, they may be excluded from the copy target even if the attributes are different. However, specifying the /IT option allows you to align file attributes.
-
* ‘Differences in encryption status’ are not included in the targets covered by /IT.
- /IM
- [Windows 10 2004 or 17763.1432? later] Includes files with different ‘internal modification timestamps’ when comparing the source and destination (i.e. include ‘Modified’ files). ‘Internal modification timestamp’ is different from the regular modification timestamp and is primarily updated when attributes such as security information (information within the MFT entry) are modified, rather than the data being rewritten, especially in the NTFS file system (MFT entry’s modification timestamp). For example, in the case of a file where only security information is modified, it will not be considered ‘included’ unless you use the /IS option (even with the /IT option), but by using the /IM option, it will be treated as ‘included’ because the internal modification timestamp is updated.
- Note that if you choose to treat security information to be copied (by including S O U in the /COPY option or using the /SEC option), the /IM option is automatically specified.
-
* This option is effective only when both the source and destination support internal modification timestamps. For example, it is effective when both the source and destination are NTFS.
- /MAX:n
- Excludes files from the copy operation if they are larger than the specified number of bytes (Maximum file size). n will be the size boundary in bytes.
- /MIN:n
- Excludes files from the copy operation if they are smaller than the specified number of bytes (Minimum file size). n will be the size boundary in bytes.
- /MAXAGE:n
- Excludes files from the copy operation if their modification timestamp is older than the specified number of days or date. (Maximum file age: Specifies the maximum elapsed period to include files in the target.) n will be the number of days to go back in the past or the actual date in the ‘YYYYMMDD’ format (if ‘3’ is specified, Robocopy sets the boundary as 3 days ago).
- /MINAGE:n
- Excludes files from the copy operation if their modification timestamp is newer than the specified number of days or date. (Minimum file age: Specifies the minimum elapsed period to include files in the target.) n will be the number of days to go back in the past or the actual date in the ‘YYYYMMDD’ format.
- /MAXLAD:n
- Excludes files from the copy operation if there has been no access to the files since the specified number of days or date. (Maximum last access date: Specifies the initial access timestamp to include files in the target.) n will be the number of days to go back in the past or the actual date in the ‘YYYYMMDD’ format (if ‘3’ is specified, Robocopy checks whether there has been access in the period from 3 days ago to the present and excludes those without access).
- /MINLAD:n
- Excludes files from the copy operation if there has been access to the files since the specified number of days or date (Minimum last access date: Specifies the final access timestamp to include files in the target.) n will be the number of days to go back in the past or the actual date in the ‘YYYYMMDD’ format.
- /FFT
- Performs date and time comparisons using FAT file times (file timestamps in the FAT file system). FAT file times have a time accuracy of 2 seconds, and differences less than that are treated as the same timestamp.
- /DST
- Performs daylight saving time adjustment.
-
* It cannot be used with older versions of the Resource Kit Robocopy.
- /XJ
- Excludes junction points and symbolic links. By default, files and directories that are ‘junctions’ or ‘symbolic links’ (only directories for ‘junctions’) are included in the copy target. Even if /SL or /SJ is specified, if /XJ is specified, the copy operation will not be performed for those files/directories.
- /XJD
- Excludes junction points and symbolic links for directories. Even if /SL or /SJ is specified, if /XJD is present, the copy operation for the respective directory will not be performed (if /XJ and /XJF are not specified, symbolic links for files will be copied).
-
* It cannot be used with older versions of the Resource Kit Robocopy.
- /XJF
- Excludes symbolic links (junction points) for files. Even if /SL is specified, if /XJF is specified, the copy operation for the respective file will not be performed (if /XJ and /XJD are not specified, junction points and symbolic links for directories will be copied).
-
* Junction points generally do not exist for files; therefore, this pertains to excluding symbolic links for files.
* It cannot be used with older versions of the Resource Kit Robocopy.
-
- /R:n
- Specifies the number of retry attempts in case of copy failure. n will be the number of retries as a numerical value. If not specified, the value stored in the registry (saved with /REG below) will be used, or if that value doesn’t exist, the default value of ‘1,000,000’ (1 million times) will be used.
- /W:n
- Specifies the waiting time, in seconds, before retrying in case of copy failure. n will be the waiting time as a numerical value in seconds. If not specified, the value stored in the registry (saved with /REG below) will be used, or if that value doesn’t exist, the default value of ‘30’ (30 seconds) will be used.
- /REG
- Saves the values specified with /R and /W to the registry. The save location is ‘HKEY_CURRENT_USER\Software\Microsoft\ResKit\Robocopy’, where ‘RetryMax’ stores the retry count, and ‘WaitTime’ stores the wait time in milliseconds.
- /TBD
- In case of the «‘he network name cannot be found’ error (system error value: 67), Robocopy will retry until the shared name (network name) is defined (To Be Defined) instead of terminate immediately as an ‘undefined error’. The number of retries and wait time will follow the settings of /R and /W.
-
※ The ‘Network path not found’ error (computer not found error) with a system error value of 53 is not covered by this and is excluded.
- /LFSM[:size]
- [Windows 10 2004 or 17763.1432? later] Enables ‘Low Free Space Mode’. In this mode, if the available space on the destination volume falls below a specified size (threshold), the copy operation is paused and retried according to the options /R and /W.
- The threshold is specified in ‘/LFSM:size’ option, where ‘size’ is a numerical value with units ‘K’ (kilobytes), ‘M’ (megabytes), or ‘G’ (gigabytes). For example, if you want to set a lower limit of 2 gigabytes, you would specify ‘/LFSM:2G’.
- If you simply specify ‘/LFSM’ without specifying a size, it will use a threshold equivalent to 10% of the ‘available space on the destination volume’ (not 10% of the ‘total capacity of the destination volume’).
-
* Since the copy process is not performed byte by byte, it is rare for the operation to pause exactly at the threshold. In most cases, it will pause when the available space is somewhat below the threshold.
-
* The following ‘output (to log)’ will be output to the console (standard output) if there is no specified output to a file.
-
- /L
- Outputs a list of files when copying, adding, or deleting occurs, but does not perform the actual operations. This is useful when you want to confirm what file operations would occur based on the options specified in Robocopy.
- /X
- Outputs a list of files that are not selected (output extra files). If files are specified in ‘<files>…’, typically only the files that were copied (or moved, etc.) are logged. However, by specifying the /X option, a list of other files (EXTRA Files) will also be output.
-
* The term ‘files not selected’ is unrelated to files excluded by the ‘File select options’.
- /V
- Outputs a list of skipped files (verbose). This includes files that were not copied because the source and destination were the same, as well as files excluded by the ‘File select options’ and other such cases.
- /TS
- Includes the file’s modification timestamp as a timestamp in the log when outputting a list of files.
-
* Timestamps are output in UTC time.
- /FP
- Includes the full path of the file in the log when outputting a list of files.
- /BYTES
- Includes the size of the file in bytes in the log when outputting a list of files. By default, values exceeding a certain threshold are output in units such as ‘k’ (KiB) or‘»m’ (MiB), but specifying /BYTES will output the value in bytes without unit separators.
- /NS
- Does not include file sizes in the log (No size). If /BYTES is specified, this option is ignored.
- /NC
- Does not include file classes in the log (No file classes). ‘File classes’ refer to categories such as ‘Newer’, ‘Older’, ‘EXTRA files’, etc., and by default, these categories are included in the log.
- /NFL
- Does not include the file list in the log (No file list).
- /NDL
- Does not include the directory list in the log (No directory list).
-
※ When /NDL is specified, file names will be output as full paths, similar to when /FP is specified.
- /NJH
- Does not output the job header (No job header). The ‘job header’ includes the Robocopy program name, start time, and various option displays.
- /NJS
- Does not output the job summary (No job summary). The ‘job summary’ includes a list of the total number of files and directories, such as copied, skipped, and extra files and directories, along with the end time.
- /NP
- Does not display progress information, such as the percentage indicating how much has been copied (No progress).
- /ETA
- Outputs the estimated time of arrival for copied files for the second and subsequent files.
-
* The estimated time of arrival tends to be significantly later than the actual time. Additionally, if the value of /IPG is increased, the estimated time of arrival will also be delayed accordingly.
- /LOG:<log-file>
- Outputs the log to a file specified by <log-file> instead of the console (standard output). During output, the contents of the file are overwritten (cleared).
- /LOG+:<log-file>
- Outputs the log to a file specified by <log-file> instead of the console (standard output). Unlike /LOG, the file’s contents are preserved during output, and the log is appended.
-
* When appending, the EOF character (\x1A) at the end of <log-file> will not be removed.
- /UNILOG:<log-file>
- Except for outputting the log in Unicode (UTF-16), it is the same as /LOG. The log will have a BOM added.
-
* [Until Windows 7?] As of February 2015, on Windows 7, this option only adds a BOM and outputs the content in the system code page, not functioning correctly (it works correctly on Windows 8.1). This behavior persists even if you switch the code page using Chcp.
* It cannot be used with older versions of the Resource Kit Robocopy. - /UNILOG+:<log-file>
- Except for outputting the log in Unicode (UTF-16), it is the same as /LOG+.
-
* [Until Windows 7?] As of February 2015, on Windows 7, this option only adds a BOM and outputs the content in the system code page, not functioning correctly (it works correctly on Windows 8.1). This behavior persists even if you switch the code page using Chcp.
* If <log-file> does not have a Unicode BOM, it will be output in the system code page. Additionally, if it has a UTF-8 BOM, it will be output in UTF-8.
* It cannot be used with older versions of the Resource Kit Robocopy. - /UNICODE
- Outputs in Unicode (UTF-16).
-
* As of November 2023, it seems that this option does not work correctly on Windows 7, Windows 8.1, Windows 10, or Windows 11. (It is recommended to use /UNILOG instead.)
* It cannot be used with older versions of the Resource Kit Robocopy. - /TEE
- Even when outputting the log to a file using /LOG or /UNILOG, log output to the console (standard output) is also performed. This is similar to using the tee command in Linux.
-
- /JOB:<job-file>
- Specifies the job file where options are described (see details on ‘About job file’ below). The <job-file> must be a file with the extension ‘RCJ’. Robocopy reads additional options specified in the job file and processes them in addition to the options specified on the command line (after /JOB).
-
* Specifying a file with an extension other than ‘RCJ’ will result in an error.
* JOB cannot be specified more than twice (you cannot load more than two job files from the command line). However, it is possible to write only one ‘/JOB’ in a job file, and from within that job file, you can load options from another job file.
* If there are overlapping options between those specified before /JOB and the options inside the job file, the options inside the job file take precedence. This is similar to how options take precedence when there are duplicates on the command line. - /SAVE:<job-file>
- Specifies the job file to save options (explained later). <job-file> must be a file with the extension ‘RCJ’. If /QUIT is not specified, the command is executed simultaneously with the saving of options.
-
* If a file with an extension other than ‘RCJ’ is specified, the extension ‘RCJ’ will be appended when saving.
* If you use both /JOB and /SAVE, the content of the job file specified with /JOB and the options specified on the command line will be merged and output.
* The options saved with /SAVE are only those specified before /SAVE, including options from job files. If there are options after /SAVE, they will not be saved in the job file. - /QUIT
- Exits without executing the command. When combined with /SAVE, it creates a job file; when combined with /JOB, it allows you to confirm the options described in the job file.
-
* It is possible to use /QUIT without combining it with /SAVE or /JOB.
* ‘/QUIT’ itself is not saved in the job file. - /NOSD
- Specifies that no source directory is provided. This is used when the source is not specified in the job file. If ‘/NOSD’ exists in the job file, you need to specify the source directory from the command line.
-
* When combining /SAVE and /QUIT to create a job file, there is no need to specify /NOSD.
- /NODD
- Specifies that no destination directory is provided. This is used when the destination is not specified in the job file. If ‘/NODD’ exists in the job file, you need to specify the destination directory from the command line.
-
* When combining /SAVE and /QUIT to create a job file, there is no need to specify /NODD.
- /IF <file>…
- Includes the file following ‘/IF’ as part of the files to be copied. This is used when describing the contents equivalent to ‘<files>…’ in the command line in the job file (it is also possible to use «/IF» on the command line).
Details
About Robocopy
Robocopy is a useful program for executing scheduled tasks such as copying (backing up or mirroring, etc.) files and directories. It provides detailed options for file attribute manipulation, retry control, log output, and more.
While Xcopy allows for relatively detailed copy operations, there are primarily the following operations that cannot be achieved with Xcopy.
- Selection and determination of copy targets based on file attributes, timestamps, etc.
- Deletion of files that exist only in the destination (mirroring).
- Loading options from an external file (job file).
* While Robocopy allows copying a single file, it cannot perform the copy of a single file where the source and destination have different filenames (for such cases, you would use Copy or Xcopy).
Selecting files to copy
Robocopy provides the ability to specify files directly from options and includes features for selecting files that meet specific conditions. The types of conditions and the corresponding options are as follows.
| Type of condition | Option to ‘include’ | Option to ‘exclude’/th> | ||
|---|---|---|---|---|
| File name | /IF | Select only files that match the pattern | /XF | Exclude files that match the pattern |
| (specify file name directly) | /XD | Exclude by (parent) directory name | ||
| Date / time | (none) | /XN | Exclude if the source is newer | |
| /XO | Exclude if the source is older | |||
| /MAXAGE | Exclude files with an older last update | |||
| /MINAGE | Exclude files with an newer last update | |||
| /MAXLAD | Exclude files that have not been accessed since the specified date | |||
| /MINLAD | Exclude files that have been accessed since the specified date | |||
| File attribute | /IA | Select only files with the specified attributes | /XA | Exclude files with the specified attributes |
| /IT | Include files with attribute changes only | |||
| /A | Select only files with the archive attribute | |||
| /M | Select only files with the archive attribute (remove the attribute after processing) | |||
| Link | (none) | /XJ | Exclude junction points and symbolic links | |
| /XJD | Exclude junction points and symbolic links for directories | |||
| /XJF | Exclude symbolic links for files | |||
| Size | (none) | /MAX | Exclude files exceeding a certain size | |
| /MIN | Exclude files that are below a certain size | |||
| Miscellaneous | /IS | Include files that ‘match’ | /XX | Exclude files that exist only in the destination |
| /XL | Exclude files that exist only in the source | |||
| /XC | Exclude files with different content |
Confirming copy operation
The above file selection options can be combined in multiple ways. To confirm which files will be selected based on the combinations, use ‘/L’. Since the command line (or job file) can become complex when combining multiple options, it is recommended to use /L for confirmation.
Note that ‘/QUIT’ only outputs options to the screen, but it can also be used for confirmation when combining the command line and job file (it does not confirm the actual files involved in the copy operation with /QUIT).
Throttling (Copy speed limitation)
[Windows 11 or later] By utilizing the /IoMaxSize and /IoRate options in Robocopy, you can suppress and limit the speed of the copy operation (throttling; this can be used to reduce the load on the system). Generally, copying is performed at the throttling limit specified by /IoMaxSize or /IoRate, but the values may be adjusted by Robocopy depending on the specified values.
Example:
robocopy D:\data\db X:\bk\db *.db /iorate:1M
-- Copy files with the extension *.db, limiting the copy speed to 1M/s
By using the /Threshold option, you can avoid imposing restrictions on files that fall below a certain size.
About job file
A job file is a text file containing the options for Robocopy. Essentially, it is a format that lists the options that can be specified on the command line. (The commands described in the job file are passed directly to the command line.)
Additionally, there are the following advantages compared to the command line.
- Possible to format using line breaks and spaces : While on the command line, you typically need to specify everything on one line, in a job file, you can split the specification across multiple lines. Additionally, you can freely use space and tab characters, allowing you to describe the content in a more readable format.
- Possible to include comments in the description : If you write a colon ‘:’ consecutively for two characters, those two characters and the subsequent characters (until a line break) are treated as ‘comments’ and are ignored during command processing. This allows you to make notes about the meaning of options, for example.
- Possible to specify long command lines : There are character limits when specifying on the command line (In Windows XP or later the limit is set to 8191 characters: Command prompt line string limitation — Windows Client | Microsoft Learn), but there is no such limit when describing in a job file.
As an example, a job file would be described as follows:
:: Comment sample

:: Specifying the source directory for copying
/SD:C:\dbs\r1\         :: Set "C:\dbs\r1" as the source directory for copying
:: Specifying the destination directory for copying
/DD:X:\Backup\dbs\r1\  :: Set "X:\Backup\dbs\r1\" as the destination directory for copying
:: Specifying files to include
/IF *.dat              :: Set "*.dat" as the copy target
    *.db               :: Also set "*.db" as the copy target
:: Copy option
/COPY:DAT              :: Copy data, attributes, and timestamps
:: Other option
/IS                    :: Copy even if same
:: Retry, etc.
/R:5 /W:10             :: Retry up to 5 times with a 10-second wait between retries
:: Log
/TS /BYTES             :: Output sizes in bytes, including timestamps
* Spaces, tab characters, and newline characters can be specified consecutively in multiples.
* ‘/SD:’ and ‘/DD:’ can be omitted only if there is no ‘/IF’ specified before them. In that case, you must always specify <source-path> <dest-path> in that order.
If you save this job file as ‘X:\Backup\MYJOB.RCJ’, you can invoke Robocopy as follows:
set MY_DATE=%DATE:/=_%
robocopy /JOB:X:\Backup\MYJOB /LOG:X:\Backup\Backup_%MY_DATE%.log
In this example, Robocopy will be executed with the options described in MYJOB.RCJ, adding the ‘/LOG’ option. This execution is roughly equivalent to the following command line.
set MY_DATE=%DATE:/=_%
robocopy C:\dbs\r1\ X:\Backup\dbs\r1\ /IF *.dat *.db /COPY:DAT /IS /R:5 /W:10 /TS /BYTES /LOG:X:\Backup\Backup_%MY_DATE%.log
Note that, while job files can be manually written in text format, it’s also possible to generate them through Robocopy using the «/SAVE» option. When creating a job file with «/SAVE,» descriptions for each option (the explanatory text displayed with ‘robocopy /?’) are saved as comments. Additionally, <source-path>, <dest-path>, and the log file name specified with /LOG are saved as absolute paths (if specified). However, if you specify the /SAVE option in the middle of the command line, options written after it will not be saved, so please be mindful of the order.
If the content specified in the job file overlaps with what is specified on the command line, the content specified on the command line takes precedence if it appears after /JOB. However, if the source and destination directories are specified in the job file, they cannot be overridden by specifying them on the command line.
* If the specification of /JOB on the command line is after <source-path> or <dest-path>, and /SD or /DD is specified in the job file, it will result in an error in the job file.
* It is possible to use /JOB within a job file (similar to an include), but specifying the job file itself will result in a semi-infinite loop. The execution will terminate with an error when it reaches the limit of simultaneously open files.
The character encoding of the job file must match the code page of the environment in which Robocopy is executed (which can be changed with Chcp or Mode).
* If the character encoding of the job file is UTF-8, set the code page with Chcp to ‘65001’. However, when using UTF-8, it seems that non-ASCII character filenames are not handled correctly (as of November 2023, confirmed on Win7/Win10/Win11).
About privileges
Some options require the privilege to execute them. In most cases, if you are an administrator, you have the necessary privileges to run the command without errors. Additionally, options like ‘/B’ can be executed by non-administrator users with backup and restore privileges, not necessarily requiring administrator rights.
[Windows Vista or later] If User Account Control (UAC) is enabled, even if the user has the necessary privileges, the lack of elevation will result in a lack of permissions, causing the command to fail. In this case, you need to elevate using methods such as:
- Open Command Prompt (or similar) by selecting ‘Run as administrator’ and execute the command within it
- Enable ‘Run with highest privileges’ when executing as a scheduled task in the Task Scheduler
Robocopy itself does not have the capability to perform elevation, so if you are using options like /B or /COPY:U, please perform privilege elevation. (Even when Robocopy is executed via Runas, it’s not sufficient as Runas does not perform UAC privilege elevation. Please refer to the examples of privilege elevation on the Runas page.)
To check whether you have the necessary privileges in the current environment (prompt/batch file), you can use ‘whoami /PRIV’ to display and retrieve a list of privileges, considering UAC elevation.
* If the currently logged-in user has higher privileges than a regular user, you can choose the logged-in user when selecting ‘Run as administrator’. This allows you to open a Command Prompt with the elevated privileges (without explicitly logging in as an administrator).
* If the UAC elevation restrictions are not enabled, you can execute commands without performing these operations (although it is not highly recommended for security reasons).
Exit codes (Error codes)
When Robocopy completes a copy operation, it sets an exit code (error code, return value) based on the operation’s outcome. Exit codes are useful when determining conditions using the If Errorlevel statement (and the ERRORLEVEL environment variable).
The exit code of Robocopy is a combination (sum) of the following values:
| Value | Meaning |
|---|---|
| 0 | No action was taken (no files were copied). |
| 1 | Files were copied successfully. |
| 2 | Files exist in the destination that do not exist in the source. |
| 4 | There are files or directories (folders) with the same name but different characteristics. |
| 8 | Some files failed to copy. |
| 16 | An error has occurred. |
For example, the exit code ‘3’ means ‘Files were copied, and additional files exist only in the destination’. The exit code ‘6’ means ‘No files were copied, but some files exist only in the destination, and there are mismatched files and directories’. The exit code ‘9’ means ‘Some files were copied, but some files failed to copy’.
※ Generally, an exit code of ‘0’ is considered successful, but in the case of Robocopy, an exit code of ‘less than 8’ (sometimes ‘less than 4’) is considered successful.
This combined exit code can be easily determined in a batch file using the If Errorlevel statement. The If Errorlevel statement checks if the exit code is ‘equal to or greater than’ a specified value, allowing you to write conditions such as ‘greater than or equal to 8’ as follows:
robocopy /JOB:MyJob.rcj
if errorlevel 8 goto OnError
if errorlevel 4 goto OnMismatchedFile

echo The copy operation completed successfully.
goto OnExit

:OnMismatchedFile
echo The copy operation completed, but some files were mismatched.
goto OnExit

:OnError
echo Something went wrong on copying.

:OnExit
Troubleshooting
Below are common issues encountered when using Robocopy and their solutions. Refer to these guidelines to resolve problems effectively.
Common Errors and Solutions
- Error 5: Access Denied
-
This occurs when there are insufficient permissions to access files or directories.
Solution:
- Use the /B or /ZB options to execute in backup mode
- Run Robocopy with administrative privileges
- Check and assign the necessary permissions to the source or destination folders
- Error 64: Network Name Not Found
-
This occurs when the network connection is interrupted or the shared folder is not correctly configured.
Solution:
- Check the network connection and retry in a stable environment
- Ensure the shared folder path is correct
- Use the /R and /W options to configure retry count and wait time
- Error 123: Invalid Path
-
This occurs when the specified path is invalid.
Solution:
- Verify the spelling and format of the path
- Enclose paths with spaces in double quotes » «
- If it is a network path, ensure it is accessible
Using Logs for Debugging
To identify the cause of issues, it is recommended to use Robocopy’s logging functionality.
- Use the /LOG option to record logs
- Add the /NP option to simplify progress reporting
- Review the generated log file to identify error locations or warning messages
Additional Troubleshooting Tips
- If the system load is high, adjust the number of threads using the /MT option.
- If disk space is insufficient, check the available space on the destination drive. (Dir command output shows available space.)
- If certain files are not copied, check the filtering options (e.g. /XF or /XD) or verify with the /L option.
If these methods do not resolve the issue, consider consulting the system administrator or contacting Microsoft Support Services.
Samples
Sample 1
robocopy C:\MyDoc D:\Backup\MyDoc /E
Copies the files and subdirectories contained in C:\MyDoc (included by /E) to D:\Backup\MyDoc. By default, files that already exist in the destination are left as they are, and files that have not changed in data and file timestamp are not copied.
Sample 2
robocopy C:\MyDoc D:\Backup\MyDoc /E /A
Copies only the files and subdirectories contained in C:\MyDoc (included by /E) that have the archive attribute set (/A behavior) to D:\Backup\MyDoc. This behavior is similar to the one in Sample 1 on the Xcopy page.
Sample 3
robocopy H:\Data R:\External\Data /MIR /A+:N
Copies the files contained in H:\Data to R:\External\Data and deletes files that exist only in R:\External\Data (/MIR behavior). Additionally, when new files are copied, it adds the non-index attribute to the destination files (/A+:N behavior).
* This does not change the attributes for files that already exist.
Sample 4
robocopy Z:\Data E:\Current\Data /E /XO
Copies the files and subdirectories contained in Z:\Data (included by /E) to E:\Current\Data. However, if the files on the Z:\Data side are older, it excludes them from the copy (/XO behavior). This behavior is similar to Sample 3 on the Xcopy page.
Sample 5
robocopy D:\Projects\Piyo\Sources X:\Projects\Bar\Sources /E /XA:R
Copies the files and subdirectories contained in D:\Projects\Piyo\Sources (included by /E) to X:\Projects\Bar\Sources. However, if the files on the source or destination side have the read-only attribute, it excludes those files from the copy (/XA:R behavior).
Sample 6
robocopy P:\Logs Q:\Backup\Logs /E /IF access*.* error*.* /XF access_ignore_*.* error_ignore_*.*
Copies all the files and subdirectories contained in P:\Logs (included by /E) that match the wildcard specifications ‘access*.*’ or ‘error*.*’ (specified by /IF) to Q:\Backup\Logs. However, files matching ‘access_ignore_*.*’ and ‘error_ignore_*.*’ are excluded (specified by /XF).
Sample 7
robocopy E:\Logs \\myserver\Backup\Logs /R:3 /W:10
Copies the files in E:\Logs to the network folder \\myserver\Backup\Logs, but specifies a retry count of 3 (/R:3) and a wait time of 10 seconds (/W:10) between retries if the operation fails.
Sample 8
robocopy D:\Data E:\Data /E /XO /L
Checks how the copying process would behave for files and subdirectories in D:\Data (included by /E) where files in the destination already exist and are newer, so they are not copied (a href=»#opt_s_xo»>/XO). The actual copying is not performed; the /L option simulates the operation.
Sample 9
robocopy D:\Foo\Bar "F:\Backups\2015 Foo Bar" /JOB:"F:\Backups\Job Files\Op1.rcj" /LOG:"F:\Backups\2015 Foo Bar Log.txt"
Copies from ‘D:\Foo\Bar’ to ‘F:\Backups\2015 Foo Bar’ using the job file ‘F:\Backups\Job Files\Op1.rcj’ and records the log in ‘F:\Backups\2015 Foo Bar Log.txt’. The specific details of the copy operation depend on the job file. The combination of /JOB and /LOG is particularly useful for performing regular copy operations, such as backups.
See also
- Copy command — used to perform simple copying.
- Move command — used to perform simple moving files.
- Xcopy command — used to copy files without complex conditions.
- Rmdir(Rd) command — used to delete a directory.
- Deltree command — used to delete a directory in MS-DOS and Windows95/98/Me.
- Dir command — used to check/verify existing files.
- Attrib command — the Archive attribute can be checked/changed by using Attrib command.
- Runas command — see also Runas command’s sample for elevating privileges needed by some options.
- Wildcards (* and ?) — Robocopy command accepts wildcards.