
Right-click is an important option that allows the user to view properties, access other options and rename, copy or delete a particular file or folder. Sometimes one may want to avoid making any changes to files or folders on the desktop and disable right-click for desktop only. This article will show you how to disable the right click in Windows.
For someone using Windows 10 (or older) as their OS, this can be achieved by accessing the Windows registry and using a registry editor. After making the necessary changes to the Explorer options, the computer needs to be restarted to implement the changes.
To disable the right-click (context-menu) on the desktop, you must go through the registry:
-
Click on the Start button. In the search field, type the command «regedit» and press Enter.
- Locate the following entry: HKEY_CURRENT_USER> Software> Microsoft> Windows> CurrentVersion> Policies> Explorer.
- Click on the Edit menu> New > DWORD Value > 32 bits.
- Name it as «NoViewContextMenu» and double-click on it.
- Enter 1 in the Value Data field. Click on OK.
- Close the Registry Editor and restart your computer for the changes to take effect.
- To restore this feature, you can simply delete the «NoViewContextMenu» or set its value to 0.
Any more Windows questions? Check out our forum!
Download Windows Speedup Tool to fix errors and make PC run faster
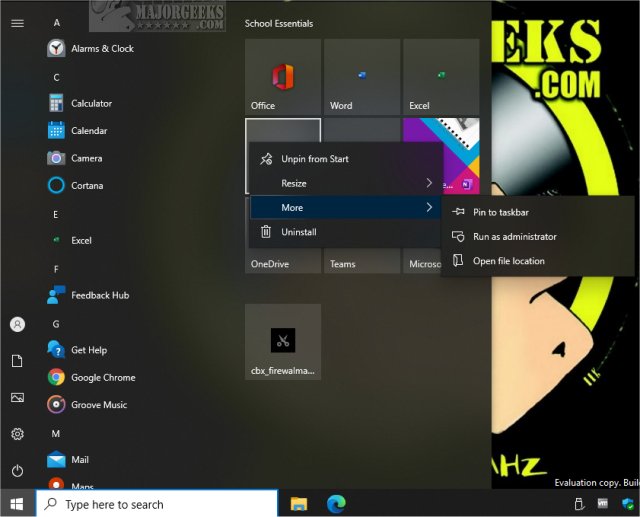
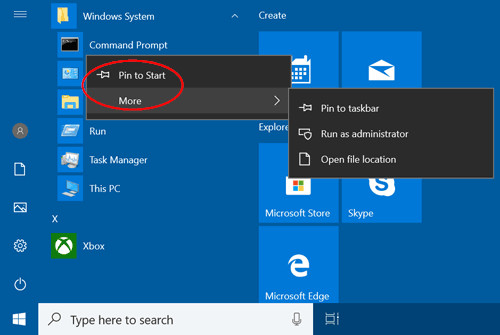
In this post, we will show you how to enable or disable the right-click context menu in the Start menu on Windows 11/10. When we right-click on a pinned app or program in the Start menu, we are able to resize the tile, pin a program as tile, uninstall a program, unpin a tile, unpin a group of tiles, open the file location of a program, pin an app to the taskbar, etc. If you don’t want someone to access all such options, then disabling right-click options for the Start menu can be useful.
There are two built-in options in Windows 11/10 to enable or disable right-clicking on the Windows 11/10 Start menu. These are:
- Using Group Policy Editor
- Using Registry Editor.
1] Using GPEDIT
This built-in option is present in Enterprise and Pro editions of Windows 10. The home users can still use this option by installing Group Policy in the Home edition manually. After that, use these steps:
- Open Group Policy Editor
- Access Start menu and Taskbar folder
- Disable context menus in the Start Menu setting.
First of all, launch GPEDIT. Now, access the Start menu and Taskbar folder. The path is:
User Configuration > Administrative Templates > Start Menu and Taskbar

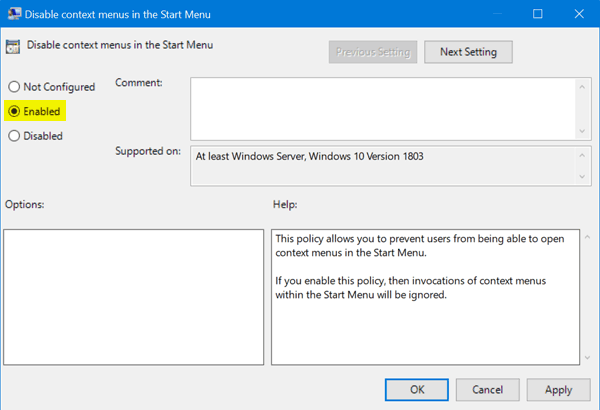
Double-click on the Disable context menus in the Start Menu setting. It will open a new window. There, click on the Enabled radio button, and save this setting using OK.

Now right-click on some program or app in the Start menu, it won’t work.
You can re-enable right-click options for the Start menu by following the above steps and selecting the Not Configured option.
2] Using Registry Editor
This option is present in all editions of Windows 11/10. The steps are as follows:
- Open Registry Editor window
- Go to HKLM Explorer key
- Create DisableContextMenusInStart DWORD value
- Set 1 in value data of this DWORD value.
Open REGEDIT or Registry Editor window. After that, go to the Explorer key. Here is the path:
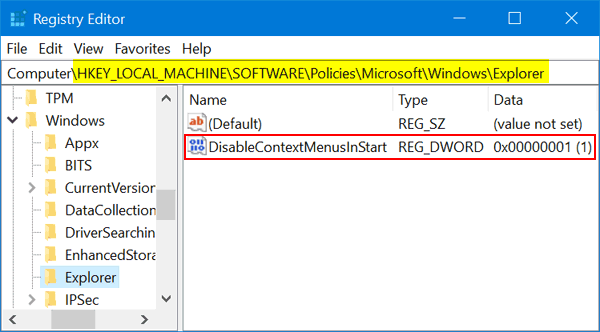
HKEY_LOCAL_MACHINE\SOFTWARE\Policies\Microsoft\Windows\Explorer

Create a DWORD (32-bit) value with a name DisableContextMenusInStart. You can do this by opening the right-click menu on the empty area and using the DWORD (32-Bit) Value option.

Double-click that value and it will open a box. In the Value data field, add 1, and press OK. Right-click menus in the Start menu are disabled.

To turn on or enable the right-click context menus in the Start menu again, follow the steps mentioned above, and add 0 in the Value data field.
To enable the context menu again, simply reverse the changes.
Hope the steps covered in this post help enable or disable right-click options in the Start menu.
Can you remove the Recommended section in Windows 11 Start menu?
Yes, you can use a free software named ExplorerPatcher to remove the Recommended section in Windows 11 Start menu. This software contains a Start menu section where you can select Disable the “Recommended” section option. Windows 11 also comes with a Group Policy setting and Registry Editor setting for removing the Recommended section, but that setting is supported in Windows 11 SE edition only.
How do I turn off right-click context menu in Windows 11?
There is a Remove File Explorer’s default context menu setting in Group Policy Editor. You can access this setting from the following path:
User Configuration > Administrative Templates > Windows Components > File Explorer
After accessing this setting, use the Enabled option, and press the OK button. This will completely turn off or disable right-click context menu in Windows 11. When you will right-click on the desktop or a desktop item or items present in the File Explorer, right-click menu will not open.
Read next: How to disable Taskbar Context Menu in Windows 11/10.
Laxman has done Bachelor’s in Computer Science, followed by an MBA. Writing about Windows OS and the free software and services that are available for the Windows operating system is what excites him.
Reader Interactions
By Timothy Tibbettson 06/15/2023 |
When you right-click on any item in your Windows 10 or 11 Start Menu, you have numerous options, including move, resize, uninstall, unpin, open file location, and more. You can entirely disable the right-click Context Menu in your Start Menu by editing the registry or using Group Policy Editor.
Disable Right-Click Context Menu in Windows 10 & 11 Start Menu — Registry
Editing the registry requires creating a new Key and DWORD, so we made the registry files for you.
Video tutorial:
Download Disable Right-Click Context Menu in Windows 10 Start Menu and extract the two files.
Double-click ‘Right-Click Context Menu in Windows 10 Start Menu — Disable.reg’ or ‘Right-Click Context Menu in Windows 10 Start Menu — Enable.reg’ (Default).
Click Yes when prompted by User Account Control.
Click Yes when prompted by Registry Editor.
Click OK when prompted by the Registry Editor.
This tweak is included as part of MajorGeeks Windows Tweaks.
Advanced users can navigate to HKEY_LOCAL_MACHINE\SOFTWARE\Policies\Microsoft\Windows\ and created a new Explorer key. Next, create a new DWORD (32-bit Value) named DisableContextMenusInStart with a Value_data of 1.
Disable Right-Click Context Menu in Windows 10 & 11 Start Menu — Group Policy Editor
Open Group Policy Editor. Windows 10 Home users will need to enable Group Policy Editor.
Go to User Configuration > Administrative Templates > Start Menu and Taskbar.
Double-click Disable context menus in the Start Menu and click on Enabled.
Similar:
comments powered by Disqus
The context menu is the Graphical user interface menu that appears while right-clicking on the mouse. This menu offers a limited set of options or choices depends on the application or operating system, Context menu can appear on any application that offers a lot of options for easy and efficient operation. In the windows environment, the context menu is accessed by right click on the mouse or by the menu key on the keyboard. Based on the application and operating system these options may vary, In windows, the Desktop context menu is very popular for giving refresh and creating new items. You can add or remove any apps are programs to this context menu. Context menu contains more useful and important actions according to the app or program. In some organizations, Right-click context menu is disabled due to security reasons. If you are looking for a way to enable or disable Right-click context menu then you can use this guide.
In Windows, you can access Right-Click context menu in Various places, Taskbar, Start Menu, and File Explorer. Follow this guide to enable or disable Right-click context menu in all places.
By default, Right-click context menu is enabled in Windows 10 or Windows 11, if you want to disable then follow the steps below. Here we are going to see how to disable Taskbar, Start menu, and File Explorer Right-Click context menu.
Enable/Disable Taskbar Right-Click context menu using Group Policy Editor:
Open Run command by pressing Windows + R and type gpedit.msc and hit enter, this command will open Group Policy Editor.
Now navigate to the following path.
User Configuration > Administrative Templates > Start Menu and Taskbar
From the left-hand side click on Start Menu and Taskbar folder and from the right-hand side look for the policy named “Remove access to the context menus for the taskbar”.

Double click on the policy to open the Policy Settings. Choose Enabled and Click on Apply and OK.

Open Command prompt and type gpupdate /force and restart the system once. This will disable the Taskbar Right-click context menu.
If you want to Enable the Taskbar, right-click context menu, follow the same steps from above, and just choose Not Configured or Disabled in Policy Settings.
Using Registry Editor:
If you are using Windows 10/11 Home Edition then you can use the registry editor method to Enable/Disable Taskbar Right-Click context menu.
Open Run Command by pressing Windows + R and type Regedit and hit enter, this command will open the Registry editor console.
Now navigate to the following registry path.
HKEY_CURRENT_USER\SOFTWARE\Microsoft\Windows\CurrentVersion\Policies\Explorer
From the left-hand side, right-click on the Explorer Registry key and choose New > DWORD (32-bit) Value, and name the DWORD as NoTrayContextMenu.
Double click on NoTrayContextMenu DWORD and set the value as mentioned below.
0-Enable Taskbar Right-click context menu
1-Disable Taskbar Right-click context menu

Click on OK and Close the Registry editor.
Enable/Disable File Explorer Right-Click context menu using Group Policy Editor:
Open Group Policy Editor and navigate to the following path.
User Configuration > Administrative Templates > Windows Components > File Explorer
From the left-hand side click on the File Explorer folder and from the right-hand side look for the policy named “Remove File Explorer’s default context menu”.

Double click on the policy to open the policy settings.
Choose Enabled and click on Apply and Ok. This will disable the File explorer right-click context menu.

If you want to enable the File Explorer context menu, just follow the same steps from above and just change the policy settings to Disabled or Not Configured.
To make the immediate changes, open the command prompt and type gpupdate /force and restart the system once.
Using Registry Editor:
Open Registry Editor and navigate to the following registry path.
HKEY_CURRENT_USER\SOFTWARE\Microsoft\Windows\CurrentVersion\Policies\Explorer
From the left-hand side click on Explorer registry key, right-click on it and choose New > DWORD (32-bit) Value, and name it as NoViewContextMenu.
Double click on NoViewContextMenu DWORD and set the value data as mentioned below.
1-To Disable File Explorer Context menu
0-To Enable File Explorer Context menu

Click on Ok and Close the registry editor.
Enable/Disable Start menu context menu using Group Policy Editor:
If you right-click on the Start menu you’ll get the Windows-X active menu, this menu gives a rich launch experience into the troubleshooting tools of Windows, including Power Options, Event Viewer, System (also Win-Pause), Device Manager, Network Connections, Disk Management, Computer Management, and Command Prompts. For security purposes, if you want to disable this start menu context menu then follow the steps below.
Open the Group Policy editor console and navigate to the following path.
User Configuration > Administrative Templates > Start Menu and Taskbar
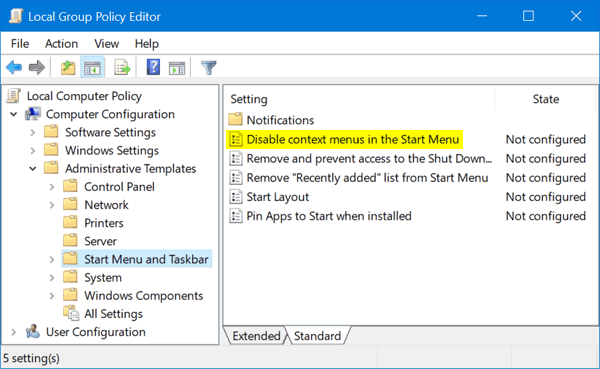
From the left-hand side click on Start Menu and Taskbar folder and from the right-hand side look for the policy named “Disable context menus in the Start Menu”.

Double click on the policy and open the policy settings.
Choose Enabled and click on Apply and OK. This will disable the start menu context menu.

If you want to enable it back, just follow the same steps above and open policy settings and choose Disabled or Not-Configured.
Using Registry Editor:
Open the Registry Editor console and navigate to the following registry path.
HKEY_CURRENT_USER\SOFTWARE\Microsoft\Windows\CurrentVersion\Policies\Explorer
From the left-hand side click on Explorer, right-click on the Explorer registry key and choose New > DWORD (32-bit) Value.
Name the DWORD as DisableContextMenusInStart.
Double click on DisableContextMenusInStart DWORD and set the value as mentioned below.
1-To Disable Start Menu Context menu
0-To Enable Start Menu Context menu

Click on Ok and close the registry editor.
Read Also:
How to Enable Classic context menu using Registry in Windows 11?
How to Restore Classic Windows 10 start menu in Windows 11?
Post Views: 2,619
November 28, 2022 updated by
Leave a reply »
Is it possible to disable context menu in the Start Menu in Windows 10? How can I stop users from right clicking on the Start Menu and making changes? In this tutorial we’ll show you 2 simple ways to remove the ability to right click on the Start Menu in Windows 11 / 10.
Method 1: Disable Right Clicking on Start Menu Using Group Policy
- Press the Windows key and R at the same time to invoke a Run command. Type gpedit.msc and press Enter.
- In the left pane of Local Group Policy Editor, navigate to Computer Configuration -> Administrative Templates -> Start Menu and Taskbar. Double-click the “Disable context menus in the Start Menu” policy in the right pane.

- Select Enabled and click OK.

Now, when you right-click on the apps in the Start Menu, the context menu will not show up any longer.
Method 2: Disable Right Clicking on Start Menu Using Registry Editor
- Press the Windows key and R at the same time to invoke a Run command. Type regedit and press Enter.
- In the Registry Editor window, navigate to the following key:
HKEY_LOCAL_MACHINE\SOFTWARE\Policies\Microsoft\Windows\ExplorerIf you do not have the “Explorer” subkey, then just create it. - Create a new 32-bit DWORD value DisableContextMenusInStart, and set it to 1 to disable the context menu in the Start Menu.

- Close Registry Editor and reboot for the changes to take effect.
- Previous Post: How to Disable Changing Geographic Location in Windows 10
- Next Post: Disable Right-Click Context Menu on Taskbar in Windows 11 / 10 / 8 / 7