
As developers, we pretty much live in “Developer Mode.” It is now possible to put Windows 10 in Developer Mode to improve testing Windows Store applications and improve the overall developer user experience of Windows 10.
Developers like to build things and solve problems, and developer-focused solutions give us better access to the tools and environments we need to get the job done. Today, we’ll take a look at Windows 10 Developer Mode, including some helpful tips.
Developer Mode was released as part of the Windows 10 “Anniversary Edition.” It provides developers some additional tools to test Windows Store applications. It also provides some additional user experience optimizations within certain common Windows features.
Developer Mode enables additional testing and debugging tools:
- Installing and debugging non-certified Windows Store applications
- Device Portal
- Device Discovery
It also provides user experience optimizations for the following Windows 10 tools:
- Windows Explorer
- Remote Desktop
- PowerShell
When it was first released, the Ubuntu Shell required Windows 10 Developer Mode. That has since changed! You can now install it directly from the Windows Store.
NOTE: Windows 10 Developer Mode is not required for the Linux bash shell!
Multiple Linux distributions are now supported:
- Ubuntu
- OpenSUSE
- SLES
Via the bash shell, you can use core Linux command-line utilities on Windows. This is useful for developers who want to use common Linux based toolchains for programming languages like Ruby, Python, and others. You can also use it to run and test .NET Core 2.0 applications that you plan to deploy to Linux servers.
Learn more about the Windows Subsystem for Linux on MSDN.
How to Enable Windows 10 Developer Mode
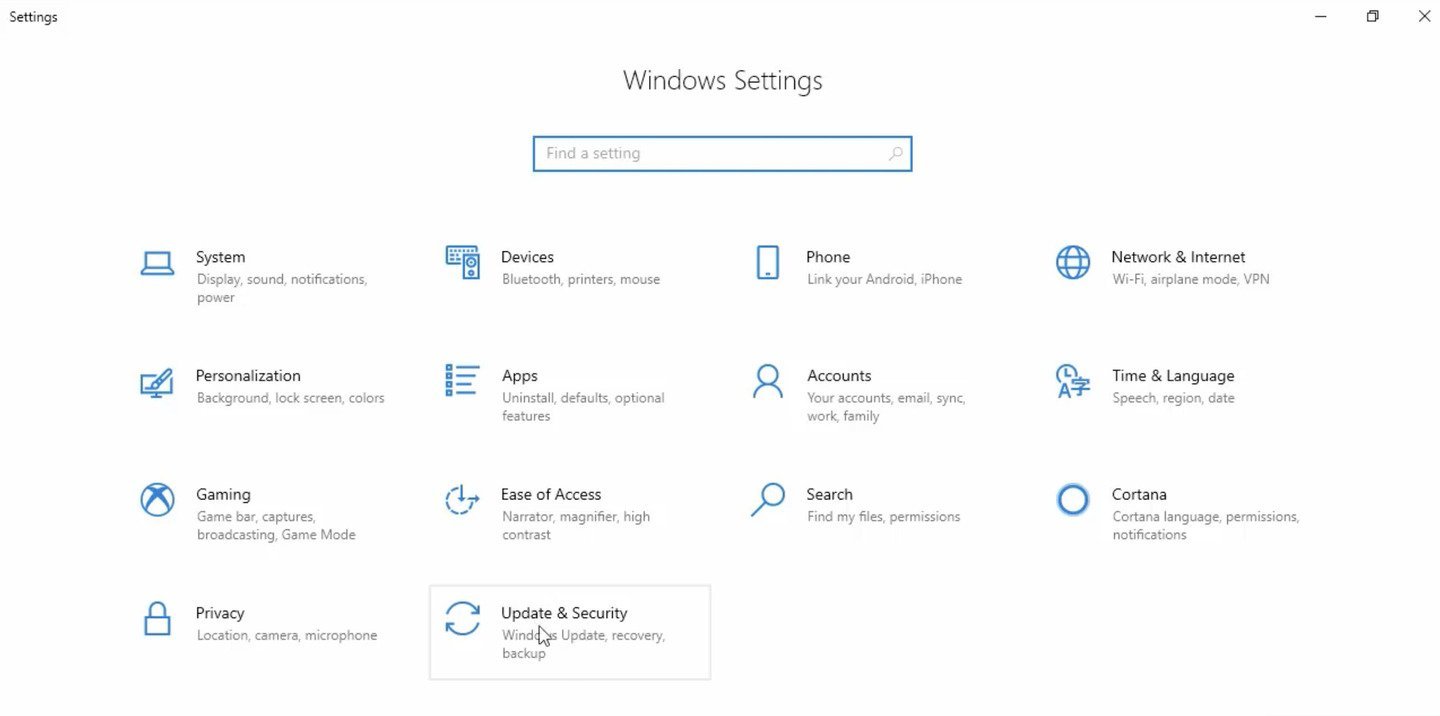
Go to “Settings” in Windows 10 and select “Update & Security.”
Windows 10 Developer Mode is also available for non-desktop devices that are running Windows 10. This includes IoT, Hololens, Xbox, Mobile and other device types.
Introducing the Windows Device Portal
The Windows Device Portal allows Windows 10 devices to be remotely managed over a network or USB connection. It provides advanced diagnostics and real-time performance data. This is useful for testing your applications on a remote Windows 10 device like an Xbox, Hololens, or another Windows 10 desktop.
Note: If you are a web developer, you will probably never use the Device Portal.
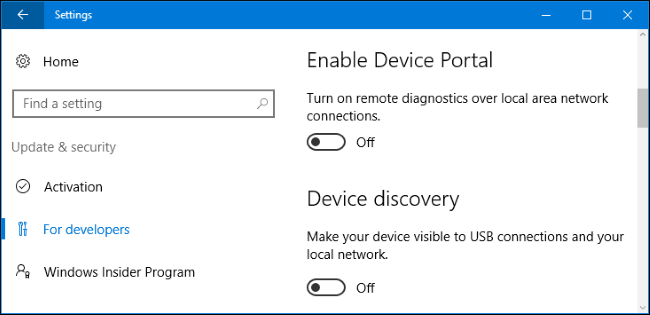
The system automatically installs Windows Device Portal when Developer Mode is enabled. However, we still need to switch on “Enable Device Portal” in the For Developers pane. Once that’s done, the software is set up, and firewall rules are configured to permit inbound connections and remote app installation.
Since Device Portal is a local web server, it allows us to interface other devices on a local network. Device Portal also lets users side load apps without the need for any physical connection.
To learn more about the Device Portal, check out the Microsoft docs.
Testing Windows Store Applications
Developer Mode is important for developers of Windows Store applications. It enables you to debug them with Visual Studio 2017. It enables you to “sideload” UWP applications. This is important for installing applications outside of the Windows Store. This also replaces the need for a “developers license” on Windows 8.1.
You may also want to use the Device Portal to test deploying your app to another Windows 10 machine for testing. Developer Model enables a Device Discovery mode and SSH to help with this process.
Windows Store developers need to test their applications on multiple devices much like a mobile developer would. Including tablets, laptops, and 2-in-1 devices. But they may also want to test their UWP applications on Hololens, Xbox and other devices.
Learn more: Deploying and debugging UWP apps and Run Windows Store apps on a remote machine
Windows 10 User Experience Changes
Once Developer Mode is enabled, several other settings are displayed on the “For developers” settings screen. Including settings for Windows Explorer, Remote Desktop, and PowerShell.
Many of the changes are settings that already exist throughout Windows 10. Developer Mode just sets some smart developer-friendly defaults and makes all of the settings available in a single place.
Windows Explorer
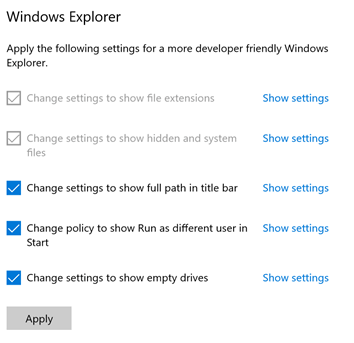
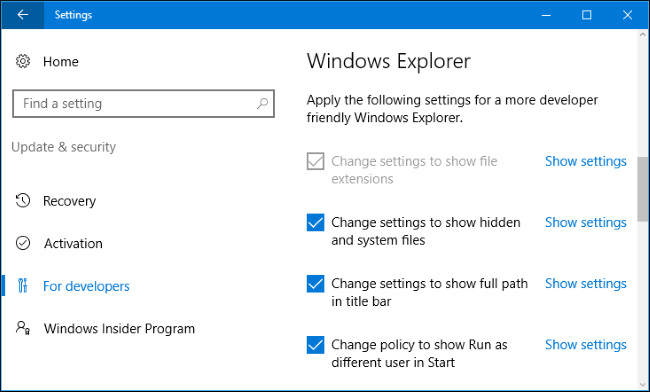
One thing that has always annoyed me is that Windows hides file extensions by default. It has always been a setting and one that I immediately changed on any new PC. Developer Mode includes this little setting by default. Yay!
Here is a screenshot showing the settings:
Remote Desktop
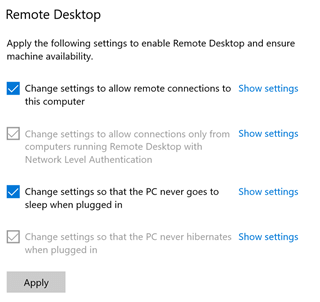
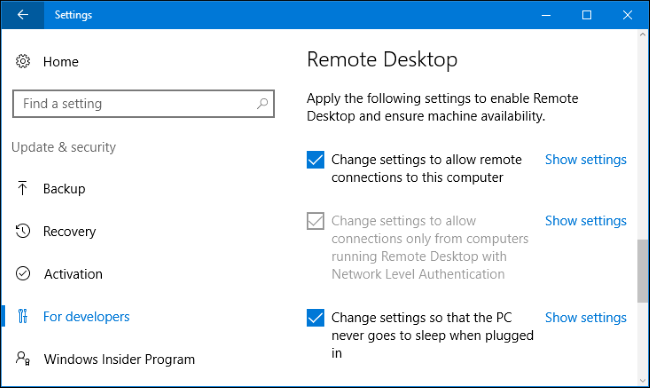
The additional settings make it easy to allow remote connections to your PC. This is really helpful if you are connecting to your PC from home or remotely within your office.
PowerShell
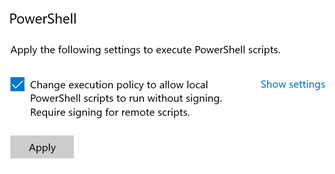
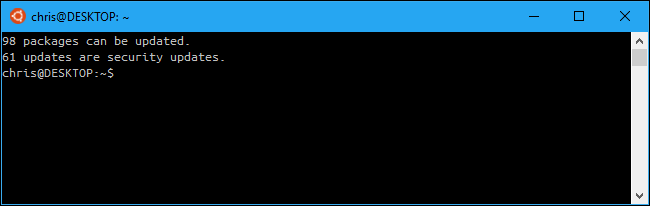
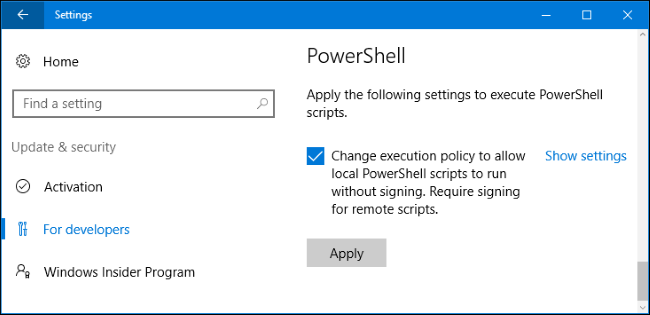
The only PowerShell setting is an important one. If you ever run any PowerShell commands, you typically have to change the execution policy so that you can run your scripts. Developer Mode defaults that setting change.
Fewer Symbolic Links Restrictions
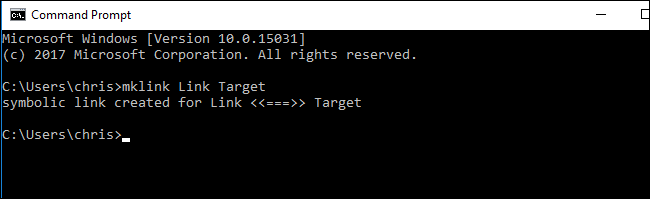
Normally, only an administrator can create symbolic links. Developer Mode lowers the restrictions so that any users can create symbolic links with the mklink command.
A lot of corporations don’t allow developers to be administrators on their machine. This is a nice addition for a commonly used feature by developers.
Consider Using Insider Builds
Although not directly related to Windows 10 Developer Mode, I think it is important to mention Windows Insider Builds. The Windows Insider Program allows developers to test upcoming versions of Windows.
This is very useful for developers who need to test things on the bleeding edge. This could be things like upcoming changes Universal Windows Platform (UWP) or Windows Store applications.
The insider program also provides Microsoft a great way to get additional beta testers of Windows within the larger ecosystem.
Things I Wish Developer Mode Did
As an ASP.NET developer, one thing I almost immediately do on every PC is install IIS. I do realize that I can use IIS Express for most things. I still prefer to use full blown IIS for some things.
I’d like to see the “For developers” screen include easy access to some optional Windows features like Telnet, IIS, Hyper-V, and others that are very developer centric and common.
It would also be nice if you could easily install other Microsoft developer tools from this same area. Including Visual Studio, Visual Studio Code, Microsoft SQL Server Management Studio, and other tools.
Summary
Windows 10 Developers Mode includes a lot of little features for developers. For now, it seems like most of which are critical for Windows Store/UWP related applications. As an ASP.NET developer, it isn’t very critical to me. Although, I do like some of the common default settings and having them all at one central location.
I look forward to seeing additional improvements to the developer experience over time. In the meantime, the most important things to install on your new Windows 10 PC are Visual Studio, Stackify Prefix, and Chocolately. Those are must haves for any developer!
Quick Links
-
How to Enable Developer Mode
-
Sideload Unsigned Apps (and Debug Them in Visual Studio)
-
Bash on Ubuntu on Windows 10
-
Easier Access to Settings Developers Want
-
Device Portal and Device Discovery
-
Fewer Symbolic Link Restrictions
If you dig through Windows 10’s settings, you may come across something called «Developer Mode». When put into Developer Mode, Windows allows you to more easily test apps you’re developing, use the Ubuntu Bash shell environment, change a variety of developer-focused settings, and do other such things.
How to Enable Developer Mode
This setting is available in the Settings app. To access it, head to Settings > Update & Security > For Developers and select «Developer mode».
Your Windows 10 PC will be put into Developer Mode. This works on all editions of Windows 10, including Windows 10 Home.

Sideload Unsigned Apps (and Debug Them in Visual Studio)
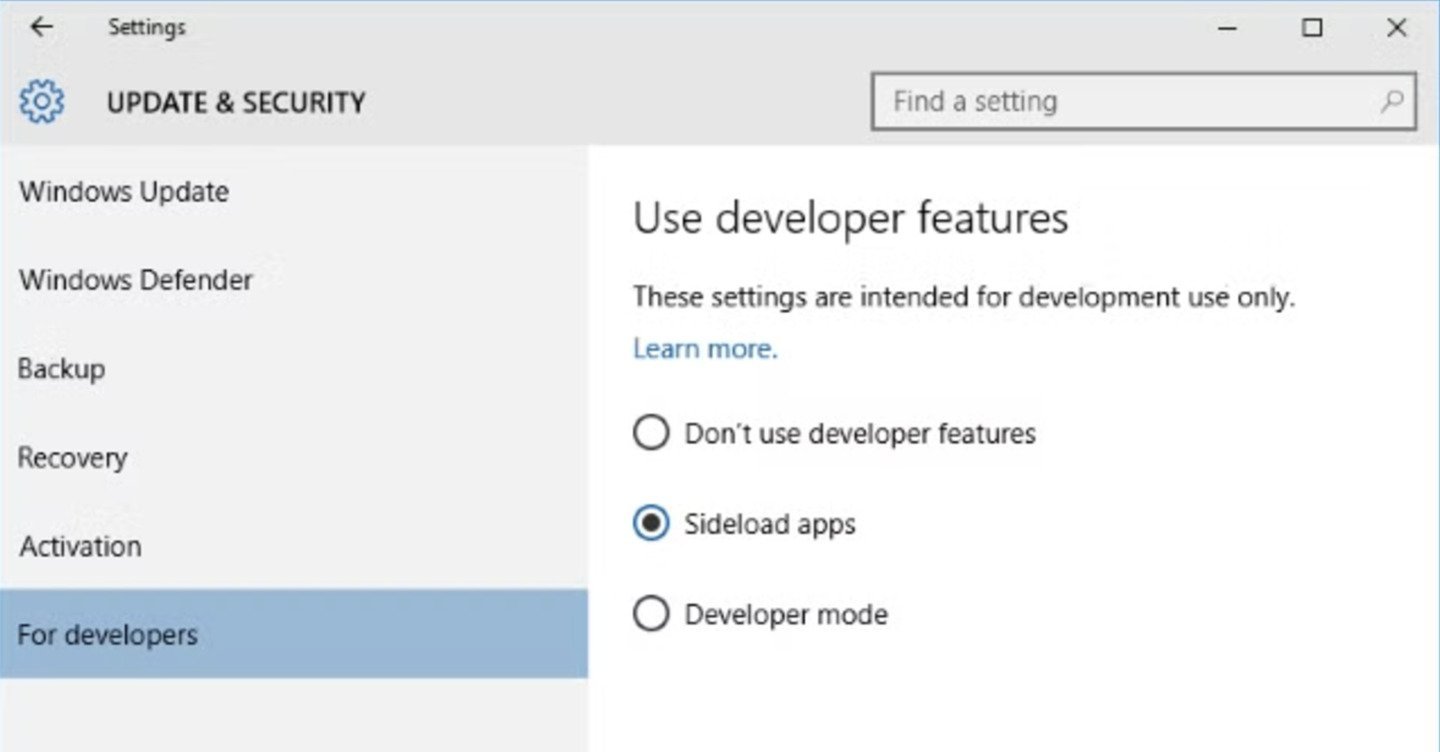
This option is located below «Windows Store apps» and «Sideload apps». Select «Windows Store apps» and Windows will only allow you to install UWP apps from the Windows Store. Select «Sideload apps», the default setting, and Windows will also allow you to install apps from outside the Windows Store, as long as they’re signed with a valid certificate.
But if you select «Developer mode», you can install UWP apps from outside of the Windows Store, even if they’re not signed. This is a crucial option for UWP app developers, who will want to test their apps on their own PCs while developing them. This option replaces the need for a «developer license» on Windows 8.1.
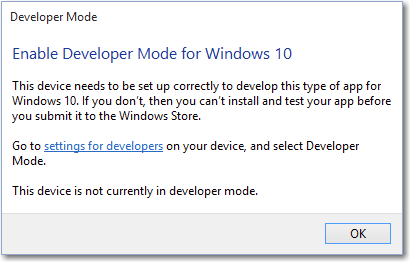
Developer Mode also allows you to debug UWP apps in Visual Studio. In fact, if you open a UWP application project in Visual Studio without Developer Mode enabled, you’ll see an «Enable Developer Mode for Windows 10» prompt message that instructs you to enable Developer Mode. You’ll then be able to run an app in debug mode directly from Visual Studio, testing it on your PC before uploading it to the Windows Store.
Bash on Ubuntu on Windows 10
If you want to use Ubuntu’s Bash shell on Windows 10, you must first put your device into «Developer Mode». Only once your device is in developer mode can you enable the «Windows Subsystem for Linux» and install the Ubuntu environment in Bash.
If you disable Developer Mode, the Windows Subsystem for Linux will be disabled as well, preventing access to the Ubuntu Bash shell.
Update: Starting with the Fall Creators Update, the Windows Subsystem for Linux is now a stable feature. You no longer have to enable Developer Mode to use Linux software on Windows.
Easier Access to Settings Developers Want
The «For Developers» pane allows you to quickly change a variety of system settings to be more developer-friendly. Some of these settings are available in Windows in other areas, but they’re scattered all over. This way, developers can access them all in one place.
For File Explorer, Developer Mode can show file extensions, empty drives, hidden files, and system files, which are all normally hidden. It can also display the full path to a directory in the file manager’s title bar and enable easier access to the «Run as a different user» option.
For Remote Desktop, Developer Mode can tweak various settings to ensure your PC is always accessible to Remote Desktop connections. It can change Windows Firewall settings to allow remote desktop connections to your computer and allow connections only from computers running Remote Desktop with Network Level Authentication.
It can also adjust your power settings to ensure the PC will never sleep or hibernate if it’s plugged in, ensuring it will remain accessible to Remote Desktop connections.
For PowerShell, Developer Mode can change the execution policy to allow your PC to run local PowerShell scripts that aren’t signed. Your PC still won’t run unsigned remote scripts.
Device Portal and Device Discovery
When you enable Developer Mode, your Windows 10 system automatically installs Windows Device Portal. However, Device Portal is never actually enabled until you set «Enable Device Portal» to «On» in the For Developers pane.
If you do enable Device Portal, the software is turned on and firewall rules are configured to allow incoming connections.
Device Portal is a local web server that makes a web interface available to other devices on your local network. You can use the web-based portal to configure and manage the device, as well as use a variety of features designed for developing and debugging apps. Device Discovery allows you to pair a device with Device Portal by entering a code.
For example, you could use Device Portal to remotely access a HoloLens while developing Windows holographic applications. Consult Microsoft’s Windows Device Portal documentation for more details about using Device Portal and Device Discovery.
Fewer Symbolic Link Restrictions
In Windows 10’s Creators Update, putting your device into developer mode relaxes restrictions on creating symbolic links. Previously, it was only possible for Administrator users to create symlinks. This is still the case on Windows 10—unless you put it into Developer Mode.
In Developer Mode, a user account with any level of privileges can create symbolic links. In other words, you can open a normal Command Prompt window and use the mklink command. Outside of Developer Mode, you’d need to open a Command Prompt window as Administrator before using the mklink command.
Symbolic links are often used by developers, so this change makes it possible for development tools to create and work with symbolic links without having to run as Administrator.
The symbolic link change is a good example of what Microsoft will continue doing with Developer Mode in the future. Developer Mode is a switch you flip to tell Windows you’re a developer, and Windows can automatically adjust a variety of settings to make Windows work better for you.
«Режим разработчика» в Windows 10 — особая конфигурация операционной системы, предназначенная для авторов программного обеспечения. Она упрощает создание, тестирование и установку приложений, не требующих публикации в Microsoft Store. В этом гайде мы расскажем о том, как активировать режим разработчика разными способами.
Для чего нужен «Режим разработчика»?
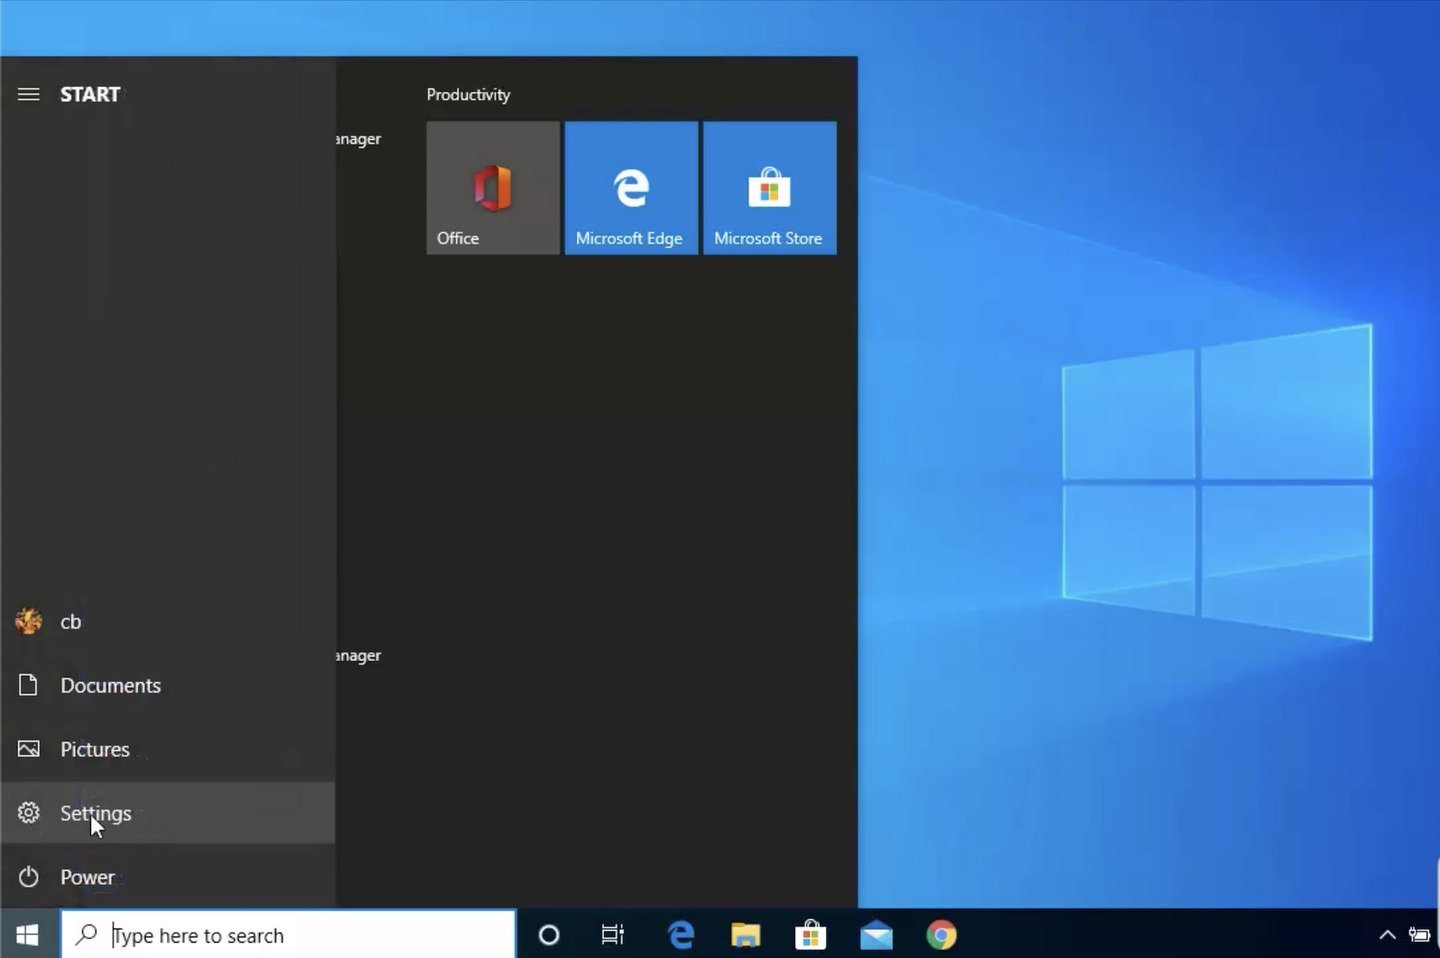
Источник: YouTube-канал ThioJoe / Интерфейс Windows 10
В первую очередь «Режим разработчика» будет полезен программистам и создателям софта. Он позволяет устанавливать приложение, минуя официальный магазин Microsoft Store, что упрощает отладку ПО.
Также он открывает доступ к инструментам разработки — например, к функции PowerShell. Она объединяет в себе возможности командной строки, языка сценариев и среды для управления системами.
Кроме того, «Режим разработчика» позволяет активировать дополнительные функции вроде Windows Subsystem for Linux. С ее помощью можно запускать полноценные дистрибутивы Linux без использования виртуальной машины.
Через меню «Параметры»
Самый простой способ. Для активации «Режима разработчика» выполните следующие шаги:
- Нажмите Win + I для открытия окна «Параметры» (Settings) или перейдите в меню «Пуск»;
- Выберите раздел «Обновление и безопасность» (Update & Security).
Источник: YouTube-канал Jake Gardner / Интерфейс Windows 10
- Слева внизу найдите вкладку «Для разработчиков» (For developers);
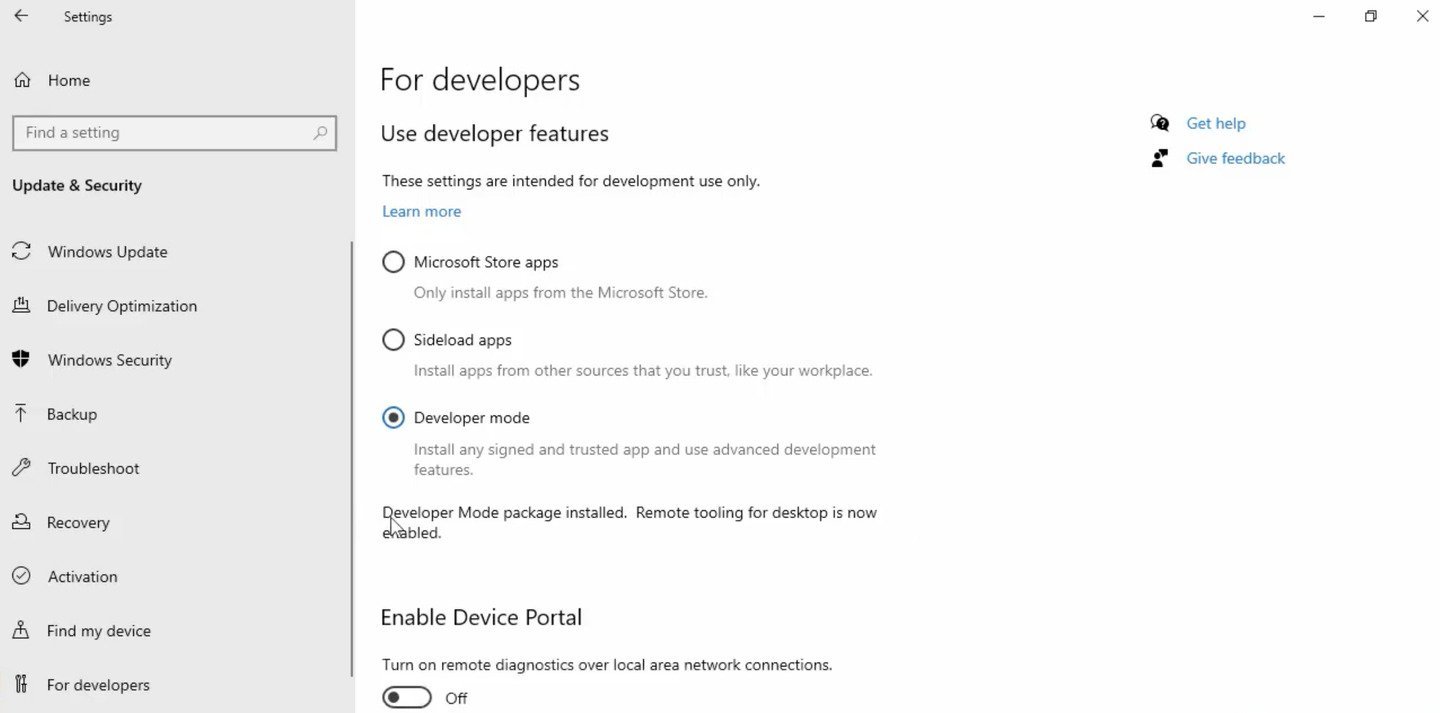
- В появившемся окне выберите «Режим разработчика» (Developer mode).

Источник: YouTube-канал Jake Gardner / Интерфейс Windows 10
- Подтвердите активацию, когда во всплывающем окне появится запрос «Использовать возможности разработчика» (Use developer features);
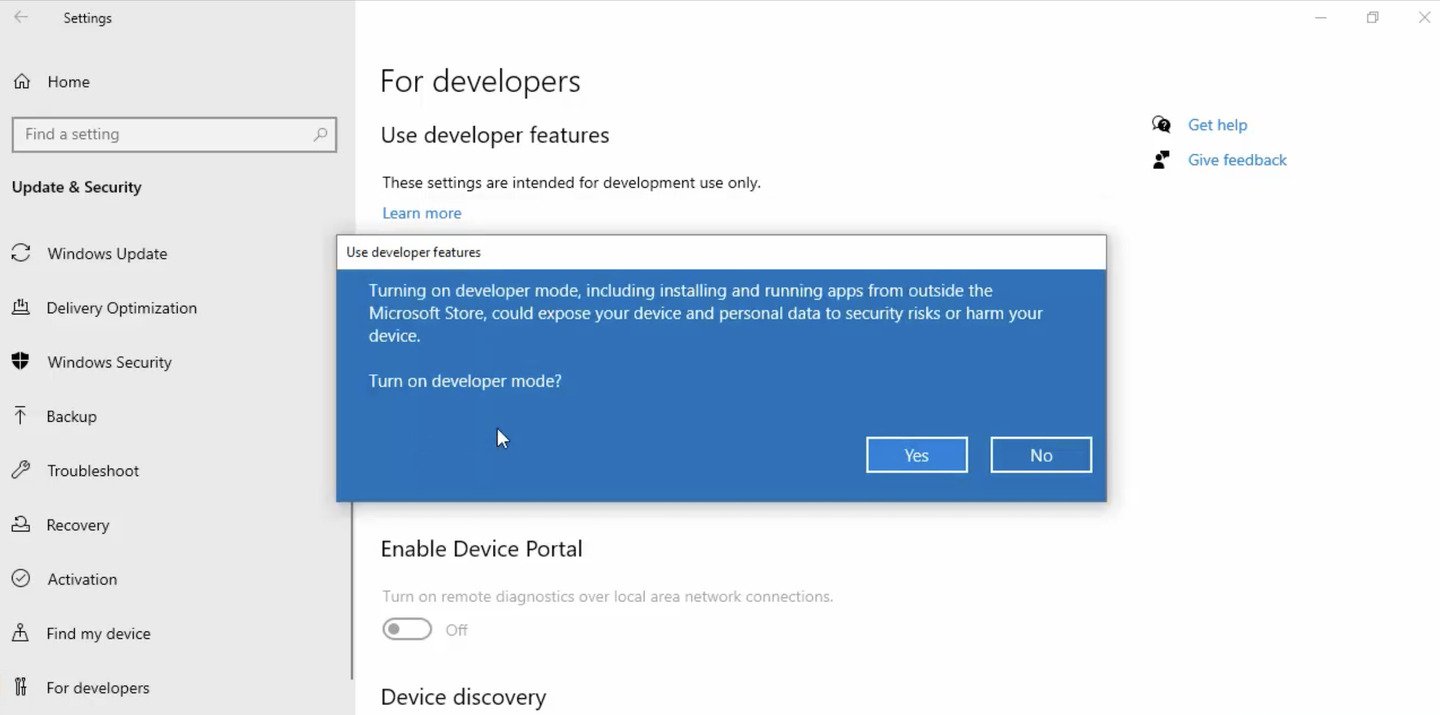
Источник: YouTube-канал Jake Gardner / Интерфейс Windows 10
- Теперь в настройках появится дополнительный параметр «Режим разработчика» (Developer mode). Активируйте его, поставив галочку напротив.
Источник: YouTube-канал Jake Gardner / Интерфейс Windows 10
Через «Редактор локальной групповой политики»
Второй способ активации «Режима разработчика» в Windows 10 — через «Редактор локальной групповой политики» (Local Group Policy Editor).
Порядок действий:
- Нажмите Win + R, чтобы открыть окно «Выполнить»;
- Введите команду gpedit.msc и нажмите Enter.
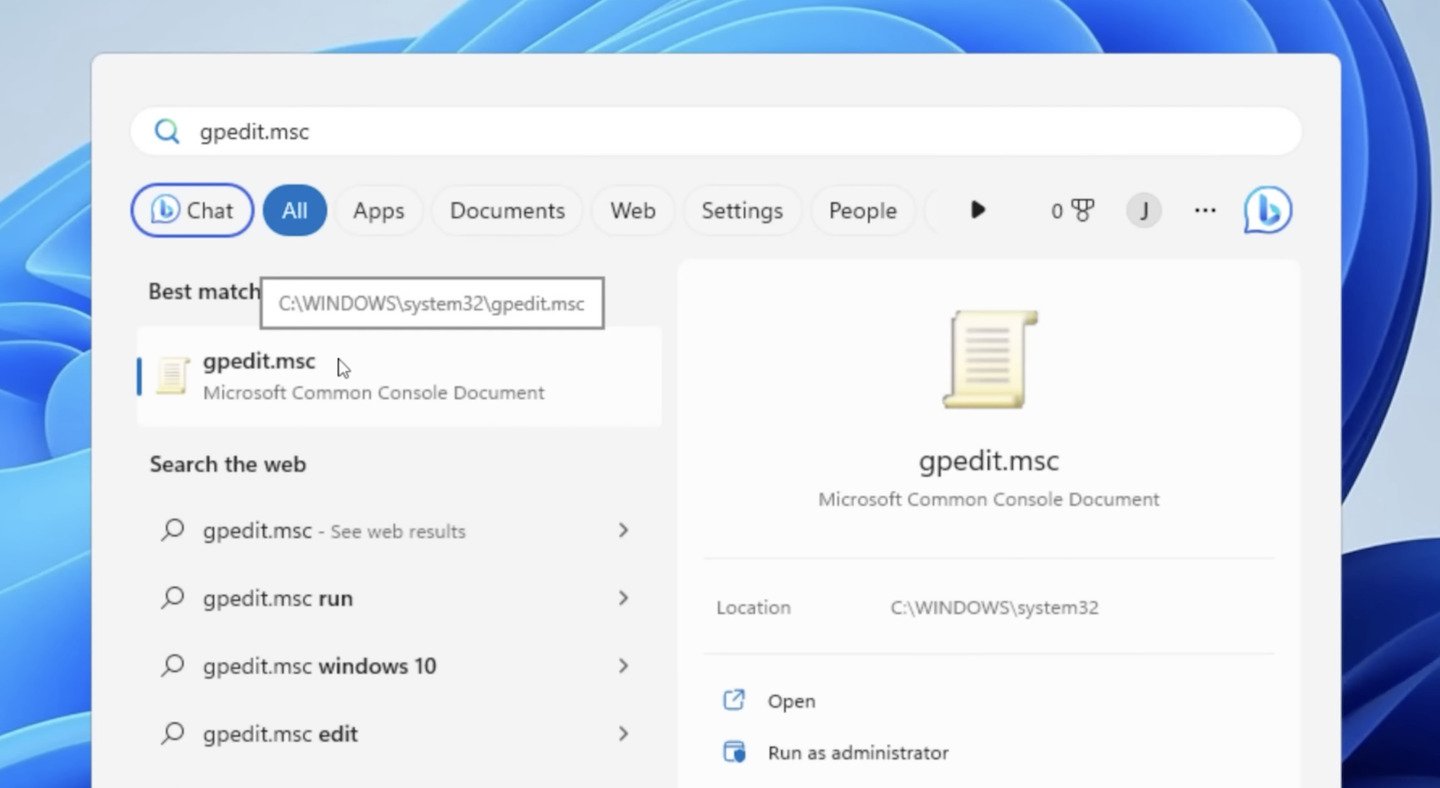
Источник: YouTube-канал QuickFix@IT / Интерфейс Windows 10
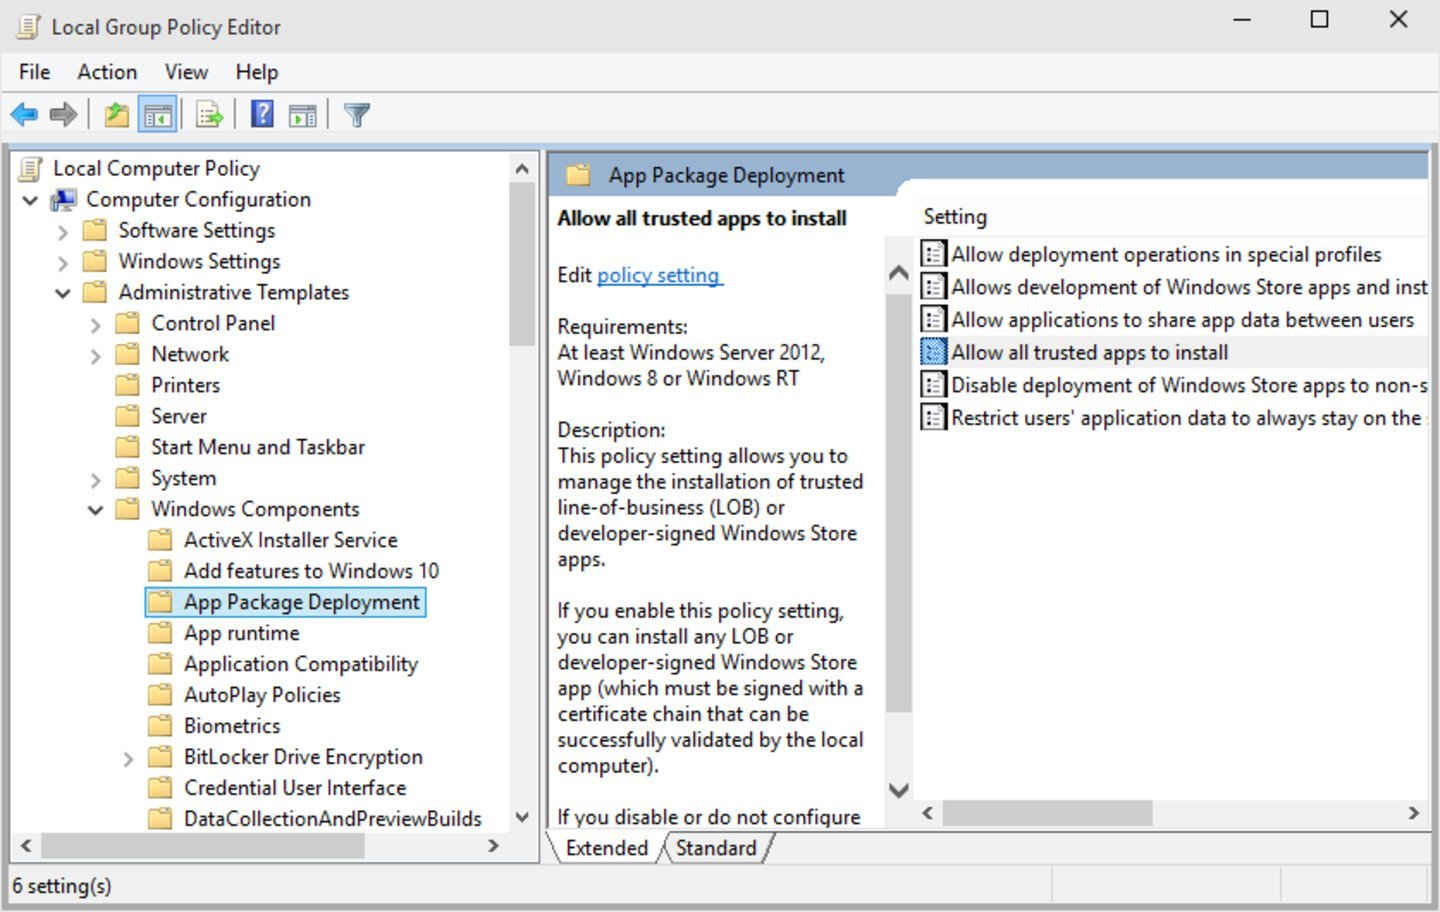
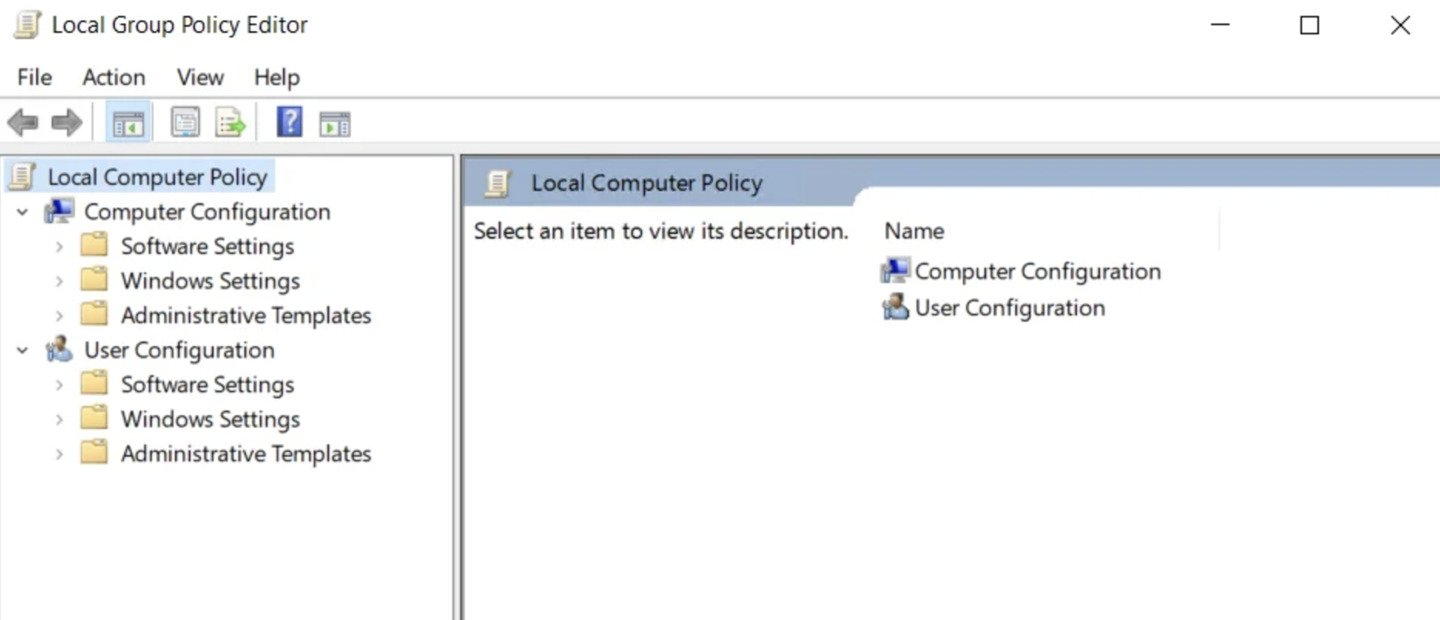
Теперь нужно выбрать раздел «Развертывание пакета приложений» (App Pachage Deployment). Для этого пройдите по пути:
- «Конфигурация компьютера» (Computer Configuration) → «Административные шаблоны» (Administrative Templates) → «Компоненты Windows» (Windows Components).
Источник: YouTube-канал QuickFix@IT / Интерфейс Windows 10
Следом необходимо активировать параметры:
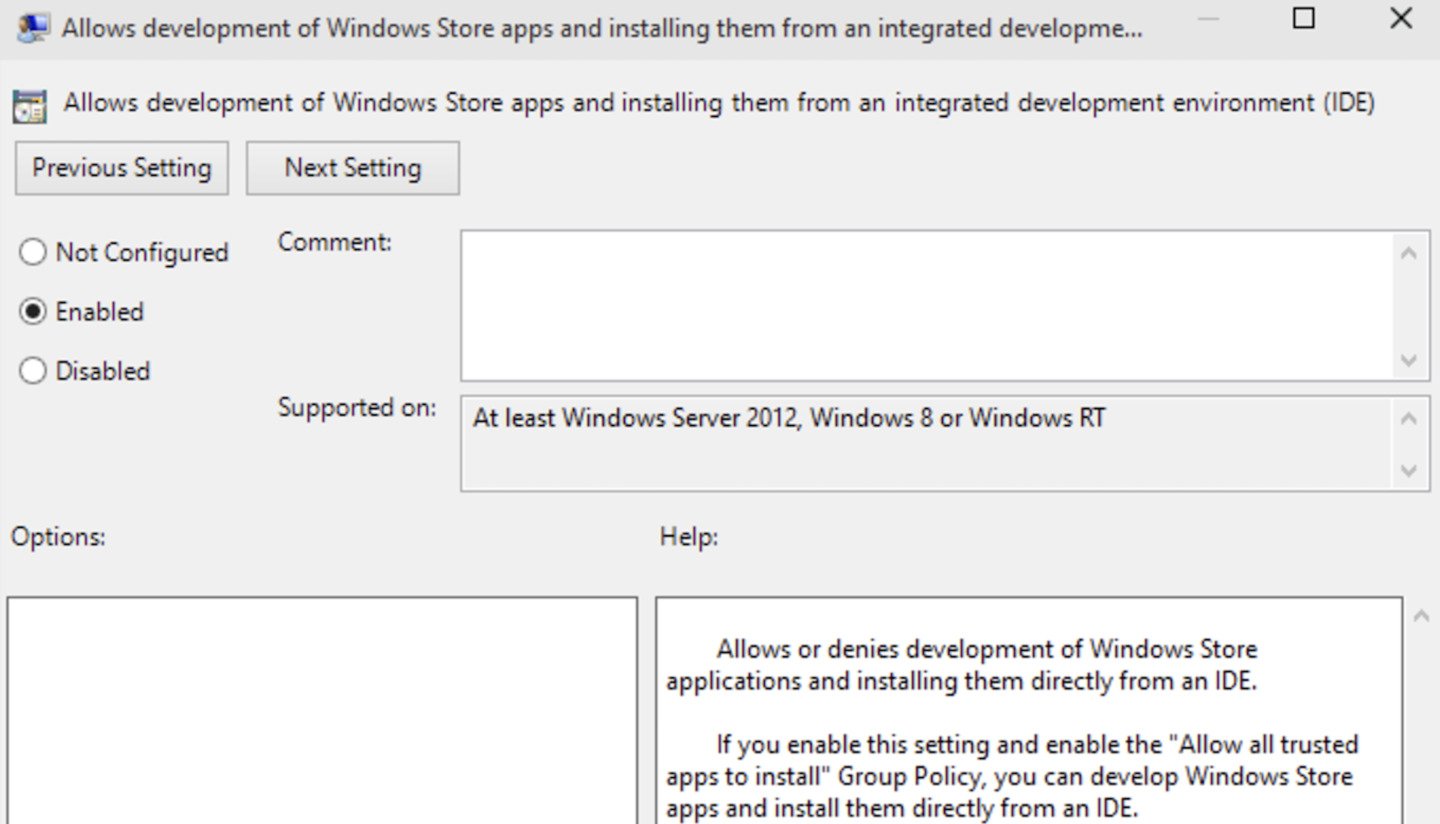
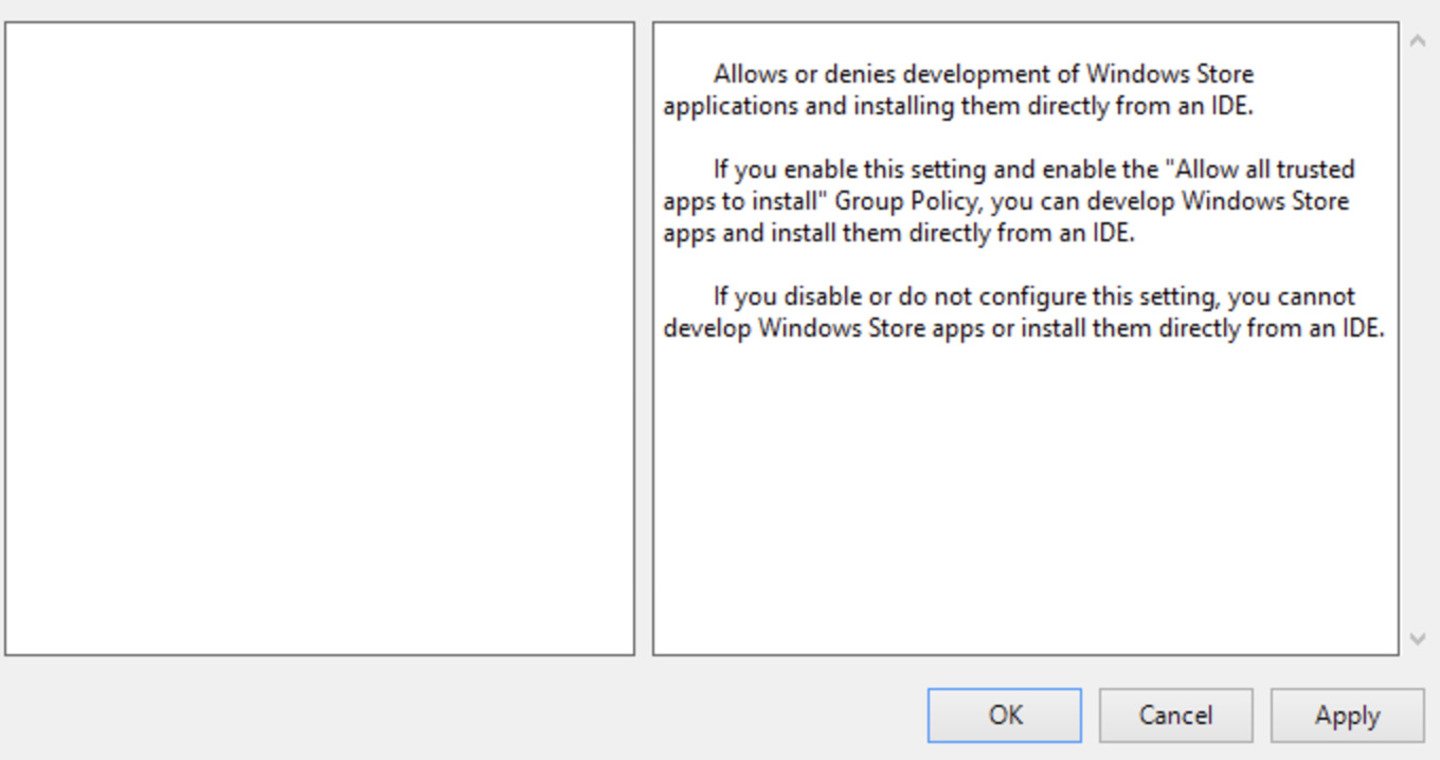
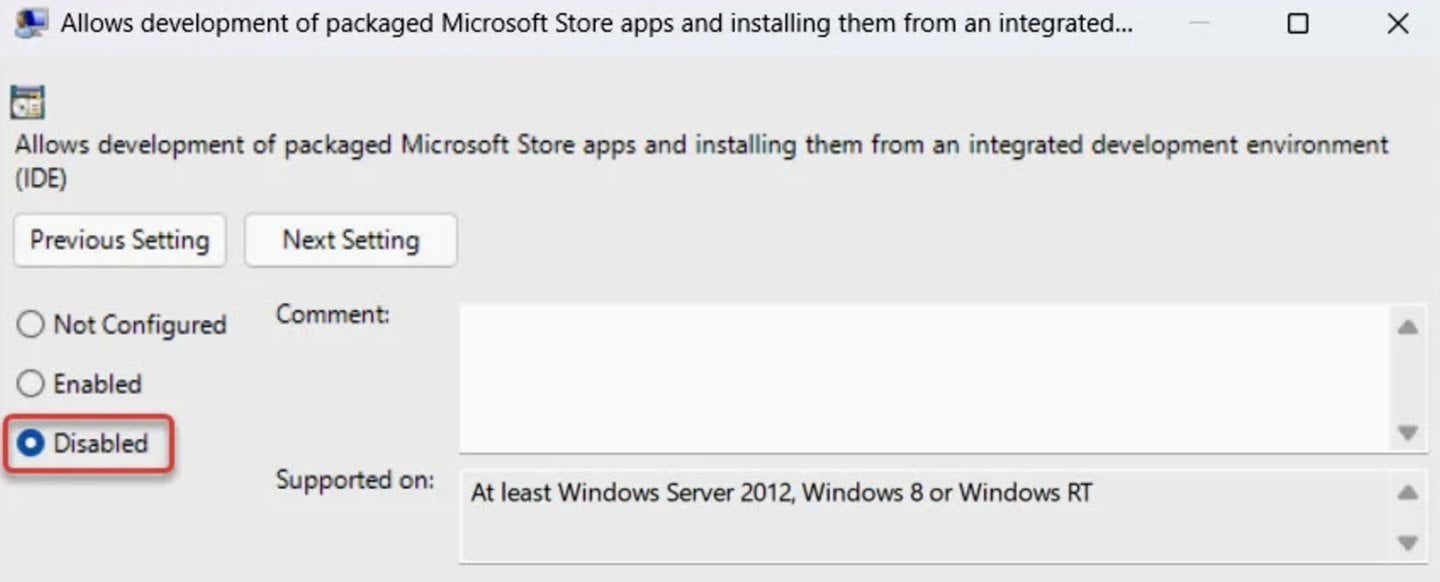
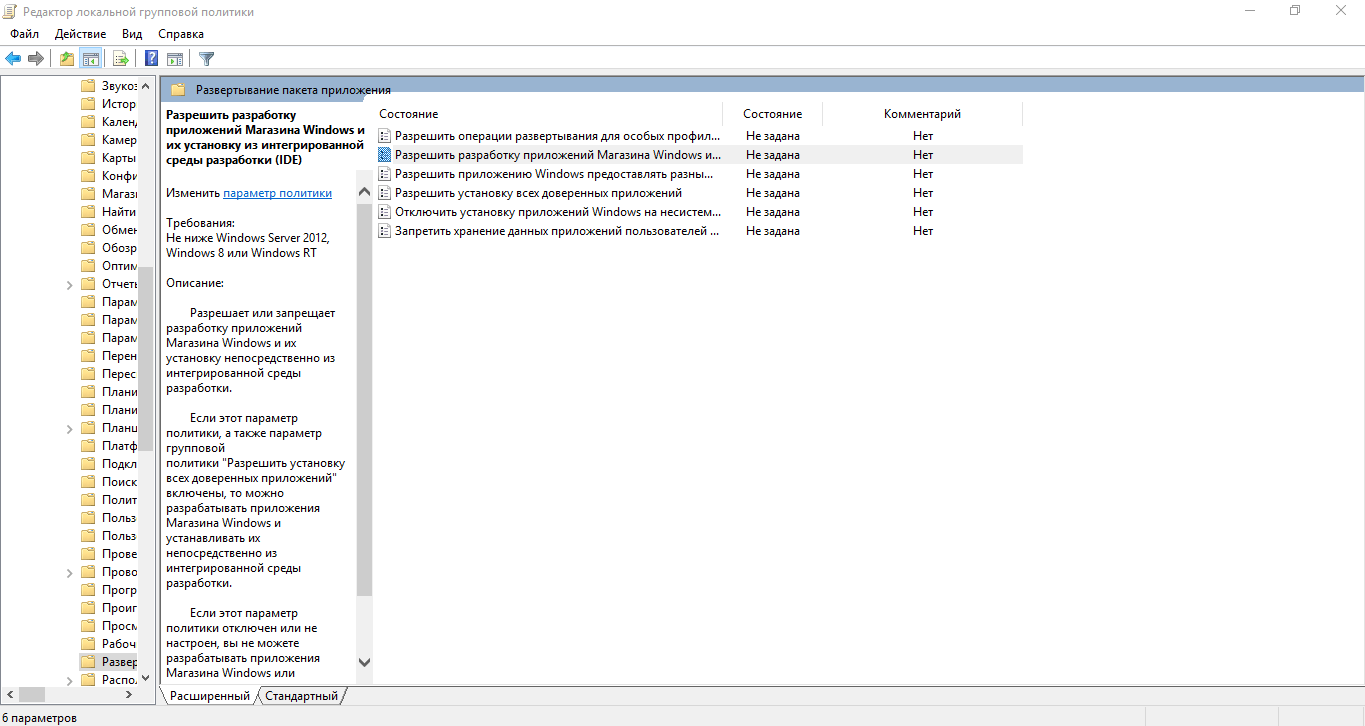
- «Разрешить разработку приложений Магазина Windows и их установку из интегрированной среды разработки» (Allow development of Windows Store apps and installing them from an integrated development environment);
- «Разрешить установку всех доверенных приложений» (Allow all trusted apps to install).
Источник: YouTube-канал Jake Gardner / Интерфейс Windows 10
- Активация производится щелчком мыши по параметру с последующей функцией «Включено» (Enable);
- Нажмите «Применить» (Apply) для обоих параметров и перезагрузите компьютер.
Источник: YouTube-канал Jake Gardner / Интерфейс Windows 10
Важно — данный способ подходит для версий Windows 10 Corporate и Professional.
Через «Редактор реестра»
Этот способ подойдет для всех версий Windows 10.
Порядок действий:
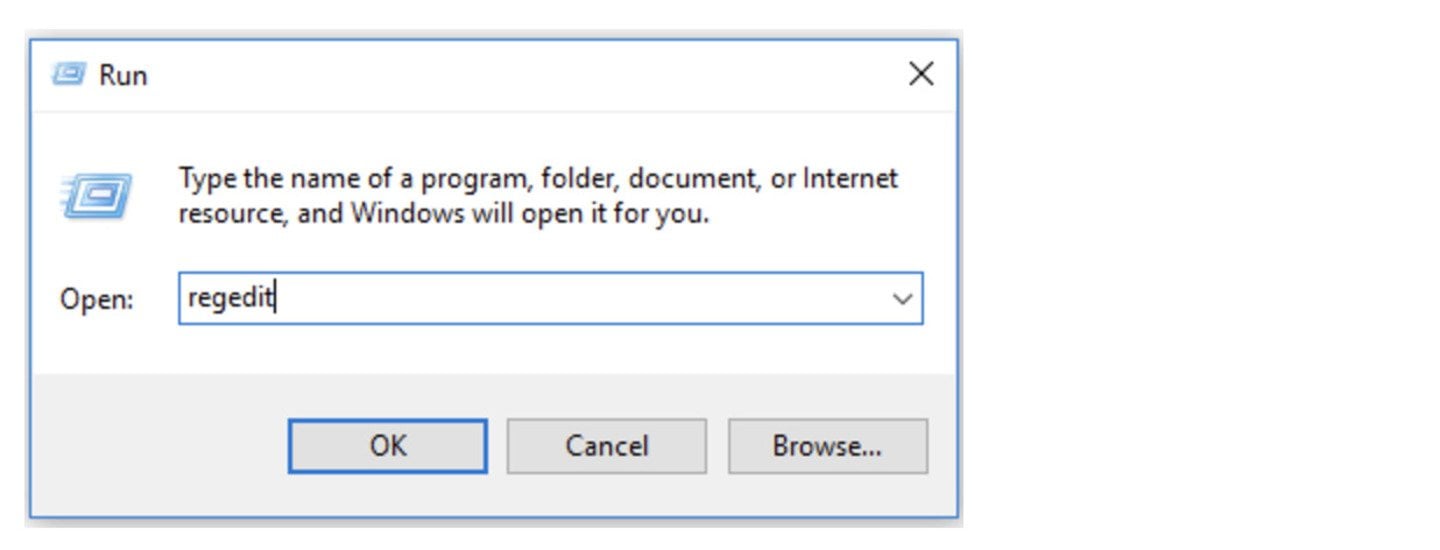
- Нажмите Win + R, чтобы открыть окно «Выполнить»;
- Введите regedit и нажмите Enter;
- Подтвердите запрос на внесение изменений.
Источник: YouTube-канал Jake Gardner / Интерфейс Windows 10
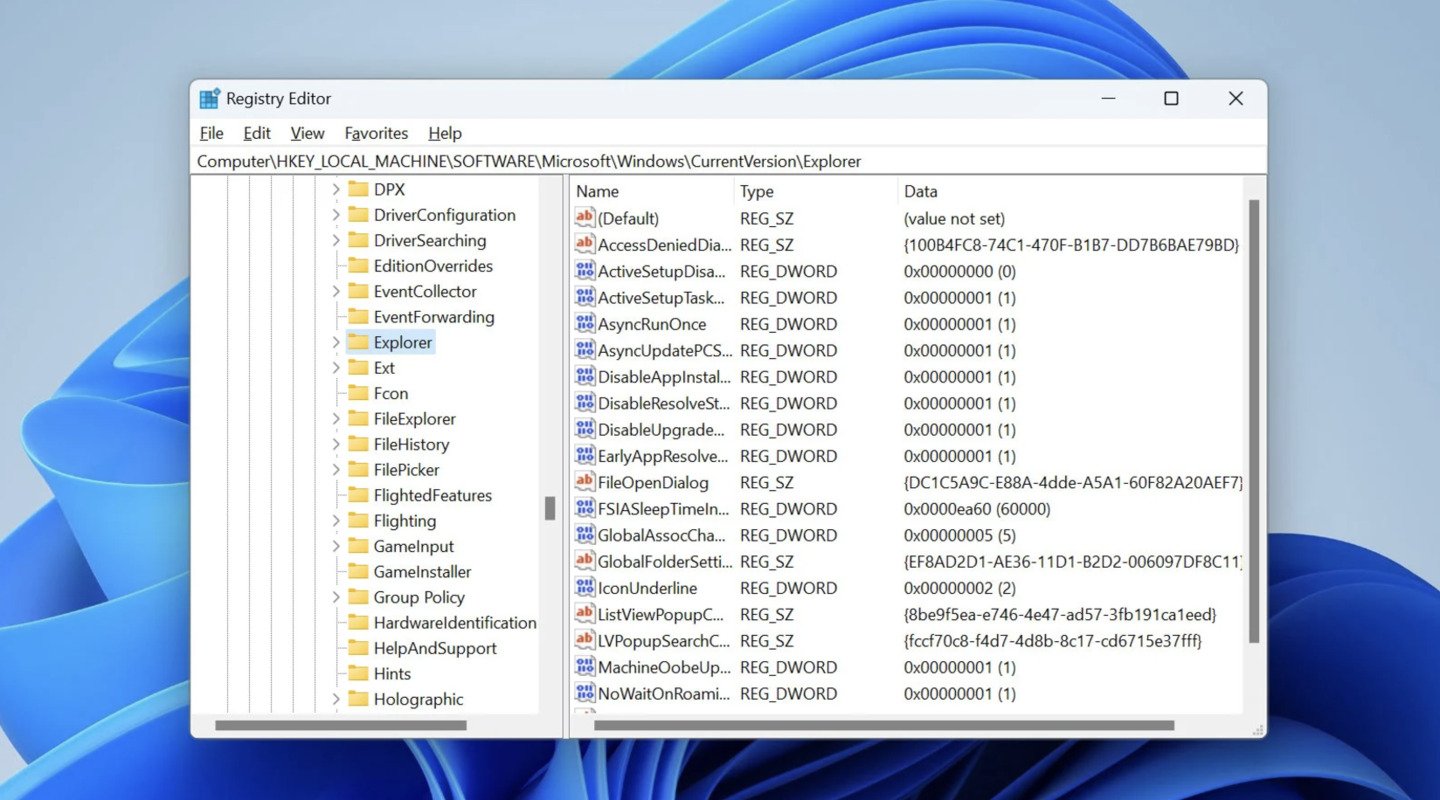
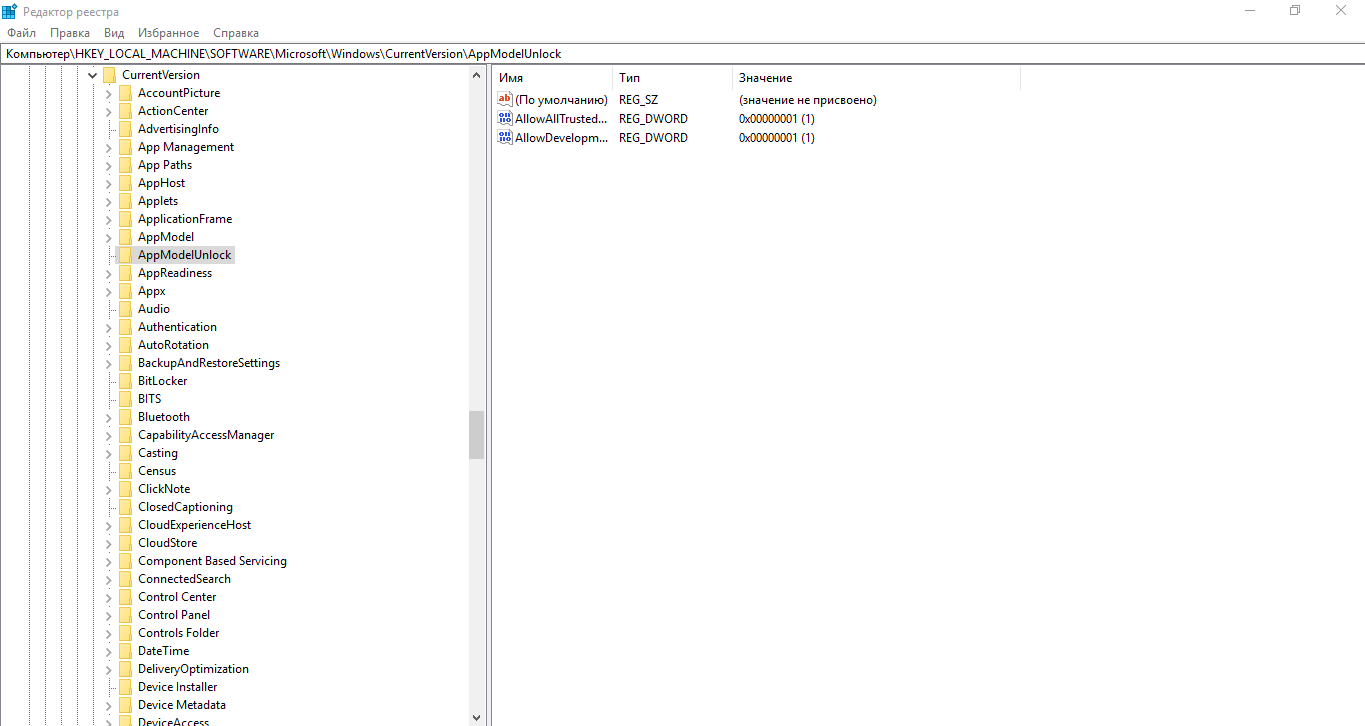
В редакторе реестра перейдите по следующему пути:
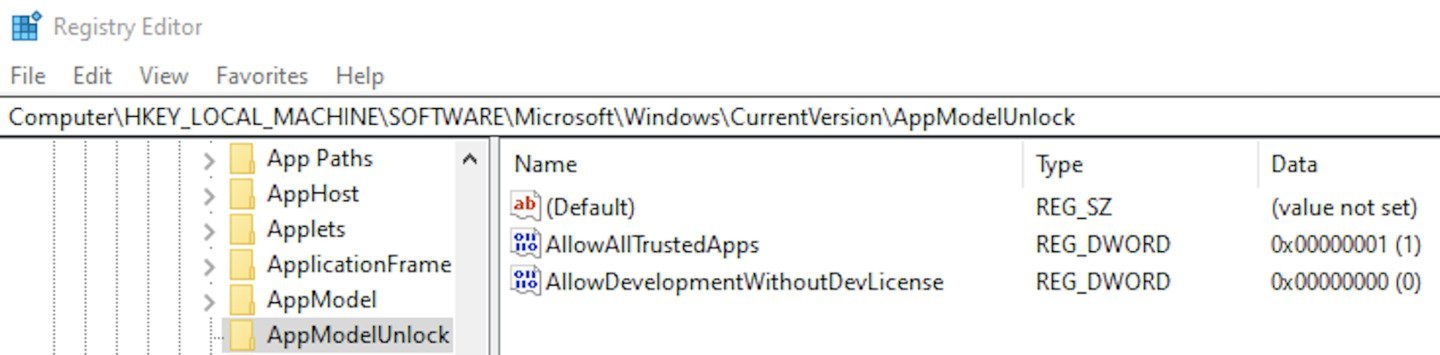
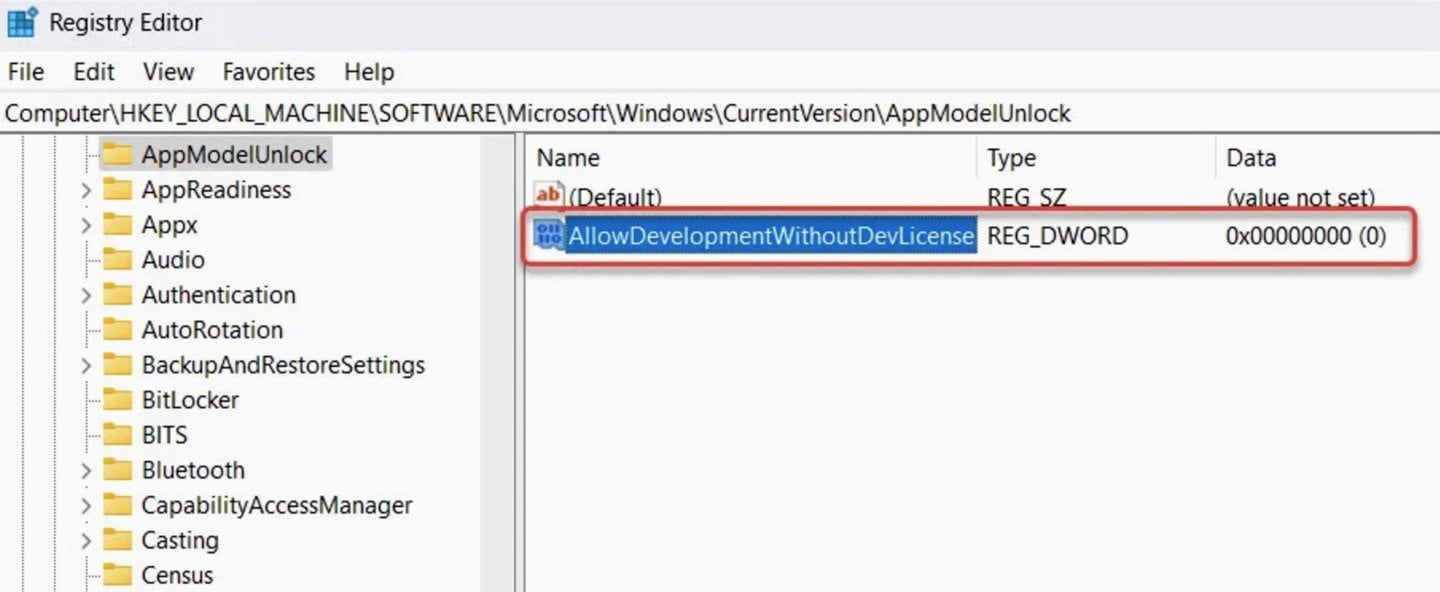
- HKEY_LOCAL_MACHINE\SOFTWARE\Microsoft\Windows\CurrentVersion\AppModelUnlock
Источник: YouTube-канал QuickFix@IT / Интерфейс Windows 10
Если раздел AppModelUnlock отсутствует, его нужно создать вручную. Для этого:
- Щелкните правой кнопкой мыши на CurrentVersion;
- Выберите «Создать раздел» (Create a new key) и назовите его «AppModelUnlock».
Источник: YouTube-канал QuickFix@IT / Интерфейс Windows 10
В разделе AppModelUnlock создайте три параметра и назовите их:
- DWORD (32-битное значение);
- AllowAllTrustedApps;
- AllowDevelopmentWithoutDevLicense.
Источник: YouTube-канал QuickFix@IT / Интерфейс Windows 10
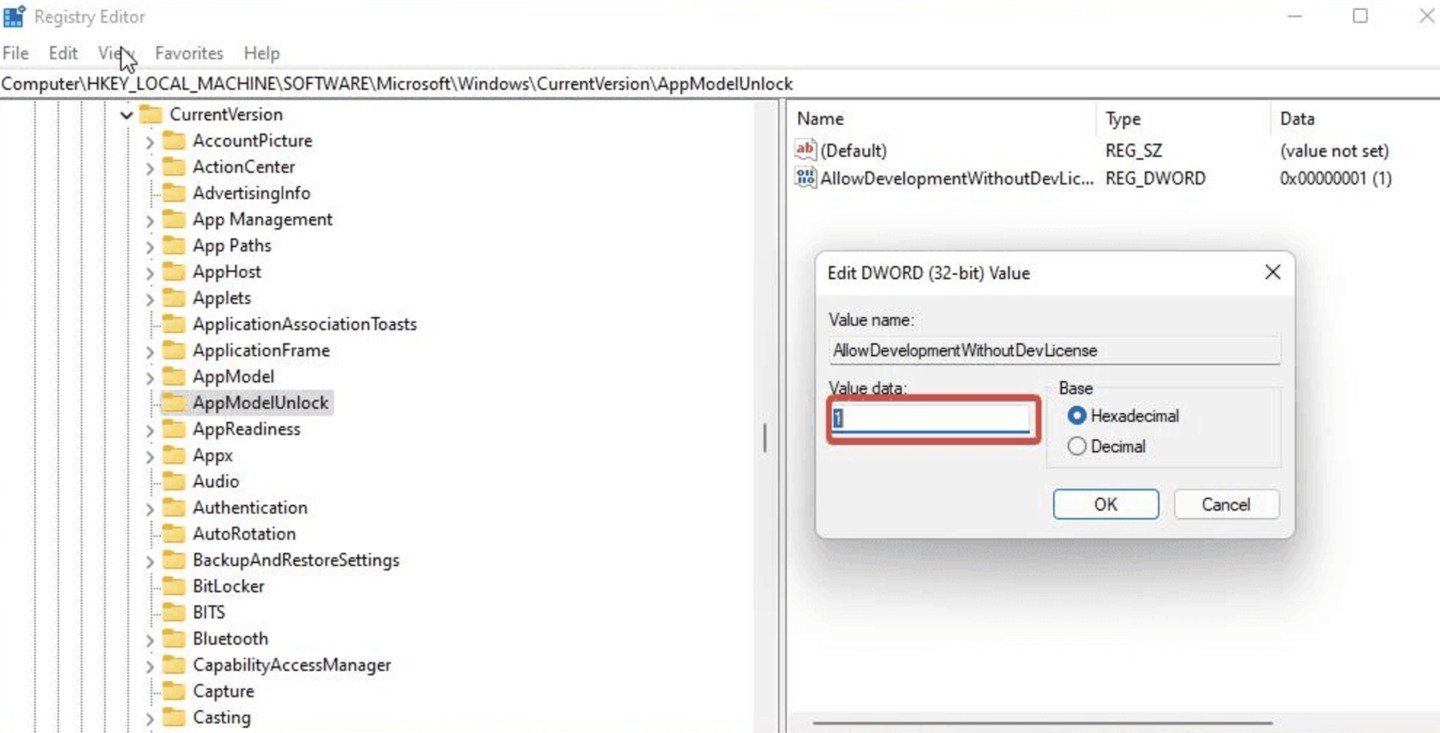
Для этого:
- Щелкните правой кнопкой мыши в правой части окна и выберите «Создать» → «Название параметра»;
- Дважды щелкните на него и установите значение «1».
Новые настройки вступят в силу после закрытия реестра и перезагрузки ПК.
Как отключить «Режим разработчика»
Отключение через «Параметры»
Чтобы отключить «Режим разработчика» в Windows 10 выполните следующие шаги:
- Откройте «Параметры» (Settings) через «Пуск» или сочетанием клавиш Win + I;
- Перейдите в раздел «Обновление и безопасность» (Update & Security).
Источник: YouTube-канал QuickHelper / Интерфейс Windows 10
- Выберите «Для разработчиков» (For developers) в левой части окна;
- Снимите галочку с пункта «Режим разработчика» (Developer mode), указав один из двух оставшихся режимов.
Источник: YouTube-канал QuickHelper / Интерфейс Windows 10
Через «Редактор групповой политики»
Для активации «Редактора локальной групповой политики» (Local Group Policy Editor) выполните следующие действия:
- Нажмите Win + R, чтобы открыть окно «Выполнить»;
- Введите команду gpedit.msc и нажмите Enter.
Источник: YouTube-канал QuickFix@IT / Интерфейс Windows 10
Следом перейдите в раздел «Развертывание пакета приложений» (п.2.2) и найдите два параметра:
- «Разрешить разработку приложений Магазина Windows и их установку из интегрированной среды разработки» (Allow development of Windows Store apps and installing them from an integrated development environment);
- «Разрешить установку всех доверенных приложений» (Allow all trusted apps to install).
Источник: YouTube-канал QuickHelper / Интерфейс Windows 10
Деактивация параметров осуществляется щелчком по параметру «Выключено» (Disable);
Через «Редактор реестра»
Необходимо открыть «Редактор реестра» и перейти к папке:
- HKEY_LOCAL_MACHINE\SOFTWARE\Microsoft\Windows\CurrentVersion\AppModelUnlock
Источник: YouTube-канал QuickFix@IT / Интерфейс Windows 10
- Теперь удалите параметр AllowDevelopmentWithoutDevLicense или измените его значение на «0»;
- Перезагрузите компьютер.
Заглавное фото: MS.Codes
Читайте также:
- Как настроить и отключить контроль учетных записей в Windows 10
- Как включить и настроить родительский контроль в Windows 10
- Как исправить ошибку 0x80070005 в Windows 10 и 11
- Как включить и настроить DLNA-сервер на Windows 10
- Windows 10 LTSB — что это такое и где скачать
If you don’t already know, Windows comes with a “Developer Mode” that allows developers to experiment and test Windows Store applications or run their own apps on the Windows platform. This feature is present in both Windows 10 and 11, but needs to be manually enabled.
If you are a regular computer user, then do not worry. You probably do not need to enable this feature, and it is probably of no use to you either. However, if you are a developer who likes to mess around with Universal Windows Platform (UWP) apps, then this article is for you.
Today we will be discussing what exactly Developer Mode is, how to enable or disable it, and what it offers.
Table of Contents
What is Developer Mode in Windows
Developer Mode is a feature in Windows that allows you to perform additional testing and debugging of the Windows Store as well as third-party applications. Furthermore, it also introduces some new tools to the Windows environment designed to help the developers with their testing.
Turning on Developer Mode also helps the user experience issues with Remote Desktop, Windows PowerShell, and File Explorer, which is otherwise restricted by default.
Developer Mode was first introduced in Windows 10 in 2016 and has since made its way to all the following Windows versions. When enabled, it offers the following additional tools for the developers to use:
- Installing and debugging uncertified Windows Store applications.
- Device Portal
- Device Discovery
Not only that, this mode improves the following Windows tools for an optimized developer experience:
- File Explorer
- Remote Desktop
- Windows PowerShell
Let us now show you how to enable Developer Mode in Windows.
Enable Developer Mode in Windows 11
Follow these steps to activate Developer Mode in Windows 11:
-
Navigate to the following:
Settings app >> Privacy and Security >> For developers
-
Here, toggle the slider under “Developer Mode” into the On position.

Turn on Developer Mode -
When asked for a confirmation, click Yes.
Yes to confirm


This will turn on the Developer Mode. You can simply toggle the sliders under “Device Portal” and “Device Discovery” to enable them too. This is discussed in detail further down this post.
Furthermore, you will find additional settings for File Explorer, Remote Desktop, and PowerShell on the same Settings page, from which you can select and then Apply the changes.
Enable Developer Mode in Windows 10
Follow these steps to activate Developer Mode in Windows 10:
-
Navigate to the following:
Settings app >> Windows Update >> For developers
-
Here, toggle the slider under “Developer Mode” into the On position.

Turn on Developer Mode -
When asked for a confirmation, click Yes.
Yes to confirm


Developer Mode will now be enabled. If you want to disable it in the future, simply toggle the slider under Developer Mode again into the Off position.
Similar to Windows 11, you can simply toggle the sliders under “Device Portal” and “Device Discovery” to enable them too. This will be discussed in detail further down this post.
Furthermore, you will find additional settings for File Explorer, Remote Desktop, and PowerShell on the same Settings page, from which you can select and then Apply the changes.
However, unlike in Windows 11, the Windows 10 “For developer” page does not give you any options on Windows Terminal.
That said, you can now sideload third-party applications or use existing Microsoft Store apps to begin your testing.
What is Device Portal
Device Portal is a tool that can be installed on your PC after enabling Developer Mode. Once that is enabled, you can then enable the Device Portal from the “For developers” settings page.
The Windows Device Portal allows you to manage your PC remotely through a locally-installed web server. Using the server’s web interface, you can then connect to this computer remotely over the network and manage it how you please. For this reason, when the Device Portal is enabled, your PC also changes the Windows Firewall.
The Device Portal provides advanced diagnostics of the PC, as well as real-time performance data. However, not every developer may need this tool.
The Device Portal is mostly useful for testing applications on remote Windows devices, such as Xbox, Hololens, etc.
You can set up credentials and other information for the Device Portal from the “For developers” settings page.

What is Device Discovery
Windows Device Discovery is another developer feature that needs to be manually enabled. Its primary function is to pair a remote Windows device so it can be connected to this PC remotely.
Once the Device Portal is enabled, you can pair a device with it using a simple code through Device Discovery.

Other Developer Mode Enhancements
As we mentioned earlier, enabling Developer Mode in Windows enhances a few pre-existing Windows tools. The sections below briefly describe what options the user can choose from.
Windows Explorer
You can manage what File Explorer now displays directly from the Settings app. However, these are only a handful of options. You can select any or all of the following options:
- Change settings to show file extensions
- Change setting to show hidden and system files
- Change settings to show full path in title bar
- Change policy to show Run as a different user in Start
- Change settings to show empty drives

Remote Desktop
The following enhancements are offered for a Remote Desktop Connection to this PC once the Developer Mode is turned on:
- Change settings to allow remote connections to this computer.
- Change settings to allow connection only from computers running Remote Desktop with Network Level Authentication.
- Change settings so that the PC never goes to sleep when plugged in

Windows PowerShell
With Developer Mode, you can set whether or not to allow running scripts in PowerShell using the following option:
- Change execution policy to allow local PowerShell scripts to run without signing. Require singing for remote scripts.

Troubleshoot Enabling Developer Mode in Windows
Users often report that they are unable to enable Developer Mode due to one reason or the other, and become frustrated when they cannot find a solution. If you experience similar issues, refer to the solutions suggested below and perform them to mitigate the issue.
Change User Account Type to Administrator
It may be possible that your user account is a standard user that does not have any administrative rights. In that case, you must convert your user account to an administrative account, or enable the Developer Mode from an account that is an administrator on your PC.
Here are 6 ways to convert your existing account into an administrative account.
Allow Trusted Apps to Install using Group Policy
Another problem could be that Windows blocks apps to install, rendering the Developer Mode and its associated tools incapable of a successful installation. In that case, you can allow trusted apps to be installed on your PC using the following steps:
-
Open the Group Policy Editor by typing in gpedit.msc in the Run Command box.

gpedit msc -
Now navigate to the following from the left pane in the Editor:
Computer Confiuration >> Administrative Templates >> Windows Components >> App Package Deployment
-
Here, double-click on the policy “Allow all trusted apps to install” in the right pane.

Open policy -
From the pop-up policy, select the Enabled radio button, then click Apply and OK.

Enable the policy -
Now open the Command Prompt with elevated rights and run the following cmdlet to implement the changes.
GPUpdate /Force
gpupdate force latest


Once this is done, try re-enabling Developer Mode and check if the issue persists.
Undo Recent Changes
If the Developer Mode was working just fine before and has suddenly encountered an error, something that was recently changed has likely affected it, making Developer Mode unable to run properly.
This change could be a new software installation, a new Windows update that was installed, or any other insignificant changes.
In that case, you can try to uninstall any recently-installed apps through Programs and Features in the Control Panel. If you believe it was caused by a Windows update, try uninstalling the update. If you made multiple changes to the operating system or do not recall any changes made, try restoring your PC to an earlier state to undo any changes.
Disable Windows Telemetry
Windows Telemetry is used to collect and track data and activity on your PC so it can be reported back to Microsoft, which is useful for them so they can work on improving the user experience.
However, this service can also prevent you from accessing certain Windows features, such as the Developer Mode. Therefore, disabling telemetry and data collection just might fix the problem.
Here are 6 ways to disable telemetry on a Windows PC.
Final Thoughts
Windows Developer Mode is an excellent tool for developers who like playing around with custom UWP and Microsoft Store apps. It gives you the ability to test their limits.
Moreover, if you want to try out the new features in the latest Developer options, you can subscribe to the Windows Insider channel and try out these new (yet somewhat unstable) features in the Developer Mode.
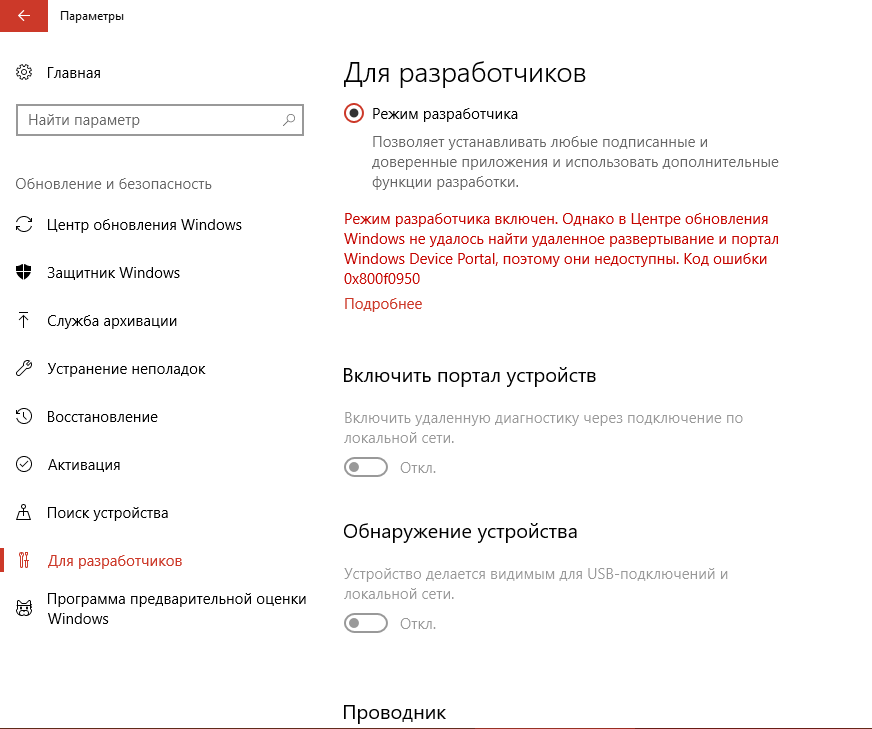
Режим разработчика, появившийся в Windows 10 вместе с новым меню «Параметры», стал ещё одним крупным нововведением в новой операционной системе. Но на что влияет эта настройка, в чём заключается её отношение к разработке, и как она может пригодиться обычному пользователю?
Вся информация в статье взята из официальной документации Microsoft и личного опыта автора.
Что за режим и зачем он нужен?
По информации из официальной документации Microsoft использование этого режима необходимо для тестирования кода, написанного в среде Visual Studio.

У режима разработчика много возможностей
Для простых пользователей ПК такой режим не представляет никакого интереса, о чём непрозрачно намекают авторы рекомендаций: «Если вы используете компьютер для повседневных занятий <…> вам не следует активировать режим разработчика». Довольно ультимативное заявление, тем не менее, является не совсем корректным, о чём мы поговорим позже. Но в чём всё-таки заключается роль этой настройки?
«Режим разработчика» – запускаемая среда, тесно связанная со средой разработки кода в Visual Studio, которая является платформой для создания приложений для Windows и Windows Phone. Она всегда без проблем работала во всех версиях ОС, не требуя дополнительных настроек, но положение изменилось с появления 10-ой версии системы. Теперь без активации этого режима разработчик не сможет запустить свои проекты ни в Visual Studio, ни в самой Windows 10. Ограничения могут быть связаны с попыткой обезопасить простых пользователей от использования нелицензионного ПО, а также вполне могут оказаться очередным этапом борьбы Microsoft с пиратством.
Помимо запуска нелицензионных приложений данная среда открывает гораздо больше возможностей, чем об этом говорит Microsoft. Среди такого функционала:
- запуск программ с расширенными правами, и не только правами администратора;
- доступ к более гибкой настройке функций системы;
- установка appx программ даже без подписи Microsoft;
- работа с Linux Bash Shell – де-факто полноценным Debian-ядром без установки второй системы.
И многое другое. Но всё же для начала разберём, как активировать эту функцию.
Активация данной среды происходит открыто, в том числе и через меню «Параметры». На контрасте с запуском аналога этого режима на Android (мы даже не говорим об Apple) процесс выглядит намного проще. Тем не менее, при наличии вероятных проблем с некоторыми из подходов, мы рассмотрим все способы активации «Режима разработчика» на Windows 10.
Через меню «Параметры»

Запускаем developer mode
Самый простой и очевидный способ, подразумевающийся для использования по стандарту. Для активации придётся сделать следующее:
- Перейдём по маршруту «Пуск» – «Параметры» – «Обновление и безопасность».
- В левой панели перейдём на вкладку «Для разработчиков».
- Выберем самую нижнюю из трёх опций – одноимённый «Режим разработчика».
- В новом окне подтвердим активацию режима, нажав на кнопку «Ок».
- Дождёмся завершения активации – система автоматически установит и настроит всё необходимое. Затем нужно перезагрузить компьютер.
После завершения процесса среда будет доступна по умолчанию.
К сожалению, не всегда запуск режима через «Параметры» обходится без каких-либо проблем. При возникновении сбоев стоит в первую очередь найти причину в интернете, воспользовавшись кодом ошибки в окне с прерыванием операции.
Причина возникающих проблем, чаще всего, заключается в невозможности установки требуемых для работы «Режима разработчика» пакетов. Это может произойти в двух случаях – отсутствии прав администратора у пользователя (исправляется, соответственно, их получением) и сбоях в работе сетевого соединения. На второй случай указывает код ошибки – чаще всего это 0x80004005.
Во втором случае стоит проверить сразу несколько параметров.
- Брандмауэр или любой сторонний антивирус. Система, защищающая компьютер от сетевых атак, может допускать ошибки и блокировать обычные соединения. Рекомендуется отключить его на время установки.
- Все возможные надстройки по блокировке «телеметрии» или «шпионства» Windows 10 чаще всего отключают доступ системы к серверам Microsoft. Решение аналогично предыдущему – отключить их и повторить запуск режима разработчика.
- Неправильная настройка подключения или неполадки сети. Стоит убедиться в работоспособности соединения.
После проверки всех параметров перезапустите систему и активируйте режим заново.
Через «Редактор локальной групповой политики»
Внимание! Данное решение не доступно в «Домашних» изданиях Windows 10: «Windows 10 Домашняя» и «Windows 10 Домашняя (для одного языка)». Для использования потребуется дополнительная настройка «Редактора», инструкцию к которой можно найти в конце этого пункта.
Данный метод использует углублённые настройки системы и является отличным решением проблем с запуском «Настроек» Windows. Требует прав администратора для использования.
Запуск через групповые политики
Для активации «Режима разработчика» с помощью функций групповых политик, сделаем следующее:
- Откроем меню «Поиск» и введём строку «Выполнить», выбрав найденную утилиту, либо просто зажмём сочетание Win + R.
- В новом окне введём «gpedit.msc» и подтвердим запуск клавишей «Enter» или нажатием кнопки «ОК».
- В окне «Редактора» обратимся к левой панели и перейдём по следующему маршруту: «Конфигурация компьютера» –«Административные шаблоны» – «Компоненты Windows» – «Развертывание пакета приложений».
- В правой панели активируем опции «Разрешить разработку приложений Магазина Windows и их установку из интегрированной среды разработки» и «Разрешить установку всех доверенных приложений». Для этого потребуется двойным щелчком мыши открыть подменю каждой и выбрать пункт «Включено» в левой верхней части экрана. Затем, нажав на кнопки «Применить» и «ОК», закрываем окно.
- Закроем «Редактор» и перезагрузим компьютер.
После перезагрузки среда «Режима разработчика» будет активна по умолчанию.
Для обладателей «Windows 10 Домашняя» и «Windows 10 Домашняя (для одного языка)»
- Откроем приложение «Блокнот» и создадим пустой файл.
- Вставим в него следующий код без изменений или переносов:
@echo off
pushd «%~dp0»
dir /b %SystemRoot%\servicing\Packages\Microsoft-Windows-GroupPolicy-ClientExtensions-Package~3*.mum >List.txt
dir /b %SystemRoot%\servicing\Packages\Microsoft-Windows-GroupPolicy-ClientTools-Package~3*.mum >>List.txt
for /f %%i in (‘findstr /i . List.txt 2^>nul’) do dism /online /norestart /add-package:»%SystemRoot%\servicing\Packages\%%i»
pause
- Откроем меню «Файл» в верхней панели приложения и выберем пункт «Сохранить как». Выберем любое удобное нам название, например, «запуск редактора групповой политики». Укажем тип файла «Любой» и добавим в окончание нашего названия расширение «.bat».
- Подтвердим сохранение, перейдя в папку, содержащую файл, и запустив его от имени администратора во всплывающем по клику правой клавишей мыши меню.
- Подтвердим запуск и дождемся окончания процесса.
В случае успешной настройки владельцы «Домашних» изданий также смогут запустить «Редактор локальной групповой политики» командой «gpedit.msc».
Через «Редактор реестра»
В отличие от «Редактора локальной групповой политики» данный способ по умолчанию доступен на всех версиях Windows 10. Требует прав администратора для выполнения.
Активация через редактор реестра
Для активации «Режима разработчика» выполним следующие шаги:
- Запустим «Редактор реестра». Открыть его можно через «Поиск», введя строку «Выполнить». Также можно просто зажать сочетание Win + R.
- В новом окне введём строку «regedit» и нажмём на кнопку «ОК» либо на клавишу Enter.
- В окне «Редактора» обратимся к левой панели и перейдём по маршруту: HKEY_LOCAL_MACHINE\ SOFTWARE\ Microsoft\ Windows\ CurrentVersion\AppModelUnlock.
- Открыв последнюю папку, обратим внимание на правую панель. Нажмём на правую кнопку мыши, выберем вкладку «Создать». В появившемся списке выберем пункт «Параметр DWORD». Создадим таким образом сразу два файла: «AllowAllTrustedApps» и «AllowDevelopmentWithoutDevLicense».
- Двойным нажатием откроем настройки каждого из параметров и установим значение «1» для каждого из них.
- Закроем «Редактор реестра» и перезагрузим наш компьютер.
После перезапуска системы «Режим разработчика» будет активен без дополнительных настроек.
Как отключить «Режим разработчика»?
Несмотря на некоторые преимущества, «Режим разработчика» всё же может доставить пользователям неудобства своим послаблением в безопасности системы или в результате каких-либо ошибок во время использования. Что делать в этом случае?

Конечно, да
Вне зависимости от того, каким способом был активирован режим, отключить его можно любым из трёх способов, приведённых в предыдущем разделе. Разница будет заключаться лишь в конечных этапах применения.
- При использовании меню «Параметры» достаточно деактивировать переключатель у пункта «Режим разработчика».
- В «Редакторе локальных групповых политик» нужно отключить опции «Разрешить разработку приложений Магазина Windows и их установку из интегрированной среды разработки» и «Разрешить установку всех доверенных приложений». Для этого потребуется двойным щелчком мыши открыть подменю каждой и выбрать пункт «Отключено» в левой верхней части экрана, а затем подтвердить изменения.
- При работе с «Редактором реестра» – изменить значения параметров «AllowAllTrustedApps» и «AllowDevelopmentWithoutDevLicense» на «0».
Все подходы являются взаимозаменяемыми, и не требуют дополнительных настроек помимо прав администратора у используемого аккаунта.
Возможности «Режима разработчика» — зачем он нужен простому пользователю?
Как было сказано в самом начале статьи, данная среда предназначена для программистов, работающих над приложениями для Windows 10 в среде Visual Studio. Их потребности во время использования режима чаще всего ограничиваются буквально двумя пунктами – доступом к работе с проектами и запуском нелицензированных утилит. Но что активация среды разработчика даст простому пользователю?
Углублённая настройка «Проводника» Windows
По умолчанию штатный менеджер файлов крайне неохотно подвергается каким-либо сторонним настройкам, ограничивая возможности пользователя изменением вида иконок и порядка сортировки файлов и папок. После получения прав разработчика ситуация меняется.
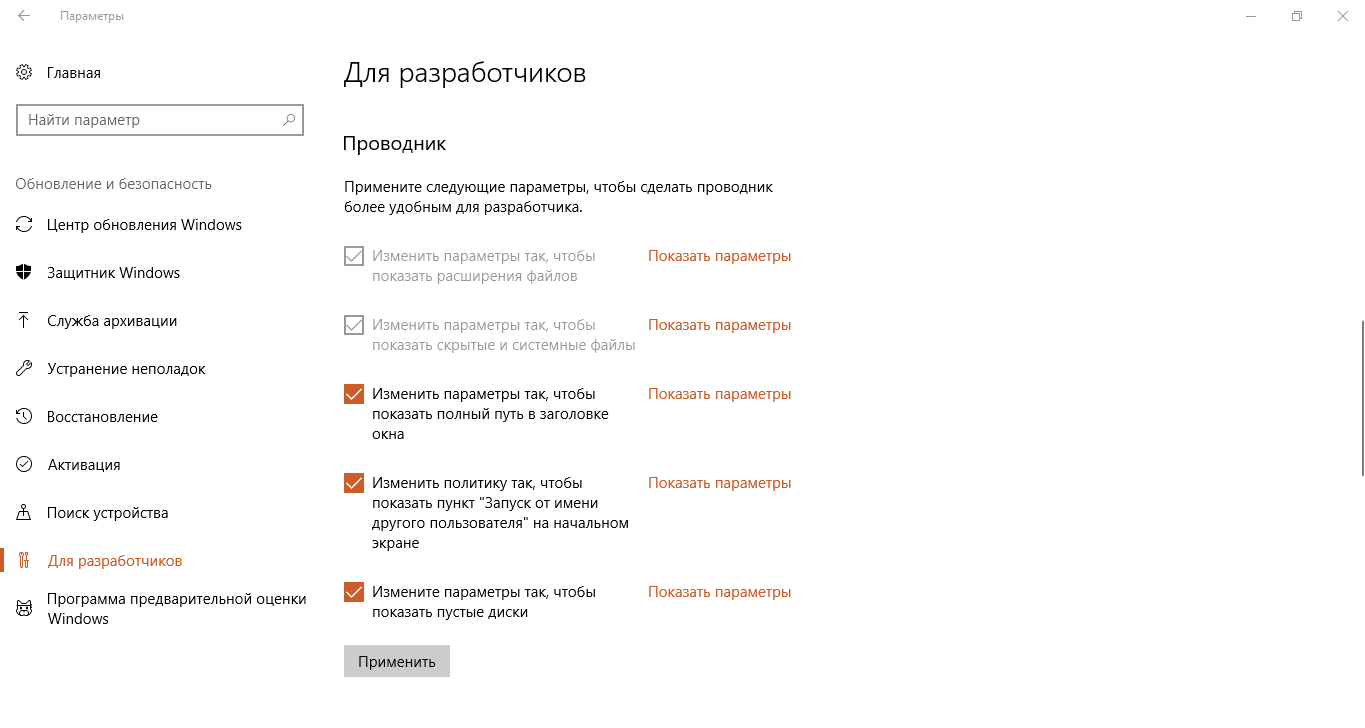
Расширенные возможности Проводника
Чтобы получить доступ к расширенным настройкам «Проводника», сделаем следующее:
- Откроем «Настройки» через меню «Пуск» либо воспользуемся возможностями «Поиска».
- Обратимся к левой панели и перейдём ко вкладке «Для разработчиков» в разделе «Обновления и безопасность».
- В правой части экрана найдём список настроек «Проводника» с одноимённым названием.
- После активации нужных нам параметров, завершим настройку конфигурации кнопкой «Применить».
Доступные настройки позволяют крайне гибко настроить отображение файлов и папок (в том числе и скрытых), а также изменить политику запуска приложений от других пользователей ПК.
Ubuntu Bash без установки второй системы
Возможность работы с ядром Debian Linux, а точнее с одной из самых популярных ее сборок под названием Ubuntu, впервые появилась в тестовых версиях Windows 10 и планировалась к реализации на первых стабильных версиях ОС.
Microsoft сдержала свои обещания, но ограничила доступ к функционалу «Терминала» Linux для простых пользователей. После включения «Режима разработчика» мы сможем получить доступ к работе с полноценной системой внутри Windows 10. Для этого потребуются выполнить несколько простых шагов:
- Перейдём в «Microsoft Store» и загрузим одноимённую утилиту «Ubuntu» (либо же любую другую, представленную в магазине Linux-based ОС).
- Закроем приложение и обратимся к «Поиску» Windows, введя строку «Bash».
- Подтвердим запуск «Терминала» Linux и дождёмся появления командной строки.
Таким образом, мы сможем получить доступ к полноценной Ubuntu (или другой Linux-based ОС) без установки второй операционной системы.
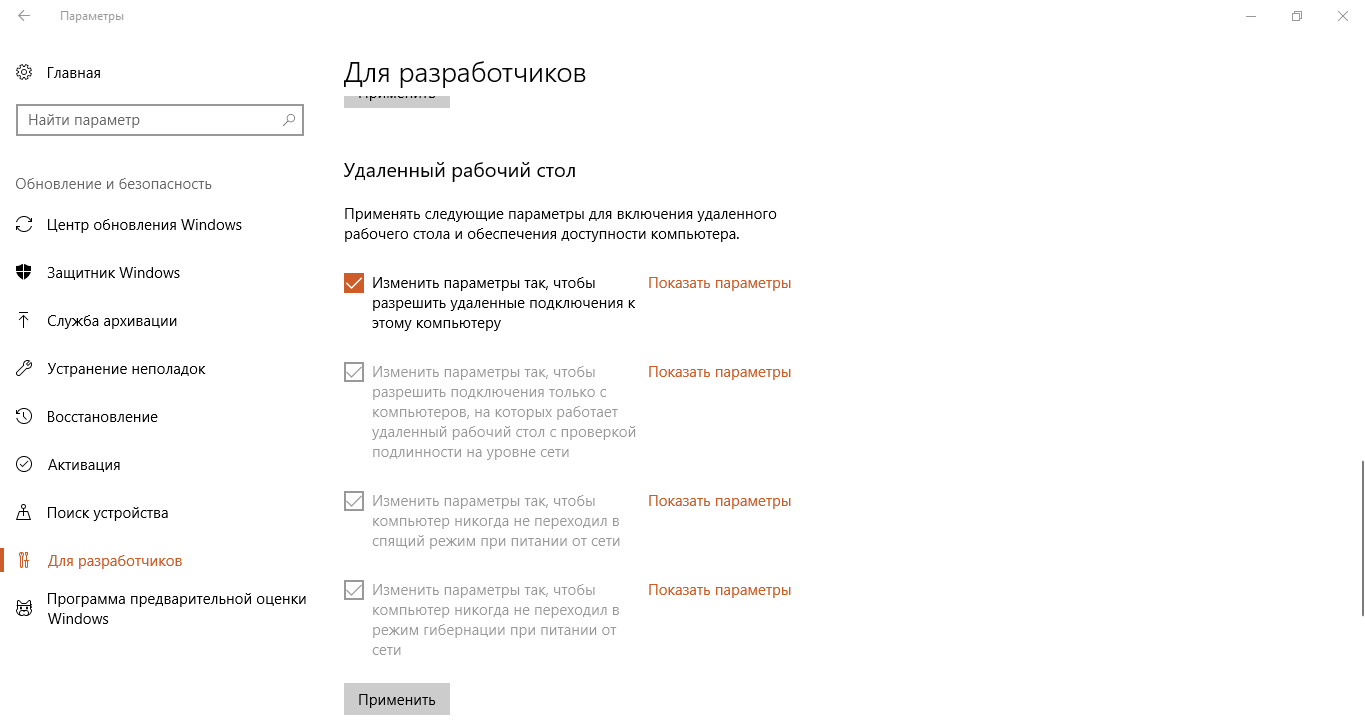
Удалённый «Рабочий стол»
Настройка удаленного рабочего стола
Данная функция способна легко заменить «TeamViewer» или любое другое приложение для удалённого доступа к системе, если бы не одно «но», а именно не всегда адекватное отношение «Брандмауэра Windows» к внешним сетевым подключениям. Данная проблема решается при активации «Режима разработчика».
- Перейдем в раздел «Для разработчиков» в «Настройках» системы – соответствующая вкладка находится в теме «Обновления и безопасность» на главной странице.
- В правой панели найдём раздел «Удалённый рабочий стол» и активируем первый пункт – «Изменить параметры так, чтобы разрешить удаленные подключения к этому компьютеру», система автоматически произведёт нужные настройки.
- Нажмём на кнопку «Применить» и закроем «Настройки».
Мы также сможем использовать и остальные настройки этого раздела – например, запрет на переход в режимы «Спящий» и «Гибернация» при определённых условиях. Это позволит в разы облегчить использование «Удаленного рабочего стола» и избежать возможных ошибок при активации.
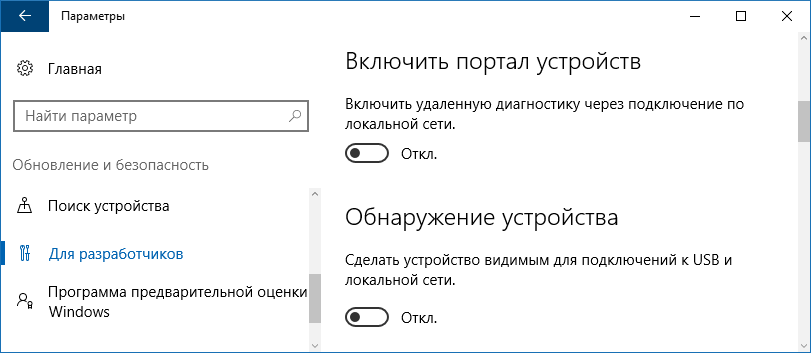
Функции «Портал устройств» и «Обнаружение устройств»
Две функции, ориентированные на дистанционную работу с компьютером и синхронизированными устройствами. Имеют серьёзные ограничения, но с активацией «Режима разработчика» раскрывают свой функционал в полной мере.
Можно даже это
«Портал устройств» представляет собой опцию, открывающую удалённый доступ к настройке и управлению компьютера по сетевому соединению. Фактически, является приложением для работы с веб-сервером, объединяющим в себе сразу несколько совместимых устройств. Соединение защищается паролем во избежание вторжения в файлы нашего ПК.
«Обнаружение устройств» являет собой именно то, о чём можно подумать, прочитав название. Эта надстройка работает в связке с «Порталом устройств», разрешая обнаружение нашего компьютера в сети сторонними устройствами.
Работа со сценариями, не имеющими подписи
Работа с исполнительными пакетами .bat всегда была одним из самых удобных способов взаимодействия с «Командной строкой» Windows и PowerShell, призванным заменить классическое приложение на 10-ой версии системы.
Утилита, как и оригинальная версия системного «терминала», поддерживает работу со сценариями, но в рамках усиления программы безопасности пользователей только пакеты с официальной подписью имеют право на запуск в PowerShell. И даже права администратора не меняют ситуацию к лучшему.
Но Microsoft всё же сжалились над требованиями программистов, работающих со скриптами, и оставили возможность их использования в среде «Режима разработчика». Доступ к свободной работе с пакетами команд также пригодится и простым пользователям, чтобы избежать ручного ввода большого количества требуемых строк.
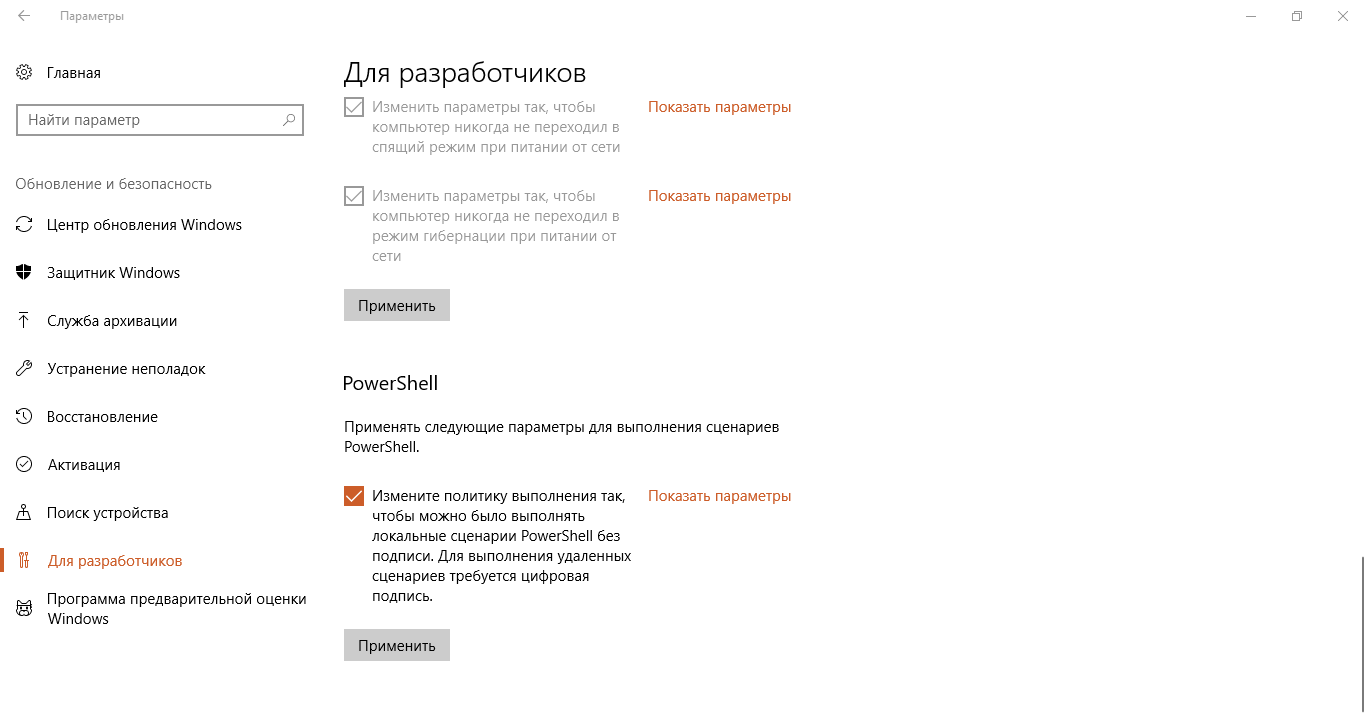
Настройка Power Shell
Для получения соответствующих прав, сделаем следующее:
- Откроем меню «Настройки» и обратимся к левой панели приложения – найдём вкладку «Для разработчиков» в разделе «Обновления и безопасность».
- В правой части экрана пролистаем список настроек до раздела «PowerShell».
- Поставим галочку в единственной настройке для этой утилиты и нажмём на кнопку «Применить».
Доступ к запуску сценариев без подписи будет автоматически активирован даже без перезапуска компьютера.
Возможные проблемы
Несмотря на то, что эта функция является встроенной в Windows 10 по умолчанию, её запуск не всегда реализуется столь гладко, как этого можно было ожидать. Некоторые ошибки являются частыми даже для последних версий ОС, некоторые – локальными сбоями в работе конкретных систем. Разберём чаще всего встречающиеся проблемы и их решения.
Параметр «Для разработчиков» оказывается неактивен в «Настройках»
Довольно частый сбой с неясным происхождением – от глобальных ошибок Windows до неправильных настроек пользователя. Единственный надёжный способ обхода – активация среды любым из двух других способов, описанных выше: через «Редактор локальной групповой политики» или «Редактор реестра».
Недоступность функций «Портал устройств» и «Обнаружение устройств»
Так же, как и в предыдущем случае, активация этих надстроек в «Режиме разработчика» просто оказывается невозможной из-за неактивности переключателя. Такой сбой чаще всего связан с ошибками некоторых версий Windows 10.
Ошибка
В ситуации с неактивными переключателями стоит в первую очередь обновить нашу систему до последней актуальной версии. Если это не оказало никакого воздействия, потребуется совершить восстановление до последнего сохранённого состояния Windows либо же полностью переустановить систему.
«Некоторыми параметрами компьютера управляет организация» – ошибка настройки групповых политик
Крайне странный сбой, периодически возникающий на домашних компьютерах пользователей. Если наш компьютер не соединён с какими-либо локальными сетями, источником ошибки, скорее всего, окажется системный сбой. Единственное решение в такой ситуации – откат Windows 10 к точке восстановления или полная переустановка ОС.
Post Views: 1 034