
Rob Parsons Updated on Apr 15, 2022 4:59 PM
UEFI (Unified Extensible Firmware Interface) is a standard firmware interface for new PCs pre-installed with Windows 8/10, which is designed to replace BIOS (basic input/output system).
Basic steps: Access UEFI BIOS settings and disable «Secure Boot» option, then change «Boot List option» as «Legacy», and enable «Load Legacy Option Rom», then follow a traditional method to boot computer from USB device or CD-ROM.
- How to boot from a USB drive in Windows
- How to boot from CD/DVD-ROM in Windows
Part 1: Access «UEFI BIOS» by PC Settings
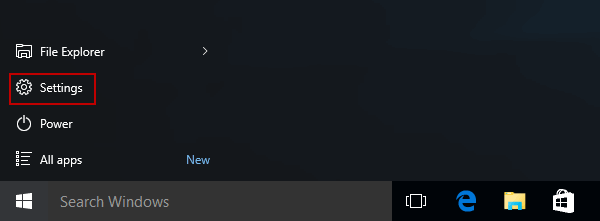
Navigate to Settings. You can get there by clicking the gear icon on the Start menu.
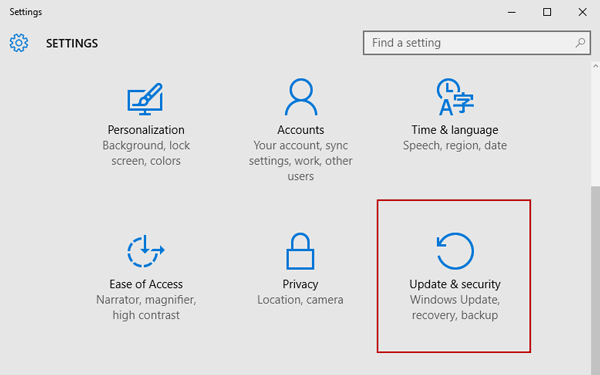
Then in Settings window, choose Update & security.
Nest, select Recovery from the left menu and you can see Advanced startup at the right side.
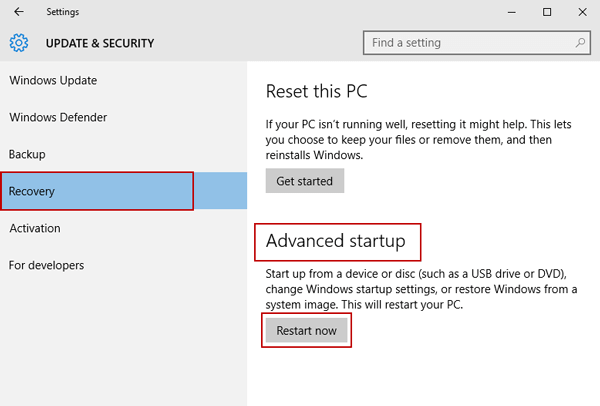
Click Restart Now under Advanced startup option. The comptuer will reboot to a special menu.
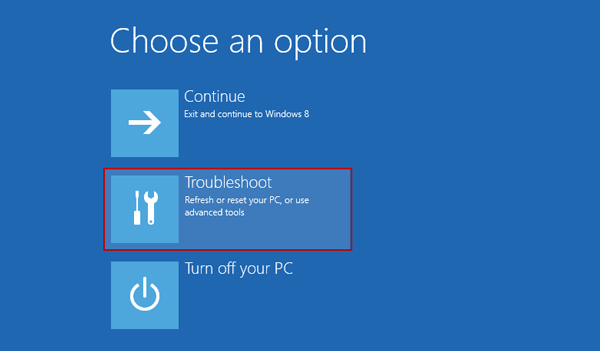
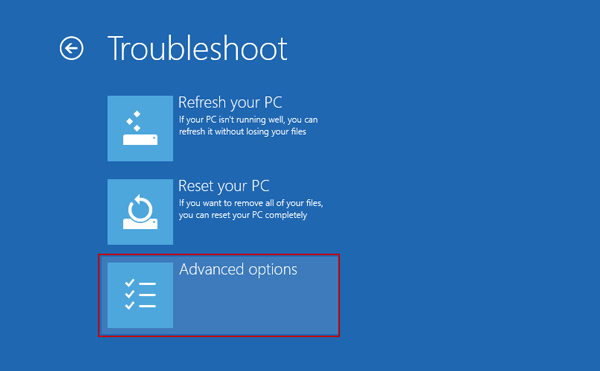
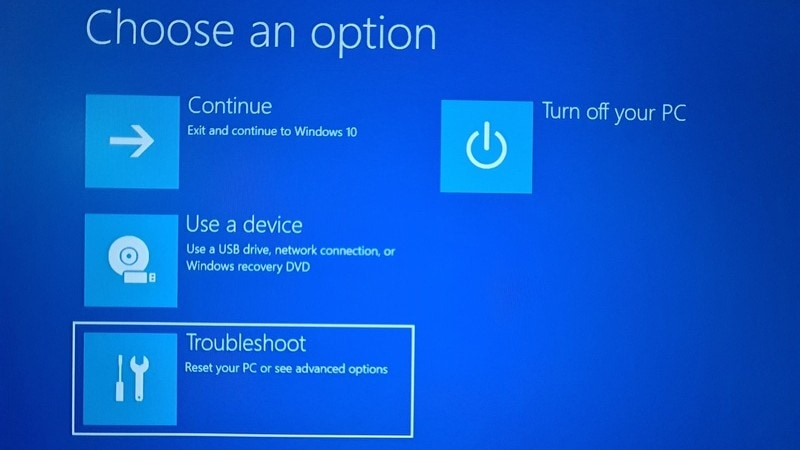
Now you will be presented with the Choose an option screen, simply select Troubleshoot.
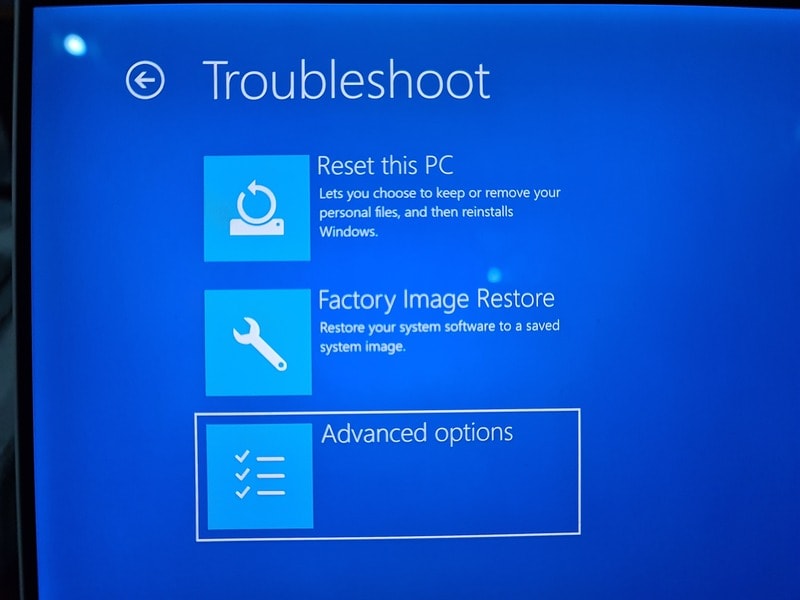
Next select Advanced options.
Next you select UEFI Firmware Settings.
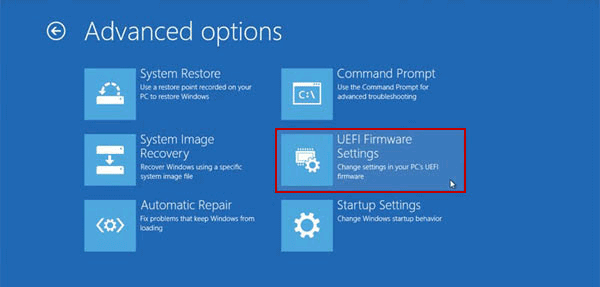
Click the Restart button. Your system will restart and take you to the UEFI BIOS.
Part 2: Disable «Secure Boot»
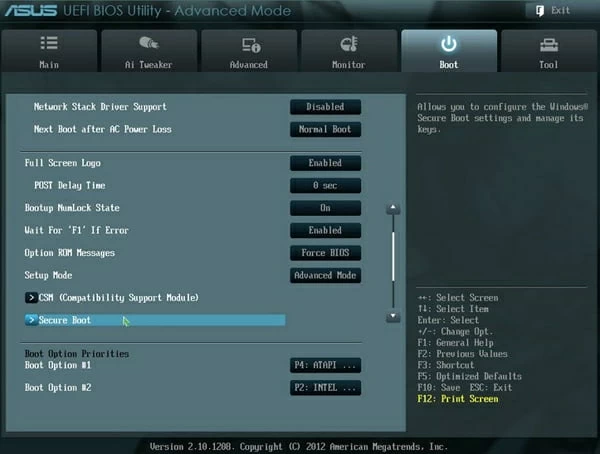
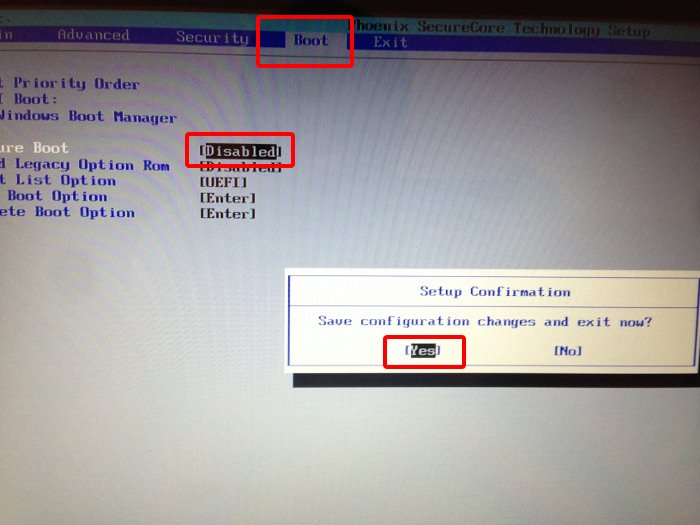
Once you’re on the UEFI utility screen, move to Boot tab on the top menu. Use the arrow key to go to Secure Boot option and then Use + or – to change its value to Disable.
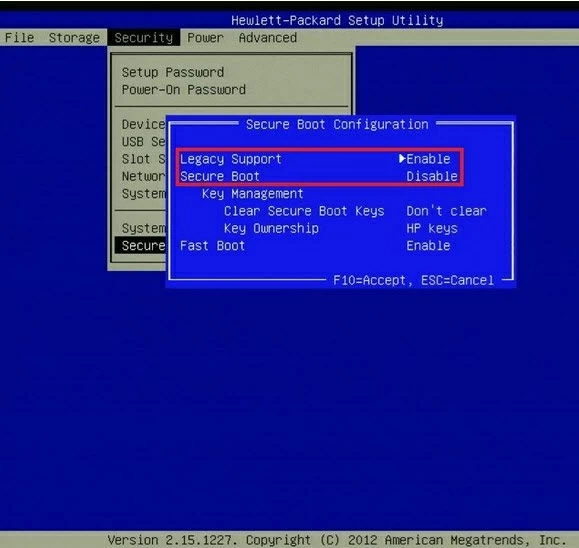
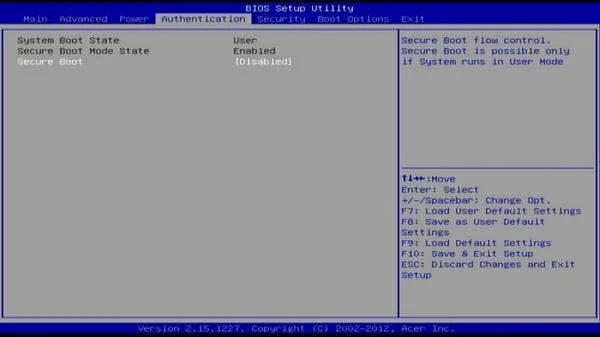
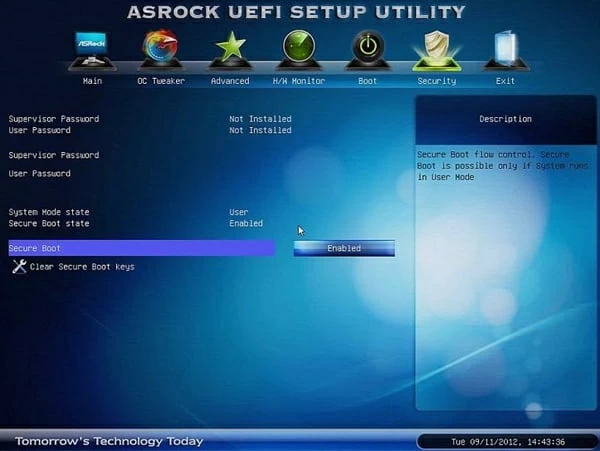
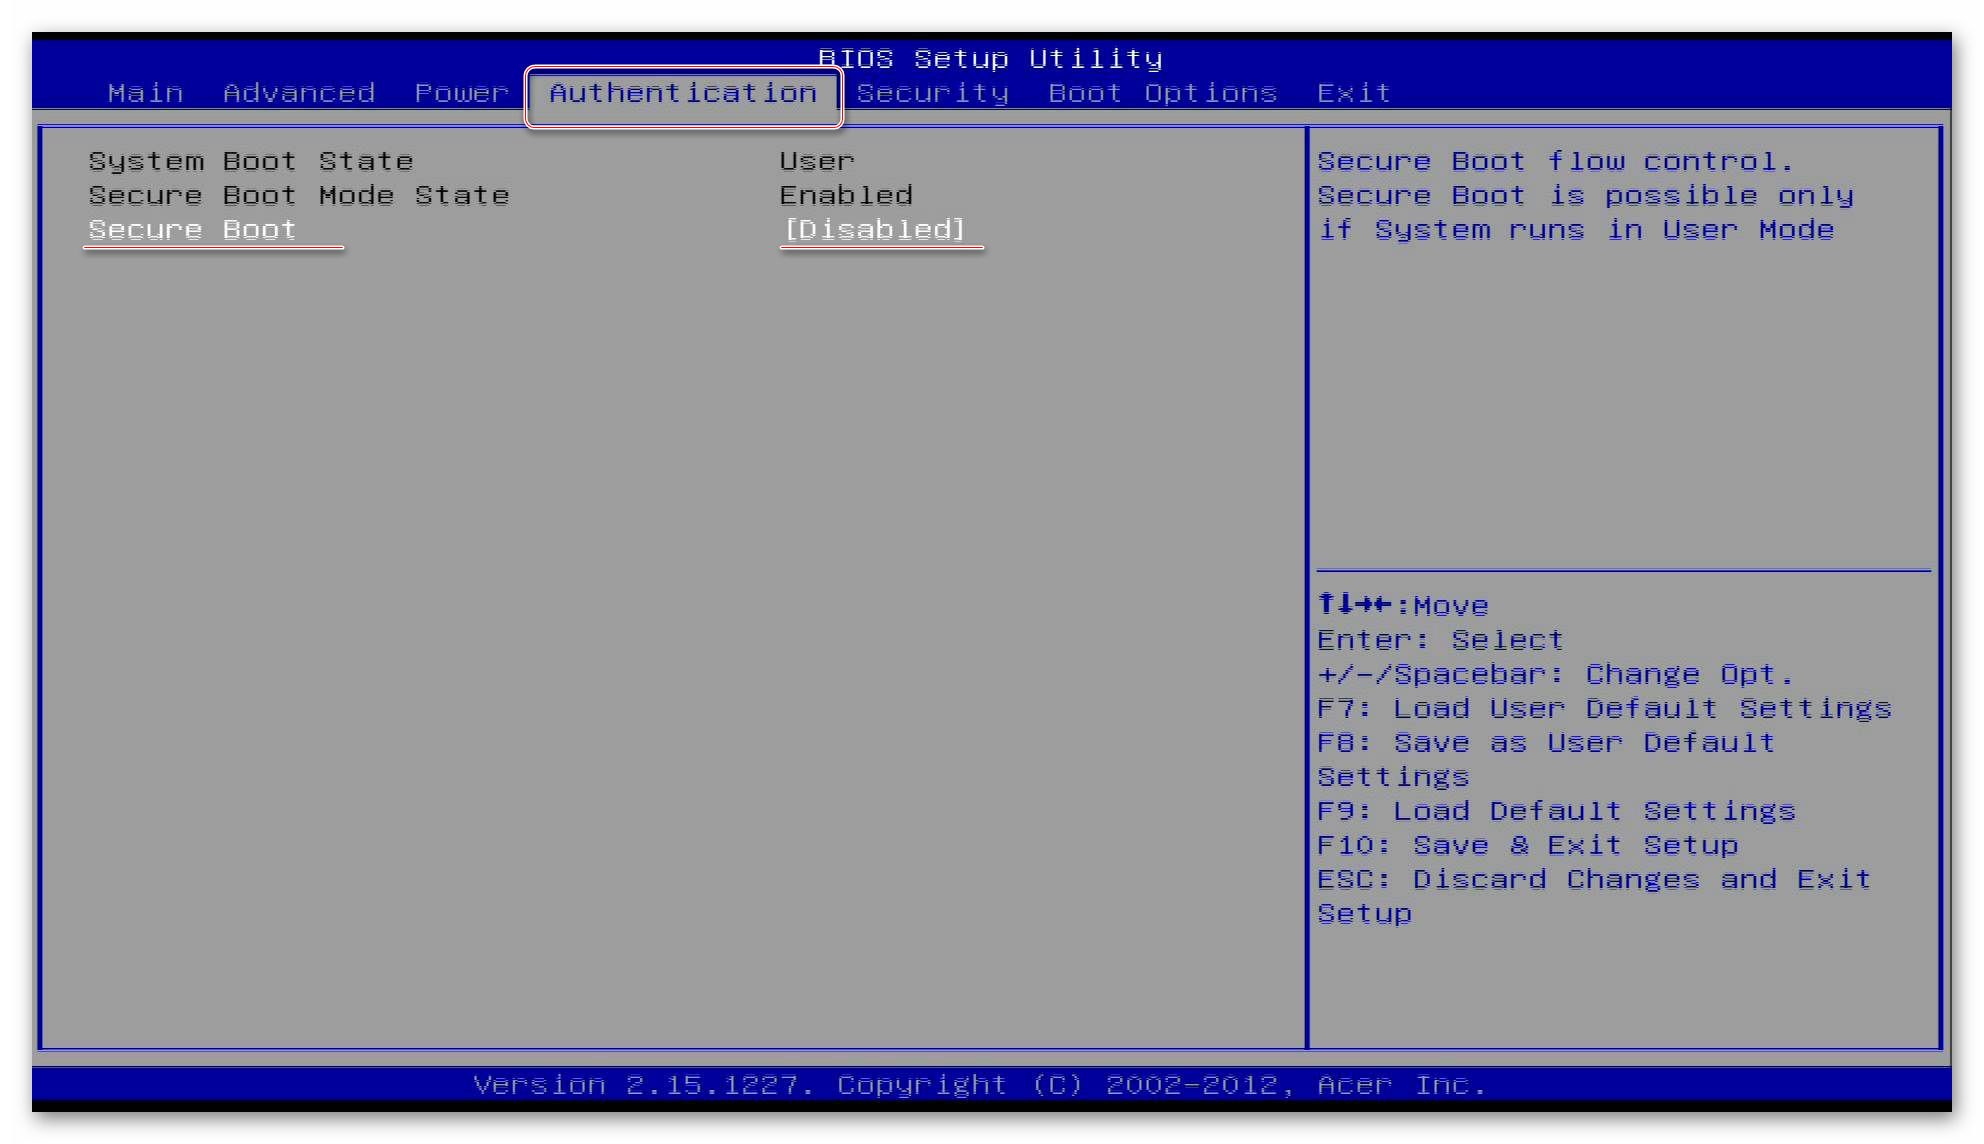
Note: Depending on the motherboard’s BIOS/ UEFI firmware, the Secure Boot option will be found on the «Boot», «Security», or «Authentication» tab.
HP Secure Boot
ASUS Secure Boot
Acer Secure Boot
ASRock Secure Boot
Next, press F10 to save the changes and exit the UEFI settings.
That’s for how to disable secure boot in Windows 10. Note that if you’re on an Arm-based Windows RT PC, you can’t disable secure boot because these devices have a locked boot loader.
Все способы:
- Информация по UEFI Secure Boot
- Способ 1: Для ASUS
- Способ 2: Для HP
- Способ 3: Для Toshiba и Lenovo
- Способ 4: Для Acer
- Способ 5: Для материнских плат Gigabyte
- Вопросы и ответы: 31
UEFI Secure Boot — это стандартная защита на BIOS, которая ограничивает возможности по запуску USB-носителей в качестве загрузочного диска. Данный защитный протокол можно встретить на компьютерах с Windows 8 и новее. Его суть заключается в том, чтобы не дать пользователю загрузиться с установщика Windows 7 и ниже (или операционной системой из другого семейства).
Информация по UEFI Secure Boot
Данная функция может быть полезна для корпоративного сегмента, так как позволяет предотвратить несанкционированную загрузку компьютера с неавторизованных носителей, которые могут содержать различное вредоносное и шпионское ПО.
Обычным же пользователям ПК эта возможность ни к чему, наоборот, в некоторых случаях она может даже мешать, например, если вы хотите установить Linux совместно с Windows. Также из-за неполадок с настройками UEFI во время работы в операционной системе может вылазить сообщение об ошибке.
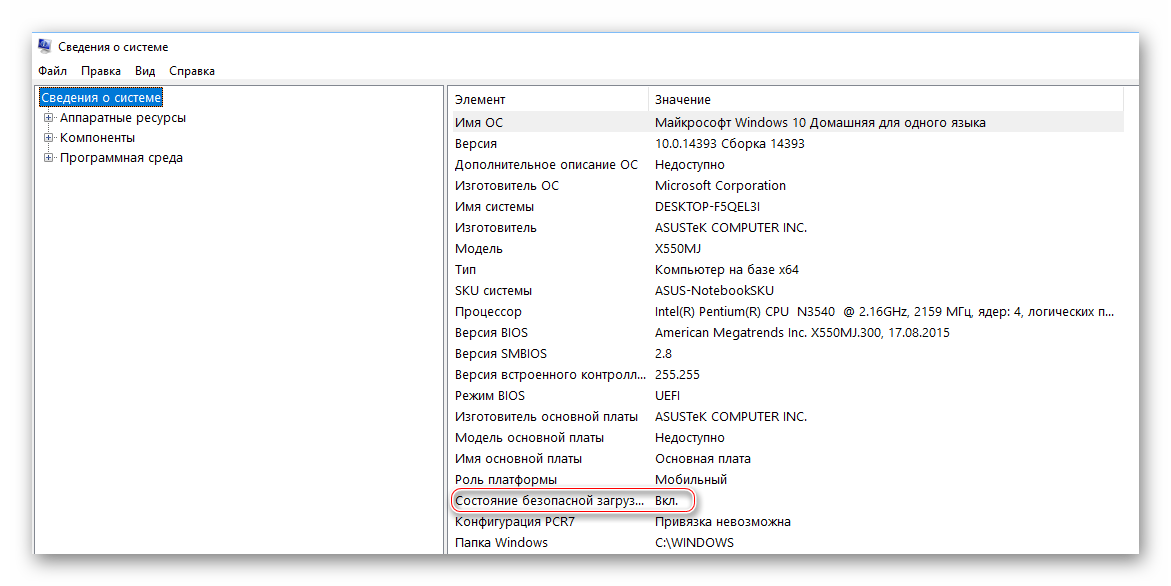
Чтобы узнать, включена ли у вас данная защита, необязательно переходить в BIOS и искать информацию по этому поводу, достаточно сделать несколько простых шагов, не выходя из Windows:
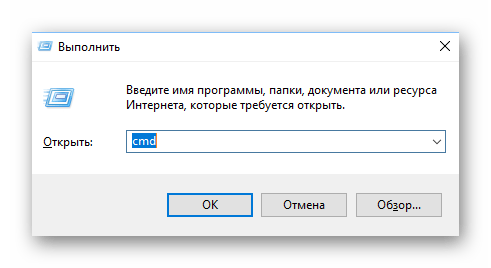
- Откройте строку «Выполнить», используя комбинацию клавиш Win+R, затем введите туда команду «cmd».
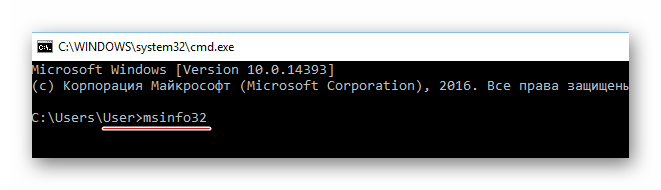
- После ввода откроется «Командная строка», куда нужно прописать следующее:
msinfo32 - В открывшемся окне выберите пункт «Сведения о системе», находящийся в левой части окна. Далее нужно найти строчку «Состояние безопасной загрузки». Если напротив стоит «Откл.», то вносить какие-либо изменения в BIOS не нужно.
В зависимости от производителя материнской платы, процесс отключения данной функции может выглядеть по-разному. Рассмотрим варианты для самых ходовых производителей материнских плат и компьютеров.
Способ 1: Для ASUS
- Войдите в BIOS.
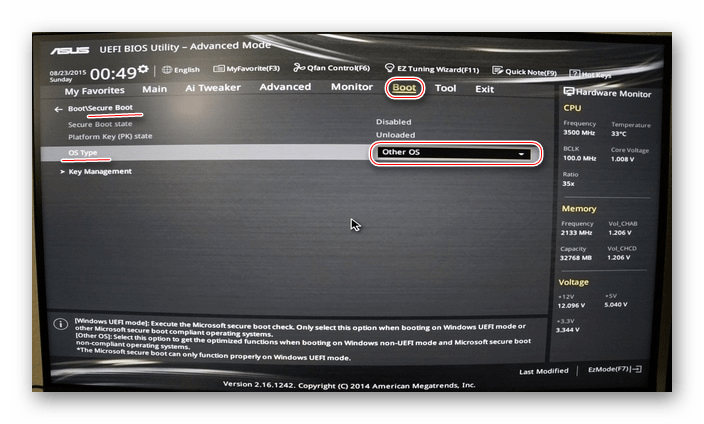
- В главном верхнем меню выберите пункт «Boot». В некоторых случаях главного меню может не быть, вместо него будет приведён список различных параметров, где нужно найти пункт с таким же названием.
- Перейдите в «Secure Boot» или и найдите параметр «OS Type». Выберите его при помощи клавиш со стрелочками.
- Нажмите Enter и в выпавшем меню поставьте пункт «Other OS».
- Выйдите при помощи «Exit» в верхнем меню. При выходе подтвердите изменения.
Подробнее: Как войти в BIOS на ASUS
Способ 2: Для HP
- Войдите в BIOS.
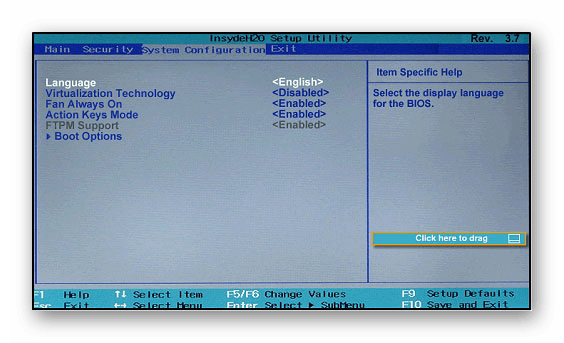
- Теперь перейдите во вкладку «System Configuration».
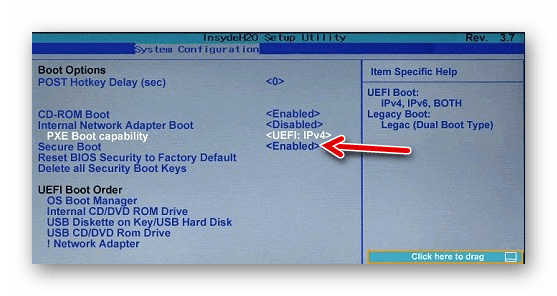
- Оттуда войдите в раздел «Boot Option» и найдите там «Secure Boot». Выделите его и нажмите Enter. В выпавшем меню нужно поставить значение «Disable».
- Выйдите из BIOS с сохранением изменений, используя клавишу F10 или пункт «Save & Exit».
Подробнее: Как войти в BIOS на HP
Способ 3: Для Toshiba и Lenovo
Здесь, после входа в BIOS, вам нужно выбрать раздел «Security». Там должен быть параметр «Secure Boot», напротив которого нужно установить значение «Disable».

Читайте также: Как войти в BIOS на ноутбуке Lenovo
Способ 4: Для Acer
Если с предыдущими производителями всё было относительно просто, то тут изначально нужный параметр будет недоступен для внесения изменений. Чтобы разблокировать его, понадобится поставить пароль на BIOS. Сделать это можно по следующей инструкции:
- После входа в BIOS, перейдите в раздел «Security».
- В нём нужно найти пункт «Set supervisor password». Чтобы поставить пароль суперпользователя, вам нужно лишь выбрать этот параметр и нажать Enter. После этого открывается окно, куда требуется вписать придуманный пароль. Требований к нему нет практически никаких, поэтому это вполне может быть что-то вроде «123456».
- Для того, чтобы все параметры BIOS разблокировались наверняка, рекомендуется произвести выход с сохранением изменений.

Читайте также: Как войти в BIOS на Acer
Чтобы снять режим защиты, воспользуйтесь этими рекомендациями:
- Повторно войдите в BIOS с использованием пароля и перейдите в раздел «Authentication», что в верхнем меню.
- Там будет параметр «Secure Boot», где нужно поменять «Enable» на «Disable».
- Теперь выйдите из BIOS с сохранением всех изменений.
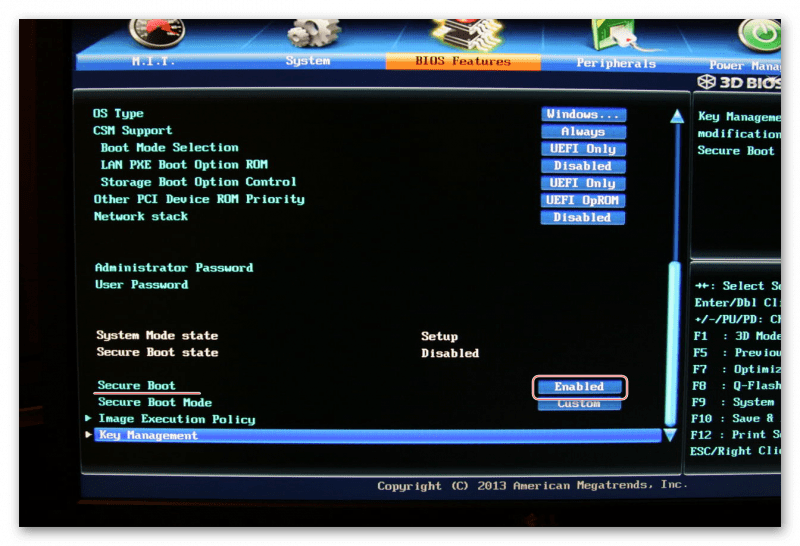
Способ 5: Для материнских плат Gigabyte
После запуска БИОС вам нужно перейти во вкладку «BIOS Features», где необходимо поставить значение «Disable» напротив «Secure Boot».
Выключить UEFI Secure Boot не так сложно, как может показаться на первый взгляд. К тому же, как таковой пользы для обычного пользователя данный параметр в себе не несёт.
Наша группа в TelegramПолезные советы и помощь
Windows 10, 8.1 and 8 hardware use the new UEFI to replace the traditional BIOS. The «secure boot» error coming with the UEFI helps to make sure that your PC boots using only firmware that is trusted by the manufacture, prevents rootkit malware and provides an additional layer of security.
All PCs with a Windows 10/8.1/8 logo sticker has secure boot enabled by default. However, sometimes you may want the UEFI secure boot violation policy that is stated disabled in Windows 10/8.1/8 to run some PC graphics cards, hardware, or operating systems such as Linux or previous version of Windows. This article will show you how to disable secure boot in Windows 10/8.1/8 easily and quickly.
Limitations of UEFI Secure Boot in Windows 10/8.1/8
- Impossible to dual boot Windows 10/8 with Linux.
- Don’t allow you to install an older version of Windows such as Windows 7.
- Can’t run system repair or password recovery CDs or utilities. (Such as Windows Password Recovery Tool, Windows Boot Genius.)
- Can’t perform advanced PC maintenance procedures, such as BIOS or firmware updates.
Follow steps below to access UEFI settings to disable legacy secure boot control in Windows 10, 8.1 and Windows 8. Note that the Secure Boot option must be set to «Disabled» or «Off» to allow you to boot from external media correctly.
That’s all for how to disable secure boot in Windows 10/8.1/8. If you are based Windows RT PCs and devices users, you can’t disable secure boot because these devices have a locked boot loader.
Free Try Windows Password Recovery Tool
World’s 1st Windows Password Recovery Software to Reset Windows Administrator & User Password.
Free Download
Free Download

These days, if you buy a computer pre-installed with Windows, it comes with UEFI boot system. UEFI is not something that Microsoft invented, instead it is a protocol existing even before Windows 8. Some Mac devices have been using UEFI for a longer time.
With UEFI comes the feature of “secure boot” which boots only those bootloaders that are signed in to UEFI firmware. This security feature prevents rootkit malware and provides an additional layer of security.
The downside of secure boot is that if you want to boot from a Linux USB or if you want to use a bootable Windows USB, it won’t allow that. Sometimes, it may also create problems in dual booting with Linux.
The good thing is that you can easily disable the secure boot. All you have to do is to access the UEFI firmware settings, go to the Boot option and disbale it.
Don’t worry. I won’t leave you hanging like that. Let me show the steps in detail.
Disabling UEFI secure boot in Windows 10
Some systems don’t let you change the secure boot option without setting an admin password. I’ll discuss the issue in later steps.
Step 1: Access the UEFI settings
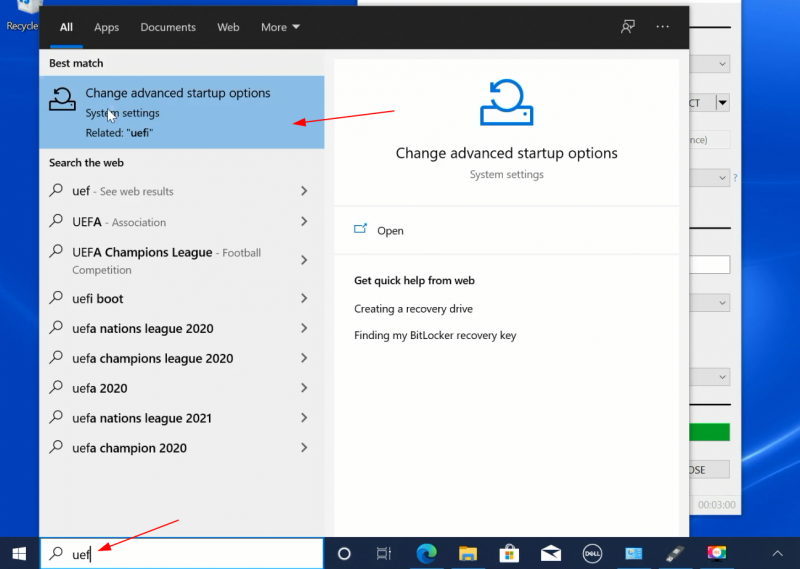
You may access the UEFI settings by powering on your system and using the F2/F10 or F12 keys at the boot time. If that doesn’t work, don’t worry. You can go to the firmware settings from within Windows as well. Here’s how.
Search for UEFI and go to Change advanced startup options in Windows menu.
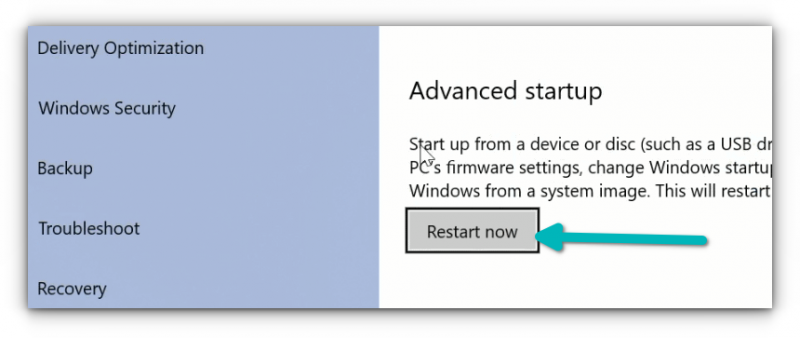
Now, click on the Restart now button under Advanced startup option.
After a few seconds, you should see a blue screen with a few options to choose from. You have to click on Troubleshoot option.
Now, some systems will give you the UEFI Firmware Settings on this screen. Some system may require you to choose an Advanced options.
If you see the UEFI Firmware Settings option, well, click on it. Otherwise, click the Advanced options.
When you see the UEFI Firmware Settings, click on it.

It will notify that you’ll have to restart in order to change any UEFI firmware settings (or UEFI settings in short). Click on the Restart button.

Your system will restart now and when it boots again, you’ll find yourself in the BIOS/UEFI settings interface.

Step 2: Disable secure boot in UEFI
By this time you must have been booted in to UEFI utility. You can change various settings here but all we want to do right now is to disable secure boot option here.
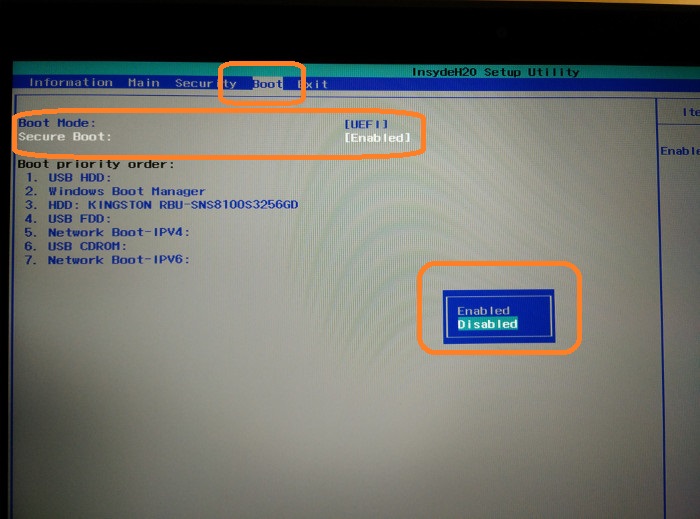
Move to Boot tab. Here, you’ll find Secure Boot option which is set to enabled.
Use the arrow key to go to Secure Boot option and then press enter to select it. Use + or – to change its value. Confirm it when prompted.
Press F10 to save the changes and exit the UEFI settings.
Troubleshooting tip: Disable secure boot option disabled?
As mentioned by some readers in the comments, if you are using an Acer laptop, you might see that option to disable secure boot has been greyed out. If that is the case, no need to panic just yet. There is a way around it.
Using arrow keys, move to Security tab. Look for Set Supervisor Password here.
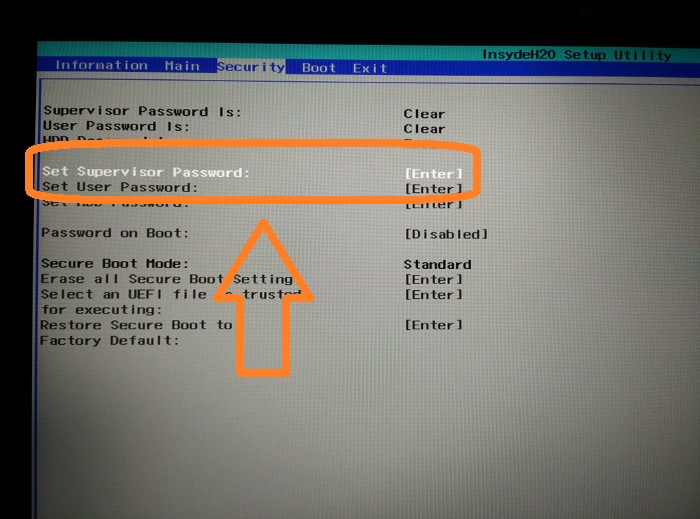
Set a Supervisor password by double-clicking on it.
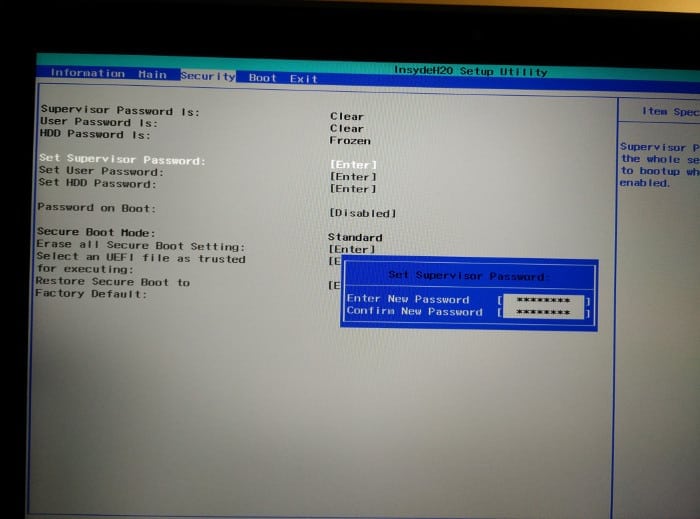
🚧
Either save this password somewhere safe where you can access it years later as well. Use a password manager or a cloud service or a draft in your email. Basically, you should not lose this password. You may also clear the supervisor password after disabling the secure boot.
Once you have set the supervisor password, move to Boot tab now. This time you’ll see that you can actually access the Secure Boot option and change its value. Press the Enter key and change its value to Disabled.
Press F10 to save and exit the UEFI settings.

Next you’ll be booted into Windows normally. That’s it. You can use similar steps to re-enable secure boot later as well.
I hope you find this tutorial helpful. Do let me know if you have confusion and I’ll try to help you out.
About the author
Abhishek Prakash
Created It’s FOSS 11 years ago to share my Linux adventures. Have a Master’s degree in Engineering and years of IT industry experience. Huge fan of Agatha Christie detective mysteries 🕵️♂️