
После приобретения нового ПК или ноутбука с процессорами Intel 12, 13 или 14-го поколения и установки Windows 11 некоторые пользователи могут столкнуться с тем, что отдельное ПО, а иногда и игры начинают работать заметно медленнее чем это было на старом компьютере.
В этой инструкции подробно о том, чем это может быть вызвано, способах решения проблемы и дополнительная информация на тему, которая может пригодиться.
Режим эффективности для процессов в Windows 11
В случае, если проблема проявляется именно так как описано выше: касается лишь отдельных программ или игр, а в остальном компьютер показывает ожидаемый уровень производительности, причиной с большой вероятностью является неправильное включение Windows 11 режима эффективности для конкретного процесса.

Процессоры Intel последних поколений имеют два типа ядер: P (Performance, производительность) и E (Efficiency, эффективность), а Windows 11, в свою очередь, умеет автоматически выбирать, с использованием каких ядер следует выполнять конкретный процесс. Но делает это не всегда правильно, что и приводит к рассматриваемой проблеме.
Для решения проблемы достаточно запретить ОС включать режим эффективности для процессов, которые тормозят, хотя и не должны этого делать.
Командная строка
Первый способ — использование командной строки (Терминал Windows также подойдёт). Шаги будут следующими:
- Запустите командную строку или Терминал Windows от имени администратора.
- Введите команду
powercfg /powerthrottling disable /path "ПУТЬ_К_ИСПОЛНЯЕМОМУ_ФАЙЛУ"
и нажмите Enter.

- Как правило, перезапуск процесса не требуется, а изменения вступают в силу сразу же.

Например, рассматриваемая в статье проблема характерна для виртуальных машин VMWare на новых процессорах Intel в Windows 11, решением будет команда:
powercfg /powerthrottling disable /path "C:\Program Files (x86)\VMware\VMware Workstation\x64\vmware-vmx.exe"
которая отключит управление мощностью и, заодно, включение режима эффективности для процесса.
Process Lasso
Для запрета включения режима эффективности для конкретных процессов можно использовать и сторонние инструменты, в частности — Process Lasso, бесплатное ПО для личного использования (с небольшими ограничениями) для оптимизации работы процессов в Windows.
Кроме этого, в программе можно будет увидеть, действительно ли именно с режимом эффективности связана проблема:
- Скачайте Process Lasso с официального сайта https://bitsum.com/ и установите программу.
- После запуска найдите процесс, с производительностью которого вы наблюдаете проблему. Обратите внимание на столбец «Состояние»: если там указано «Эффективность», причина, вероятно именно в этом.
- Нажмите правой кнопкой мыши по процессу и выберите в контекстном меню «Эффективный режим» — «Всегда» — «Выкл».


Как и в предыдущем случае, изменения должны начать действовать незамедлительно.
Дополнительная информация
В завершение некоторые дополнительные нюансы, которые могут оказаться полезными, если вы столкнулись с рассматриваемой проблемой:
- Если низкая производительность наблюдается с любым ПО и в ОС в целом, проблема не в режиме эффективности. В зависимости от конкретной ситуации может потребоваться установка всех драйверов оборудования, очистка системного раздела диска, поиск и удаление вредоносного ПО или майнеров с компьютера.
- Управление мощностью можно отключить не для отдельного процесса, а для системы в целом: либо выставить режим питания «Максимальная производительность», либо создать параметр реестра DWORD с именем PowerThrottlingOff и значением 1 в разделе реестра
HKEY_LOCAL_MACHINE\SYSTEM\CurrentControlSet\Control\Power
- Ещё одно, не рекомендуемое мной решение — отключение E-ядер процессора в БИОС/UEFI, если такая опция доступна.


Возможно, у вас есть собственные решения, позволяющие исправить проблему с низкой производительностью отдельных процессов на новых CPU Intel? Будет отлично, если вы сможете поделиться ими в комментариях.
Windows 11 has lot of hidden features to improve the overall performance of your system. Efficiency mode is one such a feature in Windows 11 which you can use to extend battery life of your laptop. Enabling this feature for any application will result in using less RAM and less CPU, thus boosting the performance of your system.
Where is Efficiency Mode Settings in Windows 11?
The efficiency mode feature is available in Task Manager app in Windows 11. This feature doesn’t work for all the applications and processes found in the Task Manager. You can enable or disable efficiency mode only for the supported processes. Since enabling this will reduce the priority for using system resources, some apps do not support this feature.
Enable Efficiency Mode in Windows 11
Let’s explore how to use Efficiency mode in Windows 11:
- The first step is to open the Task Manager and for that, press “Windows + X” keys. Select Task Manager from the list of menu items that appears.
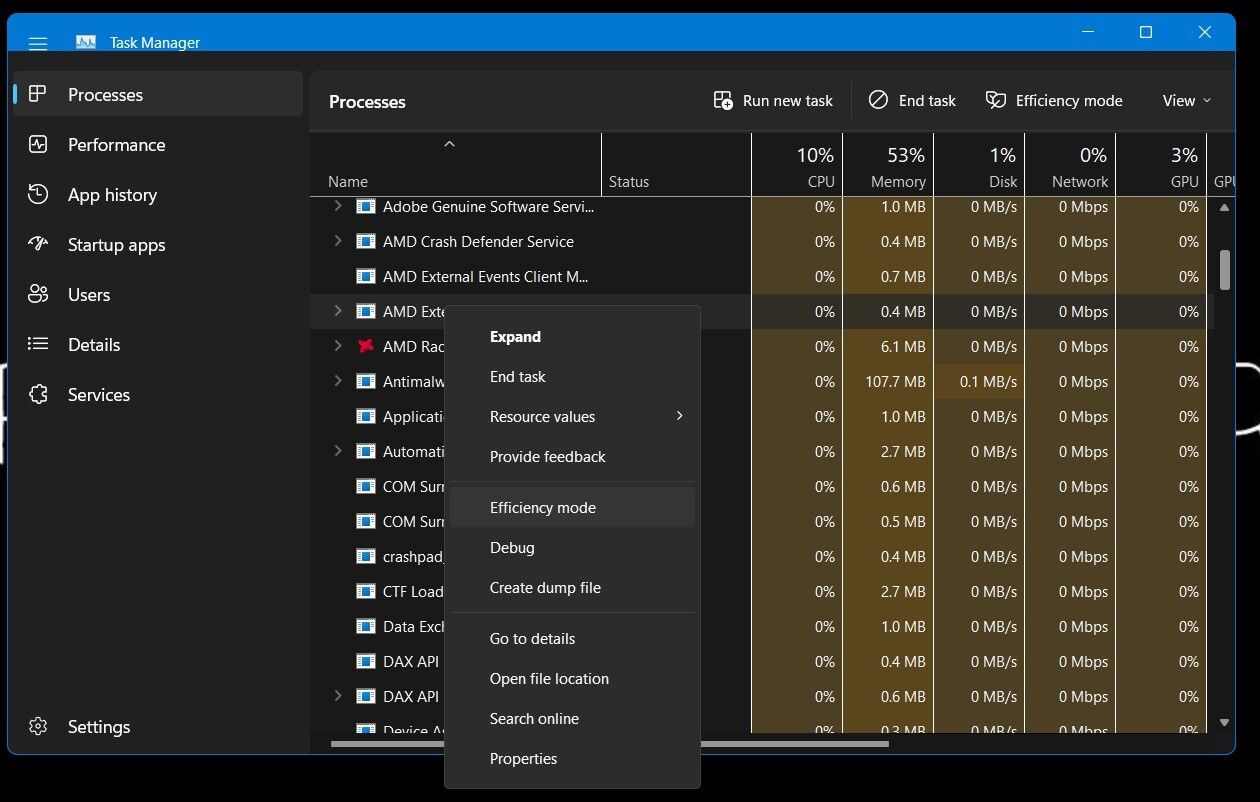
- Now look for an application that is using high memory and CPU. Once you find the application, select it and then click “Efficiency mode” option showing on the top row. Alternatively, you can also right-click on the application and then select “Efficiency mode” option.

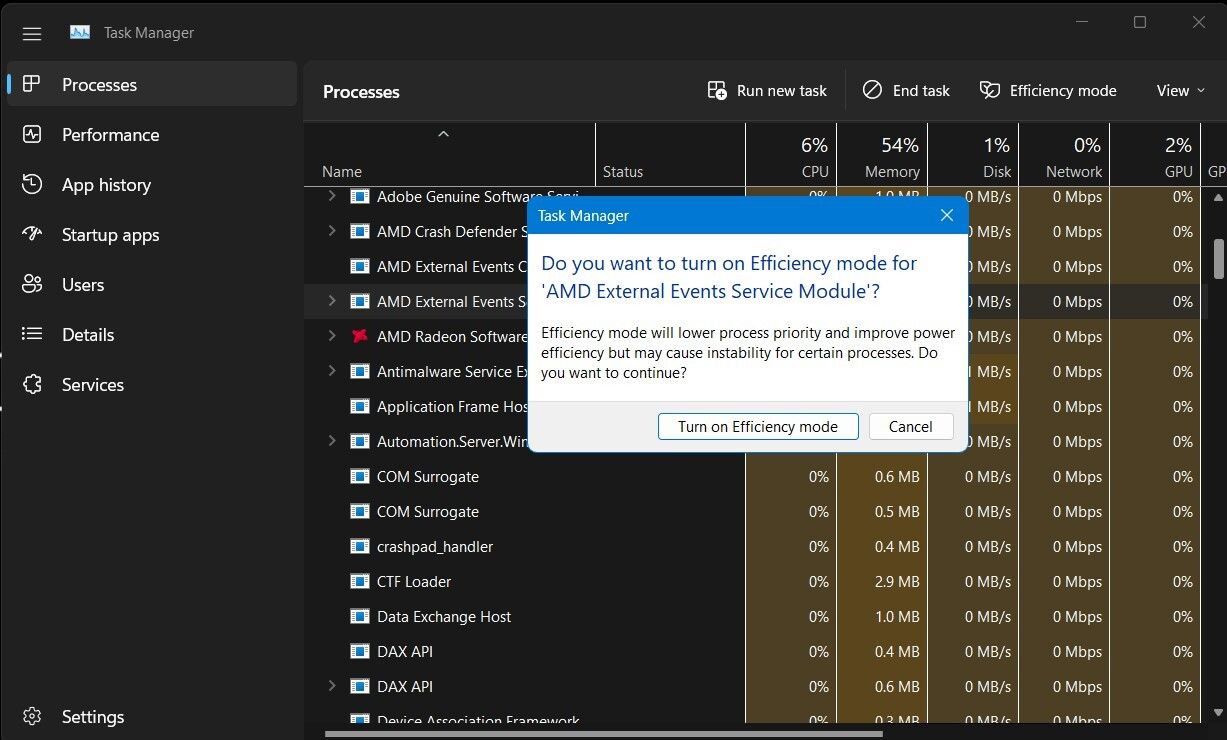
- Click “Turn on Efficiency mode” button to confirm the action. As you can see in the dialog box, some processes may cause instability when enabling this feature.
On some Windows editions like Arm, you will just see “OK” or “Cancel” button with the same warning message.

- After enabling the Efficiency mode feature, you will find the green leaves-like icon in the “Status” column for that application/process.

Windows also automatically pause some processes to improve the performance. Efficiency mode option will be greyed out for those suspended processes.
Disable Efficiency Mode
If you want to disable efficiency mode, all you need is to right-click on the application and click on “Efficiency mode” option. Alternatively, you can click the “Efficiency mode” option from the top and disable it. This time you will not see any confirmation pop-up. Now, the green leaves icon will disappear from the status column indicating mode is disabled.

Unsupported Process and Apps
As mentioned, efficiency mode feature doesn’t work for all the applications. For example, when we select Google Chrome, the option is greyed out and not possible to enable. Note that Chrome has its own memory and battery saver settings to release unused RAM and reduce battery usage.

Note: Efficiency mode is not available for Edge in Task Manager. Like Chrome, Edge browser also has its own efficiency mode to reduce memory usage by unused tabs. If you see Edge is consuming high RAM/CPU in Task Manager or you use too many open tabs, consider enabling efficiency mode in Edge settings.
Similarly, you can select any major process like Windows Explorer, you will again find the Efficiency mode is greyed out. The reason is that Windows Explorer is a core system process essential for proper functioning of the Operating System. Since reducing the priority of system process will have a negative impact on system’s performance, Windows will automatically disable efficiency mode option.

Therefore, the Efficiency mode is only available to those applications and processes that are deemed safe even if they are slowed down.
Final Words
It is easy to enable or disable efficiency mode in Windows 11 from Task Manager app to free up system resources. However, this is not something you can do for the system level. The problem is that you need to be careful and enable only for the required processes.
Efficiency Mode is a feature in Windows 11 that helps reduce process interference and improve energy efficiency. In this article, I will show you how to enable or disable the efficiency mode on Windows 11.
The Task Manager Efficiency mode reduces possible performance problems by conserving resources like your CPU, battery, and bandwidth. It should be activated for any eligible process that is using a significant amount of CPU or battery life on your PC or laptop running Windows 11.
For those of you who don’t know, the efficiency mode was first introduced in Windows 11 version 22H2 and this feature is much improved in the latest Windows 11 24H2 update. Windows 10 users cannot use this feature and must upgrade to Windows 11 to use it.

How to Turn on Efficiency Mode on Windows 11
The procedure to turn on the efficiency mode for a program or process in task manager is as follows:
- Launch the Task Manager by holding the Ctrl + Shift + Esc keys.
- Switch to the processes tab.
- Right-click or select the process you want to change and select Efficiency mode to turn it on.
In the below screenshot, I am enabling the efficiency mode for the Microsoft Outlook application.

A message box appears on the screen with the following notice: Efficiency mode will lower process priority and improve power efficiency but may cause instability for certain processes. Do you want to continue?. Click OK to enable it.

After completing the above steps, notice that the Microsoft Outlook application is enabled with efficiency mode. The status of this app in the task manager now shows a green double leaf icon indicating that this app is running in efficiency mode.

Identify the processes enabled with efficiency mode
You can identify processes that have efficiency mode enabled by looking for a green double-leaf icon next to the process in the status column of the Windows Task Manager.
For instance, in the below screenshot, you can see the Google Chrome app has a green double-leaf icon in the status column. When you hover over this icon, it reads, “This process group is in efficiency mode to limit resources used by the process.“
Note: Browser apps such as Google Chrome, Firefox, and Microsoft Edge have the option to manage the efficiency mode within the browser settings. That’s the reason why you cannot manage the efficiency mode for browsers in the task manager.

Turn off efficiency mode for a process in Task Manager
If a process is causing problems or instability after the efficiency mode has been enabled, you can disable it by following these steps:
Launch the task manager app and switch to the Processes tab. Locate the process and either right-click or select and hold the process in the Name column and select Efficiency mode from the menu.

The efficiency mode for the selected process is disabled. To confirm this, look at the Status column next to the Process and you’ll notice that the double-leaf icon is removed.

Task Manager Efficiency Mode is Greyed Out
If you’re wondering why can’t I put certain tasks on efficiency mode in task manager, then the answer is that not all processes support the efficiency mode. Microsoft excludes some processes from using the efficiency mode as it may cause instability issues.
For instance, the efficiency mode can’t be turned on or off for most process groups, such as the Windows Explorer process group, system process, etc. As a result, you’ll notice that the option is greyed out for some process in the task manager.

Edge Browser Efficiency Mode
The efficiency mode is also available in the Microsoft Edge browser. This mode puts background tabs to sleep after a period of inactivity. You can identify when this mode is on by the filled heart pulse icon in the browser’s toolbar. You can also select the icon to see the current status of the mode in the Performance menu. For more information, refer to the guide on how to turn on or off efficiency mode in Microsoft Edge.
Conclusion
The Task Manager Efficiency Mode in Windows 11 significantly improves the battery life of your device by ensuring certain running processes won’t stress the CPU out, leading to faster foreground responsiveness and better energy efficiency. However, one should exercise caution when enabling the efficiency mode because it may cause program instability.
Still Need Help?
If you need further assistance on the above article or want to discuss other technical issues, check out some of these options.
If you’re a Windows user, nothing slows down your system more than a clogged-up CPU. To help users smartly manage the allocation of CPU resources, Microsoft has added a new feature in Windows 11 Task Manager known as Efficiency mode.
We’ll cover everything you need to know about the Efficiency mode here in this article, so you can learn how it works, how it lowers the strain on your CPU, and how you can enable and disable it in Windows 11.
What Is Efficiency Mode?
Efficiency mode is a new feature in Windows 11 Task Manager that helps users limit CPU resource consumption when executing less-important tasks. As a result, they run as efficiently as possible and more resources are available for processes of the highest importance for users.
It reduces the additional load on the CPU by prioritizing processes according to the user’s preference rather than treating them all equally. Thus, processes with a higher priority execute faster.
Why Has Microsoft Introduced Efficiency Mode?
The vast majority of CPU resources are wasted by useless background tasks, which is one of the reasons why we always experience high CPU usage issues. In most cases, we can’t disable such processes, which makes matters worse. As a result, your CPU is unintentionally burdened, resulting in slower performance.
Microsoft has introduced the Efficiency mode to address this problem by allowing users to prioritize tasks according to their preferences. Prioritizing tasks effectively will enable resources to be allocated more efficiently, which results in better performance.
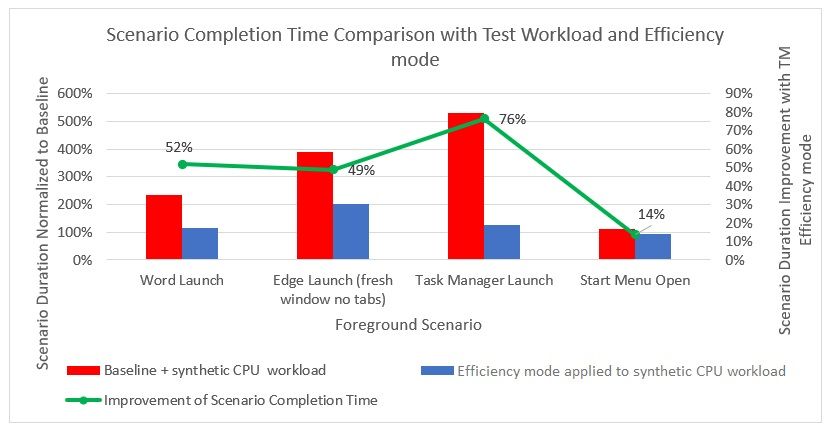
As per Microsoft’s testing, enabling the Efficiency mode improved the system’s responsiveness by approximately 14% to 76% when launching different applications, such as Word, Microsoft Edge, Task Manager, and the Start menu. An increase of this magnitude speaks volumes about how effective this mode could be.
How Does the Efficiency Mode Work?
To understand how Efficiency mode works, you need to understand what happens when you enable Efficiency mode for a task in the Task Manager.
As explained by the Microsoft devblogs’ post, enabling the Efficiency mode for a process results in two significant changes. First, the process’ base priority level is set to the lowest. Secondly, it is switched from QoS mode to EcoQoS.
Let’s develop a theoretical understanding of both of these changes to understand their impact on CPU performance better.
1. Base Priority Is Set to Lowest
Whenever a process’ base priority level is set to low, the CPU treats it as the lowest priority process. In layman’s terms, the process is assigned one of the last positions in the processing queue.
As a result, the other processes with a higher base priority will come up first in the queue and be assigned more resources to execute faster.
In short, enabling Efficiency mode on any process will limit your CPU to handle other medium and high-priority tasks first and not let lower priority tasks interfere with them.
2. QoS Mode Is Set to EcoQoS
By setting the QoS level of the process to EcoQoS, the CPU intelligently directs the least-priority tasks to the energy-efficient cores of the processor by controlling the clock rate of the CPU cores. So, the processor consumes the least amount of power when running such processes.
Although you’ll get a bit less performance with EcoQoS enabled, that’s the outcome we wish to achieve on an Efficiency mode for the least important tasks.
Moreover, according to the Microsoft devblogs’ post, EcoQoS not only reduces the CPU frequency while performing less-important tasks energy-efficiently, but it also reduces the heat production by CPU cores and keeps fan noise low.
The result is a better allocation of processing power for high-priority processing, which leads to better performance, and the balanced temperature enables the processor to run more effectively.
Summing Up…
By turning on the Efficiency mode for the process, the CPU processor can better prioritize essential tasks and consume fewer resources during the execution of less-important processes.
As a result, the Efficiency mode cleverly allocates resources to perform important tasks that use the full processing power, significantly improving the overall performance.
How to Enable or Disable Efficiency Mode
To enable the Efficiency mode in Task Manager, follow these steps:
- Right-click on the Start menu and select Task Manager.
- Right-click the process you want to enable Efficiency mode for.
-
Click on the Efficiency mode from the context menu.

-
Click the Turn on Efficiency mode button in the confirmation pop-up.

As soon as you enable Efficiency mode on a process, you’ll see the green leaf icon next to the process with Efficiency mode written in front of it.
However, if the task you have enabled Efficiency mode for depends on another parent process, the green leaf will be shown next to the parent process while Efficiency mode will be written next to the child process.
With the above representation, you can better filter out both parent and child processes running in Efficiency mode.
Check out other ways to enter the Task Manager if you are unable to access it via the Start menu.
What’s the Best Way to Use Efficiency Mode?
To utilize Efficiency mode effectively, arrange the tasks consuming the most CPU resources in descending order in the Task Manager. Then, list down the most resource-consuming tasks, filter out the less-important tasks from the list, and enable Efficiency mode for those processes.
Efficiency Mode Isn’t Available for Core Processes
In Windows, you cannot enable the Efficiency mode for the core processes to avoid the CPU treating them as less important, which will result in sluggish performance, nullifying the purpose for enabling Efficiency mode in the first place. The Efficiency mode option will be grayed out for such processes.
What to Expect Next?
To date, the Efficiency mode only works to manage CPU resources better. The mode does not affect RAM, network, or other types of resources. Hence, the Efficiency mode only better allocates CPU resources and reduces the workload on your CPU.
As per Microsoft, we can expect future iterations of the Efficiency mode to smartly use other system resources as well. However, how fast Microsoft will introduce these iterations? It’s something we will have to wait for.
Improve Your System Performance With Efficiency Mode
By now, you should be familiar with how Efficiency mode can improve your system’s performance. Therefore, enable it for resource-hogging processes to enjoy stress-free CPU processing.
How is your experience with Windows 11 so far? If it lags, make room in the storage space, remove unwanted programs, disable visual effects, and use other methods to speed it up.

Understanding Efficiency Mode in Windows 11
Efficiency Mode is a power-saving feature in Windows 11 that optimizes system performance by reducing power consumption. It is designed to extend battery life on laptops and tablets by limiting the CPU’s processing power and adjusting system settings. While Efficiency Mode can be beneficial for conserving energy, there may be instances where you want to disable this feature, such as when you require maximum performance for resource-intensive tasks or gaming. In this article, we will explore different methods to disable Efficiency Mode in Windows 11.
Method 1: Using the Power Options
The easiest way to disable Efficiency Mode in Windows 11 is by adjusting the power options. Here’s how:
- Open the Start menu and click on the Settings icon.
- In the Settings window, select the System option.
- Click on Power & Sleep in the left sidebar.
- Under the Related settings section, click on Additional power settings.
A new window will open, displaying the Power Options. Here, you can customize the power plans for your device. To disable Efficiency Mode, follow these steps:
- Click on the preferred power plan (e.g., Balanced or High Performance).
- Click on Change plan settings next to the selected power plan.
- In the Edit Plan Settings window, click on Change advanced power settings.
A new window will open, displaying the advanced power settings. Follow the steps below to disable Efficiency Mode:
- Expand the Processor power management option.
- Expand the Maximum processor state option.
- Change the value to 100% for both On battery and Plugged in.
Click Apply and OK to save the changes. Efficiency Mode will now be disabled on your Windows 11 device.
Method 2: Modifying Registry Settings
If you prefer a more advanced method, you can disable Efficiency Mode by modifying the Windows Registry. Here’s how:
- Press Win + R to open the Run dialog box.
- Type «regedit» (without quotes) and press Enter to open the Registry Editor.
- In the Registry Editor, navigate to the following path:
HKEY_LOCAL_MACHINE\SYSTEM\CurrentControlSet\Control\Power\EfficiencyOverrides
If the EfficiencyOverrides key does not exist, you can create it by right-clicking on the Power key, selecting New, and then selecting Key. Rename the newly created key as «EfficiencyOverrides».
Once you have navigated to the EfficiencyOverrides key, follow these steps:
- Right-click on an empty area in the right pane and select New, then select DWORD (32-bit) Value.
- Rename the newly created value as «FeatureIdleEnabled».
- Double-click on FeatureIdleEnabled and change the value data to «0» (without quotes). Click OK.
Close the Registry Editor and restart your computer for the changes to take effect. Efficiency Mode will now be disabled on your Windows 11 device.
Exploring Additional Options for Disabling Efficiency Mode
In addition to the methods mentioned above, there are a few other options you can explore to disable Efficiency Mode in Windows 11:
Method 3: Updating Drivers
Outdated or incompatible drivers can sometimes cause Efficiency Mode to be enabled. To ensure that your drivers are up-to-date, follow these steps:
- Open the Start menu and click on the Settings icon.
- In the Settings window, select the Windows Update option in the left sidebar.
- Click on Check for updates to search for the latest driver updates.
- If updates are available, download and install them.
Once the drivers are updated, restart your computer and check if Efficiency Mode is disabled.
Method 4: Using Third-Party Software
There are several third-party software applications available that can help you disable Efficiency Mode and customize power settings in Windows 11. These software programs provide more advanced options and control over power management. You can search for popular software options online and choose one that best suits your needs.
Method 5: Contacting the Manufacturer
If none of the above methods work or if you are unsure about making changes to your system, it is recommended to contact the manufacturer of your device for assistance. They can provide specific instructions or offer firmware updates that address Efficiency Mode-related issues.
Remember to consult the manufacturer’s documentation or support resources before making any changes to your system.
Conclusion
Disabling Efficiency Mode in Windows 11 can be necessary in certain situations where maximum performance is required. By following the methods mentioned in this article, you can effectively disable Efficiency Mode and optimize your device’s performance accordingly. Whether you choose to adjust power options, modify registry settings, update drivers, use third-party software, or seek assistance from the manufacturer, it is essential to evaluate your needs and make informed decisions to ensure a smooth and efficient computing experience.

Disabling Efficiency Mode in Windows 11
In Windows 11, the Efficiency Mode is designed to optimize power usage and improve battery life on laptops and portable devices. However, there may be situations where you need to disable this mode. Here are two methods to disable Efficiency Mode in Windows 11:
Method 1: Using Power Settings
1. Open the Start Menu and search for «Power & sleep settings.»
2. Click on «Power & sleep settings» to open the settings page.
3. Scroll down to the «Power mode» section.
4. Click on the drop-down menu below «Power mode» and select «Best performance.»
5. Efficiency Mode is now disabled.
Method 2: Using Command Prompt
1. Press Windows + R on your keyboard to open the Run dialog box.
2. Type cmd and press Enter to open the Command Prompt.
3. In the Command Prompt window, type powercfg -setdcvalueindex scheme_current sub_efficiency_optimized 0 and press Enter.
4. Efficiency Mode is now disabled.
Key Takeaways for «How to Disable Efficiency Mode Windows 11»
- Efficiency mode in Windows 11 helps optimize power usage for longer battery life.
- To disable efficiency mode, open the Windows settings by clicking on the Start button and selecting «Settings».
- In the settings, click on «System» and then go to «Power & sleep» from the left sidebar.
- Under the «Power mode» section, change the toggle switch from «Efficiency» to «Best performance».
- Disabling efficiency mode may consume more power, leading to shorter battery life on laptops.
Frequently Asked Questions
Here are some frequently asked questions about disabling Efficiency Mode in Windows 11.
1. How can I disable Efficiency Mode in Windows 11?
To disable Efficiency Mode in Windows 11, follow these steps:
1. Open the Start menu and click on «Settings».
2. In the Settings window, click on «System».
3. Under the System settings, click on «Power & sleep» in the left sidebar.
4. In the Power & sleep settings, click on the drop-down menu under «Power mode» and select «Best performance».
5. The Efficiency Mode will be disabled, and your system will prioritize performance over power saving.
2. Can I disable Efficiency Mode on a laptop running on battery?
Yes, you can disable Efficiency Mode on a laptop running on battery. However, keep in mind that disabling Efficiency Mode may decrease your battery life. To disable Efficiency Mode on a laptop running on battery, follow the same steps mentioned above.
3. What are the benefits of disabling Efficiency Mode in Windows 11?
Disabling Efficiency Mode in Windows 11 can provide the following benefits:
1. Enhanced performance: Disabling Efficiency Mode allows your system to prioritize performance over power saving, resulting in faster and smoother performance.
2. Reduced system lag: By disabling Efficiency Mode, you can minimize system lag and improve the overall responsiveness of your Windows 11 PC.
3. Optimal resource utilization: When Efficiency Mode is disabled, your system can utilize its resources more efficiently, allowing for better multitasking and handling of resource-intensive tasks.
4. Can I re-enable Efficiency Mode after disabling it?
Yes, you can re-enable Efficiency Mode in Windows 11. To do so, follow the same steps mentioned in question 1, but instead of selecting «Best performance» in the Power & sleep settings, choose «Best energy efficiency» from the drop-down menu. This will enable Efficiency Mode and optimize power saving over performance.
5. Will disabling Efficiency Mode affect my power consumption?
Disabling Efficiency Mode in Windows 11 may result in increased power consumption, as your system will prioritize performance over power saving. It is recommended to have your device connected to a power source or be aware of the impact on battery life when disabling Efficiency Mode, especially on laptops running on battery.
To disable Efficiency Mode in Windows 11, follow these simple steps. First, open the Start menu by clicking on the Windows icon in the bottom left corner of your screen. Then, click on the Settings icon, which looks like a gear. In the Settings window, select the System category.
Next, click on the Power & Sleep tab on the left-hand side of the window. In the Power & Sleep settings, scroll down until you see the «Related settings» section and click on the Additional power settings link. This will open the Power Options window.
In the Power Options window, look for the currently selected power plan. It will be highlighted with a bullet point. Click on the «Change plan settings» link next to the selected plan. On the next screen, click on the «Change advanced power settings» link.
In the Advanced settings window, scroll down until you see the Processor power management category. Expand the category by clicking on the arrow next to it. Then, expand the «Maximum processor state» option. Change the value to 100% for both «On battery» and «Plugged in.»
Finally, click on the Apply button and then on the OK button to save the changes. Efficiency Mode will now be disabled, allowing your computer to run at its full performance potential.
By following these steps, you can easily disable Efficiency Mode in Windows 11 and ensure that your computer is running at its best. Remember, it’s important to understand the impact that disabling Efficiency Mode may have on your device’s battery life.